|
|
|
Porsche, and the Porsche crest are registered trademarks of Dr. Ing. h.c. F. Porsche AG.
This site is not affiliated with Porsche in any way. Its only purpose is to provide an online forum for car enthusiasts. All other trademarks are property of their respective owners. |
|
|

  |

| 914forme |
 Sep 27 2013, 10:33 AM Sep 27 2013, 10:33 AM
Post
#21
|
|
Times a wastin', get wrenchin'!  Group: Members Posts: 3,899 Joined: 24-July 04 From: Dayton, Ohio Member No.: 2,388 Region Association: None |
Ha found wheel weights for 8.5"x15" Centerlines. According to CarCraft they run in at 12.43 pounds the center caps would add 0.24 pounds. Who runs center caps at an auto-x. Thats almost as light as a magnesium Mahle Gas Burner. At the same width they are probably very close.
Now to see if I can get a decent set of tires to cover these, and that folks makes it a wrap. Car Craft also say this change only equates to a performance gain of 0.111 of a sec on the quarter mile. Since Auto-x is like running a series of drag races, it should make a noticeable difference. |
   |

 
|
| 914forme |
Sep 29 2013, 08:22 PM
Post
#22
|
|
Times a wastin', get wrenchin'! Group: Members Posts: 3,899 Joined: 24-July 04 From: Dayton, Ohio Member No.: 2,388 Region Association: None |
Only got a work a little Saterday, and maybe an hour today, my heart just wasn't in it, after the rainy Cincinnati Show. (IMG:style_emoticons/default/sad.gif)
I did get items pulled from my trans, and re-installed. Tools needed. 12mm socket 14mm socket 27mm socket Socket Wrench, or impact wrench for disassembly Torque wrench for assembly Punch Big Hammer Big Dead Blow Hammer with a Soft Face Couple items to pry with Cold Chisel Small pick Something to clean gasket material off with. Two items to lock the drive shafts or flanges in place. I used to pipe wrenches. Tube of Yamahabond or Hondabond Oil dry see next item. (IMG:style_emoticons/default/sad.gif) First make sure all the Tranny fluid is drained out of the trans. Or else you get a slick the size of the Exon Valdez spill.  Pull the bits and pieces not needed for the shifter. Its a roll pin, drive it out with a punch and a BFH. (IMG:style_emoticons/default/smash.gif) Watch pin fly across garage, you my want to save these pieces I'm going to modify (IMG:style_emoticons/default/sawzall-smiley.gif) (IMG:style_emoticons/default/welder.gif) (IMG:style_emoticons/default/smash.gif) them for the basis of my cable shifter. It should look like this. 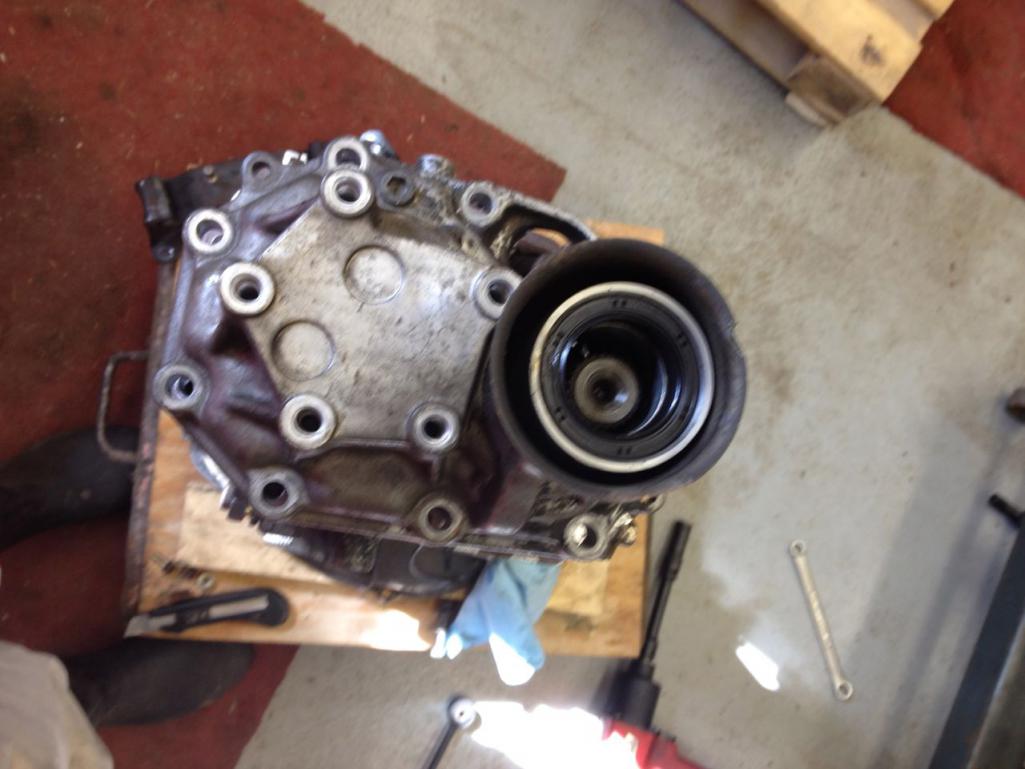 Remove all the bolts holding the nose onto the tranny. Put these aside for cleanup and re-use if your cover will allow, or measure them up for some new shinny ones. Next pick up your Dead Blow or suitable alternative, and give it a few good whacks to loosen the adhesive, and hopefully open it up enough to get a nice wide pry in there with out damaging the mating surface. Once done heres the guts you get to pull out. 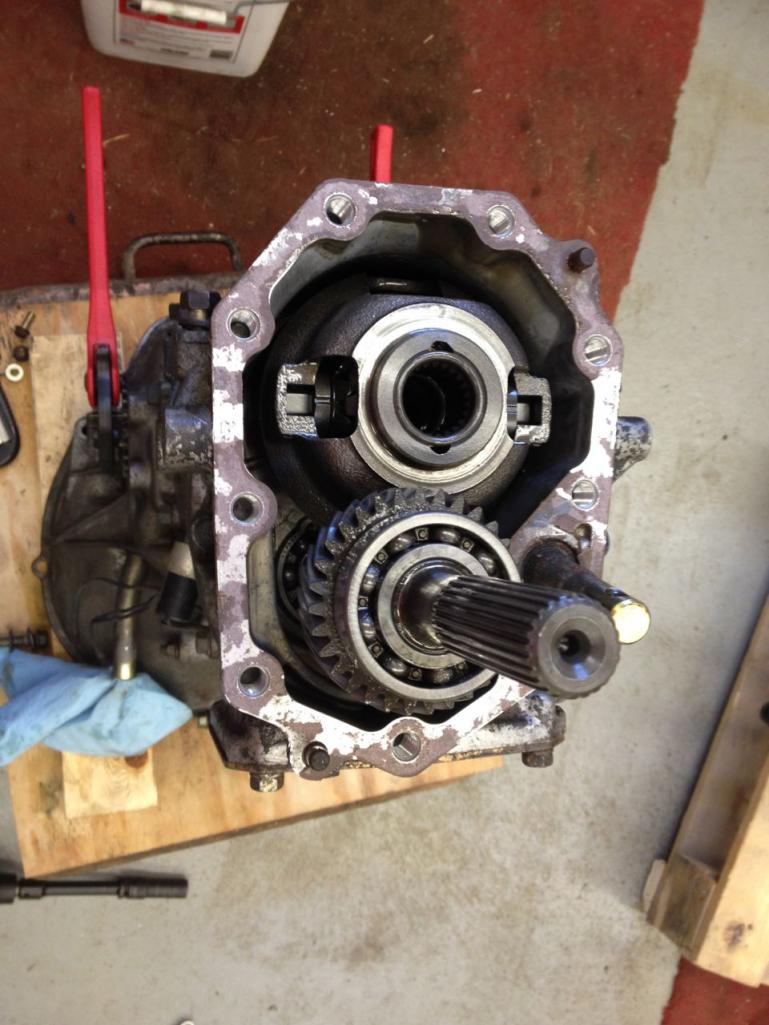 Next you pull these out. Grab ahold of both and lift they come out together. And you are left with this. 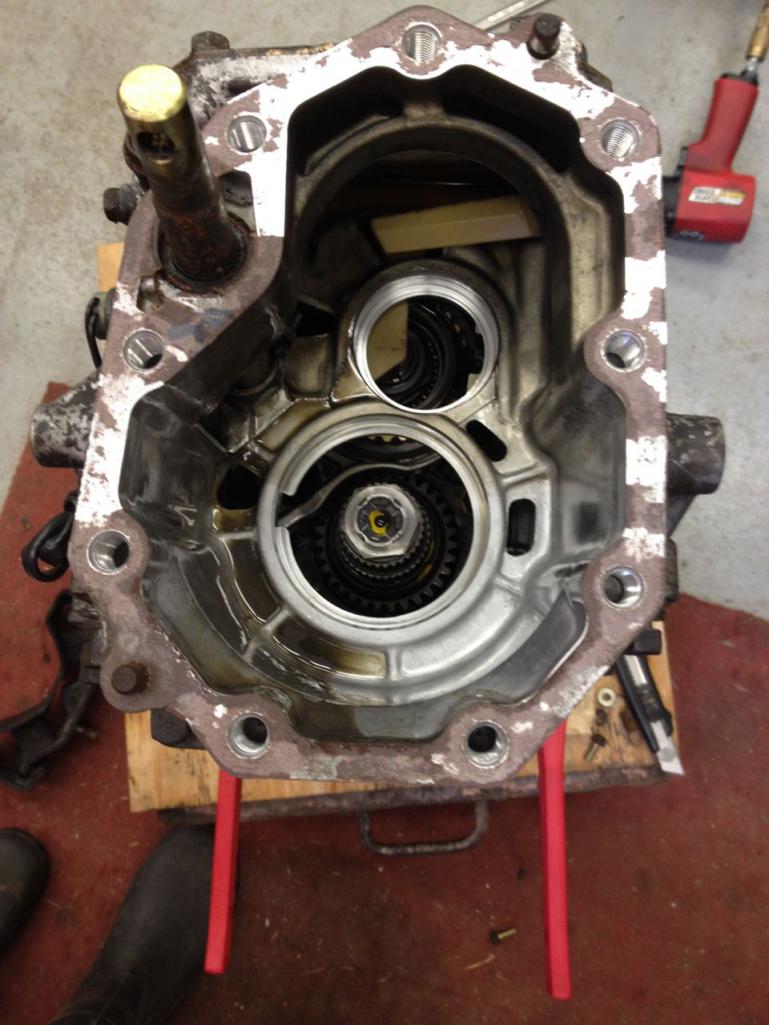 Pieces removed 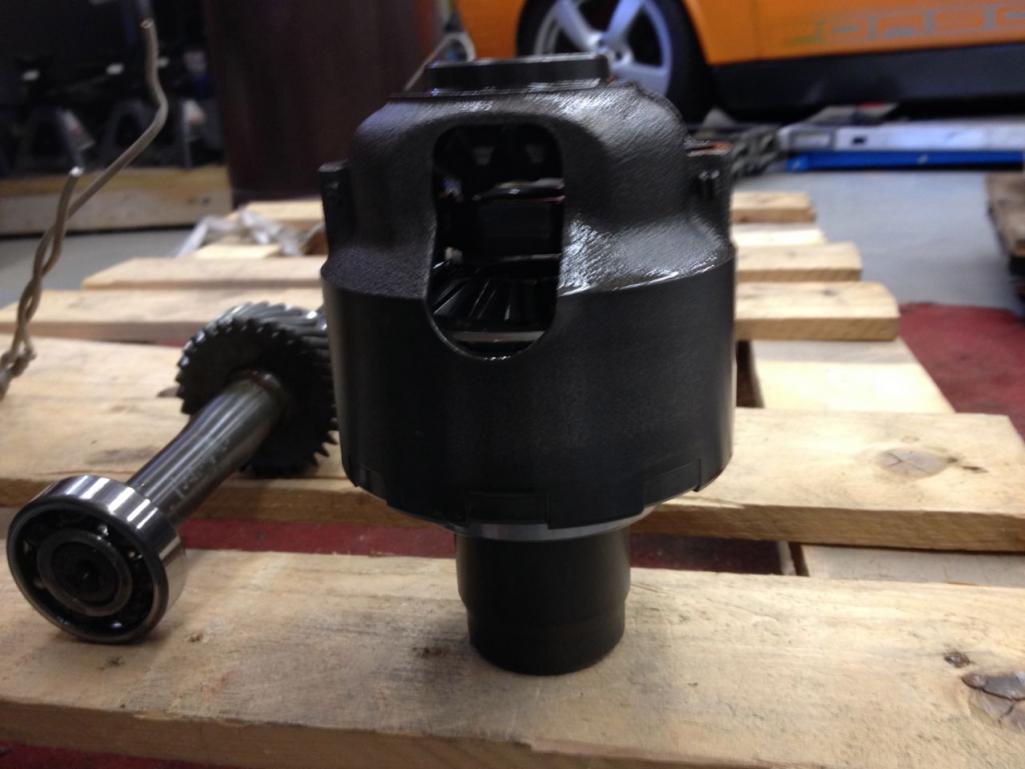 Next up you have to get this nut off the shaft. It is a 27mm and is peened over. Mine was done in 4 spots. Some assembly line worker in Japan, did his job with vigor. (IMG:style_emoticons/default/smilie_pokal.gif) Out comes the punch and BFH, and undo all his hard work. Next I took my impact wrench and locked the axles and zipped it off. This is the first set of items you will pull, nut and 2 washers. 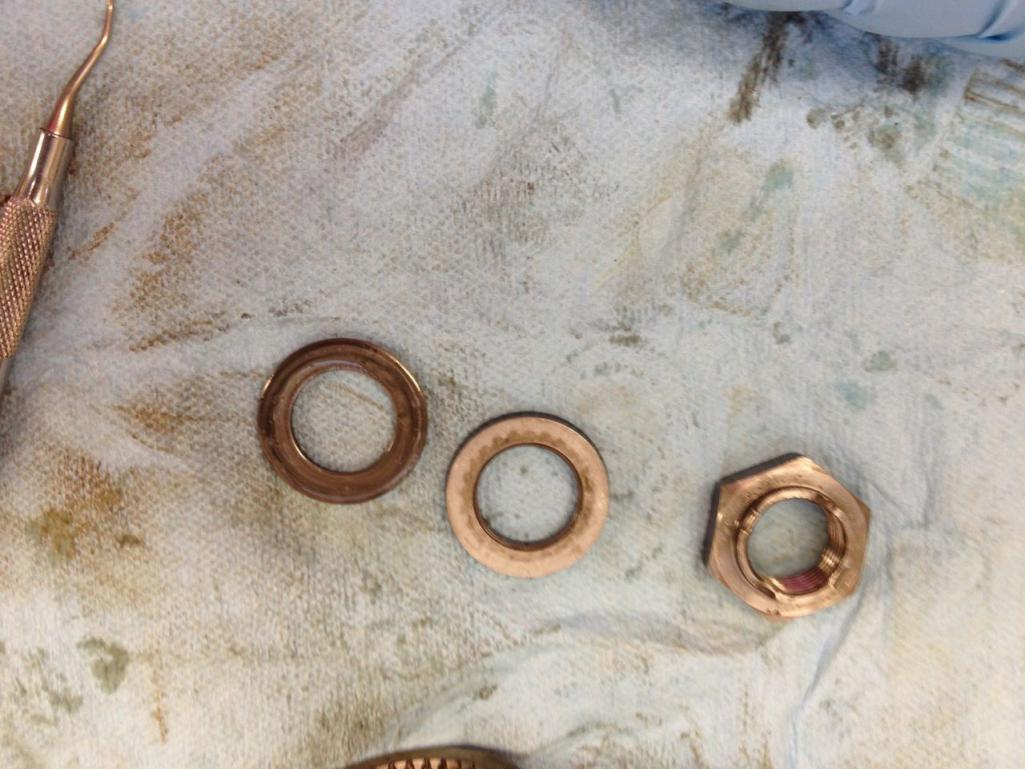 Next slip the shaft sleeve off the shaft. for lack of better terminology. There will also be a stack of washers, hardened bearing surfaces, and a roller bearing. A pick is helpful here to get these all off the shaft. 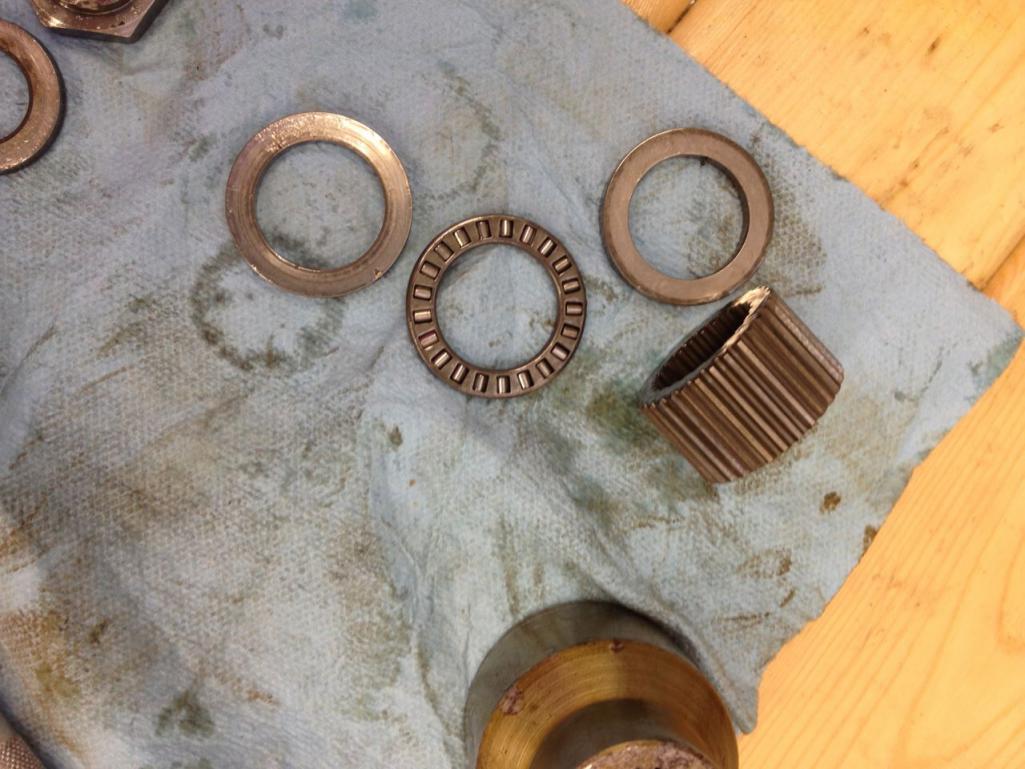 The last one gave me fits but it has to come out or else the spool will not fit correctly This picture shows its not fully seated. 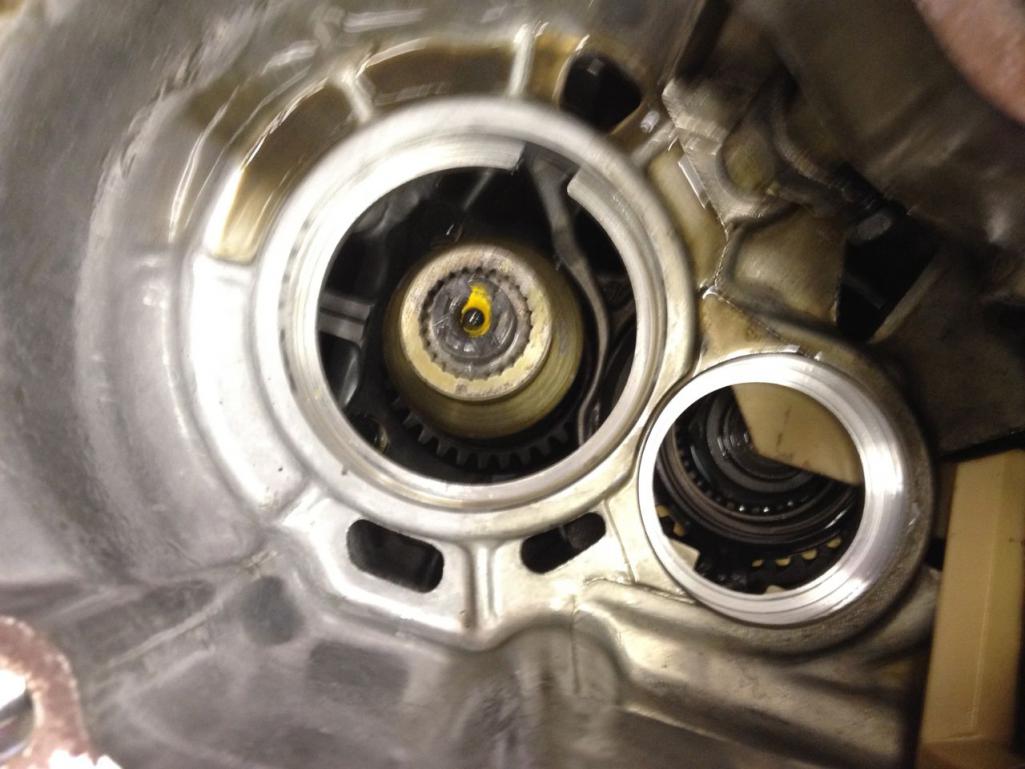 Next you will have to fiddle a little turning the shafts to get them lined up to get the spool to lock both inner and outer shafts together. And then with some luck it will drop into position. 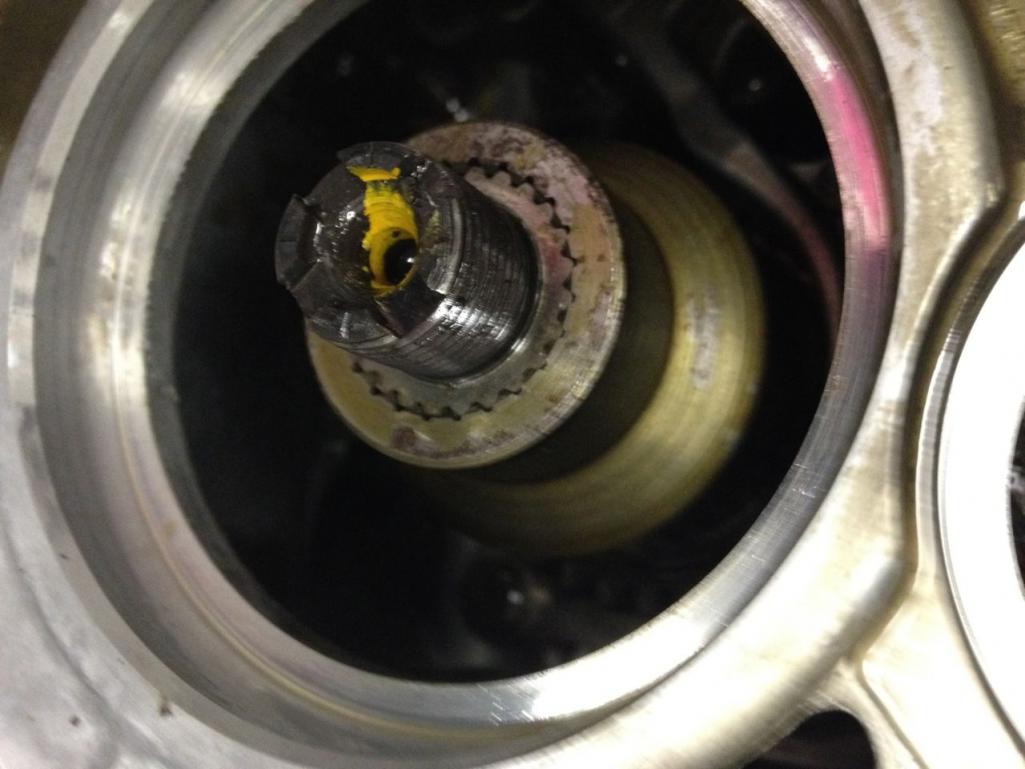 Next add the washer that was next to the nut on your gear stack. Thread it on, then torque it down, to ??? I forgot its in the FSM for the WRX sorry. Don't forget to lock the shafts again. Easy enough. 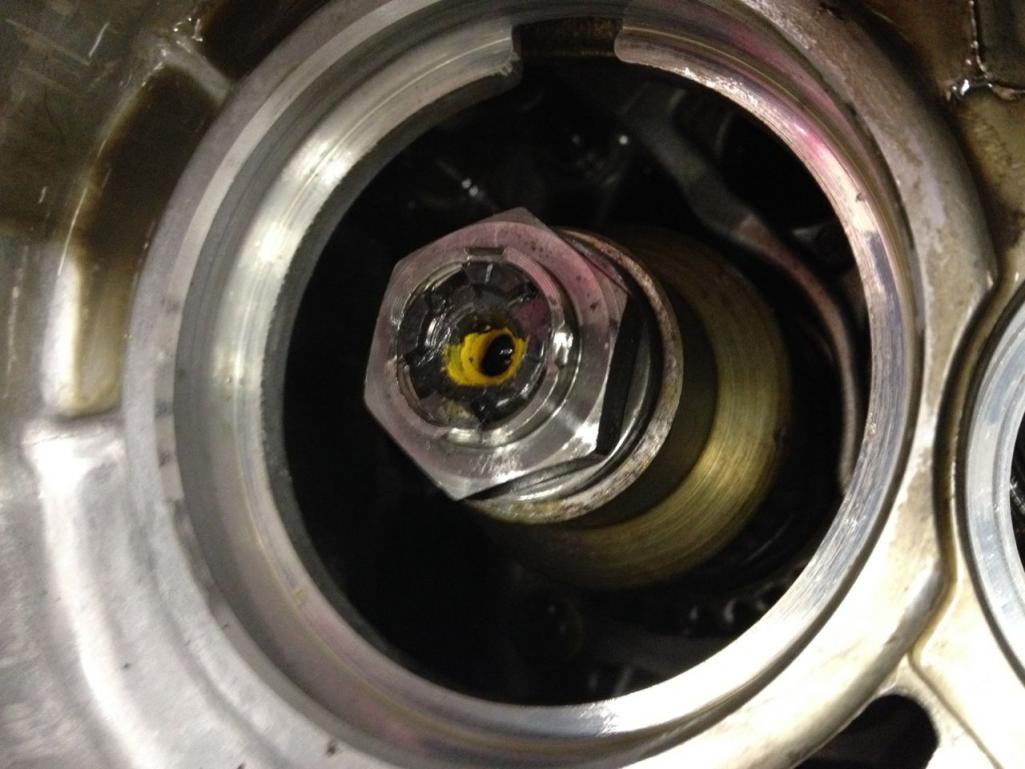 Peen over the nut to lock it into place. You can use a punch, I found a cold chisel did the job with one whack per indent. Yes I followed the original assemblers lead and and did it four times. 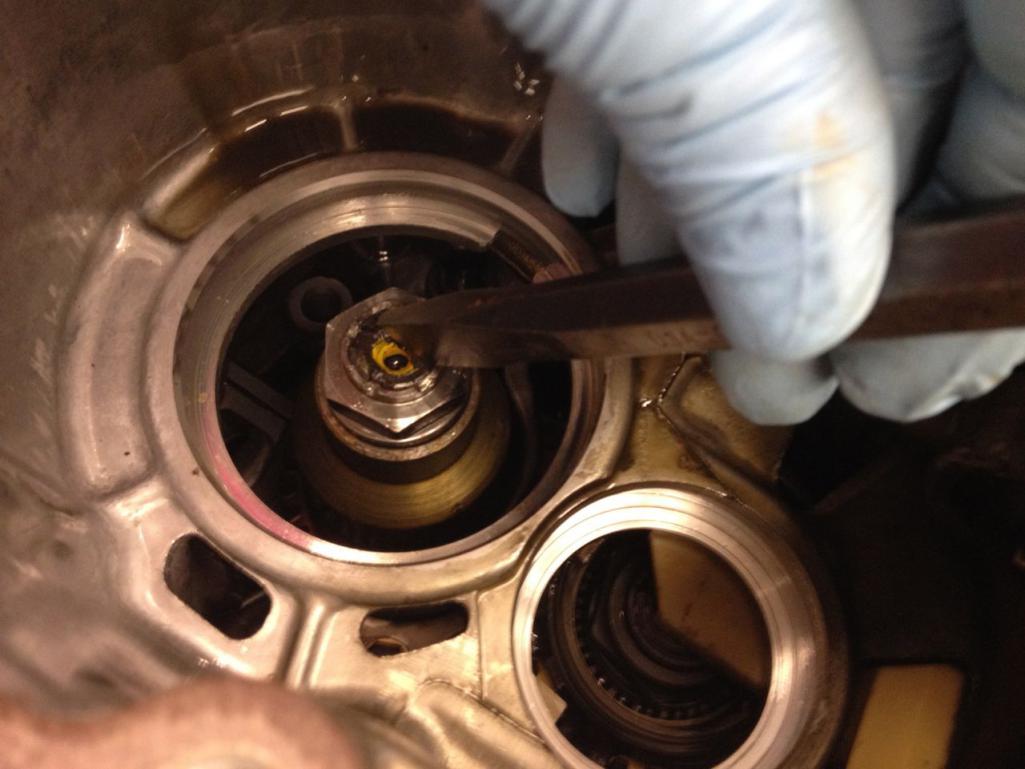 Next up get rid of the factory sealant left on the mating surface. I stuffed the inside with paper towels, and started to clean it up with a angled die grinder and a scotch brite pad. done. Clean up with what ever harsh chemicals you have around for that purpose. (IMG:style_emoticons/default/dry.gif) 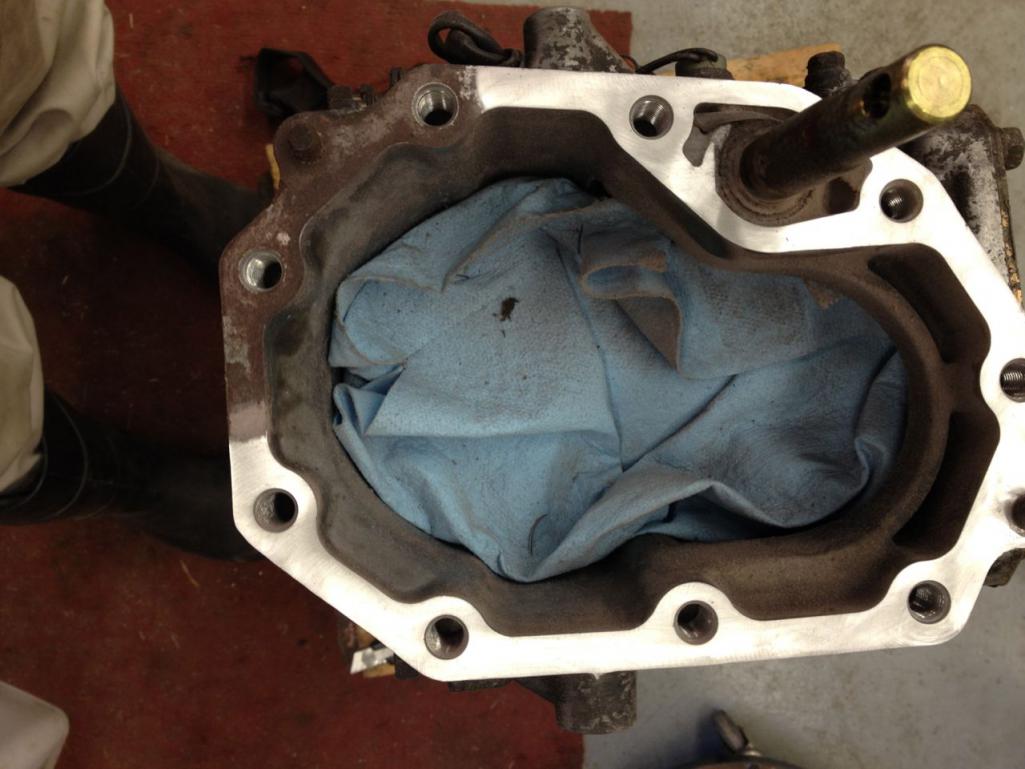 All that is left is seal the end with a thin bead of sealant, and place your cover on, torque down the cover. I have not gone there as I will be taking the trans apart further after cleaning up the outside. This is the basics on how to convert to FWD transaxle for a 914 or other mid-engine car. When you add it into the car, don't forget to add extra trans fluid to make up for the lack of central diff, and the other parts you removed. |
|
|
|
| 914forme |
Sep 29 2013, 08:33 PM
Post
#23
|
|
Times a wastin', get wrenchin'! Group: Members Posts: 3,899 Joined: 24-July 04 From: Dayton, Ohio Member No.: 2,388 Region Association: None |
Started working on the rotisserie. I should have bought one of the two that where for sale in the classified section. As usual I have gone overboard. The build is 99.9% of the fun.
Drilling the uprights, and the caster mounts, all part of the process. Had to stop here as I did not have an essential item, 3/8" nuts to weld onto the caster plates. Off to Tractor Supply for supply. Attached thumbnail(s) 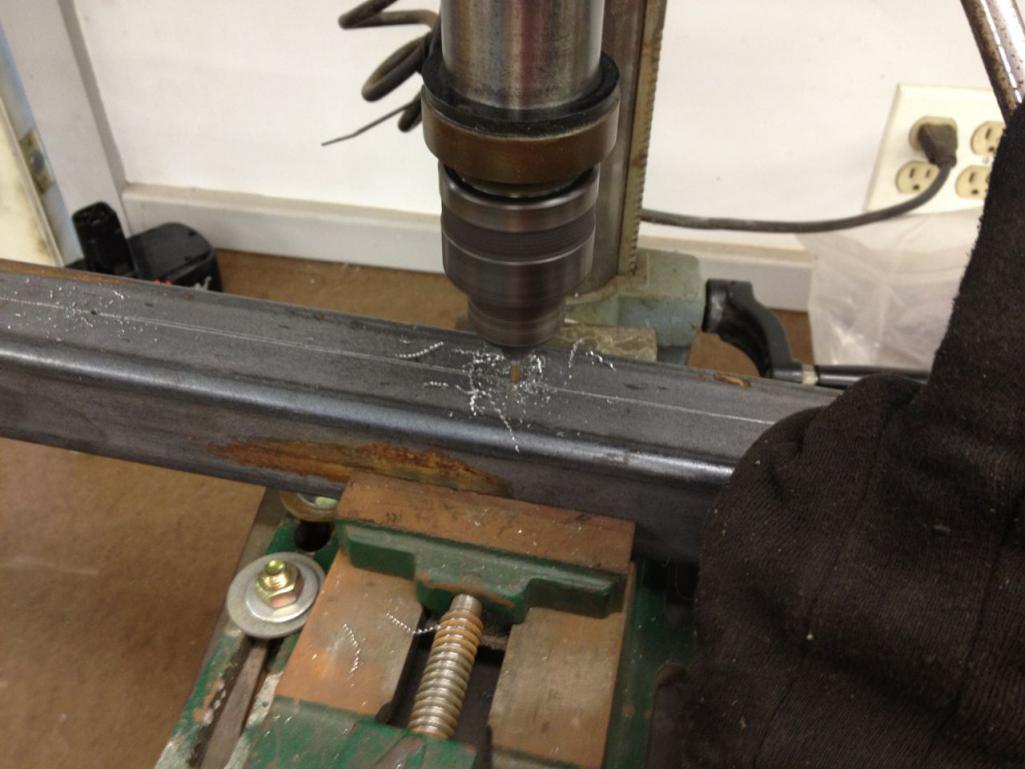 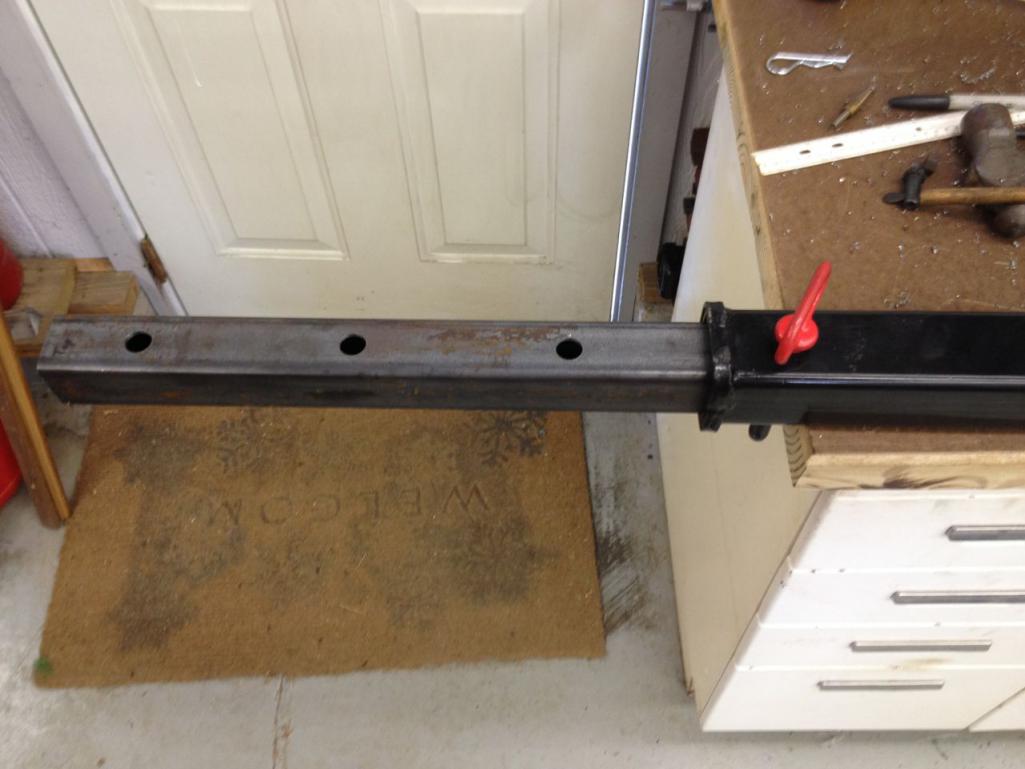  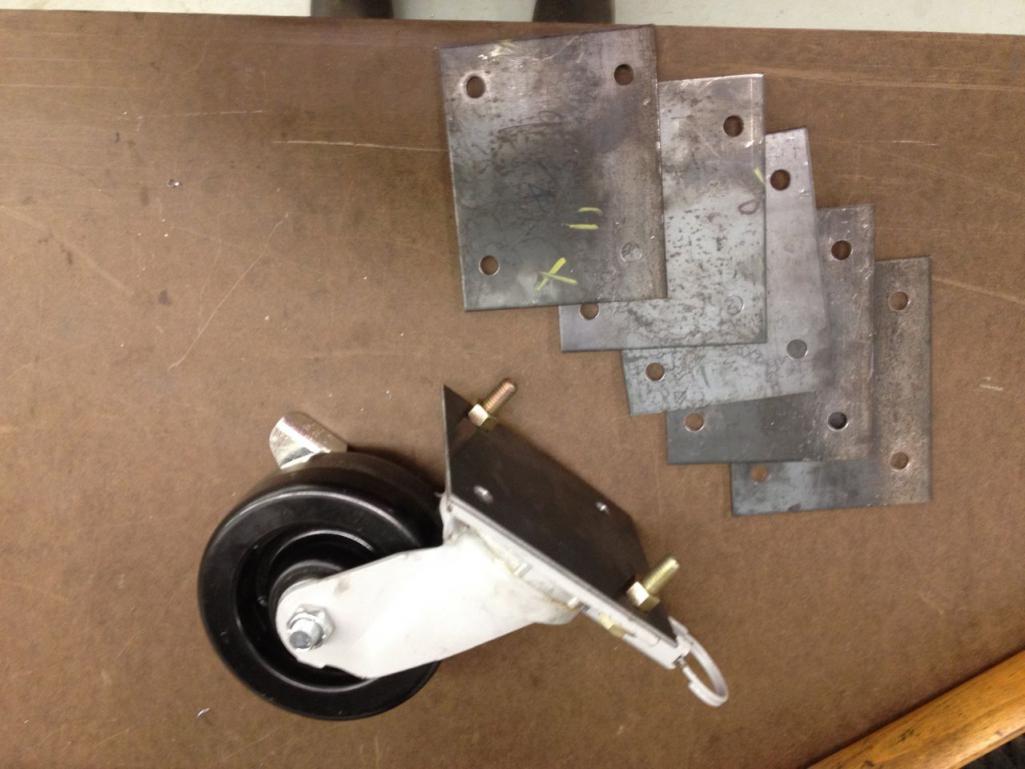
|
|
|
|
| 914forme |
Oct 8 2013, 10:40 AM
Post
#24
|
|
Times a wastin', get wrenchin'! Group: Members Posts: 3,899 Joined: 24-July 04 From: Dayton, Ohio Member No.: 2,388 Region Association: None |
Not much has happened over the last weekend. Life gets in the way. We did have a big cruise in on Friday night, shuts down the main drag of town, over 500 car came. Items of interest,
1 Lotus Exige 1 Fake Cobra 2 Nissian GTRs 1 Sunbeam Tiger 1 Sunbeam Alpine Closest thing to a Porsche 914 a Cayman done up olive green plastidip (IMG:style_emoticons/default/WTF.gif) (IMG:style_emoticons/default/barf.gif) I have been on a quest to complete my parts list and gather items needed for the conversion. And build out my just shy of 5000 line project plan. I'm a GTDer writing this post is a project un to itself. I have mapped a lot of sub systems out, and have copious notes, drawings, and tons of Evernote clippings. As of today, I scored my Centerlinish. 8.5x15s and 11.5 x 15s. Those rears may get cut down a little They are three piece units so ,just have to find what I am looking for and build it out. Oh they weigh in at less than 12 pounds apiece. Ugly but light in weight. Next on the list a set of slicks, and it looks like I will need a trailer again. I may just make like a tire rack for them. I have been quietly piecing together the parts to run 930 rear CVs to the subbie transaxle. Love it when a plan comes together. Still have a few parts to get, but the hardest ones are out of the way now. Next up figure out how I am going to cool this car. Boxster style, standard front trunk rad, vent through the hood. Brant's street car has an oil cooler vent through the hood. As does this -6 rac car.  Or something completely different. Since I'm flaring the rear more, maybe two rads mounted mid ship, and MKVII fans sucking serious air to back it up. Unfortunately I think that would look bad. Now if I was using the AIR 935 style kit, that could work with out issue. 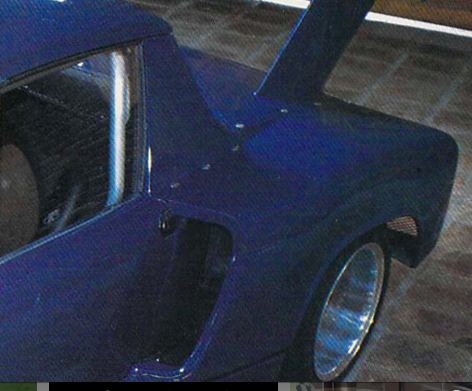 Got to (IMG:style_emoticons/default/wub.gif) the AIR Bond 934, wonder what ever happened to that car? |
|
|
|
| Woody |
Oct 8 2013, 12:24 PM
Post
#25
|
|
Sandbox Rabblerouser and head toilet scrubber Group: Members Posts: 3,858 Joined: 28-December 10 From: San Antonio Texas Member No.: 12,530 Region Association: Southwest Region |
You'll have a hard time finding a tire to run on a 15x11.5 rim unless you are going to run slicks. Im running 275/35/15 A6s on a 15x10 on the rear of my car. Street tires that wide don't exist.
|
|
|
|
| 914forme |
Oct 8 2013, 12:34 PM
Post
#26
|
|
Times a wastin', get wrenchin'! Group: Members Posts: 3,899 Joined: 24-July 04 From: Dayton, Ohio Member No.: 2,388 Region Association: None |
QUOTE(Woody @ Oct 8 2013, 02:24 PM)  You'll have a hard time finding a tire to run on a 15x11.5 rim unless you are going to run slicks. Im running 275/35/15 A6s on a 15x10 on the rear of my car. Street tires that wide don't exist. Yes sir the plan is to run slicks, but thank you for the heads up. (IMG:style_emoticons/default/beerchug.gif) |
|
|
|
| 914forme |
Oct 31 2013, 03:21 PM
Post
#27
|
|
Times a wastin', get wrenchin'! Group: Members Posts: 3,899 Joined: 24-July 04 From: Dayton, Ohio Member No.: 2,388 Region Association: None |
Okay things change in the world.
Centerline-ish wheels are 8"x15s, (IMG:style_emoticons/default/sad.gif) they are light (IMG:style_emoticons/default/biggrin.gif) they have been welded a few times (IMG:style_emoticons/default/sad.gif) Not going to race them, just to many un-kows. Don't want to beat up the seller as he did not know, and I should have done more homework. Live and learn, no hard feelings what so ever. (IMG:style_emoticons/default/beer.gif) So I started down the long slippery sloop of wheels again. I grabbed a set off a member here, keep my money on the board when ever possible. They are boxster 16s both 6 and 7s. Okay they are light, (IMG:style_emoticons/default/evilgrin.gif) , and oh look at that I can get Hanooks for them cheap, thank you tire rack closeout. One set down.   Dang it I really don't like these Kumho, had them on a Spec V once, terrible in the rain. Oh wait my 914 doesn't see rain.  I'm too cheap to just toss these away. So off to find another set of wheels for the street. I found a set of 6 and 7x16s Fuchs. That would make a nice combo for the car also. (IMG:style_emoticons/default/wub.gif) But let me check around and see what else I can find. Craigslist, oh a set of Boxster 6 and 7x16s with caps - $250. (IMG:style_emoticons/default/WTF.gif) that has got to be a miss print. Nope $250 cash, pickup. Okay done, these are super clean.  I was a little worried about the area I was in, somewhat shady. But it all worked out. (IMG:style_emoticons/default/beerchug.gif) Meet a great guy, old Rally, and hill climb guy, ran Pikes Peak. Runs a little shop on the north side of Columbus, had 3 Audi Quattro 2 coupes and an Audi 200 wagon, you know the one with the 20v turbo (IMG:style_emoticons/default/wub.gif) Great set of cars to build a awesome swap. Then I saw a car I wanted to grab. 83 GTI dude your killing me. How can you have 2 cars I love, always wanted to own sitting here as a when I get around to it thing. Then the shop door went up, and I saw the third car I wanted ever since I saw the article of MSDS' 911 swap into a VW Synchro double cab. Dude really, that is a super clean Syncro. Your killing me. (IMG:style_emoticons/default/headbang.gif) Okay yes I just broke a commandment, but it was a good one to break. We shot the (IMG:style_emoticons/default/stromberg.gif) for an hour and I headed home. There was a rusted out 914-4 chassis out front, sad really. Hate to see them rusting away. |
|
|
|
| 914forme |
Oct 31 2013, 03:36 PM
Post
#28
|
|
Times a wastin', get wrenchin'! Group: Members Posts: 3,899 Joined: 24-July 04 From: Dayton, Ohio Member No.: 2,388 Region Association: None |
Gathering the parts to do a 108mm rear CV swap into the 914.
Eric as usual came up with the parts I need, a set of early 911 rear 108s. Thanks man, not sure how you do it. (IMG:style_emoticons/default/beer.gif) 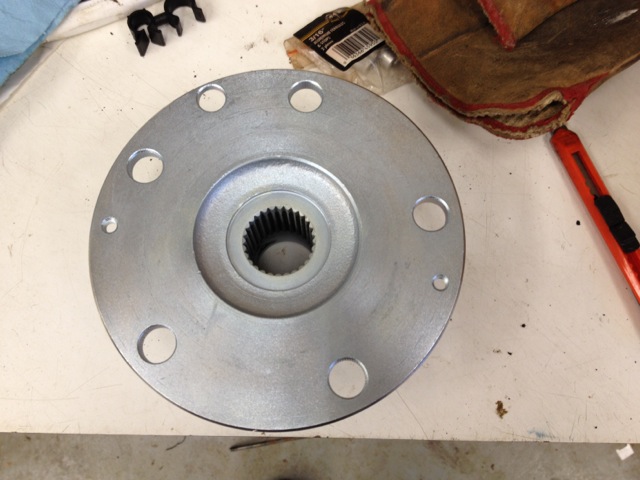 Grabbed a set of Stub axles off another board member. 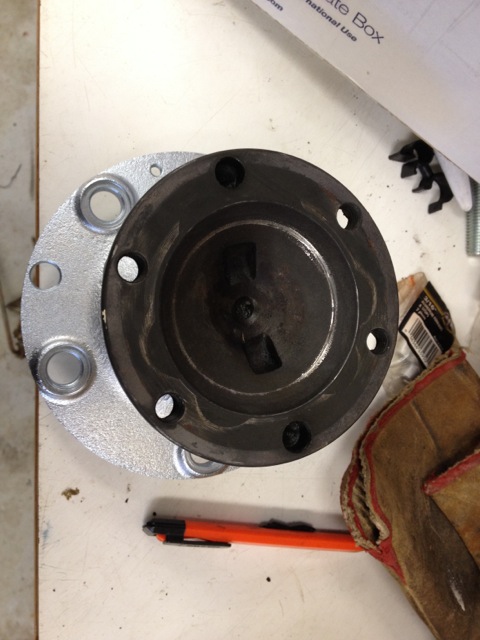 Now need to order the flanges for the subbie trans. That will give the pieces I need to get axle measurements done and find the proper length sway-a-way axle. Hopefully I get a little time this weekend to work on the car. And build my rotisserie as I should have pulled the trigger on the one in Michigan. |
|
|
|
| 914forme |
Apr 23 2014, 06:59 AM
Post
#29
|
|
Times a wastin', get wrenchin'! Group: Members Posts: 3,899 Joined: 24-July 04 From: Dayton, Ohio Member No.: 2,388 Region Association: None |
My how time moves (IMG:style_emoticons/default/blink.gif)
Decided to get some parts put back together: One OBX TB LSD rebuilt. So why is the price so good on these products? Because the machining sucks. So here we go (IMG:style_emoticons/default/smash.gif) First up stock unit, as shipped. You need to remove all the bolts, they are 6mm and not held in by much force. I busted them loose in my hands, with a shorty 3/8 ratchet.  Once all the bolts are gone, you then remove the upper case half, you will need to pry being careful of the machined surfaces. (IMG:style_emoticons/default/av-943.gif) This is what it looks like separated. 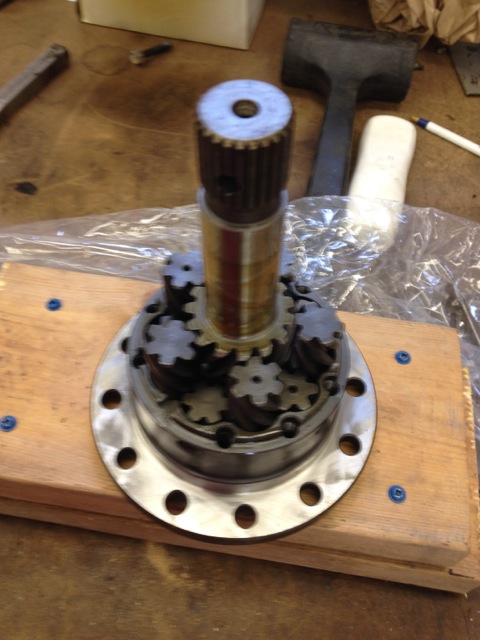 Next up pull the first set of bevel gears and the stub axle. Set them out in order, just for sanity. 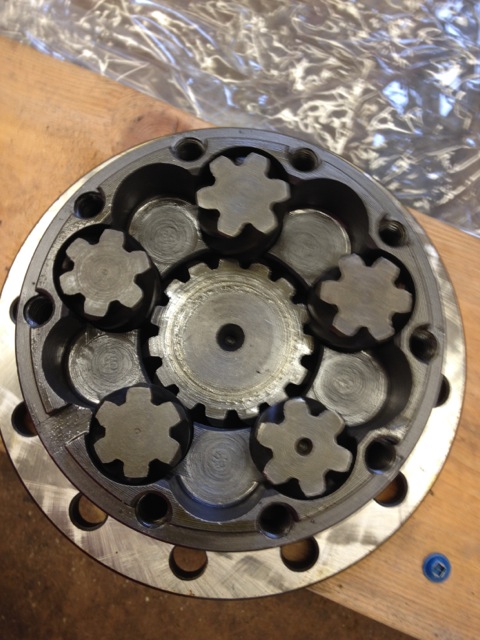 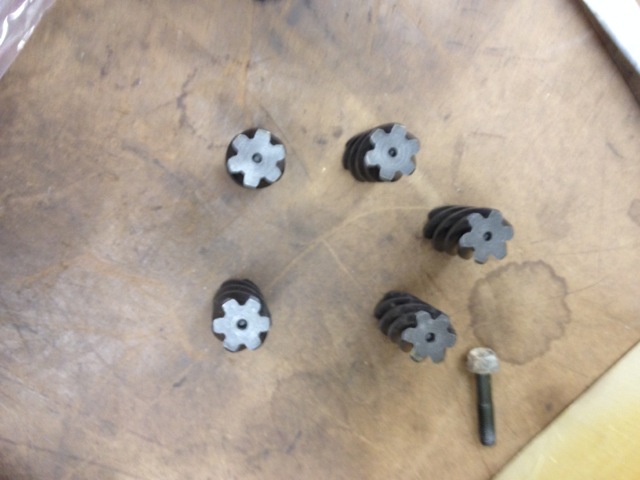 Next up, remove the inner pieces. The stack of washers in here are one thing to keep track of, I laid the out in order just to make sure I got them back in facing correctly. ITs not hard. It looks like this in the end }{}{}{. These washers are crap, they need to be replaced. 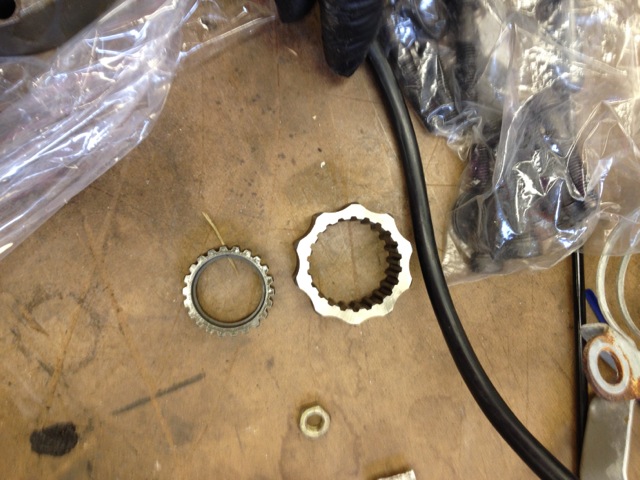 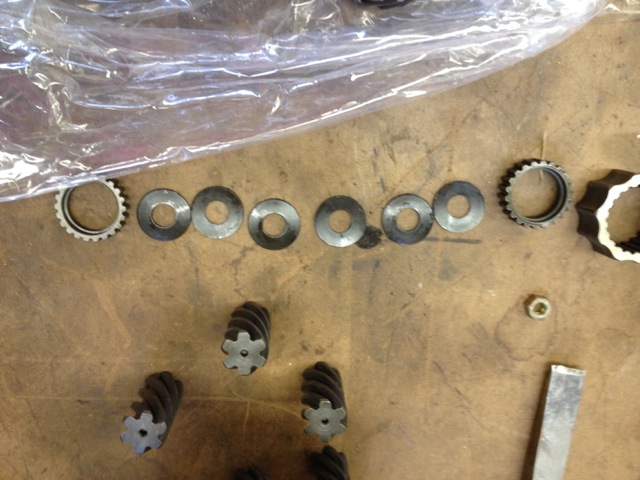 Next up remove the last set of gears and the other stub axle. 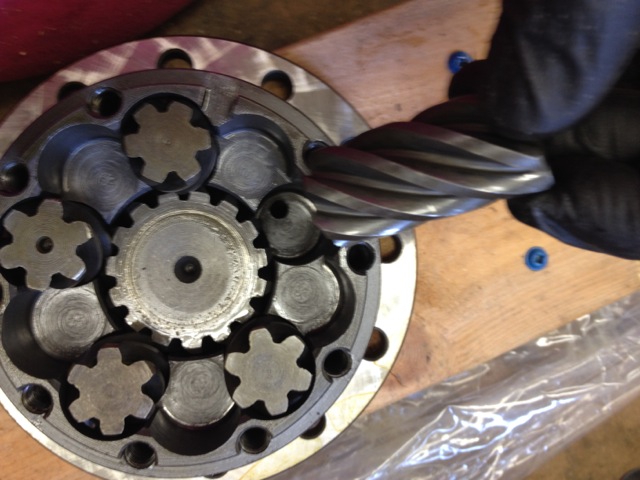 And well Im done eating my breakfast so Times a wasting I better getta wrenching! I'll give over the inspection photos and what I did to fix all the issues with this unit. And re-assembly latter. Oh it is so much fun. I'll give you a hint, hours spent with thick glass and sand paper. |
|
|
|
| Chris H. |
Apr 23 2014, 09:36 AM
Post
#30
|
|
Senior Member Group: Members Posts: 4,086 Joined: 2-January 03 From: Chicago 'burbs Member No.: 73 Region Association: Upper MidWest |
How did I miss this one? Did you get that donor car stripped? How do the engine seals look on the EG33?
|
|
|
|
| 914forme |
Apr 23 2014, 11:09 AM
Post
#31
|
|
Times a wastin', get wrenchin'! Group: Members Posts: 3,899 Joined: 24-July 04 From: Dayton, Ohio Member No.: 2,388 Region Association: None |
QUOTE(Chris H. @ Apr 23 2014, 11:36 AM) How did I miss this one? Did you get that donor car stripped? How do the engine seals look on the EG33? Nope have not stripped the donor yet, I have a spare engine, that I will be using for mockup. The seals, well they are great shape, I repaired them all over the winter, while in the SVX, Oh what a sucky job that was. |
|
|
|
| Chris H. |
Apr 23 2014, 12:29 PM
Post
#32
|
|
Senior Member Group: Members Posts: 4,086 Joined: 2-January 03 From: Chicago 'burbs Member No.: 73 Region Association: Upper MidWest |
Wow. Yeah that would have been terrible. I'll take another look at the list of stuff that was of some value to sell and send it over. Mostly small stuff. You should break even.
Cool that you have a mockup engine. I learned from someone on the board (Andrew maybe?) that the 3.3 uses the stock 4 cylinder 2.2 P's and C's so you COULD stash that one away for later and collect the parts to do a turbo 3.3 with lower compression pistons, etc. That would be fun. There's also a guy in my thread supercharging one. Cut the intake right in half. Seems to know what he's doing too. |
|
|
|
| 914forme |
Apr 23 2014, 02:03 PM
Post
#33
|
|
Times a wastin', get wrenchin'! Group: Members Posts: 3,899 Joined: 24-July 04 From: Dayton, Ohio Member No.: 2,388 Region Association: None |
Yeah I saw the Super charger unit looked neat. Since it is for my enjoyment and auto-x enjoyment, I might do a super charger if I was to go that route. These engines are so under stressed that I think you could pull mild boast wit the current compression. You need better cams, and exhaust. The intakes are just heavy I don't think they are restrictive, though the IRIS system adds a little complexity to the system. It is just a TB plate mounted in the middle of the can.
But yes the 2.2 parts work, as far as pistons, and rods, which means you can build a pretty strong engine off older Subby Tried and true. Now if the tranny will hold together or CVs. Like my one buddy says, your building a rolling dyne, something will break. |
|
|
|
| 914forme |
Apr 23 2014, 06:40 PM
Post
#34
|
|
Times a wastin', get wrenchin'! Group: Members Posts: 3,899 Joined: 24-July 04 From: Dayton, Ohio Member No.: 2,388 Region Association: None |
Okay well now lets continue down the long path of making the OBX a quality unit.
First issue is when they machined the spool they drilled the last set of holes for gear oil to get to the gears from the outside. Thats okay, but they did not go back in and even de-flash the holes. (IMG:style_emoticons/default/chair.gif) 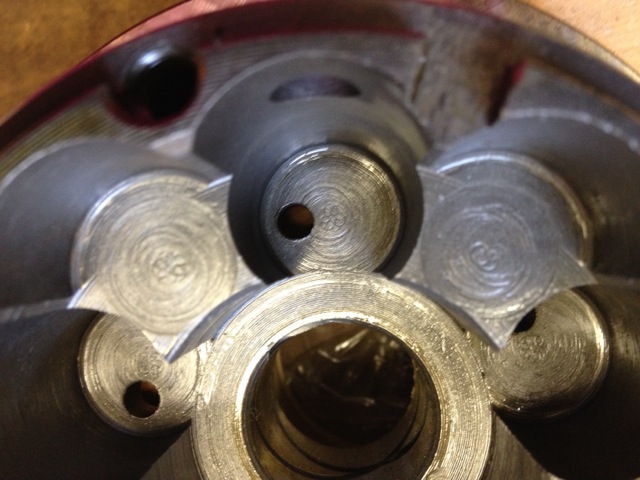 As seen in the above, so you must take a die grinder or dremel with a diamond bit and debut and chafer the holes. Or mount it in a mill and counter sink the holes. So they look like this, Ah much better now.  Next you need to clean up all the gears, the honda guys just let the diff do this, I chose to spend a lot of time with various grits of sand paper and a glass plate. I learned this in college from one of my room mates, he was a Clarinetist and made his own reeds. (IMG:style_emoticons/default/screwy.gif) Same technique works very well for polishing things to better than new. their are 20 tops and bottoms to do. Maybe I'm then (IMG:style_emoticons/default/screwy.gif) one. 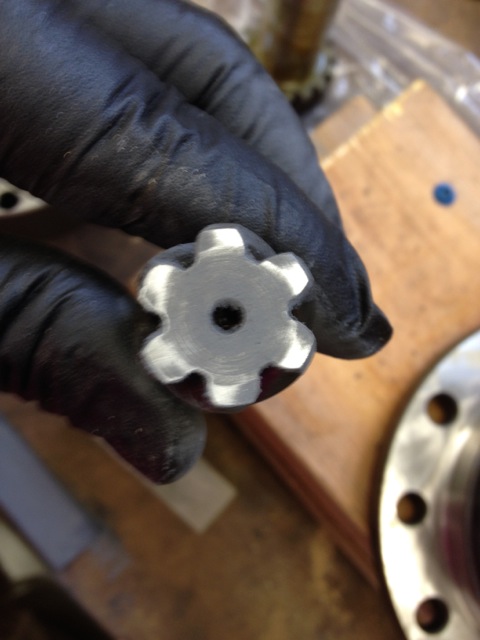 Still have a long way to go. Rinse and Repeat 40 times. Once done, they will be all nice and shiny on each end. Next is debarring the gear teeth. Oh come on guys really, I have to knock edges off all the helical gears. (IMG:style_emoticons/default/headbang.gif) 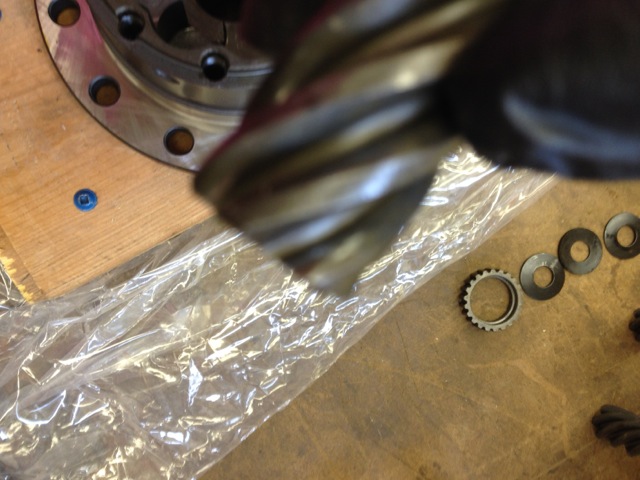 My Sir Andy picture taking skills come into focus again. I did not take a picture of this because I noticed it when I as assembling. There is a hardened Pin on the upper section of the spool that aligns with a notch in the lower section. I had to know a bur off the pin to get the unit to seat correctly. For good measure mic the pin and make sure the notch matches or is just a hair bigger. Reassemble in reverse order. Torque the new bolts down to 23 Foot Pounds. Remove them one at a time and add a dab of blue lock tight to the threads and put back in. The factory morons can really screw up a set of threads, so it is always good practice to chase them before you put the new bolts in. Be forewarned these guys are not much of a machinist or assemblers, you get what you pay for I am guessing. But I feel much better now running this in my car. This guy sells a kit if you want to use it, Kit, no affliation, just used his stuff. His writeup on how to repair these is excellent also. One item off the todo list. |
|
|
|
| 914forme |
Apr 23 2014, 06:57 PM
Post
#35
|
|
Times a wastin', get wrenchin'! Group: Members Posts: 3,899 Joined: 24-July 04 From: Dayton, Ohio Member No.: 2,388 Region Association: None |
And I started working on the rotisserie again.
Machined new up-rights, my old ones where to short. (IMG:style_emoticons/default/headbang.gif) Yes I am cheap and used a Astro Van jack as my outrigger for my drill press. Hey it works! 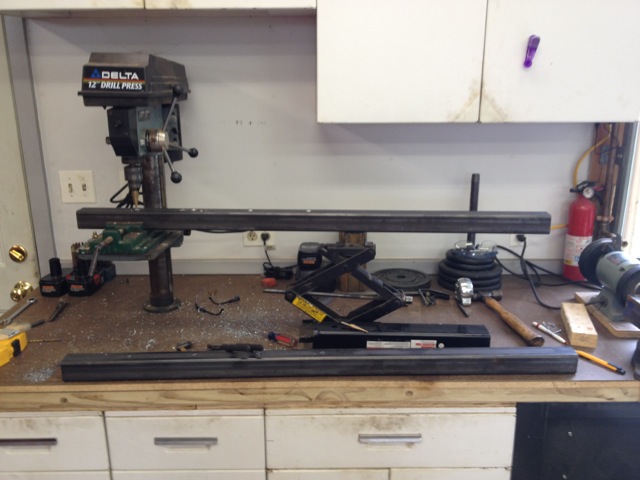 I finished two of these up. And started working on machining the bumper stand offs. 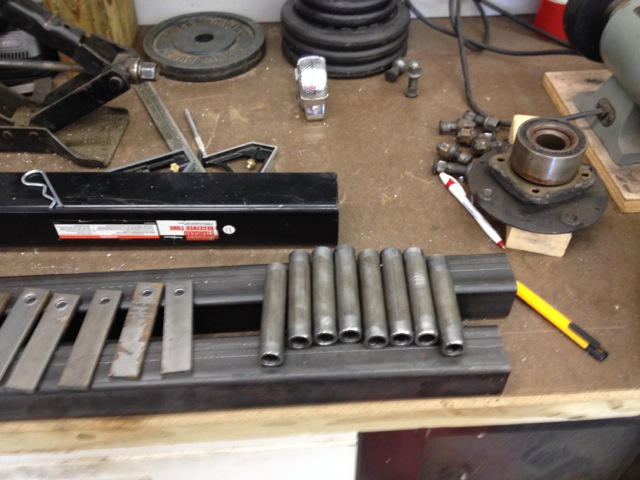 Then I started working on the plate that goes into the hub, I am using as my pivot point. McMark, I stole your idea, I'll be making it my own shortly. 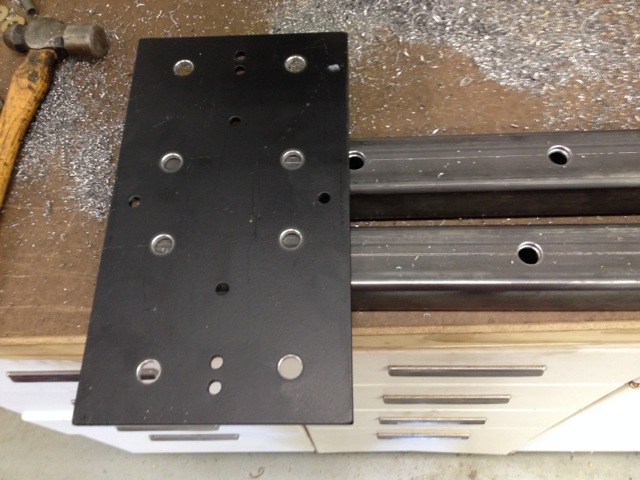 Test fit to the hub, Can't believe I pitched all the -4 lug bolts I had around. Luckly I have some extra studs. But I think i'll dig through my piles of junk and see if I can find some lug bolts. Or get the proper Metrics ordered in. 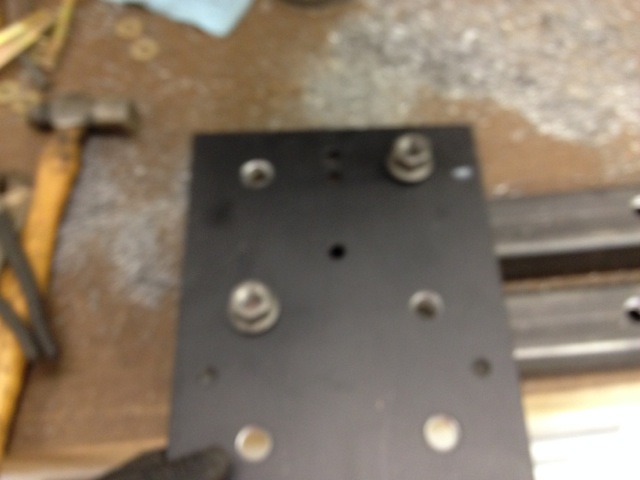 Thats it for now, I have CPADD, so I ran off to do something else when the Post Lady dropped off a couple of presents today. |
|
|
|
| 914forme |
Apr 23 2014, 07:16 PM
Post
#36
|
|
Times a wastin', get wrenchin'! Group: Members Posts: 3,899 Joined: 24-July 04 From: Dayton, Ohio Member No.: 2,388 Region Association: None |
Okay Post Lady brought me these today.
This is a piece of WWII goodness. 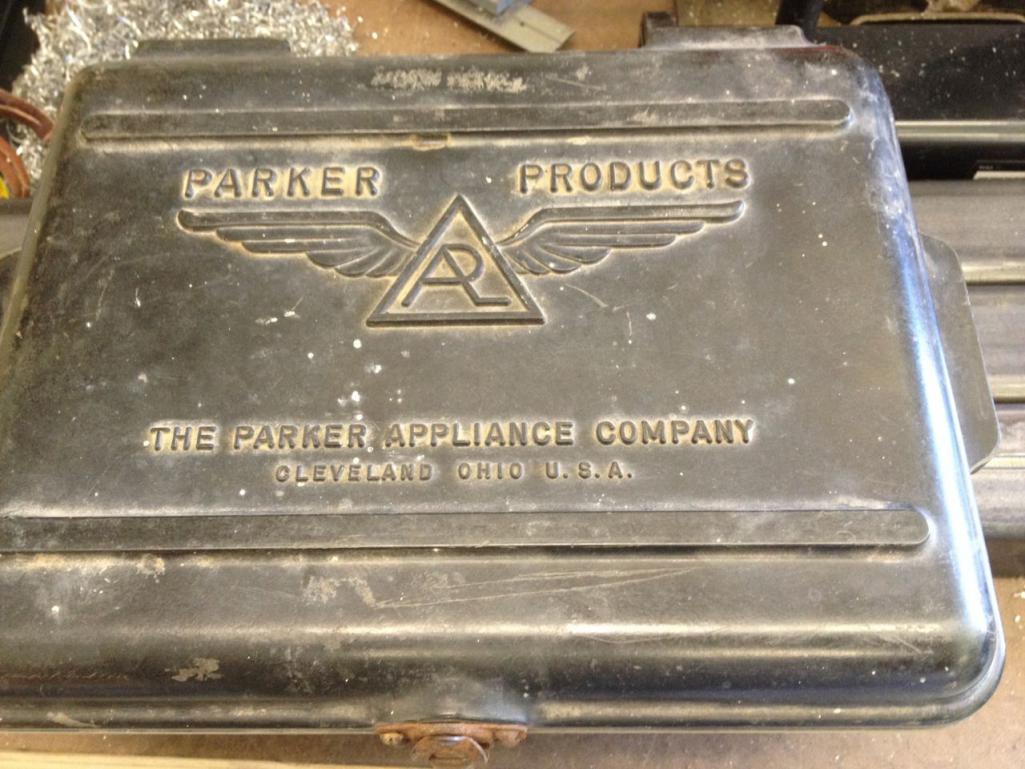 And this is a piece of VW-Porsche Incest that created these lovely gauges. Do not like the dome, looks like something Madonna would wear as a bra! 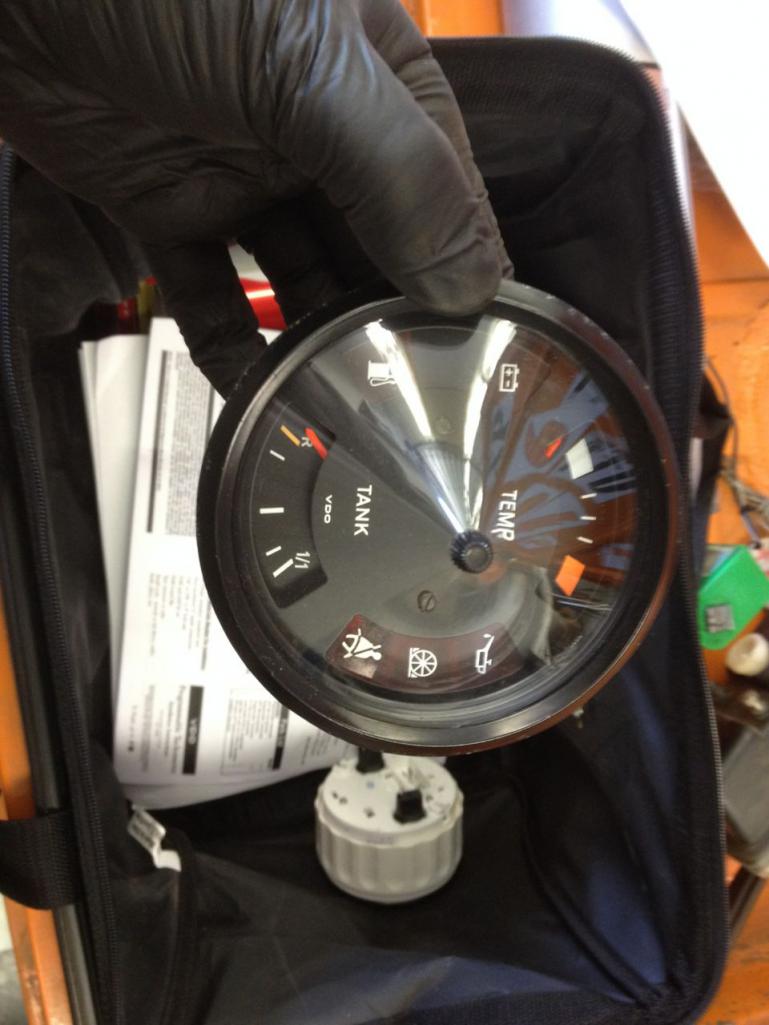 Its to form the basis for a future project. And here is what is in my WWII Parker case. 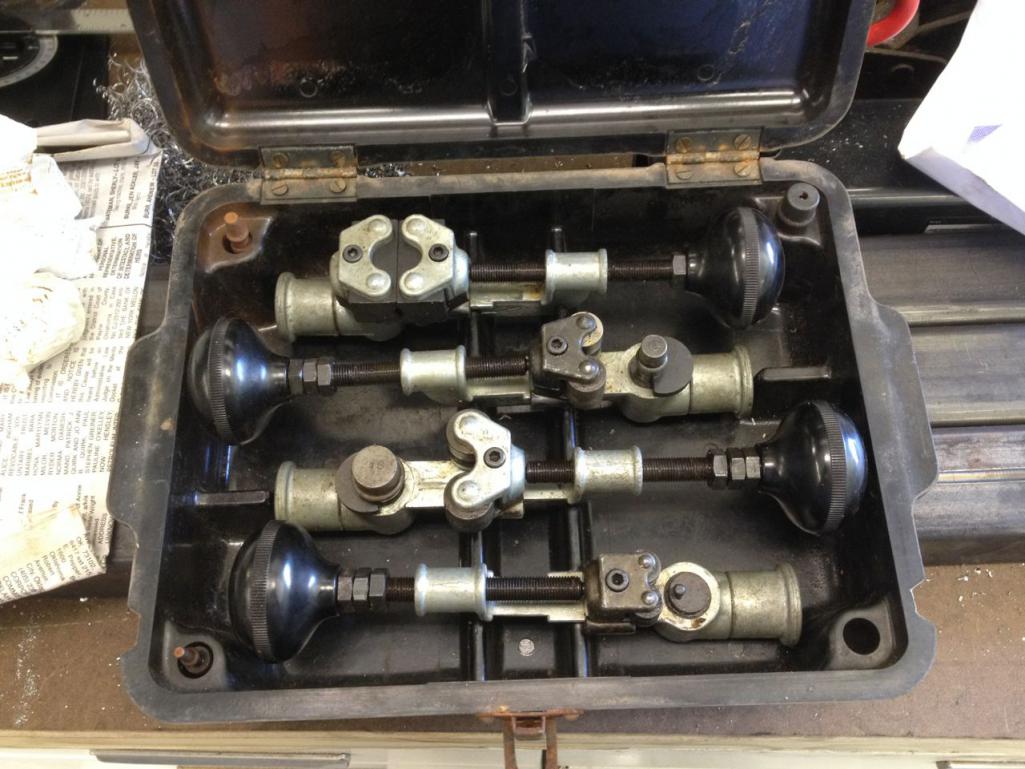 These are used to bead hard lines. That way your hoses don't slip off. I will need to clean these up and lubricate them and they will be good to go. Now I can get my fuel lines done, and beaded. Then get a few test beads done. |
|
|
|
| Amenson |
Apr 24 2014, 10:59 AM
Post
#37
|
|
That's opposite lock!! Group: Members Posts: 645 Joined: 27-May 05 From: Dublin, OH Member No.: 4,154 Region Association: None |
Wow, of all of the great details in your build thread, the Parker Bead kit is the most awesome.
Where in the hell did you find those! (IMG:style_emoticons/default/pray.gif) |
|
|
|
| 914forme |
Apr 24 2014, 05:54 PM
Post
#38
|
|
Times a wastin', get wrenchin'! Group: Members Posts: 3,899 Joined: 24-July 04 From: Dayton, Ohio Member No.: 2,388 Region Association: None |
QUOTE(Amenson @ Apr 24 2014, 12:59 PM) Wow, of all of the great details in your build thread, the Parker Bead kit is the most awesome. Where in the hell did you find those! (IMG:style_emoticons/default/pray.gif) I have had a search setup on Ebay for a while now, finally got one at a price I could justify. I have been waiting on these for about 5 years now. And thank you, just trying to help the next guy / gal that goes down this path. We get enough of these done, it might make the path wide enough, anyone will be willing to walk down it. |
|
|
|
| Chris H. |
Apr 24 2014, 06:20 PM
Post
#39
|
|
Senior Member Group: Members Posts: 4,086 Joined: 2-January 03 From: Chicago 'burbs Member No.: 73 Region Association: Upper MidWest |
When you put a flat piece of glass on the 924 gauge it looks so much better. I think it will be perfect for a conversion car if you like the stock-ish look. Still haven't checked calibration on the fuel gauge but you can swap that out with the 914 piece if you have to.
|
|
|
|
| 914forme |
Apr 24 2014, 06:37 PM
Post
#40
|
|
Times a wastin', get wrenchin'! Group: Members Posts: 3,899 Joined: 24-July 04 From: Dayton, Ohio Member No.: 2,388 Region Association: None |
For todays update, I am tired of drilling holes for this rotisserie. I should have pulled the trigger ran to Cleveland and picked up the unit Doug has. Oh well, the build is most of the fun for me.
So here we go. I got the welder out today, and my gas solenoid does not work (IMG:style_emoticons/default/WTF.gif) I have plenty of gas in the tank, it traveled down the hose. Switched to Flux Core, I'm welding thick wall tubing and plate anyway. Got the bottom frame done, welded up. I hate the splatter from Flux core. 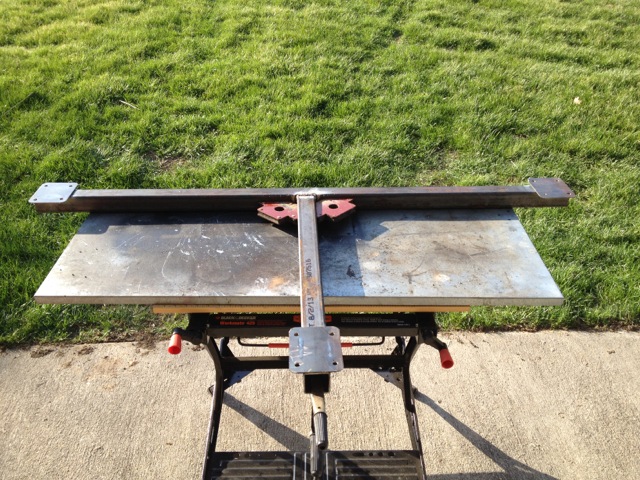 Got the front arms welded up, I might have to redo this one, I not sure how my math came out. (IMG:style_emoticons/default/confused24.gif) 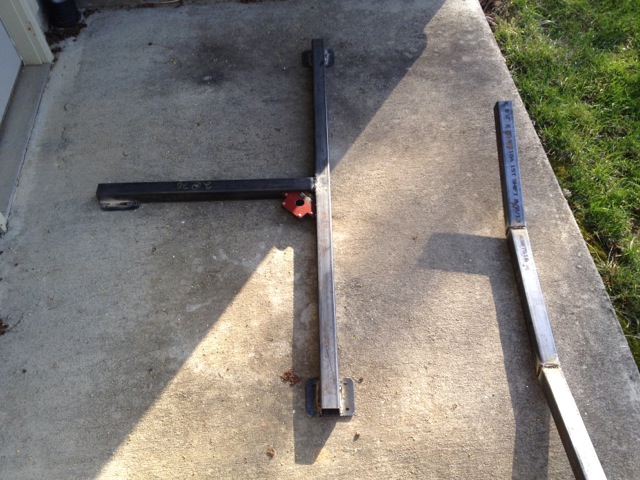 Welded my caster plates on, nice penetration on these welds. (IMG:style_emoticons/default/welder.gif) 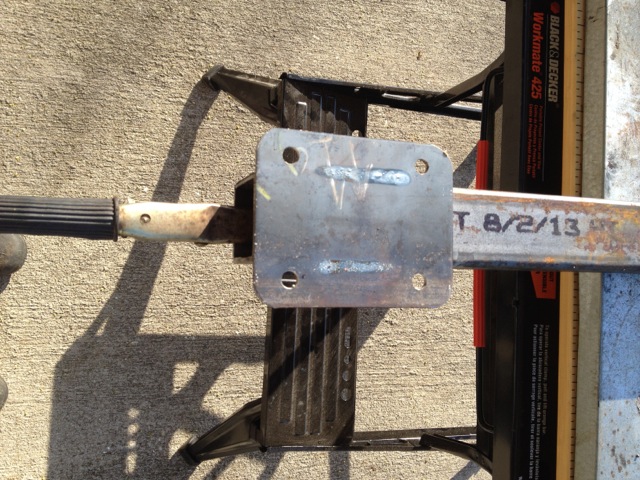 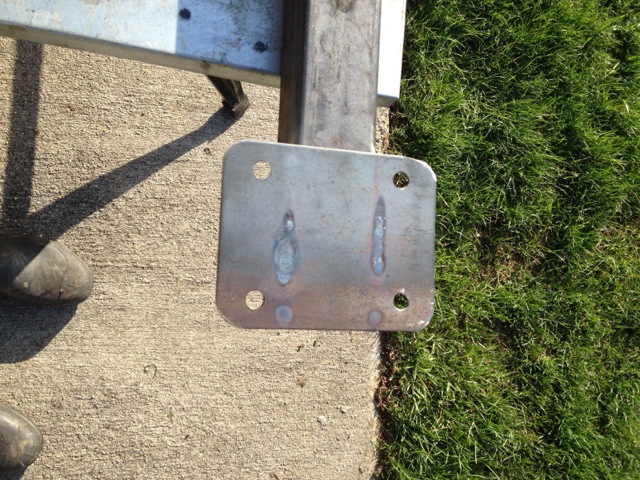 Started working on the stand offs for the bumper mounts, welded them up using 3/8" bolts. Test fitted them, and well the bolts are not big enough for the holes. So off to Tractor supply to buy 1/2 bolts. 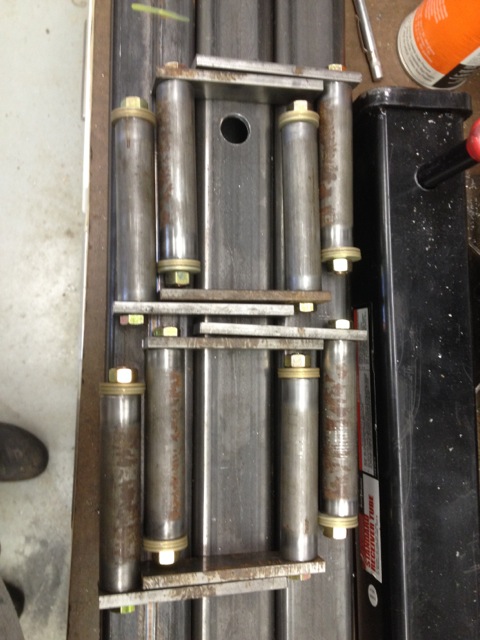 Welded on nuts to the top of the caster plates. Splatter (IMG:style_emoticons/default/barf.gif) 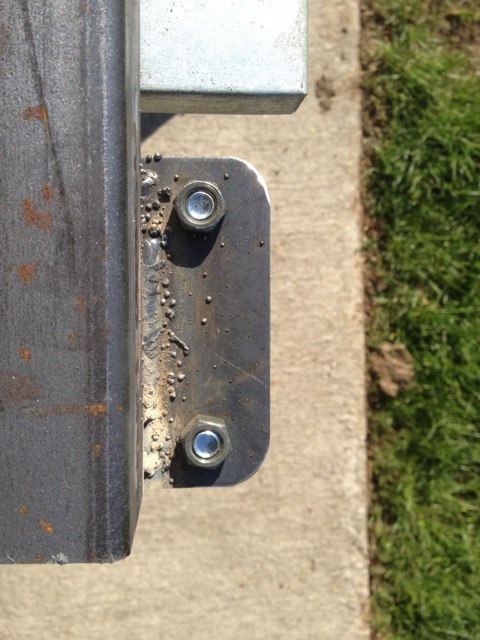 And one side is done, lol, hardly. Lots of work left todo on this side even. 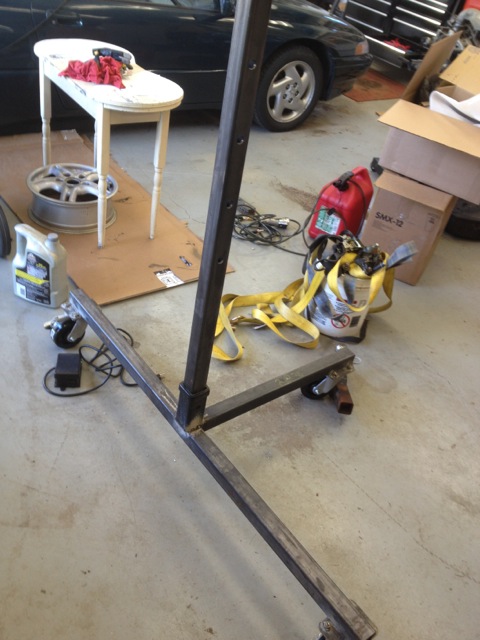 I need to invent the clean garage app. You take a picture, of your garage clean, an it becomes the background for all your other garage pictures, that way everyone thinks you work in a surgically clean environment. I really need to get the 5 gallon bucket of straps back in the truck. And that little white table is my wife's project. I have been moving it around for 3 years now. Not judging, just tired of it being here, there, everywhere. Attached image(s) 
|
|
|
|
|
1 User(s) are reading this topic (1 Guests and 0 Anonymous Users)
0 Members:

|
Lo-Fi Version | Time is now: 26th May 2026 - 09:44 PM |
Invision Power Board
v9.1.4 © 2026 IPS, Inc.