|
|
|
Porsche, and the Porsche crest are registered trademarks of Dr. Ing. h.c. F. Porsche AG.
This site is not affiliated with Porsche in any way. Its only purpose is to provide an online forum for car enthusiasts. All other trademarks are property of their respective owners. |
|
|

  |

| Han Solo |
 Dec 28 2014, 09:26 AM Dec 28 2014, 09:26 AM
Post
#201
|
|
Member  Group: Members Posts: 291 Joined: 30-September 13 From: Middle Tennessee Member No.: 16,456 Region Association: South East States |
Thanks Michael. This car will see the course again. I've already installed the seats and they're a very nice fit. The rails bolted right on so the install was easy. Thanks again!
|
   |

 
|
| wndsrfr |
Dec 28 2014, 08:10 PM
Post
#202
|
|
Senior Member Group: Members Posts: 1,457 Joined: 30-April 09 From: Rescue, Virginia Member No.: 10,318 Region Association: MidAtlantic Region |
QUOTE(Han Solo @ Dec 27 2014, 06:19 PM)  I'm doing this on my own. (IMG:style_emoticons/default/piratenanner.gif) (IMG:style_emoticons/default/popcorn[1].gif) I'm betting you'll be more satisfied with the hands on build.....keep us posted! |
|
|
|
| eeyore |
Jan 3 2015, 03:13 PM
Post
#203
|
|
Senior Member Group: Members Posts: 889 Joined: 8-January 04 From: meridian, id Member No.: 1,533 Region Association: None |
QUOTE(Han Solo @ Dec 19 2014, 04:57 PM) QUOTE(brant @ Dec 19 2014, 06:22 PM) There is no difference in case spigot size (or a thing except the #) between a 1.7 and 2.0 case. The bore is in the cylinders with the case having no effect until you go larger than 2056 Well that shoots that theory all to hell... Two things happened from what I can tell. Pistons 3 & 4 were rubbing the cylinder walls and the rear crank bearing failed. If those two things are related or caused by poor workmanship, are completely unknown to me at this time. I had a similar issue. The engine seized with rear bearing locking onto crank. The pistons were scored. I was running aluminum cylinders and thick (.080") steel barrel shims. The cylinders and pistons expanded with heat but the steel shims did not. So the pistons were swaged through the shim choke point. Enough material came off the cylinders to pollute the oil and seize the rear main bearing. It took lots of hammering to get off. However, I can't see stock/OE shims choking down on iron barrels. |
|
|
|
| Han Solo |
Jan 3 2015, 08:46 PM
Post
#204
|
|
Member Group: Members Posts: 291 Joined: 30-September 13 From: Middle Tennessee Member No.: 16,456 Region Association: South East States |
[/quote]
It took lots of hammering to get off. [/quote] A local machine shop was able to get the bearing off and polish the end. The mechanic said it took 6 tons of press to get it off. |
|
|
|
| Han Solo |
Jan 22 2015, 08:31 AM
Post
#205
|
|
Member Group: Members Posts: 291 Joined: 30-September 13 From: Middle Tennessee Member No.: 16,456 Region Association: South East States |
I'm having FAT performance do the race engine rebuild. I've found it very easy to discuss and plan with Greg Aronson there. He's got a wealth of knowledge and I'm sure his build will be solid. I also purchased a '76 2.0L parts car...
'76 parts car Specifically for the crank and engine case for the race car. Oddly, Brothers actually came up with a stock GA case (no charge) so I have the potential to build another engine. That could be a stock 94mm, mild cam with 40 Weber kind of thing but that's probably a next winter project. I'm selling parts of the '76 and will start an ad over at 914 World. Also, I pulled the rear rubber bumper off the '76, stripped the steel beam out and mounted it on the race car. Probably a tad heavier than a fiberglass early bumper reproduction but definitely more structural. I simply used the OEM chassis holes where the dog bones would go and long 5/8" bolts (7" & 9"). To make some stand-offs I used sections of 3/4" round stock (5" and 4.5") and welded a piece of square tubing in between to keep those parallel. You can push in those areas where the bolts are and the rubber bumper doesn't mush. I wouldn't think that you could push the car at all back there if it had fiberglass. |
|
|
|
| Han Solo |
Jan 25 2015, 02:33 PM
Post
#206
|
|
Member Group: Members Posts: 291 Joined: 30-September 13 From: Middle Tennessee Member No.: 16,456 Region Association: South East States |
Here's a look at the '76 bumper without inside beam and shock absorbers on the '73 autocross car. I also did some body filler around the edges of the non-tail lights. Not too bad for a race car (IMG:style_emoticons/default/smile.gif)
(IMG:http://www.914world.com/bbs2/uploads_offsite/i1336.photobucket.com-16456-1422218008.1.jpg) (IMG:http://www.914world.com/bbs2/uploads_offsite/i1336.photobucket.com-16456-1422218008.2.jpg) |
|
|
|
| Han Solo |
Mar 19 2015, 12:56 PM
Post
#207
|
|
Member Group: Members Posts: 291 Joined: 30-September 13 From: Middle Tennessee Member No.: 16,456 Region Association: South East States |
FAT Performance is just about done with the engine build. Here's the numbers...
Attached thumbnail(s) 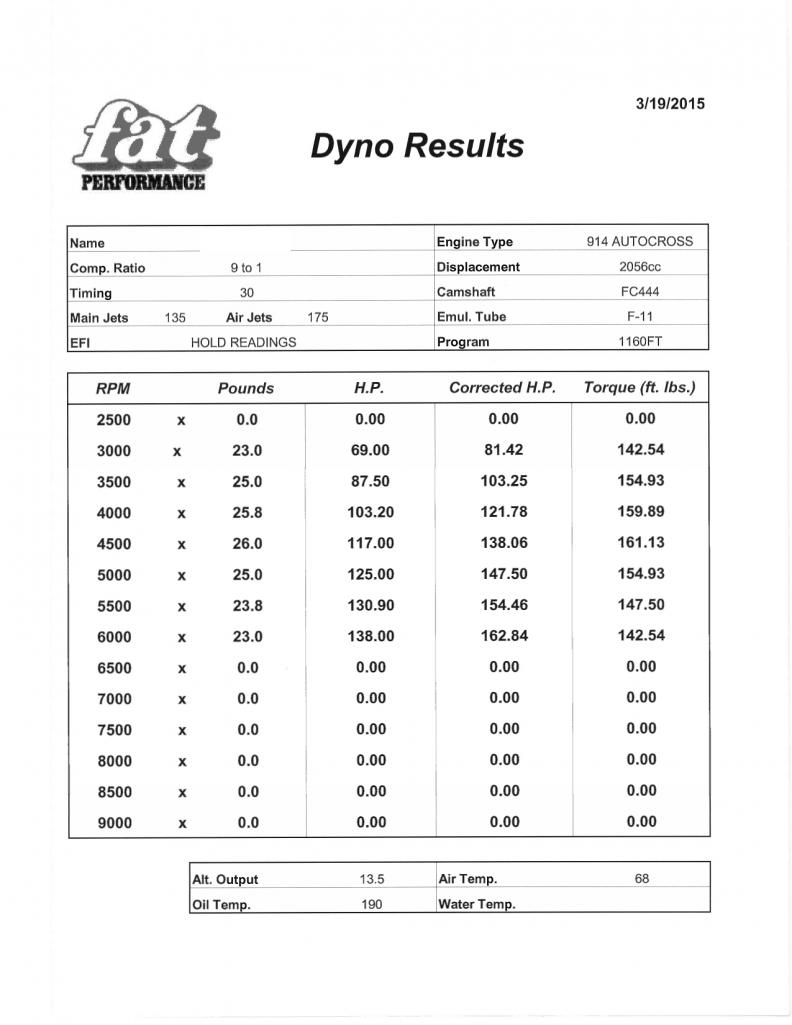
|
|
|
|
| Phoenix914 |
Mar 19 2015, 01:05 PM
Post
#208
|
|
Member Group: Members Posts: 389 Joined: 6-December 06 From: Oviedo, FL Member No.: 7,322 Region Association: South East States |
That is a smokin' 2056! (IMG:style_emoticons/default/aktion035.gif)
|
|
|
|
| Han Solo |
Apr 8 2015, 10:49 AM
Post
#209
|
|
Member Group: Members Posts: 291 Joined: 30-September 13 From: Middle Tennessee Member No.: 16,456 Region Association: South East States |
Yesterday I picked up the FAT performance rebuild at the freight terminal. It does look good! They did a different set up on the carb linkage with an interesting cable bracket. It's also got electronic ignition distributor, so no points or condenser. I had them add a oil pressure sender and gauge. There's a custom ceramic coated exhaust system. My buddy came over and we got the engine off the pallet and onto my rolling engine stand. He also helped me get the transmission lined up. I'll continue prepping the engine and doing some final work on fuel lines before stuffing it back in. The 914 is already back on the hillbilly lift.
(IMG:http://www.914world.com/bbs2/uploads_offsite/i1336.photobucket.com-16456-1428511750.1.jpg) (IMG:http://www.914world.com/bbs2/uploads_offsite/i1336.photobucket.com-16456-1428511751.2.jpg) (IMG:http://www.914world.com/bbs2/uploads_offsite/i1336.photobucket.com-16456-1428511751.3.jpg) (IMG:http://www.914world.com/bbs2/uploads_offsite/i1336.photobucket.com-16456-1428511751.4.jpg) (IMG:http://www.914world.com/bbs2/uploads_offsite/i1336.photobucket.com-16456-1428511751.5.jpg) (IMG:http://www.914world.com/bbs2/uploads_offsite/i1336.photobucket.com-16456-1428511752.6.jpg) |
|
|
|
| malcolm2 |
Apr 10 2015, 06:43 AM
Post
#210
|
|
Advanced Member Group: Members Posts: 2,749 Joined: 31-May 11 From: Nashville Member No.: 13,139 Region Association: South East States |
love the engine.
I have a question tho. I did the exact same oil presure set up. I thought the sender needed the mounting bracket to touch metal for the ground. Yours has the nice red rubber cushion wrapped around it. |
|
|
|
| Han Solo |
Apr 10 2015, 08:06 AM
Post
#211
|
|
Member Group: Members Posts: 291 Joined: 30-September 13 From: Middle Tennessee Member No.: 16,456 Region Association: South East States |
QUOTE(malcolm2 @ Apr 10 2015, 06:43 AM) love the engine. I have a question tho. I did the exact same oil presure set up. I thought the sender needed the mounting bracket to touch metal for the ground. Yours has the nice red rubber cushion wrapped around it. Greg at FAT did that set up but I suspect the sender achieves ground through the braided steel hose and fittings. |
|
|
|
| Han Solo |
Apr 13 2015, 09:21 AM
Post
#212
|
|
Member Group: Members Posts: 291 Joined: 30-September 13 From: Middle Tennessee Member No.: 16,456 Region Association: South East States |
I got the exhaust installed this weekend. It several attempts. The interior of the pipes and collector are ceramic coated so that made installation difficult. Basically what I found out (after a couple of helpful messages from Greg at FAT) is you assemble the system loosely together and then start mating up the flanges. The stub pipes were already installed so that was helpful. Also, you have to put the bolts in from the bottom but the nuts are those with a locking collar so that helped too. Most importantly though, is use some form of lubricant on the pipes into the collector. I know it's going to smoke up for a while but there's just too much resistance from the coating to twist and pull the pipes into position without some lubricant. I just used a bit of engine assembly lube. The muffler came with a nifty bracket to bolt to the tranny. I beat up the paint taking the stuff on and off but that's all just part of the learning process.
(IMG:http://www.914world.com/bbs2/uploads_offsite/i1336.photobucket.com-16456-1428938474.1.jpg) (IMG:http://www.914world.com/bbs2/uploads_offsite/i1336.photobucket.com-16456-1428938474.2.jpg) (IMG:http://www.914world.com/bbs2/uploads_offsite/i1336.photobucket.com-16456-1428938474.3.jpg) (IMG:http://www.914world.com/bbs2/uploads_offsite/i1336.photobucket.com-16456-1428938475.4.jpg) (IMG:http://www.914world.com/bbs2/uploads_offsite/i1336.photobucket.com-16456-1428938475.5.jpg) |
|
|
|
| Han Solo |
Apr 13 2015, 09:23 AM
Post
#213
|
|
Member Group: Members Posts: 291 Joined: 30-September 13 From: Middle Tennessee Member No.: 16,456 Region Association: South East States |
Wired up the oil pressure gauge this morning and started cranking without the coil wire on. Oil pressure came up nicely and then I let 'er rip. The exhaust sounds really good. I'm not happy with the fuel pressure regulator from Summit however. It won't get below 3 PSI. The Webers seem okay with that for now but I want to get that down to 1.5 - 2 PSI.
1st start FAT re-build |
|
|
|
| Phoenix914 |
Apr 13 2015, 10:19 AM
Post
#214
|
|
Member Group: Members Posts: 389 Joined: 6-December 06 From: Oviedo, FL Member No.: 7,322 Region Association: South East States |
Looks and sounds great!
|
|
|
|
| wndsrfr |
Apr 13 2015, 07:05 PM
Post
#215
|
|
Senior Member Group: Members Posts: 1,457 Joined: 30-April 09 From: Rescue, Virginia Member No.: 10,318 Region Association: MidAtlantic Region |
Sounds sweet....you're gonna love driving it! Gotta love them FAT boys--gives you great confidence for sure. I got my crank and flywheel from them.....5 dowel pins to hold the torque on my 2316.
Is the car streetable?? You'll get a lot of "thumbs up" from folks just driving around....nice. |
|
|
|
| Han Solo |
Apr 15 2015, 12:10 PM
Post
#216
|
|
Member Group: Members Posts: 291 Joined: 30-September 13 From: Middle Tennessee Member No.: 16,456 Region Association: South East States |
QUOTE(wndsrfr @ Apr 13 2015, 07:05 PM) Is the car streetable?? You'll get a lot of "thumbs up" from folks just driving around....nice. Not even close to streetable but I'll take it out on the rural road we live on for a quick road test. I've just got to keep an eye out for the sheriff! |
|
|
|
| FourBlades |
Apr 15 2015, 06:22 PM
Post
#217
|
|
From Wreck to Rockin Group: Members Posts: 2,056 Joined: 3-December 07 From: Brevard, FL Member No.: 8,414 Region Association: South East States |
Great progress! (IMG:style_emoticons/default/smilie_pokal.gif) That is the most power from a 2056 I have ever heard of. Will make a kick ass car. John |
|
|
|
| wndsrfr |
Apr 15 2015, 07:45 PM
Post
#218
|
|
Senior Member Group: Members Posts: 1,457 Joined: 30-April 09 From: Rescue, Virginia Member No.: 10,318 Region Association: MidAtlantic Region |
QUOTE(Han Solo @ Apr 15 2015, 10:10 AM) QUOTE(wndsrfr @ Apr 13 2015, 07:05 PM) Is the car streetable?? You'll get a lot of "thumbs up" from folks just driving around....nice. Not even close to streetable but I'll take it out on the rural road we live on for a quick road test. I've just got to keep an eye out for the sheriff! Hmmm....I've got my track car registered as an antique in Virginia & there's no inspection requirements as long as I'm only driving it "to or from events, testing, or occasional pleasure driving within limited distance from home." Well, that covers a lot of driving--hell, I'm always "testing" it! Check the TN antique or custom registration....you might qualify! http://www.dmv.com/tn/tennessee/custom-vehicle-registration (IMG:style_emoticons/default/driving.gif) |
|
|
|
| brant |
Apr 16 2015, 12:57 PM
Post
#219
|
|
914 Wizard Group: Members Posts: 12,047 Joined: 30-December 02 From: Colorado Member No.: 47 Region Association: Rocky Mountains |
track racing organizations usually require one working brake light.
maybe not autocross... but all of the tracks I've ever been on did. |
|
|
|
| Han Solo |
Apr 16 2015, 01:08 PM
Post
#220
|
|
Member Group: Members Posts: 291 Joined: 30-September 13 From: Middle Tennessee Member No.: 16,456 Region Association: South East States |
QUOTE(brant @ Apr 16 2015, 12:57 PM) track racing organizations usually require one working brake light. maybe not autocross... but all of the tracks I've ever been on did. That's not the case for SCCA Solo Prepared classes. Per the 2015 Solo rules book... 17. PREPARED CATEGORY 17.2 BODYWORK AND STRUCTURE U. All side marker lights and tail/stop lights may be removed. If such an item is removed, the resultant opening must be covered. This car will probably never be on a track. There is some talk that the SCCA may ramp up the Solo Trails program which could potentially be held on road courses but Solo rules and regulations would apply to those events (from what I understand). |
|
|
|
|
2 User(s) are reading this topic (2 Guests and 0 Anonymous Users)
0 Members:

|
Lo-Fi Version | Time is now: 7th September 2025 - 03:09 AM |
Invision Power Board
v9.1.4 © 2025 IPS, Inc.