|
|
|
Porsche, and the Porsche crest are registered trademarks of Dr. Ing. h.c. F. Porsche AG.
This site is not affiliated with Porsche in any way. Its only purpose is to provide an online forum for car enthusiasts. All other trademarks are property of their respective owners. |
|
|

  |

| f1rocks |
 Jan 16 2014, 11:54 AM Jan 16 2014, 11:54 AM
Post
#61
|
|
F1rocks  Group: Members Posts: 23 Joined: 13-January 14 From: Brentwood, Tennessee Member No.: 16,884 Region Association: South East States |
Where are you in middle Tennessee?
|
   |

 
|
| ablesnead |
Jan 16 2014, 04:07 PM
Post
#62
|
|
Member Group: Members Posts: 157 Joined: 16-September 13 From: United States Member No.: 16,395 Region Association: None |
This thread is driving me nuts...I mean ...jeez buy a decent tub would ya ! ..your skill is awesome your patients is astounding , but your decision making process could use some therapy....I end up admiring you ...kinda
|
|
|
|
| J P Stein |
Jan 17 2014, 09:23 AM
Post
#63
|
|
Irrelevant old fart Group: Members Posts: 8,797 Joined: 30-December 02 From: Vancouver, WA Member No.: 45 Region Association: None |
I paid 4500 bucks for that green car back in the late 90s. It looks better than it was having taken hits in each corner (fender benders) and the paint was falling off in sheets
"The plan" didn't include making it a full ime race car.......but there is the "slippery slope" personified. By the time I was done selling parts off the car, it maybe cost (WAG) $1K, minus the agravation and had a solid chassis (for a 914) to boot. .....  |
|
|
|
| Han Solo |
Jan 18 2014, 09:43 PM
Post
#64
|
|
Member Group: Members Posts: 291 Joined: 30-September 13 From: Middle Tennessee Member No.: 16,456 Region Association: South East States |
QUOTE(f1rocks @ Jan 16 2014, 12:54 PM)  Where are you in middle Tennessee? Near Lebanon TN. About seven miles from the track facility that hates sports cars. |
|
|
|
| Han Solo |
Jan 18 2014, 09:53 PM
Post
#65
|
|
Member Group: Members Posts: 291 Joined: 30-September 13 From: Middle Tennessee Member No.: 16,456 Region Association: South East States |
QUOTE(ablesnead @ Jan 16 2014, 05:07 PM) This thread is driving me nuts...I mean ...jeez buy a decent tub would ya ! ..your skill is awesome your patients is astounding , but your decision making process could use some therapy....I end up admiring you ...kinda Let's see... I paid $900 for the piece of junk. Sold probably $400 - $500 in parts. Bought some tools. Learning to weld. I've mostly enjoyed all the problem solving and learning so far with this project. I wouldn't call my skills awesome at all. Perhaps marginally effective. This chassis very well may fall to pieces the first time on an autocross course but you know what... I'll just laugh and either walk away from it or fix it. If that means my decision making process is f**ked up then I'm okay with that. I appreciate your admiration (kinda). |
|
|
|
| Han Solo |
Jan 18 2014, 09:57 PM
Post
#66
|
|
Member Group: Members Posts: 291 Joined: 30-September 13 From: Middle Tennessee Member No.: 16,456 Region Association: South East States |
So today I did the small patch under the long. This area is over-laid by the suspension console and has two layers of sheet metal. You'll see in the fourth photo where I laid the console over the finished patch. After making the patch I was preparing to treat the area and dug out all the seam sealer in the corner by the firewall. Probably my least favorite procedure but a heat gun definitely helps root that mess out. I then treated the wheel house side, the long and got treatment up inside the long. I also metal prep'ed the replacement suspension console from RD. That's a really nice stamped and welded part. After rinsing and drying everything I sprayed weld through primer on the surfaces covered by the console and the inside of console. I looked very carefully at how that new part will fit and made some measurements. I thought that I would be able to align that by using the original position (drilled out spot welds and paint). But there's too much room for mis-alignment. I'm going to make a jig of some kind using the drivers side. So I moved to the underside of the long. The last photo shows the carnage there. That's going to be my largest patch yet. I'm planing on one long piece of sheet metal for max strength.
(IMG:http://www.914world.com/bbs2/uploads_offsite/i1336.photobucket.com-16456-1390103847.1.jpg) (IMG:http://www.914world.com/bbs2/uploads_offsite/i1336.photobucket.com-16456-1390103848.2.jpg) (IMG:http://www.914world.com/bbs2/uploads_offsite/i1336.photobucket.com-16456-1390103848.3.jpg) (IMG:http://www.914world.com/bbs2/uploads_offsite/i1336.photobucket.com-16456-1390103848.4.jpg) (IMG:http://www.914world.com/bbs2/uploads_offsite/i1336.photobucket.com-16456-1390103848.5.jpg) (IMG:http://www.914world.com/bbs2/uploads_offsite/i1336.photobucket.com-16456-1390103848.6.jpg) (IMG:http://www.914world.com/bbs2/uploads_offsite/i1336.photobucket.com-16456-1390103849.7.jpg) (IMG:http://www.914world.com/bbs2/uploads_offsite/i1336.photobucket.com-16456-1390103849.8.jpg) (IMG:http://www.914world.com/bbs2/uploads_offsite/i1336.photobucket.com-16456-1390103849.9.jpg) (IMG:http://www.914world.com/bbs2/uploads_offsite/i1336.photobucket.com-16456-1390103849.10.jpg) |
|
|
|
| J P Stein |
Jan 19 2014, 09:34 AM
Post
#67
|
|
Irrelevant old fart Group: Members Posts: 8,797 Joined: 30-December 02 From: Vancouver, WA Member No.: 45 Region Association: None |
Well, if you must.......
You are into an area that is a well known weak spot of the 914....race car or not, they have been known to rip that ear right off. "while you're there" you may want to make a fix to prevent this. If you're not interested in my input, just say so and this will be the last you'll hear from me. 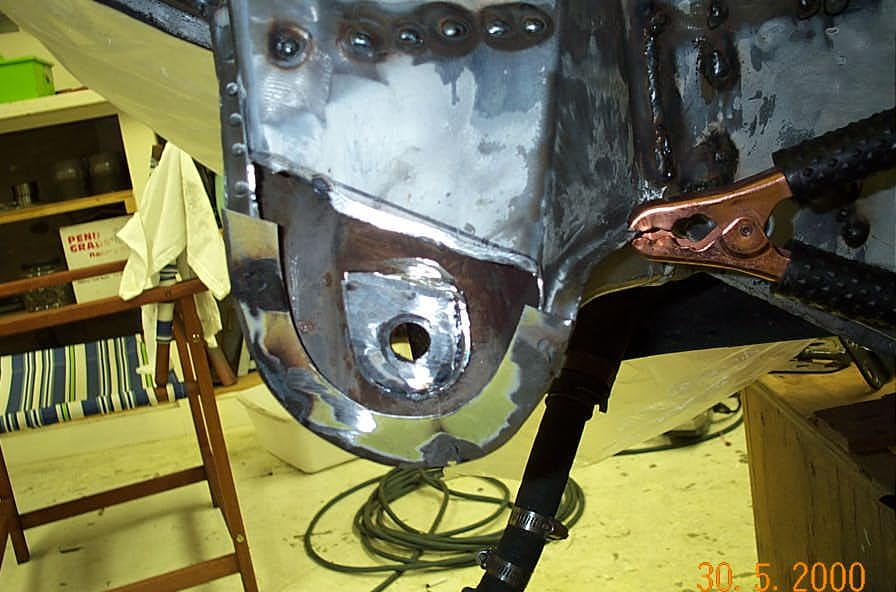 Over the top of this went a 3/16 plate & on the sides 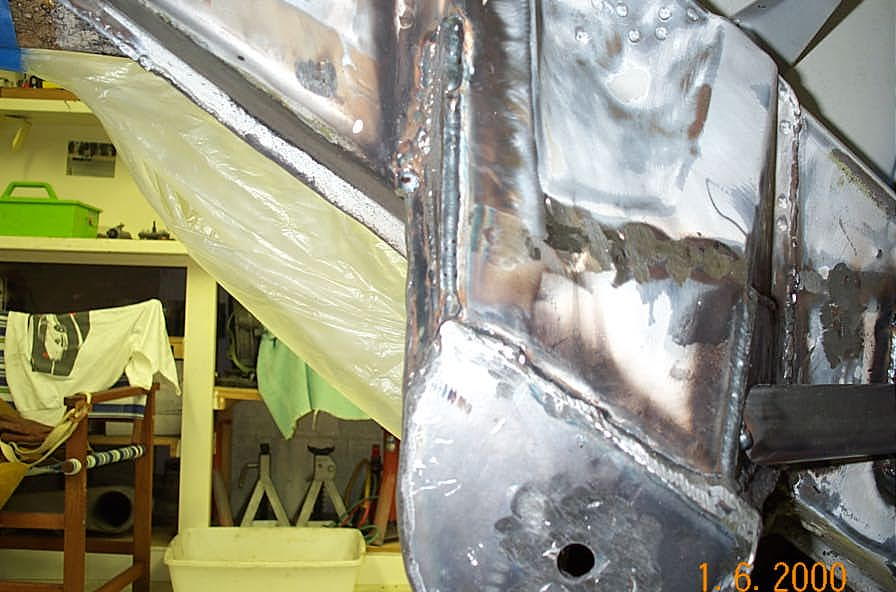 Weld the hell out of all seams & everything. 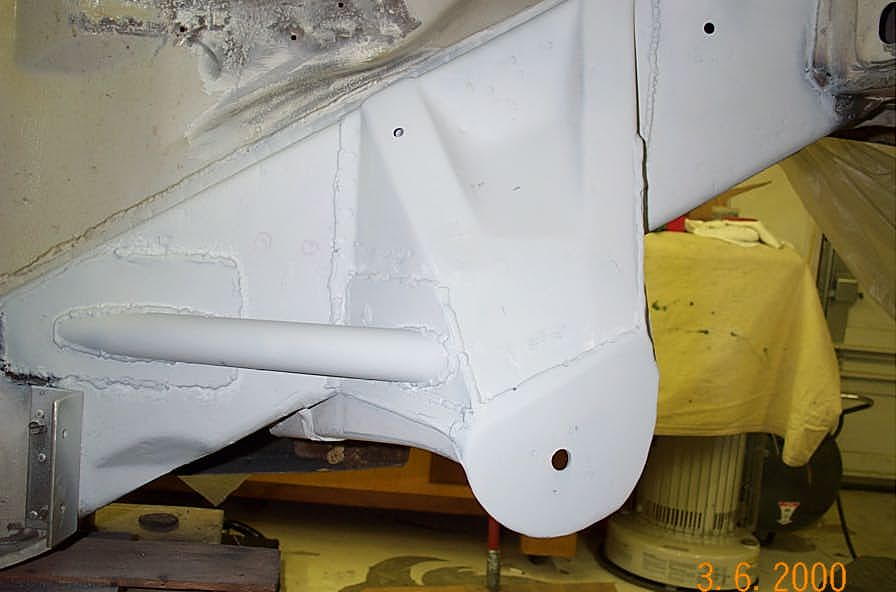 Paint to match  |
|
|
|
| Han Solo |
Jan 19 2014, 02:22 PM
Post
#68
|
|
Member Group: Members Posts: 291 Joined: 30-September 13 From: Middle Tennessee Member No.: 16,456 Region Association: South East States |
Definitely want your input and advise JP. I can see that area is inherently weak and I do like your fix. The stiffener pipe looks like a great idea. It does pass through where the motor mount is so what did you do instead?
|
|
|
|
| Han Solo |
Jan 19 2014, 02:43 PM
Post
#69
|
|
Member Group: Members Posts: 291 Joined: 30-September 13 From: Middle Tennessee Member No.: 16,456 Region Association: South East States |
This next patch is going to be REALLY tough. It's going to cover the underside of the long from about 12" forward of the firewall to almost to the out-board suspension attachment point. It took me 1 1/2 hour just to make the template. I'm still thinking one continuous piece of metal is the best way to go. But if I start to really struggle forming this - I may have to chop it into segments.
(IMG:http://www.914world.com/bbs2/uploads_offsite/i1336.photobucket.com-16456-1390164212.1.jpg) (IMG:http://www.914world.com/bbs2/uploads_offsite/i1336.photobucket.com-16456-1390164212.2.jpg) (IMG:http://www.914world.com/bbs2/uploads_offsite/i1336.photobucket.com-16456-1390164212.3.jpg) |
|
|
|
| J P Stein |
Jan 19 2014, 09:49 PM
Post
#70
|
|
Irrelevant old fart Group: Members Posts: 8,797 Joined: 30-December 02 From: Vancouver, WA Member No.: 45 Region Association: None |
I removed the 4 banger engine mounts when I put in the 6. There are a number of ways to brace the ears other than what I did.
|
|
|
|
| Cupomeat |
Jan 20 2014, 09:11 AM
Post
#71
|
|
missing my NY 914 in VA Group: Members Posts: 1,338 Joined: 26-November 07 From: Oakton VA Member No.: 8,376 Region Association: MidAtlantic Region |
(IMG:style_emoticons/default/agree.gif)
I was just thinking that myself, that you deserve Kudos for saving this one. Thanks from the 914 community |
|
|
|
| Han Solo |
Jan 20 2014, 08:19 PM
Post
#72
|
|
Member Group: Members Posts: 291 Joined: 30-September 13 From: Middle Tennessee Member No.: 16,456 Region Association: South East States |
MLK day and I've got four hours to do this monster patch. I got it cut out last night during playoff half times. The first half hour today I'm bending, fitting, trimming, repeat. I'm actually able to get clamps on most of this one. Once I'm satisfied that it will conform properly I start under the long and passenger door.
(IMG:http://www.914world.com/bbs2/uploads_offsite/i1336.photobucket.com-16456-1390270789.1.jpg) (IMG:http://www.914world.com/bbs2/uploads_offsite/i1336.photobucket.com-16456-1390270790.2.jpg) Note that I wrapped into the passenger side of the long and made a flap that went up in between the firewalls. This is the area where I cut out the heater pipe and there was structure missing. (IMG:http://www.914world.com/bbs2/uploads_offsite/i1336.photobucket.com-16456-1390270790.3.jpg) (IMG:http://www.914world.com/bbs2/uploads_offsite/i1336.photobucket.com-16456-1390270911.1.jpg) I worked my way to the rear of the car. Bending, shaping, clamping, tack welding, repeat. Everything is lining up good but it looks like I'll have to make one split to get the last wrap up into the engine bay. I also needed some ground support to press the metal up to get that contour. (IMG:http://www.914world.com/bbs2/uploads_offsite/i1336.photobucket.com-16456-1390270791.4.jpg) (IMG:http://www.914world.com/bbs2/uploads_offsite/i1336.photobucket.com-16456-1390270792.5.jpg) (IMG:http://www.914world.com/bbs2/uploads_offsite/i1336.photobucket.com-16456-1390270792.6.jpg) Once I'm done, I'm fairly pleased with the results. The spot welds combined with seam welds should be very strong. I've tied in several areas that I've already repaired so I think this should make this long good to go. (IMG:http://www.914world.com/bbs2/uploads_offsite/i1336.photobucket.com-16456-1390270793.7.jpg) (IMG:http://www.914world.com/bbs2/uploads_offsite/i1336.photobucket.com-16456-1390270794.8.jpg) This last photo shows that segment that goes up in between the firewalls. I was able to get some corner welds up in there and I think this will help the strength of this area immensely. (IMG:http://www.914world.com/bbs2/uploads_offsite/i1336.photobucket.com-16456-1390270794.9.jpg) |
|
|
|
| Han Solo |
Jan 25 2014, 04:11 PM
Post
#73
|
|
Member Group: Members Posts: 291 Joined: 30-September 13 From: Middle Tennessee Member No.: 16,456 Region Association: South East States |
I've been thinking about how to make a jig for aligning the replacement suspension console and came up with what I think will work. I wanted a device that I could build and set up on the drivers side - then take it over to the passenger side. That meant something I could flip over and keep the same dimensions. I started with the plates that secure the outboard attachment point. Those can't be flipped over so I'm going to use both as alignment points and mark them the same.
(IMG:http://www.914world.com/bbs2/uploads_offsite/i1336.photobucket.com-16456-1390687892.1.jpg) I scribed the plate down the middle (1/2" from either edge). (IMG:http://www.914world.com/bbs2/uploads_offsite/i1336.photobucket.com-16456-1390687892.2.jpg) Then I cut a piece of flat stock to fit on top of the plate and made a scribe mark down the middle of it. Note that the mark goes down the side which will be important later. (IMG:http://www.914world.com/bbs2/uploads_offsite/i1336.photobucket.com-16456-1390687892.3.jpg) Next, to build the jig on the good drivers side, I needed to figure out how to clamp the flat stock to the mounting plate now on the car. Small needle nose vise grips work well in the confined area. Align the flat stock's marks to those on the suspension plate. (IMG:http://www.914world.com/bbs2/uploads_offsite/i1336.photobucket.com-16456-1390687893.4.jpg) The other components of the jig are a section of 3/8" threaded rod, a 1/2" x 2" bolt with two flat washes and two nuts. I used one nut and washer as a backing, ran the bolt through the inner mounting point and tightened. Note that a 9/16" bolt will work better but of course Home Depot or Lowe's didn't have them. Then I started trimming the threaded rod to fit in-between the bolt head and the fixed piece of bar stock. Try to have the rod mate right in the center of the bolt head and the middle of the flat stock plate on the side. I used a large magnet to assist in this process. Trimming, grinding, checking till it fit just right. Once I got everything just right, I took the mig welder to the two joining points (bar stock to threaded rod and threaded rod to bolt head). (IMG:http://www.914world.com/bbs2/uploads_offsite/i1336.photobucket.com-16456-1390687893.5.jpg) A couple of tack weld and then finish the welding with the jig in a vise. Note that my first attempt I didn't get good penetration on the bolt head and that weld failed later. Crank up the amps and feed when you weld that. (IMG:http://www.914world.com/bbs2/uploads_offsite/i1336.photobucket.com-16456-1390687893.6.jpg) I clamped the new suspension console to the long using the old spot welds for rough location. Then I put the jig in the suspension hole and started tapping the console with a nylon hammer to get the plates aligned. It took another clamp in-between the console and motor mount to suck the console tight against the long. (IMG:http://www.914world.com/bbs2/uploads_offsite/i1336.photobucket.com-16456-1390687893.7.jpg) The cool thing about this little jig is when you flip it over for the other side - all the dimensions and angles are the same - almost. There's is a slight difference in the elevation of the mounting plate and the inner mount hole. So when you flip the jig over, the alignment plate is a little lower (about 1/2") but you can still get an eyeball on the center lines and the location of the bar stock to the mounting plate (side to side and front to back). (IMG:http://www.914world.com/bbs2/uploads_offsite/i1336.photobucket.com-16456-1390687893.8.jpg) I had already drilled the console for spot welds on the sides, top and bottom. The only place you can't get spot welds is down the long seam under the long but after spot welding (and checking the jig repeatedly) I followed up with seam welds along all sides. (IMG:http://www.914world.com/bbs2/uploads_offsite/i1336.photobucket.com-16456-1390687893.9.jpg) Although not a perfect alignment tool, I believe this jig got me well within the tolerances for good rear alignment. With how the RD suspension console is made - I think the deficiencies of elevation are not a factor. It would be really hard to change the elevation without effecting the other dimensions. I guess I'll find out when I get the suspension and wheels back on this joker. |
|
|
|
| Han Solo |
Jan 26 2014, 08:29 PM
Post
#74
|
|
Member Group: Members Posts: 291 Joined: 30-September 13 From: Middle Tennessee Member No.: 16,456 Region Association: South East States |
Fabulous weather today and I put a few hours into the project. I'm working the bottom of the outer firewall. Trimming 3/8" of rust off the bottom, fabricating patches, welding, grinding, you know the drill. I'm really low on welding wire so after the first patch I decide to clean up the drivers side long. I finally was able to get the flex brake line loose so with that and the hard line removed - I'm cutting out the engine shelf on that side. With that out of the way, I've got really good access to the anti-hell hole. There's some rust on that side but no major holes. I also cut what was left of the jack point triangle out but the donut itself is still there under the long. So last thing I sprayed the area with metal prep and also some up in between the inner and outer firewalls. If I can stabilize the rusty metal, I might punt on this side and just coat with POR 15.
(IMG:http://www.914world.com/bbs2/uploads_offsite/i1336.photobucket.com-16456-1390789769.1.jpg) (IMG:http://www.914world.com/bbs2/uploads_offsite/i1336.photobucket.com-16456-1390789770.2.jpg) |
|
|
|
| f1rocks |
Jan 27 2014, 10:00 AM
Post
#75
|
|
F1rocks Group: Members Posts: 23 Joined: 13-January 14 From: Brentwood, Tennessee Member No.: 16,884 Region Association: South East States |
QUOTE(Han Solo @ Jan 18 2014, 07:43 PM) Near Lebanon TN. About seven miles from the track facility that hates sports cars. Well it's not like we're missing much with the "sports car" portion of the track! That track eats tires. It was good to do some test and tune and not have to haul 3 hours to get there. I will be enjoying the new Corvette track in Bowling Green though. Less than an hour will be nice. You ever come over to the Cars and Coffee events in Franklin? |
|
|
|
| Han Solo |
Jan 28 2014, 01:15 PM
Post
#76
|
|
Member Group: Members Posts: 291 Joined: 30-September 13 From: Middle Tennessee Member No.: 16,456 Region Association: South East States |
QUOTE(f1rocks @ Jan 27 2014, 11:00 AM) QUOTE(Han Solo @ Jan 18 2014, 07:43 PM) Near Lebanon TN. About seven miles from the track facility that hates sports cars. Well it's not like we're missing much with the "sports car" portion of the track! That track eats tires. It was good to do some test and tune and not have to haul 3 hours to get there. I will be enjoying the new Corvette track in Bowling Green though. Less than an hour will be nice. You ever come over to the Cars and Coffee events in Franklin? I'm with the Tennessee Region SCCA and we used the parking lot and access road for autocross. It was a pretty good site for those purposes and we even did a National event that was a morph between autocross and time trail on the road coarse. I've got little good to say about Dover Motorsports. We too are looking forward to the Corvette facility. Supposedly, it will have a ten acre autocross pad (IMG:style_emoticons/default/driving.gif) I haven't made it to the cars and coffee. That's a PCA event, right? |
|
|
|
| f1rocks |
Jan 28 2014, 03:54 PM
Post
#77
|
|
F1rocks Group: Members Posts: 23 Joined: 13-January 14 From: Brentwood, Tennessee Member No.: 16,884 Region Association: South East States |
QUOTE(Han Solo @ Jan 28 2014, 11:15 AM) I haven't made it to the cars and coffee. That's a PCA event, right? Nope, just a bunch of guys bringing a very wide variety of cars. I saw one of the original batmobiles there a few months back. Had the Barris badges etc.... Had a Veyron floating around Brentwood recently I'm sure it will show up one of these days. |
|
|
|
| Han Solo |
Feb 1 2014, 11:03 PM
Post
#78
|
|
Member Group: Members Posts: 291 Joined: 30-September 13 From: Middle Tennessee Member No.: 16,456 Region Association: South East States |
Engine compartment mostly done.
Before... (IMG:http://www.914world.com/bbs2/uploads_offsite/i1336.photobucket.com-16456-1391317428.1.jpg) After... (IMG:http://www.914world.com/bbs2/uploads_offsite/i1336.photobucket.com-16456-1391317429.2.jpg) Before... (IMG:http://www.914world.com/bbs2/uploads_offsite/i1336.photobucket.com-16456-1391317429.3.jpg) After... (IMG:http://www.914world.com/bbs2/uploads_offsite/i1336.photobucket.com-16456-1391317429.4.jpg) |
|
|
|
| Han Solo |
Feb 2 2014, 08:27 PM
Post
#79
|
|
Member Group: Members Posts: 291 Joined: 30-September 13 From: Middle Tennessee Member No.: 16,456 Region Association: South East States |
I've been working for this for a long time. Getting floor pans in this car will be a HUGE accomplishment for me. And I want to take my time a do it right. So today I started test fitting the front and rear pans. My hillbilly lift actually help keep the front pan in place with just enough space between lifting beam and longs to slide the pan in from the front. I discovered what one reader mentioned back when I was patching the front bulkhead. There is a recessed area under the peddle assembly. I'll have to do some modification to the sheet metal I've added there to make that conform. I cut out some of the leading folded edges under the bulkhead because the RD front pan has them and that was helpful for placement. I also trimmed the dead metal off the back off my replacement master cylinder mount. Then I tacked the front pan in with some self-taping screws and then used my floor jack with some lumber to support the rear pan and tacked it in position. There's about 3/4" of overlap with both pans in position so I'll have to trim one. I also found that I lost elevation on some of the inner firewall lower patches. I'll have to trim that area and re-bend the metal. Being satisfied that everything will line up well, I took the pans off, cleaned and prepped the metal then spray painted both sides with weld through primer.
(IMG:http://www.914world.com/bbs2/uploads_offsite/i1336.photobucket.com-16456-1391394468.1.jpg) (IMG:http://www.914world.com/bbs2/uploads_offsite/i1336.photobucket.com-16456-1391394470.2.jpg) (IMG:http://www.914world.com/bbs2/uploads_offsite/i1336.photobucket.com-16456-1391394470.3.jpg) (IMG:http://www.914world.com/bbs2/uploads_offsite/i1336.photobucket.com-16456-1391394470.4.jpg) |
|
|
|
| Han Solo |
Feb 8 2014, 09:16 PM
Post
#80
|
|
Member Group: Members Posts: 291 Joined: 30-September 13 From: Middle Tennessee Member No.: 16,456 Region Association: South East States |
Installing the front floor pan took about 8 hours. Mostly screwing in sheet metal screws, beating with a hammer, welding and grinding. It was nice to get a break from cutting patches. I started in the middle welding the tunnel. I had drilled for spot welds on the edges of the tunnel. I filled those and added some lap welds for extra strength. I'm leaving the rear 6" un-welded because I've decided to lap the rear pan instead of butt weld. Then I moved to the outer edges under the longs. I had drilled the pan for spot welds there and that was the most difficult area. Next I brought my attention to the front areas. You may remember when I was patching the bulkhead under the dash that much of that metal was missing and I fabricated a peddle assembly mount from what little was remaining The RD front pan had the recessed area for the peddles and my fabrications didn't quite match up. So I removed the bottom metal and made some adjustment. Also note that the RD pan front edges under the wheelhouses are turned down. If one was doing a proper restoration these would be crimped up to join but much of that was missing on this car so I simply turned it up, trimmed and welding to the bottom of the wheel house. There's a rust hole on the passenger side I'll come back to later. I worked from the outboard sides towards the middle - leaving the peddle area to last. I had to add a couple slivers for the adjustment but everything welded up nicely. All the joints at the front were lap welding top and bottom for maximum strength. Finally I ground everything down and I'll hopefully have the rear pan started soon.
(IMG:http://www.914world.com/bbs2/uploads_offsite/i1336.photobucket.com-16456-1391915810.1.jpg) (IMG:http://www.914world.com/bbs2/uploads_offsite/i1336.photobucket.com-16456-1391915811.2.jpg) (IMG:http://www.914world.com/bbs2/uploads_offsite/i1336.photobucket.com-16456-1391915811.3.jpg) (IMG:http://www.914world.com/bbs2/uploads_offsite/i1336.photobucket.com-16456-1391915811.4.jpg) (IMG:http://www.914world.com/bbs2/uploads_offsite/i1336.photobucket.com-16456-1391915812.5.jpg) (IMG:http://www.914world.com/bbs2/uploads_offsite/i1336.photobucket.com-16456-1391915812.6.jpg) (IMG:http://www.914world.com/bbs2/uploads_offsite/i1336.photobucket.com-16456-1391915812.7.jpg) (IMG:http://www.914world.com/bbs2/uploads_offsite/i1336.photobucket.com-16456-1391915813.8.jpg) (IMG:http://www.914world.com/bbs2/uploads_offsite/i1336.photobucket.com-16456-1391915813.9.jpg) (IMG:http://www.914world.com/bbs2/uploads_offsite/i1336.photobucket.com-16456-1391915813.10.jpg) |
|
|
|
|
1 User(s) are reading this topic (1 Guests and 0 Anonymous Users)
0 Members:

|
Lo-Fi Version | Time is now: 8th September 2025 - 12:07 AM |
Invision Power Board
v9.1.4 © 2025 IPS, Inc.