|
|
|
Porsche, and the Porsche crest are registered trademarks of Dr. Ing. h.c. F. Porsche AG.
This site is not affiliated with Porsche in any way. Its only purpose is to provide an online forum for car enthusiasts. All other trademarks are property of their respective owners. |
|
|


| trojanhorsepower |
 Nov 14 2013, 07:28 PM Nov 14 2013, 07:28 PM
Post
#121
|
|
Senior Member  Group: Members Posts: 1,031 Joined: 21-September 03 From: Marion, NC Member No.: 1,179 Region Association: None |
Hi All
After finishing my rotisserie I am finally getting back to actual car work (started in 03). I am redoing what I did in the past (made a mess of it) and hopefully moving on from there. Doug has is helping me with the restoration, so hopefully we can make some actual progress. The entire passenger side of my car is pretty rotten so we have our work cut out for us. I got the good part of the long cut out so when Doug gets here maybe we can start filling in the gaps. In this pic I have cut out the outside long bit. 10/1/15: Joined in the build off challenge! Attached image(s) 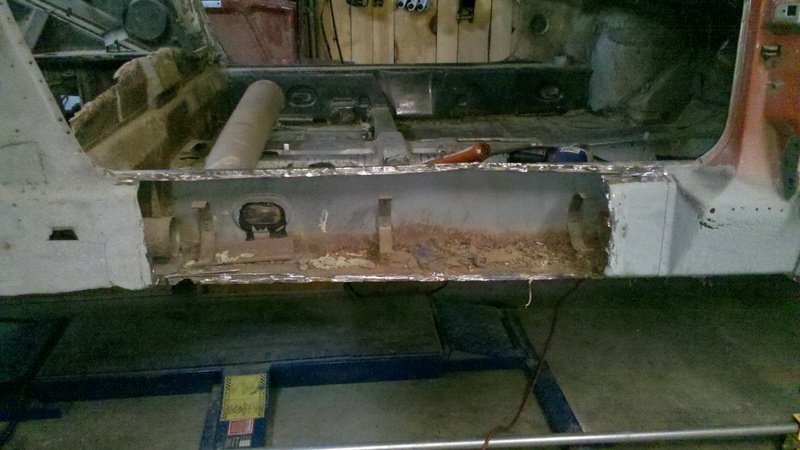
|
   |

 
|
Posts in this topic
 trojanhorsepower BUILD-OFF CHALLENGE: Trojanhorsepower's Rusty 74 restoration Mark II Nov 14 2013, 07:28 PM
 dlee6204 MMM...Rust :chow: Nov 14 2013, 07:31 PM trojanhorsepower At this point I was afraid that there was not enou... Nov 14 2013, 07:32 PM trojanhorsepower I have an old Restoration Design? patch panel for ... Nov 16 2013, 08:34 AM rick 918-S The dimple actually touches the outside panel. Tha... Nov 16 2013, 08:46 AM trojanhorsepower Thanks Rick,
That makes sense. So I need to make... Nov 16 2013, 09:42 AM
dlee6204 MMM...Rust :chow: Nov 14 2013, 07:31 PM trojanhorsepower At this point I was afraid that there was not enou... Nov 14 2013, 07:32 PM trojanhorsepower I have an old Restoration Design? patch panel for ... Nov 16 2013, 08:34 AM rick 918-S The dimple actually touches the outside panel. Tha... Nov 16 2013, 08:46 AM trojanhorsepower Thanks Rick,
That makes sense. So I need to make... Nov 16 2013, 09:42 AM
 rick 918-S
Thanks Rick,
That makes sense. So I need to mak... Nov 17 2013, 07:21 PM dlee6204
That makes sense. So I need to make a part to w... Nov 16 2013, 03:12 PM trojanhorsepower That would be great Doug. The outer section is ba... Nov 17 2013, 08:08 AM trojanhorsepower Did a little work to boost confidence. It did not... Nov 17 2013, 06:53 PM Douglas Miller
Hi All
After finishing my rotisserie I am finall... Nov 17 2013, 07:46 PM trojanhorsepower Hi Doug,
Glad to see you here. Don't hang ou... Nov 17 2013, 08:50 PM trojanhorsepower Tackled another little spot tonight. I am not qui... Nov 20 2013, 08:08 PM trojanhorsepower Plugged the antenna hole. Nov 29 2013, 08:58 PM trojanhorsepower Doug Leehr came out today and we got right to work... Nov 29 2013, 09:01 PM trojanhorsepower Next we started cutting. First the motor mount ha... Nov 29 2013, 09:04 PM trojanhorsepower Then we cut a patch panel to weld in after we clea... Nov 29 2013, 09:06 PM trojanhorsepower Lastly we cut out the rest of the rust. In this s... Nov 29 2013, 09:07 PM trojanhorsepower Doug and I worked like elves today. While I did s... Nov 30 2013, 08:32 PM trojanhorsepower We got that part tacked in and cut out the rest of... Nov 30 2013, 08:36 PM trojanhorsepower At this point we decided to cut out for the day. ... Nov 30 2013, 08:42 PM TargaToy :sawzall: Keep it up! Making real progress t... Dec 1 2013, 04:30 PM trojanhorsepower Thanks Conrad!
It has been really nice to get ... Dec 2 2013, 04:16 PM trojanhorsepower Well it has been a while since my last update, but... Dec 15 2013, 08:33 PM trojanhorsepower For now I am out of wire so it is time to grind so... Dec 15 2013, 08:35 PM trojanhorsepower With the holidays over it is time to get back to w... Jan 13 2014, 07:13 PM FourBlades Looking good man!
I love this stage of the pr... Jan 13 2014, 08:23 PM trojanhorsepower Did a little more today. I have started working o... Jan 20 2014, 06:00 PM trojanhorsepower I went back to working on the out firewall, becaus... Feb 2 2014, 06:44 PM trojanhorsepower I have been picking away at the inner firewall. T... Feb 22 2014, 06:51 PM trojanhorsepower I have been pecking away at the project.
I got th... Mar 14 2014, 07:06 PM trojanhorsepower OK so I have started to test fit the outer long pa... Mar 18 2014, 07:10 PM trojanhorsepower :bump:
Anyone.... anyone....Bueller...Bueller Mar 19 2014, 05:13 PM dlee6204 I wouldn't remove any of it until the long is ... Mar 19 2014, 06:11 PM cary Nothing can come off until the outer rocker is wel... Mar 20 2014, 02:20 AM trojanhorsepower OK, thanks guys. Mar 20 2014, 02:50 PM trojanhorsepower The outer long parts clamped/screwed on.
Edit: No... Mar 24 2014, 04:34 PM trojanhorsepower The outer long parts clamped/screwed on. Mar 24 2014, 04:34 PM trojanhorsepower While I wait for some expert double checking on th... Mar 24 2014, 04:45 PM trojanhorsepower This spot is much harder. I am really struggling ... Mar 24 2014, 04:48 PM trojanhorsepower Ok, the curvy part is probably rotted out on most ... Apr 22 2014, 06:51 PM dlee6204 Looks good! Apr 22 2014, 06:55 PM poorsche914 :agree: Apr 22 2014, 07:29 PM trojanhorsepower Well with the honeybee season in full swing work h... Jun 26 2014, 07:20 PM trojanhorsepower I also worked on the engine mount. I still need t... Jun 26 2014, 07:21 PM trojanhorsepower Bee work and other projects have slowed the car wo... Sep 19 2014, 03:13 PM trojanhorsepower Once the shed was done I could move my giant stack... Sep 19 2014, 03:14 PM trojanhorsepower So now I can get back to work. With newly gained ... Sep 19 2014, 03:16 PM trojanhorsepower I may have accidentally gotten the engine mount in... Oct 3 2014, 04:45 PM dlee6204 Good timing on the update... Was just about to te... Oct 3 2014, 04:52 PM trojanhorsepower Great! Any recommendations on placement? Als... Oct 3 2014, 04:55 PM dlee6204 Metal on metal. Only early cars had rubber outbo... Oct 3 2014, 05:11 PM trojanhorsepower I have been patching the front floor pan, while I ... Oct 10 2014, 02:19 PM FourBlades You are making good progress. :Qarl:
Keep it go... Oct 12 2014, 11:30 AM trojanhorsepower Thanks John,
I can only dream about the day it i... Oct 13 2014, 07:07 PM FourBlades I replaced one of mine that was really rusted out.... Oct 13 2014, 07:22 PM trojanhorsepower Thanks John,
Other experts please chime in.....
... Oct 15 2014, 02:10 PM FourBlades Here is a picture after I replaced mine.
There is... Oct 15 2014, 07:25 PM trojanhorsepower Thanks John,
I will check those tomorrow. Oct 15 2014, 07:44 PM trojanhorsepower Well, she's welded in now. I hope its right. Oct 17 2014, 06:28 PM trojanhorsepower The next problem is the engine shelf. Do most fol... Oct 17 2014, 06:31 PM dlee6204 The engine shelf usually takes a little persuasion... Oct 17 2014, 06:51 PM trojanhorsepower Doug, can you be a little more specific? The fire... Oct 18 2014, 01:51 PM dlee6204 The front end should have a 90 degree bend and spo... Oct 18 2014, 01:59 PM trojanhorsepower It was a good day today at the Lamb house hold. D... Oct 26 2014, 07:28 PM trojanhorsepower Been chipping away at it. Removed the last of the... Nov 9 2014, 06:51 PM trojanhorsepower Then I went back and filled the holes left from cu... Nov 9 2014, 06:52 PM dlee6204 Looks good! Time to cut out that other crossm... Nov 9 2014, 07:49 PM trojanhorsepower Yup. Maybe I will get that done tomorrow. Nov 9 2014, 08:04 PM trojanhorsepower Been a little busy with firewood, but I did get a ... Nov 25 2014, 06:33 PM trojanhorsepower I was focusing on removing seam sealer. That went... Nov 25 2014, 06:34 PM trojanhorsepower Tonight, with Hugh on the oil can we made some hol... Nov 25 2014, 06:35 PM trojanhorsepower I need to clean up the backs of the holes, clean o... Nov 25 2014, 06:38 PM FourBlades Great progress! :trophy:
Stopping point...
... Nov 26 2014, 05:36 AM trojanhorsepower I know that it has been a while (its cold out ther... Jan 19 2015, 07:39 PM trojanhorsepower It was nice and warm today so I got a little more ... Jan 19 2015, 07:42 PM dlee6204 :popcorn: Jan 19 2015, 08:19 PM saigon71 You are making some great progress! Keep plug... Jan 20 2015, 07:30 AM dlee6204 :bump:
Is this car done yet? :poke: Apr 16 2015, 02:17 PM trojanhorsepower :sad2: No... I have done a little. I got the ne... Apr 16 2015, 04:47 PM trojanhorsepower OK, at long last, an update. I finished the under... Apr 19 2015, 07:09 PM trojanhorsepower Now I have flipped the car around and started fitt... Apr 19 2015, 07:12 PM trojanhorsepower Anyone know what the distance should be from the b... Apr 19 2015, 07:13 PM injunmort on my '72, it is exactly 18 inches from the fi... Apr 20 2015, 02:43 PM trojanhorsepower Thanks! Anyone else? Is 18" the standar... Apr 20 2015, 04:42 PM Luke M
Thanks! Anyone else? Is 18" the standa... Apr 20 2015, 07:14 PM trojanhorsepower Thanks! Apr 20 2015, 07:15 PM altitude411 18 3/16'' on mine... Apr 20 2015, 07:19 PM trojanhorsepower Thanks! Apr 20 2015, 07:20 PM Luke M Seams they all differ a little but I have 18 1/8 ... Apr 20 2015, 07:42 PM trojanhorsepower OK, thanks everybody. It sounds like it is not to... Apr 20 2015, 07:44 PM trojanhorsepower Finally an update.
Got the cross member welded in... Jul 12 2015, 01:31 PM trojanhorsepower Also got the little seat adjuster bracket that wel... Jul 12 2015, 01:34 PM mgp4591 This has been fun to read and inspirational to boo... Jul 12 2015, 04:58 PM trojanhorsepower Thanks, glad you are enjoying it.
The center tunne... Jul 12 2015, 05:47 PM trojanhorsepower After Okteenerfest inspiration and some mild chast... Sep 20 2015, 04:53 PM 3d914 Making nice progress. Keep at it! Hopefully yo... Sep 20 2015, 06:27 PM trojanhorsepower Build-Off Challenge begins! Oct 1 2015, 07:38 PM r_towle Keep those doors in place now as you do the rest o... Oct 1 2015, 07:44 PM trojanhorsepower My Tasks:
Finish rust repair
Blast
Primer
Paint in... Oct 1 2015, 07:47 PM
rick 918-S
Thanks Rick,
That makes sense. So I need to mak... Nov 17 2013, 07:21 PM dlee6204
That makes sense. So I need to make a part to w... Nov 16 2013, 03:12 PM trojanhorsepower That would be great Doug. The outer section is ba... Nov 17 2013, 08:08 AM trojanhorsepower Did a little work to boost confidence. It did not... Nov 17 2013, 06:53 PM Douglas Miller
Hi All
After finishing my rotisserie I am finall... Nov 17 2013, 07:46 PM trojanhorsepower Hi Doug,
Glad to see you here. Don't hang ou... Nov 17 2013, 08:50 PM trojanhorsepower Tackled another little spot tonight. I am not qui... Nov 20 2013, 08:08 PM trojanhorsepower Plugged the antenna hole. Nov 29 2013, 08:58 PM trojanhorsepower Doug Leehr came out today and we got right to work... Nov 29 2013, 09:01 PM trojanhorsepower Next we started cutting. First the motor mount ha... Nov 29 2013, 09:04 PM trojanhorsepower Then we cut a patch panel to weld in after we clea... Nov 29 2013, 09:06 PM trojanhorsepower Lastly we cut out the rest of the rust. In this s... Nov 29 2013, 09:07 PM trojanhorsepower Doug and I worked like elves today. While I did s... Nov 30 2013, 08:32 PM trojanhorsepower We got that part tacked in and cut out the rest of... Nov 30 2013, 08:36 PM trojanhorsepower At this point we decided to cut out for the day. ... Nov 30 2013, 08:42 PM TargaToy :sawzall: Keep it up! Making real progress t... Dec 1 2013, 04:30 PM trojanhorsepower Thanks Conrad!
It has been really nice to get ... Dec 2 2013, 04:16 PM trojanhorsepower Well it has been a while since my last update, but... Dec 15 2013, 08:33 PM trojanhorsepower For now I am out of wire so it is time to grind so... Dec 15 2013, 08:35 PM trojanhorsepower With the holidays over it is time to get back to w... Jan 13 2014, 07:13 PM FourBlades Looking good man!
I love this stage of the pr... Jan 13 2014, 08:23 PM trojanhorsepower Did a little more today. I have started working o... Jan 20 2014, 06:00 PM trojanhorsepower I went back to working on the out firewall, becaus... Feb 2 2014, 06:44 PM trojanhorsepower I have been picking away at the inner firewall. T... Feb 22 2014, 06:51 PM trojanhorsepower I have been pecking away at the project.
I got th... Mar 14 2014, 07:06 PM trojanhorsepower OK so I have started to test fit the outer long pa... Mar 18 2014, 07:10 PM trojanhorsepower :bump:
Anyone.... anyone....Bueller...Bueller Mar 19 2014, 05:13 PM dlee6204 I wouldn't remove any of it until the long is ... Mar 19 2014, 06:11 PM cary Nothing can come off until the outer rocker is wel... Mar 20 2014, 02:20 AM trojanhorsepower OK, thanks guys. Mar 20 2014, 02:50 PM trojanhorsepower The outer long parts clamped/screwed on.
Edit: No... Mar 24 2014, 04:34 PM trojanhorsepower The outer long parts clamped/screwed on. Mar 24 2014, 04:34 PM trojanhorsepower While I wait for some expert double checking on th... Mar 24 2014, 04:45 PM trojanhorsepower This spot is much harder. I am really struggling ... Mar 24 2014, 04:48 PM trojanhorsepower Ok, the curvy part is probably rotted out on most ... Apr 22 2014, 06:51 PM dlee6204 Looks good! Apr 22 2014, 06:55 PM poorsche914 :agree: Apr 22 2014, 07:29 PM trojanhorsepower Well with the honeybee season in full swing work h... Jun 26 2014, 07:20 PM trojanhorsepower I also worked on the engine mount. I still need t... Jun 26 2014, 07:21 PM trojanhorsepower Bee work and other projects have slowed the car wo... Sep 19 2014, 03:13 PM trojanhorsepower Once the shed was done I could move my giant stack... Sep 19 2014, 03:14 PM trojanhorsepower So now I can get back to work. With newly gained ... Sep 19 2014, 03:16 PM trojanhorsepower I may have accidentally gotten the engine mount in... Oct 3 2014, 04:45 PM dlee6204 Good timing on the update... Was just about to te... Oct 3 2014, 04:52 PM trojanhorsepower Great! Any recommendations on placement? Als... Oct 3 2014, 04:55 PM dlee6204 Metal on metal. Only early cars had rubber outbo... Oct 3 2014, 05:11 PM trojanhorsepower I have been patching the front floor pan, while I ... Oct 10 2014, 02:19 PM FourBlades You are making good progress. :Qarl:
Keep it go... Oct 12 2014, 11:30 AM trojanhorsepower Thanks John,
I can only dream about the day it i... Oct 13 2014, 07:07 PM FourBlades I replaced one of mine that was really rusted out.... Oct 13 2014, 07:22 PM trojanhorsepower Thanks John,
Other experts please chime in.....
... Oct 15 2014, 02:10 PM FourBlades Here is a picture after I replaced mine.
There is... Oct 15 2014, 07:25 PM trojanhorsepower Thanks John,
I will check those tomorrow. Oct 15 2014, 07:44 PM trojanhorsepower Well, she's welded in now. I hope its right. Oct 17 2014, 06:28 PM trojanhorsepower The next problem is the engine shelf. Do most fol... Oct 17 2014, 06:31 PM dlee6204 The engine shelf usually takes a little persuasion... Oct 17 2014, 06:51 PM trojanhorsepower Doug, can you be a little more specific? The fire... Oct 18 2014, 01:51 PM dlee6204 The front end should have a 90 degree bend and spo... Oct 18 2014, 01:59 PM trojanhorsepower It was a good day today at the Lamb house hold. D... Oct 26 2014, 07:28 PM trojanhorsepower Been chipping away at it. Removed the last of the... Nov 9 2014, 06:51 PM trojanhorsepower Then I went back and filled the holes left from cu... Nov 9 2014, 06:52 PM dlee6204 Looks good! Time to cut out that other crossm... Nov 9 2014, 07:49 PM trojanhorsepower Yup. Maybe I will get that done tomorrow. Nov 9 2014, 08:04 PM trojanhorsepower Been a little busy with firewood, but I did get a ... Nov 25 2014, 06:33 PM trojanhorsepower I was focusing on removing seam sealer. That went... Nov 25 2014, 06:34 PM trojanhorsepower Tonight, with Hugh on the oil can we made some hol... Nov 25 2014, 06:35 PM trojanhorsepower I need to clean up the backs of the holes, clean o... Nov 25 2014, 06:38 PM FourBlades Great progress! :trophy:
Stopping point...
... Nov 26 2014, 05:36 AM trojanhorsepower I know that it has been a while (its cold out ther... Jan 19 2015, 07:39 PM trojanhorsepower It was nice and warm today so I got a little more ... Jan 19 2015, 07:42 PM dlee6204 :popcorn: Jan 19 2015, 08:19 PM saigon71 You are making some great progress! Keep plug... Jan 20 2015, 07:30 AM dlee6204 :bump:
Is this car done yet? :poke: Apr 16 2015, 02:17 PM trojanhorsepower :sad2: No... I have done a little. I got the ne... Apr 16 2015, 04:47 PM trojanhorsepower OK, at long last, an update. I finished the under... Apr 19 2015, 07:09 PM trojanhorsepower Now I have flipped the car around and started fitt... Apr 19 2015, 07:12 PM trojanhorsepower Anyone know what the distance should be from the b... Apr 19 2015, 07:13 PM injunmort on my '72, it is exactly 18 inches from the fi... Apr 20 2015, 02:43 PM trojanhorsepower Thanks! Anyone else? Is 18" the standar... Apr 20 2015, 04:42 PM Luke M
Thanks! Anyone else? Is 18" the standa... Apr 20 2015, 07:14 PM trojanhorsepower Thanks! Apr 20 2015, 07:15 PM altitude411 18 3/16'' on mine... Apr 20 2015, 07:19 PM trojanhorsepower Thanks! Apr 20 2015, 07:20 PM Luke M Seams they all differ a little but I have 18 1/8 ... Apr 20 2015, 07:42 PM trojanhorsepower OK, thanks everybody. It sounds like it is not to... Apr 20 2015, 07:44 PM trojanhorsepower Finally an update.
Got the cross member welded in... Jul 12 2015, 01:31 PM trojanhorsepower Also got the little seat adjuster bracket that wel... Jul 12 2015, 01:34 PM mgp4591 This has been fun to read and inspirational to boo... Jul 12 2015, 04:58 PM trojanhorsepower Thanks, glad you are enjoying it.
The center tunne... Jul 12 2015, 05:47 PM trojanhorsepower After Okteenerfest inspiration and some mild chast... Sep 20 2015, 04:53 PM 3d914 Making nice progress. Keep at it! Hopefully yo... Sep 20 2015, 06:27 PM trojanhorsepower Build-Off Challenge begins! Oct 1 2015, 07:38 PM r_towle Keep those doors in place now as you do the rest o... Oct 1 2015, 07:44 PM trojanhorsepower My Tasks:
Finish rust repair
Blast
Primer
Paint in... Oct 1 2015, 07:47 PM  |
1 User(s) are reading this topic (1 Guests and 0 Anonymous Users)
0 Members:

|
Lo-Fi Version | Time is now: 10th May 2026 - 12:52 PM |
Invision Power Board
v9.1.4 © 2026 IPS, Inc.