|
|
|
Porsche, and the Porsche crest are registered trademarks of Dr. Ing. h.c. F. Porsche AG.
This site is not affiliated with Porsche in any way. Its only purpose is to provide an online forum for car enthusiasts. All other trademarks are property of their respective owners. |
|
|

  |

| CptTripps |
 Jan 25 2014, 01:27 PM Jan 25 2014, 01:27 PM
Post
#1
|
|
:: Punch and Pie ::  Group: Members Posts: 3,585 Joined: 26-December 04 From: Tuscaloosa, AL and Akron, OH Member No.: 3,342 Region Association: Upper MidWest |
I had an idea a few weeks ago to re-fit the front light bucket with a more substantial light pack. LED...bright...yada yada.
Found a set of "cat eye" amber LEDs on eBay and the sizing was close enough, I figured I'd give it a try. They showed up yesterday and immediately I could tell that these would likely work REAL well. But how was I going to mount them? Attached thumbnail(s) 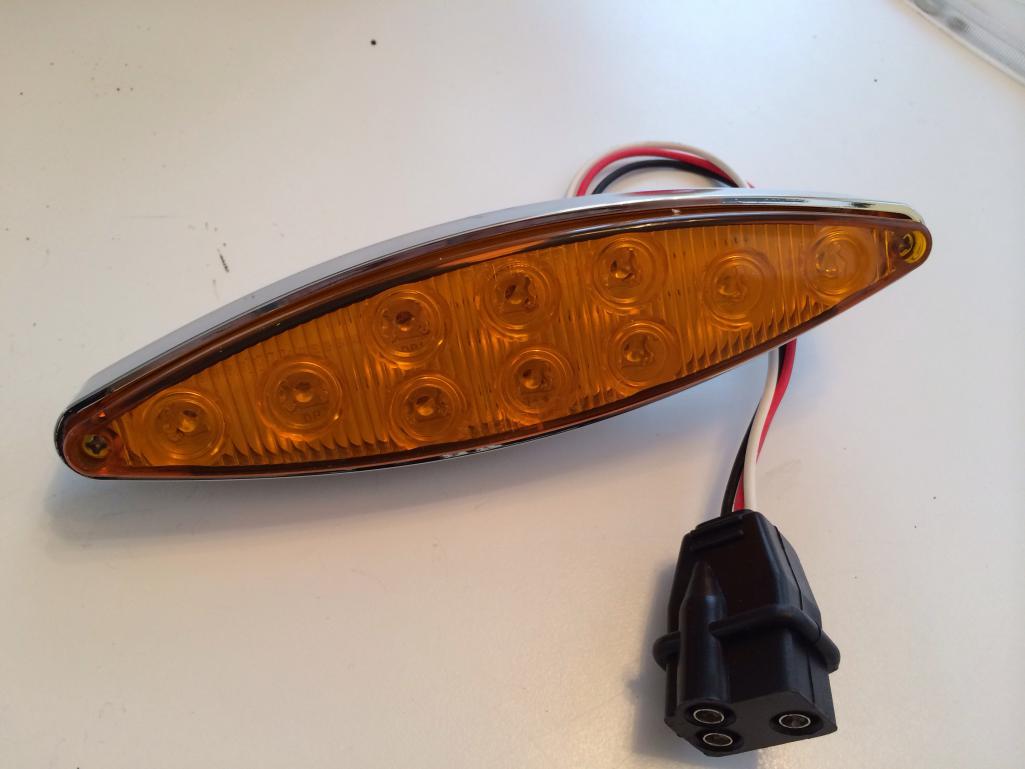
|
   |

 
|
| CptTripps |
Jan 25 2014, 01:29 PM
Post
#2
|
|
:: Punch and Pie :: Group: Members Posts: 3,585 Joined: 26-December 04 From: Tuscaloosa, AL and Akron, OH Member No.: 3,342 Region Association: Upper MidWest |
After some tinkering, I realized that I may have been over-complicating things. I had everything I needed right here.
I started tearing them down. Great quality on the packs BTW. Dot approved, so you Californians can use them. (No "off road only" disclaimer. Attached thumbnail(s) 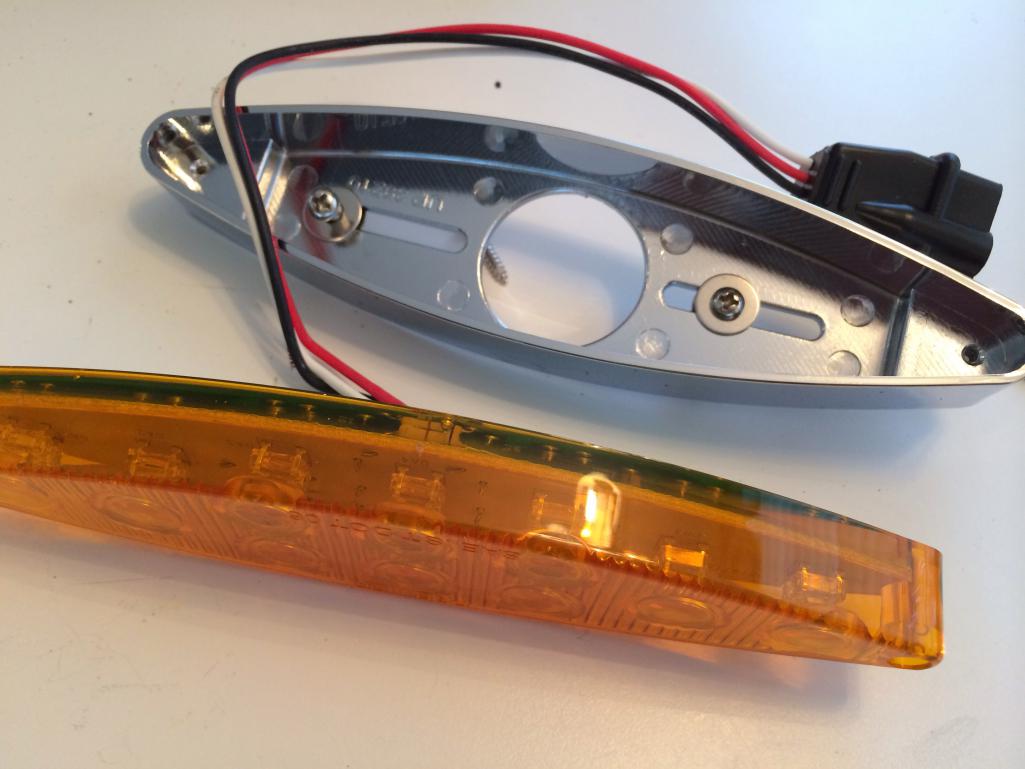 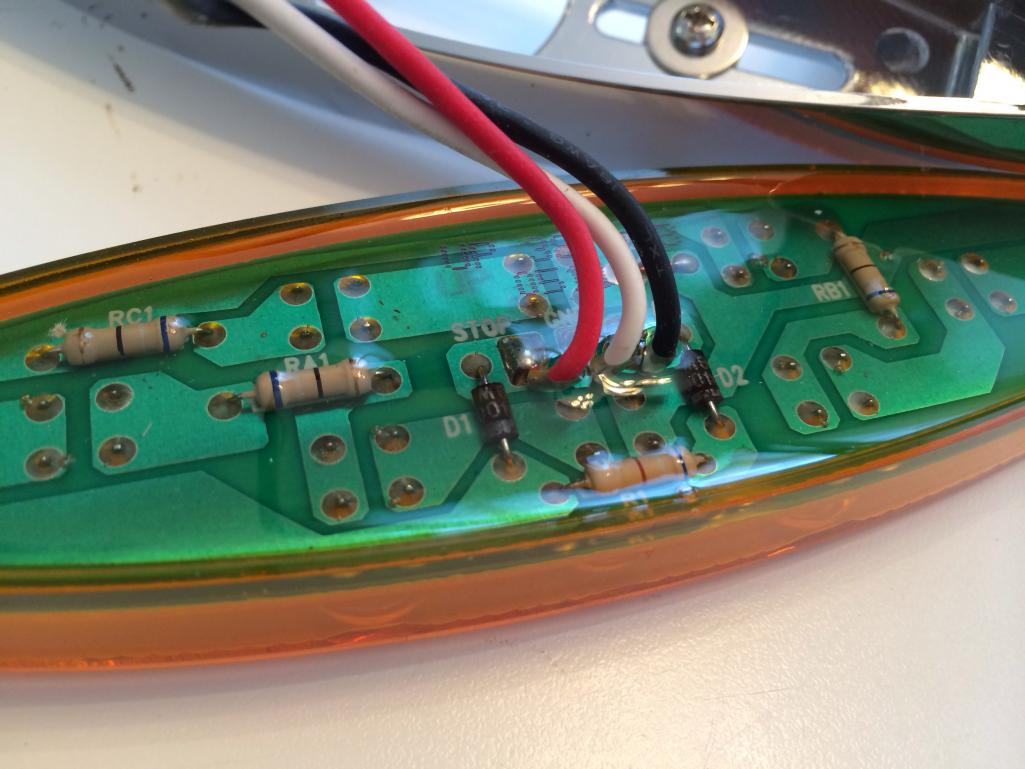
|
|
|
|
| CptTripps |
Jan 25 2014, 01:32 PM
Post
#3
|
|
:: Punch and Pie :: Group: Members Posts: 3,585 Joined: 26-December 04 From: Tuscaloosa, AL and Akron, OH Member No.: 3,342 Region Association: Upper MidWest |
Took the housing and flipped it upside-down. It was almost perfect to use as a mount inside the bucket, but needed a little dremeling.
I just took enough off of one edge that it sits in there at an angle. This will let it be more at a right angle for the benefit of other cars that need to see you. Attached thumbnail(s) 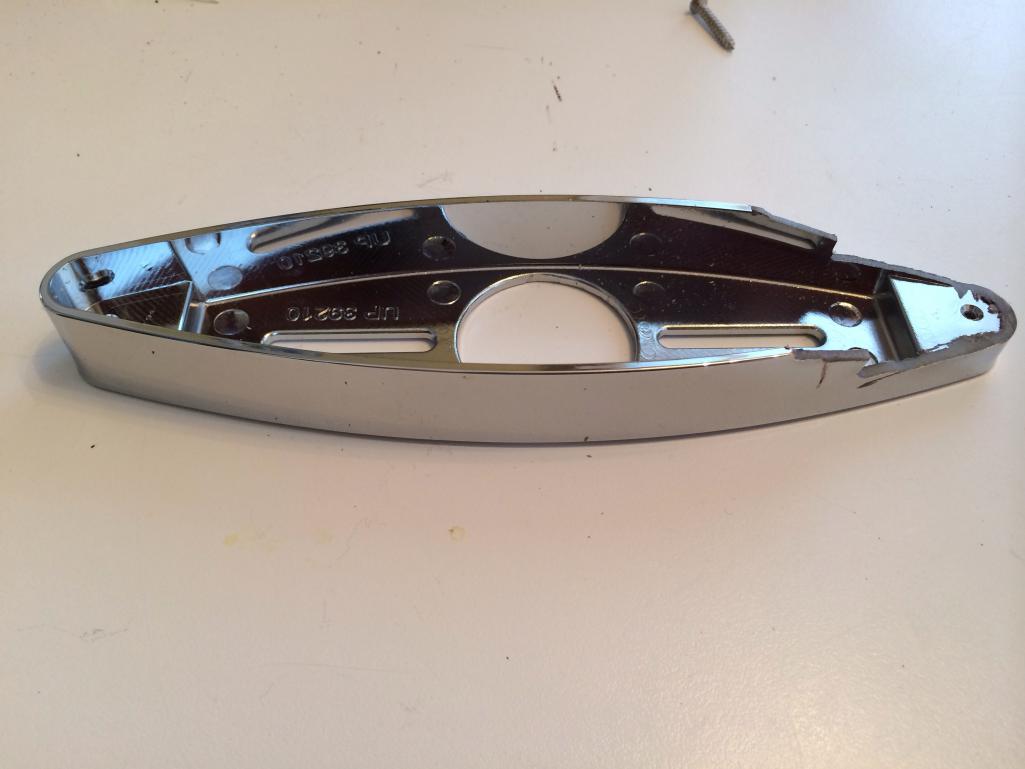
|
|
|
|
| CptTripps |
Jan 25 2014, 01:35 PM
Post
#4
|
|
:: Punch and Pie :: Group: Members Posts: 3,585 Joined: 26-December 04 From: Tuscaloosa, AL and Akron, OH Member No.: 3,342 Region Association: Upper MidWest |
After just a few min, I had it hot-glued into position to test out.
I'll epoxy it in later, but I want to try adding white lights behind this mount at some point. I may be able to do a cool "halo" for DRLs. Later for that though. Attached thumbnail(s) 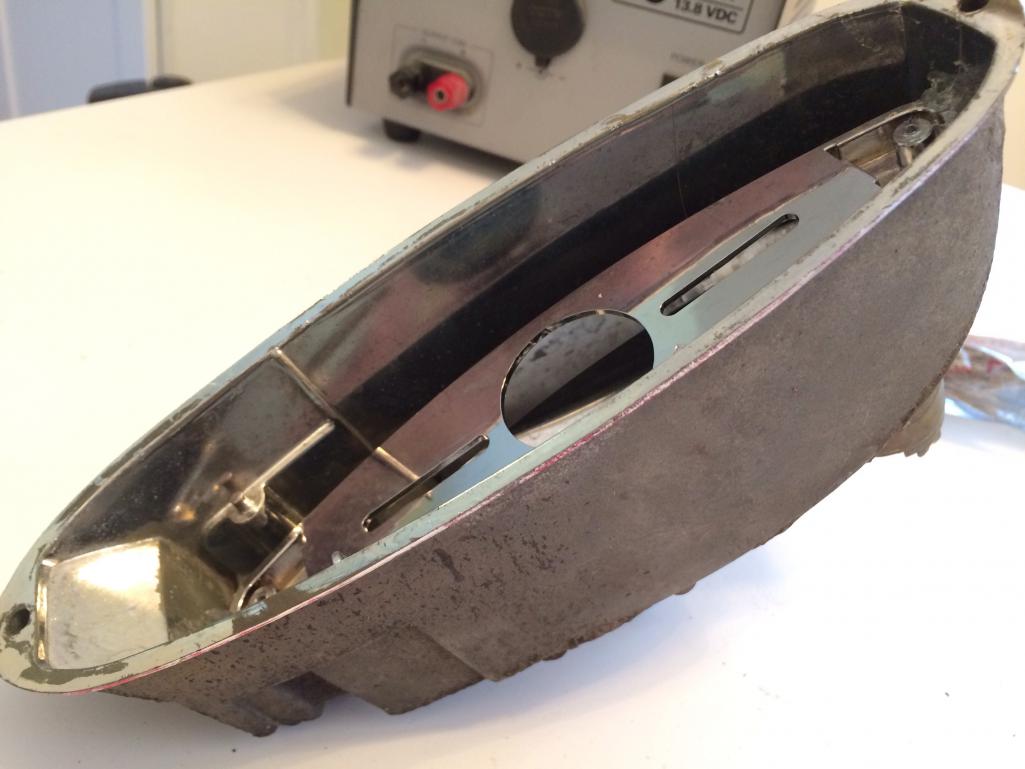  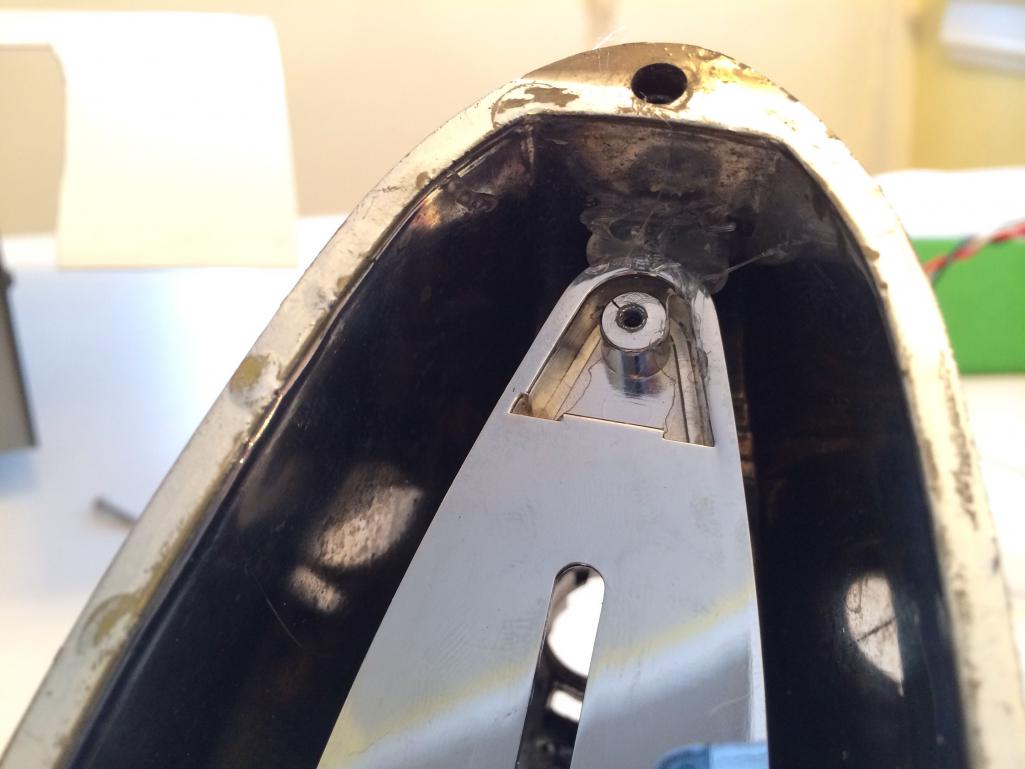
|
|
|
|
| CptTripps |
Jan 25 2014, 01:38 PM
Post
#5
|
|
:: Punch and Pie :: Group: Members Posts: 3,585 Joined: 26-December 04 From: Tuscaloosa, AL and Akron, OH Member No.: 3,342 Region Association: Upper MidWest |
Because the screw holes on the mount go all the way through, you can just screw it back on to the back side. The whole thing mounts up perfectly.
Eventually, I'll also re-incorporate the stock electrical hookups. But that's a "nice to have" and I'm sure some enterprising chap will start making up kits for something like this pretty soon, but really we're only talking about 15min of work here. (I left my soldering iron at the office, and need to break this all down anyways...so I didn't take it too far.) Attached thumbnail(s) 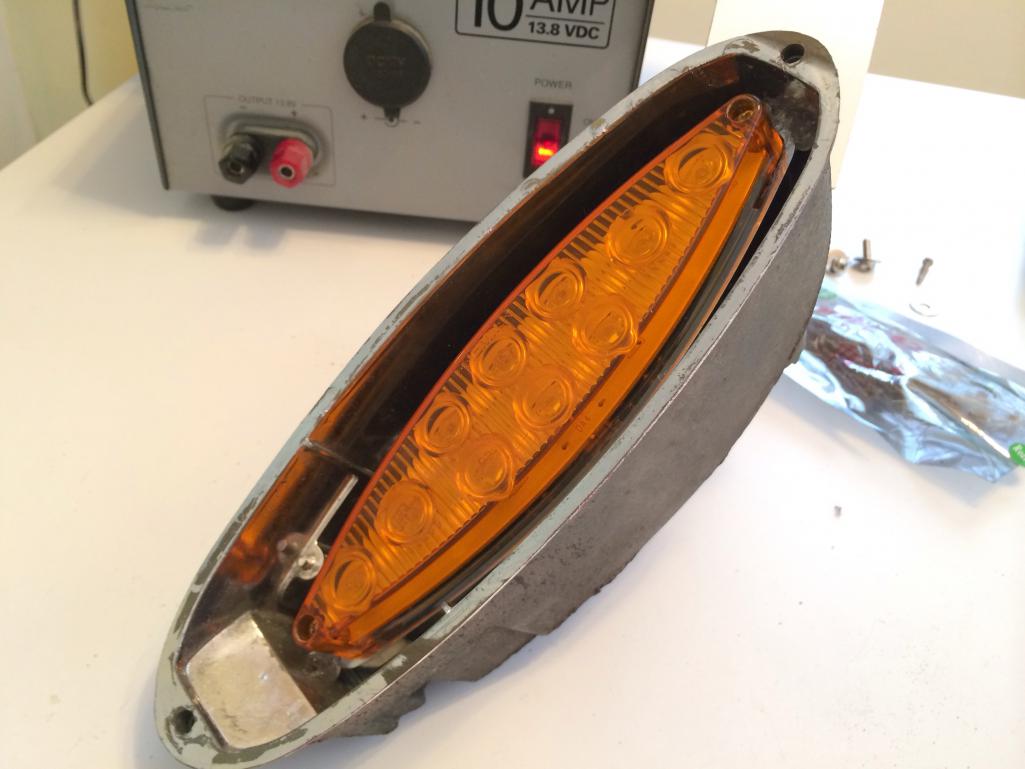 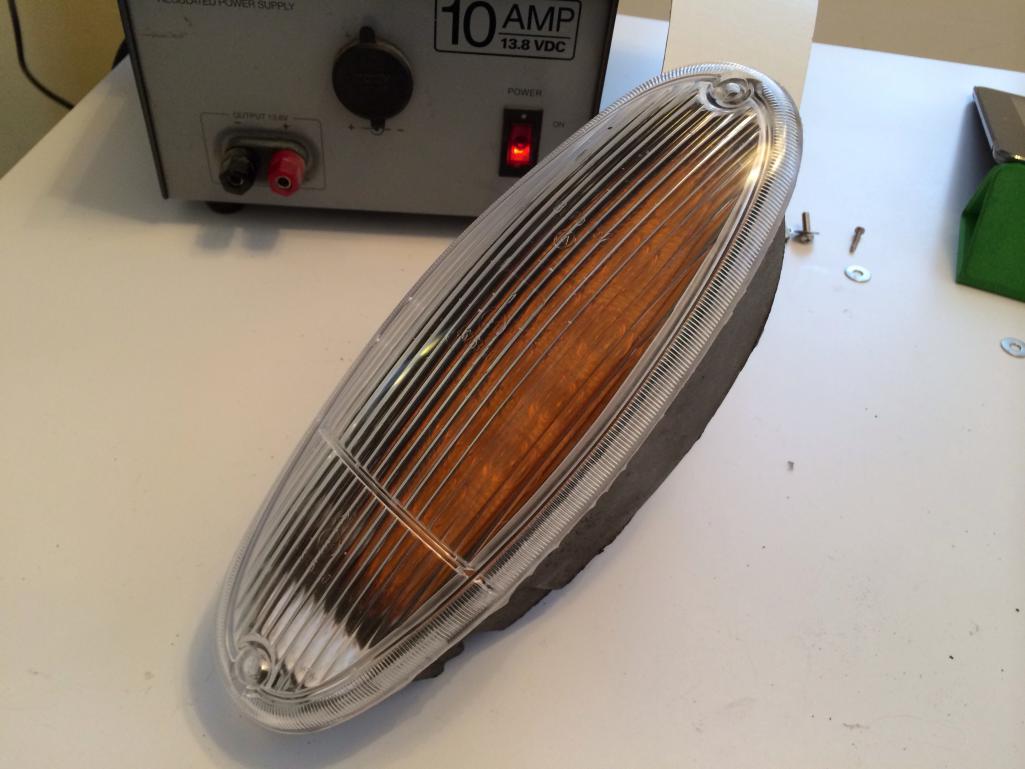 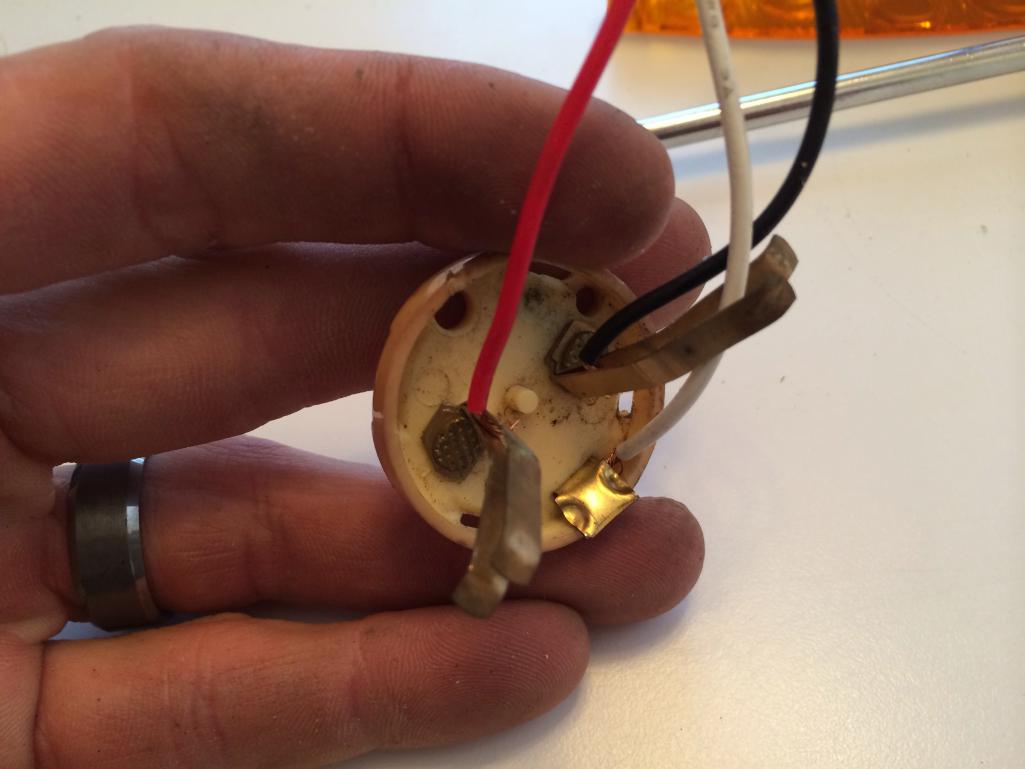
|
|
|
|
| CptTripps |
Jan 25 2014, 01:42 PM
Post
#6
|
|
:: Punch and Pie :: Group: Members Posts: 3,585 Joined: 26-December 04 From: Tuscaloosa, AL and Akron, OH Member No.: 3,342 Region Association: Upper MidWest |
And here's what it looks like with power. You can tell the difference between the running and flasher. Very visible at any angle. More so than the stock bulb I believe.
In the end, I think I have $25 into this project. That's pretty cool of you ask me. https://www.youtube.com/watch?v=K80jWrQ03p0 Attached thumbnail(s)  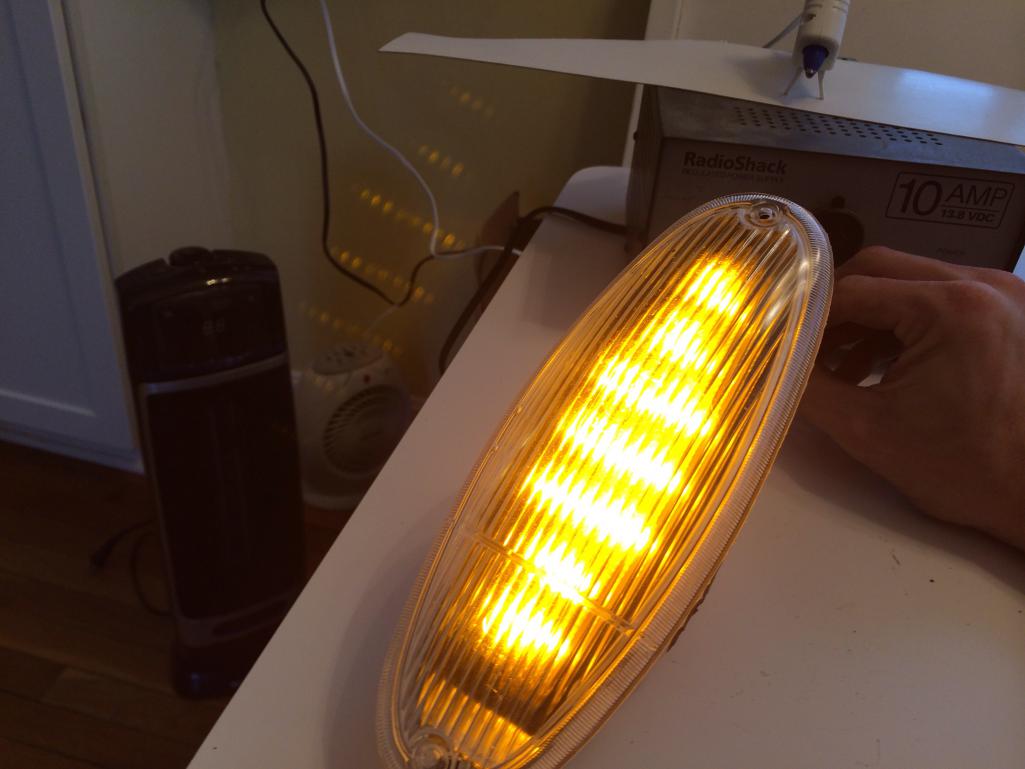
|
|
|
|
| CptTripps |
Jan 25 2014, 01:44 PM
Post
#7
|
|
:: Punch and Pie :: Group: Members Posts: 3,585 Joined: 26-December 04 From: Tuscaloosa, AL and Akron, OH Member No.: 3,342 Region Association: Upper MidWest |
I'm going to break it all down now because I still need to media blast the buckets and possibly re-chrome or paint them.
So...that's all I got. Hope it was helpful. |
|
|
|
| kid914 |
Jan 25 2014, 01:52 PM
Post
#8
|
|
ALWAYS lead...NEVER follow!!!! Group: Members Posts: 2,535 Joined: 9-March 11 From: Canada Member No.: 12,811 Region Association: Canada |
VERY NIIIIICE! for 25$ you can't beat that. Great job and nice write up.
another project..:-) e bay here I come.. Thanks |
|
|
|
| Harpo |
Jan 25 2014, 02:20 PM
Post
#9
|
|
Senior Member Group: Members Posts: 1,304 Joined: 21-August 11 From: Motor City aka Detroit Member No.: 13,469 Region Association: None |
Love it. Off to ebay to find some "cat eye" led lights Any chance you have the EBAY # for those lights?
Thanks David |
|
|
|
| r_towle |
Jan 25 2014, 02:34 PM
Post
#10
|
|
Custom Member Group: Members Posts: 24,705 Joined: 9-January 03 From: Taxachusetts Member No.: 124 Region Association: North East States |
Bummer, I thought you were going to use the horizontal in place of the round headlights....pop up and all....
Which would be cool... |
|
|
|
| Chris H. |
Jan 25 2014, 02:48 PM
Post
#11
|
|
Senior Member Group: Members Posts: 4,068 Joined: 2-January 03 From: Chicago 'burbs Member No.: 73 Region Association: Upper MidWest |
AWESOME. Looks great.
|
|
|
|
| bulitt |
Jan 25 2014, 03:11 PM
Post
#12
|
|
Achtzylinder Group: Members Posts: 4,189 Joined: 2-October 11 Member No.: 13,632 Region Association: South East States |
Thought I read somewhere the whole turn signal blinky circuit was dependent on sensing the resistance in the bulbs??? No??
Hope it works! |
|
|
|
| dangrouche |
Jan 25 2014, 03:24 PM
Post
#13
|
|
dangrouche Group: Members Posts: 550 Joined: 1-May 04 From: San Francisco Bay Area Member No.: 2,012 Region Association: None |
here's the clear lens version; but its $39 for the pair. This way, you won't need the Italian lenses.
http://www.ebay.com/sch/6000/i.html?_nkw=c...+LED&_rdc=2 |
|
|
|
| 76-914 |
Jan 25 2014, 03:48 PM
Post
#14
|
|
Repeat Offender & Resident Subaru Antagonist Group: Members Posts: 13,815 Joined: 23-January 09 From: Temecula, CA Member No.: 9,964 Region Association: Southern California |
(IMG:style_emoticons/default/thumb3d.gif) I like it!
|
|
|
|
| Chris H. |
Jan 25 2014, 04:10 PM
Post
#15
|
|
Senior Member Group: Members Posts: 4,068 Joined: 2-January 03 From: Chicago 'burbs Member No.: 73 Region Association: Upper MidWest |
On the way to classic thread after ~3 hours....
Question...(edited so it made sense) I was looking at both the amber lens and clear lens LED setups on e-bay as Dan pointed out...both have amber LEDs...does it actually matter which we use with an amber stock 914 outer lens (IMG:style_emoticons/default/confused24.gif) ? Thought it was best for the LEDs to be the same color underneath the outer lens... Paging Spoke... |
|
|
|
| CptTripps |
Jan 25 2014, 07:52 PM
Post
#16
|
|
:: Punch and Pie :: Group: Members Posts: 3,585 Joined: 26-December 04 From: Tuscaloosa, AL and Akron, OH Member No.: 3,342 Region Association: Upper MidWest |
I've still got my amber lenses. I'll throw them on tomorrow and take another vid to compare.
Originally, I was going to split the Marker and Flasher up so a few were on all the time, as the others flashed, but seeing how this is made, I can't imagine trying to do it. Now...I will say that I think there's definitely the possibility that someone :::coughSPOKEcough::: could make something similar that may work better. This is just a way to do something now with minimal effort. I'd love for there to be something about the size of the entire bucket that had a row of DRLs and maybe a different pattern, but I'm happy with this for now. I'm going to make the custom lenses I was dreaming up tomorrow. We'll see how that goes. |
|
|
|
| Spoke |
Jan 25 2014, 09:56 PM
Post
#17
|
|
Jerry Group: Members Posts: 7,268 Joined: 29-October 04 From: Allentown, PA Member No.: 3,031 Region Association: None |
Looks pretty cool.
Doug, could you take a pic of the entire back of the unit? I am trying to see how they wired the LEDs. It is always possible to change the wiring on the board. We can definitely do something custom to better fit your application. |
|
|
|
| CptTripps |
Jan 25 2014, 10:09 PM
Post
#18
|
|
:: Punch and Pie :: Group: Members Posts: 3,585 Joined: 26-December 04 From: Tuscaloosa, AL and Akron, OH Member No.: 3,342 Region Association: Upper MidWest |
It's not a matter of seeing the board...it's that the board is encased under 1/4" of epoxy!
I'll take a pic tomorrow though. |
|
|
|
| effutuo101 |
Jan 25 2014, 10:16 PM
Post
#19
|
|
Advanced Member Group: Members Posts: 2,737 Joined: 10-April 05 From: Lemon Grove Member No.: 3,914 Region Association: Southern California |
(IMG:style_emoticons/default/wub.gif)
Nice work Doug! |
|
|
|
| SirAndy |
Jan 25 2014, 10:58 PM
Post
#20
|
|
Resident German Group: Admin Posts: 42,358 Joined: 21-January 03 From: Oakland, Kalifornia Member No.: 179 Region Association: Northern California |
QUOTE(bulitt @ Jan 25 2014, 01:11 PM)  Thought I read somewhere the whole turn signal blinky circuit was dependent on sensing the resistance in the bulbs??? No?? (IMG:style_emoticons/default/agree.gif) I thought so too. Maybe not? (IMG:style_emoticons/default/confused24.gif) I was under the impression that a certain amount of current draw was needed for it to work correctly ... (IMG:style_emoticons/default/idea.gif) |
 |
|
|
1 User(s) are reading this topic (1 Guests and 0 Anonymous Users)
0 Members:

|
Lo-Fi Version | Time is now: 7th November 2025 - 08:22 PM |
Invision Power Board
v9.1.4 © 2025 IPS, Inc.