|
|
|
Porsche, and the Porsche crest are registered trademarks of Dr. Ing. h.c. F. Porsche AG.
This site is not affiliated with Porsche in any way. Its only purpose is to provide an online forum for car enthusiasts. All other trademarks are property of their respective owners. |
|
|

  |

| Doug Leggins |
 Jan 5 2005, 09:18 PM Jan 5 2005, 09:18 PM
Post
#1
|
|
Senior Member  Group: Benefactors Posts: 1,358 Joined: 6-February 03 From: Nashville, Indiana Member No.: 261 Region Association: None |
I've got the fresh air box and fan all cleaned up, painted and ready to install. I cannot get the bolt in the driver's side cowl bracket. I just can't get the box in a position that will allow for the threaded insert in the box to line up with the hole in bracket. With enough persuasion I was able to get the passenger side bolt started but no go on the driver's side so far. Any suggestions?
I seem to be having some interference between the wiper motor and the pad on the back side of the air box fan. It looks to me that the pad is there to keep the wiper motor and fan housing from rattling. Should the fan housing pad make contact with the wiper motor creating a snug fit? Attached image(s) 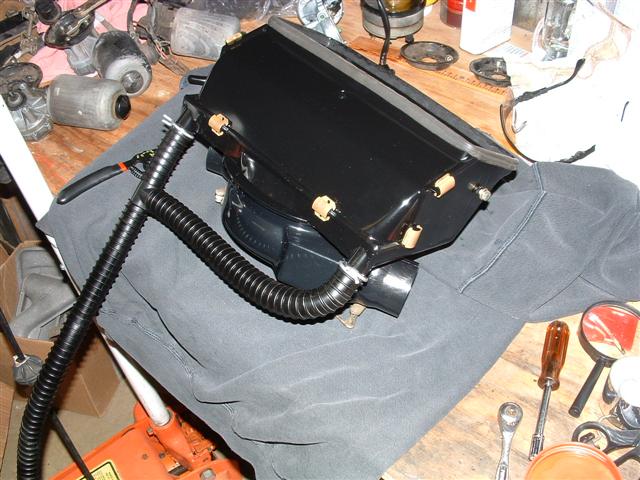
|
   |

 
|
| Joseph Mills |
Jan 5 2005, 10:02 PM
Post
#2
|
|
on a Sonoma diet now... Group: Members Posts: 1,482 Joined: 29-December 02 From: Oklahoma City, OK Member No.: 39 |
That sounds frustrating. I can't help you because I've never done it. But I'm sure someone with experience will jump in soon.
You did a good job on the paint and cleanup. Good luck with it. |
|
|
|
| SirAndy |
Jan 5 2005, 11:10 PM
Post
#3
|
|
Resident German Group: Admin Posts: 41,606 Joined: 21-January 03 From: Oakland, Kalifornia Member No.: 179 Region Association: Northern California |
hmmm, i did this a while ago and i don't recall clearance problems with the wiper motor.
make sure the fan part is in the correct position/angle in regards to the top housing. there's only one correct way to mount it to fit flush. also, i had some trouble with the fitting first because the top seal was binding at the "lip" that goes around the cowl opening. make sure the top of the assembly "snaps" into place with the seal sitting flust all around the cowl opening. if the seal/top is in a bind, the holes for the 2 bolts won't line up ... (IMG:http://www.914world.com/bbs2/html/emoticons/wink.gif) Andy |
|
|
|
| Gint |
Jan 5 2005, 11:45 PM
Post
#4
|
|
Mike Ginter Group: Admin Posts: 16,066 Joined: 26-December 02 From: Denver CO. Member No.: 20 Region Association: Rocky Mountains |
Great question. Thanks for posting it. I've pulled a few and they were all a royal bitch. I'm not really looking forward to trying to get that and the wiper motor/arm assembly back into my freshly painted tub.
|
|
|
|
| markb |
Jan 6 2005, 01:59 AM
Post
#5
|
||
|
914less :( Group: Members Posts: 5,449 Joined: 22-January 03 From: Nipomo, CA Member No.: 180 Region Association: Central California |
This is the problem I had, too. |
||
|
|
|
||
| Joe Ricard |
Jan 6 2005, 06:41 AM
Post
#6
|
|
CUMONIWANNARACEU Group: Members Posts: 6,811 Joined: 5-January 03 From: Gautier, MS Member No.: 92 |
I will have to look tonight but it seems the lower half of the unit is angled odd. Might just be the picture angle. There is a notch in the upper and lower sections for the electrical wire to pass through. When this lines up you are good. The screws don't both go in the same hole. One side goes in the front hole one side goes in the back hole. The seal should be centered in the cowl opening.
|
|
|
|
| jim912928 |
Jan 6 2005, 09:31 AM
Post
#7
|
|
Senior Member Group: Members Posts: 1,485 Joined: 8-January 04 From: Granger, IN Member No.: 1,536 Region Association: Upper MidWest |
Did mine....I had more bloody knuckles from this job then most. I didn't have a major problem mounting the unit (once I got good enough to finnagle it on without binding up the seal). The real hard part is going to be putting on those friggan cables and adjusting them correctly...now that was a PIA!. I do vaguely remember that I had problems when I tried to set it in and bring it up versus sliding it in with the seal rubbing the cowl area. It took a bunch of attempts of sliding it in.
Sorry I'm not more help then that...just one of those jobs that you like to forget! |
|
|
|
| jim912928 |
Jan 6 2005, 09:40 AM
Post
#8
|
|
Senior Member Group: Members Posts: 1,485 Joined: 8-January 04 From: Granger, IN Member No.: 1,536 Region Association: Upper MidWest |
Also check the position of the motor/fan assembly on the box. I can't tell from that picture and my car is 2 miles away in storage. But the electrical connection side goes in the back (towards the firewall). I can't remember if the connectors are on the bottom of that square area in your pic near the hose outlet. If it is, then flip the fan assembly around.
|
|
|
|
| agrump |
Jan 6 2005, 09:51 AM
Post
#9
|
|
Member Group: Members Posts: 141 Joined: 13-November 04 From: Atlanta, GA Member No.: 3,103 |
I did mine a couple of weeks ago. The gasket was binding on the lip as mentioned. I found it easier to install the box at a slight angle. The drivers side went in first and I loosely put in the bolt before getting the passenger side in. To get the clip on the cable secure I found that a medical forceps with a curved edge worked great for snapping it in place.
|
|
|
|
| Joe Ricard |
Jan 6 2005, 10:27 AM
Post
#10
|
|
CUMONIWANNARACEU Group: Members Posts: 6,811 Joined: 5-January 03 From: Gautier, MS Member No.: 92 |
Yup what Jim said. Now that I read what Jim said I can see it is not the picture that is angled funny. It is the lower assembly 180 out.
|
|
|
|
| Doug Leggins |
Jan 6 2005, 11:00 AM
Post
#11
|
|
Senior Member Group: Benefactors Posts: 1,358 Joined: 6-February 03 From: Nashville, Indiana Member No.: 261 Region Association: None |
Thanks for the tips.
As several of you mentioned, I was also experiencing trouble getting the seal to fit around the cowl opening correctly. I was able to get that snap in place feel on the pass side but just couldn't get the driver's side to get there. I'll pay more attention to this area when I try this again tonight. I'm certain that the fan is attached in the correct orientation. The notches for the electrical wires are lined up. The harness connection for the fan is located on the back side of the fan on the passenger side of the car. Gint - I too was not loking forward to this task. Made the mistake of reading that post listing the most difficult/PITA task that folks have done on their cars. The fresh air/defrost assembly under the cowl came up frequently -and now I too know why! And yes a freshly painted tub definately wrenches on the nerves a bit. And the fact that I have already broken one freshly painted air box assembly trying to install the drain tubes has really made this a trying task. But hey - It's still fun!!! just slow! |
|
|
|
| Kerrys914 |
Jan 6 2005, 11:04 AM
Post
#12
|
|
Dear, the parts I just sold paid for that part ;) Group: Members Posts: 1,568 Joined: 26-December 02 From: Williamsburg, VA Member No.: 16 |
Mine came out in 2002 and has never made it back into the car. It wasn't becasue a lack of trying... (IMG:http://www.914world.com/bbs2/html/emoticons/headbang.gif) (IMG:http://www.914world.com/bbs2/html/emoticons/headbang.gif) (IMG:http://www.914world.com/bbs2/html/emoticons/headbang.gif) (IMG:http://www.914world.com/bbs2/html/emoticons/smash.gif) (IMG:http://www.914world.com/bbs2/html/emoticons/smash.gif) (IMG:http://www.914world.com/bbs2/html/emoticons/smash.gif) (IMG:http://www.914world.com/bbs2/html/emoticons/smash.gif) (IMG:http://www.914world.com/bbs2/html/emoticons/smash.gif) (IMG:http://www.914world.com/bbs2/html/emoticons/smash.gif) (IMG:http://www.914world.com/bbs2/html/emoticons/smash.gif)
I Didn't need no freaking fresh air anyway |
|
|
|
| JmuRiz |
Jan 6 2005, 11:13 AM
Post
#13
|
|
914 Guru Group: Members Posts: 5,424 Joined: 30-December 02 From: NoVA Member No.: 50 Region Association: MidAtlantic Region |
what's the best way to get those darn C-clips that hold the box together back on. I took mine apart once and couldn't for the life of me get those things back on, I think it's just on there by tension now. Also is there supposed to be a 'grate' on top of the air opening, mine doesn't have one (probably lead to the burnt up fresh air motor).
BTW that box looks good. Are you installing w/ the fuel tank out? Supposedly easier, although i did mine w/ it in. |
|
|
|
| Doug Leggins |
Jan 6 2005, 11:44 AM
Post
#14
|
||
|
Senior Member Group: Benefactors Posts: 1,358 Joined: 6-February 03 From: Nashville, Indiana Member No.: 261 Region Association: None |
I couldn't get them reinstalled at first. I painted the clips with the Golden Cad paint set up from Eastwood and didn't want to scratch them up. I bought a tool from Sears that is used to install/remove external and internal ring clips. This tool worked great! And I have wanted one of these tools for a while! The grate was added on later cars, starting in 73 i think. I like the look better without it so I am not going to install it in my car. The tank is out - definately would be more difficult with the tank in place. |
||
|
|
|
||
| SirAndy |
Jan 6 2005, 12:19 PM
Post
#15
|
||
|
Resident German Group: Admin Posts: 41,606 Joined: 21-January 03 From: Oakland, Kalifornia Member No.: 179 Region Association: Northern California |
they slide in reallt easy from the side! no need to try to pry them open and snap them on. on a clean box, just use some wd40 and they will slide right on from the side. 5 sec. for each of them ... (IMG:http://www.914world.com/bbs2/html/emoticons/wink.gif) Andy |
||
|
|
|
||
| JmuRiz |
Jan 6 2005, 01:38 PM
Post
#16
|
|
914 Guru Group: Members Posts: 5,424 Joined: 30-December 02 From: NoVA Member No.: 50 Region Association: MidAtlantic Region |
Thanks, if I can find them again I'll give it a try! And I also like the look w/o it, so I'll probably just leave mine off (mine's a 73 but doesn't have it, maybe late 73 started it?)
|
|
|
|
| Doug Leggins |
Jan 6 2005, 09:28 PM
Post
#17
|
|
Senior Member Group: Benefactors Posts: 1,358 Joined: 6-February 03 From: Nashville, Indiana Member No.: 261 Region Association: None |
Wooo Hoooo!!!!!!
I got the air box installed. Even small victories feel good!!! Paying attention to the gasket and making sure that it was in the proper place around the cowl louvers was definately helpful. I was pushing and twisting with a significant amount of force and still just couldn't get it to line up so that I could get the drivers side bolt started. And then I pushed on the bracket to move it closer to the air box -WHAT A GREAT SITE I SAW THEN!!! The holes lined right up! The bracket must have been slightly "winged" out just enough to prevent the proper alignment. Sooooo, If your installing the air box make sure that the brackets under the cowl are not bent outward. It sure wasn't much that I moved mine, but it was that last little bit of movement that I needed. Attached image(s) 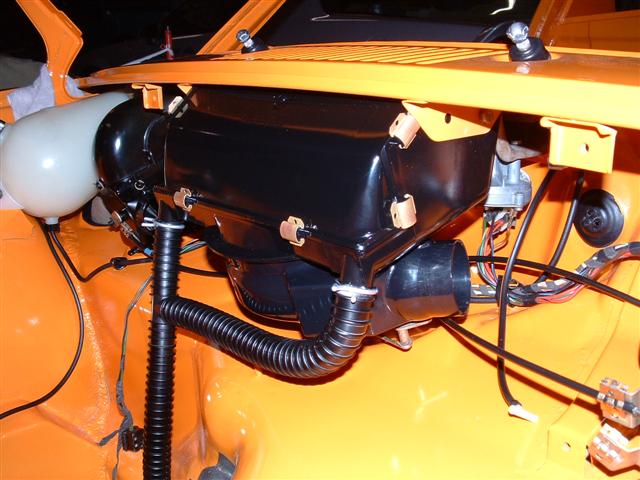
|
|
|
|
| Doug Leggins |
Jan 6 2005, 09:39 PM
Post
#18
|
|
Senior Member Group: Benefactors Posts: 1,358 Joined: 6-February 03 From: Nashville, Indiana Member No.: 261 Region Association: None |
The pad on the back side of the fan housing does rest against the wiper motor. But the motor and wiper assembly push back easily enough to allow for alignment.
Here's a pic of the pad on the fan housing. Attached image(s) 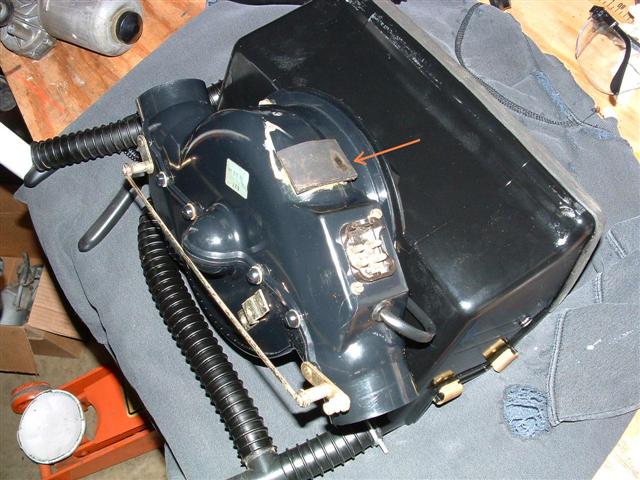
|
|
|
|
| Doug Leggins |
Jan 6 2005, 09:49 PM
Post
#19
|
|
Senior Member Group: Benefactors Posts: 1,358 Joined: 6-February 03 From: Nashville, Indiana Member No.: 261 Region Association: None |
This bracket did not look bent out at all. But just pushing it in a few degrees provided the last little bit of clearance that was needed.
Attached image(s) 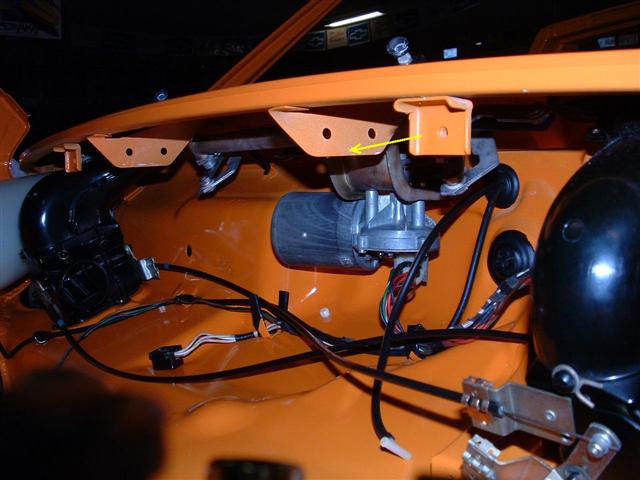
|
|
|
|
| SirAndy |
Jan 6 2005, 09:50 PM
Post
#20
|
||
|
Resident German Group: Admin Posts: 41,606 Joined: 21-January 03 From: Oakland, Kalifornia Member No.: 179 Region Association: Northern California |
schweet! (IMG:http://www.914world.com/bbs2/html/emoticons/smilie_pokal.gif) i hope you didn't have your car sandblasted. if so, it won't stay that nice and clean. ask me how i know ... (IMG:http://www.914world.com/bbs2/html/emoticons/sad.gif) Andy |
||
|
|
|
||
|
1 User(s) are reading this topic (1 Guests and 0 Anonymous Users)
0 Members:

|
Lo-Fi Version | Time is now: 28th April 2024 - 04:38 AM |
Invision Power Board
v9.1.4 © 2024 IPS, Inc.