|
|
|
Porsche, and the Porsche crest are registered trademarks of Dr. Ing. h.c. F. Porsche AG.
This site is not affiliated with Porsche in any way. Its only purpose is to provide an online forum for car enthusiasts. All other trademarks are property of their respective owners. |
|
|

  |

| StratPlayer |
 Oct 31 2014, 08:11 PM Oct 31 2014, 08:11 PM
Post
#141
|
|
StratPlayer  Group: Members Posts: 3,265 Joined: 27-December 02 From: SLC, Utah Member No.: 27 Region Association: Rocky Mountains |
Cool
|
   |

 
|
| Spoke |
Oct 31 2014, 09:24 PM
Post
#142
|
|
Jerry Group: Members Posts: 6,977 Joined: 29-October 04 From: Allentown, PA Member No.: 3,031 Region Association: None |
I'm done with the first and only set of prototype Euro LEDs w/o blanking.
The running lights on this set stays on all the time that parking/head lights are on regardless of the turnsignals. No running light blanking. I'll sell this one and only Euro w/o blanking prototype set for $85 + $10 shipping (CONUS). Respond to this thread if you're interested and I'll PM you with details. |
|
|
|
| Harpo |
Nov 1 2014, 11:09 AM
Post
#143
|
|
Senior Member Group: Members Posts: 1,304 Joined: 21-August 11 From: Motor City aka Detroit Member No.: 13,469 Region Association: None |
I will take them
David |
|
|
|
| Nutter965 |
Nov 1 2014, 11:11 AM
Post
#144
|
|
Member Group: Members Posts: 139 Joined: 17-August 14 From: Uk Northern Ireland Member No.: 17,784 Region Association: None |
QUOTE(Spoke @ Oct 31 2014, 03:02 AM)  QUOTE(Nutter965 @ Oct 23 2014, 06:38 AM) Spoke, i'd like to use the US red rear lenses but with a euro lighting colors etc, any idea how well the amber shows up through the red ? The amber comes through the red lens ok but there is some loss of intensity. I did a little video to show the difference. Not sure if it's helpful. What's the reason for running amber LEDs behind a red lens? https://www.youtube.com/watch?v=ZwUs5VGk28U It would tie in nicely with my 965 it has (as they all do) full red rear lenses but the indicators show through amber as per normal, I do have a set of both lenses on for the road and one for the MOT over here, the better the amber shows the less I'll attract attention from the police (IMG:style_emoticons/default/biggrin.gif) |
|
|
|
| Spoke |
Nov 4 2014, 12:42 PM
Post
#145
|
|
Jerry Group: Members Posts: 6,977 Joined: 29-October 04 From: Allentown, PA Member No.: 3,031 Region Association: None |
Made some plastic clips for the front LEDs.
These will work different than the rear LEDs as the lens will hold the clips in place. There is virtually nothing to clip onto in the front buckets so these will rely on gravity and the lens in place. Also in the background is a board with RTV applied to hold the LEDs in place. The RTV isn't as solid as I would like but I haven't found anything else better to use. Attached thumbnail(s) 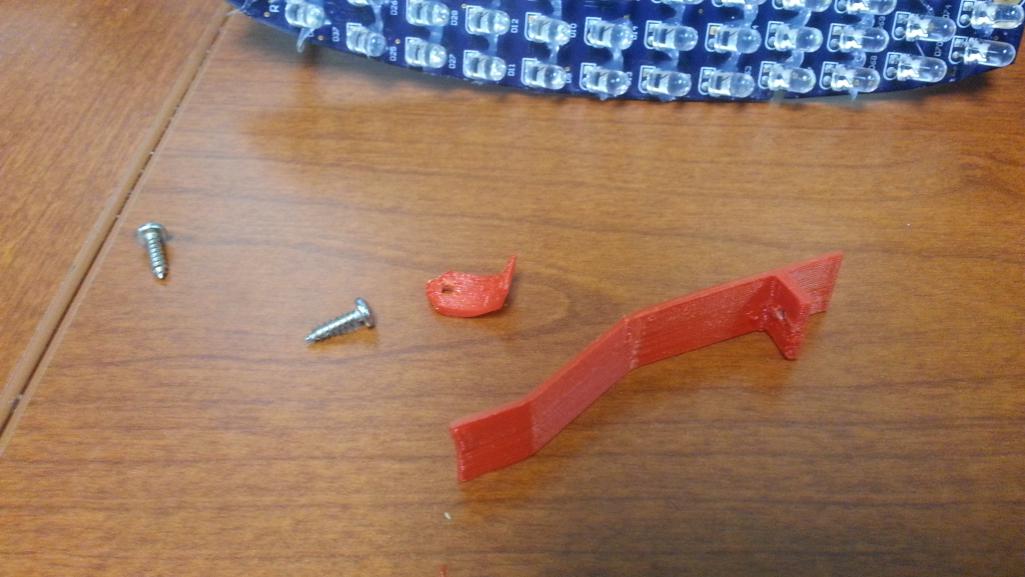
|
|
|
|
| Spoke |
Nov 4 2014, 12:49 PM
Post
#146
|
|
Jerry Group: Members Posts: 6,977 Joined: 29-October 04 From: Allentown, PA Member No.: 3,031 Region Association: None |
Installation should be easy. (IMG:style_emoticons/default/dry.gif)
The long clip goes in the back and the small clip goes in the front. Notice the small clip mounts to the top of the board and its screw comes up from the bottom. The reason for this is twofold; one so the board itself will contact the beveled part of the housing and help keep the board straight, and the screw, if screwed in from the top, would hit the beveled part of the housing. Both clips should be secured before installing the board. 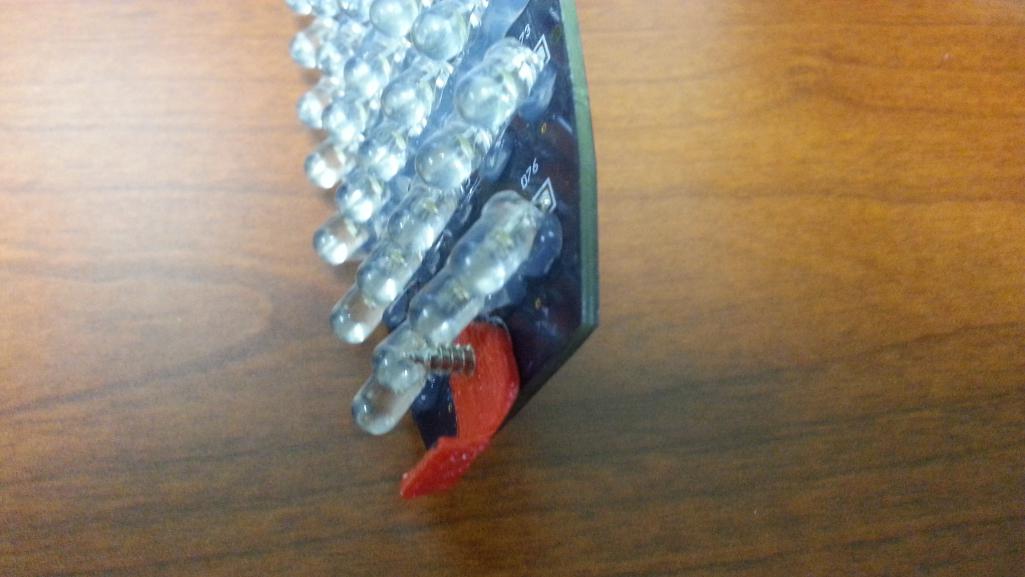 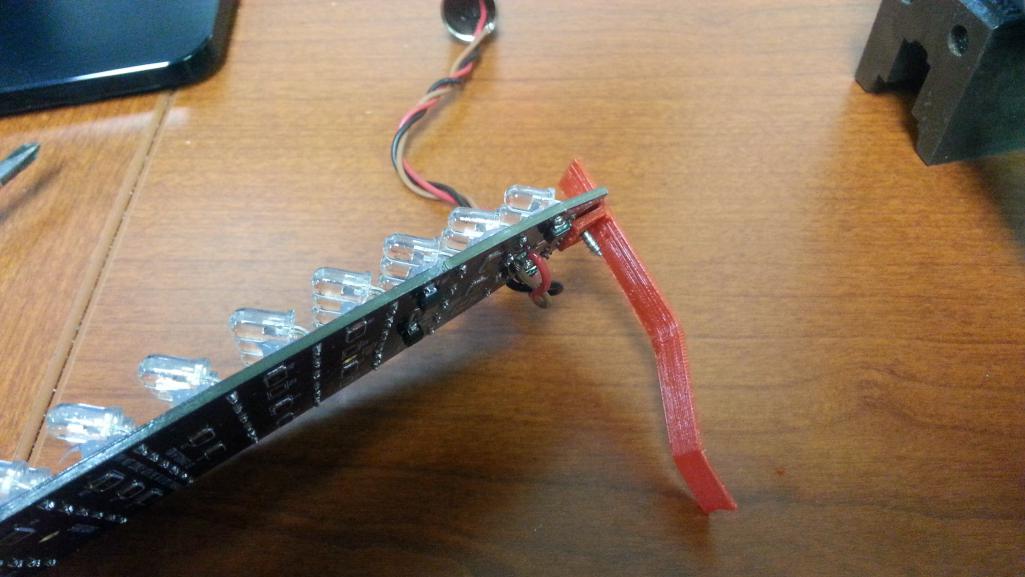 |
|
|
|
| Spoke |
Nov 4 2014, 01:02 PM
Post
#147
|
|
Jerry Group: Members Posts: 6,977 Joined: 29-October 04 From: Allentown, PA Member No.: 3,031 Region Association: None |
Once the clips are attached, the board is ready for installation.
First is to plug the board in to the existing socket. Push in the bulb base with the tip of your finger and twist until seated. The bulb base should go in easily. It might be worthwhile to practice with the existing bulb. These sockets are 40+ years old and may have a buildup of crud and oxidation. Clean the socket if necessary and use a small amount of lubricant like petroleum jelly to make sure the bulb installs easily. 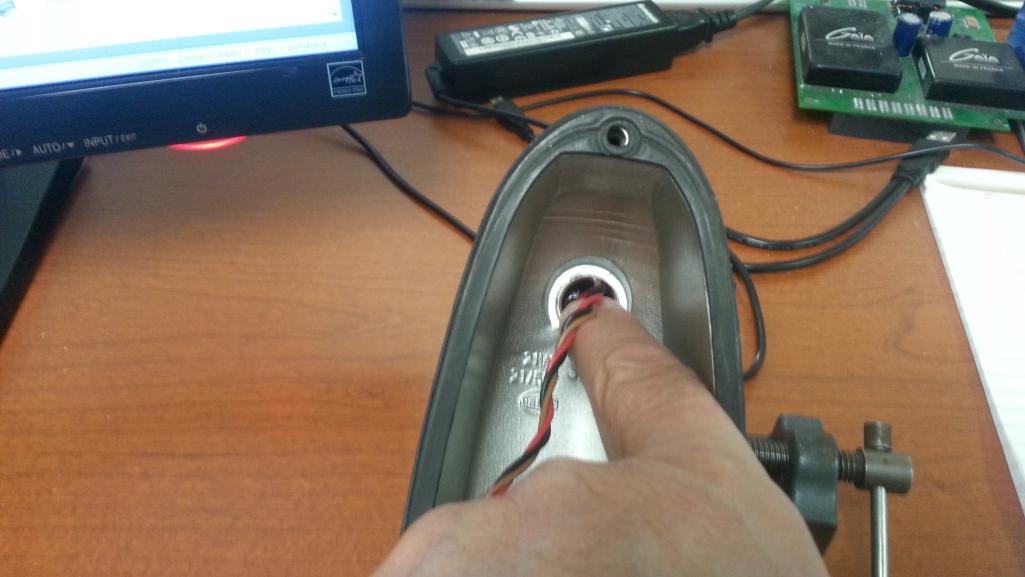 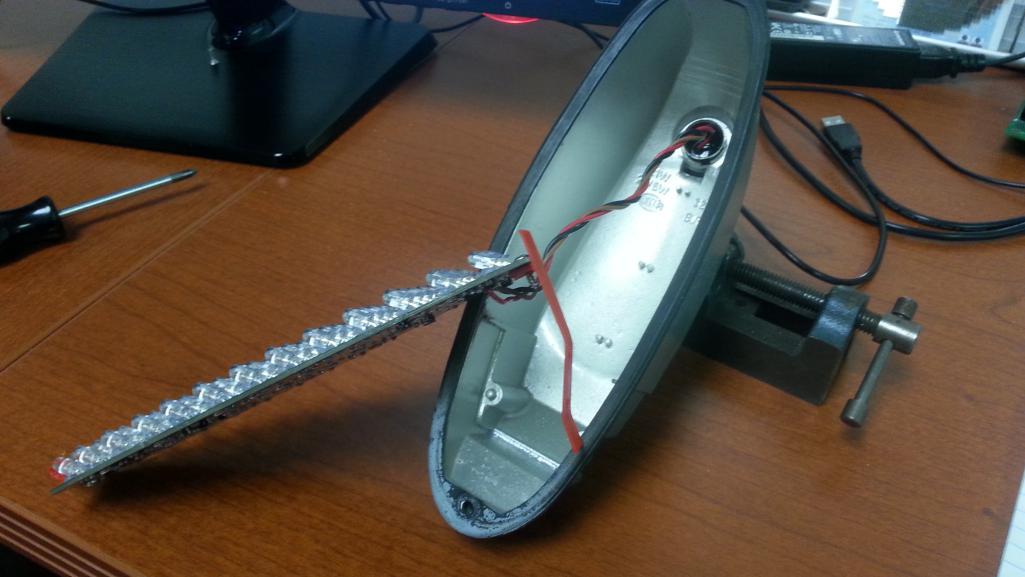 |
|
|
|
| Spoke |
Nov 4 2014, 01:08 PM
Post
#148
|
|
Jerry Group: Members Posts: 6,977 Joined: 29-October 04 From: Allentown, PA Member No.: 3,031 Region Association: None |
Once the board is plugged in, make sure the wire stays out of the way of the rear clip when installing.
Position the front of the board first. There are slots in the board that fit into the ribs of the bucket. Make sure the board is flush with the front and lower the rear of the board until the clip seats. Try not to push on the LEDs. Push on the clips if some force is necessary to seat the board. If you have to remove the board to reposition, do not grab the LEDs. Use a paper clip and get behind the board to remove it. Install the lens. 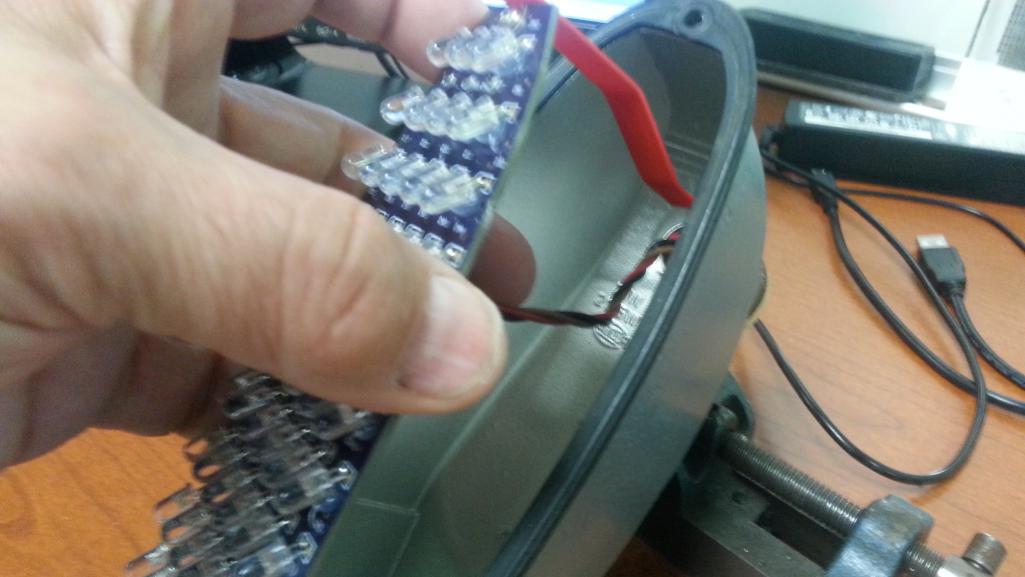 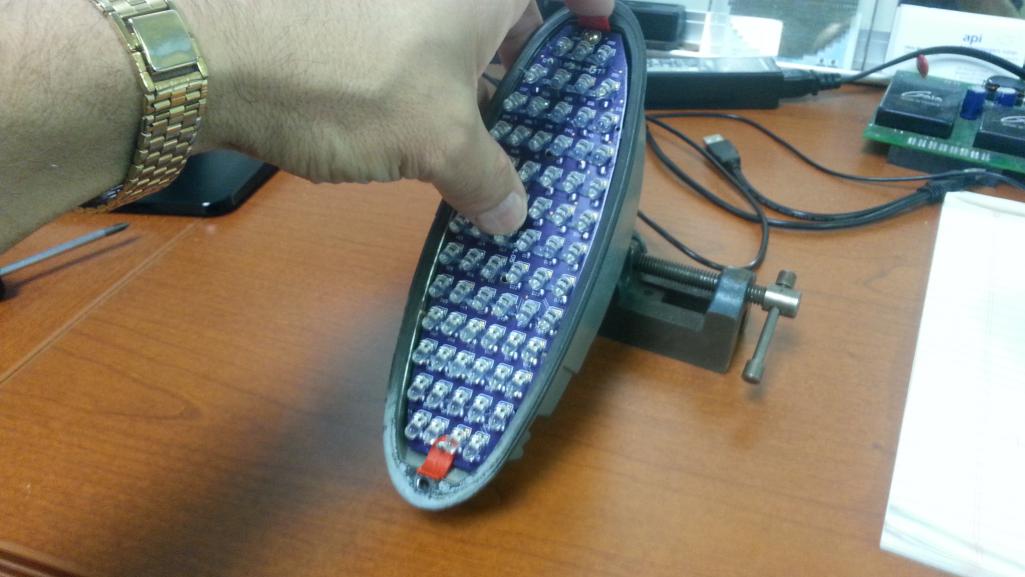 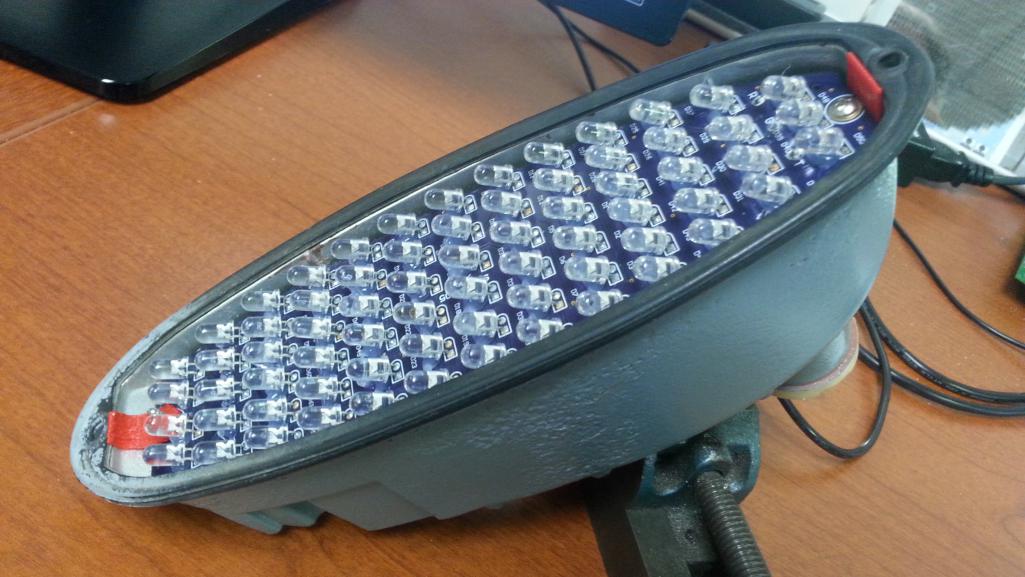 |
|
|
|
| montoya 73 2.0 |
Nov 4 2014, 01:52 PM
Post
#149
|
|
Lack of consideration to others, and Selfish! Group: Members Posts: 1,791 Joined: 27-October 04 From: Paso Robles, Ca. Member No.: 3,016 Region Association: Central California |
|
|
|
|
| Kansas 914 |
Nov 4 2014, 01:54 PM
Post
#150
|
|
Advanced Member Group: Members Posts: 2,999 Joined: 1-March 03 From: Durango, Colorado Member No.: 373 Region Association: Rocky Mountains |
I am in when these are ready - I have clear lenses up front but these should be fine.
Love the DRL! |
|
|
|
| Cairo94507 |
Nov 4 2014, 02:25 PM
Post
#151
|
|
Michael Group: Members Posts: 9,719 Joined: 1-November 08 From: Auburn, CA Member No.: 9,712 Region Association: Northern California |
That is really nice. I hope you work your way around the whole car so we can replace all the exterior lighting with LED's.
|
|
|
|
| euro911 |
Nov 4 2014, 03:06 PM
Post
#152
|
|
Retired & living the dream. God help me if I wake up! Group: Members Posts: 8,845 Joined: 2-December 06 From: So.Cal. & No.AZ (USA) Member No.: 7,300 Region Association: Southern California |
Jerry, are you still going to produce the non-blanking style?
|
|
|
|
| Spoke |
Nov 5 2014, 11:16 AM
Post
#153
|
|
Jerry Group: Members Posts: 6,977 Joined: 29-October 04 From: Allentown, PA Member No.: 3,031 Region Association: None |
QUOTE(euro911 @ Nov 4 2014, 04:06 PM) Jerry, are you still going to produce the non-blanking style? Yes, the board is set up to bypass the blanking circuit. Price will be $130 ($10 less than blanking boards) |
|
|
|
| euro911 |
Nov 5 2014, 01:29 PM
Post
#154
|
|
Retired & living the dream. God help me if I wake up! Group: Members Posts: 8,845 Joined: 2-December 06 From: So.Cal. & No.AZ (USA) Member No.: 7,300 Region Association: Southern California |
Cool (IMG:style_emoticons/default/mueba.gif)
Ready when you are (IMG:style_emoticons/default/popcorn[1].gif) |
|
|
|
| charliew |
Nov 6 2014, 01:13 PM
Post
#155
|
|
Advanced Member Group: Members Posts: 2,363 Joined: 31-July 07 From: Crawford, TX. Member No.: 7,958 |
I will take a US non-blanking set.
|
|
|
|
| CptTripps |
Nov 6 2014, 01:14 PM
Post
#156
|
|
:: Punch and Pie :: Group: Members Posts: 3,584 Joined: 26-December 04 From: Mentor, OH Member No.: 3,342 Region Association: Upper MidWest |
I'm in too...
|
|
|
|
| Spoke |
Nov 21 2014, 12:19 AM
Post
#157
|
|
Jerry Group: Members Posts: 6,977 Joined: 29-October 04 From: Allentown, PA Member No.: 3,031 Region Association: None |
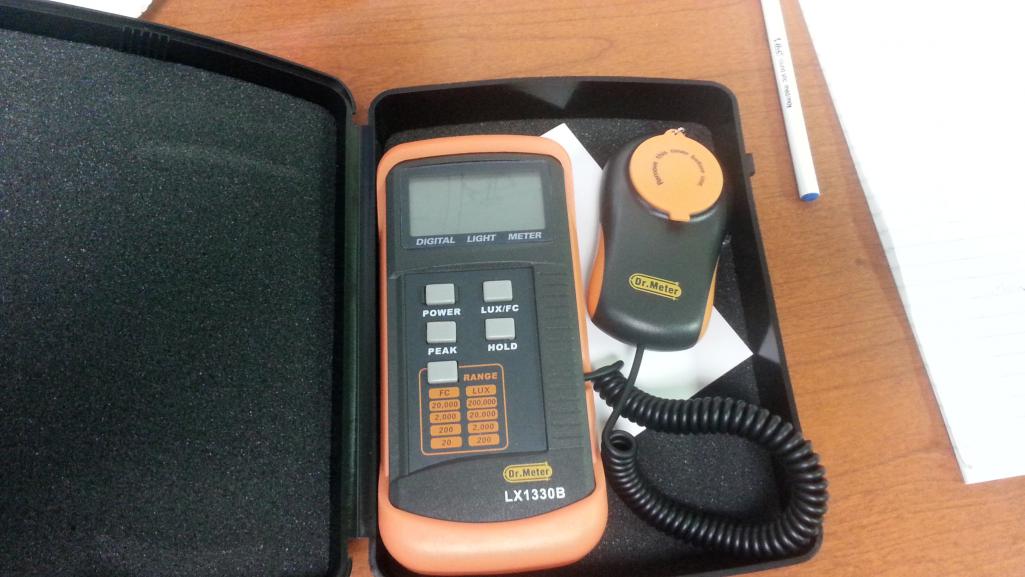
Bought a light meter to better analyze the output of the lights. Seems to work pretty well.
 The first lights I looked at where these ones for my 930. They are similar to the 914 brake lights but with 48 LEDs vs 56 LEDs on the 914 brake. 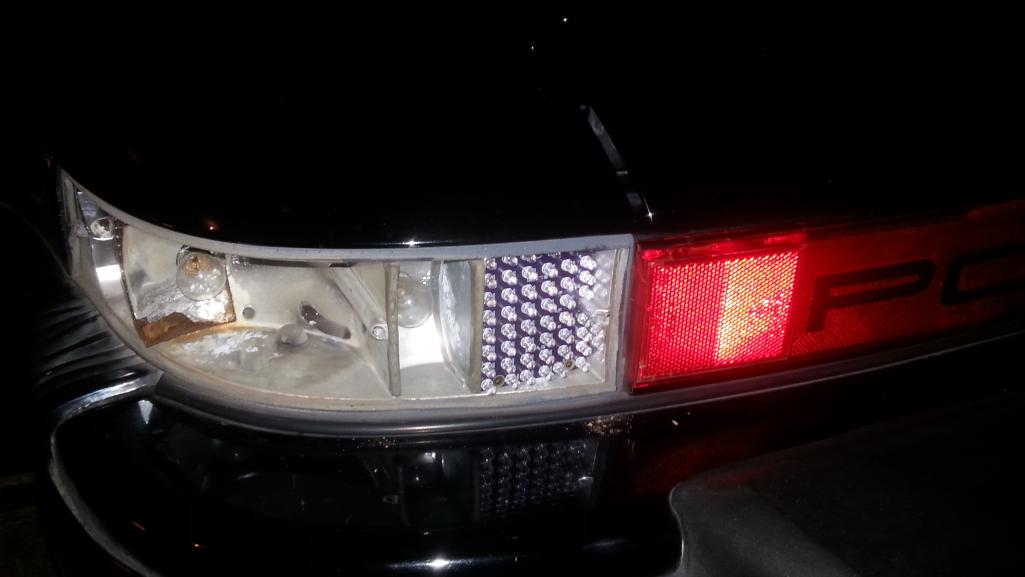 I measured the light output in LUX on the standard bulb and the LED board from about 4 ft away in the garage at night. The opposite light, the center brake light, and the license plate lights were covered up. I measured at 3 angles: 0, 15, and 30 degrees. Here is the comparison of the 930 taillights. The LED drops off pretty quickly from center but starts at a much higher intensity. This focused intensity of the LEDs was pointed out by some folks. However, the center relative intensity of the LEDs (directly behind vehicle) for the taillights is over 6x that of the bulb. 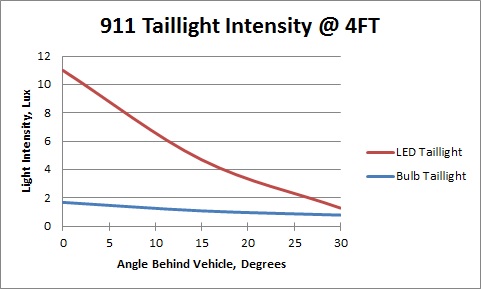 This is a comparison of the brake lights on the 930. Here the same profile is evident. Directly behind the vehicle the relative intensity of the LEDs is 3.5x that of the bulb. 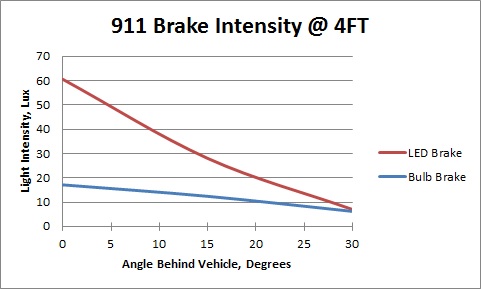 I tried to put this information into a format which would directly relate to the light pattern behind the vehicle. This graph shows the brake light pattern as viewed from above the vehicle. The intensities are 1x, 2x, and 3x of the standard bulb. The driver directly behind the vehicle would see 3x intensity of the bulb. A driver in the next lane at 10FT left or right from the vehicle about 25FT behind the vehicle would see an intensity about 2x of the standard bulb. This assumes the driving lane is 10ft wide. 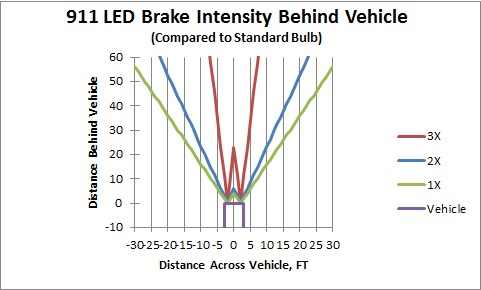 |
|
|
|
| Kansas 914 |
Nov 21 2014, 08:53 AM
Post
#158
|
|
Advanced Member Group: Members Posts: 2,999 Joined: 1-March 03 From: Durango, Colorado Member No.: 373 Region Association: Rocky Mountains |
QUOTE(Spoke @ Nov 20 2014, 11:19 PM) Bought a light meter to better analyze the output of the lights. Seems to work pretty well. That is great data. The key is even with a more drastic drop off the output of LEDs stay above that of the bulb at all times (if I read you right). Well done. |
|
|
|
| peteyd |
Nov 21 2014, 09:50 AM
Post
#159
|
|
Senior Member Group: Members Posts: 705 Joined: 27-March 08 From: Elora, Ontario, Canada Member No.: 8,858 Region Association: Canada |
Can I get a set of US blanking please.
Pete |
|
|
|
| monkeyboy |
Nov 21 2014, 09:54 AM
Post
#160
|
|
Senior Member Group: Members Posts: 808 Joined: 8-June 08 From: Los Angeles, Ca Member No.: 9,147 Region Association: None |
I will take a set of US with the blanking please.
|
|
|
|
|
2 User(s) are reading this topic (2 Guests and 0 Anonymous Users)
0 Members:

|
Lo-Fi Version | Time is now: 28th April 2024 - 11:10 AM |
Invision Power Board
v9.1.4 © 2024 IPS, Inc.