|
|
|
Porsche, and the Porsche crest are registered trademarks of Dr. Ing. h.c. F. Porsche AG.
This site is not affiliated with Porsche in any way. Its only purpose is to provide an online forum for car enthusiasts. All other trademarks are property of their respective owners. |
|
|

  |

| chads74 |
 Dec 21 2014, 01:55 PM Dec 21 2014, 01:55 PM
Post
#181
|
|
Member  Group: Members Posts: 386 Joined: 13-March 12 From: Tampa, FL Member No.: 14,252 Region Association: South East States |
I am in for one set of option 2) Euro lens blanking to add to the rear LED lights I already have.
|
   |

 
|
| GermermanCarGuy |
Dec 21 2014, 03:22 PM
Post
#182
|
|
GermanCarGuy Group: Members Posts: 81 Joined: 13-May 14 From: Rapid City, SD Member No.: 17,346 Region Association: Upper MidWest |
Still in for Euro-blanking fronts. And, if you're still making rears, I'm still in for a set of those, too.
These are way cool. Any chance you'll add the required flasher and turn this into a complete package deal? If so, I'd be in for a '74 mod with dual dash indicators. Many thanks in advance. You da man! A true award winning contributor. (IMG:style_emoticons/default/smilie_pokal.gif) Rob |
|
|
|
| Cairo94507 |
Dec 21 2014, 03:41 PM
Post
#183
|
|
Michael Group: Members Posts: 9,723 Joined: 1-November 08 From: Auburn, CA Member No.: 9,712 Region Association: Northern California |
I would love to see a package deal that included front turn sigs (I want to go with the blanking euro lens fronts), rear turn signals (USA lenses version), and side marker lights.
I like that the blanking euro-fronts really make the turn signal stand out by turning off the running light lower before the turn signal activates. What can you do for the side marker light? I wish someone could/would make a side marker replacement lens that was much closer to the body instead of being like 1.5" in depth. Assuming that is a pipe dream, I still want the side markers to be LED and function as running lights and turn signals. A guy can dream..... Spoke- You have made an outstanding product for our cars that enhances their visibility, improves safety and reduces the electrical draw to power these lights. Your modification also updates the lighting to make the cars look nicer too when the lights function. I fully plan on converting to LED headlights to further that improved electrical safety and reduce the electrical draw to make the headlights bright. Thanks again for all of your time and effort- truly a great contribution to the 914 community. (IMG:style_emoticons/default/smilie_pokal.gif) |
|
|
|
| mikesmith |
Dec 24 2014, 04:15 PM
Post
#184
|
|
Member Group: Members Posts: 202 Joined: 5-September 13 From: SF Member No.: 16,354 Region Association: Northern California |
QUOTE(Cairo94507 @ Dec 21 2014, 01:41 PM)  What can you do for the side marker light? I wish someone could/would make a side marker replacement lens that was much closer to the body instead of being like 1.5" in depth. Assuming that is a pipe dream, I still want the side markers to be LED and function as running lights and turn signals. A guy can dream..... I used two of these - you can see them in the shots that Spoke posted: http://www.dx.com/p/g4-3w-110lm-led-yellow...dc-8-30v-156534 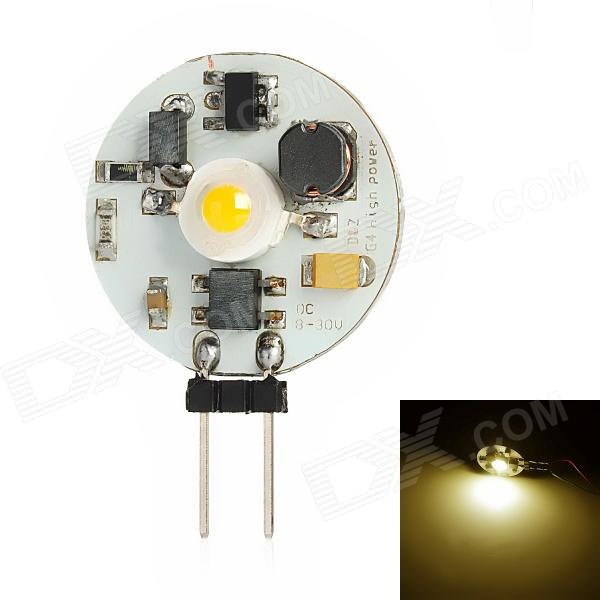 Remove the pins, solder some small wires from the pads to the contacts, then a little RTV to hold the module in place. If you want to make the markers flash with the turn signals, you can use the Modifry modules: http://www.modifry.com/index.php?route=pro...p;product_id=75 I would not mount these "under the fender" on a 914; the screw terminals really need to be protected from moisture and dirt. Inside the front bucket is probably a good location if you don't mind fiddling the wiring on the back of the bucket (you need a get a wire out for the sidemarker). You could also use something like these: http://www.ebay.com/itm/2-x-Amber-LED-Eagl...dc7&vxp=mtr 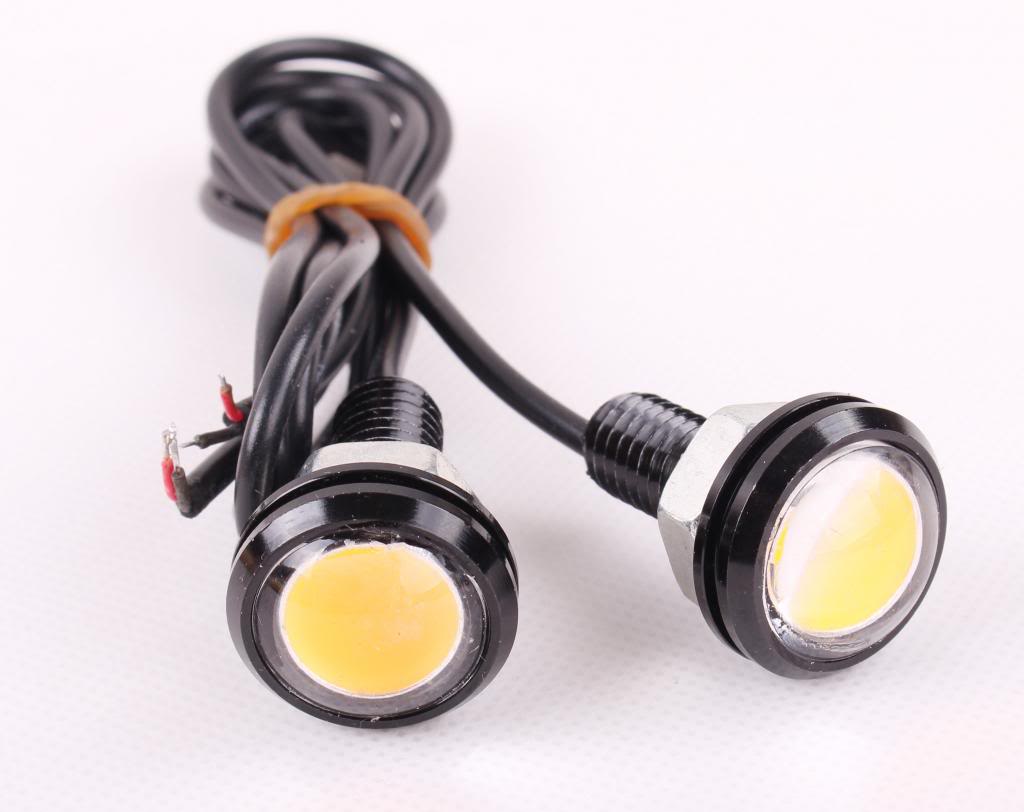 after removing the contacts from the stock housing. |
|
|
|
| euro911 |
Dec 24 2014, 07:37 PM
Post
#185
|
|
Retired & living the dream. God help me if I wake up! Group: Members Posts: 8,846 Joined: 2-December 06 From: So.Cal. & No.AZ (USA) Member No.: 7,300 Region Association: Southern California |
The top one looks like a fried egg (IMG:style_emoticons/default/laugh.gif)
I like the second choice ... I may just order some Thanks for posting |
|
|
|
| mikesmith |
Dec 24 2014, 10:15 PM
Post
#186
|
|
Member Group: Members Posts: 202 Joined: 5-September 13 From: SF Member No.: 16,354 Region Association: Northern California |
QUOTE(euro911 @ Dec 24 2014, 05:37 PM) The top one looks like a fried egg (IMG:style_emoticons/default/laugh.gif) I like the second choice ... I may just order some Please post pictures if you do; they look like they could be a very simple drop-in to the existing housing. |
|
|
|
| Spoke |
Jan 7 2015, 12:35 PM
Post
#187
|
|
Jerry Group: Members Posts: 6,978 Joined: 29-October 04 From: Allentown, PA Member No.: 3,031 Region Association: None |
Ordering parts now. Should have everything by next week to start building.
Let the fun begin. (IMG:style_emoticons/default/beerchug.gif) Attached thumbnail(s) 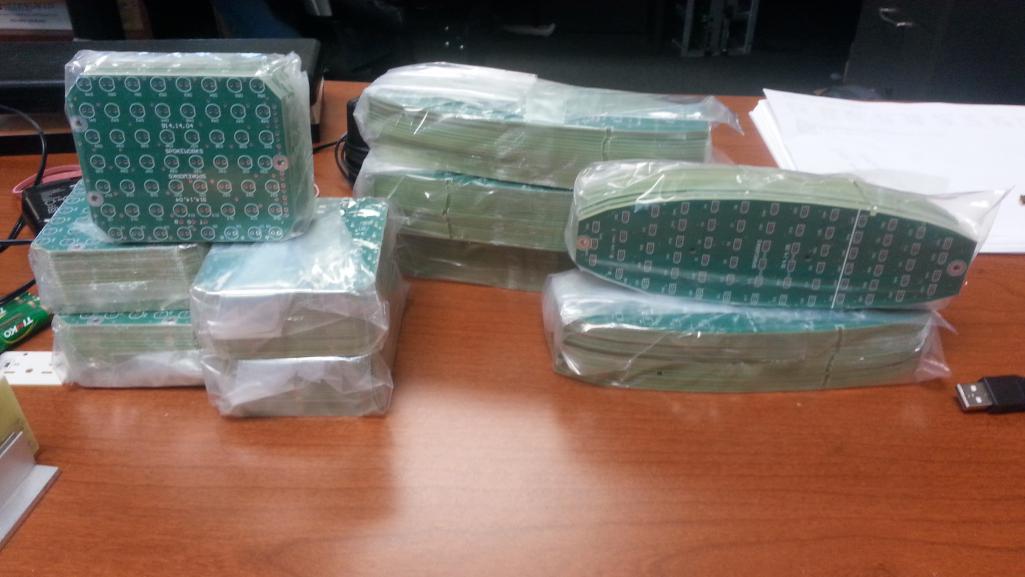
|
 |
|
| chads74 |
Jan 7 2015, 01:23 PM
Post
#188
|
|
Member Group: Members Posts: 386 Joined: 13-March 12 From: Tampa, FL Member No.: 14,252 Region Association: South East States |
I am excited!
|
|
|
|
| eric9144 |
Jan 7 2015, 02:06 PM
Post
#189
|
|
Advanced Member Group: Members Posts: 2,734 Joined: 30-March 11 From: San Diego, CA Member No.: 12,876 Region Association: Southern California |
|
|
|
|
| GermermanCarGuy |
Jan 7 2015, 03:13 PM
Post
#190
|
|
GermanCarGuy Group: Members Posts: 81 Joined: 13-May 14 From: Rapid City, SD Member No.: 17,346 Region Association: Upper MidWest |
QUOTE(euro911 @ Dec 24 2014, 06:37 PM) The top one looks like a fried egg (IMG:style_emoticons/default/laugh.gif) I like the second choice ... I may just order some Me too. Not quite ready for the install just yet; too much rust to take care of first. It's the little things like this that keeps me going. Great hindsight. Many thanks in advance. |
|
|
|
| siverson |
Jan 7 2015, 04:28 PM
Post
#191
|
|
Advanced Member Group: Benefactors Posts: 2,448 Joined: 5-May 03 From: San Diego, CA Member No.: 654 Region Association: Southern California |
Great!
|
|
|
|
| ConeDodger |
Jan 7 2015, 04:40 PM
Post
#192
|
|
Apex killer! Group: Members Posts: 23,573 Joined: 31-December 04 From: Tahoe Area Member No.: 3,380 Region Association: Northern California |
QUOTE(euro911 @ Aug 4 2014, 09:57 PM) QUOTE(ConeDodger @ Apr 3 2014, 03:14 PM) Wow, just saw this tonight (IMG:style_emoticons/default/WTF.gif) Nice (IMG:style_emoticons/default/popcorn[1].gif) Wouldn't it be more like this though, Rob ? E U R O :poke Welcome to the asshat club Mark! (IMG:style_emoticons/default/biggrin.gif) Depends on which side of the car your standing on. (IMG:style_emoticons/default/poke.gif) ... and I'm in for a pair of EURO units of course (IMG:style_emoticons/default/smile.gif) |
|
|
|
| Mueller |
Jan 7 2015, 04:58 PM
Post
#193
|
|
914 Freak! Group: Members Posts: 17,146 Joined: 4-January 03 From: Antioch, CA Member No.: 87 Region Association: None |
Just finished reading this entire thread, great product!
Too broke right to commit, hopefully in 6 months or so you'll be doing another batch for both ends of the car! |
|
|
|
| Spoke |
Jan 14 2015, 08:46 PM
Post
#194
|
|
Jerry Group: Members Posts: 6,978 Joined: 29-October 04 From: Allentown, PA Member No.: 3,031 Region Association: None |
Measured the output of the US front LED board compared with the standard bulb. The meter reads out in LUX.
Here's the setup used. The power to the LED board and bulb is 14V. Both were measured with running lights and turnsignal. With running lights on, the bulb burned 8W (0.6A) while the LED burned 1W (0.07A). With turnsignal on, the bulb burned 26W (1.9A) while the LED burned 5.5W (0.4A) I took light measurements at eye level being 0, 10, 20, 30, and 45 degrees off of the front of the bucket; each measurement 4 feet away from the bucket.  These LEDs are 23 degree devices. All boards made will have 30 degree LEDs to further widen the intensity in front of the car. Here's a comparison of the running lights. The LEDs are a bit over 8x more intense in front of the vehicle and remain brighter even 45 degrees off center. 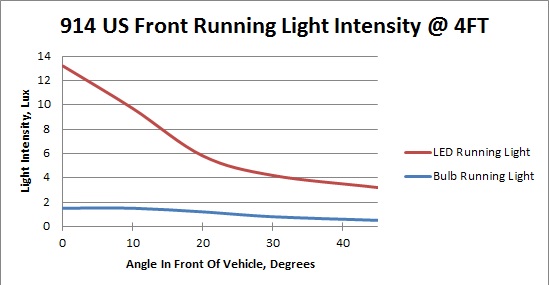 The LED turnsignal intensity is over 6x as intense as the bulb at 0 degrees. The LEDs have a nice wide angular intensity profile which is good as the turnsignals in the front will be bright for cars off the road waiting to enter in front of a 914 or when changing lanes. 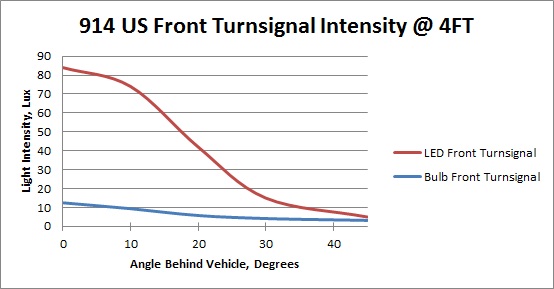 This graph is an attempt to show the light pattern in front of the car. The lines indicate where the LEDs are 6x, 3x, and 1x the intensity of the bulb. 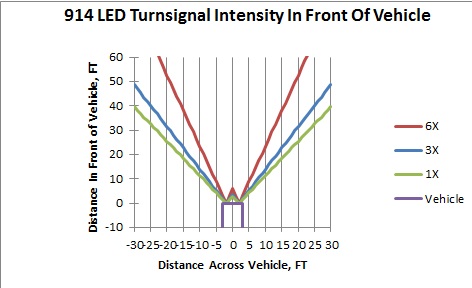 |
|
|
|
| Cairo94507 |
Jan 15 2015, 07:22 AM
Post
#195
|
|
Michael Group: Members Posts: 9,723 Joined: 1-November 08 From: Auburn, CA Member No.: 9,712 Region Association: Northern California |
That's exactly the kind of brightness these little cars need to be seen. Excellent work. I can't wait to buy a complete set for my car. Scotty is working away and hopefully soon I will be able to buy a set.
|
|
|
|
| cary |
Jan 15 2015, 07:24 AM
Post
#196
|
|
Advanced Member Group: Members Posts: 3,900 Joined: 26-January 04 From: Sherwood Oregon Member No.: 1,608 Region Association: Pacific Northwest |
Switching to the EP36 flasher. After driving the car a bit. The flasher indicator only flashes left or right once. Then goes to a slow dim blip on both. Rear LEDs seem to still run fine.
I assume the ground wire arrangement will manifest itself when I get there. The special lug will go on the incoming wire harness for the flasher socket? |
|
|
|
| Spoke |
Jan 15 2015, 11:42 AM
Post
#197
|
|
Jerry Group: Members Posts: 6,978 Joined: 29-October 04 From: Allentown, PA Member No.: 3,031 Region Association: None |
QUOTE(cary @ Jan 15 2015, 08:24 AM) Switching to the EP36 flasher. After driving the car a bit. The flasher indicator only flashes left or right once. Then goes to a slow dim blip on both. Rear LEDs seem to still run fine. I assume the ground wire arrangement will manifest itself when I get there. The special lug will go on the incoming wire harness for the flasher socket? What did you do with the wire that was on the K/C lug on the original flasher? This is the one that goes to the common connection of the indicators. This is the one that must be grounded with the EP36. PM me if you want me to send you one of the piggyback adapters for this wire. Without grounding the wire from K/C, the indicators will not work properly. |
|
|
|
| euro911 |
Jan 15 2015, 03:08 PM
Post
#198
|
|
Retired & living the dream. God help me if I wake up! Group: Members Posts: 8,846 Joined: 2-December 06 From: So.Cal. & No.AZ (USA) Member No.: 7,300 Region Association: Southern California |
Thanks for posting the results, Jerry.
Now, stop typing and get back to soldering (IMG:style_emoticons/default/slap.gif) (IMG:style_emoticons/default/poke.gif) |
|
|
|
| cary |
Jan 16 2015, 08:44 PM
Post
#199
|
|
Advanced Member Group: Members Posts: 3,900 Joined: 26-January 04 From: Sherwood Oregon Member No.: 1,608 Region Association: Pacific Northwest |
Trying to figure out where you want us to attach the common to the ground.
1973. EP36 with piggyback terminal. 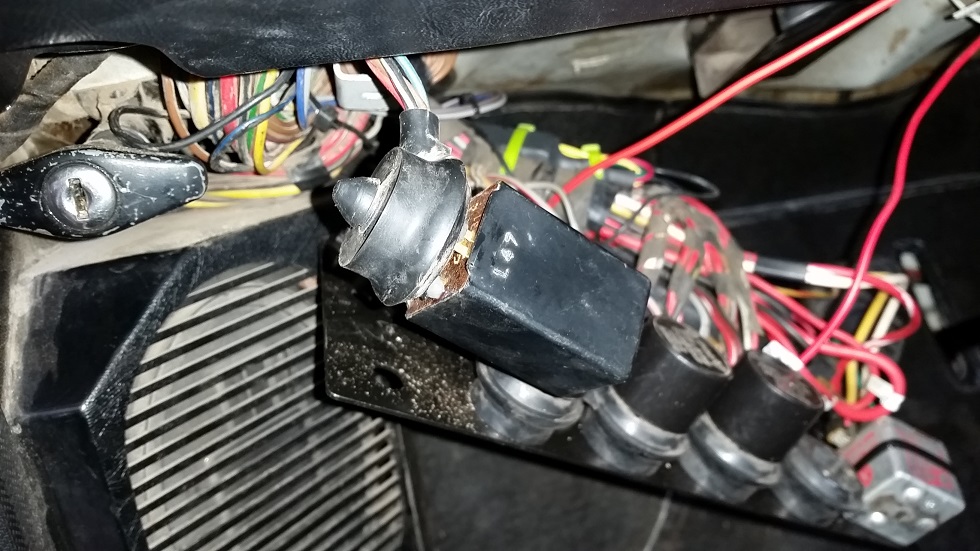 Here's the flasher relay arrangement. 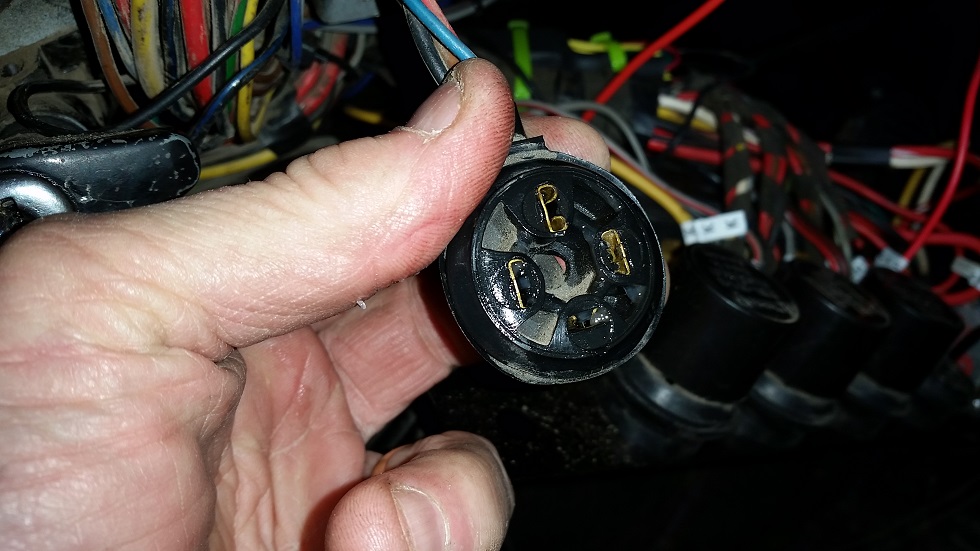 Here's socket for the relay. How do I get to the ground wire with the relay seated in the socket? 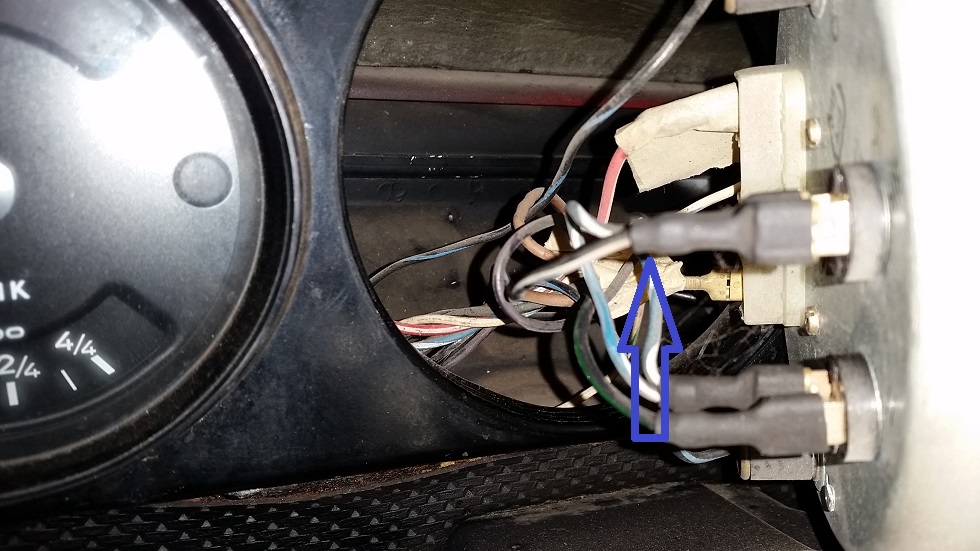 Here's the common wire on the back of the tach. |
|
|
|
| Spoke |
Jan 17 2015, 12:13 AM
Post
#200
|
|
Jerry Group: Members Posts: 6,978 Joined: 29-October 04 From: Allentown, PA Member No.: 3,031 Region Association: None |
This is the first time I've seen the connection of the flasher relay. The piggyback connectors will not work unless the connector is cut apart to reveal the individual wires.
So what would be better here is one of those crimp-on jumpers to connect the 2 wires together. |
|
|
|
|
1 User(s) are reading this topic (1 Guests and 0 Anonymous Users)
0 Members:

|
Lo-Fi Version | Time is now: 2nd May 2024 - 08:06 PM |
Invision Power Board
v9.1.4 © 2024 IPS, Inc.