|
|
|
Porsche, and the Porsche crest are registered trademarks of Dr. Ing. h.c. F. Porsche AG.
This site is not affiliated with Porsche in any way. Its only purpose is to provide an online forum for car enthusiasts. All other trademarks are property of their respective owners. |
|
|

  |

| jwalters |
 Jan 15 2005, 10:39 AM Jan 15 2005, 10:39 AM
Post
#1
|
|
Sooo Close.......  Group: Members Posts: 1,677 Joined: 14-May 04 From: Huntsville, AL Member No.: 2,068 Region Association: Europe |
(IMG:http://www.914world.com/bbs2/html/emoticons/biggrin.gif) Hi guys, once again--at work right now but not allot going on---I am replacing my rear trunk floor and was wondering if anybody else just lapped the new floor right over the old crossmember-or if you actually disemboweled it and put the whole new schebang in......
Thanks in advance.... (IMG:http://www.914world.com/bbs2/html/emoticons/beerchug.gif) |
   |

 
|
| IronHillRestorations |
Jan 15 2005, 01:23 PM
Post
#2
|
|
I. I. R. C. Group: Members Posts: 6,719 Joined: 18-March 03 From: West TN Member No.: 439 Region Association: None |
All of the rear trunk pans I've replaced were only rusted rear of the dogbone shaped crossmember. What we did was to cut out the spot welds that attach the pan to the rear panel and the inner fender. Then along the rear flange of the dogbone, where the pan is spotwelded to the dogbone, you carefully draw a line that centers the flange and cut through the pan with a cut off wheel. This way you've got a lip to hang the pan on. We leave a 1/16" gap and weld the three pieces back together. I've got a 220v spot welder, so that's how the rear of the replacement pans are welded back on here, but you can punch or drill holes and plug weld that.
Does this make sense? I'm not sure if I've got pics, but I don't think so. The place you purchased the pan from should give you tech support on this! |
|
|
|
| Lou W |
Jan 15 2005, 02:38 PM
Post
#3
|
||
|
"Here Kitty Kitty" my ass...... Group: Members Posts: 4,109 Joined: 9-May 04 From: Roseburg, OR. Member No.: 2,039 Region Association: Spain |
|
||
|
|
|
||
| SirAndy |
Jan 15 2005, 03:23 PM
Post
#4
|
||
|
Resident German Group: Admin Posts: 41,641 Joined: 21-January 03 From: Oakland, Kalifornia Member No.: 179 Region Association: Northern California |
no and no ... i drilled out the spotwelds around the crossmember, drilled out the spotwelds on the rear and the whole thing just slid out. did the same with the donor piece, then slid that back in and spot-welded using the original holes ... cut out: (IMG:http://www.sirandy.com/pix/914/work/054.jpg) donor: (IMG:http://www.sirandy.com/pix/914/work/057.jpg) donor in place: (IMG:http://www.sirandy.com/pix/914/07.30.2002/IMGP0261.jpg) (IMG:http://www.sirandy.com/pix/914/07.30.2002/IMGP0264.jpg) (IMG:http://www.sirandy.com/pix/914/07.30.2002/IMGP0263.jpg) bumper back on & new paint: (IMG:http://www.sirandy.com/pix/914/2003.04.01/IMGP1588.jpg) (IMG:http://www.sirandy.com/pix/914/2003.07.16/car004.JPG) like new: (IMG:http://www.sirandy.com/pix/914/2003.10.01/15.JPG) enough pix? (IMG:http://www.914world.com/bbs2/html/emoticons/biggrin.gif) Andy |
||
|
|
|
||
| SpecialK |
Jan 15 2005, 04:24 PM
Post
#5
|
|
aircraft surgeon Group: Benefactors Posts: 3,211 Joined: 15-March 04 From: Pacific, MO Member No.: 1,797 |
Gotta do the same repair when things thaw around here (70F Thursday (IMG:http://www.914world.com/bbs2/html/emoticons/smile.gif) , 12F today (IMG:http://www.914world.com/bbs2/html/emoticons/mad.gif) ), all pics are helpful and appreciated! (IMG:http://www.914world.com/bbs2/html/emoticons/pray.gif)
Andy - Love the "rearview" on that car of yours! (IMG:http://www.914world.com/bbs2/html/emoticons/wub.gif) |
|
|
|
| Lou W |
Jan 15 2005, 05:15 PM
Post
#6
|
|
"Here Kitty Kitty" my ass...... Group: Members Posts: 4,109 Joined: 9-May 04 From: Roseburg, OR. Member No.: 2,039 Region Association: Spain |
Andy, very nice job. (IMG:http://www.914world.com/bbs2/html/emoticons/smilie_pokal.gif)
|
|
|
|
| McMark |
Jan 15 2005, 06:23 PM
Post
#7
|
|
914 Freak! Group: Retired Admin Posts: 20,179 Joined: 13-March 03 From: Grand Rapids, MI Member No.: 419 Region Association: None |
Here's the one I did.
(IMG:http://www.paintandmetal.com/projects/davila4/davila4-Images/7.jpg) A few more pictures here. |
|
|
|
| SpecialK |
Jan 15 2005, 06:49 PM
Post
#8
|
|
aircraft surgeon Group: Benefactors Posts: 3,211 Joined: 15-March 04 From: Pacific, MO Member No.: 1,797 |
Hard to tell from the pics, but is the rear of the trunk floor just tacked in every couple of inches? Or did you "connect the dots" and weld it in solid?
|
|
|
|
| SirAndy |
Jan 15 2005, 07:42 PM
Post
#9
|
||
|
Resident German Group: Admin Posts: 41,641 Joined: 21-January 03 From: Oakland, Kalifornia Member No.: 179 Region Association: Northern California |
i just used the old spotweld holes. no need to seam weld, IMHO ... (IMG:http://www.914world.com/bbs2/html/emoticons/cool.gif) Andy |
||
|
|
|
||
| jwalters |
Jan 15 2005, 08:00 PM
Post
#10
|
||||
|
Sooo Close....... Group: Members Posts: 1,677 Joined: 14-May 04 From: Huntsville, AL Member No.: 2,068 Region Association: Europe |
(IMG:http://www.914world.com/bbs2/html/emoticons/biggrin.gif) Thanks guys--and SirAndy--very nice! The replacement piece I am getting has the rear floor and the top crossmember as one piece---I am not sure yet ifn it is stamped that way or if it is just the way it comes. Is there anyway I could get you to do a tracing of where the rear lip is tacked to the rear tailight part?? My car was in a tiny crunch many moons ago and the area where the trunk latch is, is pushed in a little from the latch to about 9inches on either side-and kinda rippled-it will still be a couple of weeks until I get the floor and would like to get a jump on it to get this area back to its original countour. Good luck with all the rest of ya'll--I pick my body up from the blaster in 2 days!!!! (IMG:http://www.914world.com/bbs2/html/emoticons/beerchug.gif) (IMG:http://www.914world.com/bbs2/html/emoticons/beerchug.gif) (IMG:http://www.914world.com/bbs2/html/emoticons/beerchug.gif) |
||||
|
|
|
||||
| SirAndy |
Jan 15 2005, 10:11 PM
Post
#11
|
||
|
Resident German Group: Admin Posts: 41,641 Joined: 21-January 03 From: Oakland, Kalifornia Member No.: 179 Region Association: Northern California |
i traced out the factory spot-welds/seams in green. if you drill out those welds, you can literally slide the whole clip out the back ... Attached image(s) 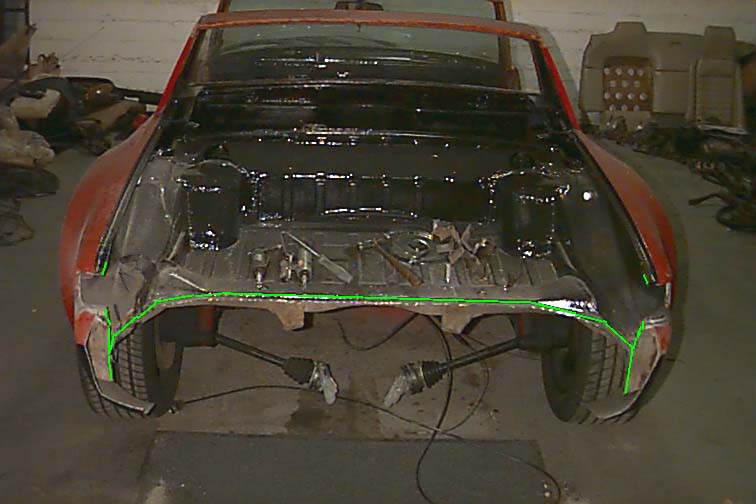
|
||
|
|
|
||
| SirAndy |
Jan 15 2005, 10:11 PM
Post
#12
|
|
Resident German Group: Admin Posts: 41,641 Joined: 21-January 03 From: Oakland, Kalifornia Member No.: 179 Region Association: Northern California |
nuther
Attached image(s) 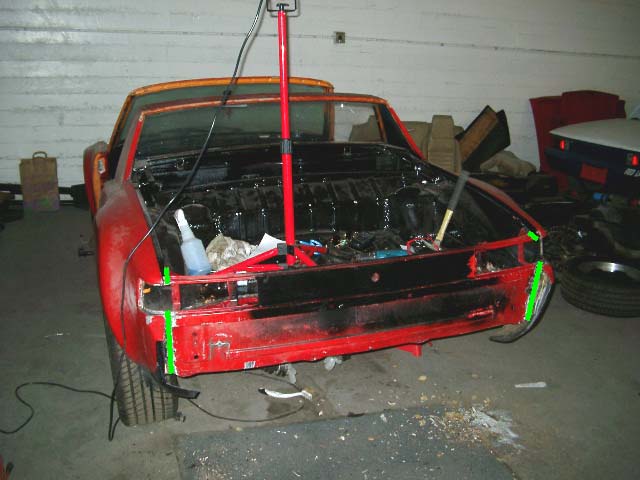
|
|
|
|
| jwalters |
Jan 16 2005, 07:27 AM
Post
#13
|
|
Sooo Close....... Group: Members Posts: 1,677 Joined: 14-May 04 From: Huntsville, AL Member No.: 2,068 Region Association: Europe |
|
|
|
|
|
1 User(s) are reading this topic (1 Guests and 0 Anonymous Users)
0 Members:

|
Lo-Fi Version | Time is now: 18th May 2024 - 03:40 AM |
Invision Power Board
v9.1.4 © 2024 IPS, Inc.