|
|
|
Porsche, and the Porsche crest are registered trademarks of Dr. Ing. h.c. F. Porsche AG.
This site is not affiliated with Porsche in any way. Its only purpose is to provide an online forum for car enthusiasts. All other trademarks are property of their respective owners. |
|
|

  |

| HalfMoon |
 Jun 26 2014, 06:28 PM Jun 26 2014, 06:28 PM
Post
#21
|
|
Senior Member  Group: Members Posts: 828 Joined: 13-November 12 From: Shenandoah Junction, WV Member No.: 15,144 Region Association: MidAtlantic Region |
QUOTE(Dave_Darling @ Jun 26 2014, 06:19 PM)  Much clearer pics, thanks! D has a red, a red/white, a black/red, and a brown wire. That matches the wiring for the "fresh air" relay. (#54 on diagram part C) C appears to have a white/yellow, a white/blue, a gray/red, and a red wire. If there is a black tracer on that red wire (could be), that matches the fog light relay wires. (#53 on diagram part A) Now we know what the relays are. Dash lights and license plate lights get their power from the main light switch. Find the black/blue wire plugged into the switch and unplug it. If the lights stay on, you are getting power from somewhere else. Very likely a power and ground connection swapped. --DD I think I see three of em... 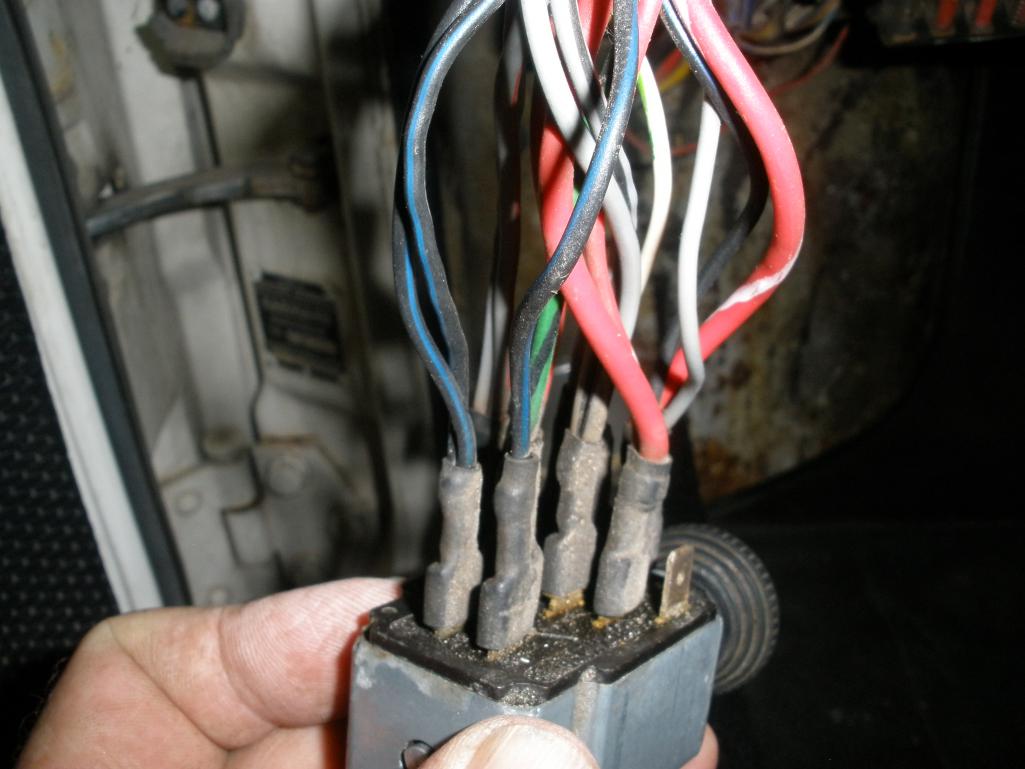 |
   |

 
|
| HalfMoon |
Jun 26 2014, 07:50 PM
Post
#22
|
|
Senior Member Group: Members Posts: 828 Joined: 13-November 12 From: Shenandoah Junction, WV Member No.: 15,144 Region Association: MidAtlantic Region |
Process of elimination.
I swapped in a spare (and known to be good) light switch and I'm still popping fuses at slot 8, with the same other symptoms happening. Also, I think the wisp of smoke that I first reported was from the fuse when it originally popped. Now I'm thinking ignition switch. Has anyone heard of slot 8 popping fuses due to a bad ignition switch? As an aside, I didn't add or change wires in anything prior to this problem so somethings worn out as opposed to an operator error. And I suspect greatly it's a component as opposed to a wire short. Thoughts, jokes, jibs? D Note-The addition of the 924 wiper switch occured AFTER the problem manifested itself. Addedum-Hey...I wonder if the light dimmer could be at fault (marked as "A" in the image, Easier to eliminate than the ignition switch, that's for sure). I have a spare.... |
|
|
|
| dadaDaveed |
Jun 26 2014, 09:18 PM
Post
#23
|
|
Member Group: Members Posts: 111 Joined: 19-February 09 From: San Antonio, TX Member No.: 10,071 Region Association: Southwest Region |
QUOTE(HalfMoon @ Jun 26 2014, 07:28 PM) QUOTE(Dave_Darling @ Jun 26 2014, 06:19 PM) Much clearer pics, thanks! D has a red, a red/white, a black/red, and a brown wire. That matches the wiring for the "fresh air" relay. (#54 on diagram part C) C appears to have a white/yellow, a white/blue, a gray/red, and a red wire. If there is a black tracer on that red wire (could be), that matches the fog light relay wires. (#53 on diagram part A) Now we know what the relays are. Dash lights and license plate lights get their power from the main light switch. Find the black/blue wire plugged into the switch and unplug it. If the lights stay on, you are getting power from somewhere else. Very likely a power and ground connection swapped. --DD I think I see three of em... It's hard to tell where things are connected from this angle, but I'd double check the wiring of the headlight switch. It looks like the wires for terminal 58L and 15 might have been swapped. This thread should help. http://www.914world.com/bbs2/index.php?showtopic=139356 |
|
|
|
| JeffBowlsby |
Jun 26 2014, 09:26 PM
Post
#24
|
|
914 Wiring Harnesses & Beekeeper Group: Members Posts: 8,969 Joined: 7-January 03 From: San Ramon CA Member No.: 104 Region Association: None |
Here are some testing diagrams for the dash switches:
https://bowlsby.net/914/WiringHarnesses/DashSwitches.pdf They can be found in the drawings section of my wiring harness website. |
|
|
|
| HalfMoon |
Jun 26 2014, 09:44 PM
Post
#25
|
|
Senior Member Group: Members Posts: 828 Joined: 13-November 12 From: Shenandoah Junction, WV Member No.: 15,144 Region Association: MidAtlantic Region |
QUOTE(dadaDaveed @ Jun 26 2014, 11:18 PM) QUOTE(HalfMoon @ Jun 26 2014, 07:28 PM) QUOTE(Dave_Darling @ Jun 26 2014, 06:19 PM) Much clearer pics, thanks! D has a red, a red/white, a black/red, and a brown wire. That matches the wiring for the "fresh air" relay. (#54 on diagram part C) C appears to have a white/yellow, a white/blue, a gray/red, and a red wire. If there is a black tracer on that red wire (could be), that matches the fog light relay wires. (#53 on diagram part A) Now we know what the relays are. Dash lights and license plate lights get their power from the main light switch. Find the black/blue wire plugged into the switch and unplug it. If the lights stay on, you are getting power from somewhere else. Very likely a power and ground connection swapped. --DD I think I see three of em... It's hard to tell where things are connected from this angle, but I'd double check the wiring of the headlight switch. It looks like the wires for terminal 58L and 15 might have been swapped. This thread should help. http://www.914world.com/bbs2/index.php?showtopic=139356 Interesting thread but his sole observation wasn't verified. Also, I didn't swap em (the wires) and my system worked fine for quite some time. Keep in mind that my car is a 1973 and the current (obviously PO replaced) switch is a later model "fat" switch, so the color ID's are different than the thread you so kindly posted. Perplexed (IMG:style_emoticons/default/headbang.gif) |
|
|
|
| HalfMoon |
Jun 26 2014, 09:48 PM
Post
#26
|
|
Senior Member Group: Members Posts: 828 Joined: 13-November 12 From: Shenandoah Junction, WV Member No.: 15,144 Region Association: MidAtlantic Region |
QUOTE(Jeff Bowlsby @ Jun 26 2014, 11:26 PM) Here are some testing diagrams for the dash switches: https://bowlsby.net/914/WiringHarnesses/DashSwitches.pdf They can be found in the drawings section of my wiring harness website. Useful! TY D |
|
|
|
| HalfMoon |
Jun 28 2014, 12:31 PM
Post
#27
|
|
Senior Member Group: Members Posts: 828 Joined: 13-November 12 From: Shenandoah Junction, WV Member No.: 15,144 Region Association: MidAtlantic Region |
Today I thought I would pull the headlight dimmer switch and do a swap with another one I had and lo and behold I see my spare is quite different than what I have on my car. The one on my car has a "jumber" so I'm thinking the PO used a different dimmer and that this "jumper" is part of doing that. Notice in the image my spare has no jumper and the different number of tang contact points between the two.
Anyone have any experience with this? I suspect my spare is the appropriate dimmer. After this I can only think of one more component I can change before doing continuity checks on the wires and that would be my ignition switch (I do have a spare). Grrrrr. How bout the difference of those dimmer switchs ya'll? 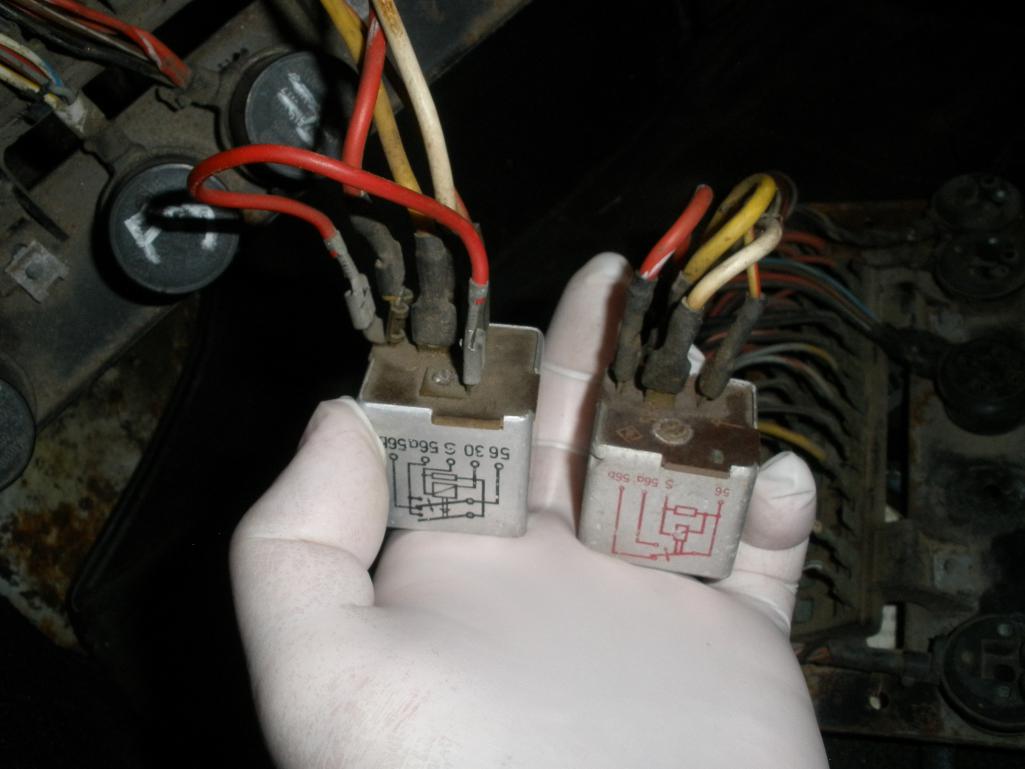 |
|
|
|
| dadaDaveed |
Jun 28 2014, 12:59 PM
Post
#28
|
|
Member Group: Members Posts: 111 Joined: 19-February 09 From: San Antonio, TX Member No.: 10,071 Region Association: Southwest Region |
QUOTE(HalfMoon @ Jun 28 2014, 01:31 PM) Today I thought I would pull the headlight dimmer switch and do a swap with another one I had and lo and behold I see my spare is quite different than what I have on my car. The one on my car has a "jumber" so I'm thinking the PO used a different dimmer and that this "jumper" is part of doing that. Notice in the image my spare has no jumper and the different number of tang contact points between the two. Anyone have any experience with this? I suspect my spare is the appropriate dimmer. After this I can only think of one more component I can change before doing continuity checks on the wires and that would be my ignition switch (I do have a spare). Grrrrr. How bout the difference of those dimmer switchs ya'll? Yes, your spare is appropriate for the '73. My car is a 73 also and I replaced a bad dimmer relay the same way (by adding the jumper). Just wire it the same way, with the jumper removed. |
|
|
|
| HalfMoon |
Jun 28 2014, 09:11 PM
Post
#29
|
|
Senior Member Group: Members Posts: 828 Joined: 13-November 12 From: Shenandoah Junction, WV Member No.: 15,144 Region Association: MidAtlantic Region |
QUOTE(dadaDaveed @ Jun 28 2014, 02:59 PM) QUOTE(HalfMoon @ Jun 28 2014, 01:31 PM) Today I thought I would pull the headlight dimmer switch and do a swap with another one I had and lo and behold I see my spare is quite different than what I have on my car. The one on my car has a "jumber" so I'm thinking the PO used a different dimmer and that this "jumper" is part of doing that. Notice in the image my spare has no jumper and the different number of tang contact points between the two. Anyone have any experience with this? I suspect my spare is the appropriate dimmer. After this I can only think of one more component I can change before doing continuity checks on the wires and that would be my ignition switch (I do have a spare). Grrrrr. How bout the difference of those dimmer switchs ya'll? Yes, your spare is appropriate for the '73. My car is a 73 also and I replaced a bad dimmer relay the same way (by adding the jumper). Just wire it the same way, with the jumper removed. Thanks DadaDaveed, One thing that has me slightly confused.... Notice the difference in wire placement in comparrison? My spare has the white wire at 56 and the yellow wire at 56a, but the one on the car (that's jumped) has the yellow wire at 56 and the white wire at 56a. Any thoughts about this? Here's a better image and the schematic (Believe it's component 27 combination relay, right?): 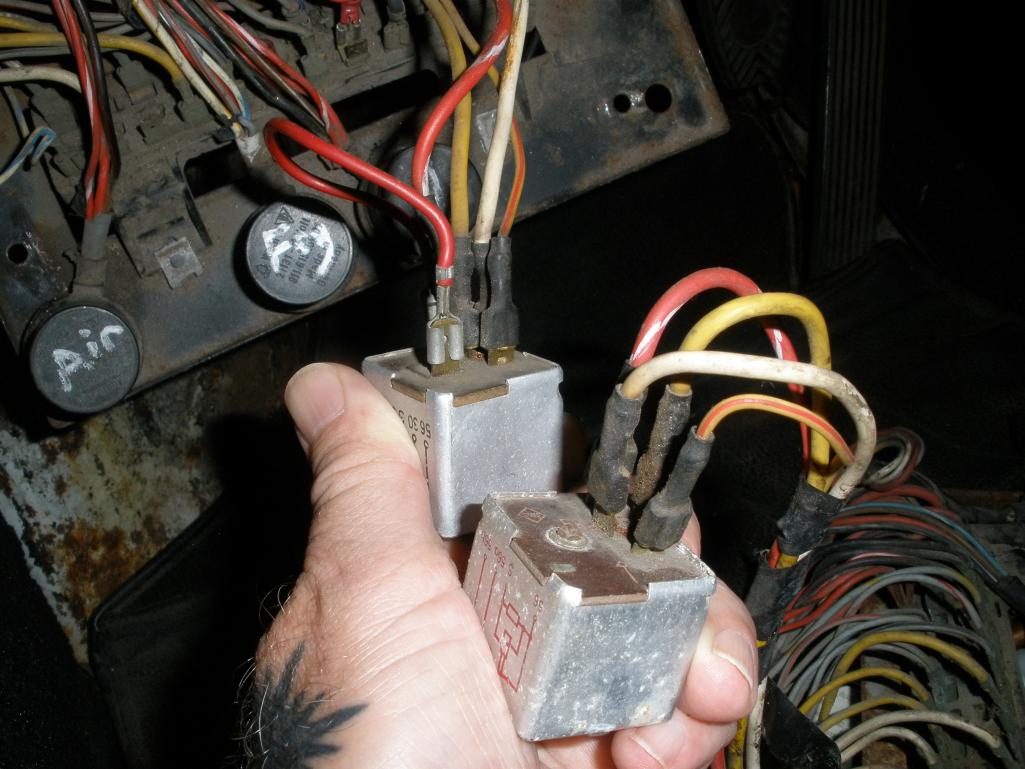 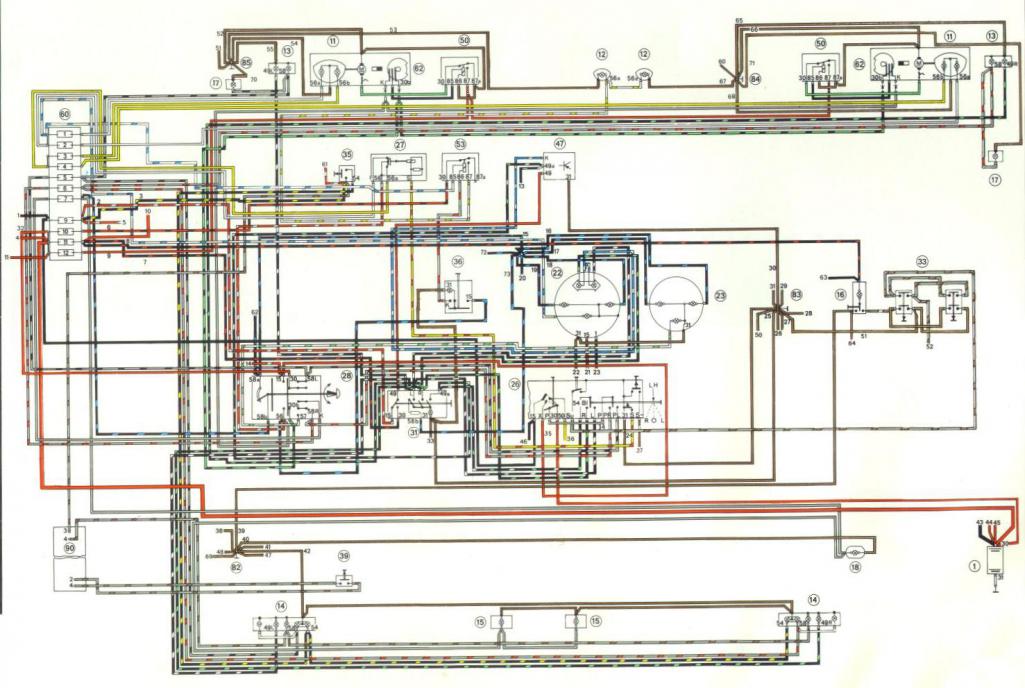 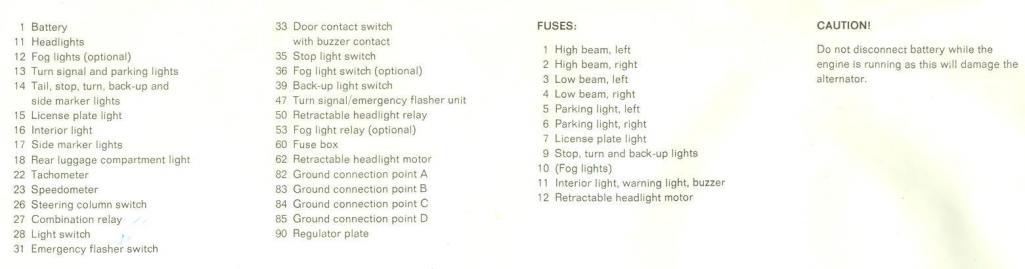 |
|
|
|
| dadaDaveed |
Jun 28 2014, 09:31 PM
Post
#30
|
|
Member Group: Members Posts: 111 Joined: 19-February 09 From: San Antonio, TX Member No.: 10,071 Region Association: Southwest Region |
I just pulled my fuse panel to take a look.
56 is where your Red is connected on both, as is mine. 56a is to the left and it should be White. 56b is to the right and should be yellow. Yellow with red stripe goes to S and if using a 5 post relay, a jumper should go from 56 to 30. |
|
|
|
| dadaDaveed |
Jun 28 2014, 09:36 PM
Post
#31
|
|
Member Group: Members Posts: 111 Joined: 19-February 09 From: San Antonio, TX Member No.: 10,071 Region Association: Southwest Region |
Honestly, I don't know if swapping 56a and 56b matters or not, but yours appears to be backwards from my functioning circuit. It's worth a try.
|
|
|
|
| HalfMoon |
Jun 28 2014, 09:45 PM
Post
#32
|
|
Senior Member Group: Members Posts: 828 Joined: 13-November 12 From: Shenandoah Junction, WV Member No.: 15,144 Region Association: MidAtlantic Region |
QUOTE(dadaDaveed @ Jun 28 2014, 11:36 PM) Honestly, I don't know if swapping 56a and 56b matters or not, but yours appears to be backwards from my functioning circuit. It's worth a try. One wonders if the PO wired em backwards and if this is the source of the problems originally posted? I'm going to wire it the way it should be 56a white, 56b yellow. Thanks dood! D |
|
|
|
| HalfMoon |
Jun 29 2014, 09:27 PM
Post
#33
|
|
Senior Member Group: Members Posts: 828 Joined: 13-November 12 From: Shenandoah Junction, WV Member No.: 15,144 Region Association: MidAtlantic Region |
Made the dimmer switch tonight but no love. Fuses still blowing at 8, license plate lights and dash lights still coming on with headlight switch off ignition turned to on.
Next thing to try is swapping out ignition switches. After that, all I can think of would be doing continuity checks on wires to search for a broken one.... Unless you got a brainstorm? Got one? Poop. |
|
|
|
| Dave_Darling |
Jun 29 2014, 10:18 PM
Post
#34
|
|
914 Idiot Group: Members Posts: 15,196 Joined: 9-January 03 From: Silicon Valley / Kailua-Kona Member No.: 121 Region Association: Northern California |
Look for places (especially lights) where wires could have been switched around. Sometimes stuff like that will sort-of work for a while, and then something shifts a little and POP!
--DD |
|
|
|
| Tom |
Jun 30 2014, 06:31 AM
Post
#35
|
|
Advanced Member Group: Members Posts: 2,139 Joined: 21-August 05 From: Port Orchard, WA 98367 Member No.: 4,626 Region Association: None |
You need to find out why fuse #8 is blowing, According to the prints from Pelican, fuse #8 feeds the following: Fresh air blower and switch that controls the speeds, cigarette lighter, and wiper motor. With the power disconnected, use a multimeter to measure the ohmic value between ground and the load side of fuse #8. It should be very low, ( like 0 ohms - grounded), that is why the fuse is blowing. Now you need to see which wire is giving the low reading. If there are multiple spade terminals, remove them one at a time to find which one is grounded. One of them is bad, it is just a matter of finding the bad one and then fixing what is wrong.
Tom EDIT: Quick check - pull the cig lighter out and see if there is corrosion inside. With lighter out does the reading on the load side of fuse #8 get higher in ohms? Tom |
|
|
|
| HalfMoon |
Jun 30 2014, 08:08 PM
Post
#36
|
|
Senior Member Group: Members Posts: 828 Joined: 13-November 12 From: Shenandoah Junction, WV Member No.: 15,144 Region Association: MidAtlantic Region |
QUOTE(Tom @ Jun 30 2014, 08:31 AM) You need to find out why fuse #8 is blowing, According to the prints from Pelican, fuse #8 feeds the following: Fresh air blower and switch that controls the speeds, cigarette lighter, and wiper motor. With the power disconnected, use a multimeter to measure the ohmic value between ground and the load side of fuse #8. It should be very low, ( like 0 ohms - grounded), that is why the fuse is blowing. Now you need to see which wire is giving the low reading. If there are multiple spade terminals, remove them one at a time to find which one is grounded. One of them is bad, it is just a matter of finding the bad one and then fixing what is wrong. Tom EDIT: Quick check - pull the cig lighter out and see if there is corrosion inside. With lighter out does the reading on the load side of fuse #8 get higher in ohms? Tom Preliminary testing had the powered side of fuse slot eight at 1 ohm and the unpowered side at 0 ohm's. It didn't make a difference if the lighter was in or out. Is that enough resistence to cause fault? |
|
|
|
| Tom |
Jul 1 2014, 12:22 AM
Post
#37
|
|
Advanced Member Group: Members Posts: 2,139 Joined: 21-August 05 From: Port Orchard, WA 98367 Member No.: 4,626 Region Association: None |
"0" ohms from the load side of the fuse to ground is bad. Since you mentioned about losing the wipers, I would look at that circuit. I don't remember if the connections on the load side of fuse #8 have multiple spade terminals or not. If so, remove one at a time and see if the resistance at fuse #8 increases. Don't worry about the powered side of fuse #8, just the load side that read "0" ohms. If in fact the load side has multiple terminals and one reads "0" ohms to ground, then try to identify where that wire goes to as it is causing a direct short to ground. That is why the larger fuse popped instantly. The lower the resistance, the greater the current. So that is too little resistance. If you have the time and desire, try searching for " Basic DC circuits". It will help you understand what you need to know to fix things on the car that involve electricity.
Tom |
|
|
|
| HalfMoon |
Jul 1 2014, 09:25 AM
Post
#38
|
|
Senior Member Group: Members Posts: 828 Joined: 13-November 12 From: Shenandoah Junction, WV Member No.: 15,144 Region Association: MidAtlantic Region |
QUOTE(Tom @ Jul 1 2014, 02:22 AM) "0" ohms from the load side of the fuse to ground is bad. Since you mentioned about losing the wipers, I would look at that circuit. I don't remember if the connections on the load side of fuse #8 have multiple spade terminals or not. If so, remove one at a time and see if the resistance at fuse #8 increases. Don't worry about the powered side of fuse #8, just the load side that read "0" ohms. If in fact the load side has multiple terminals and one reads "0" ohms to ground, then try to identify where that wire goes to as it is causing a direct short to ground. That is why the larger fuse popped instantly. The lower the resistance, the greater the current. So that is too little resistance. If you have the time and desire, try searching for " Basic DC circuits". It will help you understand what you need to know to fix things on the car that involve electricity. Tom Hey Tom, I think I'm being a knob mebbe and screwing up terminology. When we say load side and powered side I think I'm misunderstanding so I'm going to use idiot terminology.... The side I referred to as the "powered side" and had a ohm reading of 1 (with the fuse out and the battery unhooked) lit up a test light when I had the fuse out and the battery hooked up, ignition key on. The other side (which did NOT light up a test light when the fuse was out and the battery was hooked up, ignition key on) had a value of 0 ohm once the battery was unhooked. I think your reffering to this as the "load" side. Load side and powered side are different? Powered side lights up a test light=1 ohm (tested with battery unhooked) Load side does not light up a test light=0 ohm (tested with battery unhooked) Learning curve.... David Note-I think I need to re-perform the tests with the battery unhooked and the ignition key on? Addedum-I retested with the ignition key on and off, thinking this being a switched circuit when the battery is hooked up, but it made no difference in the values. |
|
|
|
| Tom |
Jul 1 2014, 11:37 AM
Post
#39
|
|
Advanced Member Group: Members Posts: 2,139 Joined: 21-August 05 From: Port Orchard, WA 98367 Member No.: 4,626 Region Association: None |
David,
The "load" side of a fuse is the side that feeds what ever electrical device, ie; " the load", that circuit is feeding. The "powered" side is the side that power from a power source is fed to. In your case, the fuse is blowing. This indicates that the load is causing too much current to flow through the fuse, then it blows. So you do not need to take ohm readings on the powered side. Disconnecting the battery when working on electrical circuits is always a good idea. When you do hook the battery back up, don't tighten the bolt on the battery cable. Just push the battery cable back on tight enough to power up the car for testing. Then if something goes terribly wrong and the smoke starts coming out, you don't have to spend extra time untightening that battery cable bolt to remove power. For fuse #8, try to divide the circuits on the load side to see which one is causing the ground. Not saying finding the ground on the load side of fuse #8 will solve all of your problems, but these cars have some weird electrical issues from time to time and it wouldn't surprise me if it did. The circuits you are having issues with do have common connections, so it just may fix your lights issue also. You don't need your key ON when doing these particular tests. Some tests may require that, but in your case with fuse #8 blowing, the key ON is not necessary. Tom |
|
|
|
| HalfMoon |
Jul 1 2014, 12:52 PM
Post
#40
|
|
Senior Member Group: Members Posts: 828 Joined: 13-November 12 From: Shenandoah Junction, WV Member No.: 15,144 Region Association: MidAtlantic Region |
QUOTE(Tom @ Jul 1 2014, 01:37 PM) David, The "load" side of a fuse is the side that feeds what ever electrical device, ie; " the load", that circuit is feeding. The "powered" side is the side that power from a power source is fed to. In your case, the fuse is blowing. This indicates that the load is causing too much current to flow through the fuse, then it blows. So you do not need to take ohm readings on the powered side. Disconnecting the battery when working on electrical circuits is always a good idea. When you do hook the battery back up, don't tighten the bolt on the battery cable. Just push the battery cable back on tight enough to power up the car for testing. Then if something goes terribly wrong and the smoke starts coming out, you don't have to spend extra time untightening that battery cable bolt to remove power. For fuse #8, try to divide the circuits on the load side to see which one is causing the ground. Not saying finding the ground on the load side of fuse #8 will solve all of your problems, but these cars have some weird electrical issues from time to time and it wouldn't surprise me if it did. The circuits you are having issues with do have common connections, so it just may fix your lights issue also. You don't need your key ON when doing these particular tests. Some tests may require that, but in your case with fuse #8 blowing, the key ON is not necessary. Tom Tom, Thanks for the clarification. I'm assuming I can check the circuits on the load side by detaching the particular wire from the back of the fuse block, connect my test lead to that wire, then trace the wire to the component detach that wire and connet my other lead to it, then take a reading? Or, is it like how I tested the load side of fuse block 8? Which would mean I would detach the component wire from the back of the fuse block, connect my ohm meter, then merely connect the other lead from my ohm meter to ground and take a reading. Having no real experience, this is all new to me. In the past, I've only used a continuity tester or a test light for simple testing (does it get power, can it get power) Thanks once again for sharing your experience. My hope is that other members with no experience are following this and learning as well :-) D |
|
|
|
|
1 User(s) are reading this topic (1 Guests and 0 Anonymous Users)
0 Members:

|
Lo-Fi Version | Time is now: 7th July 2025 - 02:45 AM |
Invision Power Board
v9.1.4 © 2025 IPS, Inc.