|
|

|
Porsche, and the Porsche crest are registered trademarks of Dr. Ing. h.c. F. Porsche AG.
This site is not affiliated with Porsche in any way. Its only purpose is to provide an online forum for car enthusiasts. All other trademarks are property of their respective owners. |
|
|
  |
| xsboost90 |
 Jan 31 2005, 10:31 PM Jan 31 2005, 10:31 PM
Post
#41
|
|
Senior Member    Group: Members Posts: 1,393 Joined: 2-August 04 From: cincinnati Member No.: 2,432 |
yeah sometimes my little propane heater just doesnt cut it! What make me feel better in these times, SPEND SOME MONEY! Get some POR 15 and start coating the insides of stuff while your cutting it open. May as well, then maybe you wont have to do this ever again.....ok so i tried. (IMG:http://www.914world.com/bbs2/html/emoticons/biggrin.gif) Ive gotten burned out doing long hours of welding floorboards and such up, just set a goal like - ill just get this section done tonite, then clean this one area....then have a beer.
|
| CptTripps |
 Jan 31 2005, 10:37 PM Jan 31 2005, 10:37 PM
Post
#42
|
|
:: Punch and Pie ::     Group: Members Posts: 3,585 Joined: 26-December 04 From: Tuscaloosa, AL and Akron, OH Member No.: 3,342 Region Association: Upper MidWest |
I ordered some por15 yesterday. I should have it this week. Should I just spray it inside the long? I have a feeling I'll be opening it up again before I put the man on. I think I want to re-do the plate I welded in for the seatbelt.
I figure if I do 2ft of the edges a night, I'll have it all off of there by the weekend, then I can start welding. That'll go faster than tearing the old one out. I may have a local welder come do it for me. He owes a few favors to a friend of mine that owes me a LOT of favors. I think if I have someone do the re-welding for me, I'll be a lot better off in the long-run. I may put the chassis-stifening kit on at the same time. Then just be sone with the interior for a while...move on to the body work. Hell, anything that's not UNDER the car will be a welcome change for me! |
| Hammy |
 Jan 31 2005, 10:43 PM Jan 31 2005, 10:43 PM
Post
#43
|
||
|
mr. Wonderful    Group: Members Posts: 1,827 Joined: 20-October 04 From: Columbia, CA./ Tuolumne Member No.: 2,978 Region Association: Northern California |
Just make SURE you wear some gloves when putting on the POR 15 stuff. My hands are all black now, nothing will take it off. (IMG:http://www.914world.com/bbs2/html/emoticons/unsure.gif) |
||
| xsboost90 |
 Jan 31 2005, 10:46 PM Jan 31 2005, 10:46 PM
Post
#44
|
|
Senior Member    Group: Members Posts: 1,393 Joined: 2-August 04 From: cincinnati Member No.: 2,432 |
did you get a spray can or just a can. Best thing to do is brush it on, for one its not something you want oversprayed onto something else... if a welder is coming over to do some of it for you, have him give you some pointers. You know the whole give a man a fish and he'll eat for one day.....
|
| xsboost90 |
 Jan 31 2005, 10:48 PM Jan 31 2005, 10:48 PM
Post
#45
|
|
Senior Member    Group: Members Posts: 1,393 Joined: 2-August 04 From: cincinnati Member No.: 2,432 |
yeah the can says that the only thing that will take the por15 off is...time.
|
| sgomes |
 Jan 31 2005, 11:39 PM Jan 31 2005, 11:39 PM
Post
#46
|
|
Electric Member    Group: Members Posts: 815 Joined: 6-May 04 From: Campbell, CA Member No.: 2,029 |
I can't exactly figure out what part of the car I'm looking at in this pic but if we're looking up at the passenger side long isn't the circled part a little scary? (IMG:http://www.914world.com/bbs2/html/emoticons/unsure.gif) (IMG:http://www.914world.com/bbs2/html/emoticons/confused24.gif)
Attached image(s) 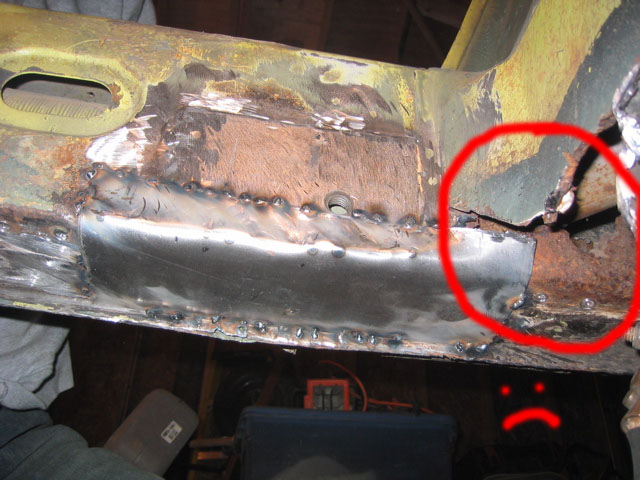
|
| CptTripps |
 Feb 1 2005, 06:48 AM Feb 1 2005, 06:48 AM
Post
#47
|
|
:: Punch and Pie ::     Group: Members Posts: 3,585 Joined: 26-December 04 From: Tuscaloosa, AL and Akron, OH Member No.: 3,342 Region Association: Upper MidWest |
Already addressed it. It's not as scary as it looks. Looks worse now without the floor pan. I got in there and took some shots. Seems to be about the only place a 'professional' repair was done on the car. It's just around the pipe for the heat duct. I got in there and metal is all solid. ie: I couldn't pull it out with my hands. It's sealed up from any moisture by the repairs on the other sides.
That's why I ordered the POR 15. I want to cover all of that...just in case. I'm going to have that welder take a look at it for me too. If I half to tear out the fender for a day or two to patch it, so be it. I'm in pretty deep at this point anyway. =) |
| SirAndy |
 Feb 1 2005, 11:08 AM Feb 1 2005, 11:08 AM
Post
#48
|
||
|
Resident German                          Group: Admin Posts: 42,257 Joined: 21-January 03 From: Oakland, Kalifornia Member No.: 179 Region Association: Northern California |
make sure you spray all that surface rust with "Metal-Ready" first before you paint it with POR-15 !! also, metal-ready needs to washed off with *water* after it dried and before you apply the por-15, otherwise, the por won't stick ... this is the only combination that really works, just putting por-15 over the surface rust won't do the trick ... keep up the good work! (IMG:http://www.914world.com/bbs2/html/emoticons/smilie_pokal.gif) Andy |
||
| kafermeister |
 Feb 3 2005, 02:40 PM Feb 3 2005, 02:40 PM
Post
#49
|
||
|
Senior Member    Group: Members Posts: 778 Joined: 20-January 03 From: Cincinnati/Northern KY Member No.: 174 |
Perry, what shape burr did you use? Rick |
||
| CptTripps |
 Feb 5 2005, 12:01 AM Feb 5 2005, 12:01 AM
Post
#50
|
|
:: Punch and Pie ::     Group: Members Posts: 3,585 Joined: 26-December 04 From: Tuscaloosa, AL and Akron, OH Member No.: 3,342 Region Association: Upper MidWest |
File this under 'while I'm in here' or maybe I should just start a new thread for my 'progress' on the car in general.
I was feeling around in the pass-rear wheel well, and found an unnotived perforation...3min later, I could put my hand in it. What to do? Patch time! Attached image(s) 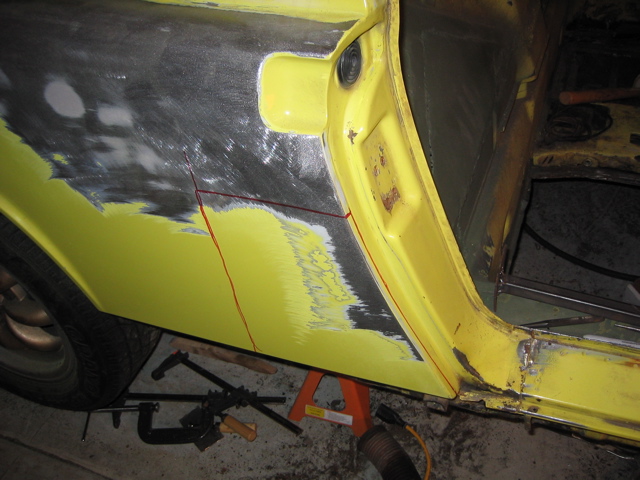
|
| CptTripps |
 Feb 5 2005, 12:03 AM Feb 5 2005, 12:03 AM
Post
#51
|
|
:: Punch and Pie ::     Group: Members Posts: 3,585 Joined: 26-December 04 From: Tuscaloosa, AL and Akron, OH Member No.: 3,342 Region Association: Upper MidWest |
Let's cut it out and see what we have....
Not too bad. you can see the repair the PO made under the batt-tray. THAT fix was done pretty well. I guess they just didn't want to do wha tI just did to finish the job... Attached image(s) 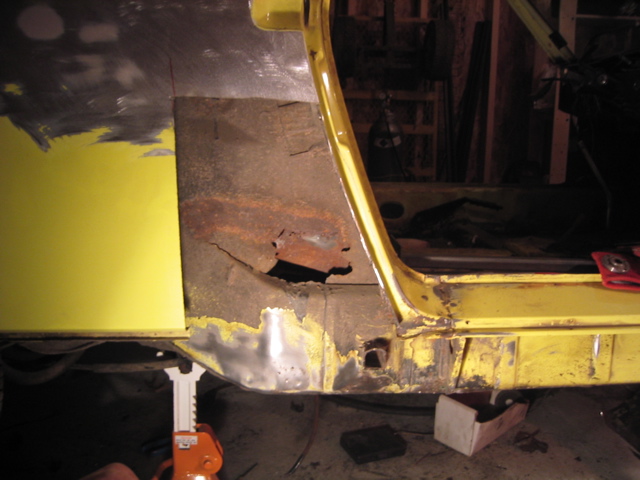
|
| CptTripps |
 Feb 5 2005, 12:05 AM Feb 5 2005, 12:05 AM
Post
#52
|
|
:: Punch and Pie ::     Group: Members Posts: 3,585 Joined: 26-December 04 From: Tuscaloosa, AL and Akron, OH Member No.: 3,342 Region Association: Upper MidWest |
Inside the long is amazingly....still shinney metal! How the hell THAT happened, I'll never know.
There wasn't any flex at all when the car was running (last week) so I'm more concerned with sealing it all up. Attached image(s) 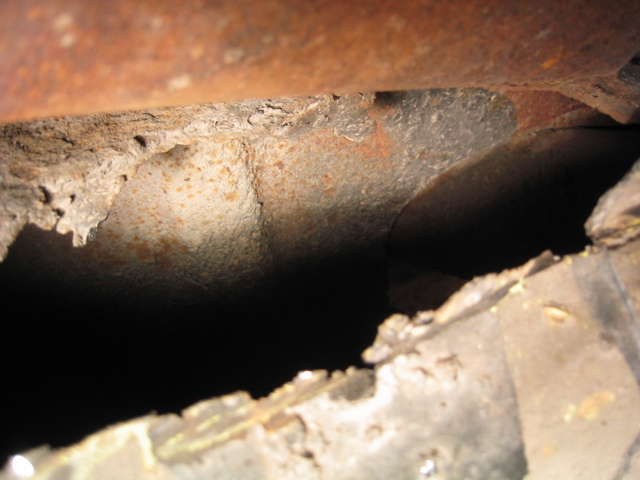
|
| CptTripps |
 Feb 5 2005, 12:08 AM Feb 5 2005, 12:08 AM
Post
#53
|
|
:: Punch and Pie ::     Group: Members Posts: 3,585 Joined: 26-December 04 From: Tuscaloosa, AL and Akron, OH Member No.: 3,342 Region Association: Upper MidWest |
I cut everything back to 'good metal' and sprayed the inside with POR-15.
Attached image(s) 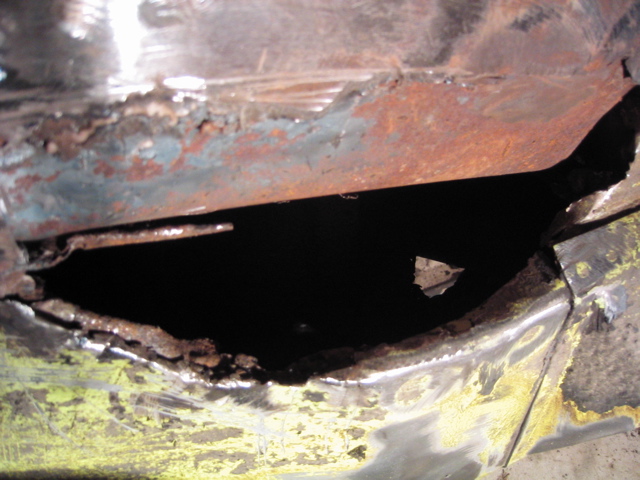
|
| CptTripps |
 Feb 5 2005, 12:09 AM Feb 5 2005, 12:09 AM
Post
#54
|
|
:: Punch and Pie ::     Group: Members Posts: 3,585 Joined: 26-December 04 From: Tuscaloosa, AL and Akron, OH Member No.: 3,342 Region Association: Upper MidWest |
Time to fit a new metal piece in where the old one was...
I used the 16ga metal I'd bought to use for the floor pan. Attached image(s) 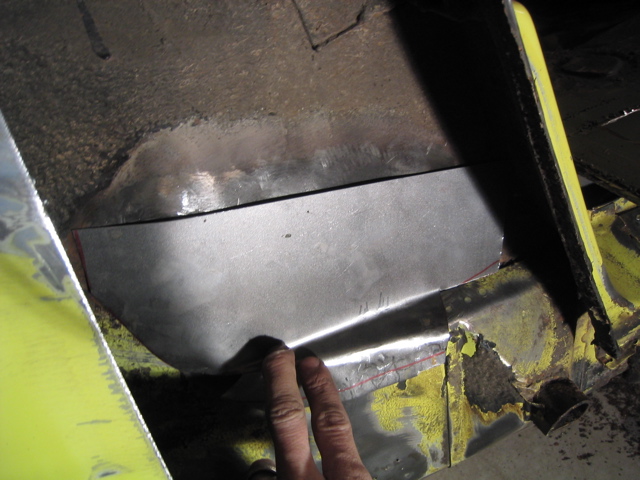
|
| CptTripps |
 Feb 5 2005, 12:12 AM Feb 5 2005, 12:12 AM
Post
#55
|
|
:: Punch and Pie ::     Group: Members Posts: 3,585 Joined: 26-December 04 From: Tuscaloosa, AL and Akron, OH Member No.: 3,342 Region Association: Upper MidWest |
I'm still not the best welder, but I'm getting MUCH better. (This always looks worse when I look at pics.)
Attached image(s) 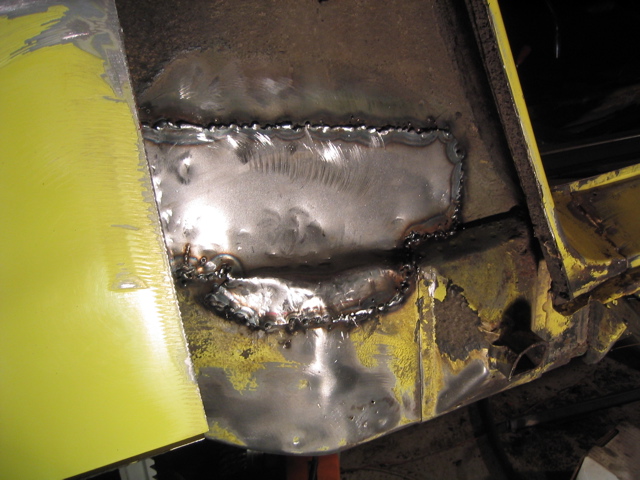
|
| CptTripps |
 Feb 5 2005, 12:13 AM Feb 5 2005, 12:13 AM
Post
#56
|
|
:: Punch and Pie ::     Group: Members Posts: 3,585 Joined: 26-December 04 From: Tuscaloosa, AL and Akron, OH Member No.: 3,342 Region Association: Upper MidWest |
I bought more seam-sealer than I need for the floors, so I figure I can use some here. I made sure to put it on extra-sloppy...just like at the factory! (joke..)
Attached image(s) 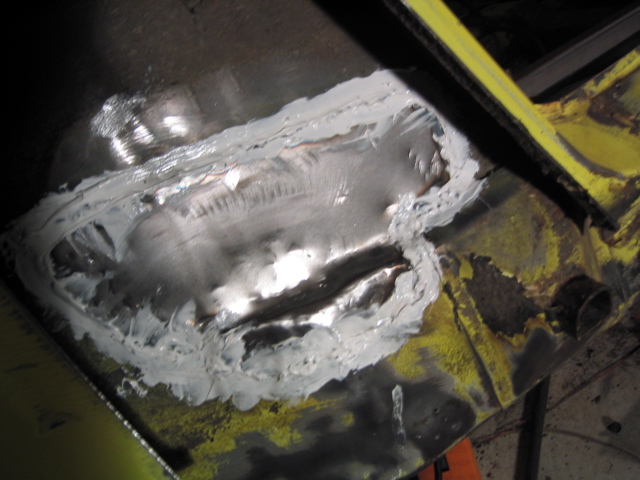
|
| CptTripps |
 Feb 5 2005, 12:15 AM Feb 5 2005, 12:15 AM
Post
#57
|
|
:: Punch and Pie ::     Group: Members Posts: 3,585 Joined: 26-December 04 From: Tuscaloosa, AL and Akron, OH Member No.: 3,342 Region Association: Upper MidWest |
After that dried for a while, I hit it with a thick coat of etching primer. I'll point the spray-gun up there when I'm painting the trunks to give it some more sealing...I've got some undercoating too...maybe I'll use that.
Attached image(s) 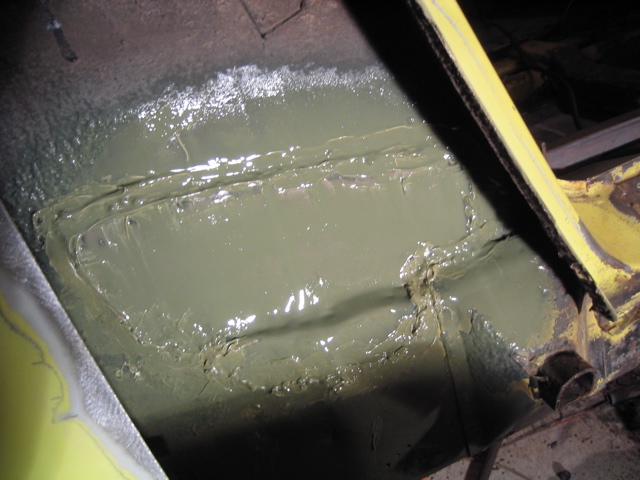
|
| CptTripps |
 Feb 5 2005, 12:17 AM Feb 5 2005, 12:17 AM
Post
#58
|
|
:: Punch and Pie ::     Group: Members Posts: 3,585 Joined: 26-December 04 From: Tuscaloosa, AL and Akron, OH Member No.: 3,342 Region Association: Upper MidWest |
And then to the handy-dandy butt weld clamps. (Harbor Freight...8 for $5!)
When I cut it out, I went on a seam in the door-jam so I'd have a nice place to go back to. Attached image(s) 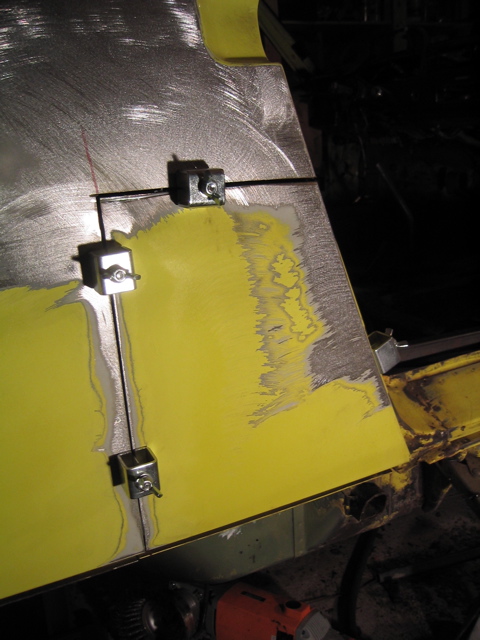
|
| CptTripps |
 Feb 5 2005, 12:20 AM Feb 5 2005, 12:20 AM
Post
#59
|
|
:: Punch and Pie ::     Group: Members Posts: 3,585 Joined: 26-December 04 From: Tuscaloosa, AL and Akron, OH Member No.: 3,342 Region Association: Upper MidWest |
Here's where the battery on my camera died. O-Well. I got it all tacked up and grinded down. I surprised the crap out of myself with the job I did. I'm charging it up tonight, you'll all get to see tomorrow.
|
| Pudge |
 Feb 8 2005, 02:41 PM Feb 8 2005, 02:41 PM
Post
#60
|
|
Newbie  Group: Members Posts: 49 Joined: 7-February 05 From: Tampa, FL Member No.: 3,568 |
Doug,
Thanks for posting your progress and tips. I have just started removing my floor pans and you have saved me alot of headaches. Please continue to post your progress and your helpful tips. Eric (IMG:http://www.914world.com/bbs2/html/emoticons/sawzall-smiley.gif) |
  |
1 User(s) are reading this topic (1 Guests and 0 Anonymous Users)
0 Members:

|
Lo-Fi Version | Time is now: 15th July 2025 - 02:08 AM |
Invision Power Board
v9.1.4 © 2025 IPS, Inc.


