|
|
|
Porsche, and the Porsche crest are registered trademarks of Dr. Ing. h.c. F. Porsche AG.
This site is not affiliated with Porsche in any way. Its only purpose is to provide an online forum for car enthusiasts. All other trademarks are property of their respective owners. |
|
|

  |

| earossi |
 Nov 18 2014, 05:16 PM Nov 18 2014, 05:16 PM
Post
#1
|
|
Member  Group: Members Posts: 210 Joined: 8-December 11 From: Chicago, Il Member No.: 13,878 Region Association: Upper MidWest |
I am readying a 3.2 Carrera engine for installation in my 76 914. My understanding is that the cast aluminum fins on the exhaust valve covers need to be locally removed to allow for removal of the valve covers with the engine in the car. The covers apparently interfere with the motor mounts.
Can someone provide a picture of properly modified valve covers? |
   |

 
|
| Mark Henry |
Nov 18 2014, 05:30 PM
Post
#2
|
|
that's what I do! Group: Members Posts: 20,065 Joined: 27-December 02 From: Port Hope, Ontario Member No.: 26 Region Association: Canada |
Just mill all the fins/ribs down to about 1/4".
|
|
|
|
| earossi |
Nov 18 2014, 05:39 PM
Post
#3
|
|
Member Group: Members Posts: 210 Joined: 8-December 11 From: Chicago, Il Member No.: 13,878 Region Association: Upper MidWest |
QUOTE(Mark Henry @ Nov 18 2014, 05:30 PM)  Just mill all the fins/ribs down to about 1/4". Unfortunately, I do not have access to a mill, and would prefer to remove a minimum amount of material using a Dremel and files. So, I am in search of a picture or sketch that shows the minimum material to remove that will still allow removal of the cover with the engine installed. |
|
|
|
| Mark Henry |
Nov 18 2014, 05:48 PM
Post
#4
|
|
that's what I do! Group: Members Posts: 20,065 Joined: 27-December 02 From: Port Hope, Ontario Member No.: 26 Region Association: Canada |
Can't help, I asked the same question and the milling job was quick and easy for me.
Pretty simple set up/job, I can't see a machine shop charging a whole lot to do this. Even a big belt sander would work. |
|
|
|
| worn |
Nov 18 2014, 06:26 PM
Post
#5
|
|
can't remember Group: Members Posts: 3,156 Joined: 3-June 11 From: Madison, WI Member No.: 13,152 Region Association: Upper MidWest |
QUOTE(Mark Henry @ Nov 18 2014, 03:48 PM) Can't help, I asked the same question and the milling job was quick and easy for me. Pretty simple set up/job, I can't see a machine shop charging a whole lot to do this. Even a big belt sander would work. Thanks Mark, Since I do have a mill and a 3.2 almost ready to go I was wondering the same thing. I have only offered up the engine once so I am a little unclear what the clearance is for. I think it involves valve adjustment but what gets in the way of what that the milling solves. Is it trailing arms? No I am sure the engine is right side up. I think. |
|
|
|
| fixer34 |
Nov 18 2014, 06:45 PM
Post
#6
|
|
Senior Member Group: Members Posts: 1,085 Joined: 16-September 14 From: Chicago area Member No.: 17,908 Region Association: Upper MidWest |
I ordered Turbo valve covers for my stock six and found out they would not install without some 'machining'. I would take a picture for you, but I don't have easy access to crawl under the car right now. It's the trailing arm mounts that interfere. If I recall, you only need to take off part of the fins near the upper, rear portion of the covers, and not much at that.
If you can wait a couple days, I'll try to get a picture. |
|
|
|
| earossi |
Nov 18 2014, 07:55 PM
Post
#7
|
|
Member Group: Members Posts: 210 Joined: 8-December 11 From: Chicago, Il Member No.: 13,878 Region Association: Upper MidWest |
As the old saying goes.....one picture would be worth more than a million words! I just need to see which ribs have to be removed, and by how much. A single picture would address my question.
|
|
|
|
| mepstein |
Nov 18 2014, 08:02 PM
Post
#8
|
|
914-6 GT in waiting Group: Members Posts: 19,295 Joined: 19-September 09 From: Landenberg, PA/Wilmington, DE Member No.: 10,825 Region Association: MidAtlantic Region |
I milled mine (actually scotty b did it) 5/16 across the entire surface. But not much to show in a pic. A belt sander might to it on the cheap.
|
|
|
|
| earossi |
Nov 18 2014, 08:14 PM
Post
#9
|
|
Member Group: Members Posts: 210 Joined: 8-December 11 From: Chicago, Il Member No.: 13,878 Region Association: Upper MidWest |
QUOTE(mepstein @ Nov 18 2014, 08:02 PM) I milled mine (actually scotty b did it) 5/16 across the entire surface. But not much to show in a pic. A belt sander might to it on the cheap. So, to be clear, you milled off 5/16 or did you mill off enough to leave 5/16 of an inch high fins? |
|
|
|
| mepstein |
Nov 18 2014, 08:41 PM
Post
#10
|
|
914-6 GT in waiting Group: Members Posts: 19,295 Joined: 19-September 09 From: Landenberg, PA/Wilmington, DE Member No.: 10,825 Region Association: MidAtlantic Region |
QUOTE(earossi @ Nov 18 2014, 09:14 PM) QUOTE(mepstein @ Nov 18 2014, 08:02 PM) I milled mine (actually scotty b did it) 5/16 across the entire surface. But not much to show in a pic. A belt sander might to it on the cheap. So, to be clear, you milled off 5/16 or did you mill off enough to leave 5/16 of an inch high fins? I milled 5/16 from the total height. That is the recommended amount to clear the suspension. I can't imagine a shop would charge more that $50 to mill. Some people use bolts but then your removing them from the aluminum heads over and over and eventually the threads will wear. |
|
|
|
| worn |
Nov 18 2014, 09:00 PM
Post
#11
|
|
can't remember Group: Members Posts: 3,156 Joined: 3-June 11 From: Madison, WI Member No.: 13,152 Region Association: Upper MidWest |
QUOTE(mepstein @ Nov 18 2014, 06:41 PM) QUOTE(earossi @ Nov 18 2014, 09:14 PM) QUOTE(mepstein @ Nov 18 2014, 08:02 PM) I milled mine (actually scotty b did it) 5/16 across the entire surface. But not much to show in a pic. A belt sander might to it on the cheap. So, to be clear, you milled off 5/16 or did you mill off enough to leave 5/16 of an inch high fins? I milled 5/16 from the total height. That is the recommended amount to clear the suspension. I can't imagine a shop would charge more that $50 to mill. Some people use bolts but then your removing them from the aluminum heads over and over and eventually the threads will wear. Thanks. I guess then I might time cert or some similar steel thing the heads. If they was coming off, which I hope they aren't. A good number to shoot for. The mill ain't much to look at but it'll do this. Thanks again. |
|
|
|
| John |
Nov 18 2014, 09:01 PM
Post
#12
|
|
member? what's a member? Group: Members Posts: 3,393 Joined: 30-January 04 From: Evansville, IN (SIRPCA) Member No.: 1,615 Region Association: None |
I used a dremel tool, files and sandpaper to do mine while I was temporarily in an apartment when I moved to Southern Indiana several years ago.
It is the suspension consoles that interfere. I was able to get mine off in order to adjust valves and made the modification at that time. I only removed a small portion of the fins where the close fit is. There isn't an interference until one goes to remove and install the lower valve covers. Some folks have also suggested replacing the problem studs with bolts and keep the ribs stock. I preferred to remove a small amount of the ribs. I only removed ribs down to the bolt boss level of the valve covers. Its easy to cut with a dremel tool and much easier with a mill. If I had a picture, I would post it. Perhaps I should go out and take some pictures one evening this week. John |
|
|
|
| Mark Henry |
Nov 18 2014, 09:46 PM
Post
#13
|
|
that's what I do! Group: Members Posts: 20,065 Joined: 27-December 02 From: Port Hope, Ontario Member No.: 26 Region Association: Canada |
QUOTE(worn @ Nov 18 2014, 07:26 PM) QUOTE(Mark Henry @ Nov 18 2014, 03:48 PM) Can't help, I asked the same question and the milling job was quick and easy for me. Pretty simple set up/job, I can't see a machine shop charging a whole lot to do this. Even a big belt sander would work. Thanks Mark, Since I do have a mill and a 3.2 almost ready to go I was wondering the same thing. I have only offered up the engine once so I am a little unclear what the clearance is for. I think it involves valve adjustment but what gets in the way of what that the milling solves. Is it trailing arms? No I am sure the engine is right side up. I think. Yep, when you try to take them off over the studs the trailing arms get in the way. Milling them looks slick and the turbo cover have more than enough meat on them to do this. |
|
|
|
| PanelBilly |
Nov 18 2014, 10:35 PM
Post
#14
|
|
914 Guru Group: Members Posts: 5,809 Joined: 23-July 06 From: Kent, Wa Member No.: 6,488 Region Association: Pacific Northwest |
Here you go. The ribs were milled to be the same height as the base of the bolts.
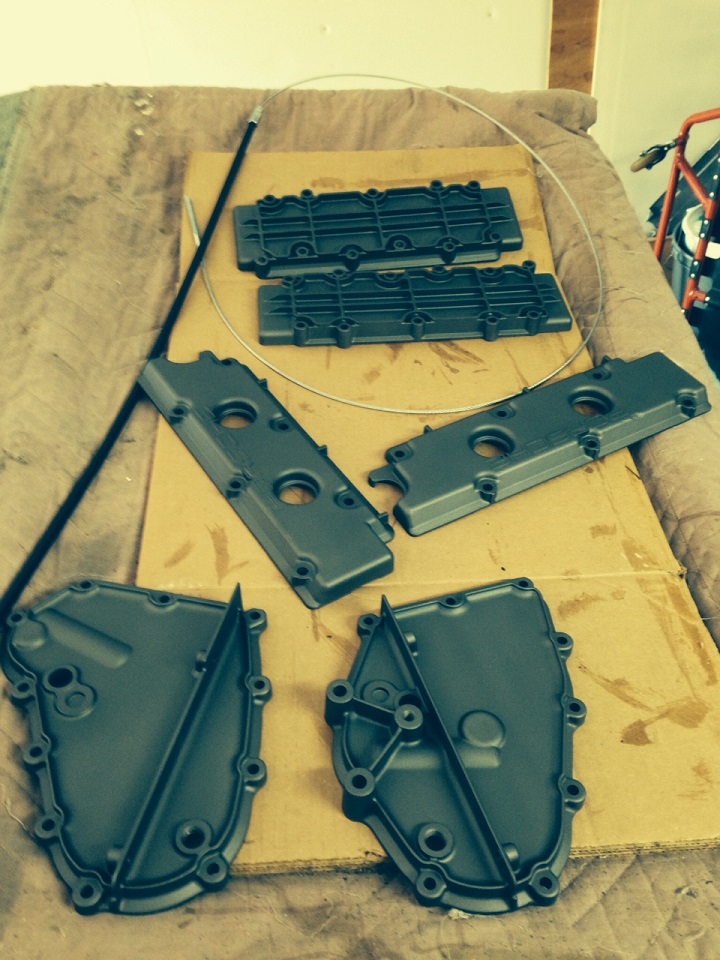 Here's another angle, but a little blurry 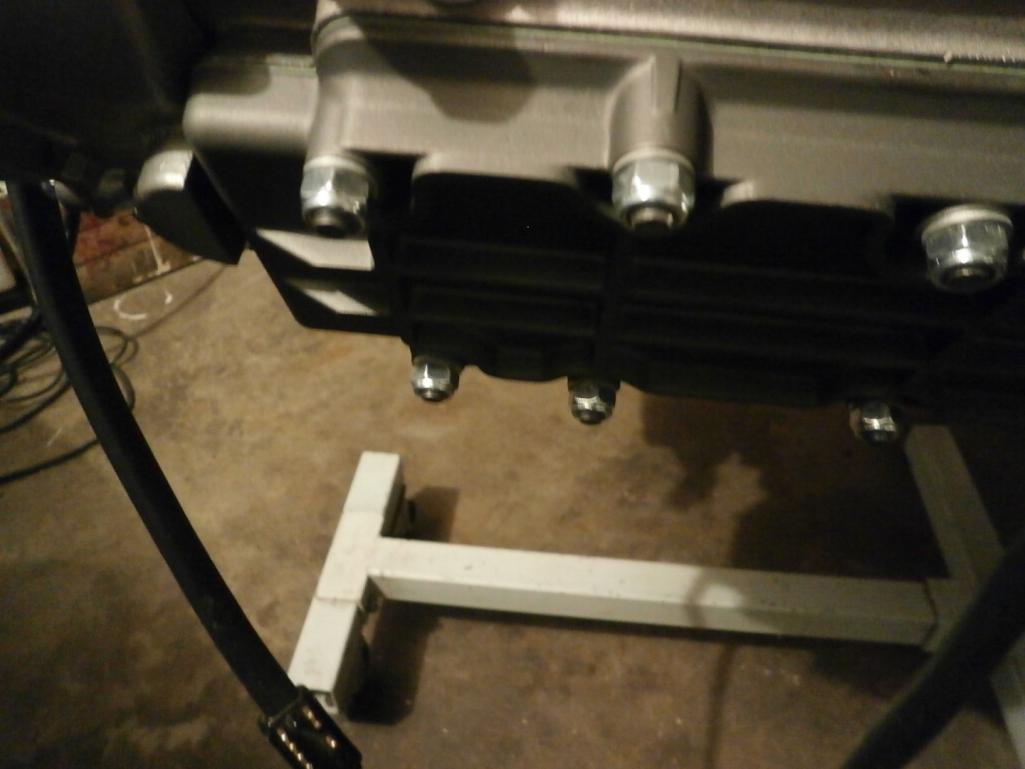 |
|
|
|
| larryM |
Nov 21 2014, 07:23 PM
Post
#15
|
|
emoze Group: Members Posts: 891 Joined: 1-January 03 From: mid- California Member No.: 65 Region Association: Northern California |
QUOTE(PanelBilly @ Nov 18 2014, 08:35 PM) Here you go. The ribs were milled to be the same height as the base of the bolts. X2 above - cost me $40 each to have mine done at local machine shop last year |
|
|
|
| worn |
Nov 21 2014, 07:42 PM
Post
#16
|
|
can't remember Group: Members Posts: 3,156 Joined: 3-June 11 From: Madison, WI Member No.: 13,152 Region Association: Upper MidWest |
QUOTE(PanelBilly @ Nov 18 2014, 08:35 PM) Here you go. The ribs were milled to be the same height as the base of the bolts. Here's another angle, but a little blurry Thanks. Nice color. |
|
|
|
| fixer34 |
Nov 23 2014, 06:32 PM
Post
#17
|
|
Senior Member Group: Members Posts: 1,085 Joined: 16-September 14 From: Chicago area Member No.: 17,908 Region Association: Upper MidWest |
QUOTE(earossi @ Nov 18 2014, 07:55 PM) As the old saying goes.....one picture would be worth more than a million words! I just need to see which ribs have to be removed, and by how much. A single picture would address my question. OK, let's see if these will help. It was actually more toward the center of the cover around 2 of the bolt holes along the top. This is a stock engine, so if your 3.2 is a little larger, you may need to cut a bit more. Tried to get 2 pictures of each side. 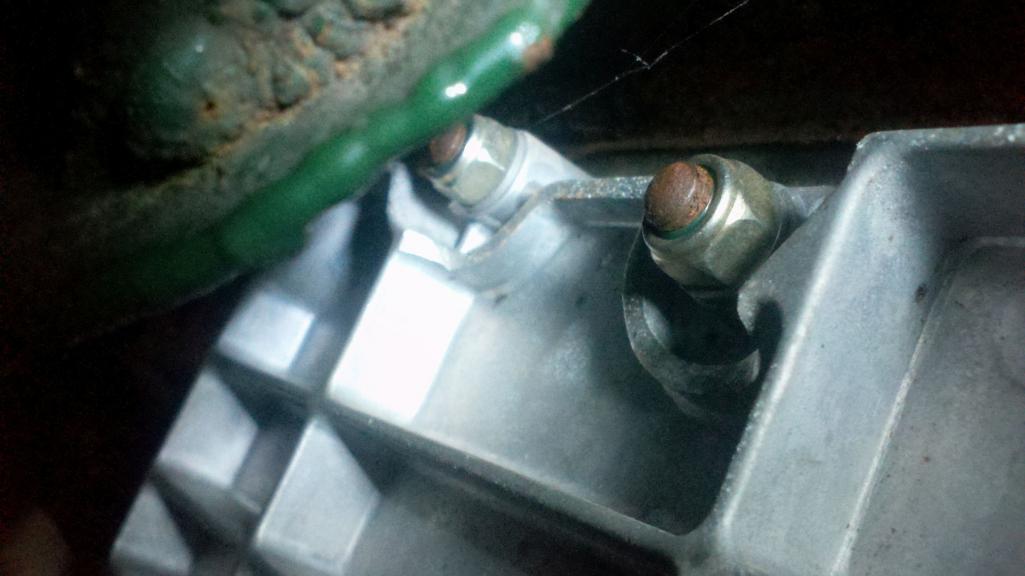 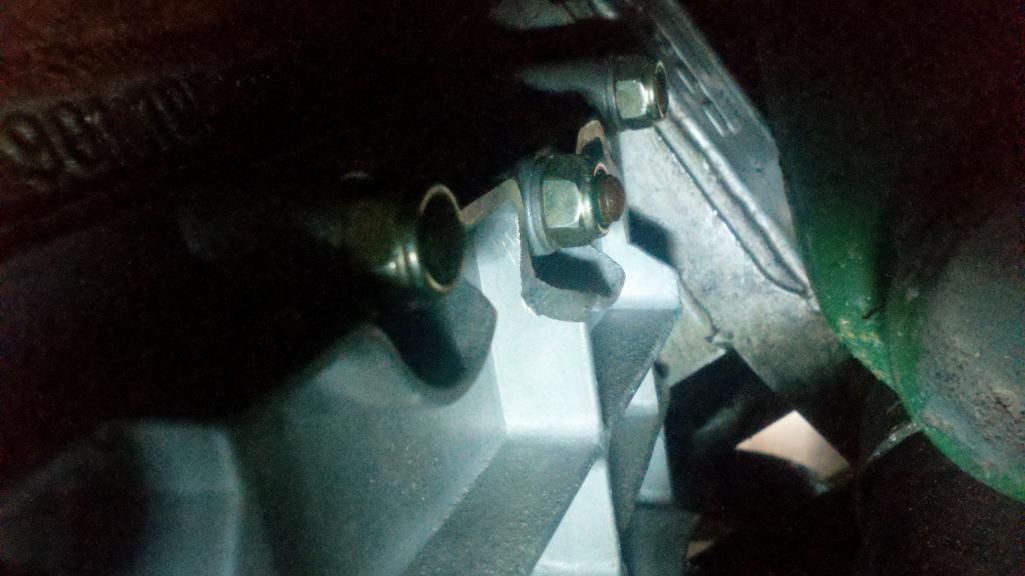 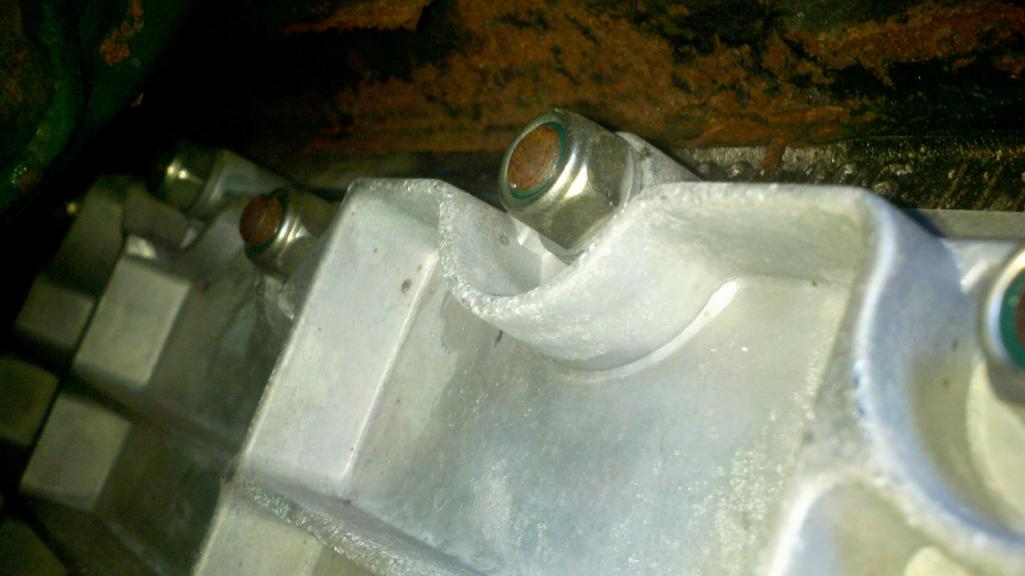 [attachmentid=477 [attachmentid=477159] I used a small hacksaw blade, some pliers and a couple files to trim it out. Didn't have access to anything more sophisticated. Just had to take enough off to allow the cover to fit between the studs and frame. 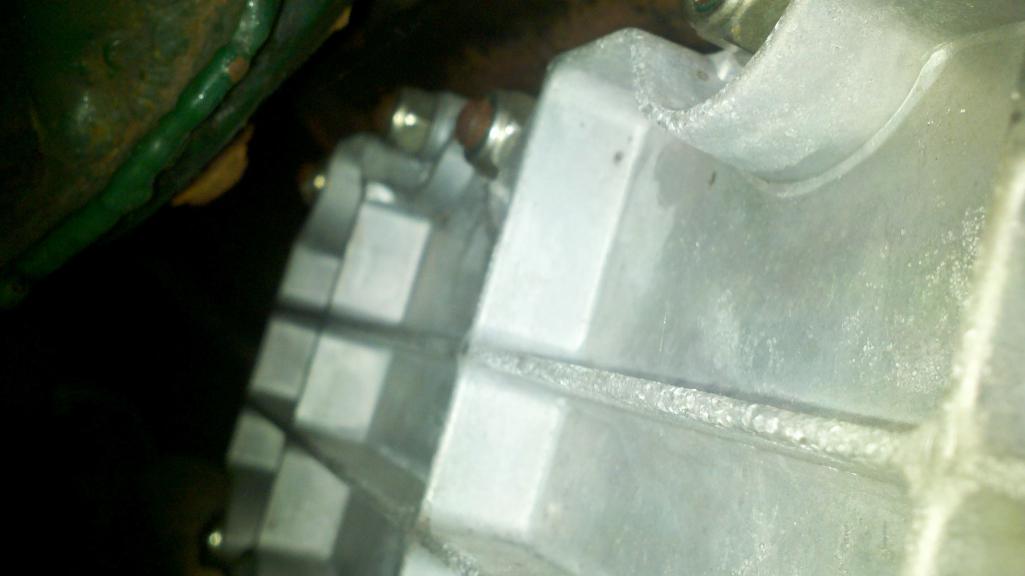 |
|
|
|
| earossi |
Nov 23 2014, 06:36 PM
Post
#18
|
|
Member Group: Members Posts: 210 Joined: 8-December 11 From: Chicago, Il Member No.: 13,878 Region Association: Upper MidWest |
QUOTE(fixer34 @ Nov 23 2014, 06:32 PM) QUOTE(earossi @ Nov 18 2014, 07:55 PM) As the old saying goes.....one picture would be worth more than a million words! I just need to see which ribs have to be removed, and by how much. A single picture would address my question. OK, let's see if these will help. It was actually more toward the center of the cover around 2 of the bolt holes along the top. This is a stock engine, so if your 3.2 is a little larger, you may need to cut a bit more. Tried to get 2 pictures of each side. [attachmentid=477159] I used a small hacksaw blade, some pliers and a couple files to trim it out. Didn't have access to anything more sophisticated. Just had to take enough off to allow the cover to fit between the studs and frame. Terrific pictures. Thanks so much. It is patently true that one or two pictures are easily worth more than a million words. Thanks. |
|
|
|
| tomeric914 |
Nov 23 2014, 06:58 PM
Post
#19
|
|
One Lap of America in a 914! Group: Members Posts: 1,259 Joined: 25-May 08 From: Syracuse, NY Member No.: 9,101 Region Association: North East States |
Use aluminum 911SC valve covers which don't have the ribs and don't require machining. They are inexpensive, plentiful and don't leak like the magnesium covers do.
|
|
|
|
| Mark Henry |
Nov 23 2014, 07:30 PM
Post
#20
|
|
that's what I do! Group: Members Posts: 20,065 Joined: 27-December 02 From: Port Hope, Ontario Member No.: 26 Region Association: Canada |
QUOTE(tomeric914 @ Nov 23 2014, 07:58 PM) Use aluminum 911SC valve covers which don't have the ribs and don't require machining. They are inexpensive, plentiful and don't leak like the magnesium covers do. True if you don't have covers, but why would you go looking when you already have turbo covers? It's an easy mod, the trimming cost nothing, and the milling is relatively cheap. |
|
|
|
|
1 User(s) are reading this topic (1 Guests and 0 Anonymous Users)
0 Members:

|
Lo-Fi Version | Time is now: 28th May 2024 - 03:46 AM |
Invision Power Board
v9.1.4 © 2024 IPS, Inc.