|
|
|
Porsche, and the Porsche crest are registered trademarks of Dr. Ing. h.c. F. Porsche AG.
This site is not affiliated with Porsche in any way. Its only purpose is to provide an online forum for car enthusiasts. All other trademarks are property of their respective owners. |
|
|

  |

| OllieG |
 Jan 8 2015, 10:47 AM Jan 8 2015, 10:47 AM
Post
#1
|
|
OllieG  Group: Members Posts: 212 Joined: 6-July 11 From: UK Member No.: 13,282 Region Association: England |
Hi,
I'm welding in a new passenger engine shelf from RD after hell hole repairs and chassis stiffening. Other than the driver's side shelf I don't have anything to reference its position. Is the passenger shelf pretty much a mirror of the driver's in terms of how far out it sticks out from the main chassis member? And how much allowance for error does the engine rubber seal give you?…better to be too close to the chassis than too far, right?..we're talking mm's here! It's been so long since there was an engine in this car I forgot what it looks like installed.. Thanks all.. |
   |

 
|
| malcolm2 |
Jan 8 2015, 12:35 PM
Post
#2
|
|
Advanced Member Group: Members Posts: 2,745 Joined: 31-May 11 From: Nashville Member No.: 13,139 Region Association: South East States |
QUOTE(OllieG @ Jan 8 2015, 10:47 AM)  Hi, I'm welding in a new passenger engine shelf from RD after hell hole repairs and chassis stiffening. Other than the driver's side shelf I don't have anything to reference its position. Is the passenger shelf pretty much a mirror of the driver's in terms of how far out it sticks out from the main chassis member? And how much allowance for error does the engine rubber seal give you?…better to be too close to the chassis than too far, right?..we're talking mm's here! It's been so long since there was an engine in this car I forgot what it looks like installed.. Thanks all.. I don't think there is much allowance. IMO, you are correct about the mirror image. I'll look for some pix of mine without the engine in the car and update this evening. I just Googled 914 engine bay and got lots WITH the engine in the car. If your engine is built with the tins on it... measure that. The shelf should fit snugly against the uni-body, right? here is one picture... not mine. Snug, right? 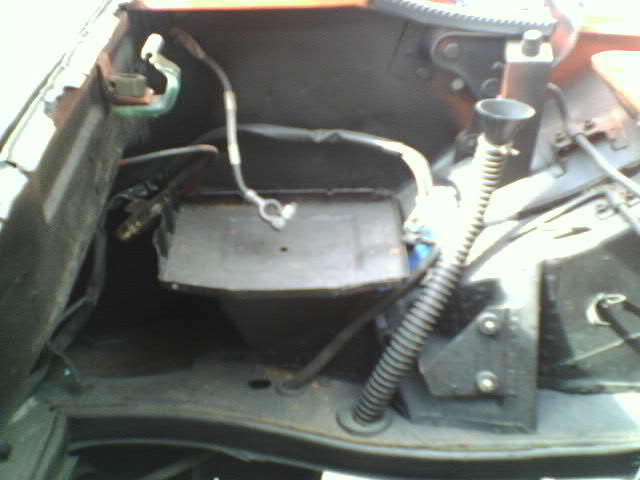 |
|
|
|
| SirAndy |
Jan 8 2015, 12:44 PM
Post
#3
|
|
Resident German Group: Admin Posts: 41,651 Joined: 21-January 03 From: Oakland, Kalifornia Member No.: 179 Region Association: Northern California |
QUOTE(malcolm2 @ Jan 8 2015, 10:35 AM) The shelf should fit snugly against the uni-body (IMG:style_emoticons/default/agree.gif) |
|
|
|
| BeatNavy |
Jan 8 2015, 01:07 PM
Post
#4
|
|
Certified Professional Scapegoat Group: Members Posts: 2,924 Joined: 26-February 14 From: Easton, MD Member No.: 17,042 Region Association: MidAtlantic Region |
I will need to do this in the hopefully not too distant future as well.
Here's a link to a thread I bookmarked for that purpose: Shelf Positioning |
|
|
|
| saigon71 |
Jan 8 2015, 03:17 PM
Post
#5
|
|
Senior Member Group: Members Posts: 1,999 Joined: 1-June 09 From: Dillsburg, PA Member No.: 10,428 Region Association: MidAtlantic Region |
I believe the "mirror image" philosophy is correct on these parts. If you still have good metal at the front & rear where the shelf mounts, that should give a decent guide on where you need to be.
Additionally, level the car if possible and measure up from the garage floor to the bottom of the drivers side shelf. Match that measurement on the passenger side for proper up-down height. If you cant level the car, measure off a fixed point on the drivers side (maybe engine bar mount fixture). I had a lot of trial & error with fitment of this piece...in particular, at the front where it curves down to the long. Here are a couple of pics I found: 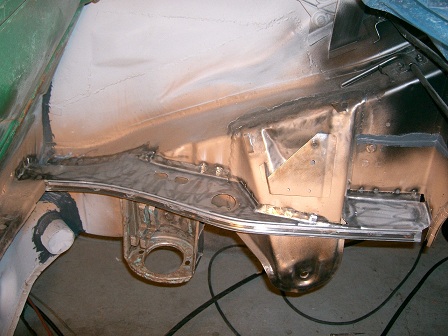 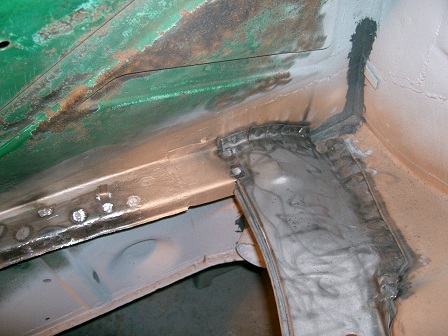 |
|
|
|
| OllieG |
Jan 8 2015, 03:53 PM
Post
#6
|
|
OllieG Group: Members Posts: 212 Joined: 6-July 11 From: UK Member No.: 13,282 Region Association: England |
QUOTE(SirAndy @ Jan 8 2015, 06:44 PM) QUOTE(malcolm2 @ Jan 8 2015, 10:35 AM) The shelf should fit snugly against the uni-body (IMG:style_emoticons/default/agree.gif) Thanks guys. Yep, no question the shelf should fit tight to the chassis..but what I need to be careful is how far the shelf sticks out so there's just the right gap between the engine tin and the shelf so the rubber seal has the right amount of space to sit in....I' ll reference the driver side. |
|
|
|
| OllieG |
Jan 8 2015, 04:00 PM
Post
#7
|
|
OllieG Group: Members Posts: 212 Joined: 6-July 11 From: UK Member No.: 13,282 Region Association: England |
QUOTE(saigon71 @ Jan 8 2015, 09:17 PM) I believe the "mirror image" philosophy is correct on these parts. If you still have good metal at the front & rear where the shelf mounts, that should give a decent guide on where you need to be. Additionally, level the car if possible and measure up from the garage floor to the bottom of the drivers side shelf. Match that measurement on the passenger side for proper up-down height. If you cant level the car, measure off a fixed point on the drivers side (maybe engine bar mount fixture). I had a lot of trial & error with fitment of this piece...in particular, at the front where it curves down to the long. Hi Bob, I remember you did this job too.. One issue I have is that the RD piece requires the edge flanges bending and I'm finding it tricky to know exactly where the bend should be....if the flanges are too short then the shelf sticks out too far and vice versa. I reckon I'm nearly there..but like you say, lots of trial and error. Thanks. |
|
|
|
| cn2800 |
Jan 8 2015, 11:27 PM
Post
#8
|
|
Member Group: Members Posts: 119 Joined: 11-August 14 From: Amarillo, Texas Member No.: 17,766 Region Association: None |
I have the engine out of my car. If you don't get measurements by tomorrow afternoon, I'll get them for you.
|
|
|
|
| TheCabinetmaker |
Jan 9 2015, 03:58 PM
Post
#9
|
|
I drive my car everyday Group: Members Posts: 8,300 Joined: 8-May 03 From: Tulsa, Ok. Member No.: 666 |
Passenger rear
(IMG:http://www.914world.com/bbs2/uploads_offsite/i290.photobucket.com-666-1420840692.1.jpg) Passenger front (IMG:http://www.914world.com/bbs2/uploads_offsite/i290.photobucket.com-666-1420840693.2.jpg) Drivers front for reference (IMG:http://www.914world.com/bbs2/uploads_offsite/i290.photobucket.com-666-1420840694.3.jpg) |
|
|
|
| OllieG |
Jan 10 2015, 05:32 AM
Post
#10
|
|
OllieG Group: Members Posts: 212 Joined: 6-July 11 From: UK Member No.: 13,282 Region Association: England |
Gotta love 914World! Thanks Curt..
Will post pics when it's done.. |
|
|
|
| OllieG |
Jan 12 2015, 03:42 PM
Post
#11
|
|
OllieG Group: Members Posts: 212 Joined: 6-July 11 From: UK Member No.: 13,282 Region Association: England |
Here's the result…I pretty much mirrored the driver's shelf for measurements. Let's hope it works out when the engine goes in!
(IMG:http://www.914world.com/bbs2/uploads_offsite/i1235.photobucket.com-13282-1421098946.1.jpg) I also had to fabricate the box section at the back of the shelf. I welded the battery tray support in place while I was at it too and then finished it all up with a epoxy primer. Don't look at the drips I'll sand them flat before the next coat!! (IMG:http://www.914world.com/bbs2/uploads_offsite/i1235.photobucket.com-13282-1421098946.2.jpg) |
|
|
|
| stevegm |
Jan 12 2015, 03:46 PM
Post
#12
|
|
Advanced Member Group: Members Posts: 2,111 Joined: 14-July 14 From: North Carolina Member No.: 17,633 Region Association: South East States |
QUOTE(OllieG @ Jan 12 2015, 04:42 PM) Here's the result…I pretty much mirrored the driver's shelf for measurements. Let's hope it works out when the engine goes in! I also had to fabricate the box section at the back of the shelf. I welded the battery tray support in place while I was at it too and then finished it all up with a epoxy primer. Don't look at the drips I'll sand them flat before the next coat!! Looks really good. Great job. |
|
|
|
| BeatNavy |
Jan 12 2015, 04:32 PM
Post
#13
|
|
Certified Professional Scapegoat Group: Members Posts: 2,924 Joined: 26-February 14 From: Easton, MD Member No.: 17,042 Region Association: MidAtlantic Region |
I agree, thanks for posting the result Ollie. Got this one bookmarked now for reference when I have to tackle it!
|
|
|
|
| malcolm2 |
Jan 13 2015, 09:47 AM
Post
#14
|
|
Advanced Member Group: Members Posts: 2,745 Joined: 31-May 11 From: Nashville Member No.: 13,139 Region Association: South East States |
That does look nice...
What about the battery tray? you got the stand, but not tray. It is an easy weld job, but you painted everything up so nicely. |
|
|
|
| OllieG |
Jan 13 2015, 10:13 AM
Post
#15
|
|
OllieG Group: Members Posts: 212 Joined: 6-July 11 From: UK Member No.: 13,282 Region Association: England |
QUOTE(malcolm2 @ Jan 13 2015, 03:47 PM) That does look nice... What about the battery tray? you got the stand, but not tray. It is an easy weld job, but you painted everything up so nicely. Good question..I had watched RD's YouTube 'How To' for the battery tray install and planned to do it this way. They pre-weld the support and the tray together before welding the whole assembly in place. Then they paint it.. But then I felt if I did it this way it would be really hard to get behind and spray the inside of the support and under the battery tray with the epoxy primer. Doing them separately means I can spray inside the support and be confident everything's getting a good coating of epoxy. I will paint the underside of the tray before welding it onto the support and obviously wire-brush clean any surfaces where I'll be welding the tray in place. BTW…this car is a 6cyl conversion so will have a 6cyl mount on the firewall…so prior to the engine shelf going in, I removed the 4cyl mounts (another nightmare job) and fabricated a new rear 'box' area for the engine shelf to fit to. Here are some more pics of the last few days' tasks.. (IMG:http://www.914world.com/bbs2/uploads_offsite/i1235.photobucket.com-13282-1421165581.1.jpg) (IMG:http://www.914world.com/bbs2/uploads_offsite/i1235.photobucket.com-13282-1421165581.2.jpg) (IMG:http://www.914world.com/bbs2/uploads_offsite/i1235.photobucket.com-13282-1421165581.3.jpg) (IMG:http://www.914world.com/bbs2/uploads_offsite/i1235.photobucket.com-13282-1421165581.4.jpg) (IMG:http://www.914world.com/bbs2/uploads_offsite/i1235.photobucket.com-13282-1421165582.5.jpg) (IMG:http://www.914world.com/bbs2/uploads_offsite/i1235.photobucket.com-13282-1421165582.6.jpg) |
|
|
|
| saigon71 |
Jan 17 2015, 09:04 AM
Post
#16
|
|
Senior Member Group: Members Posts: 1,999 Joined: 1-June 09 From: Dillsburg, PA Member No.: 10,428 Region Association: MidAtlantic Region |
Looks great Ollie! (IMG:style_emoticons/default/beerchug.gif) Excellent fabrication work on that back piece too.
Keep rolling like this and you will be on the road before you know it! |
|
|
|
|
1 User(s) are reading this topic (1 Guests and 0 Anonymous Users)
0 Members:

|
Lo-Fi Version | Time is now: 20th May 2024 - 05:08 PM |
Invision Power Board
v9.1.4 © 2024 IPS, Inc.