|
|
|
Porsche, and the Porsche crest are registered trademarks of Dr. Ing. h.c. F. Porsche AG.
This site is not affiliated with Porsche in any way. Its only purpose is to provide an online forum for car enthusiasts. All other trademarks are property of their respective owners. |
|
|

  |

| sdoolin |
 Jan 21 2015, 12:41 PM Jan 21 2015, 12:41 PM
Post
#1
|
|
Member  Group: Members Posts: 423 Joined: 1-May 14 From: LouKY Member No.: 17,299 Region Association: None |
I have searched and read quite a bit on this topic, lots of good stuff. But I still have a couple of questions. I have a '73, with early top (as identified by a thread here). Very (very) rattly so I have a new rear seal (from 914rubber.com) that I will install.
Not trying to beat a dead horse... My question(s): What have others done with the side pieces that are too long (I assume just trim down and "bevel" to fit up with top window seal (on side)), and What have others done with respect to the side metal trim pieces that are "under" the seal on the side, and that curve around the "bulb" of the seal? It seems like trimming the "curved" bit of the metal (without the screw holes) will jst lead to possible rattles from this area and that is exactly what I am trying to avoid. 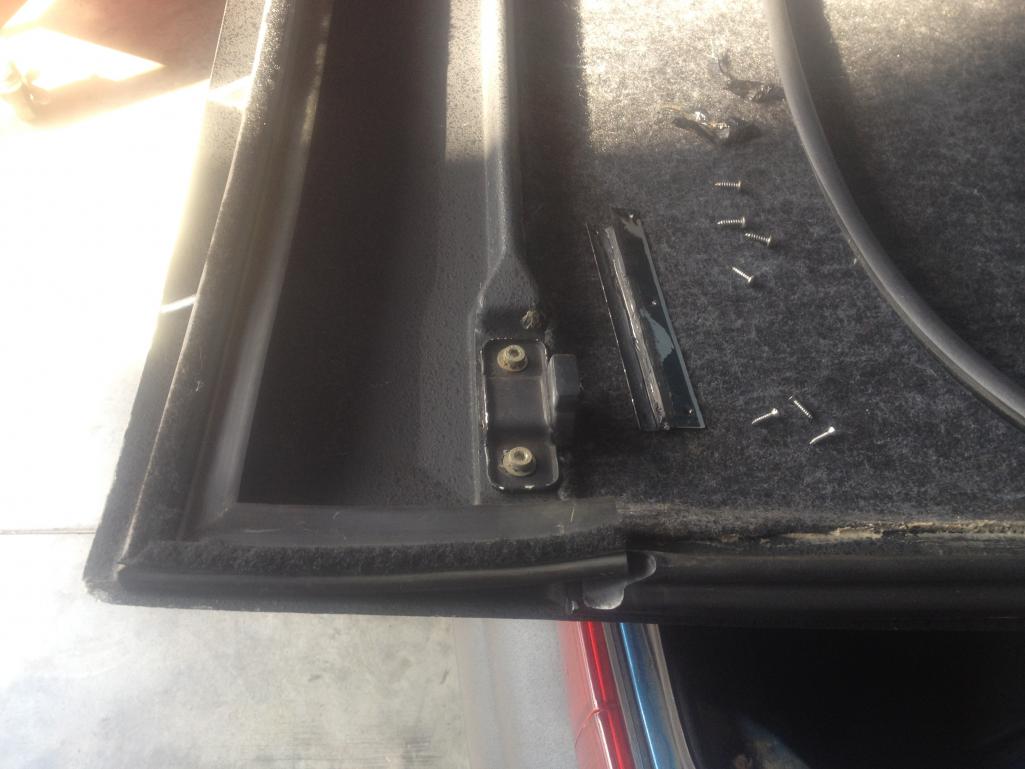 |
   |

 
|
| Markl |
Jan 21 2015, 10:21 PM
Post
#2
|
|
Member Group: Members Posts: 75 Joined: 14-September 09 From: Colorado Member No.: 10,802 Region Association: Rocky Mountains |
I'm not sure I understand the second part of your question, but I've installed 914Rubber seals on two cars without trimming any metal. No rattles, no squeaks, and no leaks.
|
|
|
|
| CptTripps |
Jan 22 2015, 08:24 AM
Post
#3
|
|
:: Punch and Pie :: Group: Members Posts: 3,586 Joined: 26-December 04 From: Tuscaloosa, AL and Akron, OH Member No.: 3,342 Region Association: Upper MidWest |
I think he's asking at what point does he cut the excess rubber off, and where.
I don't have an answer for this question, but I'm curious to know the answer. |
|
|
|
| sdoolin |
Jan 22 2015, 08:43 AM
Post
#4
|
|
Member Group: Members Posts: 423 Joined: 1-May 14 From: LouKY Member No.: 17,299 Region Association: None |
I'm asking more about the side metal piece(s). They are mounted between the top and the seal on the sides (it is not visible with seal installed) whereas along the rear of the roof/seal, the metal trim mounts above the seal (it is visible).
This piece has a "flat" bit (shiny in pic) and a "curved" bit (black in pic). I have read (don't have the link(s), but search for Targa Top and you'll find them) where some have trimmed the curved bit off as it tends to interfere with the new seal (not a product issue) and others have a different solution. Just looking for ideas, I will likely trim it all to fit and just ensure it is secure and properly located during install. I suspect it will cure the rattling regardless. |
|
|
|
| Mikey914 |
Jan 23 2015, 09:27 AM
Post
#5
|
|
The rubber man Group: Members Posts: 12,782 Joined: 27-December 04 From: Hillsboro, OR Member No.: 3,348 Region Association: None |
The metal will mount on top of the seal just like the OEM. Do the corners 1st. The metal is a good guide for the holes as they will not move. As far as trimming the seal. It needs to be fitted to the roof. The vertical targa seal should touch the corner of the other seal (targa to window seal), and the rear seal you have should but right up against it. Assuming that your targa to window seals are sealed correctly on the outside corner, the rear seal should end right at that joint. One of the reasons I make these longer is for a perfect fit. You will have to check before you cut as you may want to adjust the targa to window seals.
A piece of trivia for those that don't know NEVER pull the targa to window seal through the track. You may think you have compressed it back, bt rubber has memory, and if there is ANY tension, it will be relieved over time and allow the seal to "shrink" back to the manufactured length. The correct way to install is the outside edge 1st, then pop in the inner track. Also, if you need to trim a new carpet knife and some warm soapy water and you can cut it like butter. You can actually get it to seal very nicely, just shaving off a little at a time until it compresses when the latch is engaged. It makes a wonderfully tight seal at the corner. |
|
|
|
| Mikey914 |
Jan 23 2015, 09:36 AM
Post
#6
|
|
The rubber man Group: Members Posts: 12,782 Joined: 27-December 04 From: Hillsboro, OR Member No.: 3,348 Region Association: None |
By the way those are the old seals superseded by the ones with the flaps. may be worth putting someplace safe. If 6's get crazy expensive they are the concurs correct seal.
Attached thumbnail(s)  Attached image(s) 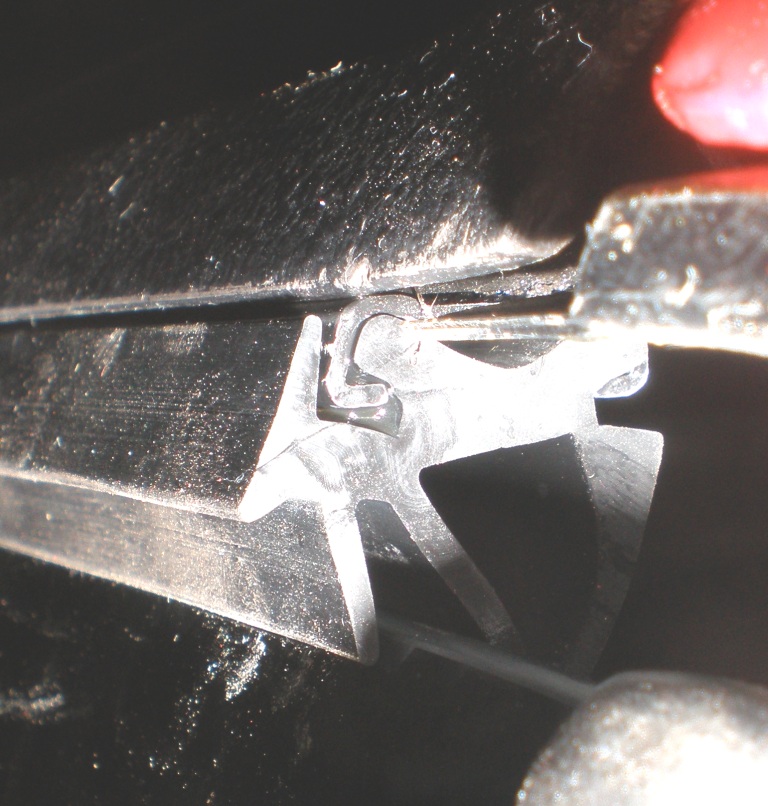
|
|
|
|
| Mikey914 |
Jan 23 2015, 09:37 AM
Post
#7
|
|
The rubber man Group: Members Posts: 12,782 Joined: 27-December 04 From: Hillsboro, OR Member No.: 3,348 Region Association: None |
The last picture is the targa to window seal installed without the main targa seal in the way, to show how it should sit on the glass.
|
|
|
|
| Mikey914 |
Jan 23 2015, 09:41 AM
Post
#8
|
|
The rubber man Group: Members Posts: 12,782 Joined: 27-December 04 From: Hillsboro, OR Member No.: 3,348 Region Association: None |
And I just noticed the short piece of metal in the picture. It goes under the seal and is glued to the seal. There is a top piece that will sandwich it. So you can dry fit and use a little glue once it's installed to hold it onto the seal. A small dash of black silicone would work well. Not required, but helps put a little more pressure against the roll bar.
|
|
|
|
| EdwardBlume |
Jan 23 2015, 01:50 PM
Post
#9
|
|
914 Wizard Group: Members Posts: 12,340 Joined: 2-January 03 From: SLO Member No.: 81 Region Association: Central California |
I just installed mine as well. I did the sides first. I cut the ends with scissors. I followed the bolt pattern from outside in. The sticky side both helped and was a pain. My seal was shrunk lengthwise across the top so I had to rework mounting it twice adding new bolt holes through the seal. Be very careful with the trim. I did get some distortion to the chrome trim to seat the bolts. I also used new screws.
Installation on the car seemed great. Haven't tested water or wind yet, but doubt any issues due to construction. Good luck! |
|
|
|
| JimN73 |
Jan 23 2015, 03:19 PM
Post
#10
|
|
Senior Member Group: Members Posts: 535 Joined: 6-October 07 From: Gig Harbor Member No.: 8,192 Region Association: Pacific Northwest |
Mark, can you define/describe the "pop in the inner track" part? Not working so well for me.
Thanks, QUOTE(Mikey914 @ Jan 23 2015, 07:27 AM)  The metal will mount on top of the seal just like the OEM. Do the corners 1st. The metal is a good guide for the holes as they will not move. As far as trimming the seal. It needs to be fitted to the roof. The vertical targa seal should touch the corner of the other seal (targa to window seal), and the rear seal you have should but right up against it. Assuming that your targa to window seals are sealed correctly on the outside corner, the rear seal should end right at that joint. One of the reasons I make these longer is for a perfect fit. You will have to check before you cut as you may want to adjust the targa to window seals. A piece of trivia for those that don't know NEVER pull the targa to window seal through the track. You may think you have compressed it back, bt rubber has memory, and if there is ANY tension, it will be relieved over time and allow the seal to "shrink" back to the manufactured length. The correct way to install is the outside edge 1st, then pop in the inner track. Also, if you need to trim a new carpet knife and some warm soapy water and you can cut it like butter. You can actually get it to seal very nicely, just shaving off a little at a time until it compresses when the latch is engaged. It makes a wonderfully tight seal at the corner. |
|
|
|
| sdoolin |
Jan 23 2015, 03:35 PM
Post
#11
|
|
Member Group: Members Posts: 423 Joined: 1-May 14 From: LouKY Member No.: 17,299 Region Association: None |
Mikey - thanks for info. I will be fitting the rear seal later this weekend, may have another question or two.
Am in the middle of wheel/axle bearings on all 4 corners... |
|
|
|
| Mikey914 |
Jan 24 2015, 01:33 AM
Post
#12
|
|
The rubber man Group: Members Posts: 12,782 Joined: 27-December 04 From: Hillsboro, OR Member No.: 3,348 Region Association: None |
"POP" the inner track in, I'm referring to putting the outside edge in the track 1st, and pushing the inside edge in with a screwdriver carefully. So not to scratch the chrome track. You can see from the profile why the outside has to go in 1st.
|
|
|
|
|
1 User(s) are reading this topic (1 Guests and 0 Anonymous Users)
0 Members:

|
Lo-Fi Version | Time is now: 11th May 2026 - 02:04 AM |
Invision Power Board
v9.1.4 © 2026 IPS, Inc.