|
|
|
Porsche, and the Porsche crest are registered trademarks of Dr. Ing. h.c. F. Porsche AG.
This site is not affiliated with Porsche in any way. Its only purpose is to provide an online forum for car enthusiasts. All other trademarks are property of their respective owners. |
|
|


| dlee6204 |
 Jan 29 2015, 07:17 PM Jan 29 2015, 07:17 PM
Post
#101
|
|
Howdy  Group: Members Posts: 2,162 Joined: 30-April 06 From: Burnsville, NC Member No.: 5,956 |
I thought I would share my most recent project. I picked this car up a couple weeks ago on craigslist. It's a '71 w/ 78K on the clock. It's definitely in project form but one thing that I liked about it is that it is pretty original and unmolested... no goofy PO repairs, all stock parts, relatively low miles plus I love the early style 914 w/ steelies (IMG:style_emoticons/default/wub.gif) . Its been stored in a barn for many years. It does have some rust but its fairly manageable which is pretty good for East coast standards.
The plan right now is to keep it all stock and just create a nice original driver. Bringing it home... 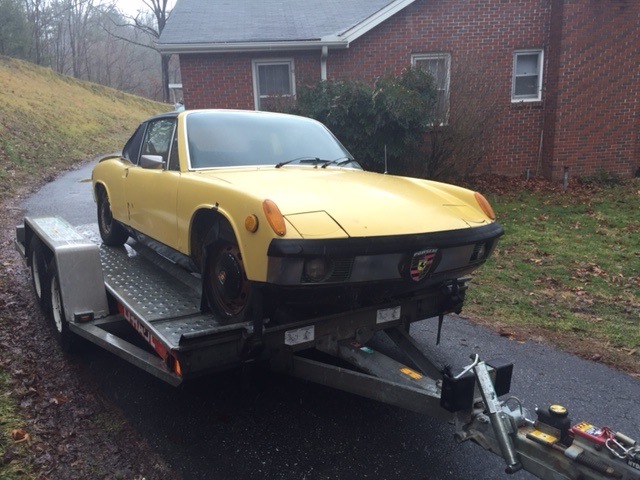 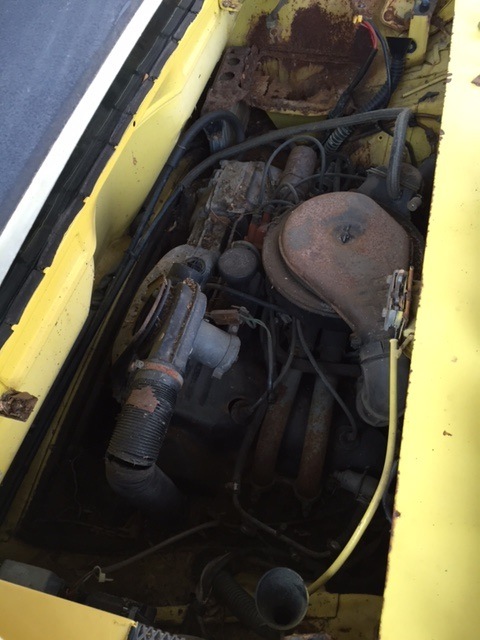 The battery tray has some light surface rust 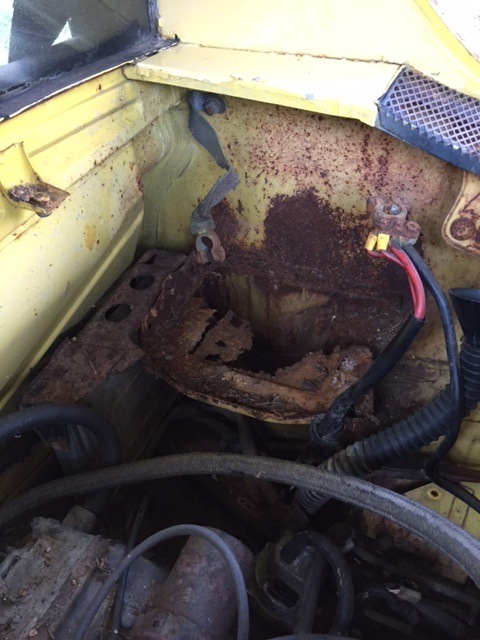 Here's the underside of the passenger long. I was able to jack the car up and door gaps didn't change (IMG:style_emoticons/default/piratenanner.gif) .... Heck, most 914s I bring home don't even have a place to jack it up anymore.  |
   |

 
|
Posts in this topic
 dlee6204 '71 Build Thread Jan 29 2015, 07:17 PM
 stevegm Very cool. I really like the early cars with steel... Jan 29 2015, 07:22 PM dlee6204 Tonight I removed the battery tray and cleaned out... Jan 29 2015, 07:22 PM trojanhorsepower :beer2:
Doug saves another one!
When are you ... Jan 29 2015, 07:54 PM Erben914 "The battery tray has some light surface rust... Jan 29 2015, 08:41 PM bulitt
no goofy PO repairs,
It was the cheap weld... Jan 29 2015, 09:26 PM dlee6204
no goofy PO repairs,
It was the cheap wel... Jan 30 2015, 04:28 AM dlee6204
:beer2:
Doug saves another one!
When are you... Jan 30 2015, 04:33 AM FourBlades Looks like a good one! :Qarl:
John Jan 30 2015, 05:05 AM dlee6204 Today I pulled off the rockers to see what was hid... Jan 31 2015, 08:00 PM dlee6204 The driver side will needs a little more work. Wh... Jan 31 2015, 08:03 PM dlee6204 This week I also got the injectors sent off to the... Jan 31 2015, 08:07 PM dlee6204 I got a package from Restoration Design today.
:... Feb 5 2015, 06:18 PM dlee6204 I also got the injectors back from being cleaned. ... Feb 5 2015, 06:21 PM
stevegm Very cool. I really like the early cars with steel... Jan 29 2015, 07:22 PM dlee6204 Tonight I removed the battery tray and cleaned out... Jan 29 2015, 07:22 PM trojanhorsepower :beer2:
Doug saves another one!
When are you ... Jan 29 2015, 07:54 PM Erben914 "The battery tray has some light surface rust... Jan 29 2015, 08:41 PM bulitt
no goofy PO repairs,
It was the cheap weld... Jan 29 2015, 09:26 PM dlee6204
no goofy PO repairs,
It was the cheap wel... Jan 30 2015, 04:28 AM dlee6204
:beer2:
Doug saves another one!
When are you... Jan 30 2015, 04:33 AM FourBlades Looks like a good one! :Qarl:
John Jan 30 2015, 05:05 AM dlee6204 Today I pulled off the rockers to see what was hid... Jan 31 2015, 08:00 PM dlee6204 The driver side will needs a little more work. Wh... Jan 31 2015, 08:03 PM dlee6204 This week I also got the injectors sent off to the... Jan 31 2015, 08:07 PM dlee6204 I got a package from Restoration Design today.
:... Feb 5 2015, 06:18 PM dlee6204 I also got the injectors back from being cleaned. ... Feb 5 2015, 06:21 PM
 forrestkhaag
I also got the injectors back from being cleaned.... Feb 5 2015, 07:21 PM dlee6204 I finally found time to pull the motor and started... Mar 22 2015, 07:10 AM 914Sixer Looking good! I like the OE muffler look. Mar 22 2015, 08:15 AM KELTY360
The battery tray has some light surface rust
... Mar 22 2015, 09:40 AM Cairo94507 This car appears to be in amazingly good condition... Mar 22 2015, 10:22 AM dlee6204 I cleaned up the heat exchangers yesterday. They ... Mar 23 2015, 06:51 PM dlee6204 Well I started digging into some of the rust over ... Mar 30 2015, 06:22 PM dlee6204 I also found some previous bodywork damage on the ... Mar 30 2015, 06:23 PM dlee6204 This project is going to be on hold for a while. ... May 3 2015, 05:01 AM trojanhorsepower Congrats Doug!
Where about is your new place? May 3 2015, 07:24 AM dlee6204 Nevermind Jun 11 2015, 11:25 AM dlee6204 I finally had some time to get back to this projec... Oct 18 2015, 06:09 PM dlee6204 I had to remove the bad material which meant more ... Oct 18 2015, 06:24 PM dlee6204 So I used this technique to remove all the bad mat... Oct 18 2015, 06:28 PM Cairo94507 :popcorn: Nice work. Oct 19 2015, 06:56 AM mrfourteen Another yellow one in the Build Off.
Looks like a... Oct 19 2015, 07:24 AM dlee6204 So I am finally getting back to this build, betwee... Feb 10 2016, 06:34 PM dlee6204 Started to tear it down. The plan is to tear it a... Feb 10 2016, 06:44 PM Olympic 1.7
Started to tear it down. The plan is to tear it ... Feb 11 2016, 11:46 AM dlee6204 Also just because I haven't had time to work o... Feb 10 2016, 06:46 PM dlee6204 One more thing... I found out the speedometer is ... Feb 10 2016, 06:51 PM dlee6204
Started to tear it down. The plan is to tear it... Feb 11 2016, 01:57 PM dlee6204 Well I finished tearing down the motor and got it ... Mar 1 2016, 07:35 PM dlee6204 Side note. Also scored some new early style brake... Mar 1 2016, 07:41 PM dlee6204 I got my heads back today from being rebuilt. I j... Mar 23 2016, 11:13 AM dlee6204 Finally some more progress!
Originally I ho... Apr 21 2016, 06:30 PM dlee6204 I also got some rust repair done on the driver... Apr 21 2016, 06:42 PM dlee6204 I finished by cleaning up the inner sail panel are... Apr 21 2016, 06:46 PM 76-914 :popcorn: Apr 21 2016, 07:06 PM dlee6204 Today I was able to trim and fit the new sail pane... Apr 23 2016, 02:34 PM dlee6204 The replacement sail panel fit like a glove with v... Apr 23 2016, 02:37 PM dlee6204 One of the tasks I had to do to the door jamb was ... Apr 23 2016, 02:43 PM dlee6204 Progress: I got the engine halves back together an... May 6 2016, 06:08 PM dlee6204 Also started tearing into the engine bay. Remove ... May 6 2016, 06:19 PM dlee6204 I started tearing into the passenger side over the... May 9 2016, 06:02 PM dlee6204 The infamous glob of goo that causes so much rust.... May 9 2016, 06:05 PM dlee6204 While I was in the area I took a good look at the ... May 9 2016, 06:09 PM 76-914 Your having way too much fun. :D :popcorn: May 9 2016, 08:13 PM 2mAn excellent skills! May 9 2016, 09:51 PM dlee6204 Today I took some time to remove the interior.
... May 15 2016, 03:18 PM dlee6204 Got a little more work done tonight. I got the sa... May 16 2016, 06:25 PM Garland Glad to see that interior out of the way. Coming a... May 16 2016, 06:35 PM dlee6204 I started to tear out the floor. I'm about ha... May 23 2016, 06:27 PM dlee6204 Got some more removed tonight. Crossmember is rem... May 25 2016, 06:47 PM dlee6204 This weekend I made some big progress is the engin... May 30 2016, 02:01 PM dlee6204 Got it all welded up. :) It feels good to be addi... May 30 2016, 02:02 PM dlee6204 I also welded in the new trunk hinges. :welder:
... May 30 2016, 02:06 PM raynekat Looking spectacular.
Keep up the great work. May 30 2016, 04:10 PM dlee6204 I tore into the long tonight. I first braced the ... Jun 1 2016, 06:43 PM dlee6204 Got my inner long welded in. :welder:
Jun 6 2016, 04:07 PM 76-914 Way to go, Doug. You don't let anything slow y... Jun 6 2016, 05:33 PM trojanhorsepower Looks good Doug! Jun 7 2016, 06:21 PM dlee6204 Been working on some small stuff.
First, got o... Jun 9 2016, 03:49 AM dlee6204 Got the upper part of the long installed and the j... Jun 9 2016, 03:35 PM jmitro really nice work. :beer2:
gives me a good idea ... Jun 9 2016, 04:54 PM Claus Graf Save the Porsche!
Awesome work. Keep forging ... Jun 9 2016, 07:59 PM tygaboy
Save the Porsche!
Awesome work. Keep forging... Jun 10 2016, 11:50 AM dlee6204 I've been busy working on my other 914 but I d... Jun 20 2016, 08:33 AM dlee6204 Started on the floorpan. I first had to trim my f... Jun 26 2016, 02:38 PM dlee6204 And floor pan is welded in. I still have to do al... Jun 26 2016, 02:41 PM dlee6204 I just took advantage of the sale happening at Res... Jun 28 2016, 03:28 PM dlee6204 Got the interior floorpan complete with crossmembe... Jul 19 2016, 05:53 PM trojanhorsepower Way to go! Jul 19 2016, 06:00 PM dlee6204 I started digging into the rear trunk area. I dis... Jul 19 2016, 06:10 PM dlee6204 Full damage exposed.
Luckily the old chassis nu... Jul 19 2016, 06:16 PM dlee6204 RE: '71 Build Thread Jul 19 2016, 06:38 PM dlee6204 I cut a replacement panel off a parts car and befo... Jul 19 2016, 06:40 PM dlee6204 I haven't made as much progress as I would lik... Jul 19 2016, 06:47 PM 914forme Wow nice work on that blast cabinet Jul 20 2016, 04:59 AM tygaboy Really enjoying your resto! I have to replace ... Jul 20 2016, 08:20 AM dlee6204 I reached a milestone tonight and finished all wel... Jul 21 2016, 06:15 PM 76-914 Well, now that your out from under it I should tel... Jul 21 2016, 06:22 PM dlee6204 I had a very productive weekend. I set out to com... Jul 24 2016, 06:44 PM dlee6204 Test fitting the new panels. :shades2:
Jul 24 2016, 06:45 PM dlee6204 This was the perfect opportunity to try out Eastwo... Jul 24 2016, 06:50 PM dlee6204 Ready for install.
:welder: :welder: :welder... Jul 24 2016, 06:58 PM dlee6204 Sill plate welded on. :welder:
Ground down a... Jul 24 2016, 07:02 PM dlee6204 I also gave my blast cabinet a test run. I could ... Jul 24 2016, 07:05 PM DirtyCossack This build has become a freight train rolling unst... Jul 24 2016, 07:17 PM trojanhorsepower Looks great Doug!
Glad your blaster is working... Jul 25 2016, 07:00 PM dlee6204 Got the rear trunk, reinforcement, and heat shield... Jul 30 2016, 07:38 PM dlee6204
This build has become a freight train rolling uns... Jul 30 2016, 07:41 PM raynekat Doug Dude.....you are a one man wrecking crew....i... Jul 30 2016, 08:07 PM dlee6204 Got the rear panel welded in.
Jul 31 2016, 12:58 PM dlee6204 Also got the driver's side sail panel, door ja... Jul 31 2016, 01:01 PM porschetub Very enjoyable reading,great work appears you aren... Jul 31 2016, 04:43 PM
forrestkhaag
I also got the injectors back from being cleaned.... Feb 5 2015, 07:21 PM dlee6204 I finally found time to pull the motor and started... Mar 22 2015, 07:10 AM 914Sixer Looking good! I like the OE muffler look. Mar 22 2015, 08:15 AM KELTY360
The battery tray has some light surface rust
... Mar 22 2015, 09:40 AM Cairo94507 This car appears to be in amazingly good condition... Mar 22 2015, 10:22 AM dlee6204 I cleaned up the heat exchangers yesterday. They ... Mar 23 2015, 06:51 PM dlee6204 Well I started digging into some of the rust over ... Mar 30 2015, 06:22 PM dlee6204 I also found some previous bodywork damage on the ... Mar 30 2015, 06:23 PM dlee6204 This project is going to be on hold for a while. ... May 3 2015, 05:01 AM trojanhorsepower Congrats Doug!
Where about is your new place? May 3 2015, 07:24 AM dlee6204 Nevermind Jun 11 2015, 11:25 AM dlee6204 I finally had some time to get back to this projec... Oct 18 2015, 06:09 PM dlee6204 I had to remove the bad material which meant more ... Oct 18 2015, 06:24 PM dlee6204 So I used this technique to remove all the bad mat... Oct 18 2015, 06:28 PM Cairo94507 :popcorn: Nice work. Oct 19 2015, 06:56 AM mrfourteen Another yellow one in the Build Off.
Looks like a... Oct 19 2015, 07:24 AM dlee6204 So I am finally getting back to this build, betwee... Feb 10 2016, 06:34 PM dlee6204 Started to tear it down. The plan is to tear it a... Feb 10 2016, 06:44 PM Olympic 1.7
Started to tear it down. The plan is to tear it ... Feb 11 2016, 11:46 AM dlee6204 Also just because I haven't had time to work o... Feb 10 2016, 06:46 PM dlee6204 One more thing... I found out the speedometer is ... Feb 10 2016, 06:51 PM dlee6204
Started to tear it down. The plan is to tear it... Feb 11 2016, 01:57 PM dlee6204 Well I finished tearing down the motor and got it ... Mar 1 2016, 07:35 PM dlee6204 Side note. Also scored some new early style brake... Mar 1 2016, 07:41 PM dlee6204 I got my heads back today from being rebuilt. I j... Mar 23 2016, 11:13 AM dlee6204 Finally some more progress!
Originally I ho... Apr 21 2016, 06:30 PM dlee6204 I also got some rust repair done on the driver... Apr 21 2016, 06:42 PM dlee6204 I finished by cleaning up the inner sail panel are... Apr 21 2016, 06:46 PM 76-914 :popcorn: Apr 21 2016, 07:06 PM dlee6204 Today I was able to trim and fit the new sail pane... Apr 23 2016, 02:34 PM dlee6204 The replacement sail panel fit like a glove with v... Apr 23 2016, 02:37 PM dlee6204 One of the tasks I had to do to the door jamb was ... Apr 23 2016, 02:43 PM dlee6204 Progress: I got the engine halves back together an... May 6 2016, 06:08 PM dlee6204 Also started tearing into the engine bay. Remove ... May 6 2016, 06:19 PM dlee6204 I started tearing into the passenger side over the... May 9 2016, 06:02 PM dlee6204 The infamous glob of goo that causes so much rust.... May 9 2016, 06:05 PM dlee6204 While I was in the area I took a good look at the ... May 9 2016, 06:09 PM 76-914 Your having way too much fun. :D :popcorn: May 9 2016, 08:13 PM 2mAn excellent skills! May 9 2016, 09:51 PM dlee6204 Today I took some time to remove the interior.
... May 15 2016, 03:18 PM dlee6204 Got a little more work done tonight. I got the sa... May 16 2016, 06:25 PM Garland Glad to see that interior out of the way. Coming a... May 16 2016, 06:35 PM dlee6204 I started to tear out the floor. I'm about ha... May 23 2016, 06:27 PM dlee6204 Got some more removed tonight. Crossmember is rem... May 25 2016, 06:47 PM dlee6204 This weekend I made some big progress is the engin... May 30 2016, 02:01 PM dlee6204 Got it all welded up. :) It feels good to be addi... May 30 2016, 02:02 PM dlee6204 I also welded in the new trunk hinges. :welder:
... May 30 2016, 02:06 PM raynekat Looking spectacular.
Keep up the great work. May 30 2016, 04:10 PM dlee6204 I tore into the long tonight. I first braced the ... Jun 1 2016, 06:43 PM dlee6204 Got my inner long welded in. :welder:
Jun 6 2016, 04:07 PM 76-914 Way to go, Doug. You don't let anything slow y... Jun 6 2016, 05:33 PM trojanhorsepower Looks good Doug! Jun 7 2016, 06:21 PM dlee6204 Been working on some small stuff.
First, got o... Jun 9 2016, 03:49 AM dlee6204 Got the upper part of the long installed and the j... Jun 9 2016, 03:35 PM jmitro really nice work. :beer2:
gives me a good idea ... Jun 9 2016, 04:54 PM Claus Graf Save the Porsche!
Awesome work. Keep forging ... Jun 9 2016, 07:59 PM tygaboy
Save the Porsche!
Awesome work. Keep forging... Jun 10 2016, 11:50 AM dlee6204 I've been busy working on my other 914 but I d... Jun 20 2016, 08:33 AM dlee6204 Started on the floorpan. I first had to trim my f... Jun 26 2016, 02:38 PM dlee6204 And floor pan is welded in. I still have to do al... Jun 26 2016, 02:41 PM dlee6204 I just took advantage of the sale happening at Res... Jun 28 2016, 03:28 PM dlee6204 Got the interior floorpan complete with crossmembe... Jul 19 2016, 05:53 PM trojanhorsepower Way to go! Jul 19 2016, 06:00 PM dlee6204 I started digging into the rear trunk area. I dis... Jul 19 2016, 06:10 PM dlee6204 Full damage exposed.
Luckily the old chassis nu... Jul 19 2016, 06:16 PM dlee6204 RE: '71 Build Thread Jul 19 2016, 06:38 PM dlee6204 I cut a replacement panel off a parts car and befo... Jul 19 2016, 06:40 PM dlee6204 I haven't made as much progress as I would lik... Jul 19 2016, 06:47 PM 914forme Wow nice work on that blast cabinet Jul 20 2016, 04:59 AM tygaboy Really enjoying your resto! I have to replace ... Jul 20 2016, 08:20 AM dlee6204 I reached a milestone tonight and finished all wel... Jul 21 2016, 06:15 PM 76-914 Well, now that your out from under it I should tel... Jul 21 2016, 06:22 PM dlee6204 I had a very productive weekend. I set out to com... Jul 24 2016, 06:44 PM dlee6204 Test fitting the new panels. :shades2:
Jul 24 2016, 06:45 PM dlee6204 This was the perfect opportunity to try out Eastwo... Jul 24 2016, 06:50 PM dlee6204 Ready for install.
:welder: :welder: :welder... Jul 24 2016, 06:58 PM dlee6204 Sill plate welded on. :welder:
Ground down a... Jul 24 2016, 07:02 PM dlee6204 I also gave my blast cabinet a test run. I could ... Jul 24 2016, 07:05 PM DirtyCossack This build has become a freight train rolling unst... Jul 24 2016, 07:17 PM trojanhorsepower Looks great Doug!
Glad your blaster is working... Jul 25 2016, 07:00 PM dlee6204 Got the rear trunk, reinforcement, and heat shield... Jul 30 2016, 07:38 PM dlee6204
This build has become a freight train rolling uns... Jul 30 2016, 07:41 PM raynekat Doug Dude.....you are a one man wrecking crew....i... Jul 30 2016, 08:07 PM dlee6204 Got the rear panel welded in.
Jul 31 2016, 12:58 PM dlee6204 Also got the driver's side sail panel, door ja... Jul 31 2016, 01:01 PM porschetub Very enjoyable reading,great work appears you aren... Jul 31 2016, 04:43 PM  |
14 User(s) are reading this topic (14 Guests and 0 Anonymous Users)
0 Members:

|
Lo-Fi Version | Time is now: 23rd June 2026 - 02:27 PM |
Invision Power Board
v9.1.4 © 2026 IPS, Inc.