|
|
|
Porsche, and the Porsche crest are registered trademarks of Dr. Ing. h.c. F. Porsche AG.
This site is not affiliated with Porsche in any way. Its only purpose is to provide an online forum for car enthusiasts. All other trademarks are property of their respective owners. |
|
|

  |

| gereed75 |
 Jun 25 2015, 08:08 AM Jun 25 2015, 08:08 AM
Post
#1
|
|
Senior Member  Group: Members Posts: 1,240 Joined: 19-March 13 From: Pittsburgh PA Member No.: 15,674 Region Association: North East States |
Just built this combo gauge.
Thanks to Steve Snyder for sending the center button to finish it off. Used an 84 911 combo to get the temp and press modules and a later 914 fuel for the module and face plate. All off ebay for about $150.00. Used condensed gothic dry transfer lettering...fairly close match to the original size and font. A real PITA to put on. Not perfect but looks fine from 2 feet. Made a new back plate per the instructions in various threads on the site. Lots of little dremel cutting (IMG:style_emoticons/default/sawzall-smiley.gif) The generosity and help from the World is really great!! 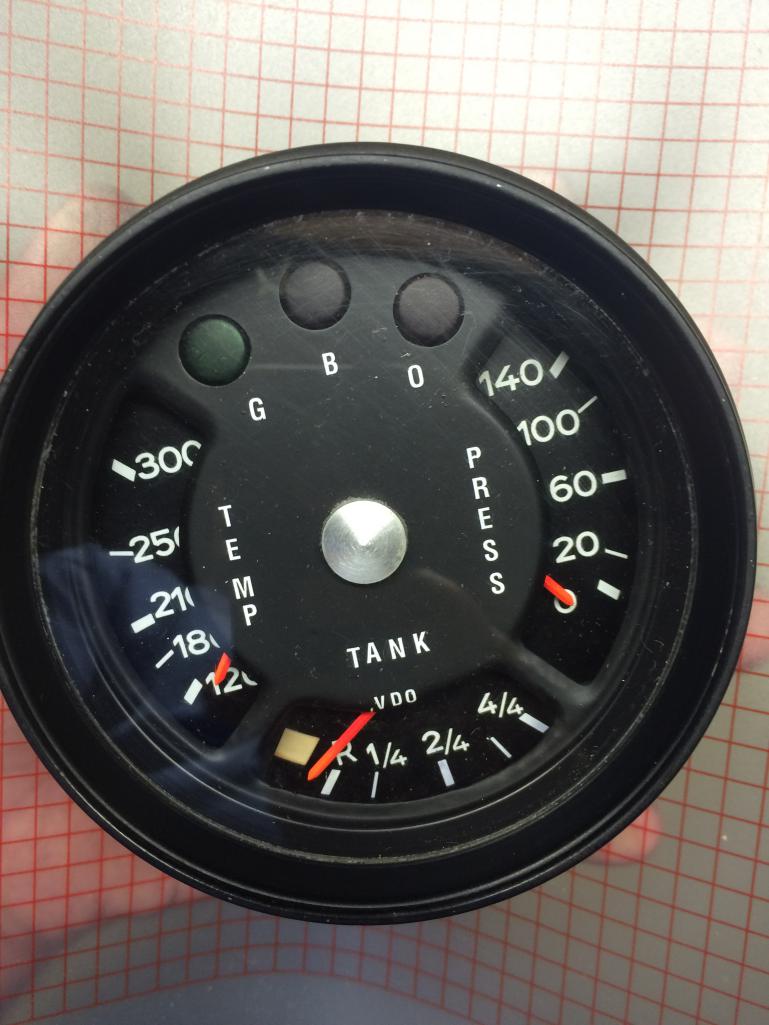 Going out to install. Hope it all works Attached thumbnail(s) 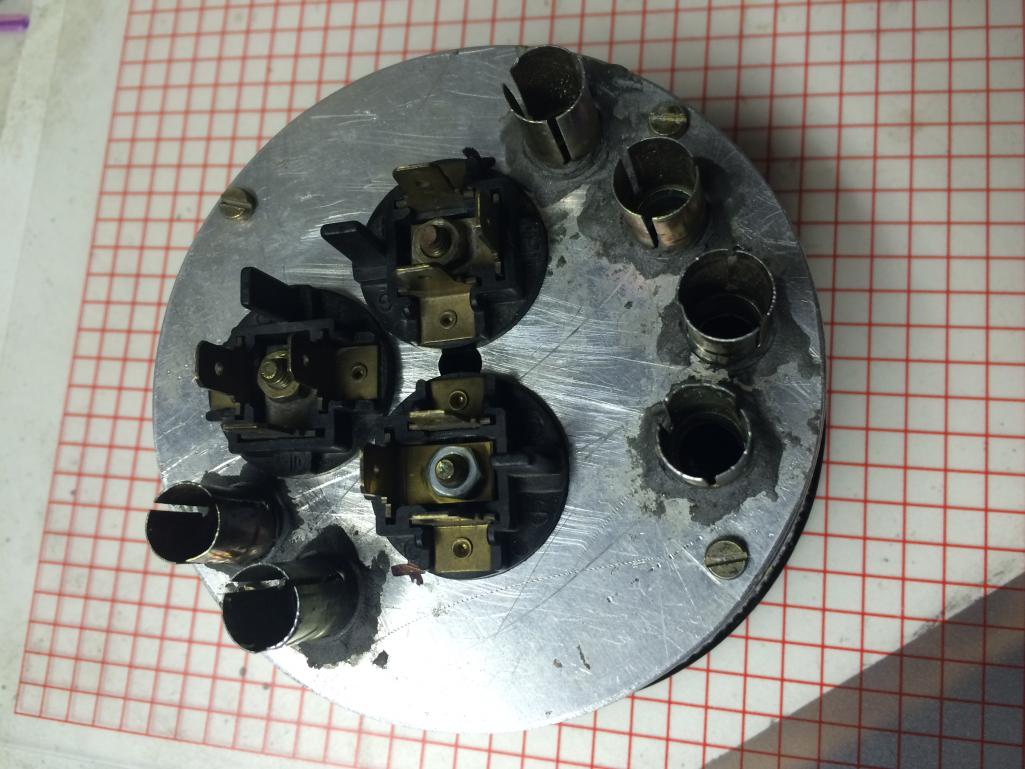
|
   |

 
|
| rhodyguy |
Jun 25 2015, 08:21 AM
Post
#2
|
|
Chimp Sanctuary NW. Check it out. Group: Members Posts: 22,061 Joined: 2-March 03 From: Orion's Bell. The BELL! Member No.: 378 Region Association: Galt's Gulch |
what temp sensor will you be using? for a 4 or 6? the stock sump location if for a 4?
|
|
|
|
| gereed75 |
Jun 25 2015, 08:55 AM
Post
#3
|
|
Senior Member Group: Members Posts: 1,240 Joined: 19-March 13 From: Pittsburgh PA Member No.: 15,674 Region Association: North East States |
QUOTE(rhodyguy @ Jun 25 2015, 10:21 AM)  what temp sensor will you be using? for a 4 or 6? the stock sump location if for a 4? For a six. Will use the stock temp sender. Replaced the stock pressure switch with a combo switch and pressure sender for an 84 911. Looks like I will have to add a wire to the harness for the pressure sender. Diagram does not show one but I will check the actual harness since I believe the GT's had a combo gauge in them with pressure. Maybe the wire is actually there. (IMG:style_emoticons/default/confused24.gif) Hope so but doubt it. |
|
|
|
| Eddie914 |
Jun 25 2015, 09:50 AM
Post
#4
|
|
Unregistered |
WOW!
Great Job! I might have time to try the same for my teener ... after I retire ... which will be about five years ... after I die! Cheers, Eddie |
|
|
|
| Mark Henry |
Jun 25 2015, 12:58 PM
Post
#5
|
|
that's what I do! Group: Members Posts: 20,065 Joined: 27-December 02 From: Port Hope, Ontario Member No.: 26 Region Association: Canada |
WOW!
Very cool! Exactly what I want to do and I already have the gauges. Any more pics and do you have a link to that font? |
|
|
|
| Steve Snyder |
Jun 25 2015, 01:45 PM
Post
#6
|
|
Member Group: Members Posts: 241 Joined: 10-June 08 From: Graham, NC Member No.: 9,158 Region Association: South East States |
That looks sweet! Great job.
|
|
|
|
| bahnzai |
Jun 25 2015, 02:07 PM
Post
#7
|
|
Member Group: Members Posts: 305 Joined: 26-July 06 From: Columbia, SC Member No.: 6,509 Region Association: South East States |
Any more details would be great. I am sure there are a number of us that need/want to build a similar gauge.
Thanks! Danny |
|
|
|
| 914forme |
Jun 25 2015, 02:33 PM
Post
#8
|
|
Times a wastin', get wrenchin'! Group: Members Posts: 3,896 Joined: 24-July 04 From: Dayton, Ohio Member No.: 2,388 Region Association: None |
(IMG:style_emoticons/default/aktion035.gif) Great Job there
|
|
|
|
| Alphaogre |
Jun 25 2015, 03:13 PM
Post
#9
|
|
Member Group: Members Posts: 460 Joined: 28-May 12 From: San Diego Member No.: 14,487 Region Association: Southern California |
I just bought a donor 911 gauge to build a multi gauge for my 914-4. How difficult was it?
|
|
|
|
| Vysoc |
Jun 25 2015, 04:11 PM
Post
#10
|
|
Vysoc Group: Members Posts: 586 Joined: 27-August 09 From: Young Harris, Georgia Member No.: 10,737 Region Association: South East States |
|
|
|
|
| JmuRiz |
Jun 25 2015, 07:12 PM
Post
#11
|
|
914 Guru Group: Members Posts: 5,423 Joined: 30-December 02 From: NoVA Member No.: 50 Region Association: MidAtlantic Region |
Very creative look, and probably eliminates the wheel hiding the upper one on a quad gauge.
|
 |
|
| gereed75 |
Jun 25 2015, 08:58 PM
Post
#12
|
|
Senior Member Group: Members Posts: 1,240 Joined: 19-March 13 From: Pittsburgh PA Member No.: 15,674 Region Association: North East States |
Used this classic thread as guidance http://www.914world.com/bbs2/index.php?sho...c=57909&hl=
Used a late 4 fuel gage like the one currently for sale on e-bay for $29.95 .Used the face plate out of it and the late style gauge module. Combined that with an 80's 911 combo gage. Used the housing and gage modules out of that. The lettering is dry transfer from Woodland Scenics ..... SKU MG738. Put each letter on separately but would probably lay them out on scotch tape first and then transfer to the gauge face. Quicker and better alignment. Painted the face gloss black, put the letters on and then oversprayed with Testors Flat Clear to match the stock face pretty close. Had to trim the individual module face plates to get them to fit in this orientation. It's tight but works. One bad thing is that the light holders do no ground to the back plate when epoxied back in. I am working that out. Pretty easy once you get in there and work with it a bit. Oh yea, for six guys, there is a spare wire that terminates at the combo gage. It is solid green and is there for a temp sender on Sporto models. It terminates back on the engine compartment relay board. I will tie into that for the connection to the sender. Saves running a new wire (IMG:style_emoticons/default/piratenanner.gif) . |
|
|
|
| wndsnd |
Jun 25 2015, 09:15 PM
Post
#13
|
|
You wanted a horse, but got a goat. Nobody wants a goat.... Group: Members Posts: 2,861 Joined: 12-February 12 From: North Shore, MA Member No.: 14,124 Region Association: North East States |
Fine work!
|
|
|
|
| r_towle |
Jun 25 2015, 09:24 PM
Post
#14
|
|
Custom Member Group: Members Posts: 24,564 Joined: 9-January 03 From: Taxachusetts Member No.: 124 Region Association: North East States |
Good job
|
|
|
|
| Maltese Falcon |
Jun 25 2015, 09:25 PM
Post
#15
|
|
Advanced Member Group: Members Posts: 4,634 Joined: 14-September 04 From: Mulholland SoCal Member No.: 2,755 Region Association: None |
I like the layout and it's well executed... job well done (IMG:style_emoticons/default/aktion035.gif)
Marty |
|
|
|
| bahnzai |
Jun 26 2015, 05:00 AM
Post
#16
|
|
Member Group: Members Posts: 305 Joined: 26-July 06 From: Columbia, SC Member No.: 6,509 Region Association: South East States |
Gary,
Thanks so much for the additional info and insights. Where were you able to get the triple gauge face plate? Thanks again! Danny |
|
|
|
| mepstein |
Jun 26 2015, 05:12 AM
Post
#17
|
|
914-6 GT in waiting Group: Members Posts: 19,239 Joined: 19-September 09 From: Landenberg, PA/Wilmington, DE Member No.: 10,825 Region Association: MidAtlantic Region |
QUOTE(bahnzai @ Jun 26 2015, 07:00 AM) Gary, Thanks so much for the additional info and insights. Where were you able to get the triple gauge face plate? Thanks again! Danny looks homemade - in a good way. |
|
|
|
| gereed75 |
Jun 26 2015, 05:47 AM
Post
#18
|
|
Senior Member Group: Members Posts: 1,240 Joined: 19-March 13 From: Pittsburgh PA Member No.: 15,674 Region Association: North East States |
QUOTE(mepstein @ Jun 26 2015, 07:12 AM) QUOTE(bahnzai @ Jun 26 2015, 07:00 AM) Gary, Thanks so much for the additional info and insights. Where were you able to get the triple gauge face plate? Thanks again! Danny looks homeade - in a good way. Danny, Used the fuel gauge faceplate rotated 90 degrees. What were the top and bottom window cutouts become the left and right cutouts. Keep the top center indicator light hole and add two more. I cut out the bottom fuel "TANK" window and rolled the edges down in an effort (imperfect) to replicate the VDO edge treatment. You can see some roughness in that edge as Mark so observedly caught (IMG:style_emoticons/default/poke.gif) (IMG:style_emoticons/default/smile.gif) Strip the original paint and markings, paint and re-mark as you prefer with the dry transfer letters Thanks all for the kind comments. Thanks Stephan for your great original thread (IMG:style_emoticons/default/cheer.gif) All looks good buried in the binnacle. (IMG:style_emoticons/default/shades.gif) |
|
|
|
| mepstein |
Jun 26 2015, 05:53 AM
Post
#19
|
|
914-6 GT in waiting Group: Members Posts: 19,239 Joined: 19-September 09 From: Landenberg, PA/Wilmington, DE Member No.: 10,825 Region Association: MidAtlantic Region |
QUOTE(gereed75 @ Jun 26 2015, 07:47 AM) QUOTE(mepstein @ Jun 26 2015, 07:12 AM) QUOTE(bahnzai @ Jun 26 2015, 07:00 AM) Gary, Thanks so much for the additional info and insights. Where were you able to get the triple gauge face plate? Thanks again! Danny looks homeade - in a good way. Danny, Used the fuel gauge faceplate rotated 90 degrees. What were the top and bottom window cutouts become the left and right cutouts. Keep the top center indicator light hole and add two more. I cut out the bottom fuel "TANK" window and rolled the edges down in an effort (imperfect) to replicate the VDO edge treatment. You can see some roughness in that edge as Mark so observedly caught (IMG:style_emoticons/default/poke.gif) (IMG:style_emoticons/default/smile.gif) Strip the original paint and markings, paint and re-mark as you prefer with the dry transfer letters Thanks all for the kind comments. All looks good buried in the binnacle. (IMG:style_emoticons/default/shades.gif) I just meant that it was done by gereed75, not a purchased item. I think it looks awesome. (IMG:style_emoticons/default/beerchug.gif) |
|
|
|
| gereed75 |
Jun 26 2015, 05:55 AM
Post
#20
|
|
Senior Member Group: Members Posts: 1,240 Joined: 19-March 13 From: Pittsburgh PA Member No.: 15,674 Region Association: North East States |
QUOTE(mepstein @ Jun 26 2015, 07:53 AM) QUOTE(gereed75 @ Jun 26 2015, 07:47 AM) QUOTE(mepstein @ Jun 26 2015, 07:12 AM) QUOTE(bahnzai @ Jun 26 2015, 07:00 AM) Gary, Thanks so much for the additional info and insights. Where were you able to get the triple gauge face plate? Thanks again! Danny looks homeade - in a good way. Danny, Used the fuel gauge faceplate rotated 90 degrees. What were the top and bottom window cutouts become the left and right cutouts. Keep the top center indicator light hole and add two more. I cut out the bottom fuel "TANK" window and rolled the edges down in an effort (imperfect) to replicate the VDO edge treatment. You can see some roughness in that edge as Mark so observedly caught (IMG:style_emoticons/default/poke.gif) (IMG:style_emoticons/default/smile.gif) Strip the original paint and markings, paint and re-mark as you prefer with the dry transfer letters Thanks all for the kind comments. All looks good buried in the binnacle. (IMG:style_emoticons/default/shades.gif) I just meant that it was done by Danny, not a purchased item. I think it looks awesome. (IMG:style_emoticons/default/beerchug.gif) Thanks Mep, knew that (IMG:style_emoticons/default/beerchug.gif) |
|
|
|
|
1 User(s) are reading this topic (1 Guests and 0 Anonymous Users)
0 Members:

|
Lo-Fi Version | Time is now: 26th April 2024 - 02:47 PM |
Invision Power Board
v9.1.4 © 2024 IPS, Inc.