|
|
|
Porsche, and the Porsche crest are registered trademarks of Dr. Ing. h.c. F. Porsche AG.
This site is not affiliated with Porsche in any way. Its only purpose is to provide an online forum for car enthusiasts. All other trademarks are property of their respective owners. |
|
|

  |

| Lucky9146 |
 Sep 20 2017, 07:49 PM Sep 20 2017, 07:49 PM
Post
#241
|
|
Always Wanted A Bigger Go Cart  Group: Members Posts: 1,690 Joined: 22-September 14 From: Poway California Member No.: 17,942 Region Association: Southern California |
QUOTE(Larmo63 @ Sep 19 2017, 05:38 PM)  You can source a large, narrow hose clamp at Home Depot or Lowe's that is used for Dryer exhaust hose. It works and fits perfect. Larmo63 is right a dryer hose clamp fits perfect and is installed. No Picture just imagine a hose clamp. (IMG:style_emoticons/default/smile.gif) Spent a fair amount of time laying out my last 2 oil hoses today. Oil tank to engine oil cooler (on the left) was not bad because I had already developed hoses from the tank to near the original engine mount. Getting made tomorrow. 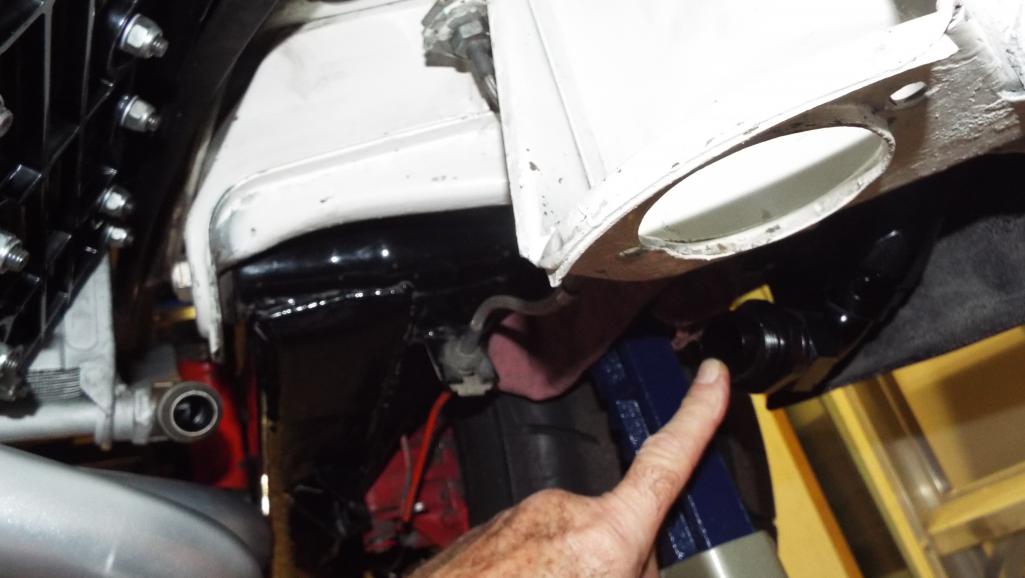 Thermostat on firewall to engine is going to be a bit of a cluster because of the close proximity to the engine mount.  Many of my hoses were already made by the PO with considerable investment and thought. The front oil cooler hose routing through the air passages in the longs was the intended design, as well as the thermostat location, which I followed through on and installed because I though it was a good plan and I liked the idea. Getting from that 90 on the thermostat to the engine will be fun. I may not post pictures of the completed solution if you know what I mean. (IMG:style_emoticons/default/biggrin.gif) Learned the other day that Larmo 63 made his own hoses and I saw them at least the ones by the front oil cooler and they looked great! I was impressed. |
   |

 
|
| Larmo63 |
Sep 20 2017, 08:19 PM
Post
#242
|
|
Advanced Member Group: Members Posts: 4,267 Joined: 3-March 14 From: San Clemente, Ca Member No.: 17,068 Region Association: Southern California |
You should be okay with that hose there, just mock it up and have your guy make it. The less unions in the hose, the better.
Looks good!! |
|
|
|
| Lucky9146 |
Sep 23 2017, 11:27 AM
Post
#243
|
|
Always Wanted A Bigger Go Cart Group: Members Posts: 1,690 Joined: 22-September 14 From: Poway California Member No.: 17,942 Region Association: Southern California |
QUOTE(Larmo63 @ Sep 20 2017, 07:19 PM) You should be okay with that hose there, just mock it up and have your guy make it. The less unions in the hose, the better. Looks good!! Thanks! Last couple of days have been dedicated mostly to oil lines, the last 2 braided oil lines that is. Mocked up and then made by my “guy”, well actually it's a she and she has made several really accurate AN hoses for this car in the past. Next post has the details. and yes less unions is the goal! 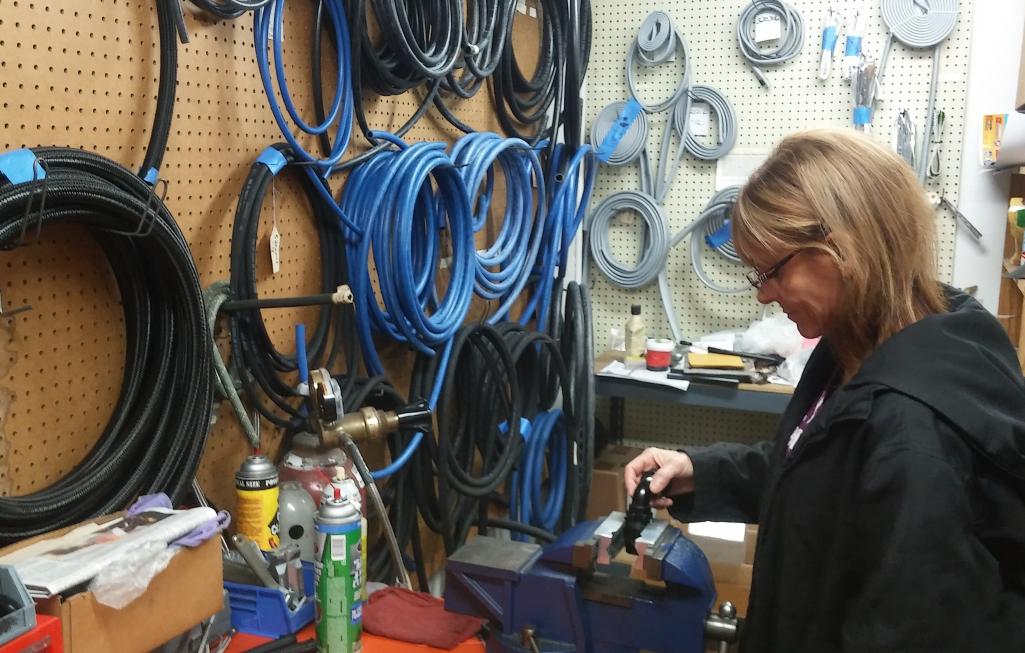 |
|
|
|
| Lucky9146 |
Sep 23 2017, 11:44 AM
Post
#244
|
|
Always Wanted A Bigger Go Cart Group: Members Posts: 1,690 Joined: 22-September 14 From: Poway California Member No.: 17,942 Region Association: Southern California |
First up was the AN16 with straight end and 30 deg end. Decided a bit of 800 degree shield would be good next to the header too.
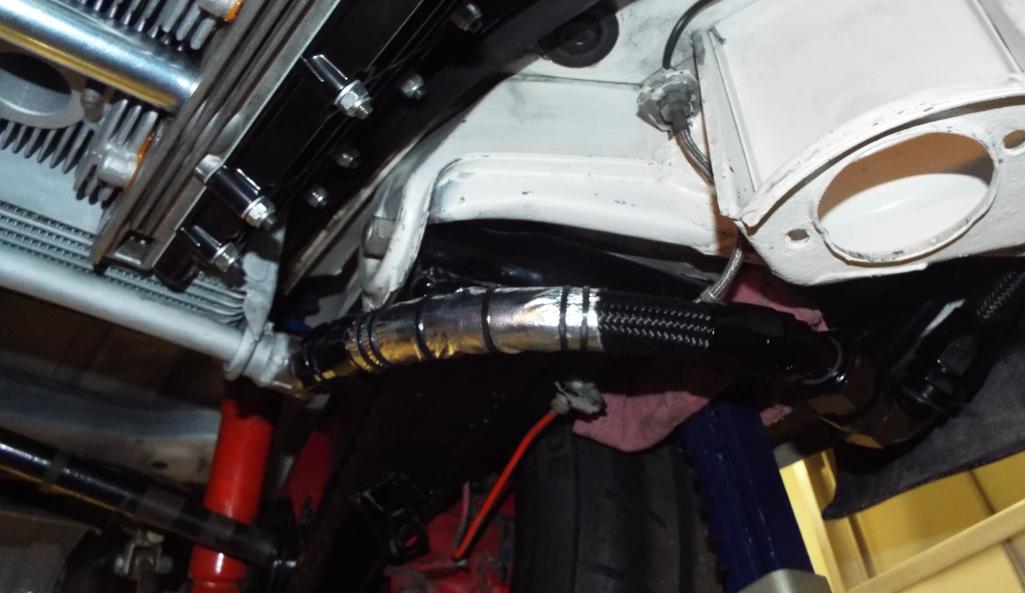 A couple years ago when I ran the AN12 front oil cooler lines through the heater tubes to the engine bay it all made sense and I liked it. Having an elbow coming out of the thermostat right next to engine mount seemed tight but ok. Now, with the engine in place that hose is a bit of a challenge, and like Learmo63 says, the fewer the elbows the better. My last post said jokingly that I may not post pictures but I am now happy with what I ended up with. So pictures there will be! I always liked an original 911 hard line concept; tight bend out of the block, close to the engine and drain tubes plus away from headers. So I shortened a 911 hard line, bent, and had a fitting tig welded to the end. This hard line is similar to the PMS line they sell for $160 and I did it for $42. I had the line cut 2 years ago just waiting for the engine install. Have to say the first hose approach was a bunch of close proximity elbows and it was nuts. The big spiral approach is going to be it! Just a bit of clamping and I’m done with oil system. Seems like baby steps but progress none the same. And many thanks to my hose"guy" 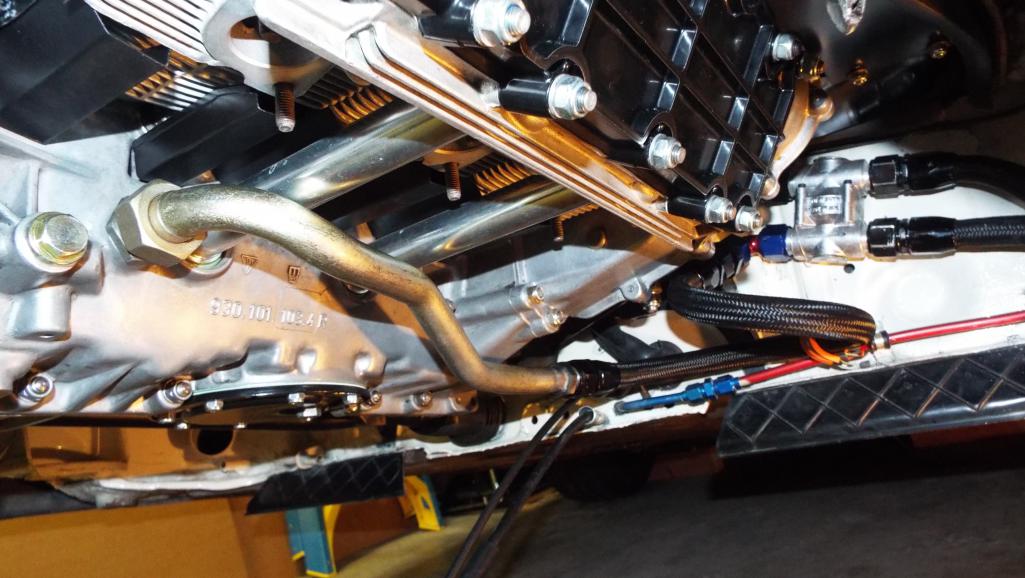 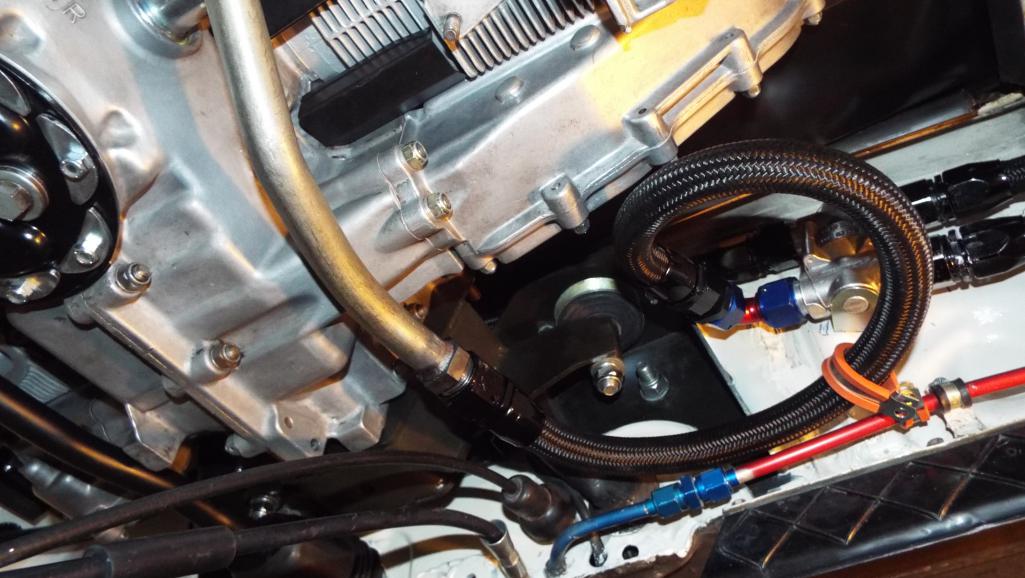 |
|
|
|
| 914forme |
Sep 23 2017, 05:32 PM
Post
#245
|
|
Times a wastin', get wrenchin'! Group: Members Posts: 3,896 Joined: 24-July 04 From: Dayton, Ohio Member No.: 2,388 Region Association: None |
(IMG:style_emoticons/default/confused24.gif) are your zip ties also 800 degrees resistant (IMG:style_emoticons/default/confused24.gif)
They make ss zip ties, or you can use ss safety wire, and just twist it on the end. Everything else is looking great, making much more progress than I am, keep it up. |
|
|
|
| Lucky9146 |
Sep 23 2017, 08:03 PM
Post
#246
|
|
Always Wanted A Bigger Go Cart Group: Members Posts: 1,690 Joined: 22-September 14 From: Poway California Member No.: 17,942 Region Association: Southern California |
QUOTE(914forme @ Sep 23 2017, 04:32 PM) (IMG:style_emoticons/default/confused24.gif) are your zip ties also 800 degrees resistant (IMG:style_emoticons/default/confused24.gif) They make ss zip ties, or you can use ss safety wire, and just twist it on the end. Everything else is looking great, making much more progress than I am, keep it up. Thanks! Good point they are not! I was looking at that when I got done. (IMG:style_emoticons/default/idea.gif) Safety wire it is! (IMG:style_emoticons/default/agree.gif) Thanks for looking in! Hope you're making progress on your project. (IMG:style_emoticons/default/beerchug.gif) |
|
|
|
| maf914 |
Sep 24 2017, 06:04 AM
Post
#247
|
|
Not a Guru! Group: Members Posts: 3,049 Joined: 30-April 03 From: Central Florida Member No.: 632 Region Association: None |
Porschetub, How did you fabricate and attach the second bracket/boss to support the second bronze bushing on the shift linkage console?
Attached image(s) 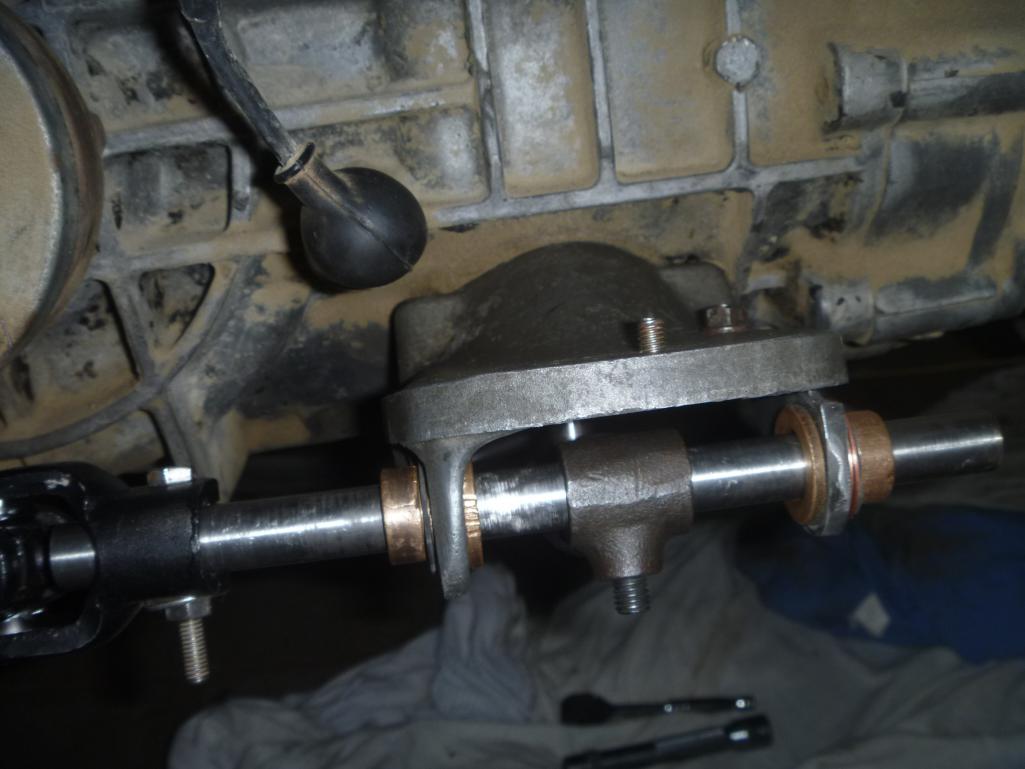
|
|
|
|
| Lucky9146 |
Sep 25 2017, 01:32 PM
Post
#248
|
|
Always Wanted A Bigger Go Cart Group: Members Posts: 1,690 Joined: 22-September 14 From: Poway California Member No.: 17,942 Region Association: Southern California |
2015
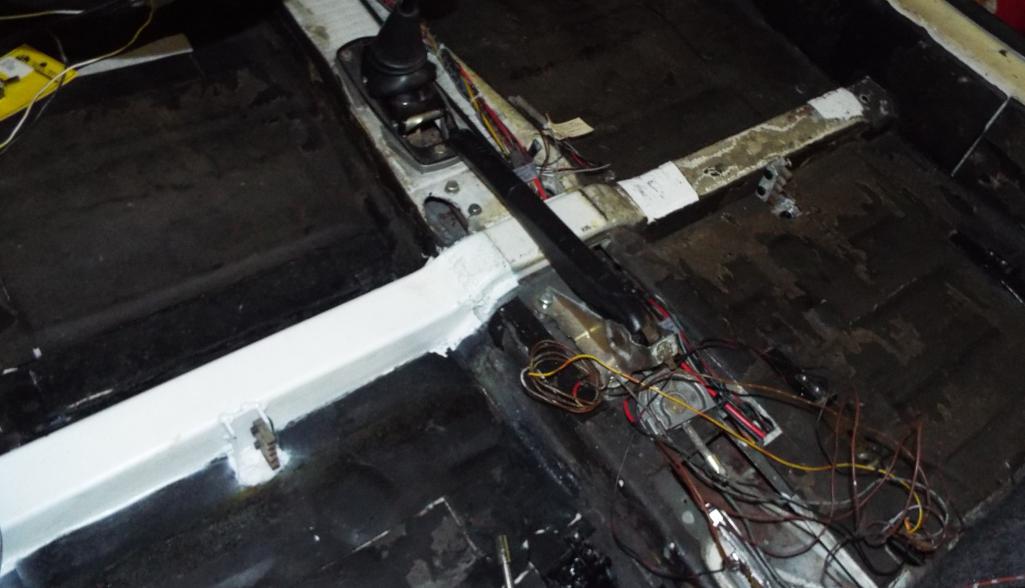
Seat Rail Cross Member Repair Sept / Oct 2015 Not sure why I didn’t post before but a host of reasons as things came to a screeching halt the end of 2015. Disclaimer: You have to cut me some slack here as I had not owned a 914 prior to this and it came with giant 911 seats just sitting in it not bolted in at all. When I originally took the seats out I noticed there was no seat bracket anything, so I knew I had a problem right there. But you don’t know what you don’t know. By Sept 2015 I had spent countless hours IN the car with wiring and the rear firewall insulation and never, and I mean never, noticed until one day I was looking at pictures of an interior on 914 World (and that just might be Andy’s) and I saw this beauty. Look at this perfect yellow floor, mine is ugly one below (IMG:style_emoticons/default/sad.gif) 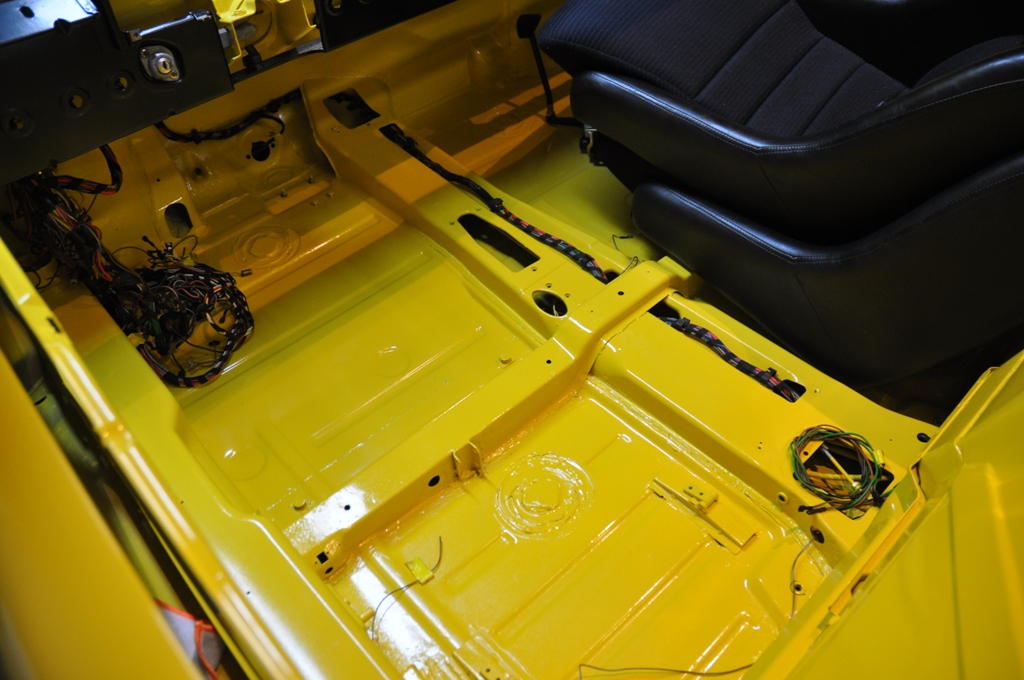 Do you see what I saw? The damn cross rail did not go all the way across the drivers side on mine, I mean WTF? Now I realized I was really was missing something! It was cut completely off! (IMG:style_emoticons/default/sawzall-smiley.gif) Welds ground like it was never there!! All the hinge brackets and hinges gone! Flat floor! Covered with a patchwork of sound deadening. I do know the owner before moparrob had Sparco seat but not much more than that. Passenger side seat hinges ground off. 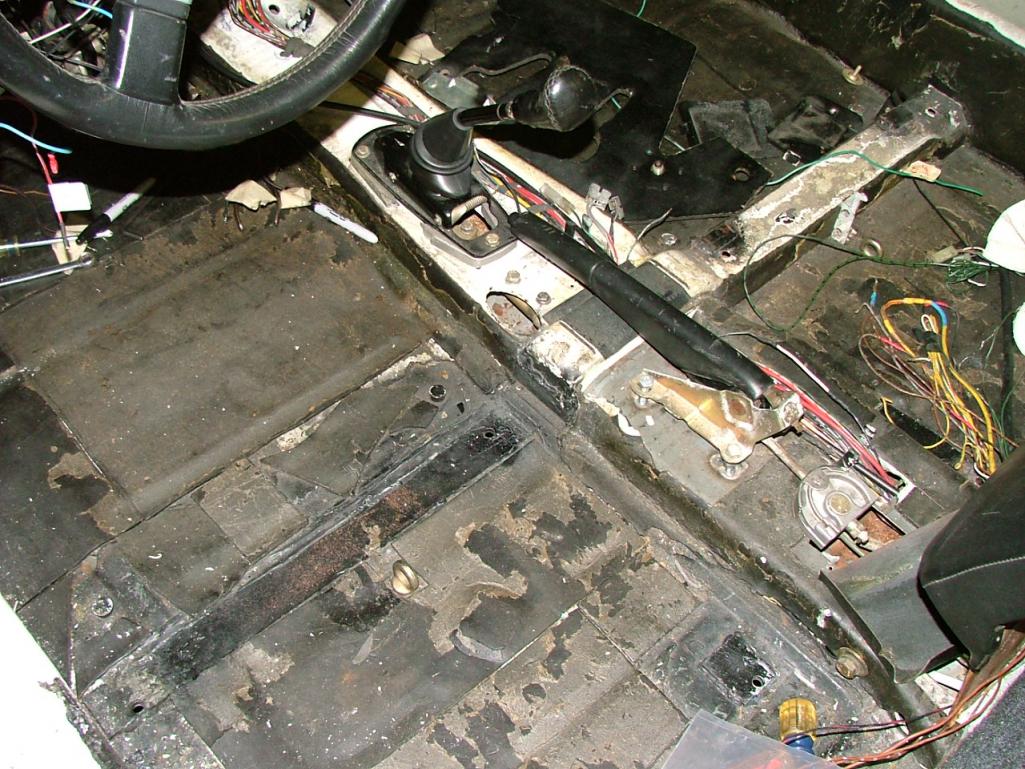 Well shit I got to fix this at least for structural integrity anyway and I wanted to be able to run stock seats and who knows maybe someday Scheels ( I mean I saw Larmo63’s Scheels at 914 Fun Day and I’m Jealous and that is what actually refreshed my memory of this wonderful mess). 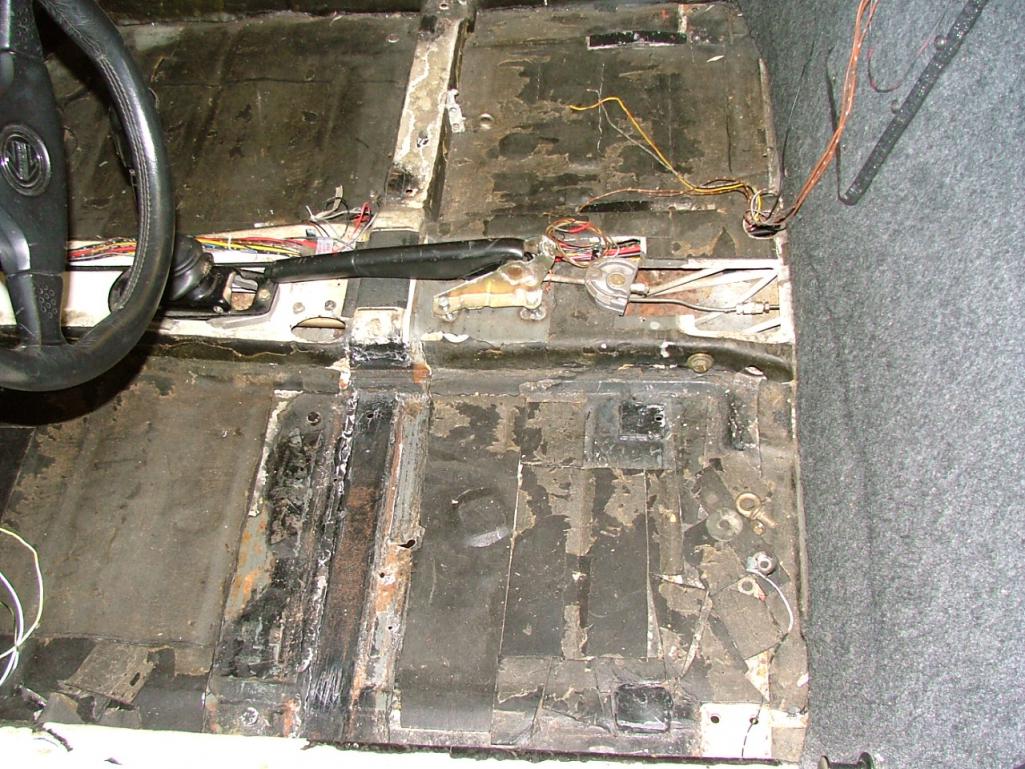 I had by this time new German glass front and non German rear installed (another story for another day that I would just as soon forget) so I fashioned some partitions out of hard board for sparks. 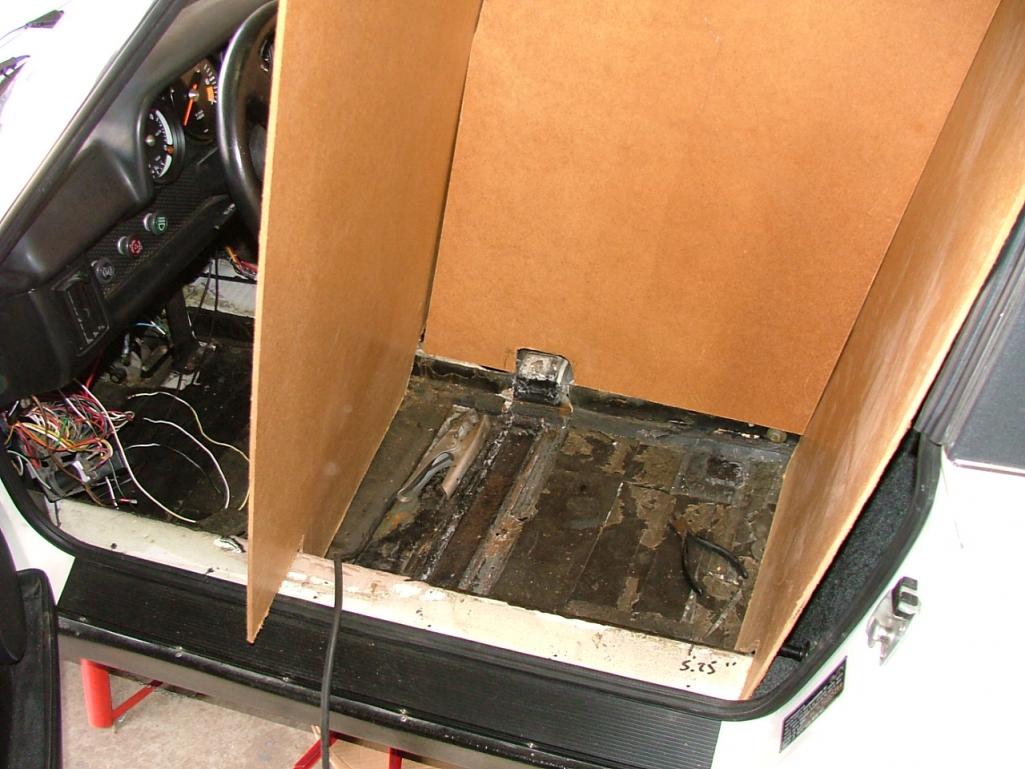 The only place I could find the half cross rail was AA but I was happy to be able to find just a half. And it actually was a pretty nicely made piece and did not require a lot of customization to fit it in. Not the welding expertise of mb911 but I got it done! Kind of a tight area too. (IMG:style_emoticons/default/welder.gif) 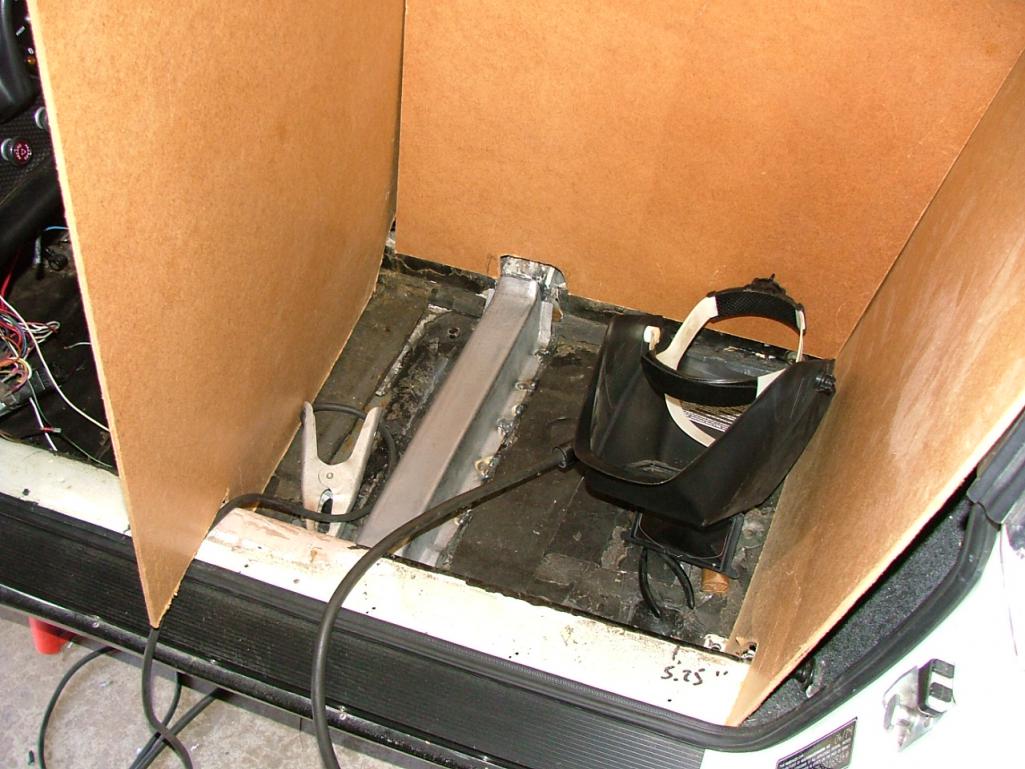 Installation of seat brackets was a royal pain but they are even and level. Picture of completed to follow. 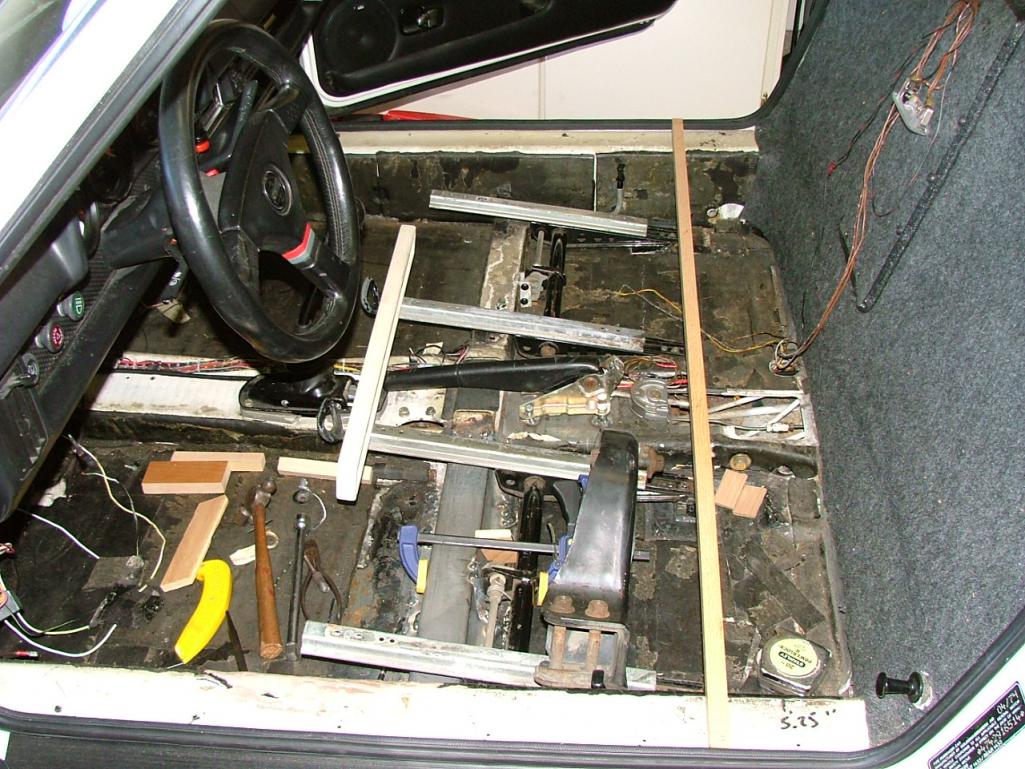 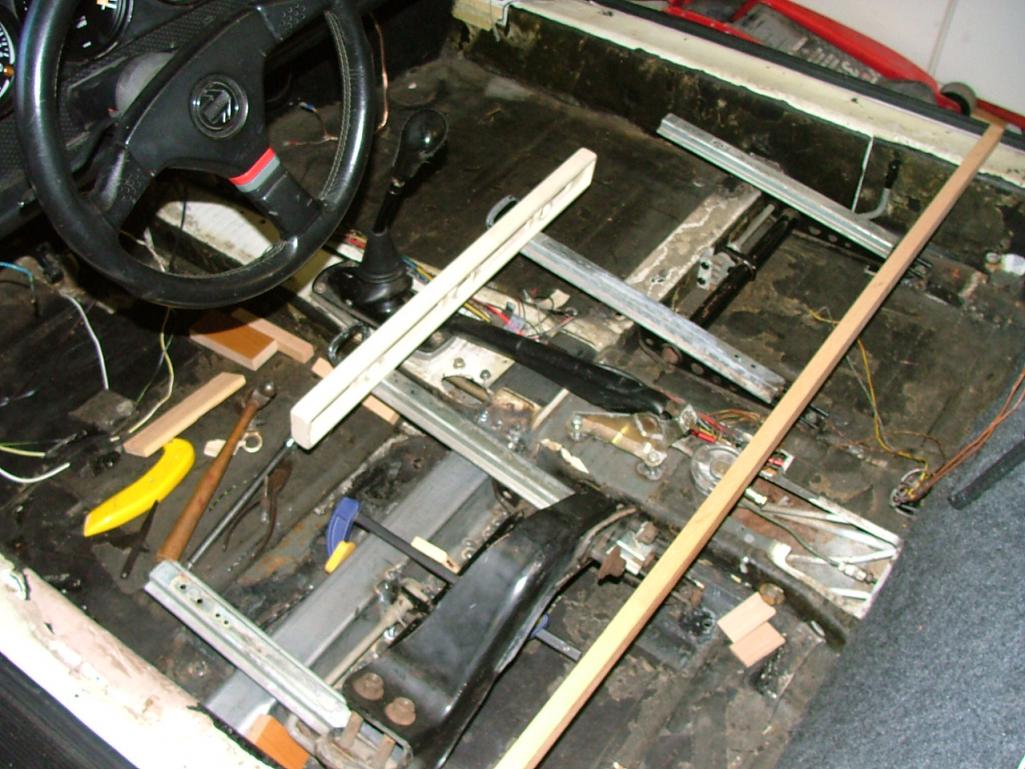 |
|
|
|
| Lucky9146 |
Sep 25 2017, 01:59 PM
Post
#249
|
|
Always Wanted A Bigger Go Cart Group: Members Posts: 1,690 Joined: 22-September 14 From: Poway California Member No.: 17,942 Region Association: Southern California |
Completed job 2015 cross member
 And with stock seats installed  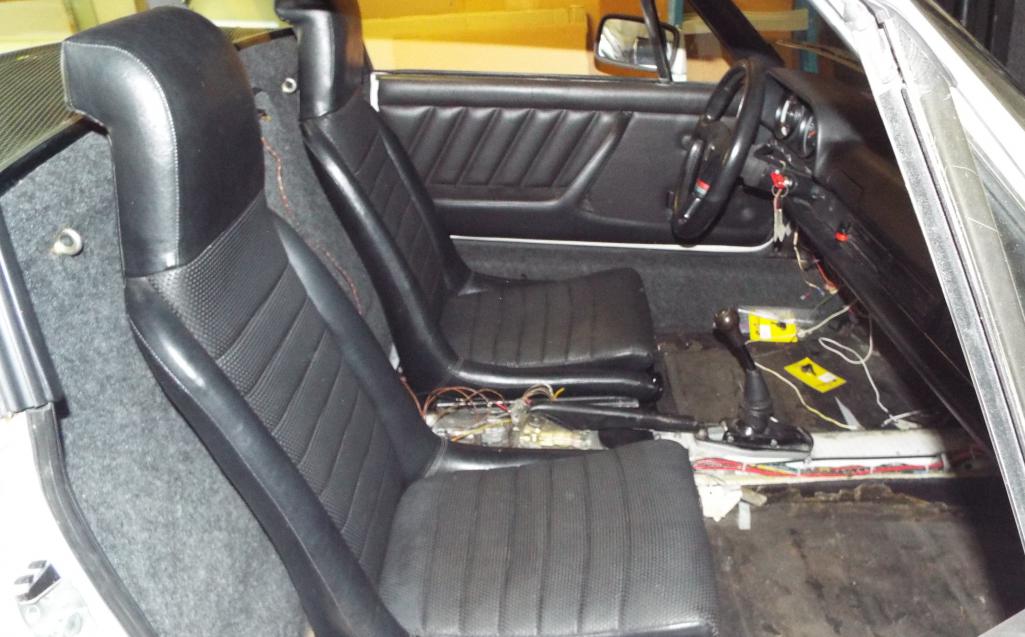 But in doing the post above about 2015 I decided to remove the seats and see what all I still have left to do in there. My day was ruined when this handle broke off moving the seat forward. This all gets really frustrating sometimes and it just doesn’t pay to get out of bed. Killer is I sold my extras for cheap at a swap meet hoping somebody could use them. 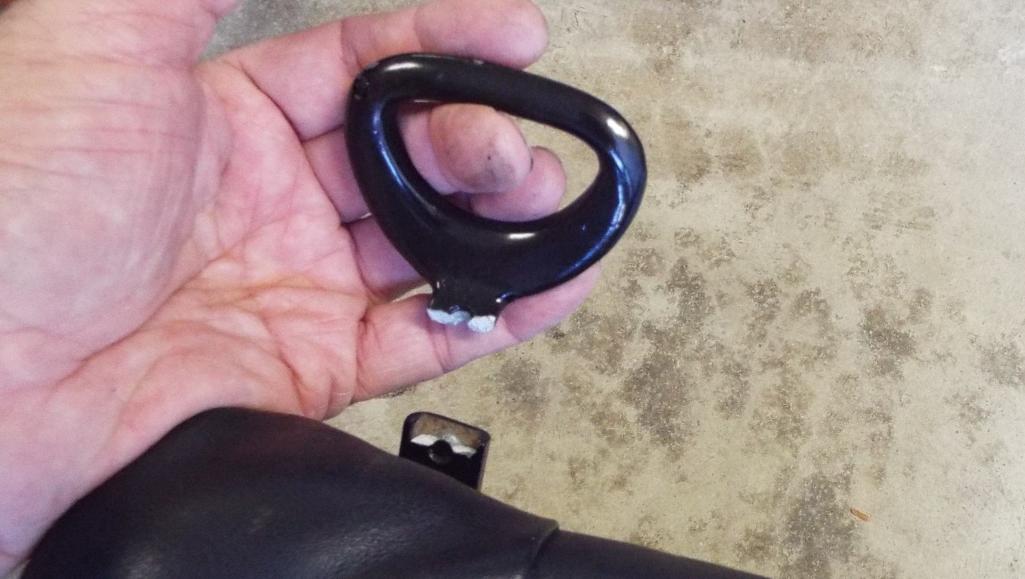 |
|
|
|
| porschetub |
Sep 25 2017, 02:01 PM
Post
#250
|
|
Advanced Member Group: Members Posts: 4,963 Joined: 25-July 15 From: New Zealand Member No.: 18,995 Region Association: None |
Interesting handbrake setup,that would work well surely,good progress going on here (IMG:style_emoticons/default/beerchug.gif) .
|
|
|
|
| porschetub |
Sep 25 2017, 02:27 PM
Post
#251
|
|
Advanced Member Group: Members Posts: 4,963 Joined: 25-July 15 From: New Zealand Member No.: 18,995 Region Association: None |
QUOTE(maf914 @ Sep 25 2017, 01:04 AM) Porschetub, How did you fabricate and attach the second bracket/boss to support the second bronze bushing on the shift linkage console? maf914,I used a scrap of 50x50x5 box section (RHS) cut and sectioned to make an angle,the reason I choose this was because the 5mm thinkness is basically correct to support the bush,I may have added an extra snap ring as a spacer but can't remember offhand. 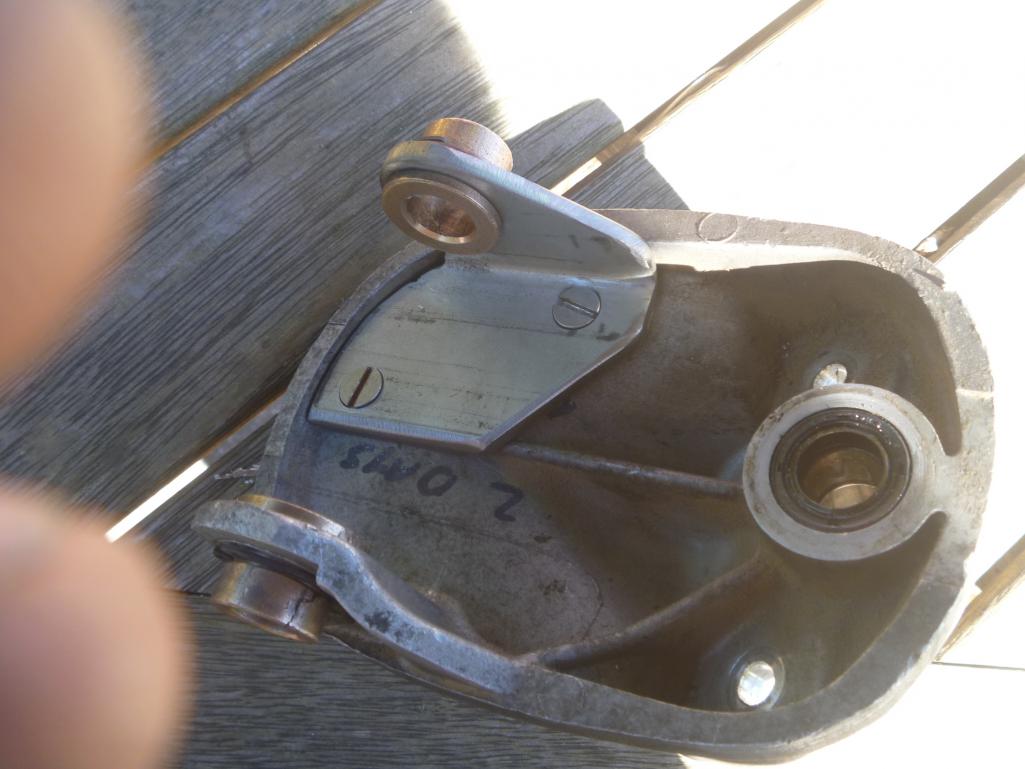 It takes a bit of setup time but wasn't too hard,as I had a longer rod made up I decided to add another uni-joint to further help rod alignment ,you need to cut a hole in the rear of the plastic cover for obvious reasons. I got the oil impregnated bushes from a seller on ebay. Hope that helps. |
|
|
|
| moparrob |
Sep 25 2017, 04:20 PM
Post
#252
|
|
Senior Member Group: Members Posts: 646 Joined: 27-April 10 From: Los Angeles Member No.: 11,663 Region Association: None |
QUOTE(porschetub @ Sep 25 2017, 01:27 PM) QUOTE(maf914 @ Sep 25 2017, 01:04 AM) Porschetub, How did you fabricate and attach the second bracket/boss to support the second bronze bushing on the shift linkage console? maf914,I used a scrap of 50x50x5 box section (RHS) cut and sectioned to make an angle,the reason I choose this was because the 5mm thinkness is basically correct to support the bush,I may have added an extra snap ring as a spacer but can't remember offhand. It takes a bit of setup time but wasn't too hard,as I had a longer rod made up I decided to add another uni-joint to further help rod alignment ,you need to cut a hole in the rear of the plastic cover for obvious reasons. I got the oil impregnated bushes from a seller on ebay. Hope that helps. Very creative on that bracket. It would be nice if someone did a three axis scan on that and created the part in billet. |
|
|
|
| moparrob |
Sep 25 2017, 04:20 PM
Post
#253
|
|
Senior Member Group: Members Posts: 646 Joined: 27-April 10 From: Los Angeles Member No.: 11,663 Region Association: None |
Double post (IMG:style_emoticons/default/huh.gif)
|
|
|
|
| mepstein |
Sep 25 2017, 04:32 PM
Post
#254
|
|
914-6 GT in waiting Group: Members Posts: 20,264 Joined: 19-September 09 From: Landenberg, PA/Wilmington, DE Member No.: 10,825 Region Association: MidAtlantic Region |
QUOTE(Lucky9146 @ Sep 23 2017, 01:44 PM) First up was the AN16 with straight end and 30 deg end. Decided a bit of 800 degree shield would be good next to the header too. A couple years ago when I ran the AN12 front oil cooler lines through the heater tubes to the engine bay it all made sense and I liked it. Having an elbow coming out of the thermostat right next to engine mount seemed tight but ok. Now, with the engine in place that hose is a bit of a challenge, and like Learmo63 says, the fewer the elbows the better. My last post said jokingly that I may not post pictures but I am now happy with what I ended up with. So pictures there will be! I always liked an original 911 hard line concept; tight bend out of the block, close to the engine and drain tubes plus away from headers. So I shortened a 911 hard line, bent, and had a fitting tig welded to the end. This hard line is similar to the PMS line they sell for $160 and I did it for $42. I had the line cut 2 years ago just waiting for the engine install. Have to say the first hose approach was a bunch of close proximity elbows and it was nuts. The big spiral approach is going to be it! Just a bit of clamping and I’m done with oil system. Seems like baby steps but progress none the same. And many thanks to my hose"guy" I’m not there to see this in 3D but I wonder if a 45 degree fitting on each end of a short piece of line would connect without the loop. Or keeping the 90 on the thermostat and adding a 45 on the oil pipe. |
 |
|
| Larmo63 |
Sep 25 2017, 04:36 PM
Post
#255
|
|
Advanced Member Group: Members Posts: 4,267 Joined: 3-March 14 From: San Clemente, Ca Member No.: 17,068 Region Association: Southern California |
I like the GT center hand brake idea, but when it is up does the shifter interfere with it. They look close, maybe too close?
It's much better to drive a 914 with seats in it. (IMG:style_emoticons/default/beerchug.gif) Order two steel seat adjuster handles from 914 Rubber and be done with it. Those old alloy ones break regularly. |
|
|
|
| Lucky9146 |
Sep 25 2017, 05:15 PM
Post
#256
|
|
Always Wanted A Bigger Go Cart Group: Members Posts: 1,690 Joined: 22-September 14 From: Poway California Member No.: 17,942 Region Association: Southern California |
QUOTE(porschetub @ Sep 25 2017, 01:27 PM) QUOTE(maf914 @ Sep 25 2017, 01:04 AM) Porschetub, How did you fabricate and attach the second bracket/boss to support the second bronze bushing on the shift linkage console? maf914,I used a scrap of 50x50x5 box section (RHS) cut and sectioned to make an angle,the reason I choose this was because the 5mm thinkness is basically correct to support the bush,I may have added an extra snap ring as a spacer but can't remember offhand. It takes a bit of setup time but wasn't too hard,as I had a longer rod made up I decided to add another uni-joint to further help rod alignment ,you need to cut a hole in the rear of the plastic cover for obvious reasons. I got the oil impregnated bushes from a seller on ebay. Hope that helps. Porschetub thanks for all the info I was wondering too how it was made and was glad maf914 asked. I am not sure who I know could make this but the piece is a really good idea. |
|
|
|
| Lucky9146 |
Sep 25 2017, 05:37 PM
Post
#257
|
|
Always Wanted A Bigger Go Cart Group: Members Posts: 1,690 Joined: 22-September 14 From: Poway California Member No.: 17,942 Region Association: Southern California |
QUOTE(mepstein @ Sep 25 2017, 03:32 PM) QUOTE(Lucky9146 @ Sep 23 2017, 01:44 PM) A couple years ago when I ran the AN12 front oil cooler lines through the heater tubes to the engine bay it all made sense and I liked it. Having an elbow coming out of the thermostat right next to engine mount seemed tight but ok. Now, with the engine in place that hose is a bit of a challenge, and like Learmo63 says, the fewer the elbows the better. I always liked an original 911 hard line concept; tight bend out of the block, close to the engine and drain tubes plus away from headers. So I shortened a 911 hard line, bent, and had a fitting tig welded to the end. This hard line is similar to the PMS line they sell for $160 and I did it for $42. I had the line cut 2 years ago just waiting for the engine install. Have to say the first hose approach was a bunch of close proximity elbows and it was nuts. The big spiral approach is going to be it! Just a bit of clamping and I’m done with oil system. Seems like baby steps but progress none the same. And many thanks to my hose"guy" I’m not there to see this in 3D but I wonder if a 45 degree fitting on each end of a short piece of line would connect without the loop. Or keeping the 90 on the thermostat and adding a 45 on the oil pipe. Yeah it looks like it would work with 45 deg from the pic I know what you mean. The end coming out of the 90 at the thermostat and the end of the hard line were only 7 inches from each other and with 90's on them they were in the same plane. Not a lot of real estate to work with. I really don't think there was room for 45's and then more 90's just didn't make sense and even that wouldn't really work either. Thanks for looking in. Edit to add picture to show how tight it is against the engine mount right now I have a piece of rubber in there for cushion. if anything the elbow coming out of the thermostat could bave been like 75 degrees. The mount is coming down at an angle. Hope this helps. 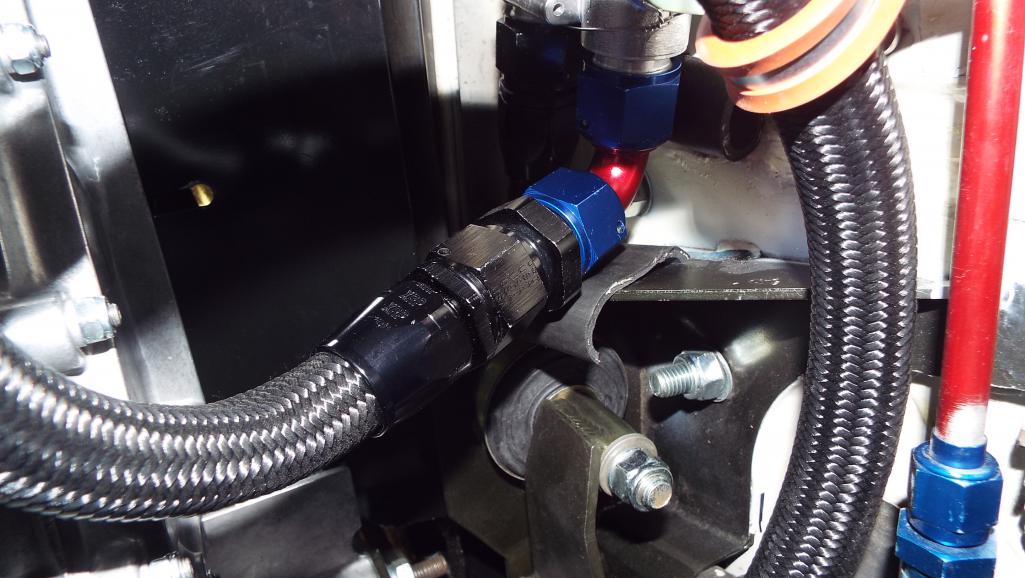 |
|
|
|
| Lucky9146 |
Sep 25 2017, 06:26 PM
Post
#258
|
|
Always Wanted A Bigger Go Cart Group: Members Posts: 1,690 Joined: 22-September 14 From: Poway California Member No.: 17,942 Region Association: Southern California |
QUOTE(Larmo63 @ Sep 25 2017, 03:36 PM) I like the GT center hand brake idea, but when it is up does the shifter interfere with it. They look close, maybe too close? It's much better to drive a 914 with seats in it. (IMG:style_emoticons/default/beerchug.gif) Order two steel seat adjuster handles fro 914 Rubber and be done with it. Those old alloy ones break regularly. Yes center hand brake should be cool. (IMG:style_emoticons/default/agree.gif) Since I just installed the shifter linkage the other day I can now check it so thanks for asking. Shifter fully back and brake up to match. Picture shows got about an inch, but I doubt the brake is that high when pulled up, have to see and that's another whole project. (IMG:style_emoticons/default/blink.gif) I will get right on the 914 Rubber seat handles thanks for that too! (IMG:style_emoticons/default/beerchug.gif) 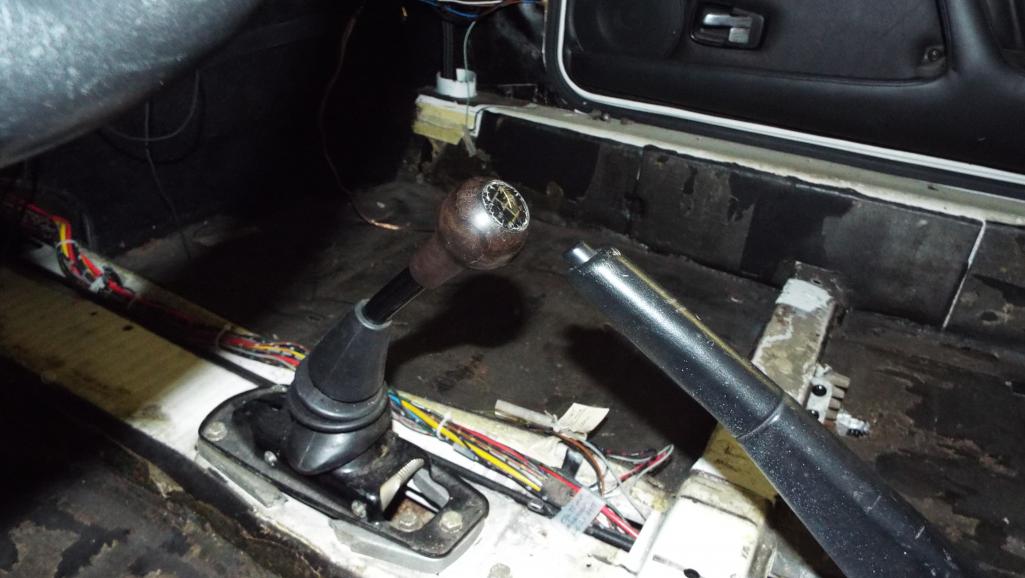 |
|
|
|
| Larmo63 |
Sep 25 2017, 09:37 PM
Post
#259
|
|
Advanced Member Group: Members Posts: 4,267 Joined: 3-March 14 From: San Clemente, Ca Member No.: 17,068 Region Association: Southern California |
I thought the same exact thing that Mark said in his comment about the oil line loop. I doubt the loop hurts anything, but a direct connection does look possible.
|
|
|
|
| maf914 |
Sep 26 2017, 06:50 AM
Post
#260
|
|
Not a Guru! Group: Members Posts: 3,049 Joined: 30-April 03 From: Central Florida Member No.: 632 Region Association: None |
QUOTE(Lucky9146 @ Sep 25 2017, 03:15 PM) QUOTE(porschetub @ Sep 25 2017, 01:27 PM) QUOTE(maf914 @ Sep 25 2017, 01:04 AM) Porschetub, How did you fabricate and attach the second bracket/boss to support the second bronze bushing on the shift linkage console? maf914,I used a scrap of 50x50x5 box section (RHS) cut and sectioned to make an angle,the reason I choose this was because the 5mm thinkness is basically correct to support the bush,I may have added an extra snap ring as a spacer but can't remember offhand. It takes a bit of setup time but wasn't too hard,as I had a longer rod made up I decided to add another uni-joint to further help rod alignment ,you need to cut a hole in the rear of the plastic cover for obvious reasons. I got the oil impregnated bushes from a seller on ebay. Hope that helps. Porschetub thanks for all the info I was wondering too how it was made and was glad maf914 asked. I am not sure who I know could make this but the piece is a really good idea. Yes, thank you Porschetub for the explanation. Chris at Tangerine Racing offers a kit that adds double bushings at the shift console, and Mark Henry and Brant have posted threads and photos of their custom double bushing installations. All good information. |
|
|
|
|
2 User(s) are reading this topic (2 Guests and 0 Anonymous Users)
0 Members:

|
Lo-Fi Version | Time is now: 29th November 2025 - 08:43 AM |
Invision Power Board
v9.1.4 © 2025 IPS, Inc.