|
|
|
Porsche, and the Porsche crest are registered trademarks of Dr. Ing. h.c. F. Porsche AG.
This site is not affiliated with Porsche in any way. Its only purpose is to provide an online forum for car enthusiasts. All other trademarks are property of their respective owners. |
|
|


| Lucky9146 |
 Aug 3 2015, 10:29 PM Aug 3 2015, 10:29 PM
Post
#281
|
|
Always Wanted A Bigger Go Cart  Group: Members Posts: 1,699 Joined: 22-September 14 From: Poway California Member No.: 17,942 Region Association: Southern California |
Bought This car in Nov 2013 and unfortunately it had to sit in my trailer until May of this year to get started on it. The picture is how the car looked the way I got it and how it came out of the trailer. Factory P/N steel flares, nice paint job, a not installed 3.0 close to ready to install, Oh, and an in process conversion. Just some cleaning and put it together and yes a lot of learning/ research. Because (a) I have never owned a 914. (b) never done an engine conversion (built a few). © never picked up where someone left off (you know how its easier to put something back together when you take it apart).
I got the "bug" from a friend who took me up the Ortega Hwy in his 6 conversion and I was hooked. I decided to share my experiences with the "world" and hopefully along the way gain some insight. I have met some great 914 folks so far at swap meets and parts houses and everyone has been quite helpful. I will tell more of the story of what came with the car and what I have done so far as the days go by. Check in once in a while. Attached thumbnail(s) 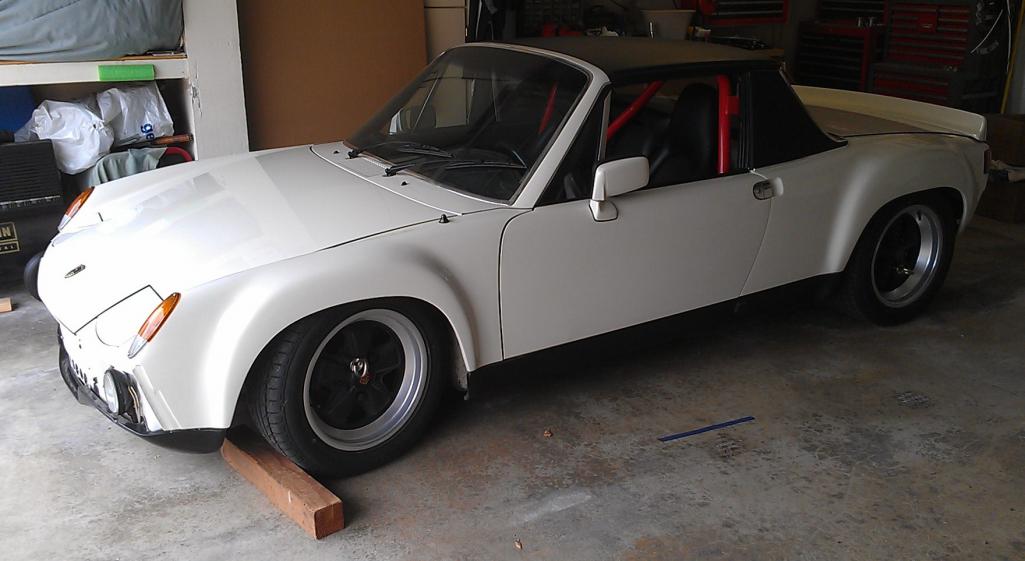
|
   |

 
|
Posts in this topic
Lucky9146 Finishing A 914-6 GT Conversion Project Aug 3 2015, 10:29 PM mgp4591 Welcome to the money pit! Lots of good advice ... Aug 3 2015, 10:34 PM
 Lucky9146 Welcome to the money pit! Lots of good advice ... Aug 3 2015, 11:05 PM jmitro looks great so far; look forward to see more of th... Aug 3 2015, 10:55 PM whitetwinturbo :wub: the "great" white ....... I'm ... Aug 3 2015, 11:04 PM Lucky9146 the "great" white ....... I'm sortin... Aug 3 2015, 11:20 PM whitetwinturbo ............ I started a build thread "There ... Aug 3 2015, 11:12 PM Lucky9146 So as I have found so typical is the jack stand st... Aug 3 2015, 11:17 PM Maltese Falcon Good purchase of MoparRob's white 6/conversio... Aug 3 2015, 11:50 PM Lucky9146 [quote name='Maltese Falcon' date='Aug... Aug 4 2015, 09:38 AM Lucky9146 [quote name='Maltese Falcon' date='Aug... Aug 4 2015, 10:22 AM Lucky9146 So now I learned from Maltese Falcon that since my... Aug 6 2015, 09:33 AM mepstein
So now I learned from Maltese Falcon that since m... Aug 6 2015, 09:49 AM Lucky9146 So where does one begin when you have never owned ... Aug 4 2015, 12:07 AM Cairo94507 Terrific - Keep up the good work so you can get th... Aug 4 2015, 06:22 AM RobW Everybody was wondering where that one went. Looki... Aug 4 2015, 07:23 AM Lucky9146
Everybody was wondering where that one went. Look... Aug 4 2015, 10:15 AM eric9144 Hey I'm right up the hill from you, hit me up ... Aug 4 2015, 09:49 AM Lucky9146
Hey I'm right up the hill from you, hit me up... Aug 4 2015, 10:26 AM mepstein It belonged to a guy named Rolland who had it runn... Aug 4 2015, 10:27 AM Lucky9146
It belonged to a guy named Rolland who had it run... Aug 4 2015, 10:54 AM mepstein
It belonged to a guy named Rolland who had it ru... Aug 4 2015, 11:09 AM Lucky9146
[quote name='Lucky9146' post='2218658' date='Aug ... Aug 4 2015, 11:35 AM Lucky9146 On with cleaning and lerrning here is the left rea... Aug 4 2015, 10:33 AM rhodyguy here is a shot of the cushions/wire protectors i p... Aug 4 2015, 11:44 AM Maltese Falcon Lucky9146,
Here is one angle of my '74.
Photo ... Aug 4 2015, 01:16 PM Lucky9146
Lucky9146,
Here is one angle of my '74.
Photo... Aug 4 2015, 01:21 PM lonewolfe I'm going to enjoy following this thread! ... Aug 4 2015, 01:23 PM pete000 I don't know what it is, but I think there is ... Aug 4 2015, 04:00 PM Lucky9146 [quote name='pete000' date='Aug 4 2015... Aug 4 2015, 04:55 PM KELTY360 Unlike a lot of guys here, I wasn't in line to... Aug 4 2015, 04:26 PM Cairo94507 Hi Pete - I generally do not like the Porsche grap... Aug 4 2015, 04:43 PM Lucky9146 This car came with some really nice parts! So... Aug 4 2015, 04:52 PM rhodyguy the shift rod bushing looks a little spent. Aug 5 2015, 07:25 AM Lucky9146
the shift rod bushing looks a little spent.
Lik... Aug 5 2015, 09:51 AM Lucky9146 So I decided to run the oil hoses from the front t... Aug 5 2015, 09:12 AM rhodyguy do em all. the complete 'kit' from pelican... Aug 5 2015, 10:00 AM rhodyguy in this picture the top is the throttle cable. the... Aug 5 2015, 10:41 AM Lucky9146
in this picture the top is the throttle cable. th... Aug 5 2015, 11:09 AM rhodyguy 73' Aug 5 2015, 11:41 AM Larmo63 Great looking engine!!! :worship:
I... Aug 5 2015, 12:19 PM Lucky9146 One of the things I have completed is the rear bum... Aug 6 2015, 12:22 AM lonewolfe
One of the things I have completed is the rear bu... Aug 6 2015, 12:50 AM Lucky9146
One of the things I have completed is the rear b... Aug 6 2015, 09:10 AM earossi
[quote name='lonewolfe' post='2219478' date='Aug ... Aug 8 2015, 08:26 AM rhodyguy in your favor it's not an LE. then you would h... Aug 6 2015, 09:47 AM Lucky9146 Thought I would share some history of the car at l... Aug 6 2015, 11:02 AM Lucky9146 Pictures of front trunk as received. Louver was i... Aug 6 2015, 05:13 PM Lucky9146 Minimal rust was treated with Pour 15, louver was ... Aug 6 2015, 05:19 PM lonewolfe I like how the spare tire mount was added for a sp... Aug 6 2015, 05:22 PM Lucky9146
I like how the spare tire mount was added for a s... Aug 6 2015, 05:53 PM SLITS
unfortunately I have no info on the fuel filter o... Aug 8 2015, 07:31 AM Lucky9146 Front carpet reinstalled. Under front louver seale... Aug 6 2015, 05:32 PM Lucky9146 Have been looking for months for the cir-clip that... Aug 6 2015, 06:14 PM Lucky9146 Engine compartment insulation was not installed wh... Aug 6 2015, 10:47 PM Lucky9146 Insulation Installed Aug 6 2015, 10:50 PM Lucky9146 To continue on with the front trunk, oil cooler, a... Aug 8 2015, 12:29 AM Lucky9146 The PO installed oil cooler and card board mock up... Aug 8 2015, 12:41 AM Lucky9146 So I started with the mock up and some spare galva... Aug 8 2015, 01:09 AM mepstein Very nicely done! Aug 8 2015, 06:57 AM RobW
Very nicely done!
:agree: :agree:
Very ni... Aug 8 2015, 07:08 AM Lucky9146 The real elephant in the room for me is the wiring... Aug 9 2015, 11:49 AM porschetub
The real elephant in the room for me is the wirin... Aug 9 2015, 12:46 PM Lucky9146 I can't help but laugh @ your comments ,I... Aug 9 2015, 01:13 PM Lucky9146 The Tach is a 911 641 303 03 which is for a 78-83 ... Aug 9 2015, 12:04 PM Lucky9146 Next up is the very cool quad guage custom built f... Aug 9 2015, 12:23 PM Lucky9146 The "elephant in the room" continues by ... Aug 9 2015, 01:37 PM porschetub
The "elephant in the room" continues by... Aug 12 2015, 02:05 AM Lucky9146
The "elephant in the room" continues b... Aug 17 2015, 11:27 AM Mike Bellis Your other thread sent me here... There should be ... Aug 9 2015, 10:03 PM Lucky9146 It is my understanding that from '73 up the ve... Aug 22 2015, 10:07 AM tp_reading
It is my understanding that from '73 up the v... Aug 22 2015, 01:36 PM Lucky9146
[quote name='Lucky9146' post='2227015' date='Aug ... Aug 22 2015, 09:14 PM tp_reading
[quote name='Lucky9146' post='2227015' date='Aug... Aug 23 2015, 07:23 AM mepstein 99% sure those connectors plug into a seperate (sm... Aug 22 2015, 10:38 AM SLITS You found the center console connectors. Sent a P... Aug 23 2015, 07:18 AM Lucky9146 Anybody with a 74 take a look at my newly installe... Aug 24 2015, 01:19 PM rhodyguy Pm sent. Aug 24 2015, 01:21 PM Lucky9146 So learn as you go. Seems the lower bracket for m... Aug 24 2015, 02:10 PM OllieG I wasn't sure what that bracket on mine was fo... Aug 28 2015, 03:10 AM R8CERX Jim
Link to the seats you were looking for...
any... Aug 28 2015, 08:53 PM Lucky9146 My last post was mid August so it has been very sl... Oct 29 2015, 10:25 PM bcheney You're doing some nice work. Keep up the momen... Oct 29 2015, 10:41 PM whitetwinturbo Gas tank looks REALLY nice :stir: Oct 30 2015, 10:24 AM jkb944t This is some awesome work!
Jeff B Nov 4 2015, 06:39 AM Lucky9146 Thanks to those who responded to my last post with... Nov 4 2015, 10:47 AM whitetwinturbo Cool gauge! :beer1: Nov 4 2015, 11:22 AM Lucky9146 Put power to the chassis recently for the first ti... Nov 4 2015, 11:43 AM rhodyguy Wow! Clean. Nice work. Nov 5 2015, 10:40 AM Lucky9146 Unfortunately I have not been able to devote much ... Dec 4 2015, 11:45 AM Justinp71 :popcorn: Looking Good!
I hope to redo my fr... Dec 4 2015, 12:10 PM Lucky9146
:popcorn: Looking Good!
I hope to redo my f... Dec 4 2015, 01:22 PM MJHanna Nice work on the bumper :Qarl: It's one of t... Dec 4 2015, 12:13 PM siverson Nice work! Makes me want to get my orange car ... Dec 4 2015, 12:35 PM Lucky9146
Nice work! Makes me want to get my orange car... Dec 4 2015, 01:27 PM Mueller Very nice....yep, attention to detail makes a huge... Dec 4 2015, 02:24 PM Cairo94507 Wow! Excellent attention to detail. Your car... Dec 4 2015, 03:10 PM moparrob I was the prior owner of this car and must say tha... Dec 3 2016, 10:39 PM forrestkhaag At your convenience, can you post a picture of the... Dec 4 2016, 12:07 PM mb911 I am just so impressed with the build. The bumper ... Dec 4 2016, 12:45 PM
Lucky9146 Welcome to the money pit! Lots of good advice ... Aug 3 2015, 11:05 PM jmitro looks great so far; look forward to see more of th... Aug 3 2015, 10:55 PM whitetwinturbo :wub: the "great" white ....... I'm ... Aug 3 2015, 11:04 PM Lucky9146 the "great" white ....... I'm sortin... Aug 3 2015, 11:20 PM whitetwinturbo ............ I started a build thread "There ... Aug 3 2015, 11:12 PM Lucky9146 So as I have found so typical is the jack stand st... Aug 3 2015, 11:17 PM Maltese Falcon Good purchase of MoparRob's white 6/conversio... Aug 3 2015, 11:50 PM Lucky9146 [quote name='Maltese Falcon' date='Aug... Aug 4 2015, 09:38 AM Lucky9146 [quote name='Maltese Falcon' date='Aug... Aug 4 2015, 10:22 AM Lucky9146 So now I learned from Maltese Falcon that since my... Aug 6 2015, 09:33 AM mepstein
So now I learned from Maltese Falcon that since m... Aug 6 2015, 09:49 AM Lucky9146 So where does one begin when you have never owned ... Aug 4 2015, 12:07 AM Cairo94507 Terrific - Keep up the good work so you can get th... Aug 4 2015, 06:22 AM RobW Everybody was wondering where that one went. Looki... Aug 4 2015, 07:23 AM Lucky9146
Everybody was wondering where that one went. Look... Aug 4 2015, 10:15 AM eric9144 Hey I'm right up the hill from you, hit me up ... Aug 4 2015, 09:49 AM Lucky9146
Hey I'm right up the hill from you, hit me up... Aug 4 2015, 10:26 AM mepstein It belonged to a guy named Rolland who had it runn... Aug 4 2015, 10:27 AM Lucky9146
It belonged to a guy named Rolland who had it run... Aug 4 2015, 10:54 AM mepstein
It belonged to a guy named Rolland who had it ru... Aug 4 2015, 11:09 AM Lucky9146
[quote name='Lucky9146' post='2218658' date='Aug ... Aug 4 2015, 11:35 AM Lucky9146 On with cleaning and lerrning here is the left rea... Aug 4 2015, 10:33 AM rhodyguy here is a shot of the cushions/wire protectors i p... Aug 4 2015, 11:44 AM Maltese Falcon Lucky9146,
Here is one angle of my '74.
Photo ... Aug 4 2015, 01:16 PM Lucky9146
Lucky9146,
Here is one angle of my '74.
Photo... Aug 4 2015, 01:21 PM lonewolfe I'm going to enjoy following this thread! ... Aug 4 2015, 01:23 PM pete000 I don't know what it is, but I think there is ... Aug 4 2015, 04:00 PM Lucky9146 [quote name='pete000' date='Aug 4 2015... Aug 4 2015, 04:55 PM KELTY360 Unlike a lot of guys here, I wasn't in line to... Aug 4 2015, 04:26 PM Cairo94507 Hi Pete - I generally do not like the Porsche grap... Aug 4 2015, 04:43 PM Lucky9146 This car came with some really nice parts! So... Aug 4 2015, 04:52 PM rhodyguy the shift rod bushing looks a little spent. Aug 5 2015, 07:25 AM Lucky9146
the shift rod bushing looks a little spent.
Lik... Aug 5 2015, 09:51 AM Lucky9146 So I decided to run the oil hoses from the front t... Aug 5 2015, 09:12 AM rhodyguy do em all. the complete 'kit' from pelican... Aug 5 2015, 10:00 AM rhodyguy in this picture the top is the throttle cable. the... Aug 5 2015, 10:41 AM Lucky9146
in this picture the top is the throttle cable. th... Aug 5 2015, 11:09 AM rhodyguy 73' Aug 5 2015, 11:41 AM Larmo63 Great looking engine!!! :worship:
I... Aug 5 2015, 12:19 PM Lucky9146 One of the things I have completed is the rear bum... Aug 6 2015, 12:22 AM lonewolfe
One of the things I have completed is the rear bu... Aug 6 2015, 12:50 AM Lucky9146
One of the things I have completed is the rear b... Aug 6 2015, 09:10 AM earossi
[quote name='lonewolfe' post='2219478' date='Aug ... Aug 8 2015, 08:26 AM rhodyguy in your favor it's not an LE. then you would h... Aug 6 2015, 09:47 AM Lucky9146 Thought I would share some history of the car at l... Aug 6 2015, 11:02 AM Lucky9146 Pictures of front trunk as received. Louver was i... Aug 6 2015, 05:13 PM Lucky9146 Minimal rust was treated with Pour 15, louver was ... Aug 6 2015, 05:19 PM lonewolfe I like how the spare tire mount was added for a sp... Aug 6 2015, 05:22 PM Lucky9146
I like how the spare tire mount was added for a s... Aug 6 2015, 05:53 PM SLITS
unfortunately I have no info on the fuel filter o... Aug 8 2015, 07:31 AM Lucky9146 Front carpet reinstalled. Under front louver seale... Aug 6 2015, 05:32 PM Lucky9146 Have been looking for months for the cir-clip that... Aug 6 2015, 06:14 PM Lucky9146 Engine compartment insulation was not installed wh... Aug 6 2015, 10:47 PM Lucky9146 Insulation Installed Aug 6 2015, 10:50 PM Lucky9146 To continue on with the front trunk, oil cooler, a... Aug 8 2015, 12:29 AM Lucky9146 The PO installed oil cooler and card board mock up... Aug 8 2015, 12:41 AM Lucky9146 So I started with the mock up and some spare galva... Aug 8 2015, 01:09 AM mepstein Very nicely done! Aug 8 2015, 06:57 AM RobW
Very nicely done!
:agree: :agree:
Very ni... Aug 8 2015, 07:08 AM Lucky9146 The real elephant in the room for me is the wiring... Aug 9 2015, 11:49 AM porschetub
The real elephant in the room for me is the wirin... Aug 9 2015, 12:46 PM Lucky9146 I can't help but laugh @ your comments ,I... Aug 9 2015, 01:13 PM Lucky9146 The Tach is a 911 641 303 03 which is for a 78-83 ... Aug 9 2015, 12:04 PM Lucky9146 Next up is the very cool quad guage custom built f... Aug 9 2015, 12:23 PM Lucky9146 The "elephant in the room" continues by ... Aug 9 2015, 01:37 PM porschetub
The "elephant in the room" continues by... Aug 12 2015, 02:05 AM Lucky9146
The "elephant in the room" continues b... Aug 17 2015, 11:27 AM Mike Bellis Your other thread sent me here... There should be ... Aug 9 2015, 10:03 PM Lucky9146 It is my understanding that from '73 up the ve... Aug 22 2015, 10:07 AM tp_reading
It is my understanding that from '73 up the v... Aug 22 2015, 01:36 PM Lucky9146
[quote name='Lucky9146' post='2227015' date='Aug ... Aug 22 2015, 09:14 PM tp_reading
[quote name='Lucky9146' post='2227015' date='Aug... Aug 23 2015, 07:23 AM mepstein 99% sure those connectors plug into a seperate (sm... Aug 22 2015, 10:38 AM SLITS You found the center console connectors. Sent a P... Aug 23 2015, 07:18 AM Lucky9146 Anybody with a 74 take a look at my newly installe... Aug 24 2015, 01:19 PM rhodyguy Pm sent. Aug 24 2015, 01:21 PM Lucky9146 So learn as you go. Seems the lower bracket for m... Aug 24 2015, 02:10 PM OllieG I wasn't sure what that bracket on mine was fo... Aug 28 2015, 03:10 AM R8CERX Jim
Link to the seats you were looking for...
any... Aug 28 2015, 08:53 PM Lucky9146 My last post was mid August so it has been very sl... Oct 29 2015, 10:25 PM bcheney You're doing some nice work. Keep up the momen... Oct 29 2015, 10:41 PM whitetwinturbo Gas tank looks REALLY nice :stir: Oct 30 2015, 10:24 AM jkb944t This is some awesome work!
Jeff B Nov 4 2015, 06:39 AM Lucky9146 Thanks to those who responded to my last post with... Nov 4 2015, 10:47 AM whitetwinturbo Cool gauge! :beer1: Nov 4 2015, 11:22 AM Lucky9146 Put power to the chassis recently for the first ti... Nov 4 2015, 11:43 AM rhodyguy Wow! Clean. Nice work. Nov 5 2015, 10:40 AM Lucky9146 Unfortunately I have not been able to devote much ... Dec 4 2015, 11:45 AM Justinp71 :popcorn: Looking Good!
I hope to redo my fr... Dec 4 2015, 12:10 PM Lucky9146
:popcorn: Looking Good!
I hope to redo my f... Dec 4 2015, 01:22 PM MJHanna Nice work on the bumper :Qarl: It's one of t... Dec 4 2015, 12:13 PM siverson Nice work! Makes me want to get my orange car ... Dec 4 2015, 12:35 PM Lucky9146
Nice work! Makes me want to get my orange car... Dec 4 2015, 01:27 PM Mueller Very nice....yep, attention to detail makes a huge... Dec 4 2015, 02:24 PM Cairo94507 Wow! Excellent attention to detail. Your car... Dec 4 2015, 03:10 PM moparrob I was the prior owner of this car and must say tha... Dec 3 2016, 10:39 PM forrestkhaag At your convenience, can you post a picture of the... Dec 4 2016, 12:07 PM mb911 I am just so impressed with the build. The bumper ... Dec 4 2016, 12:45 PM  |
1 User(s) are reading this topic (1 Guests and 0 Anonymous Users)
0 Members:

|
Lo-Fi Version | Time is now: 2nd April 2026 - 01:08 PM |
Invision Power Board
v9.1.4 © 2026 IPS, Inc.