|
|
|
Porsche, and the Porsche crest are registered trademarks of Dr. Ing. h.c. F. Porsche AG.
This site is not affiliated with Porsche in any way. Its only purpose is to provide an online forum for car enthusiasts. All other trademarks are property of their respective owners. |
|
|

  |

| Lucky9146 |
 Apr 11 2018, 10:53 AM Apr 11 2018, 10:53 AM
Post
#601
|
|
Always Wanted A Bigger Go Cart  Group: Members Posts: 1,690 Joined: 22-September 14 From: Poway California Member No.: 17,942 Region Association: Southern California |
QUOTE(Mueller @ Apr 10 2018, 05:27 PM)  Car looks great.... nice lift as well. Thanks! (IMG:style_emoticons/default/beerchug.gif) If you or anyone is considering this lift PM me. (IMG:style_emoticons/default/driving.gif) (IMG:style_emoticons/default/white914.jpg) |
   |

 
|
| Lucky9146 |
Apr 11 2018, 08:34 PM
Post
#602
|
|
Always Wanted A Bigger Go Cart Group: Members Posts: 1,690 Joined: 22-September 14 From: Poway California Member No.: 17,942 Region Association: Southern California |
Wanted to take a minute to give the utmost credit to Paul at Performance Oriented for the fine work he did on the Weber carbs for me. Part of his service is he sets them up and runs them, dialing them in on his test engine, and he claims they are ready to run.
Well this is no joke and in fact they were ready to run and I have not even had to adjust them further yet. I can do some checks, and will soon, but to be honest they are set up so well this engine just fires right up and idles so smooth. (IMG:style_emoticons/default/smilie_pokal.gif) This was one area I wanted to eliminate as a potential unknown on first start up and he did that for me. Paul really stands behind his work too. (IMG:style_emoticons/default/beerchug.gif) (IMG:style_emoticons/default/driving.gif) (IMG:style_emoticons/default/white914.jpg) 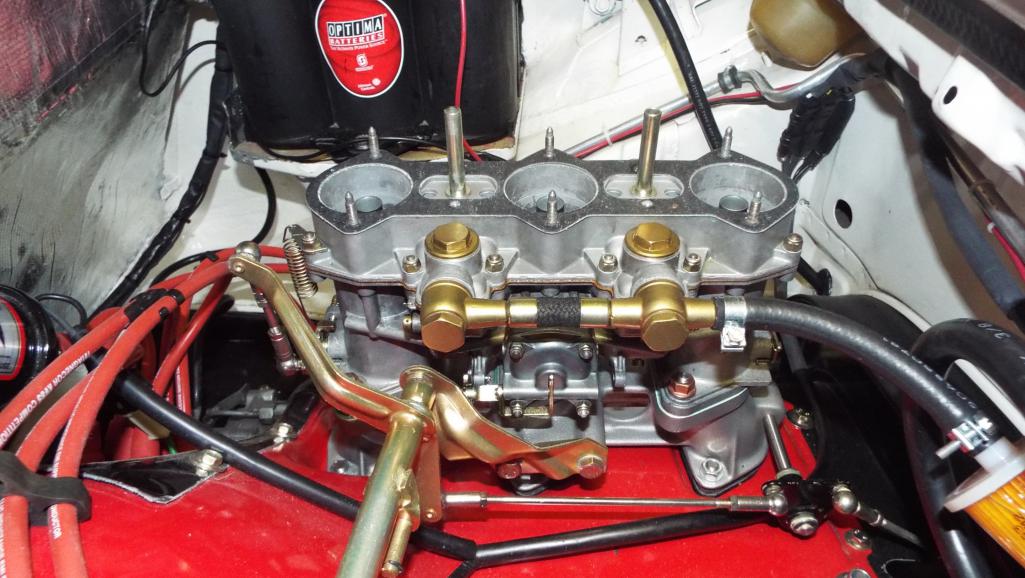 |
|
|
|
| pete000 |
Apr 11 2018, 10:56 PM
Post
#603
|
|
Senior Member Group: Members Posts: 1,887 Joined: 23-August 10 From: Bradenton Florida Member No.: 12,094 Region Association: South East States |
This is on my wish list...
|
|
|
|
| ValcoOscar |
Apr 12 2018, 07:33 AM
Post
#604
|
|
Garage Life Group: Members Posts: 2,546 Joined: 19-November 13 From: SoCal Member No.: 16,669 Region Association: Southern California |
QUOTE(Lucky9146 @ Apr 11 2018, 07:34 PM) Wanted to take a minute to give the utmost credit to Paul at Performance Oriented for the fine work he did on the Weber carbs for me. Part of his service is he sets them up and runs them, dialing them in on his test engine, and he claims they are ready to run. Well this is no joke and in fact they were ready to run and I have not even had to adjust them further yet. I can do some checks, and will soon, but to be honest they are set up so well this engine just fires right up and idles so smooth. (IMG:style_emoticons/default/smilie_pokal.gif) This was one area I wanted to eliminate as a potential unknown on first start up and he did that for me. Paul really stands behind his work too. (IMG:style_emoticons/default/beerchug.gif) (IMG:style_emoticons/default/driving.gif) (IMG:style_emoticons/default/white914.jpg) Hey Jim- Rumor is Paul is retiring and thus NO longer taking on work. Do you know anything about this? Oscar |
|
|
|
| Lucky9146 |
Apr 12 2018, 09:26 AM
Post
#605
|
|
Always Wanted A Bigger Go Cart Group: Members Posts: 1,690 Joined: 22-September 14 From: Poway California Member No.: 17,942 Region Association: Southern California |
QUOTE(ValcoOscar @ Apr 12 2018, 06:33 AM) QUOTE(Lucky9146 @ Apr 11 2018, 07:34 PM) Wanted to take a minute to give the utmost credit to Paul at Performance Oriented for the fine work he did on the Weber carbs for me. Part of his service is he sets them up and runs them, dialing them in on his test engine, and he claims they are ready to run. Well this is no joke and in fact they were ready to run and I have not even had to adjust them further yet. I can do some checks, and will soon, but to be honest they are set up so well this engine just fires right up and idles so smooth. (IMG:style_emoticons/default/smilie_pokal.gif) This was one area I wanted to eliminate as a potential unknown on first start up and he did that for me. Paul really stands behind his work too. (IMG:style_emoticons/default/beerchug.gif) (IMG:style_emoticons/default/driving.gif) (IMG:style_emoticons/default/white914.jpg) Hey Jim- Rumor is Paul is retiring and thus NO longer taking on work. Do you know anything about this? Oscar Oscar. I didn't know the answer so I went to the horses mouth to ask Paul about retiring and more jobs. I was surprised. Here is his reply of a few minutes ago. (IMG:style_emoticons/default/type.gif) (IMG:style_emoticons/default/driving.gif) (IMG:style_emoticons/default/white914.jpg) Hi Jim, Well yes & no. I am not taking on more work until all current customer obligations are completed and I have rebuilt my 35 sets of Webers for sale. By this time, I will have reached retirement age of 65 and will enjoy the benefits associated by that. Once all the above has been accomplished I will again take on customer projects as best I can. I expect this effort to extend through the better part of 2019 to achieve. Cheers, Paul Abbott Performance Oriented 1040 Luradel Ave S Salem, Oregon 97302 530.520.5816 www.PerformanceOriented.com |
|
|
|
| ValcoOscar |
Apr 12 2018, 09:48 AM
Post
#606
|
|
Garage Life Group: Members Posts: 2,546 Joined: 19-November 13 From: SoCal Member No.: 16,669 Region Association: Southern California |
QUOTE(Lucky9146 @ Apr 12 2018, 08:26 AM) QUOTE(ValcoOscar @ Apr 12 2018, 06:33 AM) QUOTE(Lucky9146 @ Apr 11 2018, 07:34 PM) Wanted to take a minute to give the utmost credit to Paul at Performance Oriented for the fine work he did on the Weber carbs for me. Part of his service is he sets them up and runs them, dialing them in on his test engine, and he claims they are ready to run. Well this is no joke and in fact they were ready to run and I have not even had to adjust them further yet. I can do some checks, and will soon, but to be honest they are set up so well this engine just fires right up and idles so smooth. (IMG:style_emoticons/default/smilie_pokal.gif) This was one area I wanted to eliminate as a potential unknown on first start up and he did that for me. Paul really stands behind his work too. (IMG:style_emoticons/default/beerchug.gif) (IMG:style_emoticons/default/driving.gif) (IMG:style_emoticons/default/white914.jpg) Hey Jim- Rumor is Paul is retiring and thus NO longer taking on work. Do you know anything about this? Oscar Oscar. I didn't know the answer so I went to the horses mouth to ask Paul about retiring and more jobs. I was surprised. Here is his reply of a few minutes ago. (IMG:style_emoticons/default/type.gif) (IMG:style_emoticons/default/driving.gif) (IMG:style_emoticons/default/white914.jpg) Hi Jim, Well yes & no. I am not taking on more work until all current customer obligations are completed and I have rebuilt my 35 sets of Webers for sale. By this time, I will have reached retirement age of 65 and will enjoy the benefits associated by that. Once all the above has been accomplished I will again take on customer projects as best I can. I expect this effort to extend through the better part of 2019 to achieve. Cheers, Paul Abbott Performance Oriented 1040 Luradel Ave S Salem, Oregon 97302 530.520.5816 www.PerformanceOriented.com That was quick. Thanks for the update Jim. I have only heard good things about Paul of Performance Oriented. (IMG:style_emoticons/default/drunk.gif) |
|
|
|
| Lucky9146 |
Apr 15 2018, 09:59 PM
Post
#607
|
|
Always Wanted A Bigger Go Cart Group: Members Posts: 1,690 Joined: 22-September 14 From: Poway California Member No.: 17,942 Region Association: Southern California |
Had a chance to go to the Peterson Museum today and Stop by and see Marty at MSDS working on his project.
If you have not been to the Porsche Effect Display at the Peterson, put it on your list of things to do.... (IMG:style_emoticons/default/driving.gif) (IMG:style_emoticons/default/white914.jpg)  |
|
|
|
| Lucky9146 |
Apr 15 2018, 10:05 PM
Post
#608
|
|
Always Wanted A Bigger Go Cart Group: Members Posts: 1,690 Joined: 22-September 14 From: Poway California Member No.: 17,942 Region Association: Southern California |
There are some great cars at the Peterson and I won't ruin it for you with posting more pictures but they have an impressive display including race cars and a 917. Saw this cool poster and have to share it here.
(IMG:style_emoticons/default/driving.gif) (IMG:style_emoticons/default/white914.jpg) 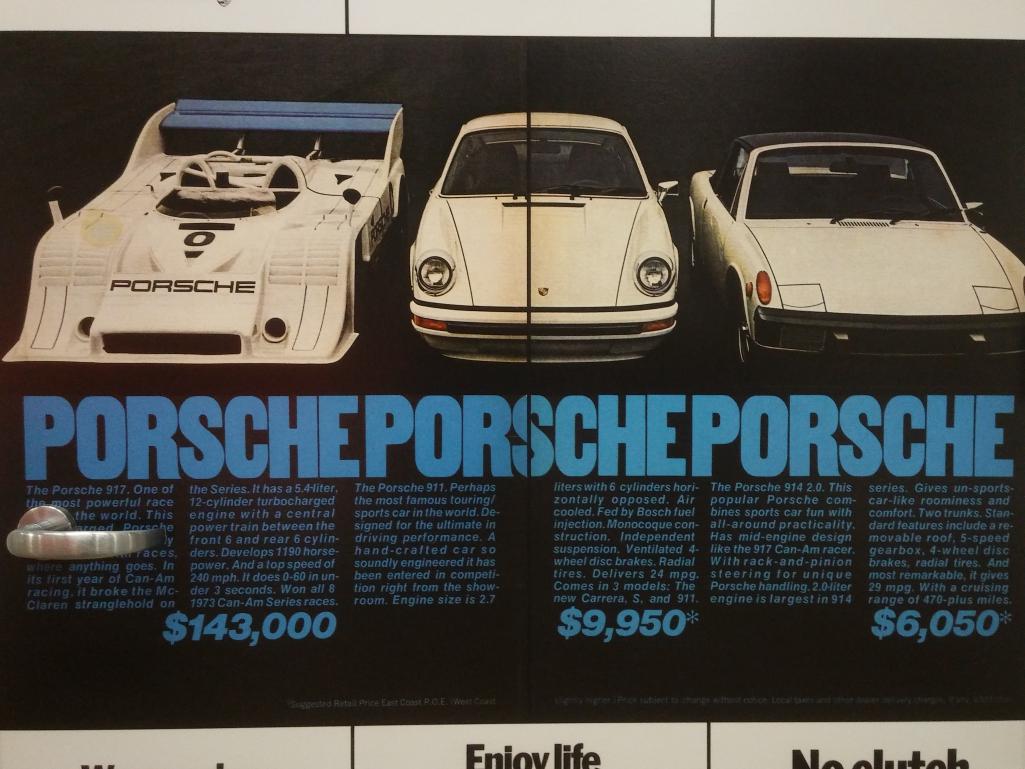 |
|
|
|
| Lucky9146 |
Apr 15 2018, 10:17 PM
Post
#609
|
|
Always Wanted A Bigger Go Cart Group: Members Posts: 1,690 Joined: 22-September 14 From: Poway California Member No.: 17,942 Region Association: Southern California |
As I said we, as in my wife and I, got a chance to see Marty's "project" today. I am guilty of not having checked out his thread but will keep an eye on it from now on!!! Cool car (IMG:style_emoticons/default/smilie_pokal.gif)
He is a pretty humble guy in my opinion and said he thought he posted so many pictures that people had seen enough well this site is about pictures of his project and I don't think you can post too many, so let Marty know you want to see more. (IMG:style_emoticons/default/aktion035.gif) Had a great time there today and he graciously took time to describe in detail what he and his son are working on. His car is going to be a beast! PS My picture does not do that engine and trans justice, it is just beautiful in person! (IMG:style_emoticons/default/beerchug.gif) (IMG:style_emoticons/default/driving.gif) (IMG:style_emoticons/default/white914.jpg) 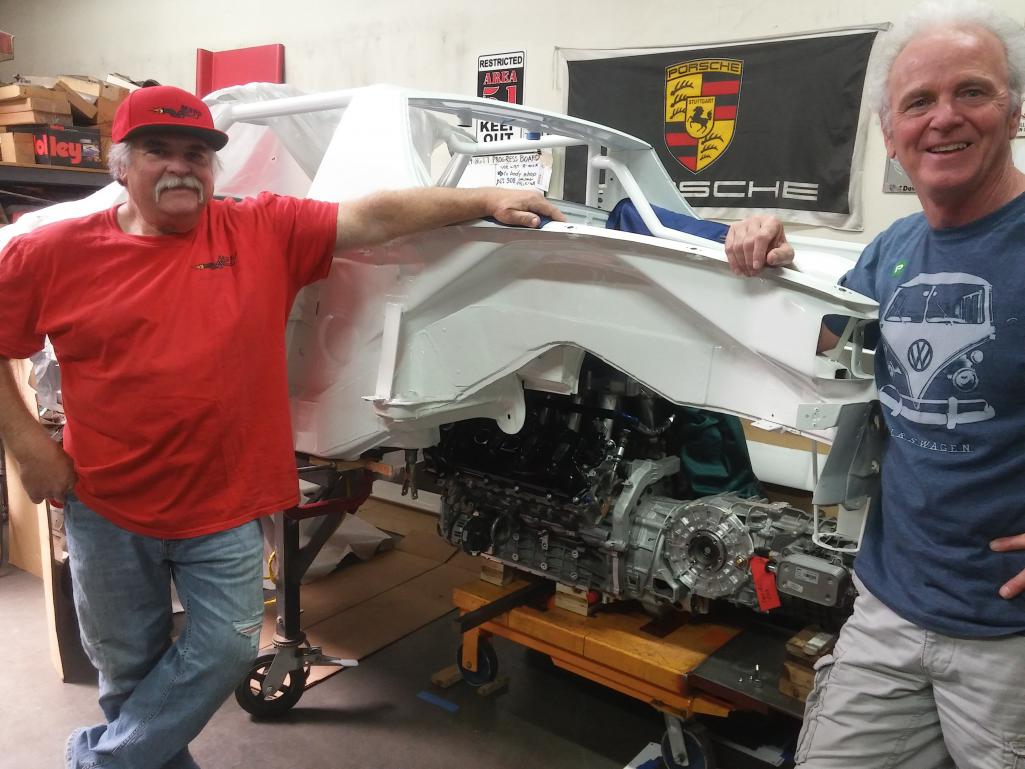 |
|
|
|
| Lucky9146 |
Apr 15 2018, 10:48 PM
Post
#610
|
|
Always Wanted A Bigger Go Cart Group: Members Posts: 1,690 Joined: 22-September 14 From: Poway California Member No.: 17,942 Region Association: Southern California |
Marty is going to do some rework to my Right header to solve my exhaust leak. The one flange is out of plane to the other and leaking and we can't explain why. He sold the headers to the PO like 7 years ago it is anybodies guess as to (IMG:style_emoticons/default/WTF.gif) may have occurred during that time.
The upshot here though is Marty is such a stand up guy, and as I mentioned before he offered to fix it, and really does stand behind his work. (IMG:style_emoticons/default/first.gif) Note soot Right Flange 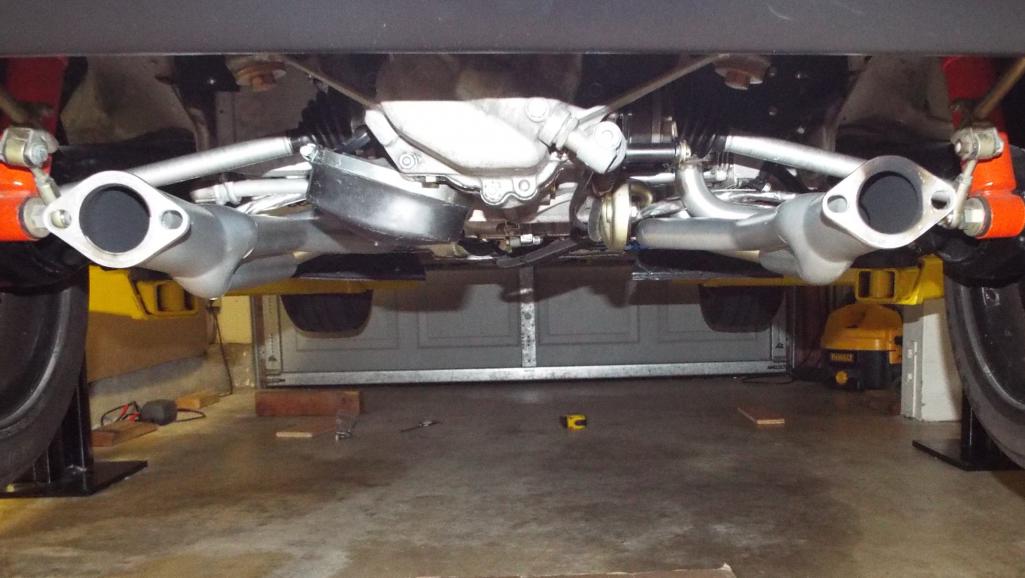 I had tried a number of things to fix the leak, and had the muffler off and on a number of times, trying to figure out what the hell the problem was. I finally noticed the angles of the flanges looked different from the side Took a 18" X 24" square and stood it on the floor and the left flange looked like this. 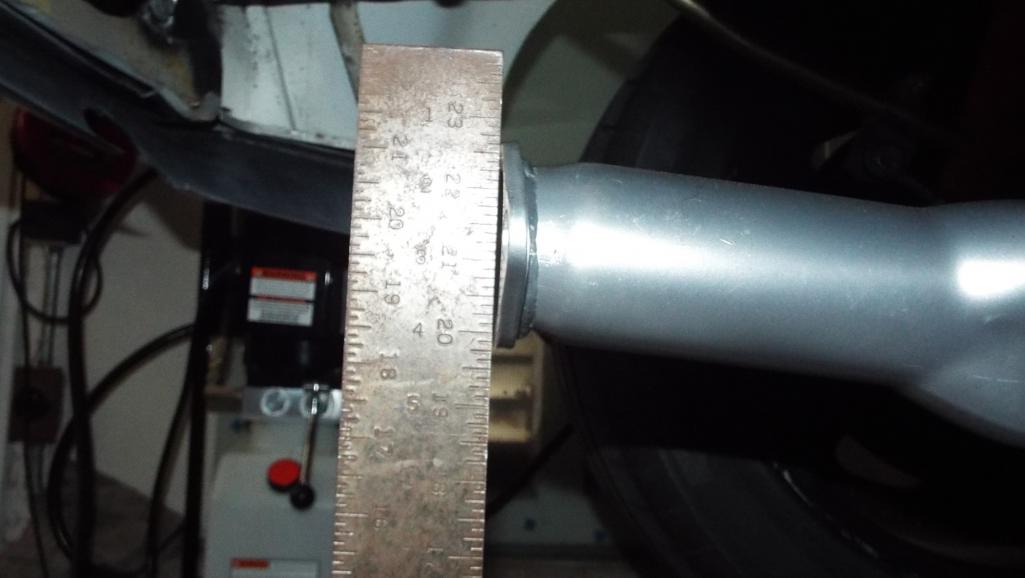 Then the right flange looked like this. When Marty saw this he said send it up and he would fix it. He said there is no way gaskets and permatex would fix that! He is going to cut off the flange and weld on a new one. Thanks Marty!!!! (IMG:style_emoticons/default/beerchug.gif) driving: (IMG:style_emoticons/default/white914.jpg) 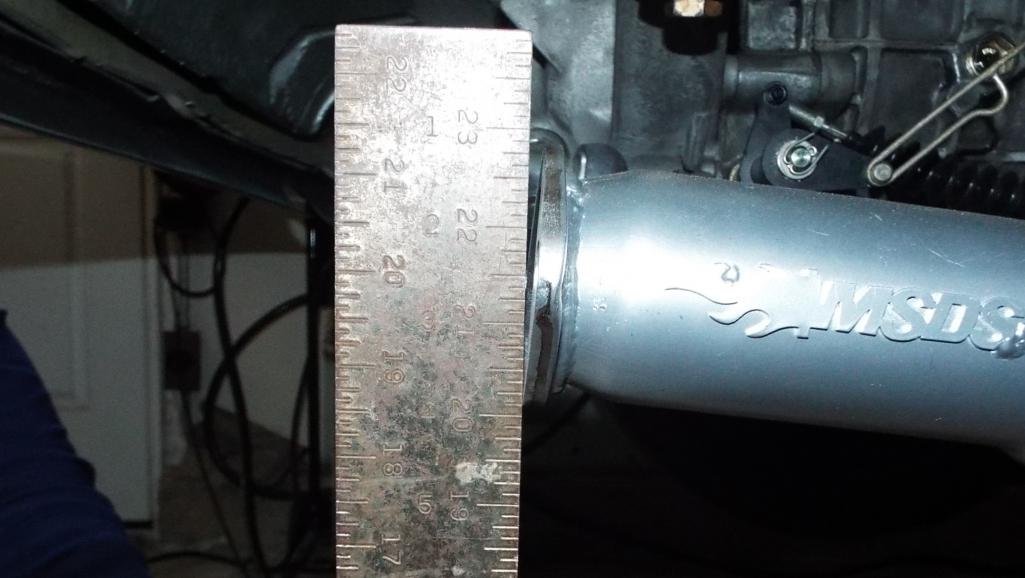 |
|
|
|
| moparrob |
Apr 15 2018, 11:53 PM
Post
#611
|
|
Senior Member Group: Members Posts: 646 Joined: 27-April 10 From: Los Angeles Member No.: 11,663 Region Association: None |
QUOTE(Lucky9146 @ Apr 15 2018, 08:17 PM) As I said we, as in my wife and I, got a chance to see Marty's "project" today. I am guilty of not having checked out his thread but will keep an eye on it from now on!!! Cool car (IMG:style_emoticons/default/smilie_pokal.gif) Sounds like a great day on all fronts. I did not see that Marty had posted a thread on a new build, and could not find it on a search by his username. Do you happen to have the link Jim? |
|
|
|
| porschetub |
Apr 16 2018, 01:06 AM
Post
#612
|
|
Advanced Member Group: Members Posts: 4,963 Joined: 25-July 15 From: New Zealand Member No.: 18,995 Region Association: None |
[quote name='Lucky9146' date='Apr 16 2018, 04:48 PM' post='2599849']
Marty is going to do some rework to my Right header to solve my exhaust leak. The one flange is out of plane to the other and leaking and we can't explain why. He sold the headers to the PO like 7 years ago it is anybodies guess as to (IMG:style_emoticons/default/WTF.gif) may have occurred during that time. The upshot here though is Marty is such a stand up guy, and as I mentioned before he offered to fix it, and really does stand behind his work. (IMG:style_emoticons/default/first.gif) Note soot Right Flange I had tried a number of things to fix the leak, and had the muffler off and on a number of times, trying to figure out what the hell the problem was. I finally noticed the angles of the flanges looked different from the side Took a 18" X 24" square and stood it on the floor and the left flange looked like this. Had the same issue,but the custom built headers I purchased from the PO were fine ,his supplied 2 in one out had bent flanges and leaked ..a real hassle to sort but ok now. Wow Marty moved in there to sort it,pleased for you. |
|
|
|
| Lucky9146 |
Apr 16 2018, 09:23 AM
Post
#613
|
|
Always Wanted A Bigger Go Cart Group: Members Posts: 1,690 Joined: 22-September 14 From: Poway California Member No.: 17,942 Region Association: Southern California |
QUOTE(moparrob @ Apr 15 2018, 10:53 PM) QUOTE(Lucky9146 @ Apr 15 2018, 08:17 PM) As I said we, as in my wife and I, got a chance to see Marty's "project" today. I am guilty of not having checked out his thread but will keep an eye on it from now on!!! Cool car (IMG:style_emoticons/default/smilie_pokal.gif) Sounds like a great day on all fronts. I did not see that Marty had posted a thread on a new build, and could not find it on a search by his username. Do you happen to have the link Jim? Marty's Project is "Porsche 914 - 8 GTT" under the handle MATTYLITE Check it out if you haven't already. Pretty cool build and all Porsche! (IMG:style_emoticons/default/first.gif) (IMG:style_emoticons/default/driving.gif) (IMG:style_emoticons/default/white914.jpg) |
|
|
|
| Lucky9146 |
Apr 16 2018, 03:24 PM
Post
#614
|
|
Always Wanted A Bigger Go Cart Group: Members Posts: 1,690 Joined: 22-September 14 From: Poway California Member No.: 17,942 Region Association: Southern California |
My car came with a Momo steering wheel. Posting Pics of my stock steering wheel that I bought here off a member and had leather recovered. It is a 1973 dated wheel so correct later for my '74. Trying to figure out the bits I need to complete the horn with mepstein. Thanks Mark! (IMG:style_emoticons/default/beerchug.gif)
(IMG:style_emoticons/default/driving.gif) (IMG:style_emoticons/default/white914.jpg) 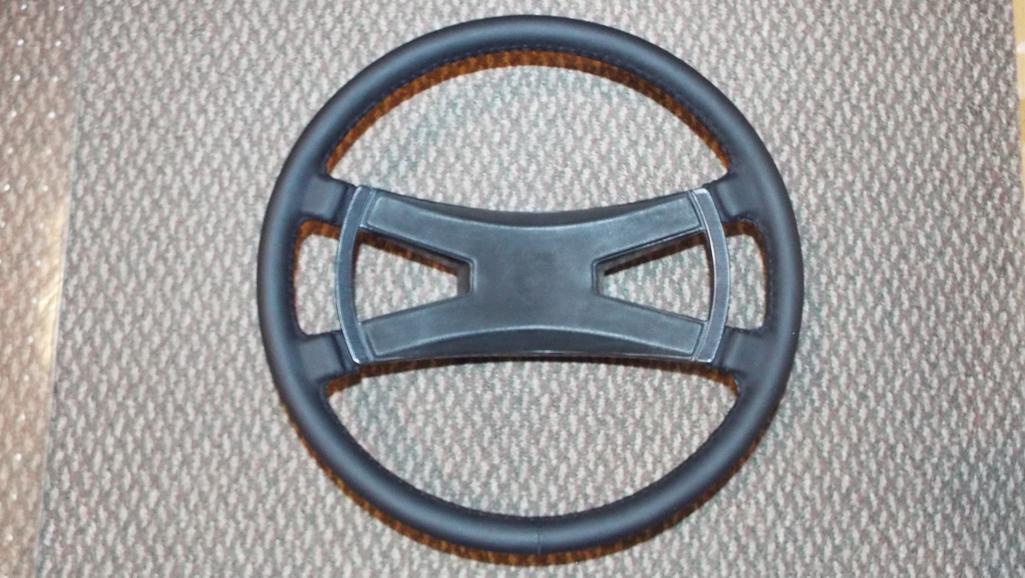 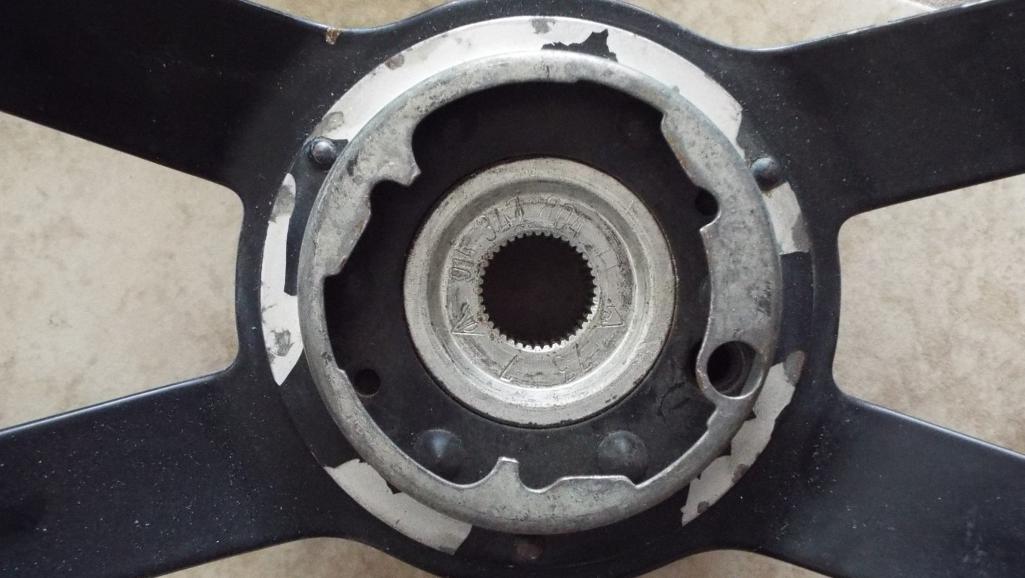 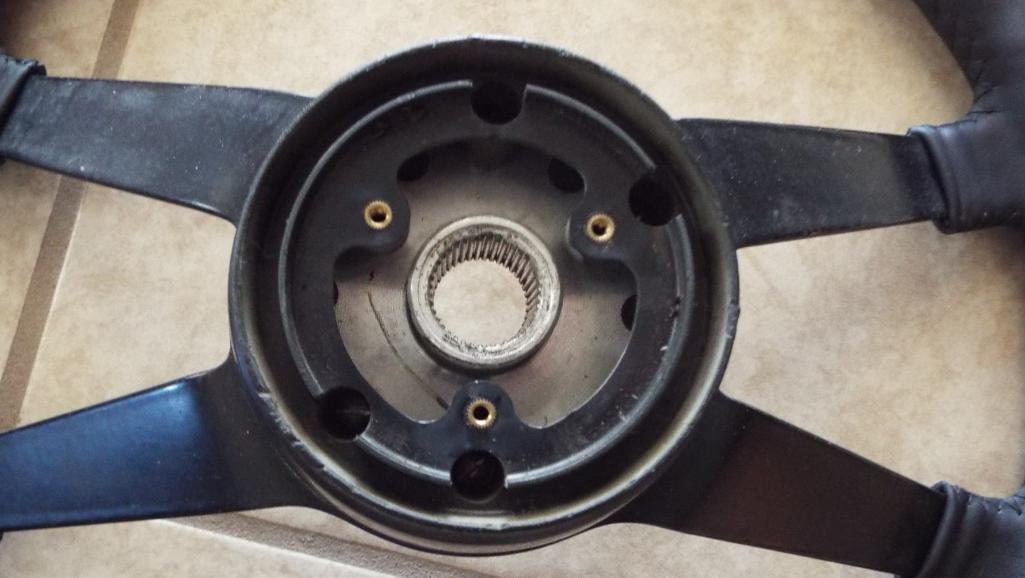  |
|
|
|
| mepstein |
Apr 16 2018, 04:02 PM
Post
#615
|
|
914-6 GT in waiting Group: Members Posts: 20,265 Joined: 19-September 09 From: Landenberg, PA/Wilmington, DE Member No.: 10,825 Region Association: MidAtlantic Region |
Looks like you have all the right parts except the plastic horn ring that has a wire attached. I’ll look through my stash for a good one.
Attached thumbnail(s) 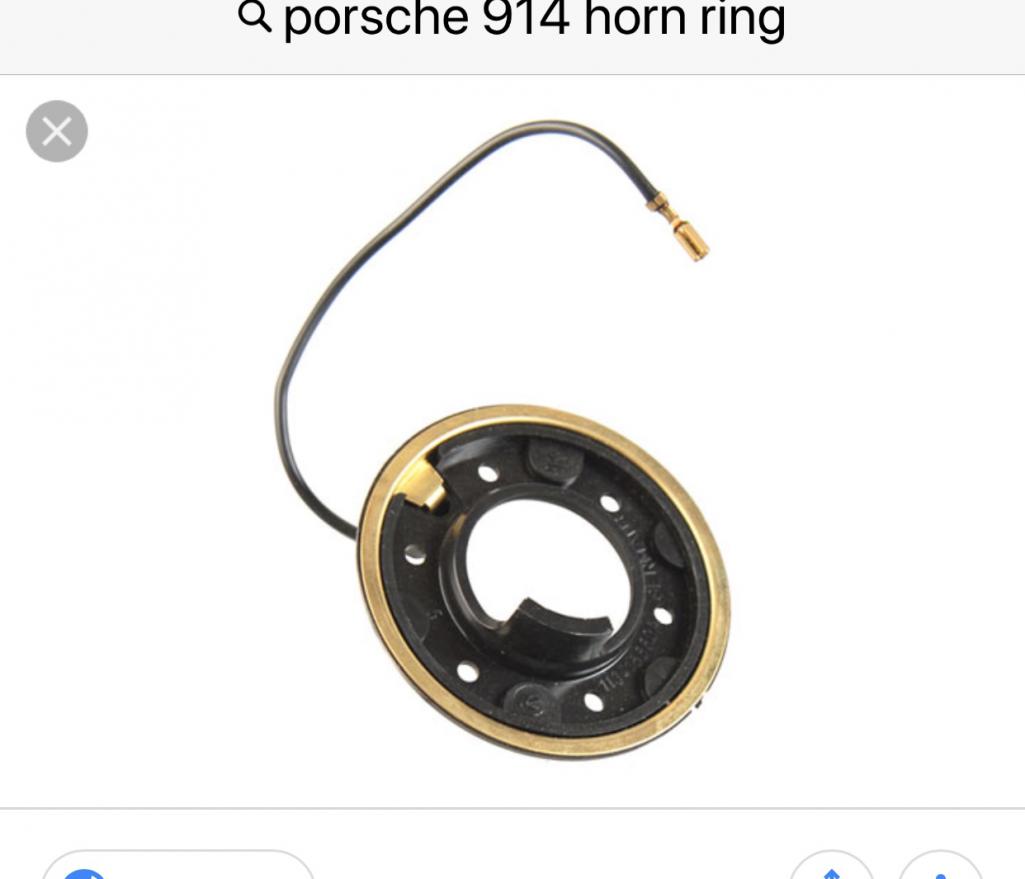
|
 |
|
| defianty |
Apr 17 2018, 07:23 AM
Post
#616
|
|
Senior Member Group: Members Posts: 659 Joined: 9-August 06 From: Essex, UK Member No.: 6,621 Region Association: None |
You'll need one of these too Jim.
(IMG:https://www.rmeuropean.com/Images/BigPictures/90134782301-MFG253-2.jpg) |
|
|
|
| Lucky9146 |
Apr 20 2018, 09:39 PM
Post
#617
|
|
Always Wanted A Bigger Go Cart Group: Members Posts: 1,690 Joined: 22-September 14 From: Poway California Member No.: 17,942 Region Association: Southern California |
Back a page to page 30 Post 596 I was showing my crumbling front sway bar drop link bushings.
I ordered what I was sure to be the correct ones, after being on the phone with what seemed to be a very thorough guy for about an hour, no exaggeration. I received not the wrong ones but the wrong part entirely from a supplier I had never dealt with, they shall remain nameless and I will not flame them. What they sent was drop links instead of bushings, and not even MY drop link! (IMG:style_emoticons/default/confused24.gif) When this happened I became concerned because this sway bar is well over 20 years old and I began to think un-obtainable. I have the Weltmeister front sway bar and the picture below shows the 4 "K" bushings I am trying to get. I did however find them at Paragon in Corpus Christie TX. Turns out the guy has a 914! Great guy! (IMG:style_emoticons/default/beerchug.gif) 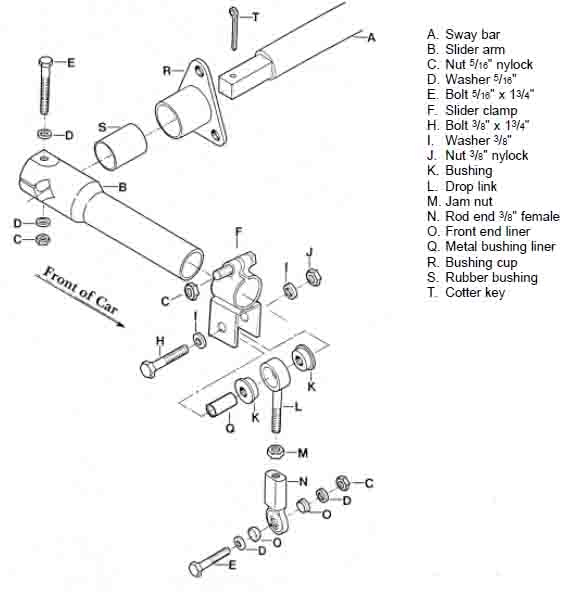 I decided to also replace the 2 sway bar bushings Part "S" that actually go in the bushing cups with bar running through the car. Trying to measure the driver side bar to figure out if I had a 19 mm or 22 mm bar, the bushing looked OK. 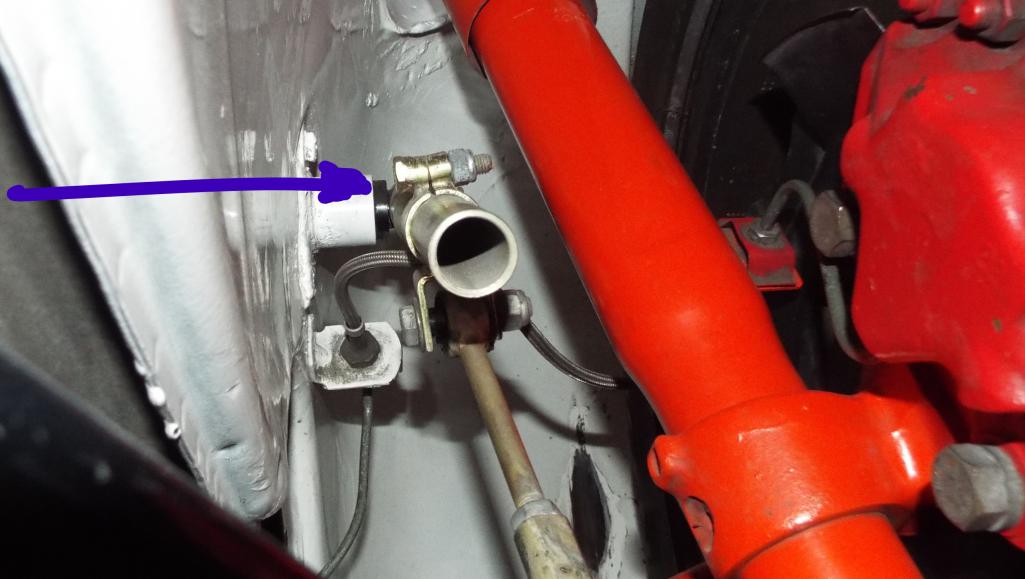 When I looked at the passenger side I found this ugly sight. (IMG:style_emoticons/default/barf.gif) How I never noticed this before I do not know. (IMG:style_emoticons/default/headbang.gif) It looks like it may never been installed right. (IMG:style_emoticons/default/confused24.gif) 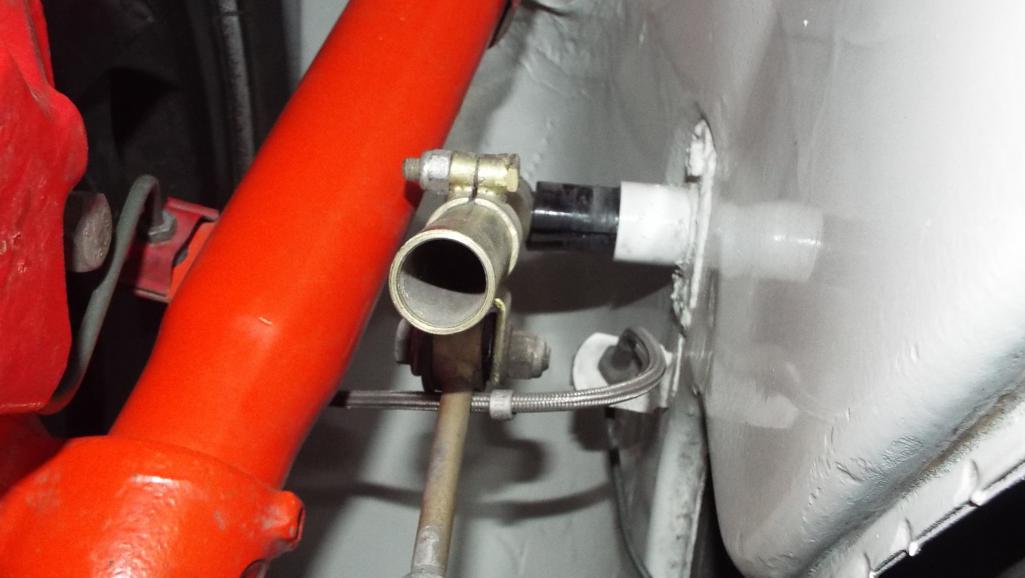 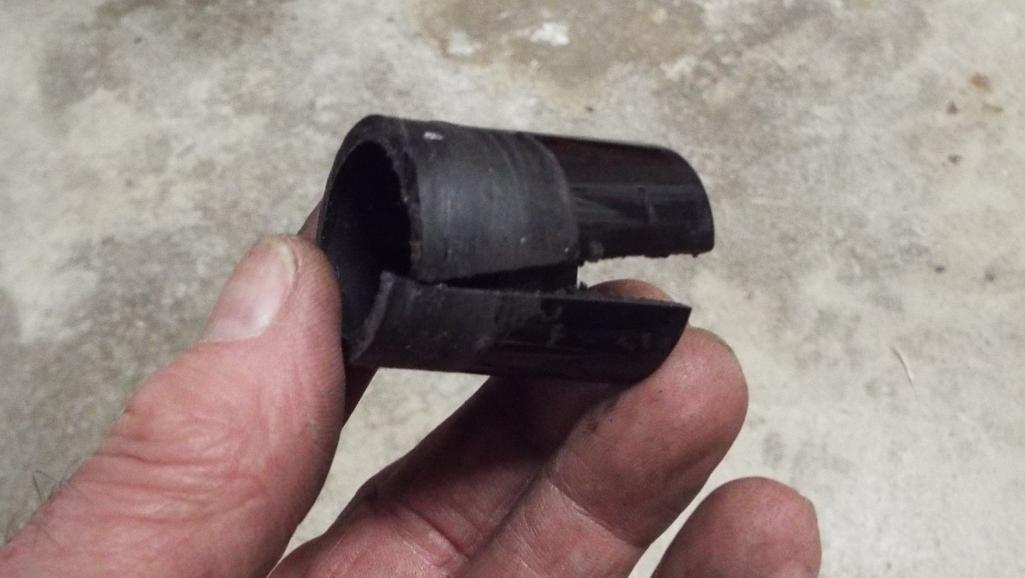 What I don't understand is what if anything actually holds the sway bar centered to keep this from ever happening again? Obviously the bar is longer by about 1 3/4 inches than the width of the installed bushing cup ends. I have decided to post another specific topic thread and reach out to anyone else with this particular Weltmeister bar. http://www.914world.com/bbs2/index.php?showtopic=327883 Thanks for looking in any help appreciated! (IMG:style_emoticons/default/help.gif) (IMG:style_emoticons/default/white914.jpg) |
|
|
|
| Lucky9146 |
Apr 27 2018, 12:35 PM
Post
#618
|
|
Always Wanted A Bigger Go Cart Group: Members Posts: 1,690 Joined: 22-September 14 From: Poway California Member No.: 17,942 Region Association: Southern California |
Below are the key points from the thread I posted that I wanted captured here in my build thread.
"Anybody Have This 22mm Weltmeister Front Sway Bar?, Don't understand what keeps it centered" I thank you one and all for all the help. This is truly a great thread! (IMG:style_emoticons/default/beerchug.gif) ___________________________________________ pete000 Apr 20 2018, 09:28 PM Post #2 I have that same bar but haven't had any issues with it drifting. ___________________________________________ Steve Apr 20 2018, 09:33 PM Post #3 I used to have that Weltmeister bar. The bushing should look the same on both sides with about an 1/8” sticking out on both sides. You center the bar with the arms flush to the bushing on both sides. They do have a tendency to move side to side. Either dump the whole thing and buy a tarret bar or buy some clamps on the inside from McMaster Carr. ___________________________________________ defianty Apr 20 2018, 11:48 PM Post #6 I have the same bar Jim. Although I've never run with it yet I did purchase two shaft collars with grubs to alleviate any lateral movement. Plan is to install them on the inner wheel well next to the sway bar support plates. I also got some large nylon washers to stop any contact. I'm sure I got this idea from someone on here so hopefully they'll be along soon. with pictures. One problem I did have was finding a 19mm collar. In the end I got 18mm and had a friend machine them out to size. _____________________________________________ Luke M Apr 21 2018, 06:59 AM Post #7 I have a brand new welt bar that I haven't installed yet. I do see the kit comes with 2 hose clamps which would clamp around the bar under the fuel tank. I would say this is to keep the bar from drifting left to right. I plan on replacing the clamps for collars when I do install it. ____________________________________________________ jcd914 Apr 21 2018, 10:20 AM Post #9 I have dealt with this in a few ways. First push the bushing all the way in to the bush cup mounted to the inner fender, they should only stick a short distance. Then loosen the arms on the bar and work them in as far as they will go. The arms clamp on the square end of the bar and can move around if loose or may not have been install pushed on to the bar as far as possible. Now you will know how much gap you have to deal with. I have had some where there was very little gap and the bar could only move back and forth a few mm. If you have enough gap your bar will move side to side much, there are different ways to fill the gap. However you deal with the gap you want to end up with the arms equally spaced on each side of the car in order to keep the geometry of the swaybar arms, drop links and A-arms the same. The hose clamp the some kits come with is functional but I don't like it. Clamp on collars work much better but you then might have metal rubbing against metal depending on where you install them. I have always put them on the outside, between the swaybar arm and the bushing. It means you don't have to remove the fuel tank if you want to take the bar out or if a collar worked loose and needs to be tightened. I have had spacers made of plastic bushing material (turcite), basically a pair of large plastic washers that fit over the bar and go between the arm and the bushing end or the bushing cup. I have had wider bushing made up that have a step so the push into the bushing cup and stop against the outer edge and have a larger surface for the swaybar arm to rub against. I have also (in a pinch) taken a PVC pipe fitting that fit over the bar and cut it into spacers to fit between the sway bar arm and the bushing to fill the gap. Note: I did not do this on a customers car, not a real professional solution but it worked. You just want the bar centered and set up with very little play to move side to side. Jim ________________________________________ wysri9 @ Apr 23 2018, 02:30 PM) I took a good look at mine and although this is only a test build, things seem to snug up nicely. I could detect no play between the bushings. here are some pics:- Lucky9146 Apr 25 2018, 10:10 PM Looks great and thanks for the pics. Your picture shows very well the large space from the arm to the cotter pin.  I have my issue figured out. When the car came to me I thought it was set up as I had been told the car had seen 145 mph clocked at a track with a big 4. I should have checked it and did not. It appears that the arms either were not tight or had walked outboard toward the cotter pin. I plan to put some type of spacer between the arm and the cotter pin just to ensure it does stay in place. Thanks again _______________________________________________ jcd914 Apr 25 2018, 04:30 PM Post #16 QUOTE(Lucky9146 @ Apr 25 2018, 09:53 AM) Finally came to the realization that the drop links on mine are incorrect and way too short. This can be seen from the picture sent by wysri9 here. At the time this photo was posted I was more concerned with the slider arm and all the extra space to the cotter pin to digest this now obvious fact. It wasn't until I tried to reassemble that things just did not make sense. 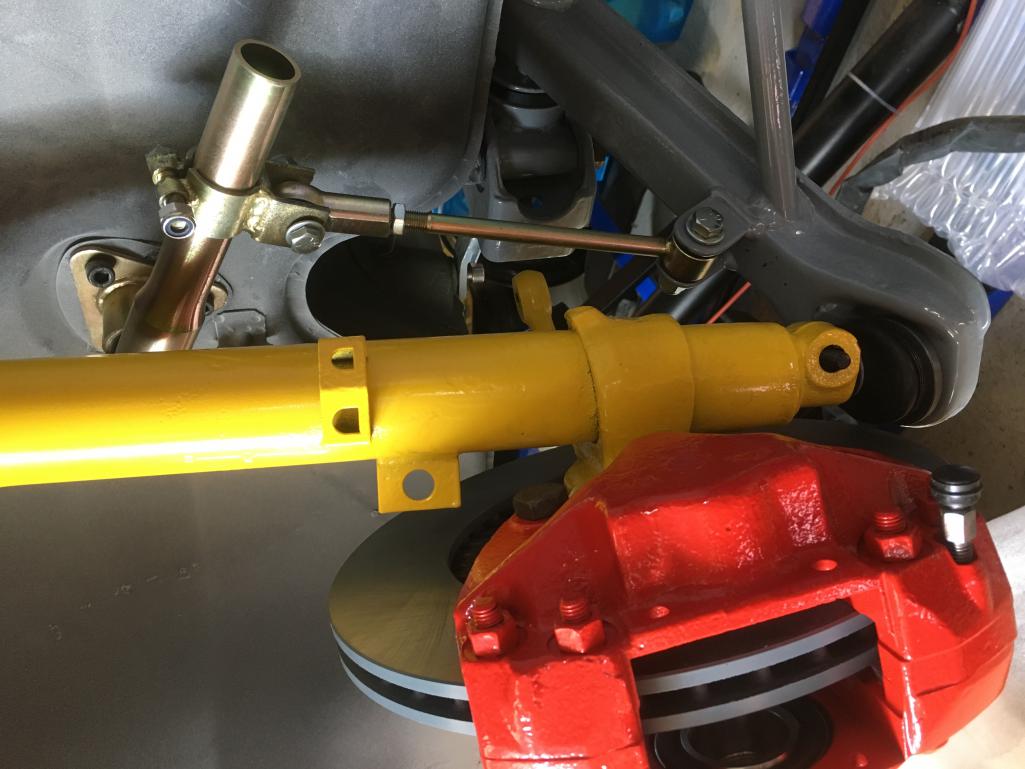 Spoke with Jason at Paragon Products in Corpus Christie TX and he confirmed it. The drop link should be 6 7/8" long and mine is only 4 7/8' long. Explains a lot. The front suspension was so pre-loaded and the A arms actually hung on the sway bar arms as opposed to the struts. Now I understand why it was so hard to get it apart. A full 2" too short? Keep in mind I barely have this thing on the road, still sorting out the bugs and break the engine in, so very few miles yet to guage anything. The correct length for your drop link is dependent on the ride height of your car. Ideally the sway bar arm should be parallel to the ground when the car is settled on its suspension. So the length of the drop link would be different depending on your ride height. I have shortened many sets of drop links to match them to the car they are going on. I think the Weltmeister drop links are too long to begin with except for car sitting at full height. I would wait to change the drop links until you can get the car on the ground and settled and see where the arm is. _______________________________________________ Lucky9146 Apr 26 2018, 10:10 PM jcd914 is correct that the drop link is dependent on the ride height. My car is low. I set the car on the suspension with the sway bar arms horizontal to the ground and the 4 7/8" drop links that I had fit perfectly! Personally, I think the Weltmeister instructions suck. (IMG:style_emoticons/default/barf.gif) Thank you jcd914 This is a great site! (IMG:style_emoticons/default/white914.jpg) 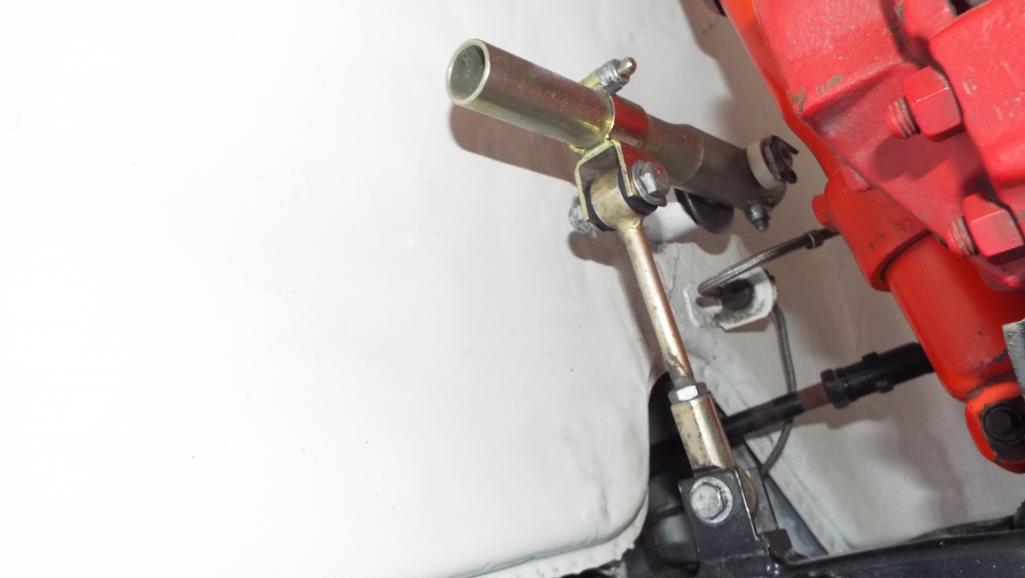 |
|
|
|
| moparrob |
Apr 27 2018, 01:40 PM
Post
#619
|
|
Senior Member Group: Members Posts: 646 Joined: 27-April 10 From: Los Angeles Member No.: 11,663 Region Association: None |
Man this is like a bad dream that just wont stop. When is that car going to be finished?
The ghost of Roland lives in that car. |
|
|
|
| 914Toy |
Apr 27 2018, 01:54 PM
Post
#620
|
|
Senior Member Group: Members Posts: 746 Joined: 12-November 17 From: Laguna beach Member No.: 21,596 Region Association: Southern California |
QUOTE(Lucky9146 @ Apr 27 2018, 11:35 AM) Below are the key points from the thread I posted that I wanted captured here in my build thread. "Anybody Have This 22mm Weltmeister Front Sway Bar?, Don't understand what keeps it centered" I thank you one and all for all the help. This is truly a great thread! (IMG:style_emoticons/default/beerchug.gif) ___________________________________________ pete000 Apr 20 2018, 09:28 PM Post #2 I have that same bar but haven't had any issues with it drifting. ___________________________________________ Steve Apr 20 2018, 09:33 PM Post #3 I used to have that Weltmeister bar. The bushing should look the same on both sides with about an 1/8” sticking out on both sides. You center the bar with the arms flush to the bushing on both sides. They do have a tendency to move side to side. Either dump the whole thing and buy a tarret bar or buy some clamps on the inside from McMaster Carr. ___________________________________________ defianty Apr 20 2018, 11:48 PM Post #6 I have the same bar Jim. Although I've never run with it yet I did purchase two shaft collars with grubs to alleviate any lateral movement. Plan is to install them on the inner wheel well next to the sway bar support plates. I also got some large nylon washers to stop any contact. I'm sure I got this idea from someone on here so hopefully they'll be along soon. with pictures. One problem I did have was finding a 19mm collar. In the end I got 18mm and had a friend machine them out to size. _____________________________________________ Luke M Apr 21 2018, 06:59 AM Post #7 I have a brand new welt bar that I haven't installed yet. I do see the kit comes with 2 hose clamps which would clamp around the bar under the fuel tank. I would say this is to keep the bar from drifting left to right. I plan on replacing the clamps for collars when I do install it. ____________________________________________________ jcd914 Apr 21 2018, 10:20 AM Post #9 I have dealt with this in a few ways. First push the bushing all the way in to the bush cup mounted to the inner fender, they should only stick a short distance. Then loosen the arms on the bar and work them in as far as they will go. The arms clamp on the square end of the bar and can move around if loose or may not have been install pushed on to the bar as far as possible. Now you will know how much gap you have to deal with. I have had some where there was very little gap and the bar could only move back and forth a few mm. If you have enough gap your bar will move side to side much, there are different ways to fill the gap. However you deal with the gap you want to end up with the arms equally spaced on each side of the car in order to keep the geometry of the swaybar arms, drop links and A-arms the same. The hose clamp the some kits come with is functional but I don't like it. Clamp on collars work much better but you then might have metal rubbing against metal depending on where you install them. I have always put them on the outside, between the swaybar arm and the bushing. It means you don't have to remove the fuel tank if you want to take the bar out or if a collar worked loose and needs to be tightened. I have had spacers made of plastic bushing material (turcite), basically a pair of large plastic washers that fit over the bar and go between the arm and the bushing end or the bushing cup. I have had wider bushing made up that have a step so the push into the bushing cup and stop against the outer edge and have a larger surface for the swaybar arm to rub against. I have also (in a pinch) taken a PVC pipe fitting that fit over the bar and cut it into spacers to fit between the sway bar arm and the bushing to fill the gap. Note: I did not do this on a customers car, not a real professional solution but it worked. You just want the bar centered and set up with very little play to move side to side. Jim ________________________________________ wysri9 @ Apr 23 2018, 02:30 PM) I took a good look at mine and although this is only a test build, things seem to snug up nicely. I could detect no play between the bushings. here are some pics:- Lucky9146 Apr 25 2018, 10:10 PM Looks great and thanks for the pics. Your picture shows very well the large space from the arm to the cotter pin. I have my issue figured out. When the car came to me I thought it was set up as I had been told the car had seen 145 mph clocked at a track with a big 4. I should have checked it and did not. It appears that the arms either were not tight or had walked outboard toward the cotter pin. I plan to put some type of spacer between the arm and the cotter pin just to ensure it does stay in place. Thanks again _______________________________________________ jcd914 Apr 25 2018, 04:30 PM Post #16 QUOTE(Lucky9146 @ Apr 25 2018, 09:53 AM) Finally came to the realization that the drop links on mine are incorrect and way too short. This can be seen from the picture sent by wysri9 here. At the time this photo was posted I was more concerned with the slider arm and all the extra space to the cotter pin to digest this now obvious fact. It wasn't until I tried to reassemble that things just did not make sense. Spoke with Jason at Paragon Products in Corpus Christie TX and he confirmed it. The drop link should be 6 7/8" long and mine is only 4 7/8' long. Explains a lot. The front suspension was so pre-loaded and the A arms actually hung on the sway bar arms as opposed to the struts. Now I understand why it was so hard to get it apart. A full 2" too short? Keep in mind I barely have this thing on the road, still sorting out the bugs and break the engine in, so very few miles yet to guage anything. The correct length for your drop link is dependent on the ride height of your car. Ideally the sway bar arm should be parallel to the ground when the car is settled on its suspension. So the length of the drop link would be different depending on your ride height. I have shortened many sets of drop links to match them to the car they are going on. I think the Weltmeister drop links are too long to begin with except for car sitting at full height. I would wait to change the drop links until you can get the car on the ground and settled and see where the arm is. _______________________________________________ Lucky9146 Apr 26 2018, 10:10 PM jcd914 is correct that the drop link is dependent on the ride height. My car is low. I set the car on the suspension with the sway bar arms horizontal to the ground and the 4 7/8" drop links that I had fit perfectly! Personally, I think the Weltmeister instructions suck. (IMG:style_emoticons/default/barf.gif) Thank you jcd914 This is a great site! (IMG:style_emoticons/default/white914.jpg) My 2 cent worth - as a place to start, you have the drop links too close to the torsion bar - i.e. will probably be too resistant to car roll = hard ride and significant stress on the wheel well. |
|
|
|
|
1 User(s) are reading this topic (1 Guests and 0 Anonymous Users)
0 Members:

|
Lo-Fi Version | Time is now: 29th November 2025 - 12:49 PM |
Invision Power Board
v9.1.4 © 2025 IPS, Inc.