|
|
|
Porsche, and the Porsche crest are registered trademarks of Dr. Ing. h.c. F. Porsche AG.
This site is not affiliated with Porsche in any way. Its only purpose is to provide an online forum for car enthusiasts. All other trademarks are property of their respective owners. |
|
|

  |

| R8CERX |
 Aug 28 2015, 08:53 PM Aug 28 2015, 08:53 PM
Post
#81
|
|
2014 New year resolution: To get along with Woody...  Group: Members Posts: 606 Joined: 5-June 13 From: California Member No.: 15,972 Region Association: Southern California |
Jim
Link to the seats you were looking for... anyone here has had experience with these type of seats? (914 type) here is the link: http://www.exoticcarseats.com/ |
   |

 
|
| Lucky9146 |
Oct 29 2015, 10:25 PM
Post
#82
|
|
Always Wanted A Bigger Go Cart Group: Members Posts: 1,711 Joined: 22-September 14 From: Poway California Member No.: 17,942 Region Association: Southern California |
My last post was mid August so it has been very slow with mostly wiring. And lots of it.
But before I get to that, I did carpet the back interior wall and access cover. The first of the wiring challenge was locating and installing the MSD in the trunk. Wiring the MSD in, coupled with the engine conversion wiring Harness from Perry Kiehl, proved to be quite the challenge. For me anyway. Have to say that Perry Kiehl was extremely helpful in getting through it. Especially so, since I did not buy it from him directly, the PO did and Perry really came through to help out. I made a aluminum mounting plate as seen in the picture to adapt to the trunk forward wall. Had to modify the Gas tank to make room for the oil cooler lines heading to the longitudinal as mentioned earlier. Local radiator shop did excellent work and resealed the tank as well. Thought it was going to take more modification than it did mostly cutting the flange off and a small indentation provided enough room. Also carpeted the wall in the front trunk. Much more wiring in the next post. Attached thumbnail(s) 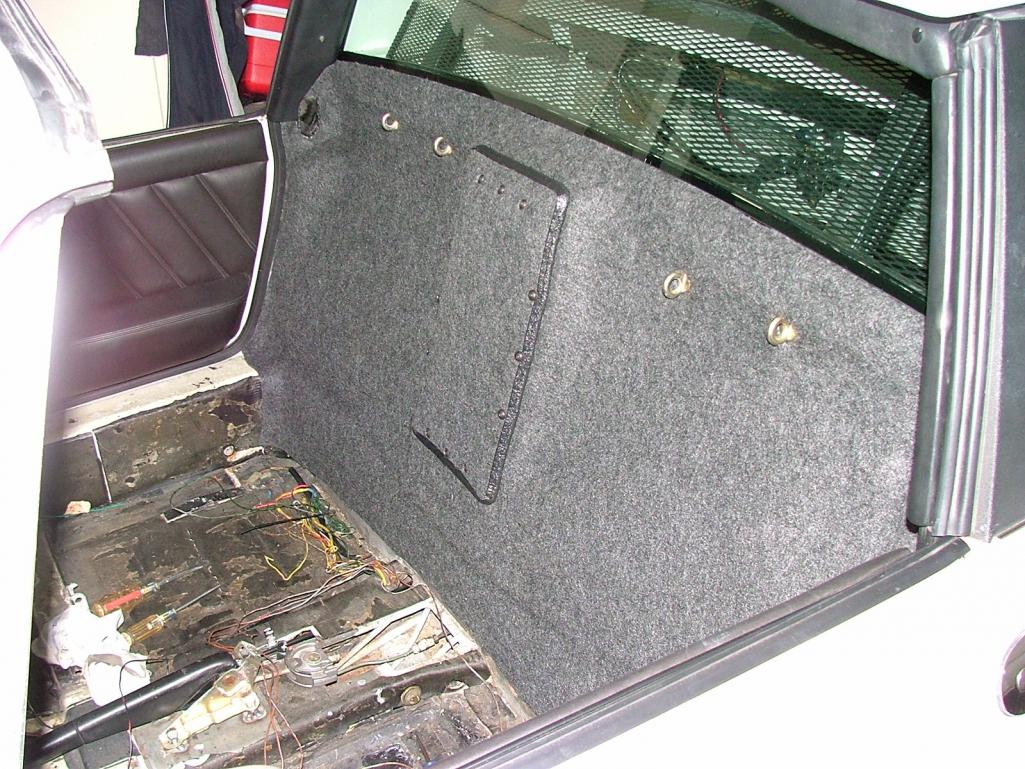 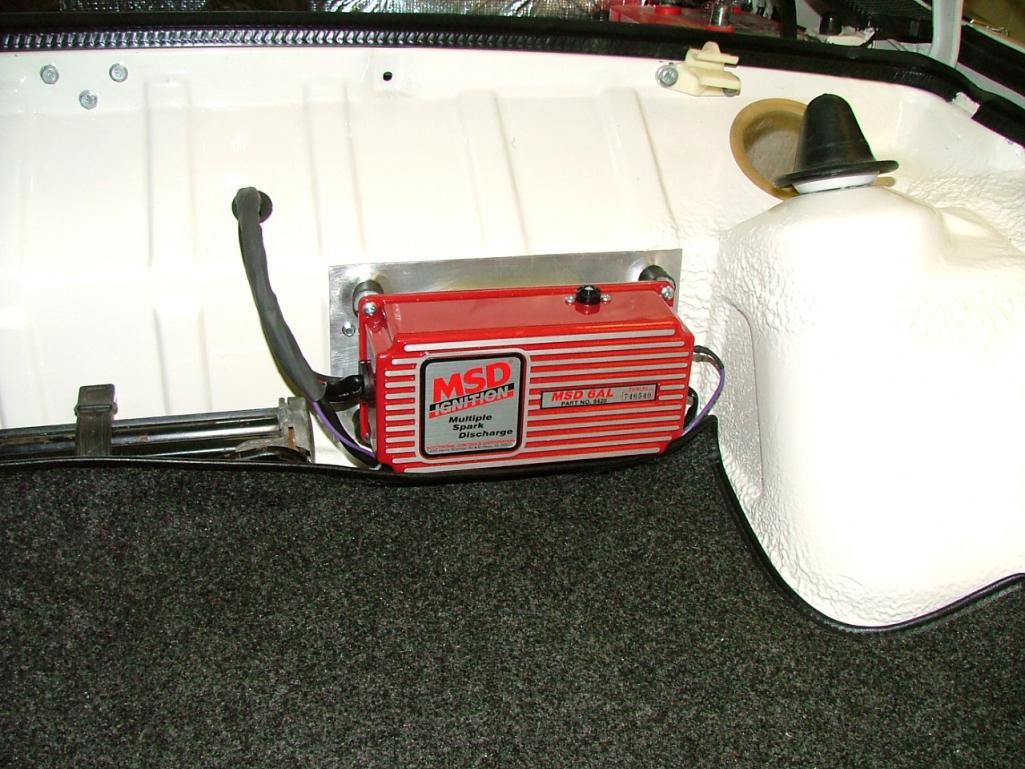 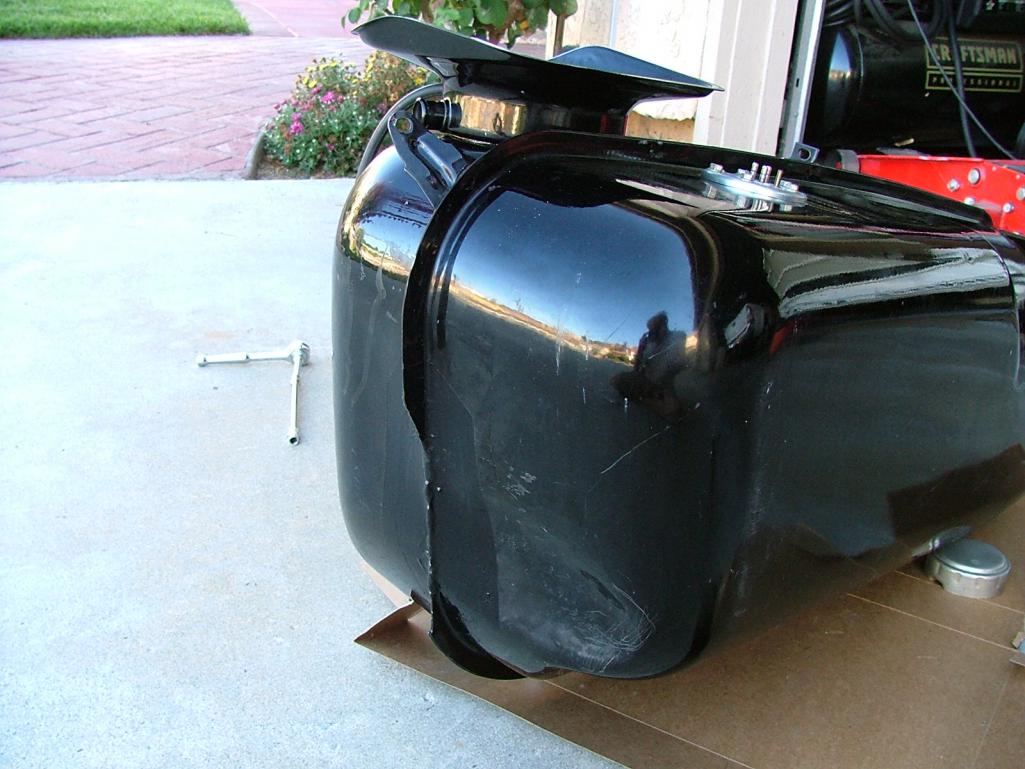 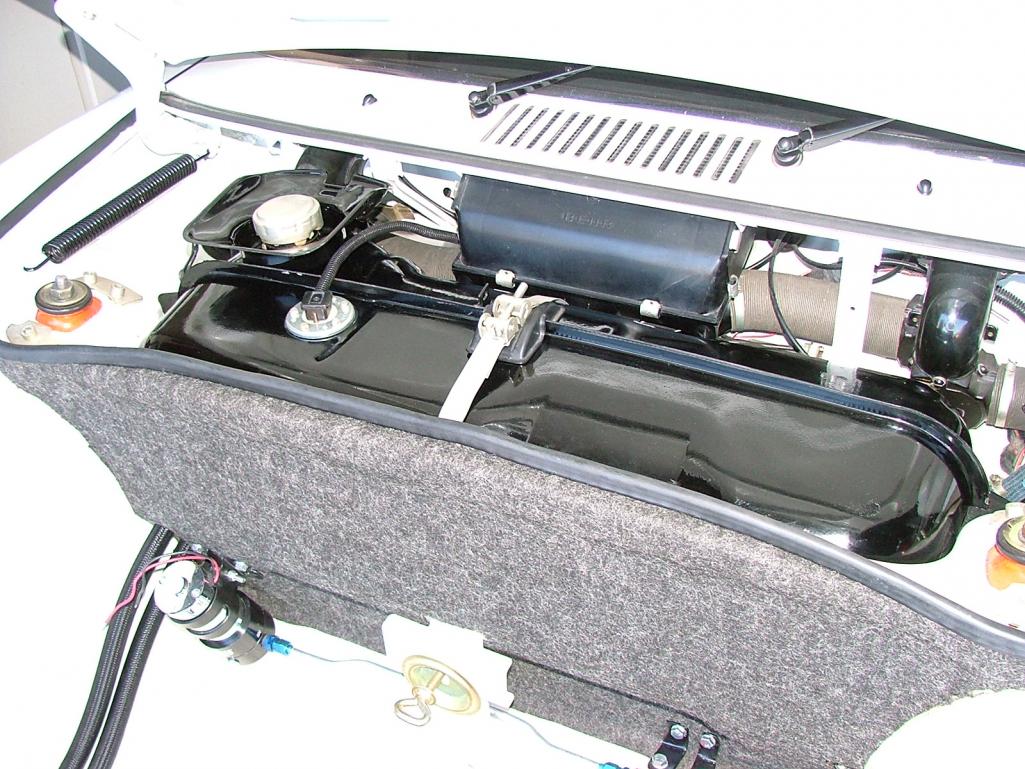
|
|
|
|
| bcheney |
Oct 29 2015, 10:41 PM
Post
#83
|
|
Senior Member Group: Members Posts: 1,341 Joined: 16-November 03 From: Orlando, FL Member No.: 1,348 Region Association: South East States |
You're doing some nice work. Keep up the momentum and you'll be done before you know it. I remember seeing this car for sale...it is a nice project with many great parts. All the best to ya and I will continue to watch your progress (IMG:style_emoticons/default/piratenanner.gif)
|
|
|
|
| whitetwinturbo |
Oct 30 2015, 10:24 AM
Post
#84
|
|
Honey, does this wing make my ass look fat? Group: Members Posts: 1,391 Joined: 22-October 11 From: Newport Beach/Kalefornya/USA Member No.: 13,704 Region Association: Southern California |
Gas tank looks REALLY nice (IMG:style_emoticons/default/stirthepot.gif)
|
|
|
|
| jkb944t |
Nov 4 2015, 06:39 AM
Post
#85
|
|
Member Group: Members Posts: 470 Joined: 17-January 05 From: Canton, OH Member No.: 3,459 Region Association: None |
This is some awesome work!
Jeff B |
|
|
|
| Lucky9146 |
Nov 4 2015, 10:47 AM
Post
#86
|
|
Always Wanted A Bigger Go Cart Group: Members Posts: 1,711 Joined: 22-September 14 From: Poway California Member No.: 17,942 Region Association: Southern California |
Thanks to those who responded to my last post with encouraging feedback.
The engine compartment is all wired now and very cleaned up looking. I like how it came out. Hid the wires to the original fuel pump and also hid the wires to the blower, ran the new wire for the oil temp in eng compartment too. Still want to keep my options open as far as putting the engine in, so holding off for now. Looking to still add a starter relay. Quad gage wiring completed recently. What a challenge that was! It is actually a quad gage with 4 warning lights, pretty slick. 4 days invested here on this alone. Lots of calls to New Vintage Gage in Detroit. Ben was very helpful. Again, the gage was not purchased by me directly, it was puchased by the PO. So Ben went above and beyond to help sort out a gage they sold about 4 years ago. Pretty cool. Had to run several new wires replacing wires and additional wires. Also thanks to Matt at CPR and Dave Walker toolguy. Attached thumbnail(s) 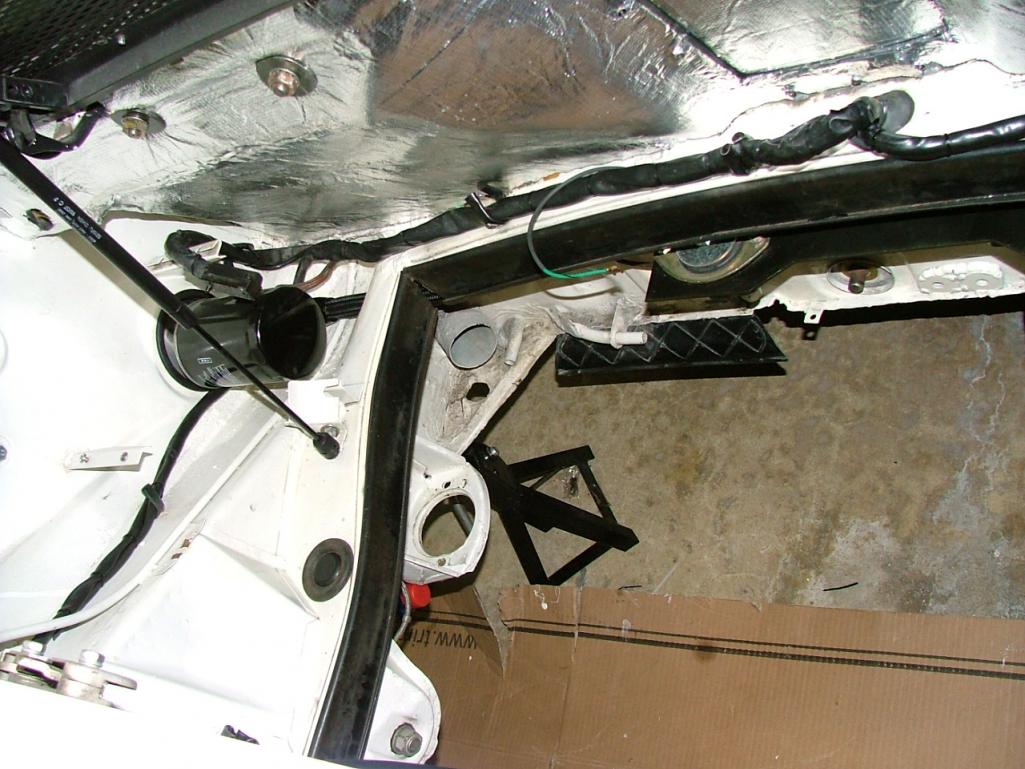 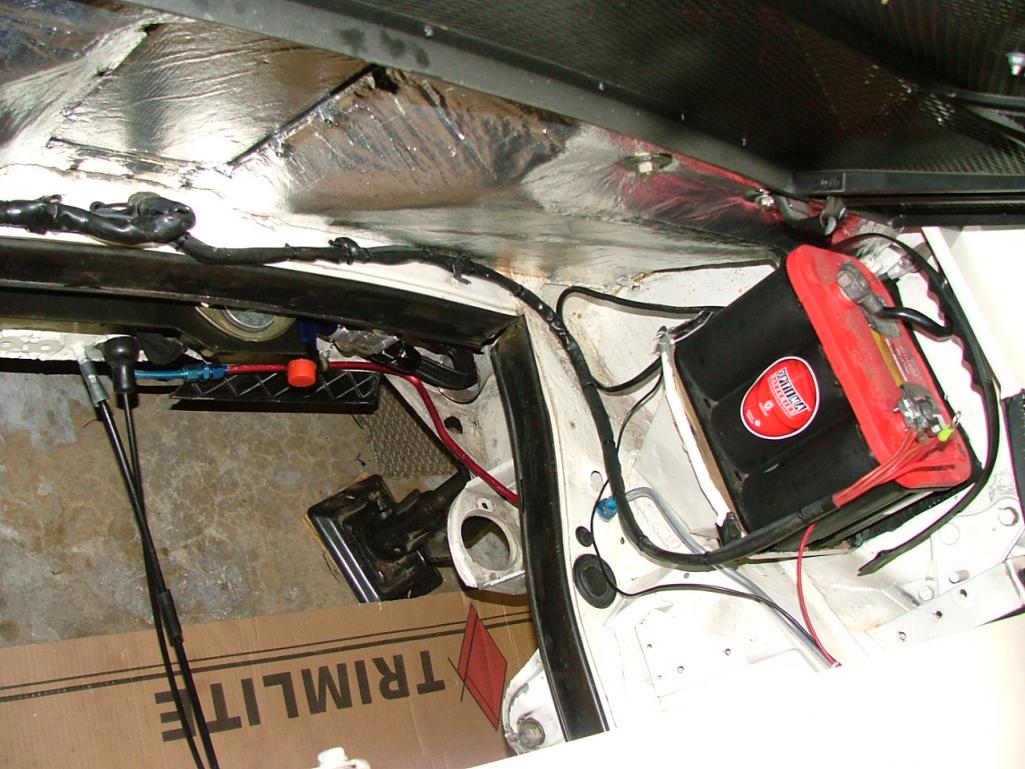  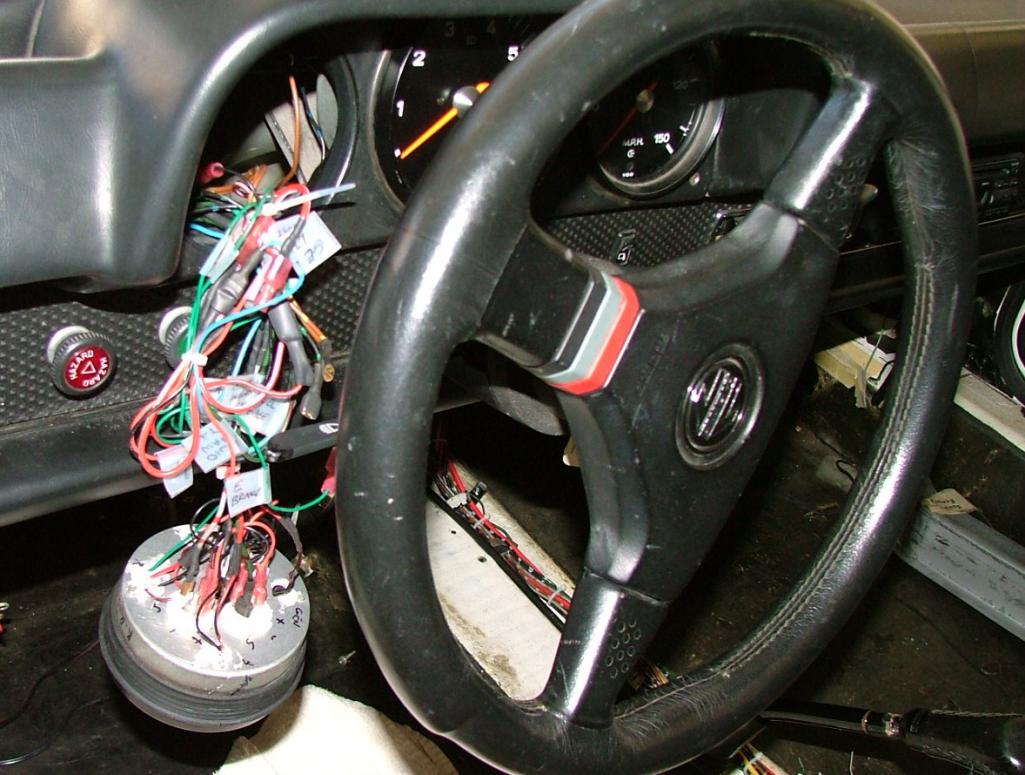 
|
|
|
|
| whitetwinturbo |
Nov 4 2015, 11:22 AM
Post
#87
|
|
Honey, does this wing make my ass look fat? Group: Members Posts: 1,391 Joined: 22-October 11 From: Newport Beach/Kalefornya/USA Member No.: 13,704 Region Association: Southern California |
Cool gauge! (IMG:style_emoticons/default/beer.gif)
|
|
|
|
| Lucky9146 |
Nov 4 2015, 11:43 AM
Post
#88
|
|
Always Wanted A Bigger Go Cart Group: Members Posts: 1,711 Joined: 22-September 14 From: Poway California Member No.: 17,942 Region Association: Southern California |
Put power to the chassis recently for the first time since I have owned the car! This car has not seen power in 18 years!!! Matt at CPR suggested a good systematic approach to applying power for the first time. No fuses blew, no melted wires and a lot worked, some not so much. Had some burned out bulbs, bad ground, and normal stuff. The reason I had not put power to the chassis is there were a bunch of extraneous wires to figure out, sort out, and rip out. Plus there were a couple of previously burned/ blistered wires to replace. (picture) Thanks dlewis for the box of 914 wires to use. Also read here on world from a guy who burned his harness not once but twice, freaked me out. It is nice to see head lights, running lights, gage lights, flashers, horn, wipers, fog lights, and turn signals. Still bugs to work out like parking brake light, and interior light. I even got the radio and power antenna working!
This car originally being a 4 cyl had the single bulb blinker in the tach. With the 6 cyl tach it actually has a left and right. I needed to run wires from the flasher area the grn/blk right turn and grey/ blk left turn. Now the white/blue original wire for single turn signal is now not used!?? oh well. I have correct turn signals now on the 6 cyl tach!!! Blink normal and everything!!! There is hope for me yet. (Disclaimer: It didn’t work first time). Wiring diagrams from Dave Walker toolguy sure helped. Next focus was wiring on the oil cooler fans and fuel pump. I finally get it! Thanks to Dave Walker toolguy I finally do get it how the wiring is suppose to work with a relay. So re-did the wiring to the fans because I thought it could look way better (before and after pictures) Want to use the small 4 fuse block and took the in line fuse previously installed for the fans and moved it to a small fuse / relay panel. It will be so much easier to see on that little fuse block than bundled up in a wiring harness under the oil cooler shroud. Used Porsche relays on the panel since I had the bases (thanks dlewis) and relays so made a fuse box/ relay tray out of aluminum, toolguy helped me out with his slick machine shop in punching and bending the alum panel. The 4 fuse panel has a fuse for the fans and fuse for the fuel pump with 2 empty fuse positions for anything future. Note that the fan had its own relay so that is still located on the fan frame. Also I left myself a spare relay base on the panel to potentially run a relay for the headlights or anything else. Attached thumbnail(s) 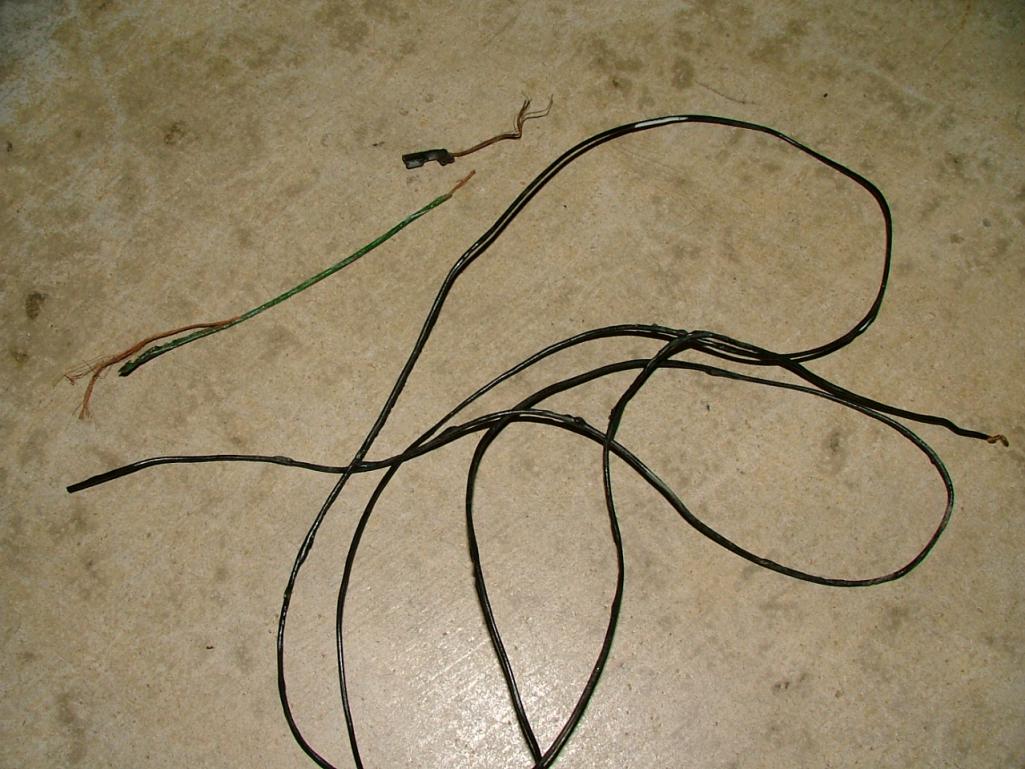 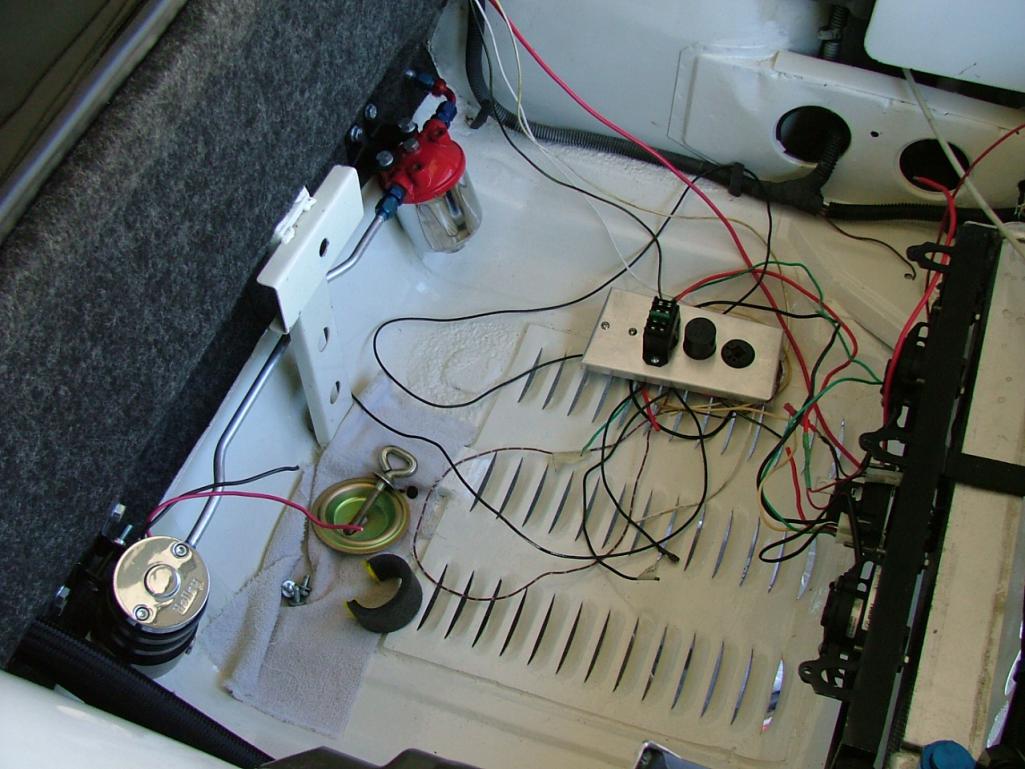 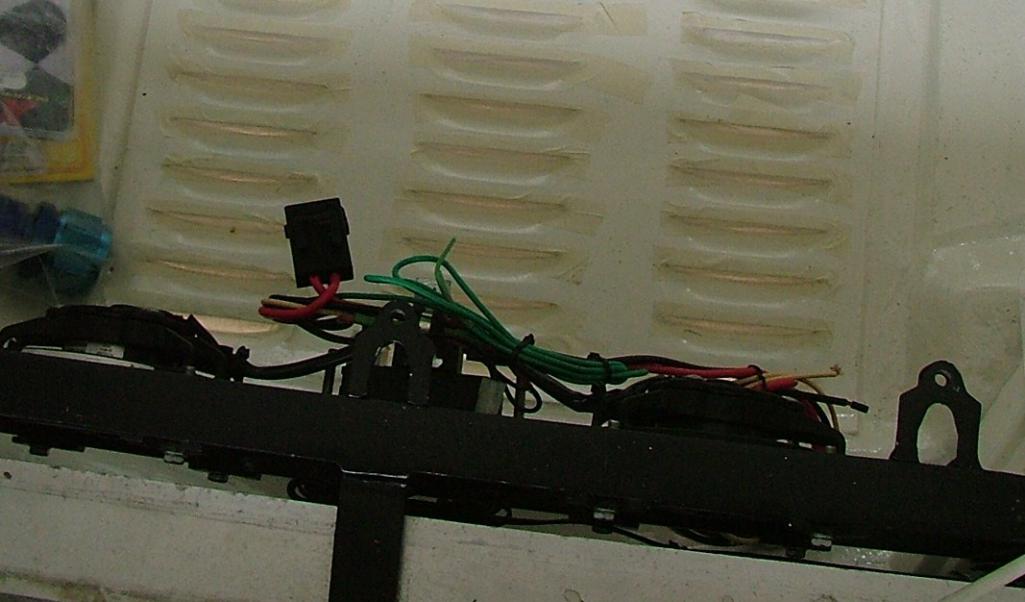 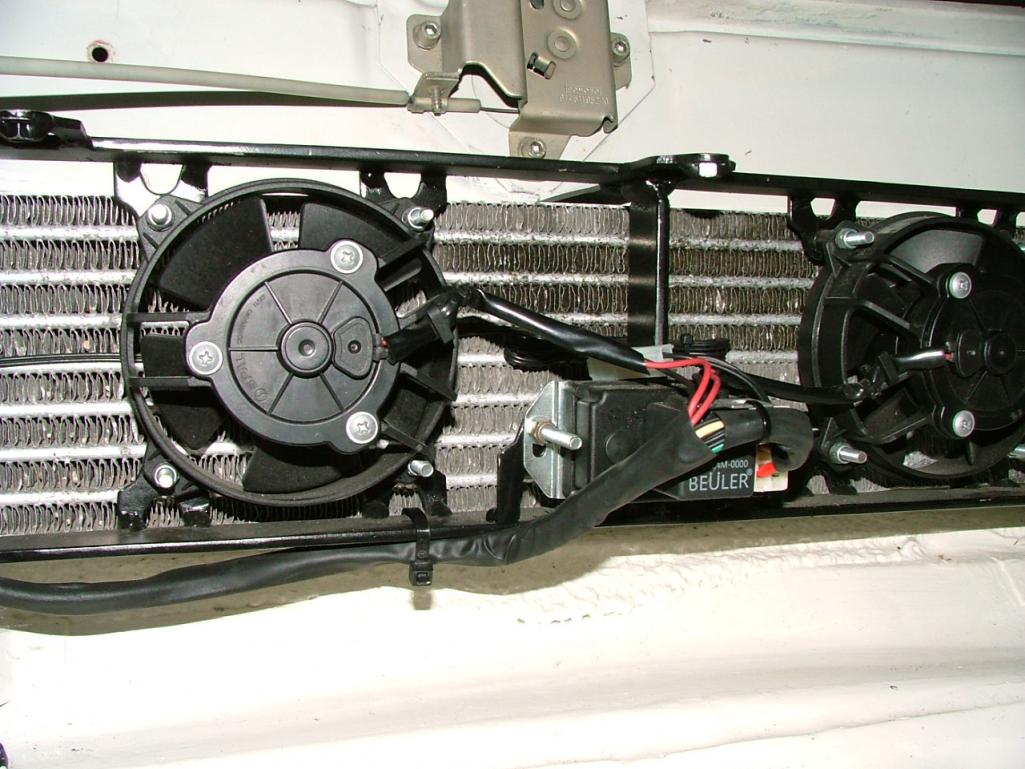 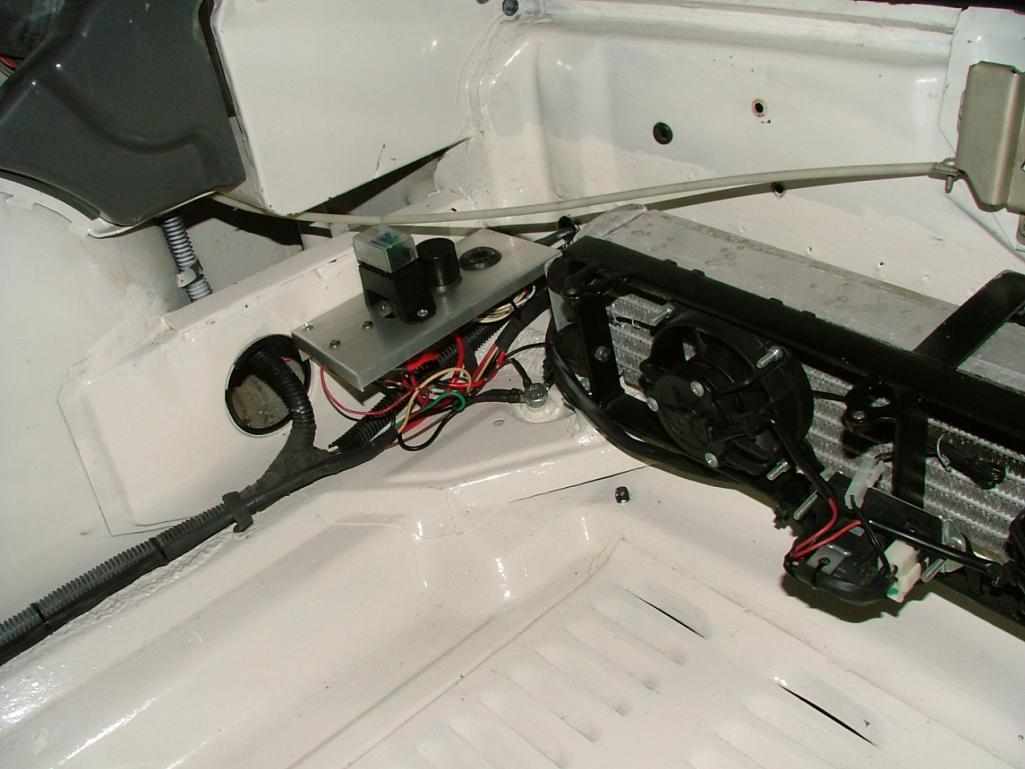 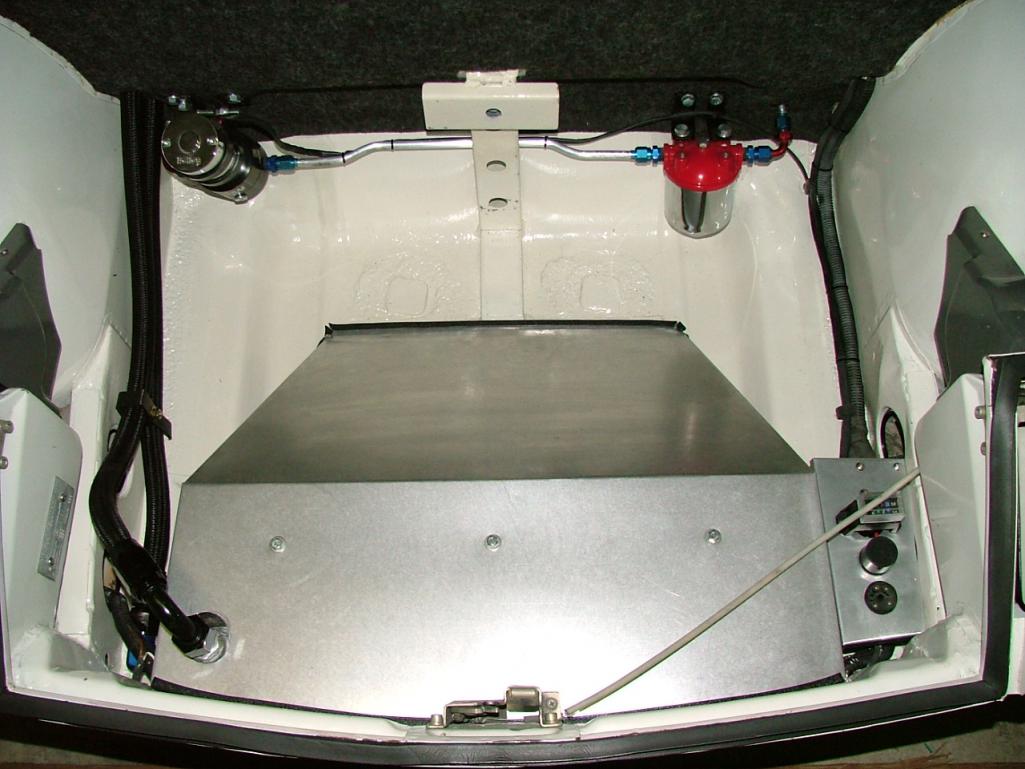 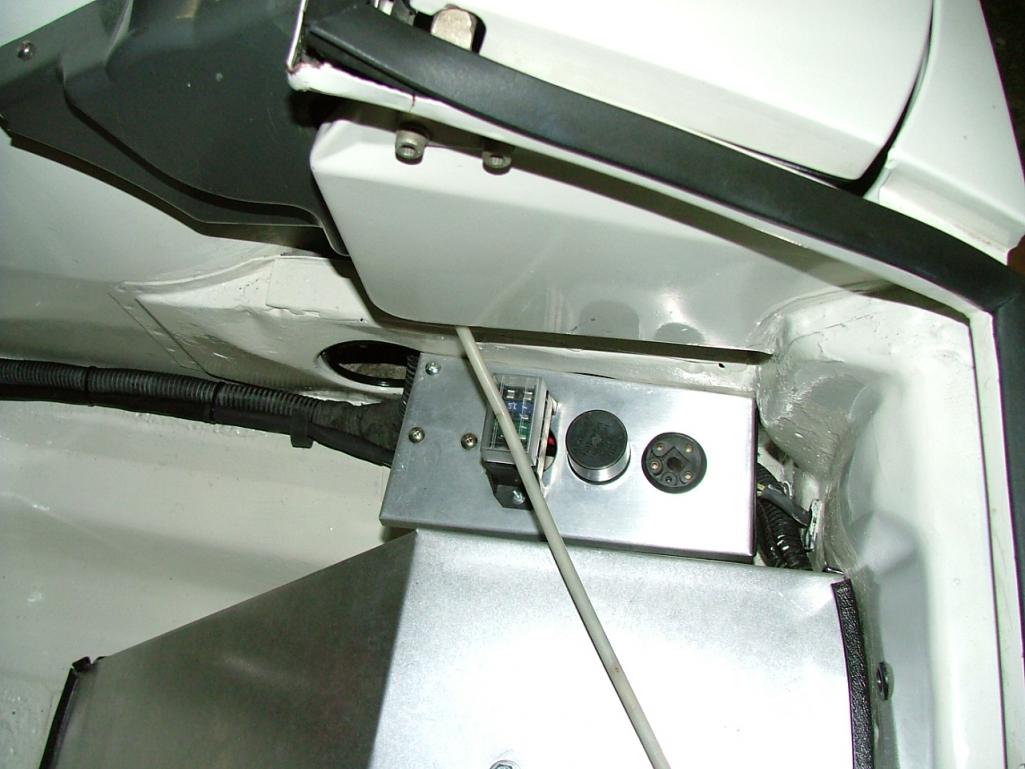 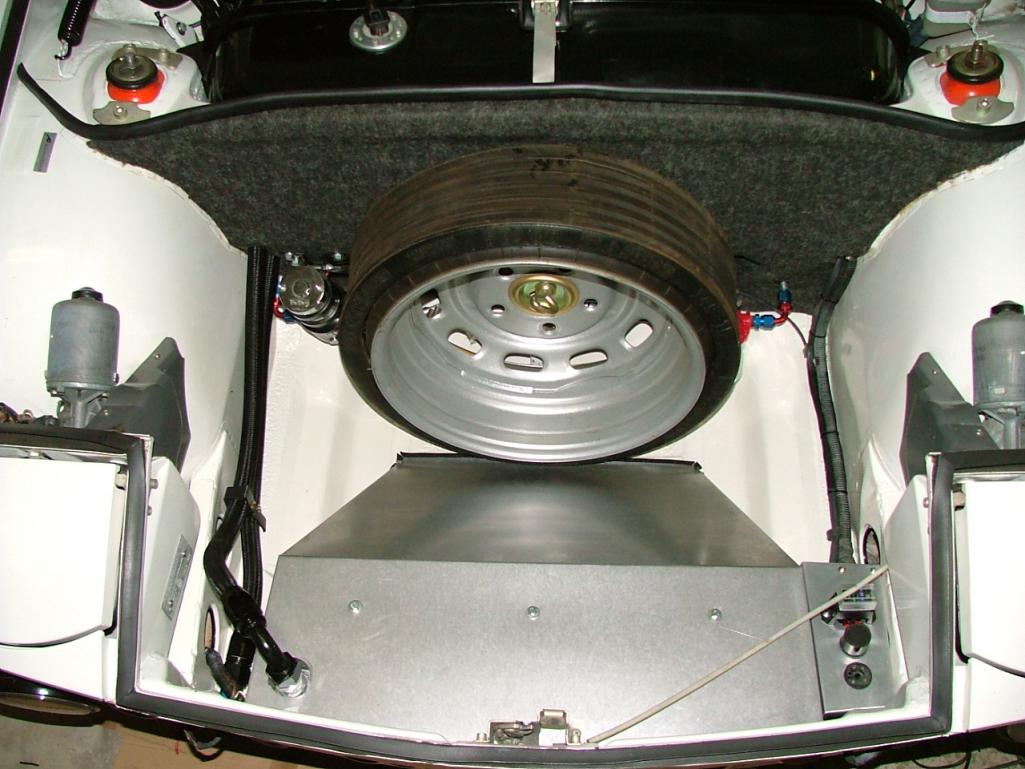
|
|
|
|
| rhodyguy |
Nov 5 2015, 10:40 AM
Post
#89
|
|
Chimp Sanctuary NW. Check it out. Group: Members Posts: 22,252 Joined: 2-March 03 From: Orion's Bell. The BELL! Member No.: 378 Region Association: Galt's Gulch |
Wow! Clean. Nice work.
|
|
|
|
| Lucky9146 |
Dec 4 2015, 11:45 AM
Post
#90
|
|
Always Wanted A Bigger Go Cart Group: Members Posts: 1,711 Joined: 22-September 14 From: Poway California Member No.: 17,942 Region Association: Southern California |
Unfortunately I have not been able to devote much time to the project over the last month but I was able to complete the installation of the front bumper. This was actually no small feat and a culmination of a several month process but dammit I really wanted a chrome front bumper!
The car as I bought it had a fiberglass bumper and lower valance. First of course was finding a decent front bumper that would be able to be chromed. The bumper I found was just ok and it did have a good bumper top. Second was having the bumper modified to accommodate the intake for the front oil cooler PLUS match up to the fiberglass lower valance. Thanks Chris! Then there was the chrome shop and almost 4 months later. Next was finding some sort of mesh screen to go in the intake. Lastly was fitting it all to the car. Trial fit, trail fit, trial fit, and trial fit. For those looking for an inexpensive solution for the mesh screen I found at the Home Depot that gutter guard worked great and was already painted black, was close to the right size, fairly easy to work with, and like $3.00. How many parts can you buy for $3.00? Note the PO cut extra holes for the oil cooler intake in the front panel, I just blacked out around it. Attaching the mesh to the fiberglass valance was accomplished with strategically placed tie wraps. Attached thumbnail(s) 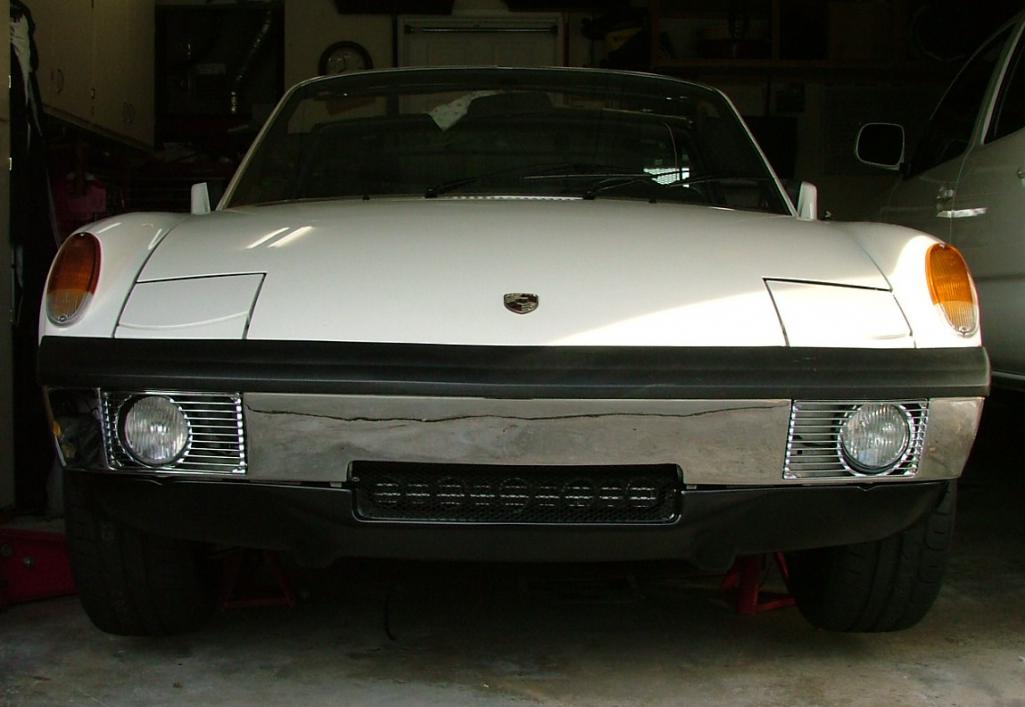 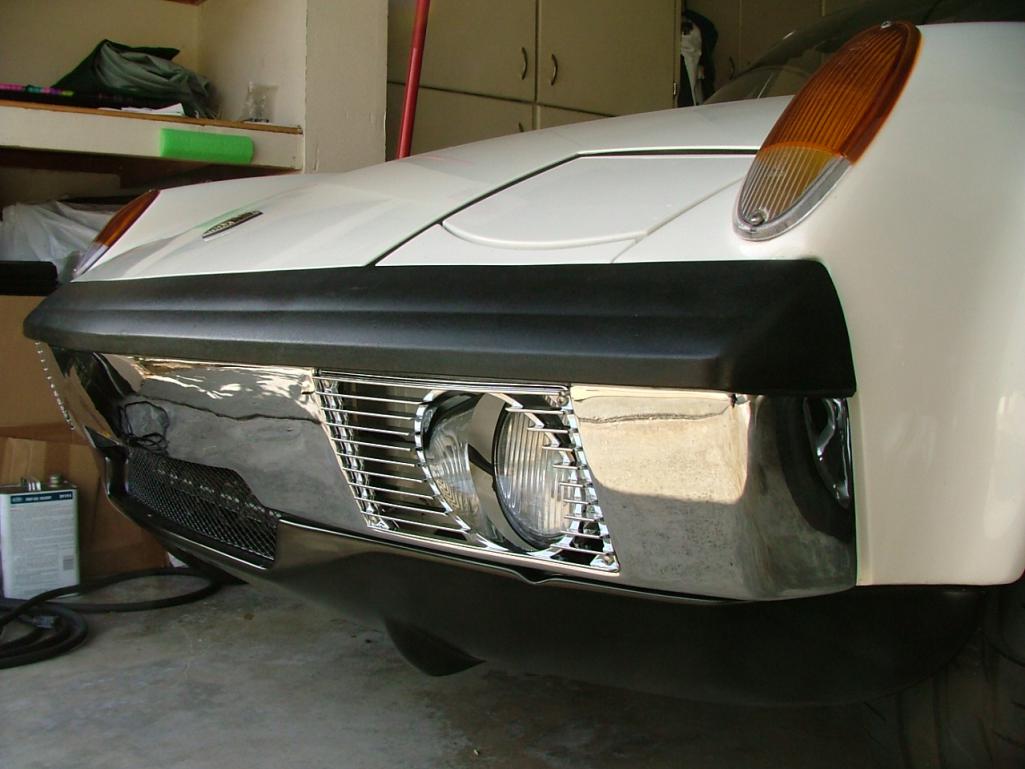 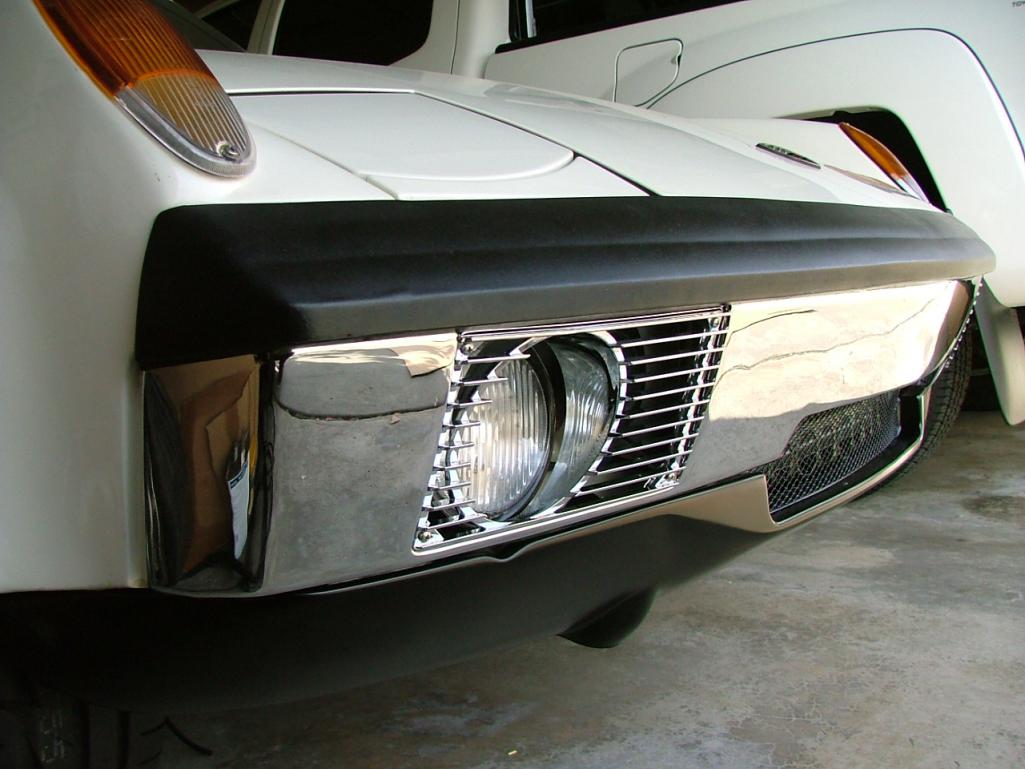
|
|
|
|
| Justinp71 |
Dec 4 2015, 12:10 PM
Post
#91
|
|
Senior Member Group: Members Posts: 1,647 Joined: 11-October 04 From: Sacramento, CA Member No.: 2,922 Region Association: None |
(IMG:style_emoticons/default/popcorn[1].gif) Looking Good!
I hope to redo my front bumper soon as well. Did you modify the bumper yourself? |
|
|
|
| MJHanna |
Dec 4 2015, 12:13 PM
Post
#92
|
|
Does this 911 make my butt look big? Group: Members Posts: 806 Joined: 23-January 03 From: Lowry Crossing, Texas Member No.: 185 |
Nice work on the bumper (IMG:style_emoticons/default/piratenanner.gif) It's one of those details that "make' your car. No one that looks at it will have any idea how much effort went into it. But you will always look at it with eyes that show and remind you that it was all worth the effort. (IMG:style_emoticons/default/aktion035.gif) (IMG:style_emoticons/default/cheer.gif) (IMG:style_emoticons/default/piratenanner.gif)
|
|
|
|
| siverson |
Dec 4 2015, 12:35 PM
Post
#93
|
|
Advanced Member Group: Benefactors Posts: 2,464 Joined: 5-May 03 From: San Diego, CA Member No.: 654 Region Association: Southern California |
Nice work! Makes me want to get my orange car back on the road. Our builds are very similar.
-Steve |
|
|
|
| Lucky9146 |
Dec 4 2015, 01:22 PM
Post
#94
|
|
Always Wanted A Bigger Go Cart Group: Members Posts: 1,711 Joined: 22-September 14 From: Poway California Member No.: 17,942 Region Association: Southern California |
QUOTE(Justinp71 @ Dec 4 2015, 10:10 AM)  (IMG:style_emoticons/default/popcorn[1].gif) Looking Good! I hope to redo my front bumper soon as well. Did you modify the bumper yourself? No, did not modify myself wish I could say I did. A guy I know here in San Diego who is a metal wizard did it for me. He has done some amazing stuff so this was like a minor thing for him but I sure appreciated it. |
|
|
|
| Lucky9146 |
Dec 4 2015, 01:27 PM
Post
#95
|
|
Always Wanted A Bigger Go Cart Group: Members Posts: 1,711 Joined: 22-September 14 From: Poway California Member No.: 17,942 Region Association: Southern California |
QUOTE(siverson @ Dec 4 2015, 10:35 AM) Nice work! Makes me want to get my orange car back on the road. Our builds are very similar. -Steve Thanks, I know what you mean about getting it on the road. Yes yours does look similar. Unfortunately mine is getting too used to the jack stands. The way things are going it looks like 2016 for me. Still lots to do. |
|
|
|
| Mueller |
Dec 4 2015, 02:24 PM
Post
#96
|
|
914 Freak! Group: Members Posts: 17,155 Joined: 4-January 03 From: Antioch, CA Member No.: 87 Region Association: None |
Very nice....yep, attention to detail makes a huge difference, great job.
|
|
|
|
| Cairo94507 |
Dec 4 2015, 03:10 PM
Post
#97
|
|
Michael Group: Members Posts: 10,671 Joined: 1-November 08 From: Auburn, CA Member No.: 9,712 Region Association: Northern California |
Wow! Excellent attention to detail. Your car is looking beautiful. Full speed ahead.
|
|
|
|
| moparrob |
Dec 3 2016, 10:39 PM
Post
#98
|
|
Senior Member Group: Members Posts: 646 Joined: 27-April 10 From: Los Angeles Member No.: 11,663 Region Association: None |
I was the prior owner of this car and must say that I am very impressed with the work Jim has done since he has had it. I also realize that i would not have had the skills to complete the car to this level and I applaud his patience and perseverance in picking up the pieces and bringing this project ever so close to completion.
I can't wait to see it running when he is able to devote more time to the project. Needless to say - SUBSCRIBED! |
|
|
|
| forrestkhaag |
Dec 4 2016, 12:07 PM
Post
#99
|
|
Senior Member Group: Members Posts: 935 Joined: 21-April 14 From: Scottsdale, Arizona Member No.: 17,273 Region Association: Southwest Region |
At your convenience, can you post a picture of the access port open to see the engine front / and loosely describe your cover's dimensions? I have built a cover from doner firewall but want to confirm that I will be able to get at everything necessary in the engine bay with my dimensions. Thanks and nice work.
(IMG:style_emoticons/default/beerchug.gif) |
|
|
|
| mb911 |
Dec 4 2016, 12:45 PM
Post
#100
|
|
914 Guru Group: Members Posts: 7,785 Joined: 2-January 09 From: Burlington wi Member No.: 9,892 Region Association: Upper MidWest |
I am just so impressed with the build. The bumper rechrome seams really cheap.. Do you have some contact info?
|
|
|
|
|
1 User(s) are reading this topic (1 Guests and 0 Anonymous Users)
0 Members:

|
Lo-Fi Version | Time is now: 15th June 2026 - 08:15 AM |
Invision Power Board
v9.1.4 © 2026 IPS, Inc.