|
|
|
Porsche, and the Porsche crest are registered trademarks of Dr. Ing. h.c. F. Porsche AG.
This site is not affiliated with Porsche in any way. Its only purpose is to provide an online forum for car enthusiasts. All other trademarks are property of their respective owners. |
|
|

  |

| mbseto |
 Aug 16 2015, 07:32 PM Aug 16 2015, 07:32 PM
Post
#1
|
|
Senior Member  Group: Members Posts: 1,257 Joined: 6-August 14 From: Cincy Member No.: 17,743 Region Association: North East States |
Funny, I am as nervous starting this thread as I was to start cutting into my car.
I resolved to start a rustoration thread when I made my first cuts, so here it is. I'm hoping the community will pipe in periodically with any, "Don't do that!", "Do it this other way!", "Do this first!", or "Don't forget this!" comments that are appropriate. Any and all guidance will be appreciated. So here's the car as I got it, not quite a year ago: 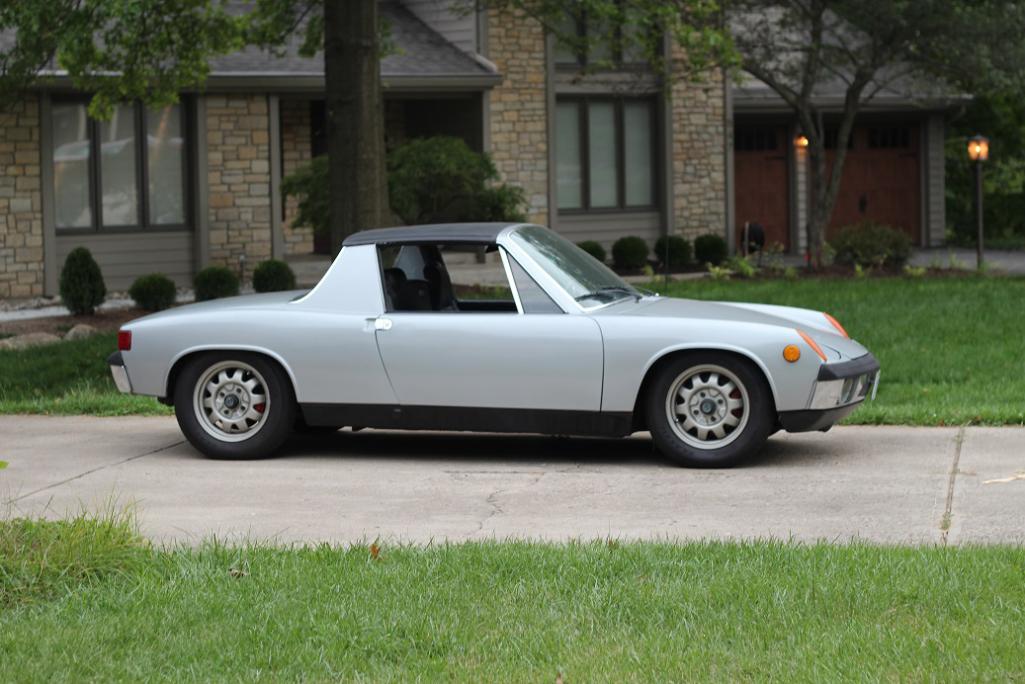 Started out doing a little engine work to get it running, then drove it around a little bit before starting to take it apart. Took the engine out, put it up on a dolly, took out much of the interior and suspension, and this is how it sits now: 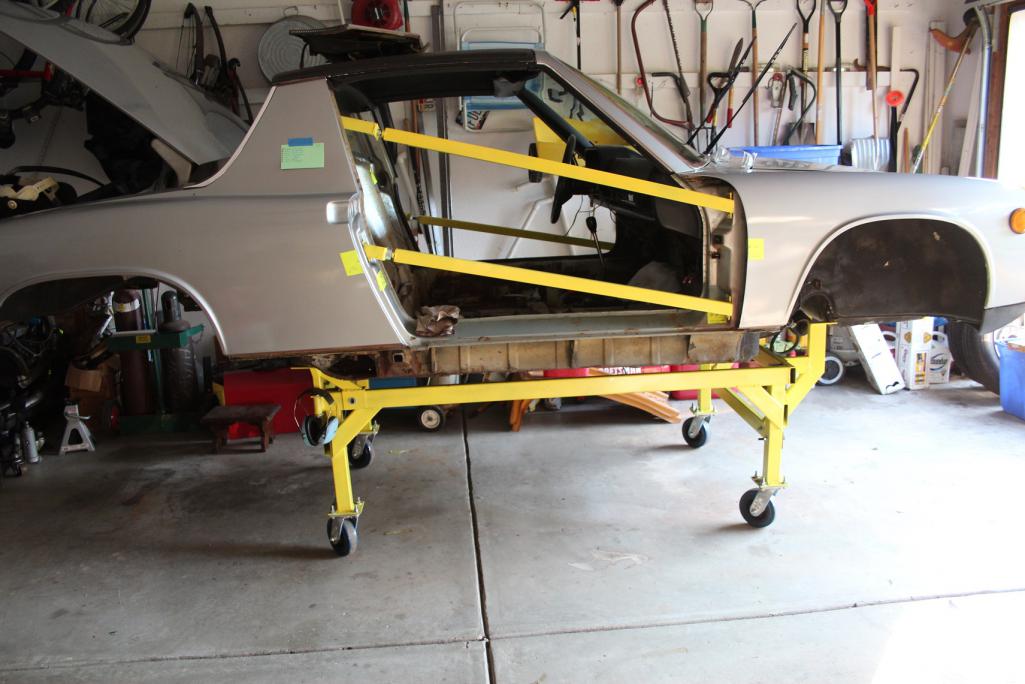 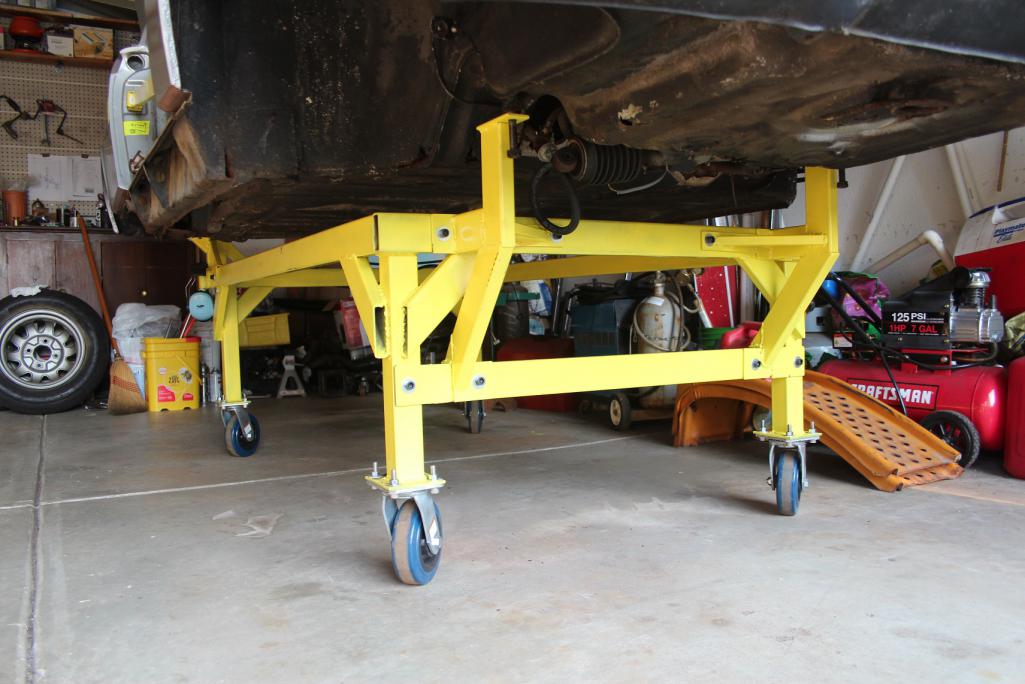 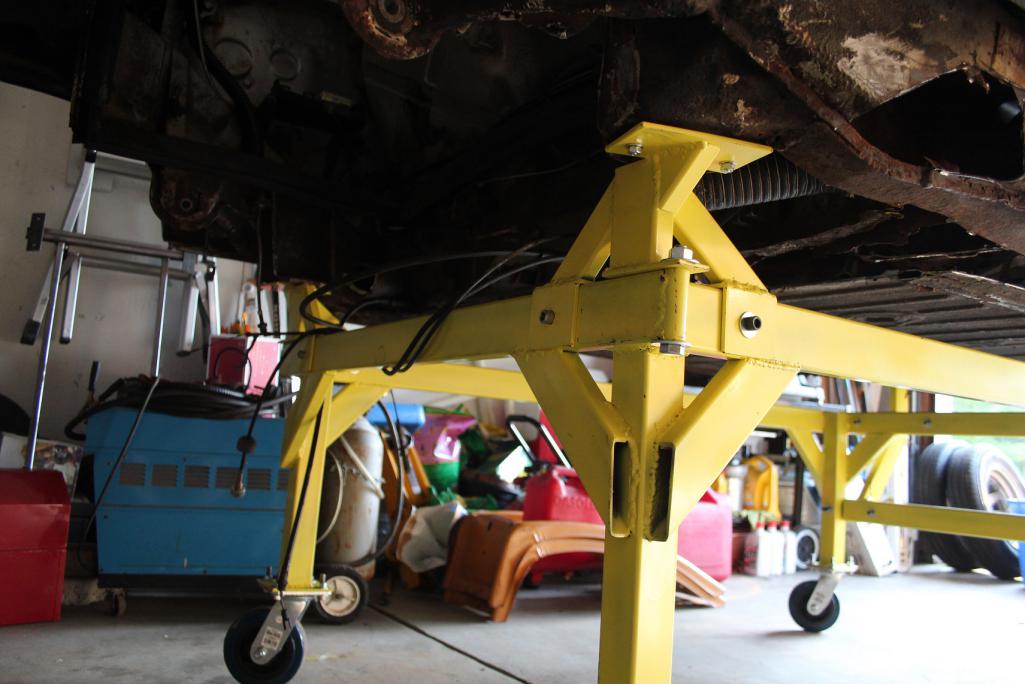 After cleaning out the inside and seeing the rust, it was hard to believe we were driving it at all. These are the first cuts, just straightening out the edges of the rust holes really. 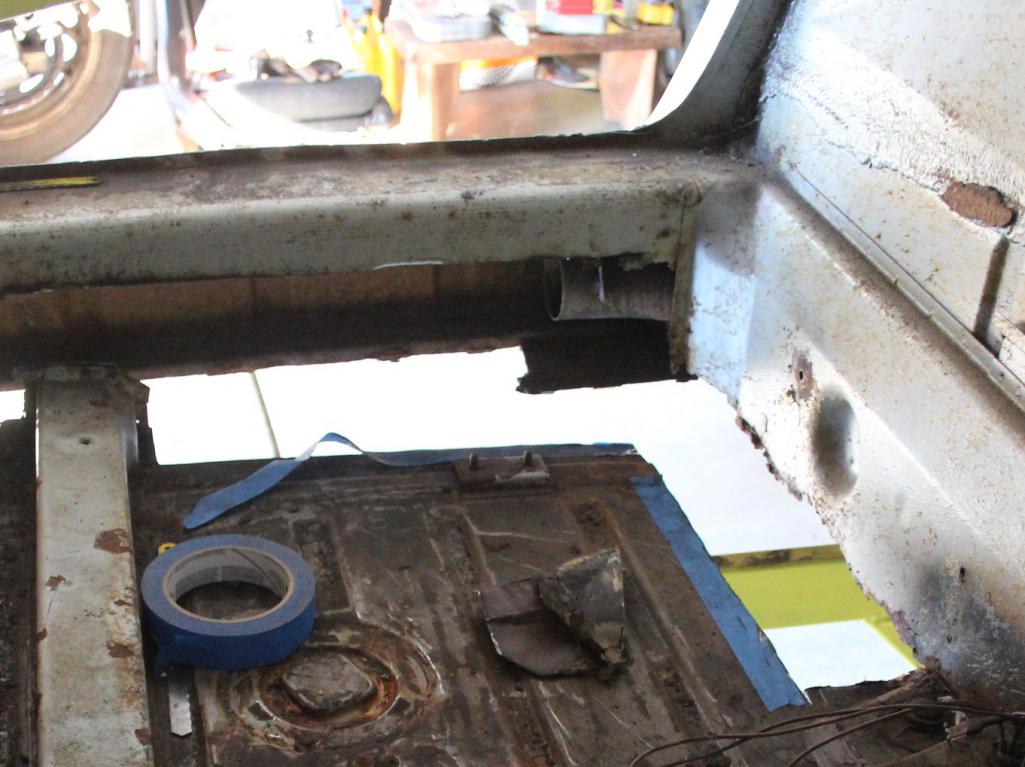 More pics coming soon, I'll be documenting the extent of the damage and forming a battle plan. |
   |

 
|
| TargaToy |
Aug 16 2015, 07:35 PM
Post
#2
|
|
-NONSOLIS RADIOS SEDIOUIS FULMINA MITTO- Group: Members Posts: 714 Joined: 26-March 10 From: DelMarVa Peninsula Member No.: 11,509 Region Association: MidAtlantic Region |
Love your dolly setup. Keep the progress reports coming. I'll look forward to following your repairs.
Amazing how much bad crud can lurk below an otherwise really pretty paint job, eh? |
|
|
|
| rick 918-S |
Aug 16 2015, 08:44 PM
Post
#3
|
|
Hey nice rack! -Celette Group: Members Posts: 21,288 Joined: 30-December 02 From: Now in Superior WI Member No.: 43 Region Association: Northstar Region |
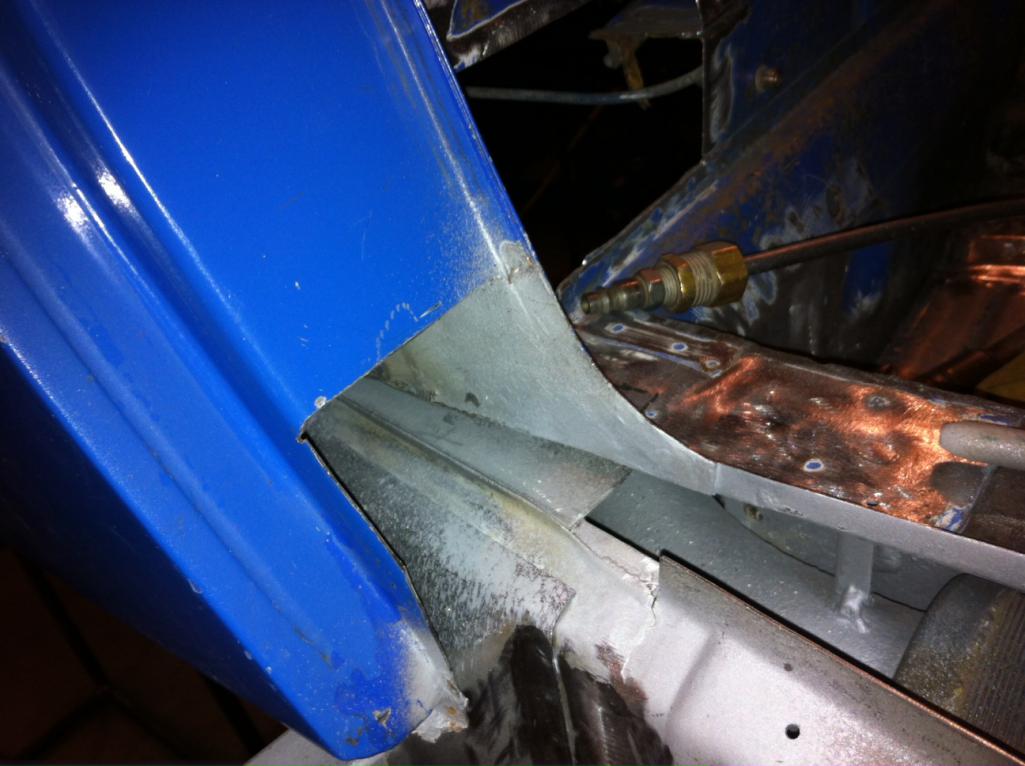
Good bracing. If you end up needing to weld higher than you can reach on the longitudinal I would suggest cutting the door jamb like this. I often see guys cut off the lower quarter panel. I personally don't care to do it that way and don't think it is necessary.
 |
|
|
|
| mgp4591 |
Aug 16 2015, 09:01 PM
Post
#4
|
|
914 Guru Group: Members Posts: 5,958 Joined: 1-August 12 From: Salt Lake City Ut Member No.: 14,748 Region Association: Intermountain Region |
Thanks for posting your pics- now I don't feel that bad about my rust situation! How's your center tunnel- is it rusted up the sides an inch or two? That's the only piece I could find that RD doesn't sell as their inventory is excellent ... has anyone seen those for sale on any vendor site?
|
|
|
|
| Zimms |
Aug 17 2015, 02:46 AM
Post
#5
|
|
Senior Member Group: Members Posts: 1,416 Joined: 11-February 06 From: Michigan Member No.: 5,565 Region Association: Upper MidWest |
QUOTE(TargaToy @ Aug 16 2015, 09:35 PM)  Love your dolly setup. (IMG:style_emoticons/default/agree.gif) Nice work |
|
|
|
| thieuster |
Aug 17 2015, 04:27 AM
Post
#6
|
|
Member Group: Members Posts: 447 Joined: 31-January 15 From: 275 mls NW from Stuttgart. Member No.: 18,384 Region Association: Europe |
Nice! Don't be tempted to start working on the engine too soon. A restored engine sitting idle in the corner of the workshop for a long period will start deteriorating.
BTW, I love the wheels on your car. What are these? Menno |
|
|
|
| rgalla9146 |
Aug 17 2015, 08:32 AM
Post
#7
|
|
Advanced Member Group: Members Posts: 4,975 Joined: 23-November 05 From: Paramus NJ Member No.: 5,176 Region Association: None |
QUOTE(thieuster @ Aug 17 2015, 06:27 AM) Nice! Don't be tempted to start working on the engine too soon. A restored engine sitting idle in the corner of the workshop for a long period will start deteriorating. BTW, I love the wheels on your car. What are these? Menno VW Super Beetle .... '78-'79 ? |
|
|
|
| Claus Graf |
Aug 17 2015, 09:03 AM
Post
#8
|
|
Member Group: Members Posts: 51 Joined: 25-November 14 From: Houston, TX Member No.: 18,154 Region Association: None |
Nice dolly. Good Luck with the 914!
I would support the front and rear end by adding more beams to the dolly (and maybe a couple of casters). I would work on one side at a time while leaving the door installed (on the side you're not working). Regards Claus |
|
|
|
| blackmoon |
Aug 17 2015, 09:17 AM
Post
#9
|
|
Member Group: Members Posts: 153 Joined: 27-May 08 From: Cal Bay Area Member No.: 9,106 Region Association: None |
nice work, good luck with the restoration, it's all about the journey
|
|
|
|
| jmitro |
Aug 17 2015, 09:50 AM
Post
#10
|
|
Senior Member Group: Members Posts: 713 Joined: 23-July 15 From: Oklahoma Member No.: 18,986 Region Association: None |
love that color.
good luck with your rustoration; I'm just a few hours of work behind you. Removing the engine this week, then start cutting out the rusty parts |
|
|
|
| sfrenck |
Aug 17 2015, 09:58 AM
Post
#11
|
|
Member Group: Members Posts: 492 Joined: 28-February 10 From: Wilmington, DE Member No.: 11,411 Region Association: MidAtlantic Region |
Shouldn't the door braces form an "X" or a "Z"?
Not saying that the car is going to move since it's bolted to that beefy support frame, but I don't see how a "four-bar brace" keeps the jambs fixed relative to each other (think sagging fence gate without the diagonal brace). |
|
|
|
| 914werke |
Aug 17 2015, 10:24 AM
Post
#12
|
|
"I got blisters on me fingers" Group: Members Posts: 11,683 Joined: 22-March 03 From: USofA Member No.: 453 Region Association: Pacific Northwest |
QUOTE(mgp4591 @ Aug 16 2015, 08:01 PM) How's your center tunnel- is it rusted up the sides an inch or two? That's the only piece I could find that RD doesn't sell as their inventory is excellent ... has anyone seen those for sale on any vendor site? (IMG:style_emoticons/default/idea.gif) I do. (IMG:style_emoticons/default/shades.gif) |
|
|
|
| mbseto |
Aug 17 2015, 06:28 PM
Post
#13
|
|
Senior Member Group: Members Posts: 1,257 Joined: 6-August 14 From: Cincy Member No.: 17,743 Region Association: North East States |
Thanks all for the kind words.
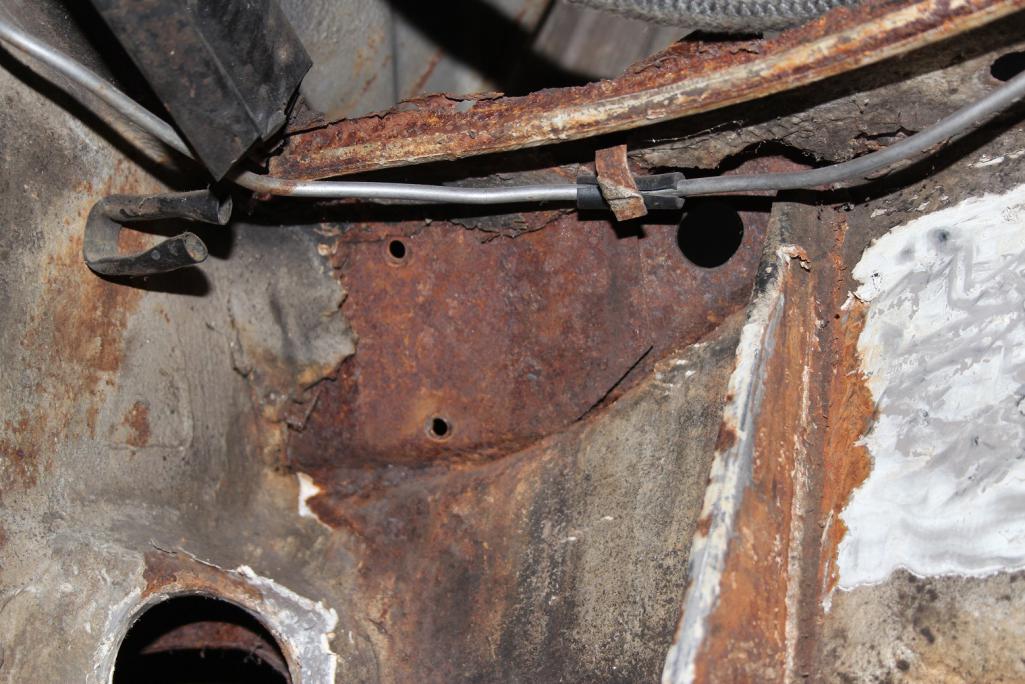
QUOTE(rick 918-S @ Aug 16 2015, 10:44 PM) ...I would suggest cutting the door jamb like this. I often see guys cut off the lower quarter panel. I personally don't care to do it that way and don't think it is necessary. Rick; I was hoping to get away with something like that. But the suspension pylon needs to be removed, and so far as I've seen in searching this site, I'll have to cut the quarter panel. Please correct me if I'm wrong on this because I would really rather not. But look at this: When I poked at this, the hole just kept getting bigger and bigger. Rust and sunflower hulls were pouring out of it. Got a whole bag full. 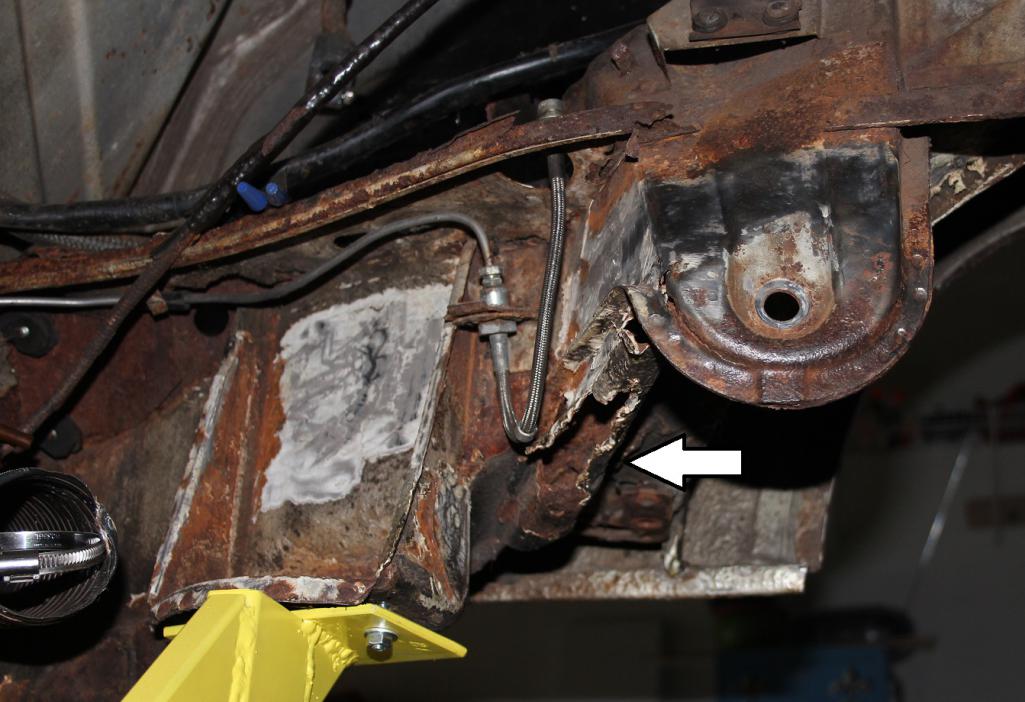 While the outer pylon seems solid, the metal of the long around it is cheese. Cut the long open and this is looking aft and up, inside the long from just aft of the jack point (it looks backwards because it's looking in a mirror). You can see the entrance to the wee beastie's nest. 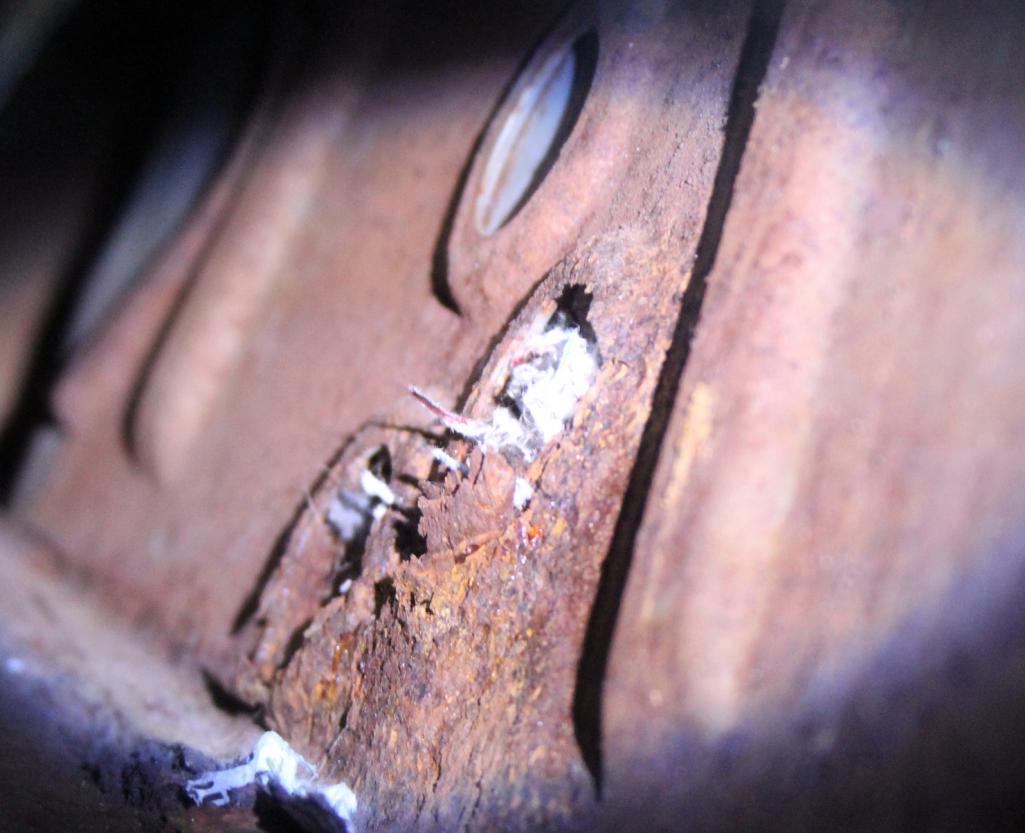 I'm betting his little skeleton might still be inside the pylon. Just for good measure, here's a top down view of my properly hellish hell hole: 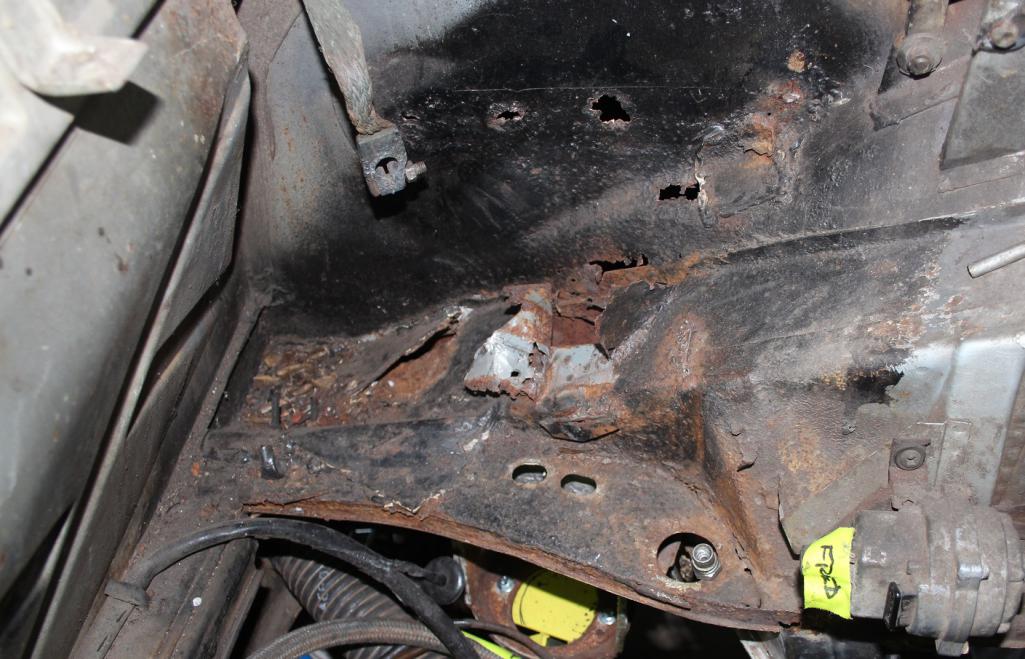 |
|
|
|
| mbseto |
Aug 17 2015, 06:34 PM
Post
#14
|
|
Senior Member Group: Members Posts: 1,257 Joined: 6-August 14 From: Cincy Member No.: 17,743 Region Association: North East States |
QUOTE(rgalla9146 @ Aug 17 2015, 10:32 AM) QUOTE(thieuster @ Aug 17 2015, 06:27 AM) BTW, I love the wheels on your car. What are these? VW Super Beetle .... '78-'79 ? Lemmerz Baja Champion, and yes- Super Beetle, but I think only available in '72-'73? They've really grown on me, but they are narrow. Car's going to be a drifter whether I want to or not. |
|
|
|
| mbseto |
Aug 17 2015, 06:44 PM
Post
#15
|
|
Senior Member Group: Members Posts: 1,257 Joined: 6-August 14 From: Cincy Member No.: 17,743 Region Association: North East States |
QUOTE(sfrenck @ Aug 17 2015, 11:58 AM) Shouldn't the door braces form an "X" or a "Z"? Not saying that the car is going to move since it's bolted to that beefy support frame, but I don't see how a "four-bar brace" keeps the jambs fixed relative to each other (think sagging fence gate without the diagonal brace). I intended the dolly and the braces to all work together- they will all remain attached so far as possible. Both braces on each side are adjustable to set door gaps. The plan is to measure frequently and if anything sags during the cutting, I will add bracing before welding. |
|
|
|
| JoeDees |
Aug 17 2015, 08:29 PM
Post
#16
|
|
Senior Member Group: Members Posts: 515 Joined: 10-November 14 From: Northern Kentucky Member No.: 18,106 Region Association: None |
I'll be learning in the near future whether you can replace the inner suspension console without cutting the fender (out with the old and the inner long this coming weekend), but in my prep for the job I have assessed that cutting the outer wheelhouse any higher than the outer suspension console would require cutting the fender. I thanked God when I realized that mine was somehow only rusted on the inner side and down low in the curve.
|
|
|
|
| mbseto |
Oct 3 2015, 07:49 PM
Post
#17
|
|
Senior Member Group: Members Posts: 1,257 Joined: 6-August 14 From: Cincy Member No.: 17,743 Region Association: North East States |
Guess I better update you guys... Some PO welded in some random patches, have to dig them out and find out where the original metal starts. This is the underside of the hell hole:
 And from above... Looks like grandma's quilt: 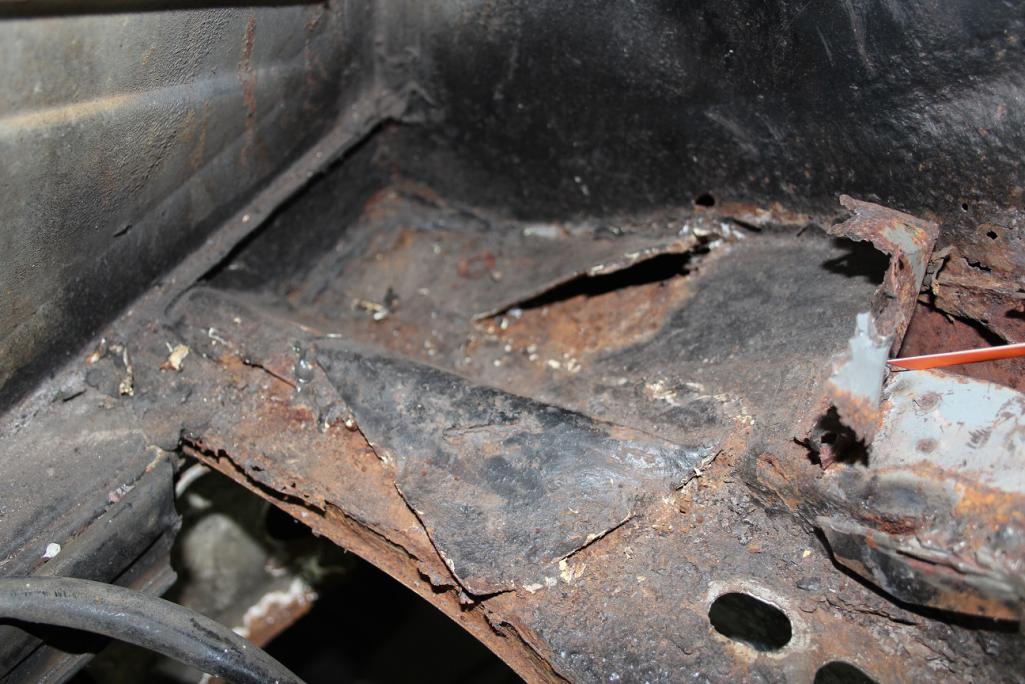 Pulled it all out. This is the PO's "hell hole repair kit" 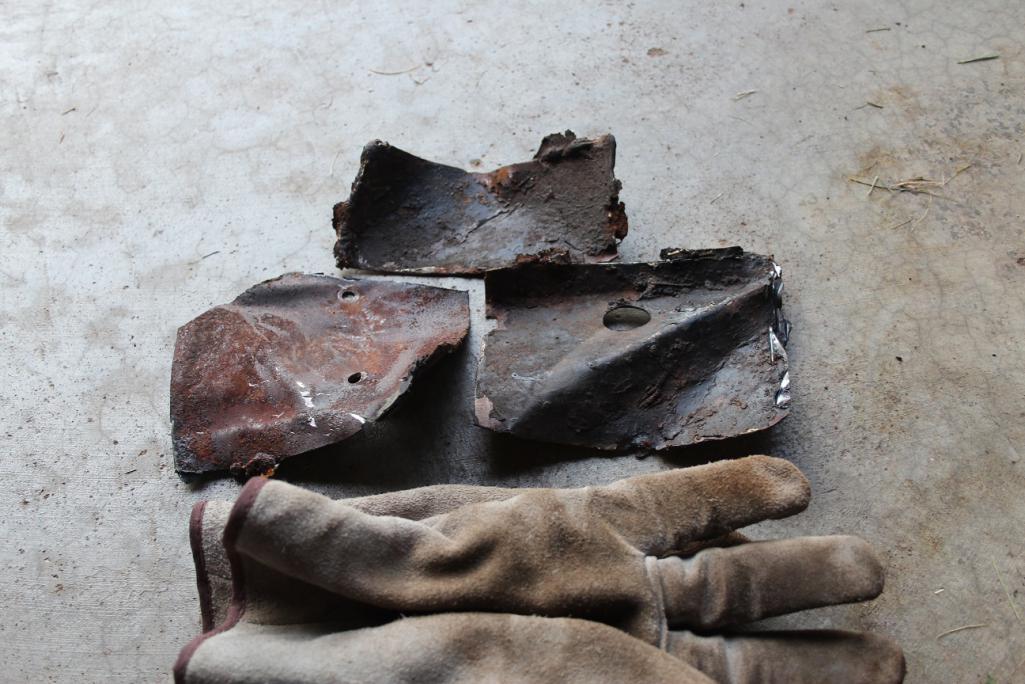 |
|
|
|
| mbseto |
Oct 3 2015, 07:57 PM
Post
#18
|
|
Senior Member Group: Members Posts: 1,257 Joined: 6-August 14 From: Cincy Member No.: 17,743 Region Association: North East States |
I'm planning on buying a bunch of sheet metal from RD. But to help stay within budget, I made a bending brake- this will be the source of my new inner longs. I've got a pile of 18g, but I have a piece of 12g to test the limits of this thing. If it can handle it, I may just make the inner longs from 12g. No additional stiffening kit required!
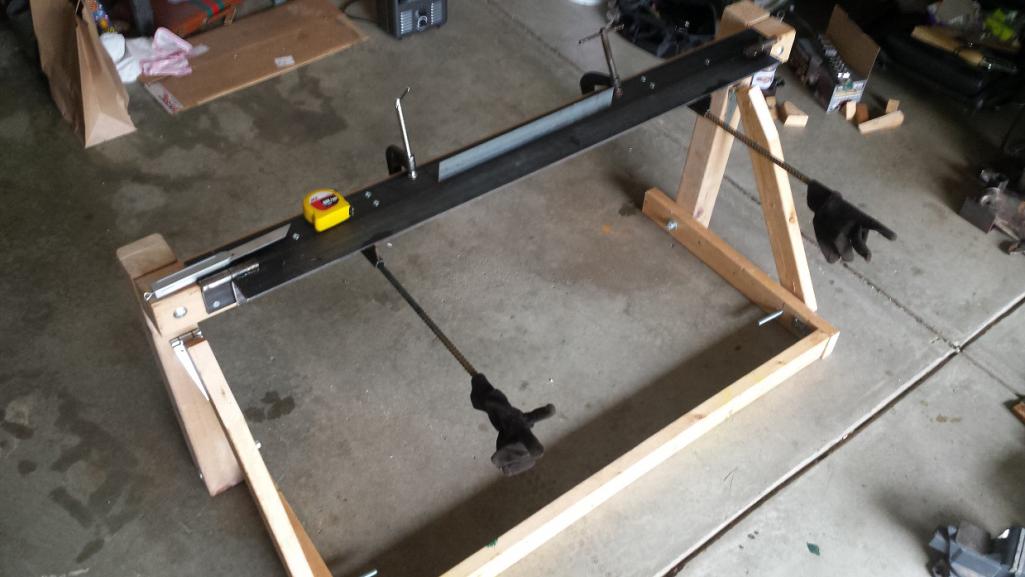 Using test strips to get set up: 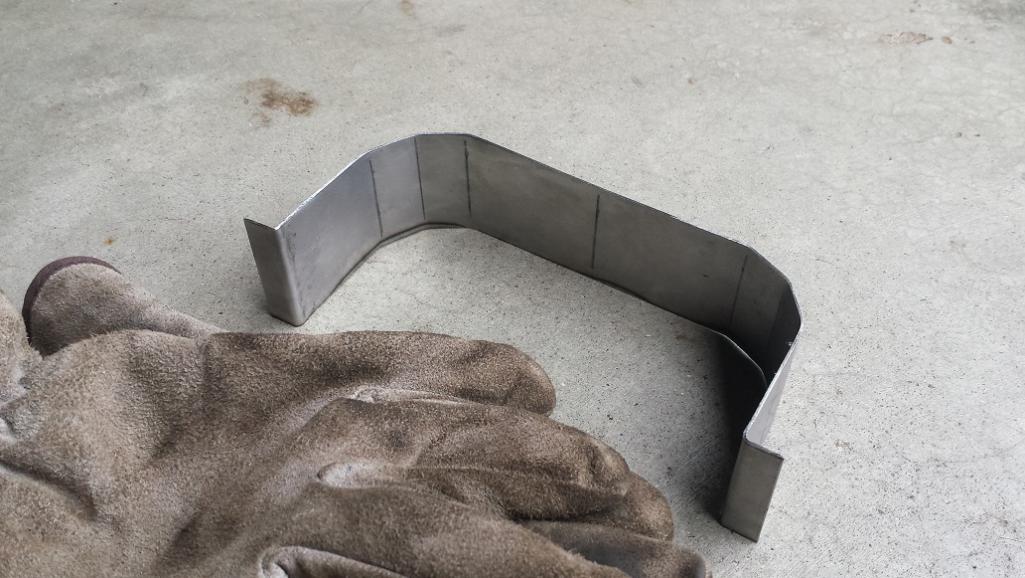 Breakfast of champions: 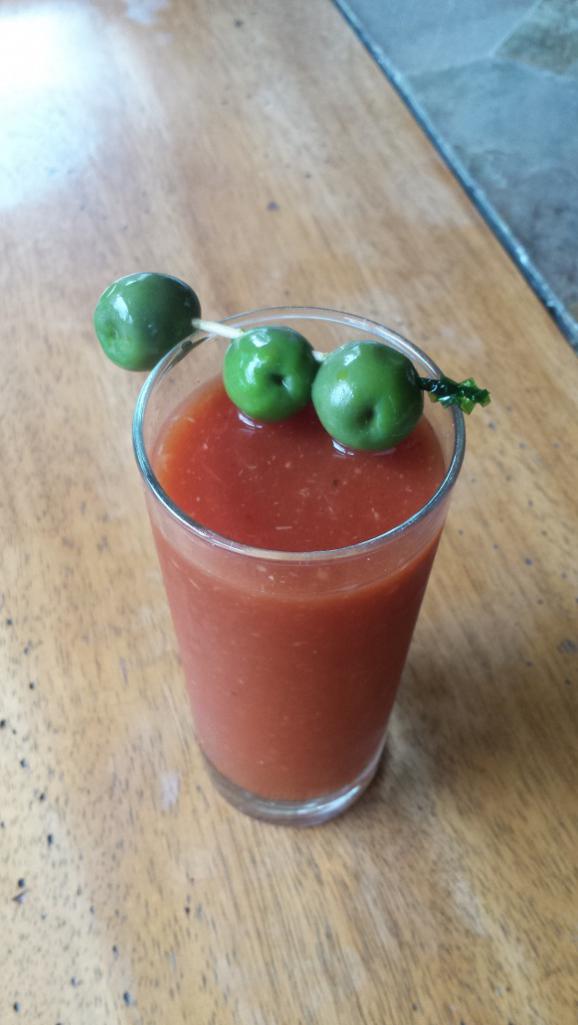 |
|
|
|
| JoeDees |
Oct 3 2015, 07:57 PM
Post
#19
|
|
Senior Member Group: Members Posts: 515 Joined: 10-November 14 From: Northern Kentucky Member No.: 18,106 Region Association: None |
So far in my rustoration I'm not finding a need to cut out the fender. Some stuff may require contortionism, but it seems possible.
|
|
|
|
| mbseto |
Oct 3 2015, 08:09 PM
Post
#20
|
|
Senior Member Group: Members Posts: 1,257 Joined: 6-August 14 From: Cincy Member No.: 17,743 Region Association: North East States |
I'm going to try to weld everything from the inside. I'll go as long as I can without cutting the fender. If I get to a point where I have to, I'll take the whole quarter panel off intact.
|
|
|
|
|
30 User(s) are reading this topic (30 Guests and 0 Anonymous Users)
0 Members:

|
Lo-Fi Version | Time is now: 23rd June 2026 - 01:24 PM |
Invision Power Board
v9.1.4 © 2026 IPS, Inc.