|
|

|
Porsche, and the Porsche crest are registered trademarks of Dr. Ing. h.c. F. Porsche AG.
This site is not affiliated with Porsche in any way. Its only purpose is to provide an online forum for car enthusiasts. All other trademarks are property of their respective owners. |
|
|
  |
| 930cabman |
 Jan 11 2021, 10:24 AM Jan 11 2021, 10:24 AM
Post
#161
|
|
Advanced Member     Group: Members Posts: 4,384 Joined: 12-November 20 From: Buffalo Member No.: 24,877 Region Association: North East States 
|
I've been wracking my brain over this much of the weekend and can only agree with what has already been said. Considering the careful and skillful quality of your work, I would be slow to second guess yourself and start moving mounts until you are absolutely sure you have figured out where the sag is coming from first. As has been said, you can easily take that much sag out of a door simply by banging out bulge/stretch at the top hinge by banging the hinge landing on the post back in place. Unfortunately, it looks like the front gaps of your door is good so would question if that is the problem. Another thing to think about that the windshield frame is easily bent so maybe some careful checking there to make sure you can trust the measurement across the top. It looks like you have to remove your door brace to install the door. It might be worth rigging an adjustable brace you can use with the door on. I found it really helpful to be able to adjust the brace to understand how the chassis reacts as a whole as measurements change. If it were me, I'd be thinking hard about the inner long alignment as you already are. It's just too hard to say much more from pics. Hopefully some of the guys with Cellete experience can weigh in as they may have insight us garage cobblers don't. +1 Garage or maybe garbage cobblers could be appropriate |
| mbseto |
 Jan 12 2021, 03:52 PM Jan 12 2021, 03:52 PM
Post
#162
|
|
Senior Member    Group: Members Posts: 1,257 Joined: 6-August 14 From: Cincy Member No.: 17,743 Region Association: North East States |
First, guys, thanks for the responses, I appreciate the advice and encouragement.
@tygaboy What about the other side? Does it measure out correctly and do you have good door gaps there? If so, at least you have some points of reference. I checked back when I wrapped up that side, but that's been a while. I think I am going to put the door on over there, too. If it's in a similar state, I'd like to take care of it all at once. And have you fit the roof? That may help confirm where the rear of the car is. The roof has been in place from the start, I never take it off. My thought was that it would act as an additional brace. I hope that was the right decision. @930cabman Were the doors ever properly fitting since you owned the car? Yes, they fit well, but due to the rusted longs, the gaps closed up when jacking the car. I would be careful moving engine mounts, .... They were completely removed to replaced the longs. They were repositioned using the dolly as a jig - the mounts sit on plates in the corners of the dolly and those plates were drilled to match when I first mounted the car. I think I may need to un-tack it, let the long down a little bit, then re-tack it. Generally the front section is rigid to itself and the rear section rigid to itself, connecting the dots is our work. I suspect the adjustable door braces put a little twist in the rear section. Do you have 25 1/8" from the windscreen frame to the targa bar? I'll check that... @bbrock I've been wracking my brain over this much of the weekend ... You and me both!! :-) Another thing to think about that the windshield frame is easily bent so maybe some careful checking there to make sure you can trust the measurement across the top. The little triangular part of the door window is laying perfectly in its seal. It might be worth rigging an adjustable brace you can use with the door on. This is wise advice, I am wishing I had started out that way. |
| Superhawk996 |
 Jan 12 2021, 04:23 PM Jan 12 2021, 04:23 PM
Post
#163
|
|
914 Guru      Group: Members Posts: 7,595 Joined: 25-August 18 From: Woods of N. Idaho Member No.: 22,428 Region Association: Galt's Gulch 
|
And have you fit the roof? That may help confirm where the rear of the car is. The roof has been in place from the start, I never take it off. My thought was that it would act as an additional brace. I hope that was the right decision. Sorry to see this latest development. (IMG:style_emoticons/default/sad.gif) As other have said don't panic. Dont do anyting rash in a hurry. I think the main point you missed from Chris was to use the roof to gauge whether the rear has twisted. The roof should have approximately the same length of overhang on each side of the sail panel. The roof provides no real bracing. The attachments are simply to weak to do anything meaningful. It is useful as a gauge though. If it is twisted, you should have quite a bit of asymetry in the targa overhand to the sail and/or differnt for/aft fit along the width of the targa. You can have quite a bit of twist and it wouldn't affect the 25 1/8" dimension from targa bar to windshield frame. I'd second the approach of creating door braces that can be used with the doors installed. That is what I've done and haven't regretted the time spent to fabricate them for a moment. As Brent said, you'd be surprised how little adjustment on the braces is needed to affect gaps in a big way. For what it's worth, I've found the transition from the horizontal long to the angled engine compartment area to be very sensitive. My chassis was completly fine until I decided to weld in a joint doubler. After that my outer suspension console moved in Z-height by 4-6mm. Nothing else moved in X or Y dimension. I still have not resolved this on my car since I can offset it with trailing arm shims. But I'll tell you it bothers me and I may still fix it but will only do so once the inner suspension console and the engine mount are installed. If you think about that transition, being sort of a hockey stick shape, a little twist in the long and/or that transition area will affect the things aft of it. You might want to take a close look at whether your welds in that transition area have twisted the rear. I'm pretty sure if you can hone in on where the twist originated, you can cut some welds and resolve it without resorting to using the engine mount to pull it. You know this from metal shaping - especially shrinking. You can chase things with the part deforming in ways you don't want. Then you find just the right spot to shrink and BOOM it all pops into place, is what you wanted from the get-go and is dimensionally stable after that. |
| 930cabman |
 Jan 12 2021, 05:28 PM Jan 12 2021, 05:28 PM
Post
#164
|
|
Advanced Member     Group: Members Posts: 4,384 Joined: 12-November 20 From: Buffalo Member No.: 24,877 Region Association: North East States 
|
And have you fit the roof? That may help confirm where the rear of the car is. The roof has been in place from the start, I never take it off. My thought was that it would act as an additional brace. I hope that was the right decision. Sorry to see this latest development. (IMG:style_emoticons/default/sad.gif) As other have said don't panic. Dont do anyting rash in a hurry. I think the main point you missed from Chris was to use the roof to gauge whether the rear has twisted. The roof should have approximately the same length of overhang on each side of the sail panel. The roof provides no real bracing. The attachments are simply to weak to do anything meaningful. It is useful as a gauge though. If it is twisted, you should have quite a bit of asymetry in the targa overhand to the sail and/or differnt for/aft fit along the width of the targa. You can have quite a bit of twist and it wouldn't affect the 25 1/8" dimension from targa bar to windshield frame. THINK PARALLELOGRAM , FITTING THE ROOF PANEL SHOULD PROVE/DISPROVE THIS I'd second the approach of creating door braces that can be used with the doors installed. That is what I've done and haven't regretted the time spent to fabricate them for a moment. As Brent said, you'd be surprised how little adjustment on the braces is needed to affect gaps in a big way. YES AGREED For what it's worth, I've found the transition from the horizontal long to the angled engine compartment area to be very sensitive. My chassis was completly fine until I decided to weld in a joint doubler. After that my outer suspension console moved in Z-height by 4-6mm. Nothing else moved in X or Y dimension. I still have not resolved this on my car since I can offset it with trailing arm shims. But I'll tell you it bothers me and I may still fix it but will only do so once the inner suspension console and the engine mount are installed. INTRODUCING EXTREME HEAT (WELDING) DOES WEIRD THINGS TO EVEN HEAVY GAUGE METAL, MORE SO ON THIN GAUGE If you think about that transition, being sort of a hockey stick shape, a little twist in the long and/or that transition area will affect the things aft of it. You might want to take a close look at whether your welds in that transition area have twisted the rear. I'm pretty sure if you can hone in on where the twist originated, you can cut some welds and resolve it without resorting to using the engine mount to pull it. You know this from metal shaping - especially shrinking. You can chase things with the part deforming in ways you don't want. Then you find just the right spot to shrink and BOOM it all pops into place, is what you wanted from the get-go and is dimensionally stable after that. BEST OF LUCK, THINK IT THROUGH BEFORE TAKING ACTION |
| mbseto |
 Jan 16 2021, 03:25 PM Jan 16 2021, 03:25 PM
Post
#165
|
|
Senior Member    Group: Members Posts: 1,257 Joined: 6-August 14 From: Cincy Member No.: 17,743 Region Association: North East States |
Since the last set of posts, I put the passenger side door back on, just to make sure that side still looks OK. Thankfully, it does. Also per the suggestions you guys had, I inspected the roof overhang and measured to window-frame-to-targa-bar. The roof overhang was even across the back. I took the targa off and the frame to bar was dead on 25-1/8" on the passenger side, but about 25-1/2" on the driver's side. Which of course matches the twisted door gaps on that side.
I checked the cockpit for square by running strings diagonally across. The string just touch in the center, so wherever this problem starts, it is behind the firewall. 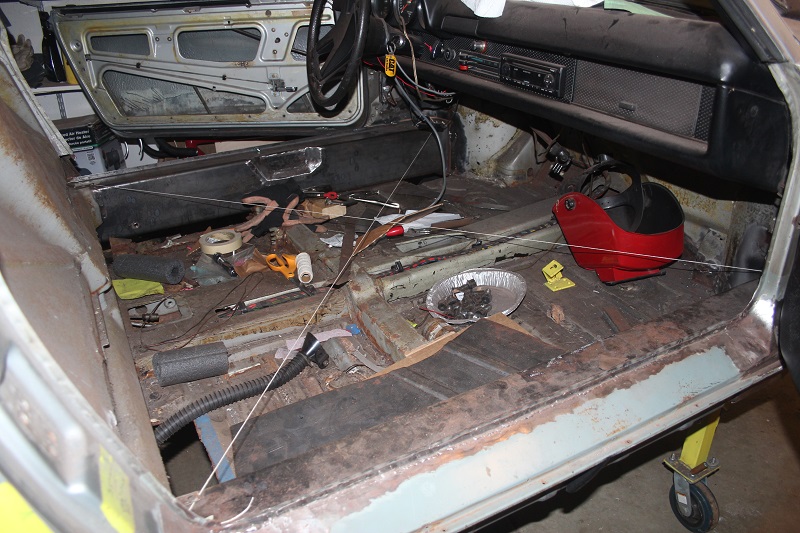 So I spent a couple sessions just sitting on the couch with a glass of bourbon and pondering the overall structure. I think the problem starts with the joint I made between the horizontal section of the long and the angled section. Right where the arrow is below, you can see a strip of metal about an inch wide that joins the two. And here is what killed me... My dolly is on the short side - it goes from the front axle to the engine mounts. So the whole back section is cantilevered. I was counting on the door braces to hold everything in place, but they acted like the wishbones on a double wishbone suspension. Like the parallelogram that @Superhawk996 mentioned, all the linear measurements are held, but the angles can change. So when I measured the door opening at the bottom, it was correct, but it was no longer dead horizontal. 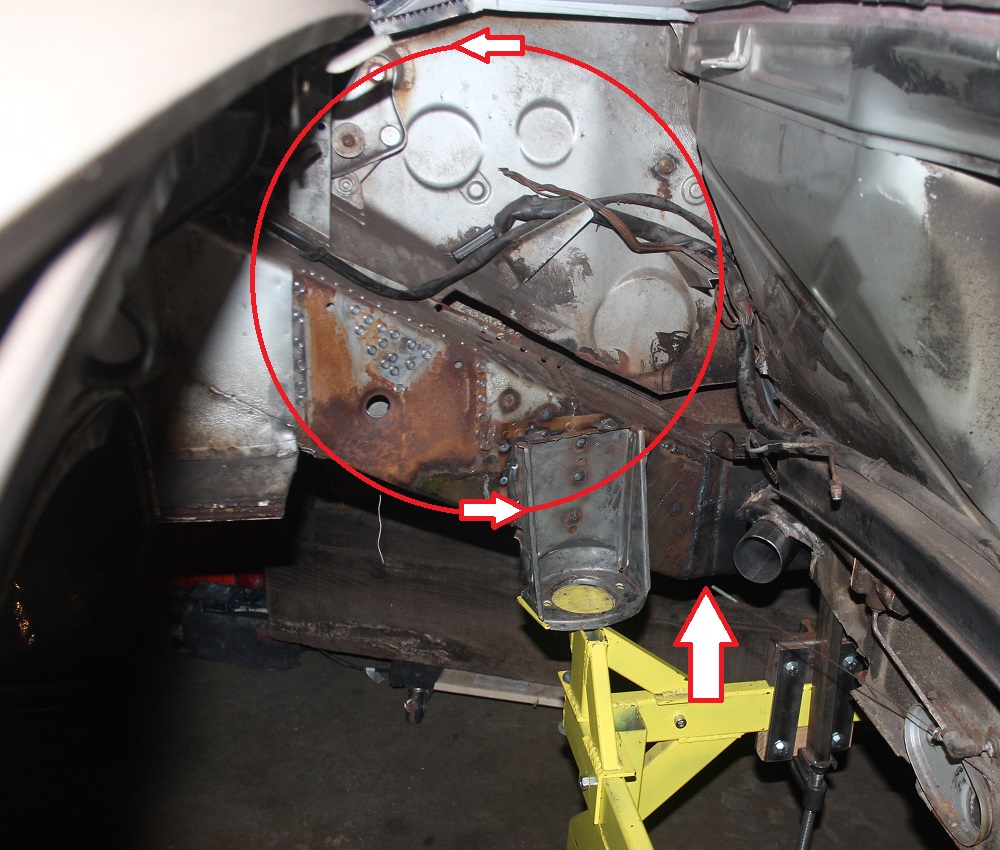 So I put that circle right about where I think the whole thing rotated. To fix this, I need to cut the long at the arrow and open that gap up about a centimeter. I'll need the brace to pull back at the shoulder belt point to straighten it all up, then re-weld. As suggested, I'll whip up a brace that can go on with the door in place. The engine mount will have to come off... I won't use it to try to pull anything into place, but it will have to be repositioned because the whole rear is going to move and it needs to stay where it is relative to the rest of the car. Right now the only thing that bothers me about fixing this is the inner layer. Here's the reverse angle below. That sleeve was made so that no welds on the outer would coincide with welds on the inner. They aren't even in the same direction, all the outer welds are vertical and all the inner welds are horizontal. It's going to be tough to cut through the long and then put it back together without the outer and inner both having a weld in the same place, right on top of each other. That inner layer is rosette welded solid in there. It's going to be tough to remove any part of it to get the welds where I want them... 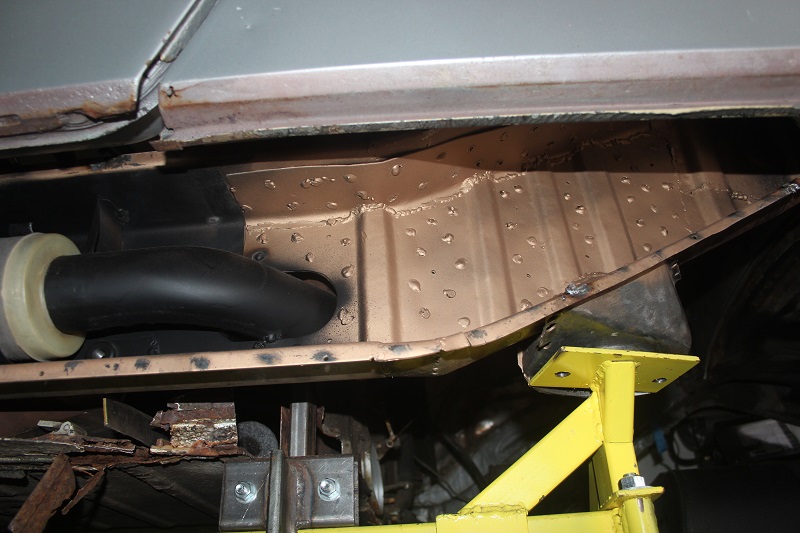 |
| Superhawk996 |
 Jan 16 2021, 03:41 PM Jan 16 2021, 03:41 PM
Post
#166
|
|
914 Guru      Group: Members Posts: 7,595 Joined: 25-August 18 From: Woods of N. Idaho Member No.: 22,428 Region Association: Galt's Gulch 
|
Nice work tracking it down. (IMG:style_emoticons/default/smilie_pokal.gif) Sounds like you're developing a plausible plan.
This is where copying Jeff Hail's cart may have saved me and made my life easier. My chassis is held at the rear trans mounts and the front axle. Prevents that type of cantilever and tendency for things to sag at the rear when welding. It's not like I thought that through in advance but now that you mention your issue, I think I got lucky just copying Jeff's cart! Sometimes I'd rather be lucky than good! That place where your single red arrow is . . . it's exactly the same spot where I welded my doubler that caused by outer suspension console to lift in Z. Sensitive area. Take your time, go slow, and keep it cool when you weld it back up. |
| 930cabman |
 Jan 16 2021, 04:22 PM Jan 16 2021, 04:22 PM
Post
#167
|
|
Advanced Member     Group: Members Posts: 4,384 Joined: 12-November 20 From: Buffalo Member No.: 24,877 Region Association: North East States 
|
Introducing heat to our thin gauge frames can (and often does) wreak havoc. I am a carpenter by trade but have done quite a bit of steel fabrication along the way. I can recall a project many years ago with 4" schedule 40 pipe. I chased the bending for quite some time, but finally got it right. I have had some challenges with our 914, hopefully on the right road. I have had to cut some work apart, reposition the pieces and reweld.
A double/triple check would be to place a spirit level on the front strut mountings and compare it with placing the level on the rear strut mountings Think it out thoroughly before you cut. Best of luck |
| mbseto |
 Feb 6 2021, 10:01 PM Feb 6 2021, 10:01 PM
Post
#168
|
|
Senior Member    Group: Members Posts: 1,257 Joined: 6-August 14 From: Cincy Member No.: 17,743 Region Association: North East States |
So there's been a lot of thinking going on, and a lot of poking and prodding to try to figure out how this thing move when I put pressure in different places. Went ahead and made a brace that she could wear with the door installed, that part was a no-brainer. I've seen some other guys make these, but didn't really have the search terms to find the parts I need. Looked familiar, just didn't know what it is called. Spent a Sunday out at my buddies farm to help with some chainsaw work in exchange for some firewood, and as we were hitching up the trailer, I realized where I've seen this part a thousand times. "What's that?" I asked my buddy, pointing to the part as we are dropping the bush hog to hitch up the trailer. "That? That's the top link." Off to Tractor Supply to buy a top link and cut it up.
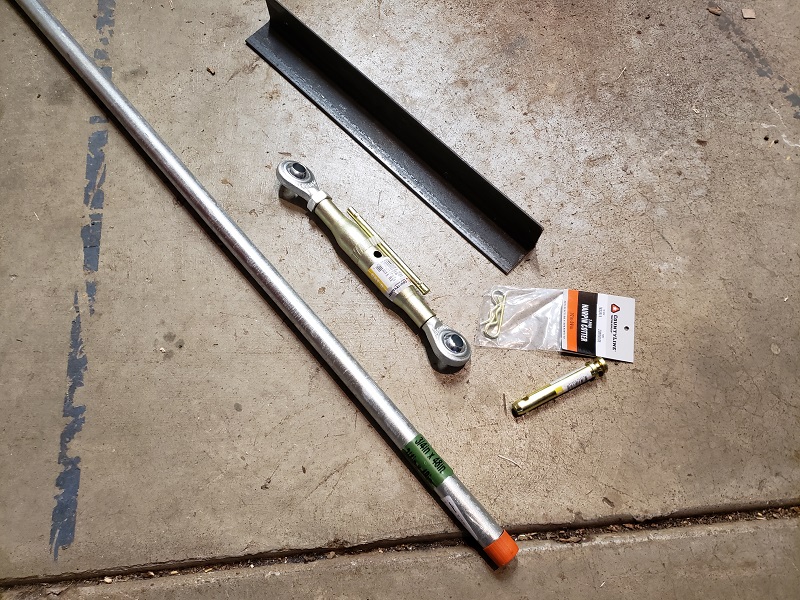 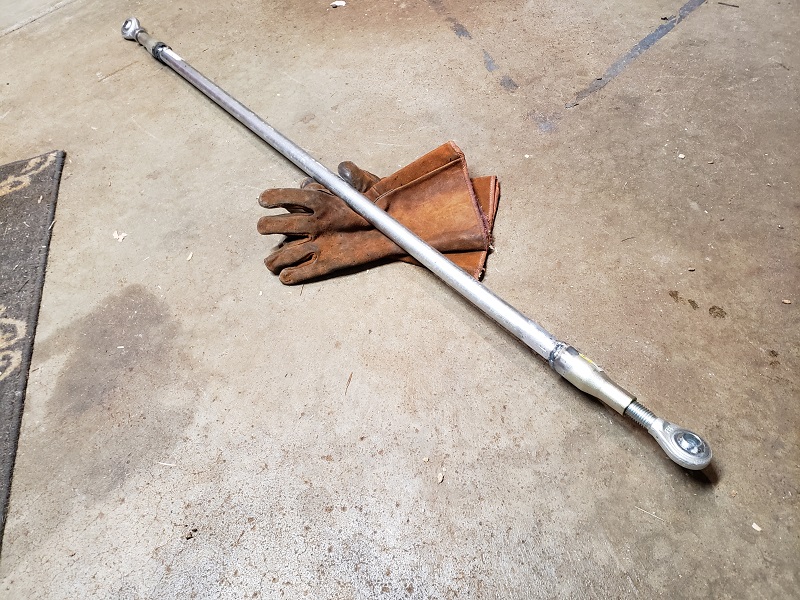 The top link was about $27 as I remember and with the other bits it was probably under forty-five total. I was trying to control costs pretty strictly with the first set of braces, but after playing with this one a little bit and the ease with which I can adjust it, I think this is the way to go. Just a twist, and the frame moves: 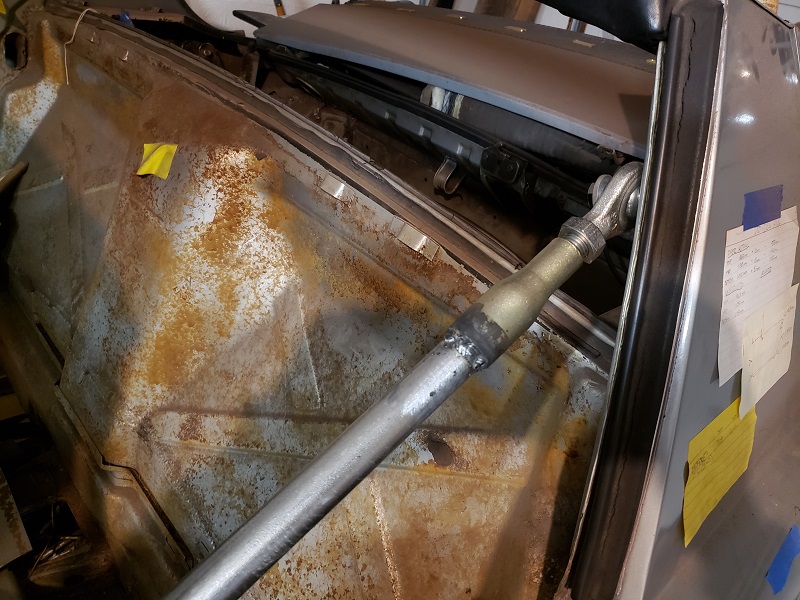 So here's the before pic of the gaps. It looks worse in real life, the pic actually does not show how bad it is. 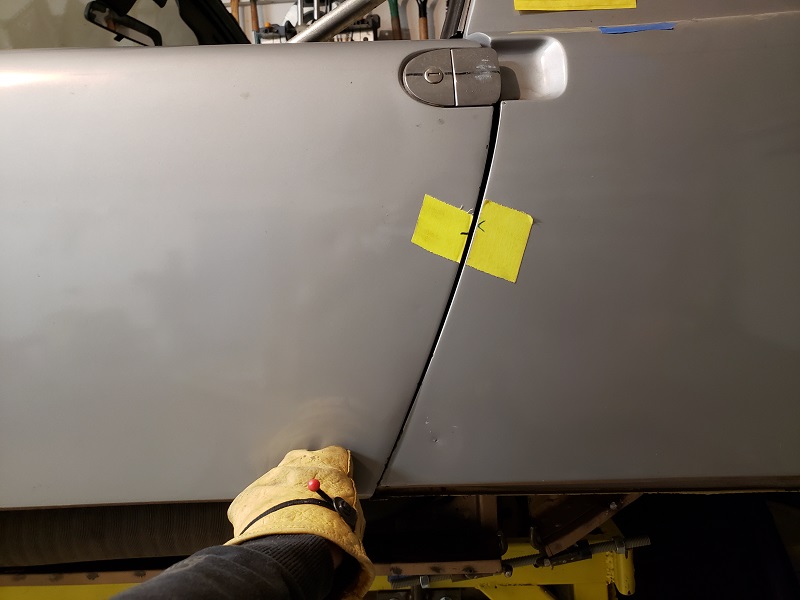 Here's an actual measurement at the top. 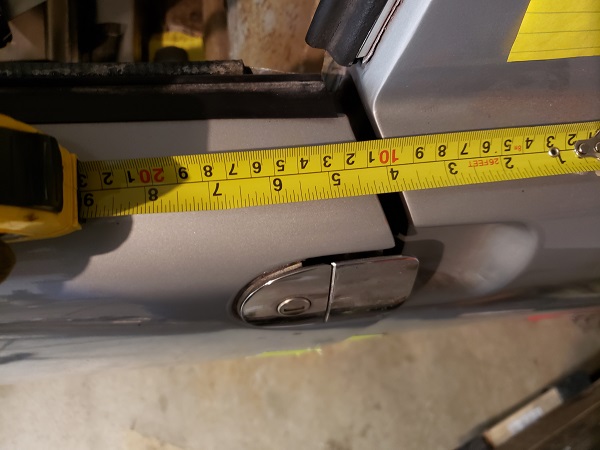 |
| mbseto |
 Feb 6 2021, 10:17 PM Feb 6 2021, 10:17 PM
Post
#169
|
|
Senior Member    Group: Members Posts: 1,257 Joined: 6-August 14 From: Cincy Member No.: 17,743 Region Association: North East States |
So I installed the new brace, cut through the long just aft of the horizontal section, and also removed the engine mount. Now I'm trying to figure out what needs to happen to line everything up again. If I tighten that brace, the whole quarter moves forward and back. So the gap at the top closes to the right size, but the gap at the bottom, which is already completely closed, closes even more. I was
Another thing I tried was throwing my stump under the rear of the car and putting a scissor jack on it, and gently lifting it at the trans mount. With the whole rear cantilevered off the engine mounts, I figured letting that weight off might let the whole rear quarter rotate, closing the top gap and opening the bottom. Nope, it just lifted the whole car up. Even with the long and firewall severed, the frame is surprisingly rigid. Seemed like I needed to push the long apart where I had made the cut, but I have no sort of tool to do that. So I made this little pushme-pullya: 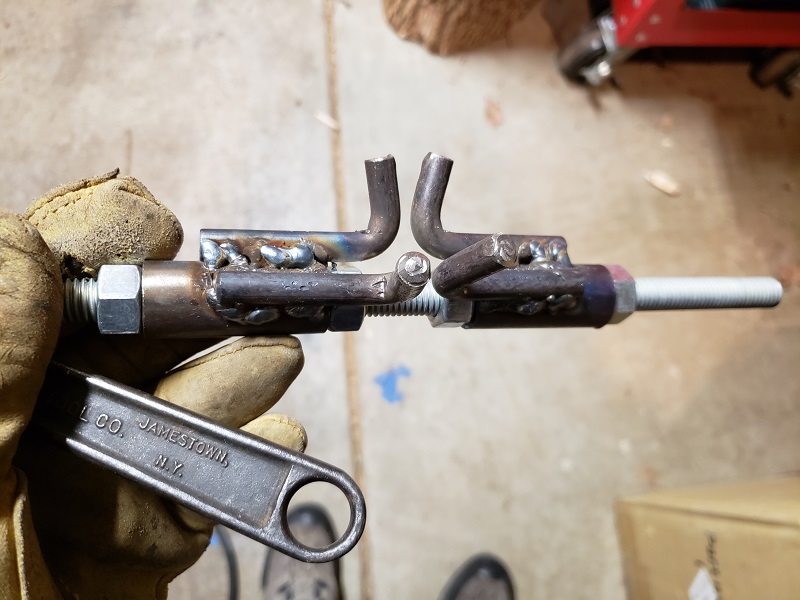 Stuck him in the gap and started twisting. That started to open up that lower gap. Now we're getting somewhere... Something to note in this photo - my dolly is designed to hold the frame by the engine mount. With the mount removed, I need something in that corner to support the frame. The solution is that thing you see clamped to the dolly rail. It is a repurposed C-clamp that supported a strut that slides up between the two walls of the firewall. I can adjust it up and down to get everything level before reattaching the engine mount. 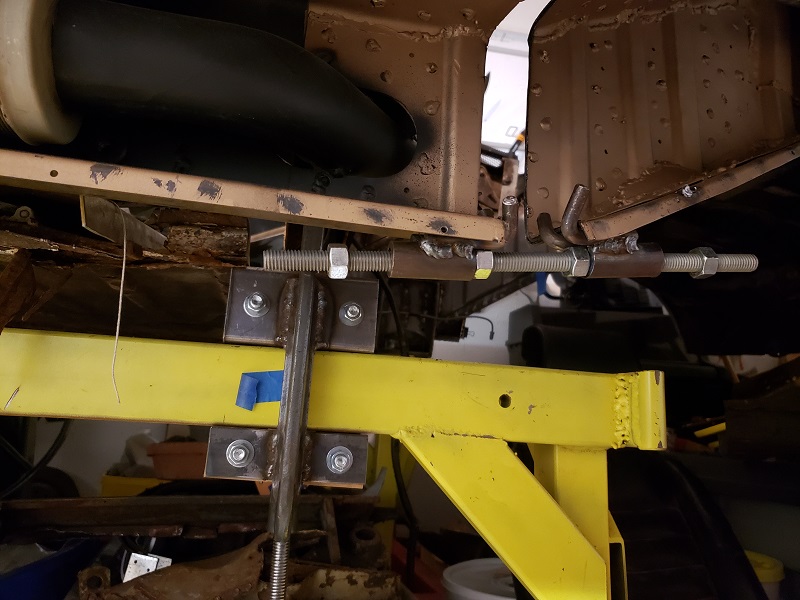 |
| mbseto |
 Feb 6 2021, 10:46 PM Feb 6 2021, 10:46 PM
Post
#170
|
|
Senior Member    Group: Members Posts: 1,257 Joined: 6-August 14 From: Cincy Member No.: 17,743 Region Association: North East States |
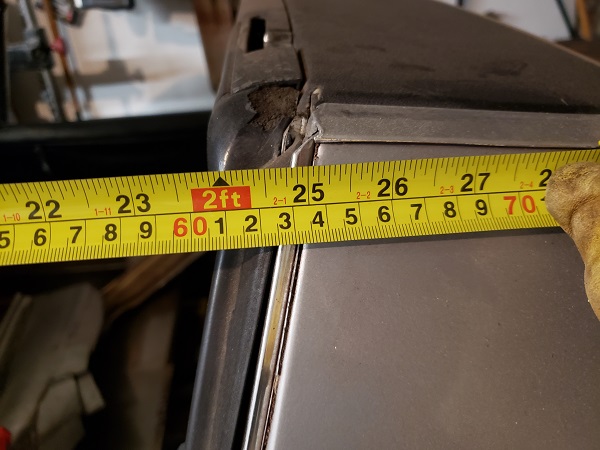
With this additional adjustment that I can make, I started with the door brace and tightened it until I had a window-frame-to-targa-bar measurement of 25-1/8". The door gap at the top looked about right too.
 Next, I cranked on the pushme-pullya and it slowly opened up the lower gap until it also looked much better. I was able to improve the horizontal alignment by clamping the long to the flange on the firewall (where it will eventually be welded). I feel like it is about 95% better: 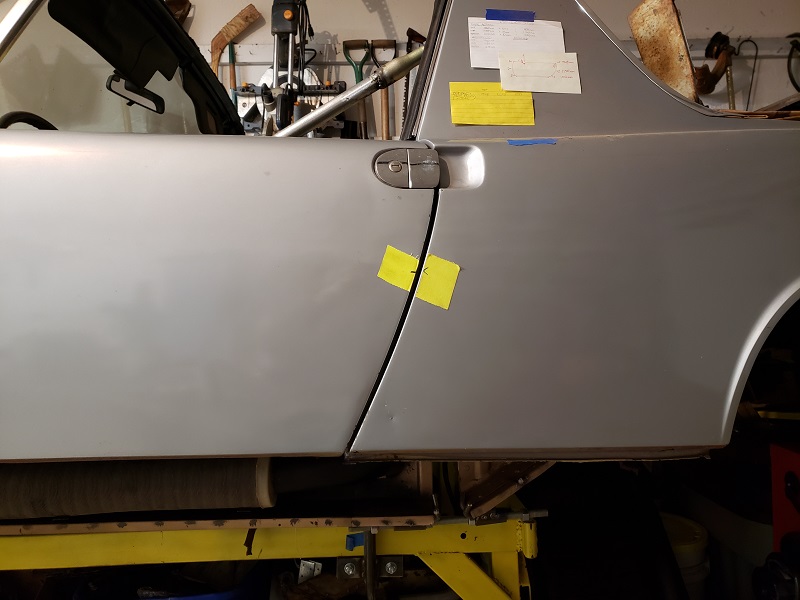 So I feel like there is a way out of the woods now. Once again, thanks guys for the advice and encouragement. I surely welcome any comments on what you see above. I'm anxious to get some tacks in place and see this straightened out for good. |
| Cairo94507 |
 Feb 7 2021, 08:56 AM Feb 7 2021, 08:56 AM
Post
#171
|
|
Michael           Group: Members Posts: 10,531 Joined: 1-November 08 From: Auburn, CA Member No.: 9,712 Region Association: Northern California 
|
That is way, way better than what it was. Nice job identifying the issue so you can remedy it for a very nice fit. (IMG:style_emoticons/default/beerchug.gif)
|
| tygaboy |
 Feb 7 2021, 09:35 AM Feb 7 2021, 09:35 AM
Post
#172
|
|
914 Guru      Group: Members Posts: 5,730 Joined: 6-October 15 From: Petaluma, CA Member No.: 19,241 Region Association: Northern California 
|
You just earned the "Perseverance Award" in my book. Staring down that sort of do-over would likely have done me in. BIG kudos to you! (IMG:style_emoticons/default/pray.gif) (IMG:style_emoticons/default/aktion035.gif)
And great job engineering those correction tools. Really impressive. The only thing I'd add at this point it is that when I did my chassis work, I'd do as little welding as was needed to hold things in place, then I'd back off all the support rods, bracing, pushme-pullya stuff and see if things still measured out. I found that it worked best for me to "over set" that 25 1/8" measurement to a bit wider during welding since I assumed shrinkage would pull things at least some. YMMV, but given what we're seeing, I'd say "You got this!" Thanks for sharing this. It's going to help others. Again, really, really great recovery. |
| Amenson |
 Feb 7 2021, 03:15 PM Feb 7 2021, 03:15 PM
Post
#173
|
|
That's opposite lock!!    Group: Members Posts: 645 Joined: 27-May 05 From: Dublin, OH Member No.: 4,154 Region Association: None 
|
It was clear from your earlier posts that you were adventurous and had the skills to pull it off. This is downright fearless.
Keep it up, this is awesome. |
| 930cabman |
 Feb 7 2021, 03:57 PM Feb 7 2021, 03:57 PM
Post
#174
|
|
Advanced Member     Group: Members Posts: 4,384 Joined: 12-November 20 From: Buffalo Member No.: 24,877 Region Association: North East States 
|
It was clear from your earlier posts that you were adventurous and had the skills to pull it off. This is downright fearless. Keep it up, this is awesome. Perseverance is almost always a good thing. I am sure a glass or two of bourbon helped the process along. First fix the issue in your brain, then carry it out in practice. "Sir Issac Newton" basic philosophy when asked how he came upon gravity, calculus, ... Glad to see you have made progress after a small setback |
| bkrantz |
 Feb 7 2021, 08:24 PM Feb 7 2021, 08:24 PM
Post
#175
|
|
914 Guru      Group: Members Posts: 8,558 Joined: 3-August 19 From: SW Colorado Member No.: 23,343 Region Association: Rocky Mountains 
|
Outstanding work! You deserve an award for staying optimistic and clever in the face of severe adversity. Lesser people would have "fixed" that mis-alignment with a big hammer and some bondo (lots and lots of bondo).
|
| timothy_nd28 |
 Feb 7 2021, 11:11 PM Feb 7 2021, 11:11 PM
Post
#176
|
|
Advanced Member     Group: Members Posts: 2,299 Joined: 25-September 07 From: IN Member No.: 8,154 Region Association: Upper MidWest 
|
Thanks for sharing and being very detailed with your repairs. I made a huge huge huge dumb mistake when working on my 914. I had my tub on a rotisserie, and the tub was upside down on this rotisserie. I didn't have the doors or anything braced when I welded in new floor panels. That gap on your driver door looks extremely similar to what I have. I will definitely be referring back to this thread when it comes time to make my repairs. Thank you and keep them pictures coming! (IMG:style_emoticons/default/beerchug.gif)
|
| mbseto |
 Mar 22 2021, 10:23 PM Mar 22 2021, 10:23 PM
Post
#177
|
|
Senior Member    Group: Members Posts: 1,257 Joined: 6-August 14 From: Cincy Member No.: 17,743 Region Association: North East States |
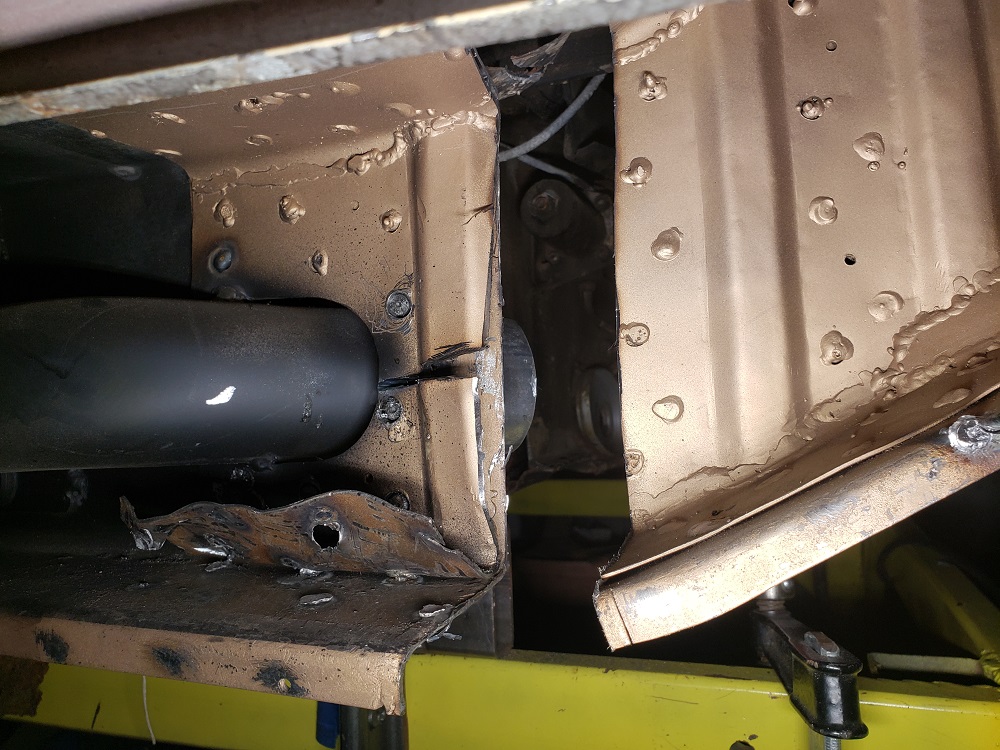
Nothing informs the quality of your welds quite like a hammer and cold chisel.
 |
| Arno914 |
 Mar 23 2021, 01:33 AM Mar 23 2021, 01:33 AM
Post
#178
|
|
Member   Group: Members Posts: 233 Joined: 13-May 20 From: near Frankfurt, Germany Member No.: 24,260 Region Association: Germany 
|
Before final assembly, is there any possibility of getting the car on a "Celette" to make sure? Maybe your door gaps are fine now, but what if the alignment is out of spec.? I think it would be a wise investment considered all the tremendous work you have done so far. The section behind the firewall is very sensitive for that matter.
|
  |
1 User(s) are reading this topic (1 Guests and 0 Anonymous Users)
0 Members:

|
Lo-Fi Version | Time is now: 23rd December 2025 - 01:35 PM |
Invision Power Board
v9.1.4 © 2025 IPS, Inc.


