|
|

|
Porsche, and the Porsche crest are registered trademarks of Dr. Ing. h.c. F. Porsche AG.
This site is not affiliated with Porsche in any way. Its only purpose is to provide an online forum for car enthusiasts. All other trademarks are property of their respective owners. |
|
|
  |
| mbseto |
 Mar 6 2016, 09:42 PM Mar 6 2016, 09:42 PM
Post
#41
|
|
Senior Member    Group: Members Posts: 1,257 Joined: 6-August 14 From: Cincy Member No.: 17,743 Region Association: North East States |
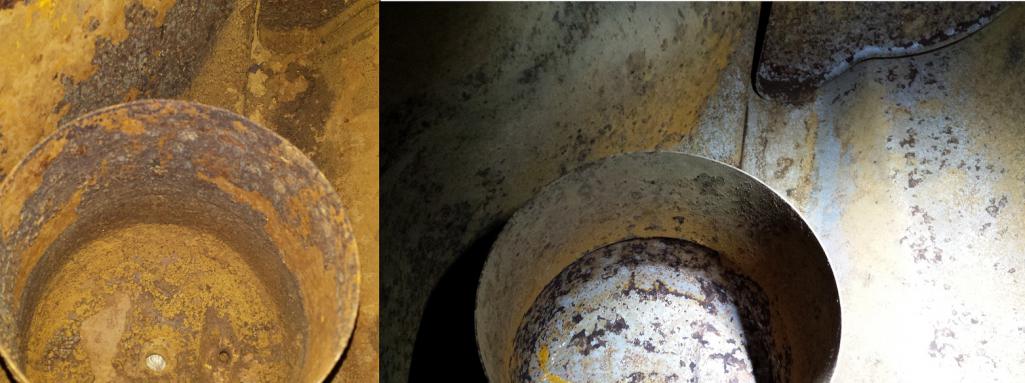
Results of electrolysis on the tank. I would turn on the battery charger and let it run overnight. The sacrificial electrode would get covered in rust and slowly the current would drop until it was too rusty to conduct. Each morning I shut it off and pulled the electrode out. After work, I would clean it up and stick it back in and do it all over again. This is the result after 4 or 5 sessions... before and after:
 On a side note, my HF grinder spindle lock got really loose a while back and has been having trouble holding the spindle while I change discs. Took a few minutes and took the head off. Thought I'd take a look, although even 30 minutes is too much to spend fixing a 14 dollar tool. Turns out the casting broke away where it supports that little lock pin. Going to put up with it for now, if I get bored at some point I make get mix some JBWeld and fix it. 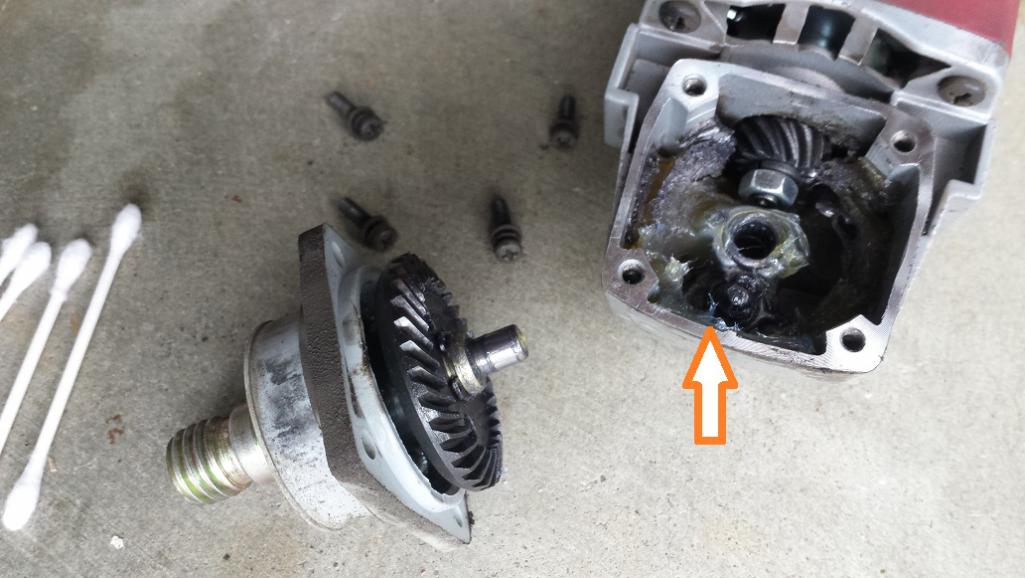 |
| mbseto |
 Jul 6 2016, 09:42 PM Jul 6 2016, 09:42 PM
Post
#42
|
|
Senior Member    Group: Members Posts: 1,257 Joined: 6-August 14 From: Cincy Member No.: 17,743 Region Association: North East States |
Front passenger corner is pretty much rebuilt and strong, ready to support the front end of a brand new long.
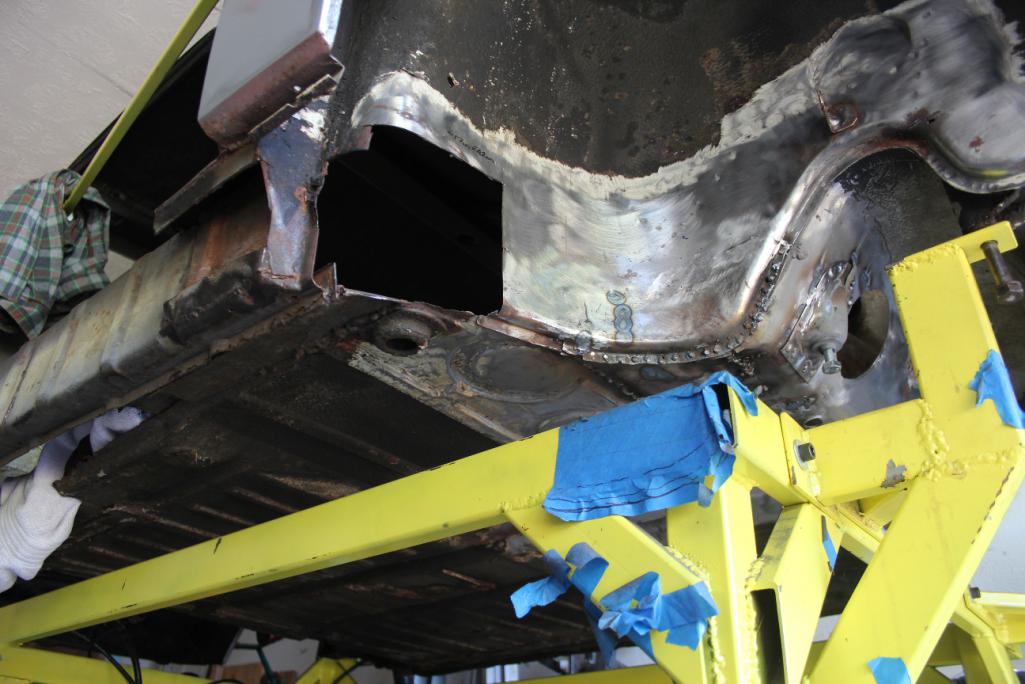 That gaping hole that's left needs to have a piece that wraps around the corner and then extends into the long. I.e., it will be sandwiched between the two halves of the long. Here's the piece with the two halves: 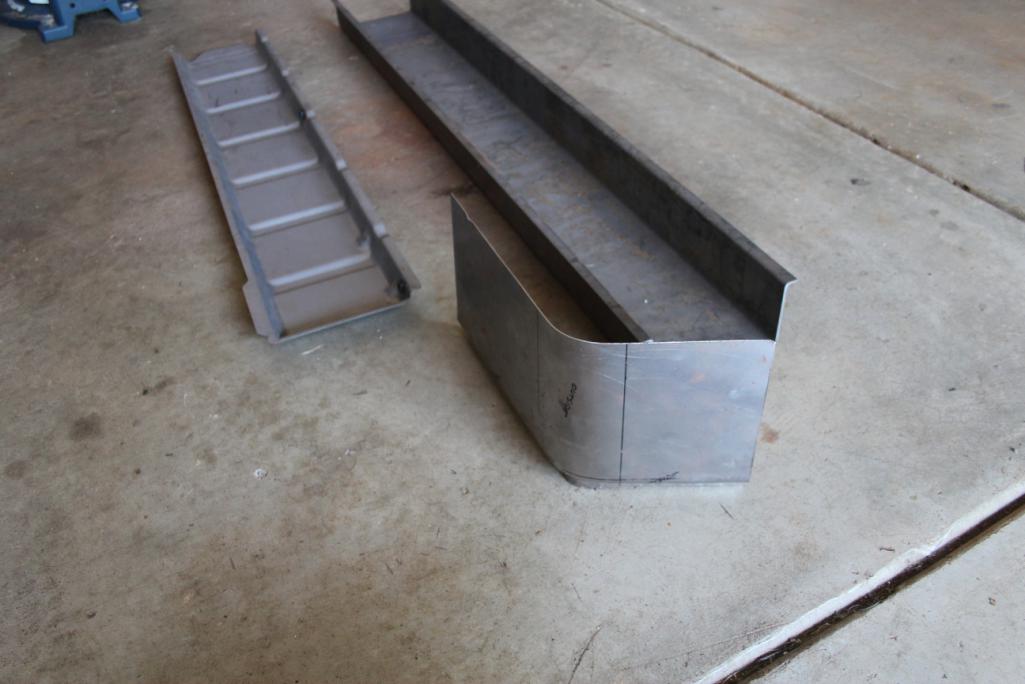 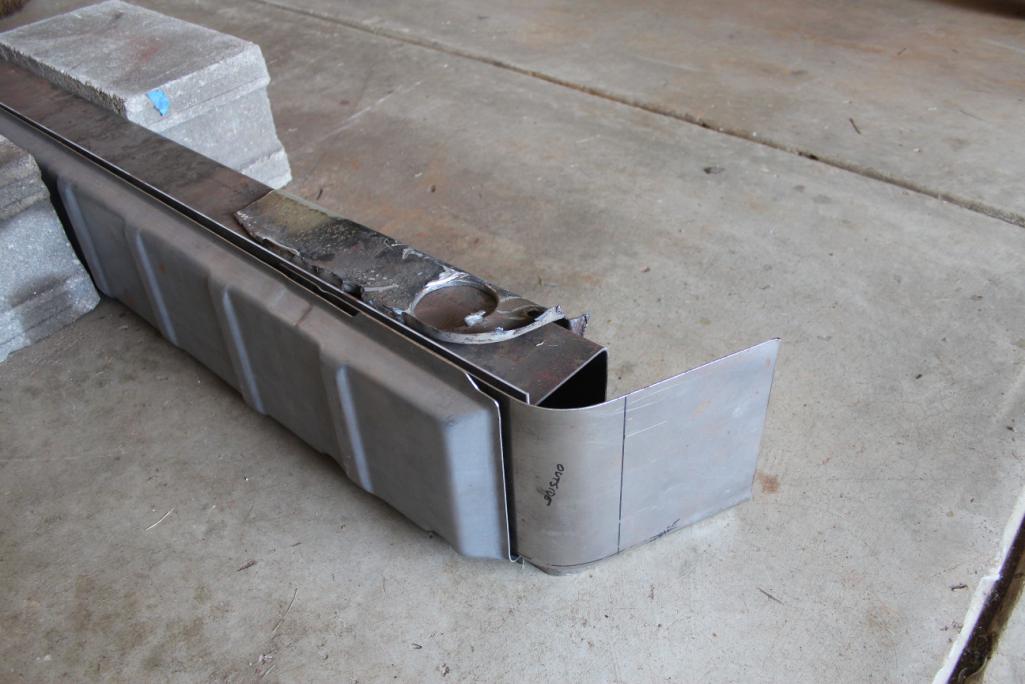 More on this later. The next step is to get the old long out of the way so this piece can be added in first. |
| mbseto |
 Jul 6 2016, 09:47 PM Jul 6 2016, 09:47 PM
Post
#43
|
|
Senior Member    Group: Members Posts: 1,257 Joined: 6-August 14 From: Cincy Member No.: 17,743 Region Association: North East States |
Now you see it, now you don't...
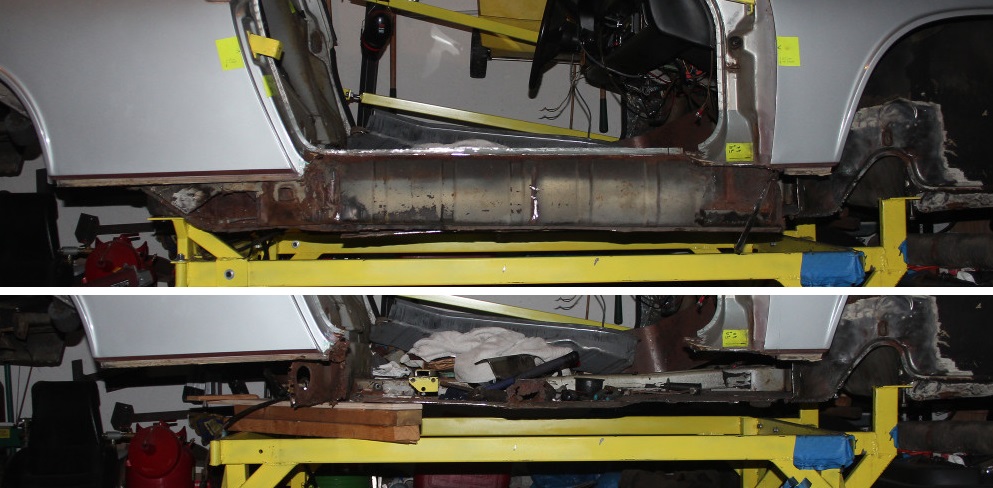 Final corner piece in, ready to fit the long: 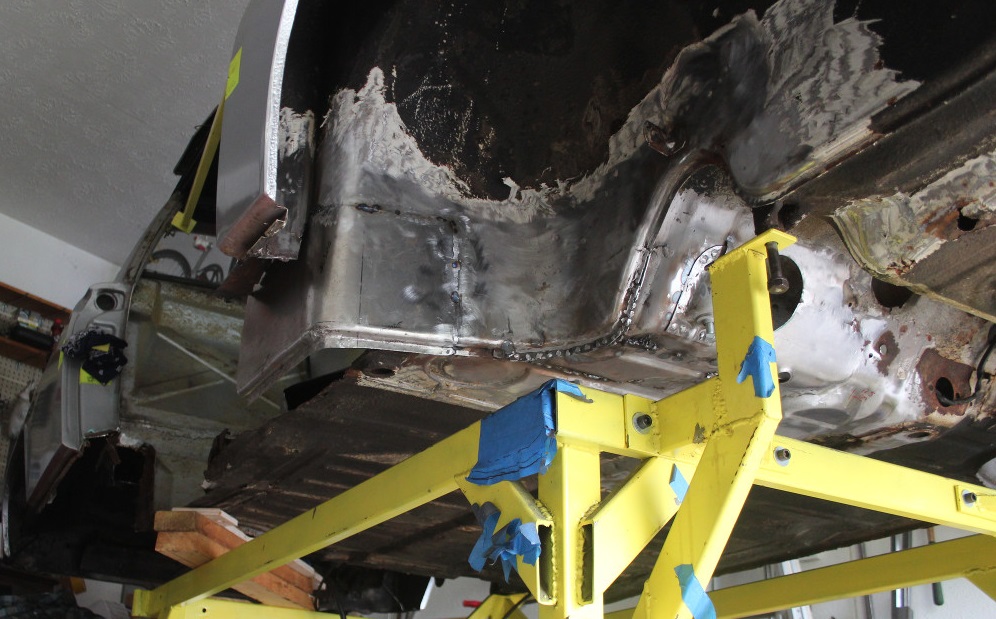 |
| mbseto |
 Jul 6 2016, 10:11 PM Jul 6 2016, 10:11 PM
Post
#44
|
|
Senior Member    Group: Members Posts: 1,257 Joined: 6-August 14 From: Cincy Member No.: 17,743 Region Association: North East States |
Here's the whole thing as it came out. You see a lot of it missing with straight edges as if it were cut away. In reality, this was mostly rusted away and the jagged rusty edges were just trimmed off. 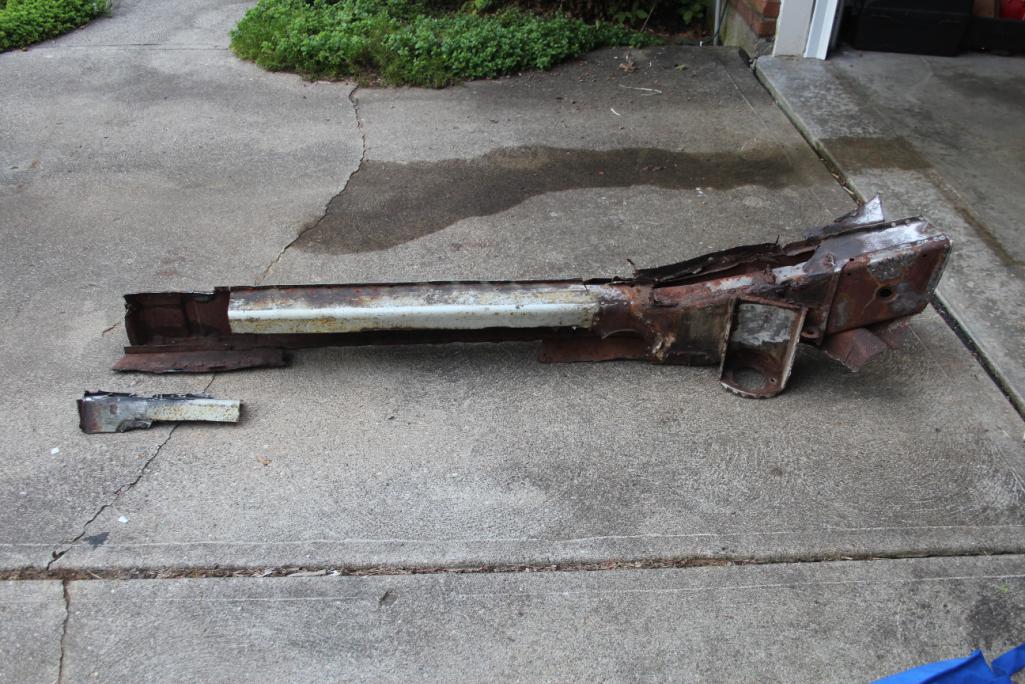 Condition of the motor mount. Going to remove this and clean it up, see if it can be saved. The hole on top was covered by a couple rectangular patches that looked like the were hammered in place and welded on- I think I posted pics earlier. Took them off when I cut out the engine shelf. 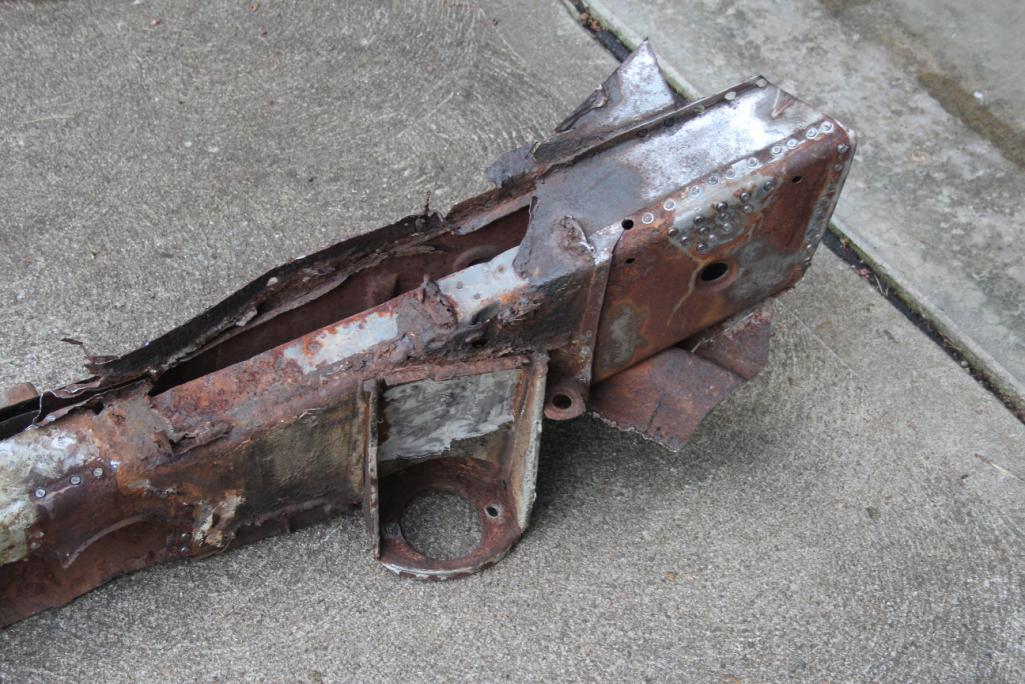 Condition of the pylon. Don't think this can be saved. There's a nest inside it, I'm afraid it is corroded from the inside beyond help. Have a little wager whether I'm going to find a little mouse skeleton inside. 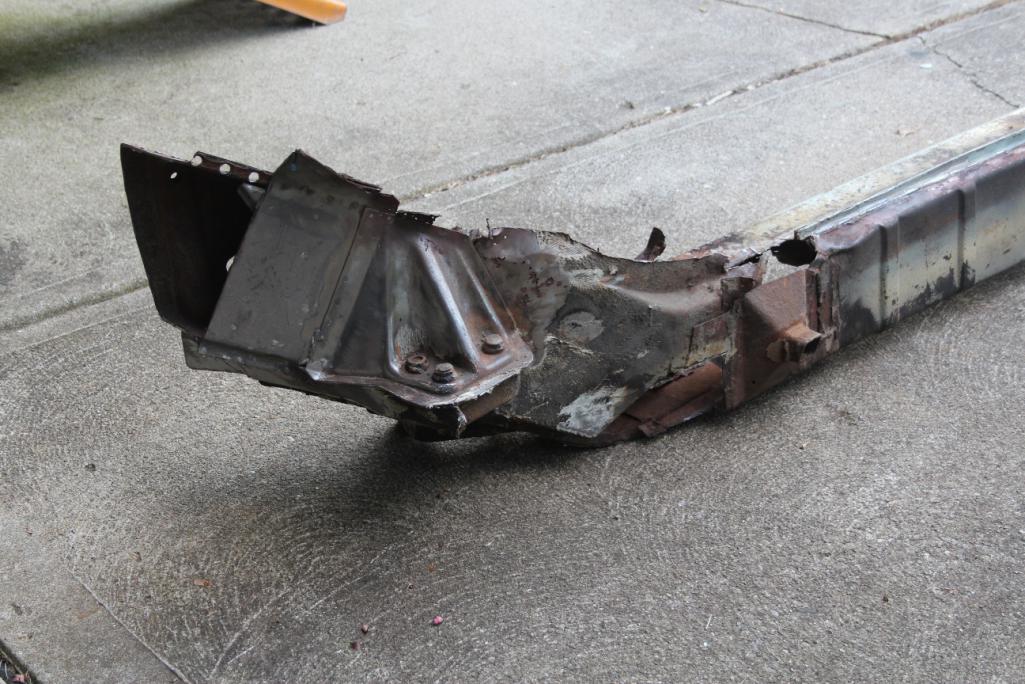 Patchwork around the jack point. I was more critical of the previous work on this until I start welding my own patches in. (IMG:style_emoticons/default/sad.gif) 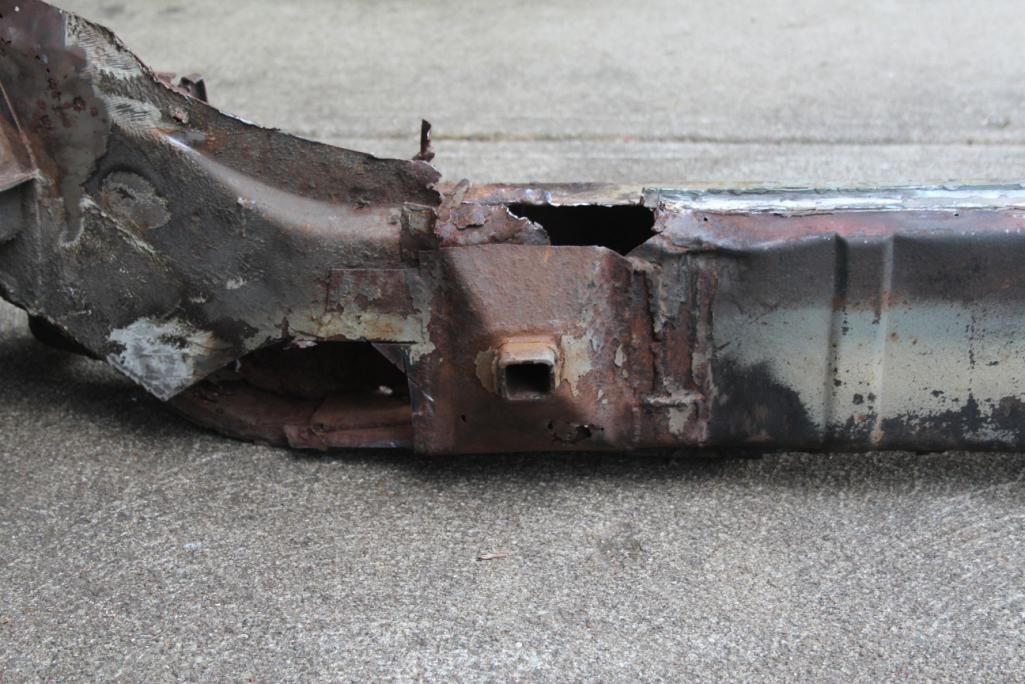 More patch work... 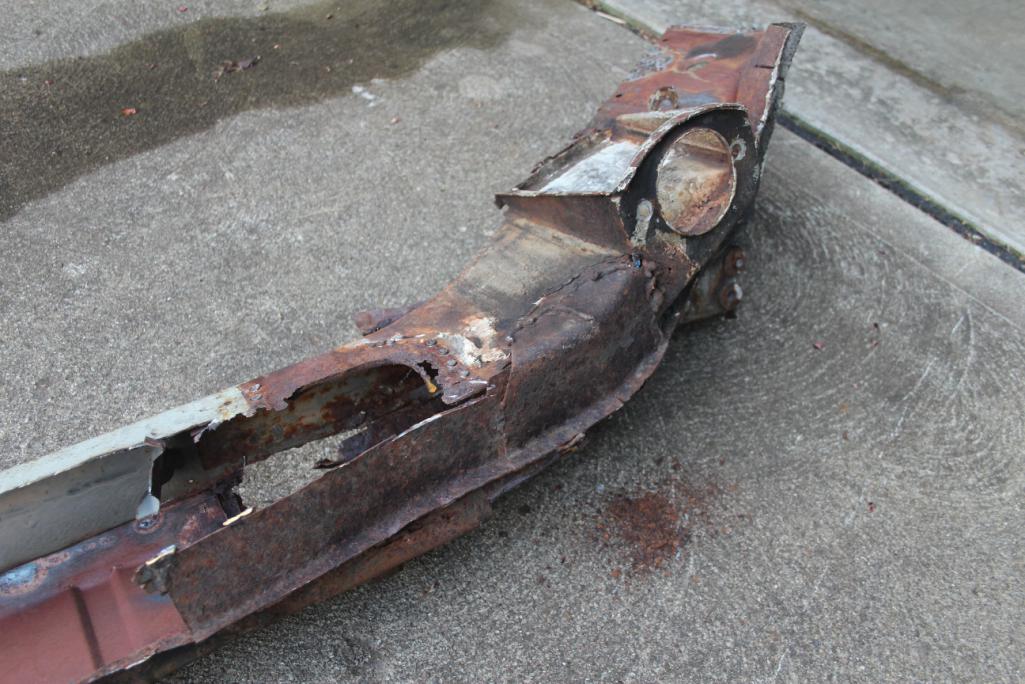 And the forward section... 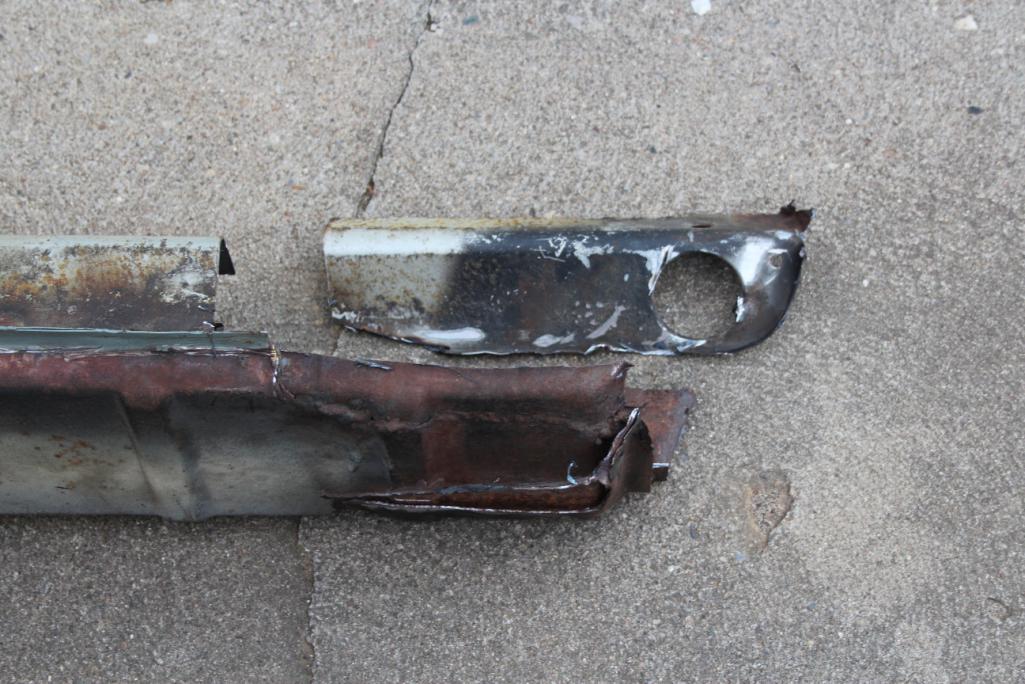 So in the end, hoped to have an educational experience in seeing how the frame is put together. I did learn a lot, but feel a little like a doctor that learned anatomy by dissecting a zombie. I hope I'm building a better Frankenstein. |
| 914forme |
 Jul 7 2016, 11:44 AM Jul 7 2016, 11:44 AM
Post
#45
|
|
Times a wastin', get wrenchin'!     Group: Members Posts: 3,896 Joined: 24-July 04 From: Dayton, Ohio Member No.: 2,388 Region Association: None 
|
Cool, I love dissections.
|
| mbseto |
 Jul 18 2016, 07:10 PM Jul 18 2016, 07:10 PM
Post
#46
|
|
Senior Member    Group: Members Posts: 1,257 Joined: 6-August 14 From: Cincy Member No.: 17,743 Region Association: North East States |
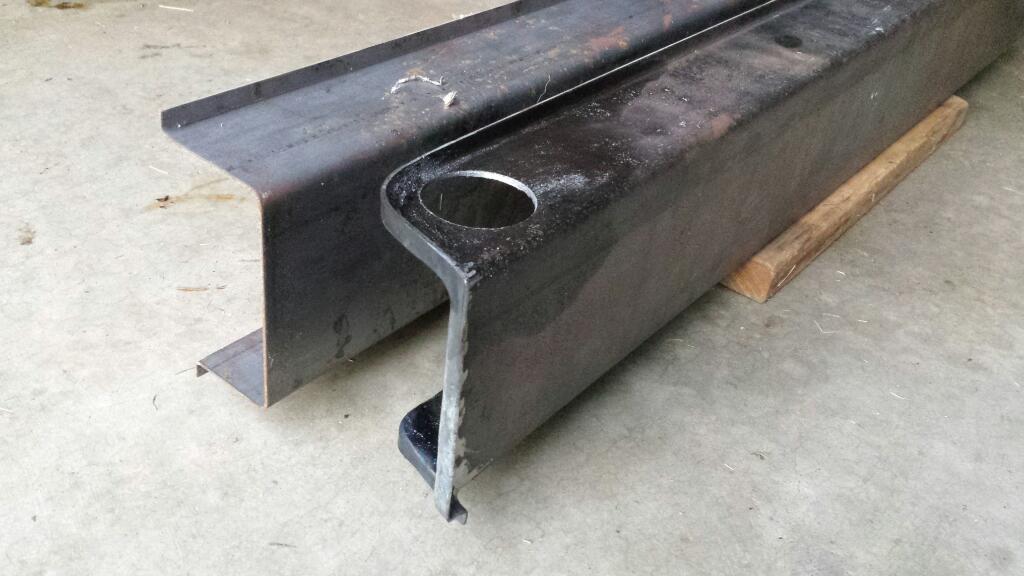
Had a shop bend channel sections in 12g. Did the rest myself.
 |
| Andyrew |
 Jul 18 2016, 08:45 PM Jul 18 2016, 08:45 PM
Post
#47
|
|
Spooling.... Please wait           Group: Members Posts: 13,380 Joined: 20-January 03 From: Riverbank, Ca Member No.: 172 Region Association: Northern California 
|
12ga? Holy crap...
|
| mbseto |
 Jul 19 2016, 09:37 AM Jul 19 2016, 09:37 AM
Post
#48
|
|
Senior Member    Group: Members Posts: 1,257 Joined: 6-August 14 From: Cincy Member No.: 17,743 Region Association: North East States |
|
| JoeDees |
 Jul 19 2016, 09:40 AM Jul 19 2016, 09:40 AM
Post
#49
|
|
Senior Member    Group: Members Posts: 515 Joined: 10-November 14 From: Northern Kentucky Member No.: 18,106 Region Association: None |
That's awesome right there.
|
| buck toenges |
 Jul 19 2016, 09:53 AM Jul 19 2016, 09:53 AM
Post
#50
|
|
Senior Member    Group: Members Posts: 554 Joined: 25-November 03 From: Fort wayne In Member No.: 1,388 Region Association: None 
|
How are you going to refinish your fuel tank on the inside?
|
| mbseto |
 Jul 19 2016, 10:00 AM Jul 19 2016, 10:00 AM
Post
#51
|
|
Senior Member    Group: Members Posts: 1,257 Joined: 6-August 14 From: Cincy Member No.: 17,743 Region Association: North East States |
Thinking of getting the POR15 kit. I'm planning to boroscope the inside to make sure it looks OK all the way to the back, I'll post that once I do it.
|
| jd74914 |
 Jul 19 2016, 02:28 PM Jul 19 2016, 02:28 PM
Post
#52
|
|
Its alive     Group: Members Posts: 4,864 Joined: 16-February 04 From: CT Member No.: 1,659 Region Association: North East States |
Thinking of getting the POR15 kit. I'm planning to boroscope the inside to make sure it looks OK all the way to the back, I'll post that once I do it. I'd recommend the Caswell Platings kit instead if you haven't already gotten the POR15 kit. I've used it on a few tanks and been very happy. (IMG:style_emoticons/default/smile.gif) Would you mind sharing the cost of getting those longs bent? No pressure, just curious. |
| JoeDees |
 Jul 19 2016, 04:10 PM Jul 19 2016, 04:10 PM
Post
#53
|
|
Senior Member    Group: Members Posts: 515 Joined: 10-November 14 From: Northern Kentucky Member No.: 18,106 Region Association: None |
When I move back to CVG next year we're going to have to meet up at the Hoffbrau Haus to tell war on rust stories. Or at our workshops if we don't have these cars done...
|
| 914forme |
 Jul 19 2016, 05:43 PM Jul 19 2016, 05:43 PM
Post
#54
|
|
Times a wastin', get wrenchin'!     Group: Members Posts: 3,896 Joined: 24-July 04 From: Dayton, Ohio Member No.: 2,388 Region Association: None 
|
When I move back to CVG next year we're going to have to meet up at the Hoffbrau Haus to tell war on rust stories. Or at our workshops if we don't have these cars done... Oh wow, I doubt I'll be done (IMG:style_emoticons/default/sad.gif) That is crazy having your own logs bent up, but not a bad idea. You did great work on them. |
| trojanhorsepower |
 Jul 19 2016, 06:05 PM Jul 19 2016, 06:05 PM
Post
#55
|
|
Senior Member    Group: Members Posts: 1,011 Joined: 21-September 03 From: Marion, NC Member No.: 1,179 Region Association: None |
Wow! A complete longectomy.
The replacement looks great. |
| mbseto |
 Jul 19 2016, 09:10 PM Jul 19 2016, 09:10 PM
Post
#56
|
|
Senior Member    Group: Members Posts: 1,257 Joined: 6-August 14 From: Cincy Member No.: 17,743 Region Association: North East States |
|
| mbseto |
 Jul 19 2016, 09:13 PM Jul 19 2016, 09:13 PM
Post
#57
|
|
Senior Member    Group: Members Posts: 1,257 Joined: 6-August 14 From: Cincy Member No.: 17,743 Region Association: North East States |
When I move back to CVG next year we're going to have to meet up at the Hoffbrau Haus to tell war on rust stories. Or at our workshops if we don't have these cars done... Oh wow, I doubt I'll be done (IMG:style_emoticons/default/sad.gif) That is crazy having your own logs bent up, but not a bad idea. You did great work on them. Absolutely- done or not, it looks like we've all got enough stories to get us through a couple rounds. |
| jmitro |
 Jul 20 2016, 08:26 AM Jul 20 2016, 08:26 AM
Post
#58
|
|
Senior Member    Group: Members Posts: 713 Joined: 23-July 15 From: Oklahoma Member No.: 18,986 Region Association: None 
|
That's really nice work you're doing. once the longs are welded in and together, you should spray the inside with the Eastwood internal frame coating or something similar.
|
| mbseto |
 Jul 25 2016, 08:33 PM Jul 25 2016, 08:33 PM
Post
#59
|
|
Senior Member    Group: Members Posts: 1,257 Joined: 6-August 14 From: Cincy Member No.: 17,743 Region Association: North East States |
More dissection... Cut the suspension pylon and motor mount out to see if it could be salvaged though I was pretty sure they were a lost cause. I think I was right, here's the result...
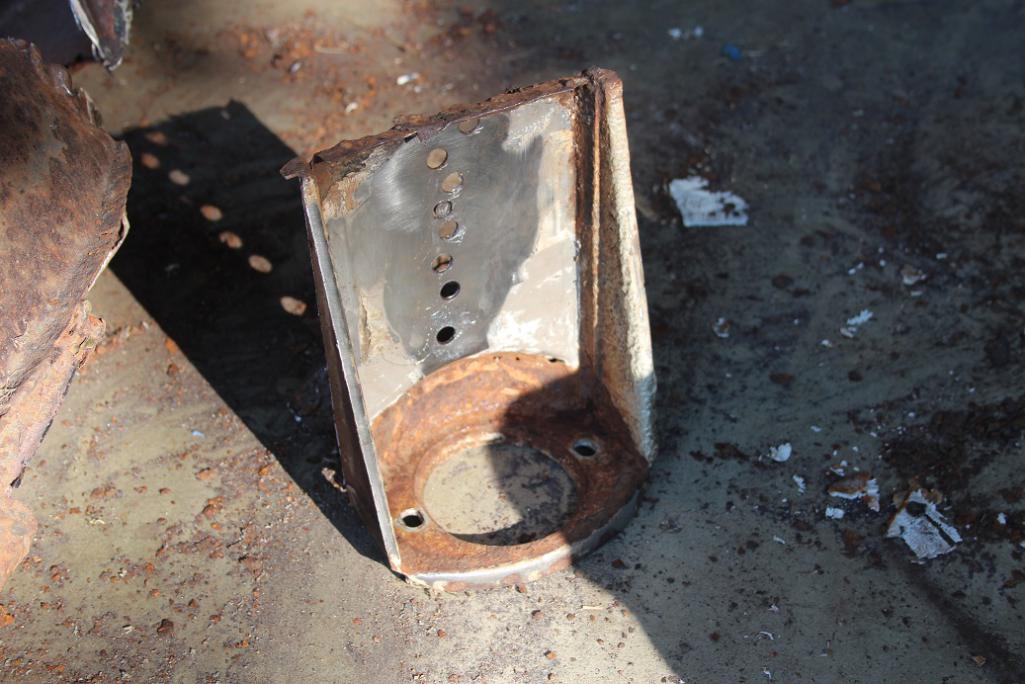 Hydrogen hydroxide: if it can do this to car parts, imagine what it does to your insides! 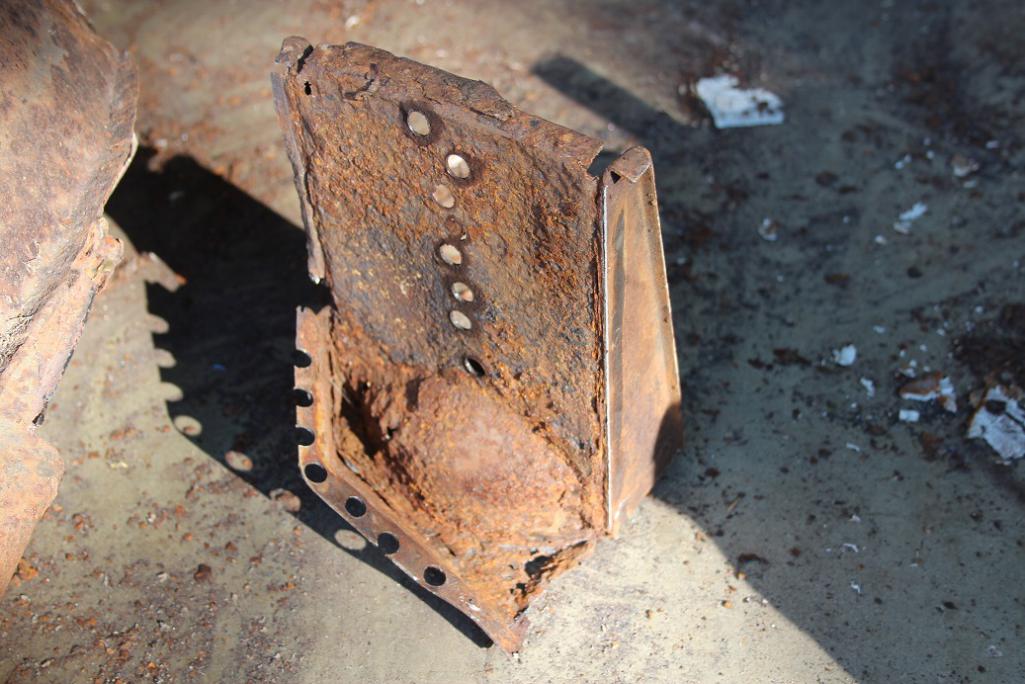 Nobody makes these do they? Got the mouse nest- no mice left, I guess they figured the old house was no longer structurally sound. Little mouse inspector probably condemned it... 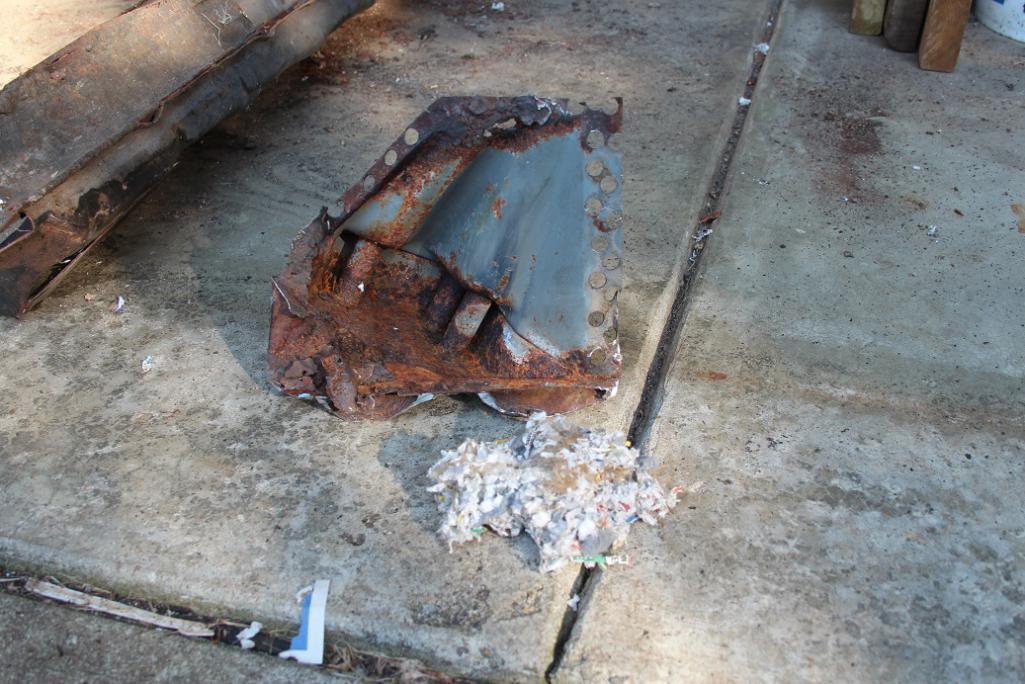 |
| mbseto |
 Aug 21 2016, 10:11 AM Aug 21 2016, 10:11 AM
Post
#60
|
|
Senior Member    Group: Members Posts: 1,257 Joined: 6-August 14 From: Cincy Member No.: 17,743 Region Association: North East States |
With that long completely cut out, it is pretty floppy and I no longer have a place in the rear corner to grab it. The two hurdles I'm looking at now are, how to level it and how to know when it's level. First, I need a way to support that loose corner, and ideally something that is adjustable. Had an old broken c-clamp laying around...
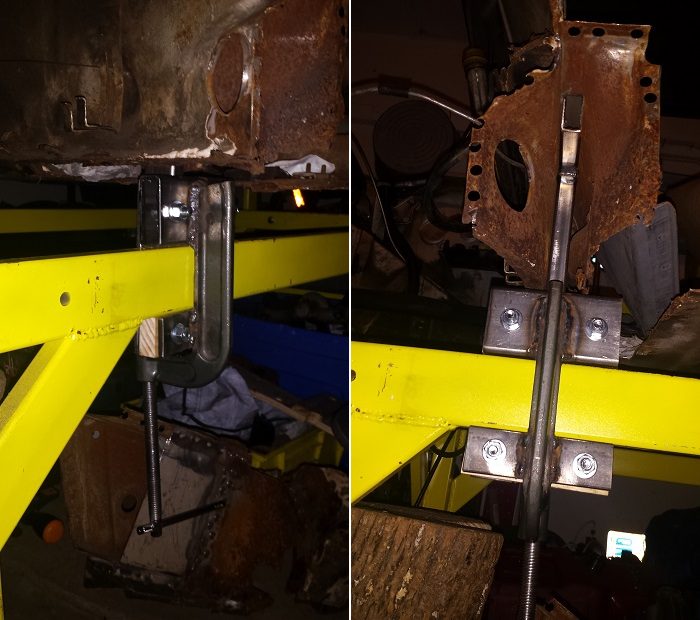 One of the problems with having the whole long out is that there is no motor mount and no suspension mounts- nothing to hold on to and no reference. However, the lower section of the rear firewall has a level flange- it can serve as both a reference and a support. This clamp adjuster is two pieces: a T welded from stock which slides up between the layers of the lower FW and registers against that horizontal flange, and the clamp with some brackets welded on to affix it to my dolly. I can turn the screw to raise or lower that corner. It all sits inside where the long would be so it will not interfere with my welding. |
  |
1 User(s) are reading this topic (1 Guests and 0 Anonymous Users)
0 Members:

|
Lo-Fi Version | Time is now: 23rd December 2025 - 01:35 PM |
Invision Power Board
v9.1.4 © 2025 IPS, Inc.


