|
|
|
Porsche, and the Porsche crest are registered trademarks of Dr. Ing. h.c. F. Porsche AG.
This site is not affiliated with Porsche in any way. Its only purpose is to provide an online forum for car enthusiasts. All other trademarks are property of their respective owners. |
|
|

  |

| 914forme |
 Jul 15 2018, 07:24 PM Jul 15 2018, 07:24 PM
Post
#141
|
|
Times a wastin', get wrenchin'!  Group: Members Posts: 3,896 Joined: 24-July 04 From: Dayton, Ohio Member No.: 2,388 Region Association: None |
Your seams look really nice, mine where so full of crude, I think Hans was show Anton how to put ten pounds of seam sealer in a 2 pound space. I also took a MAP torch and heated the seam to burn out the crap. And even when I was welding them I still got stuff coming up into the weld puddle. (IMG:style_emoticons/default/headbang.gif)
|
   |

 
|
| Mueller |
Jul 18 2018, 10:58 PM
Post
#142
|
|
914 Freak! Group: Members Posts: 17,155 Joined: 4-January 03 From: Antioch, CA Member No.: 87 Region Association: None |
Cut out the inlet and outlet holes for the cooling system.
Need to trim the valance, not sure if I need to cut the bumper or not. A few Subaru guys have not needed to cut the bumper so I might get lucky. 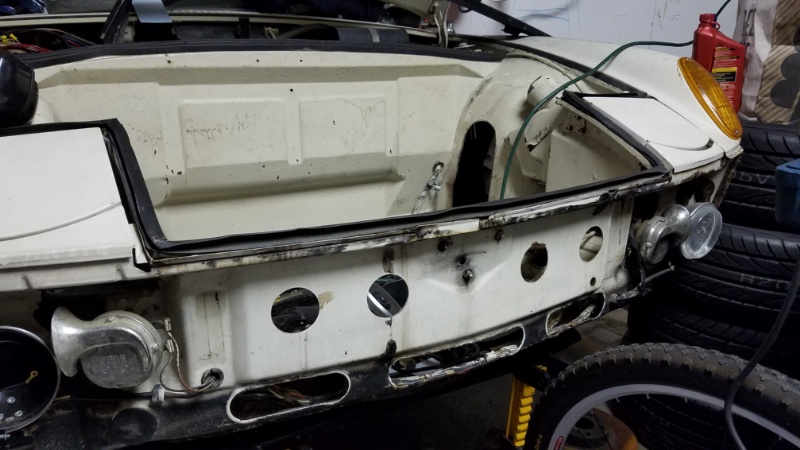  |
|
|
|
| Chris914n6 |
Jul 19 2018, 01:08 AM
Post
#143
|
|
Jackstands are my life. Group: Members Posts: 3,510 Joined: 14-March 03 From: Las Vegas, NV Member No.: 431 Region Association: Southwest Region |
You have seen mine right? Air enters thru the fog grills and gets directed towards the center. I had to rivet a piece of plastic to the bumper bracket to block flow the wrong way. I also didn't cut between the holes. Cooling air volume in the sweet spot. You should be fine with what you have so far.
edit: added pics. No fogs obviously and 75 so horns under chassis. (IMG:http://www.914world.com/bbs2/uploads_offsite/farm2.staticflickr.com-431-1532054861.1.jpg) (IMG:http://www.914world.com/bbs2/uploads_offsite/farm1.staticflickr.com-431-1532054861.2.jpg) |
|
|
|
| tygaboy |
Jul 19 2018, 07:26 AM
Post
#144
|
|
914 Guru Group: Members Posts: 5,720 Joined: 6-October 15 From: Petaluma, CA Member No.: 19,241 Region Association: Northern California |
Looking good, Mike!
Don't you just love the knock out punches? I've been wondering if I could get away without notching the bumper on my car so I'll be interested to see how your plan works out. Take care and keep up the great work. |
 |
|
| Chris H. |
Jul 19 2018, 07:43 AM
Post
#145
|
|
Senior Member Group: Members Posts: 4,069 Joined: 2-January 03 From: Chicago 'burbs Member No.: 73 Region Association: Upper MidWest |
Great start. It's easy to cut more if you need to but that should be fine.
What's with those horns man (IMG:style_emoticons/default/biggrin.gif) ? |
|
|
|
| tygaboy |
Jul 19 2018, 08:17 AM
Post
#146
|
|
914 Guru Group: Members Posts: 5,720 Joined: 6-October 15 From: Petaluma, CA Member No.: 19,241 Region Association: Northern California |
Mike - I forgot to ask: What size holes are those? I have some dimple dies that you're welcome to borrow, if I have the right size.
That press is looks to be the same one I have and it should work fine, again, assuming I have the right size die. Let me know... Chris |
|
|
|
| Andyrew |
Jul 19 2018, 08:42 AM
Post
#147
|
|
Spooling.... Please wait Group: Members Posts: 13,380 Joined: 20-January 03 From: Riverbank, Ca Member No.: 172 Region Association: Northern California |
You'll rely on your fan more than you would otherwise but I think that it'll still be fine (IMG:style_emoticons/default/smile.gif) that Honda motor runs pretty cool being all aluminum. If you shroud your exit you'll have much better flow, and ducting or shrouding your entering air would increase your flow as well.
|
|
|
|
| Dion |
Jul 19 2018, 11:09 AM
Post
#148
|
|
RN Group: Members Posts: 2,920 Joined: 16-September 04 From: Audubon,PA Member No.: 2,766 Region Association: MidAtlantic Region |
So this engine is going to have an equivalent of, if not more , of the power and of
a 3.2? Good god, that’s gonna be a rocket. Keep at it Mike. |
|
|
|
| BIGKAT_83 |
Jul 19 2018, 12:06 PM
Post
#149
|
|
Senior Member Group: Members Posts: 1,800 Joined: 25-January 03 From: Way down south Bogart,GA Member No.: 194 Region Association: South East States |
QUOTE(tygaboy @ Jul 19 2018, 10:17 AM)  Mike - I forgot to ask: What size holes are those? I have some dimple dies that you're welcome to borrow, if I have the right size. That press is looks to be the same one I have and it should work fine, again, assuming I have the right size die. Let me know... Chris The harbor freight punch set is for pipe sizes and most dimple die sets are for tubing sizes and won’t work. |
|
|
|
| 914forme |
Jul 19 2018, 12:35 PM
Post
#150
|
|
Times a wastin', get wrenchin'! Group: Members Posts: 3,896 Joined: 24-July 04 From: Dayton, Ohio Member No.: 2,388 Region Association: None |
(IMG:style_emoticons/default/agree.gif) That being said these will work with the punches and press you have if you want to dimple dies them.
|
|
|
|
| Mueller |
Jul 19 2018, 02:01 PM
Post
#151
|
|
914 Freak! Group: Members Posts: 17,155 Joined: 4-January 03 From: Antioch, CA Member No.: 87 Region Association: None |
QUOTE(914forme @ Jul 19 2018, 11:35 AM) (IMG:style_emoticons/default/agree.gif) That being said these will work with the punches and press you have if you want to dimple dies them. OUCH! Those are nice, but I don't see using them that often. Makes sense for a pro shop or someone doing a lot of that type of work. I didn't notice until yesterday that they are pipe sized, so far that has not been a problem. I can buy used Greenlee punches on ebay or craigslist if I need a true tube diameter. |
|
|
|
| tygaboy |
Jul 19 2018, 02:01 PM
Post
#152
|
|
914 Guru Group: Members Posts: 5,720 Joined: 6-October 15 From: Petaluma, CA Member No.: 19,241 Region Association: Northern California |
QUOTE(BIGKAT_83 @ Jul 19 2018, 11:06 AM) QUOTE(tygaboy @ Jul 19 2018, 10:17 AM) Mike - I forgot to ask: What size holes are those? I have some dimple dies that you're welcome to borrow, if I have the right size. That press is looks to be the same one I have and it should work fine, again, assuming I have the right size die. Let me know... Chris The harbor freight punch set is for pipe sizes and most dimple die sets are for tubing sizes and won’t work. Ah, yes, I forgot about that... EDIT: Mike, you beat me to my reply. In any case, let me know if I can help w/anything. |
|
|
|
| JRust |
Jul 19 2018, 02:49 PM
Post
#153
|
|
914 Guru Group: Members Posts: 6,317 Joined: 10-January 03 From: Albany Oregon Member No.: 129 Region Association: Pacific Northwest |
QUOTE(Mueller @ Jul 18 2018, 09:58 PM) Need to trim the valance, not sure if I need to cut the bumper or not. A few Subaru guys have not needed to cut the bumper so I might get lucky. My bumper is stock. I do have the renegade valance that pushes the air up in the center. No cooling issues at all with my NA motor. I'll be shocked if I have any with my new turbo motor. I'd think what you have there is enough. Although the upper holes you added won't get much flow unless you do more to direct air up there. Those will be pretty square behind the bumper. No sure the best way to force air to them. Something from the fog light grills like Chris mentioned maybe? |
|
|
|
| Chris H. |
Jul 25 2018, 07:26 PM
Post
#154
|
|
Senior Member Group: Members Posts: 4,069 Joined: 2-January 03 From: Chicago 'burbs Member No.: 73 Region Association: Upper MidWest |
(IMG:style_emoticons/default/icon_bump.gif) How's it going Mike? Had a chance to work on the car this week or no?
|
|
|
|
| Mueller |
Jul 29 2018, 08:36 PM
Post
#155
|
|
914 Freak! Group: Members Posts: 17,155 Joined: 4-January 03 From: Antioch, CA Member No.: 87 Region Association: None |
Went up to Canada for 5 days, back to working on the car once home and recovered from traveling.
Radiator going in. 1st time using my HF sheetmetal shear, works great so far. Even broke out the Clecos 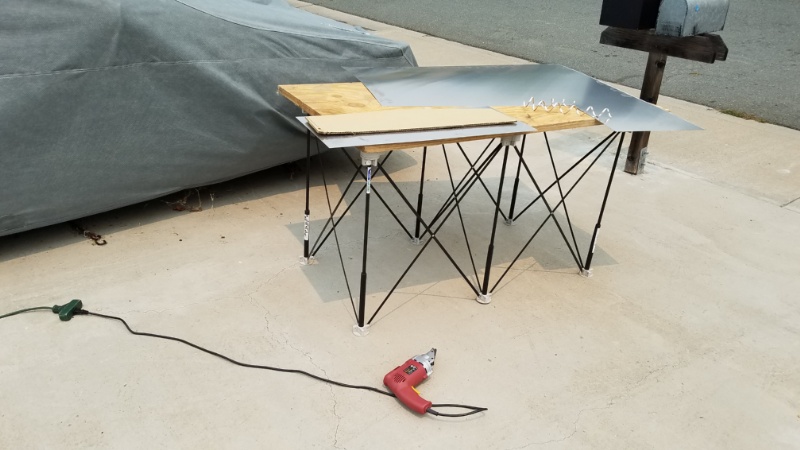 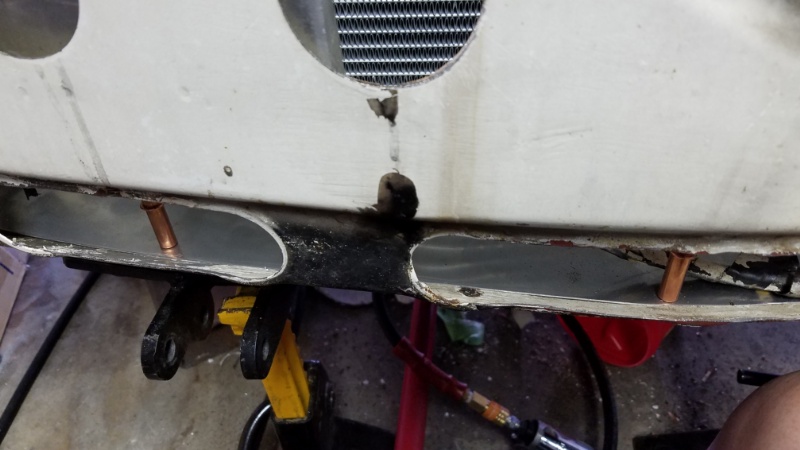 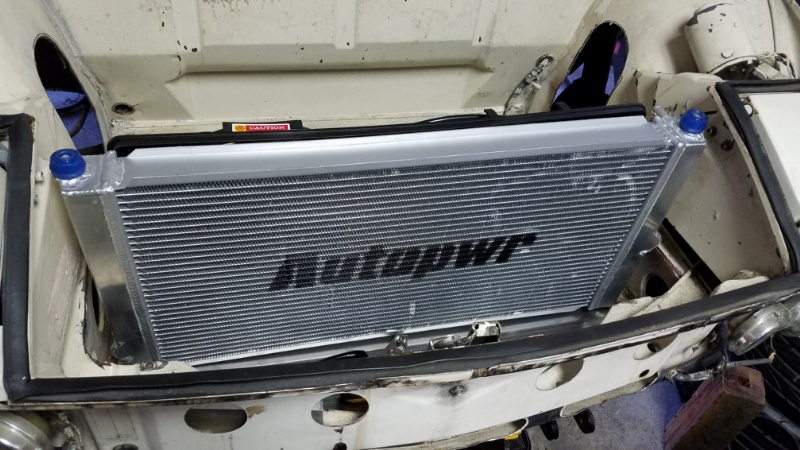 |
|
|
|
| Mueller |
Jul 29 2018, 08:41 PM
Post
#156
|
|
914 Freak! Group: Members Posts: 17,155 Joined: 4-January 03 From: Antioch, CA Member No.: 87 Region Association: None |
The bottom of the radiator is on rubber bushings that are on studs like the top have. To locate and stop the bottom of the radiator from moving there are 2 thru holes in the bottom shroud that are slightly larger diameter than the rubber bushings.
The blue bushings on the top I found in my junk drawer just like the bottom bushings. Cardboard template I made, the curve matched up pretty darn good. Now if I had them fancy Chris Baker tools....hahaha 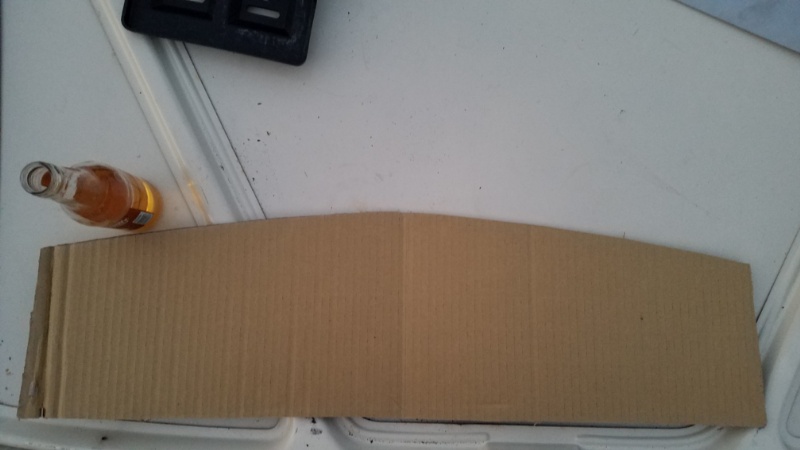 |
|
|
|
| Andyrew |
Jul 29 2018, 10:29 PM
Post
#157
|
|
Spooling.... Please wait Group: Members Posts: 13,380 Joined: 20-January 03 From: Riverbank, Ca Member No.: 172 Region Association: Northern California |
Looking good!! Started from the bottom now your here (On your radiator build) (IMG:style_emoticons/default/tongue.gif)
Thats the same way I did mine. I like that electric sheer from HF, lots of power in that cheep tool! Are you using aluminum or steel for the shroud? |
|
|
|
| Mueller |
Jul 30 2018, 12:35 AM
Post
#158
|
|
914 Freak! Group: Members Posts: 17,155 Joined: 4-January 03 From: Antioch, CA Member No.: 87 Region Association: None |
QUOTE(Andyrew @ Jul 29 2018, 09:29 PM) Looking good!! Started from the bottom now your here (On your radiator build) (IMG:style_emoticons/default/tongue.gif) Thats the same way I did mine. I like that electric sheer from HF, lots of power in that cheep tool! Are you using aluminum or steel for the shroud? .040" (I think) aluminum, should have used a little thicker. It should be okay.... if course in my mind I'm already designing it differently for a future upgrade when I repair the rust in the front trunk. |
|
|
|
| 76-914 |
Jul 30 2018, 07:59 AM
Post
#159
|
|
Repeat Offender & Resident Subaru Antagonist Group: Members Posts: 13,826 Joined: 23-January 09 From: Temecula, CA Member No.: 9,964 Region Association: Southern California |
QUOTE(Mueller @ Jul 29 2018, 11:35 PM) QUOTE(Andyrew @ Jul 29 2018, 09:29 PM) Looking good!! Started from the bottom now your here (On your radiator build) (IMG:style_emoticons/default/tongue.gif) Thats the same way I did mine. I like that electric sheer from HF, lots of power in that cheep tool! Are you using aluminum or steel for the shroud? .040" (I think) aluminum, should have used a little thicker. It should be okay.... if course in my mind I'm already designing it differently for a future upgrade when I repair the rust in the front trunk. As much reinforcement as you'll use in such a small area you could go .032"-.028". FYI, Aircraft Spruce will usually cut and ship the same day. LMK if you need anything for rivet work. (IMG:style_emoticons/default/beerchug.gif) |
|
|
|
| tygaboy |
Jul 30 2018, 08:00 AM
Post
#160
|
|
914 Guru Group: Members Posts: 5,720 Joined: 6-October 15 From: Petaluma, CA Member No.: 19,241 Region Association: Northern California |
QUOTE(Mueller @ Jul 29 2018, 07:41 PM) The bottom of the radiator is on rubber bushings that are on studs like the top have. To locate and stop the bottom of the radiator from moving there are 2 thru holes in the bottom shroud that are slightly larger diameter than the rubber bushings. The blue bushings on the top I found in my junk drawer just like the bottom bushings. Cardboard template I made, the curve matched up pretty darn good. Now if I had them fancy Chris Baker tools....hahaha Hey now! No fair proving that I don't need to be such a tool whore! (IMG:style_emoticons/default/laugh.gif) Mike, your build is looking good! |
|
|
|
|
1 User(s) are reading this topic (1 Guests and 0 Anonymous Users)
0 Members:

|
Lo-Fi Version | Time is now: 9th December 2025 - 09:52 AM |
Invision Power Board
v9.1.4 © 2025 IPS, Inc.