|
|
|
Porsche, and the Porsche crest are registered trademarks of Dr. Ing. h.c. F. Porsche AG.
This site is not affiliated with Porsche in any way. Its only purpose is to provide an online forum for car enthusiasts. All other trademarks are property of their respective owners. |
|
|


| tygaboy |
 Oct 26 2015, 06:12 PM Oct 26 2015, 06:12 PM
Post
#61
|
|
914 Guru  Group: Members Posts: 5,803 Joined: 6-October 15 From: Petaluma, CA Member No.: 19,241 Region Association: Northern California |
Hi folks. Been a while since I've been a Porsche owner. I've had a '62 356, a few 914s, a '74 911 and even worked for a while at an independent Porsche shop here in the SF Bay Area. Anyway, I just purchased a '74 914 that's been sitting since 1987. Good news is it was in a covered garage. Got it home and started poking around only to find...
...it's in remarkably good shape. It's got a couple small dings on the body and a crap respray that's literally falling off but other really, no sign of any rust. I've begun collecting parts for the chassis stiffening and 5 lug conversion but have yet to decide on narrow body or flares. Also have to determine V8, 6 conversion, Subaru. (Is it true a Cayenne won't fit?) Anyway, I wanted to introduce myself and thank you all for creating and maintaining such a great community. And thanks in advance for answering all the questions that are sure to come. Wish me luck, I'm goin' in! Chris Attached thumbnail(s) 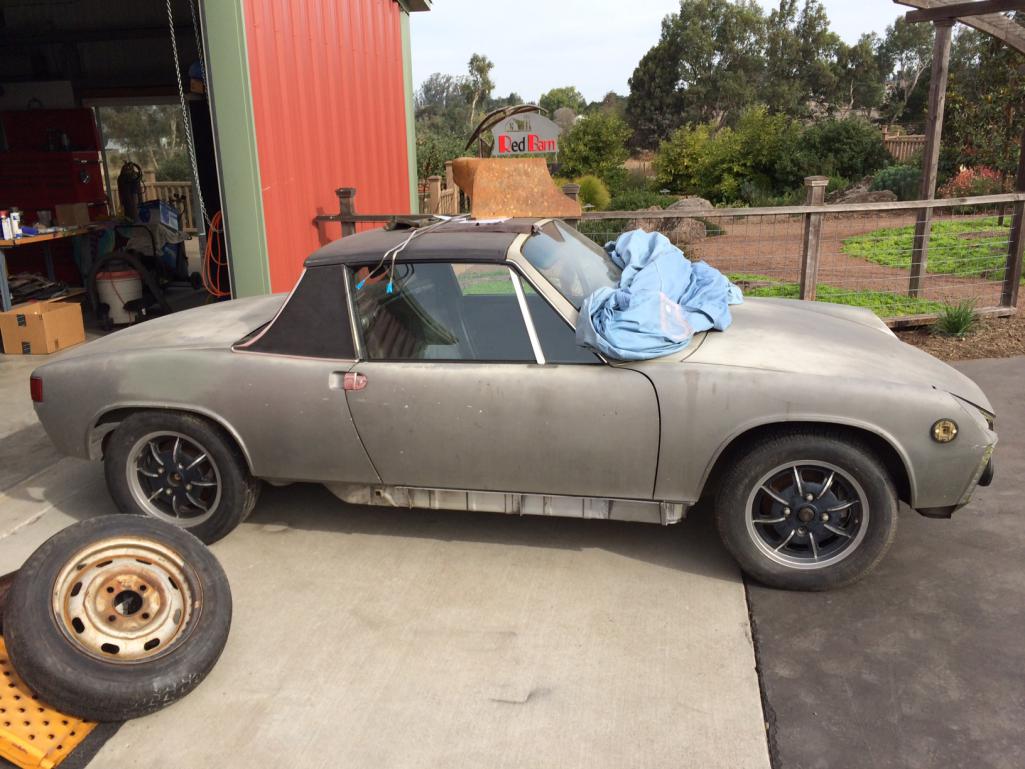 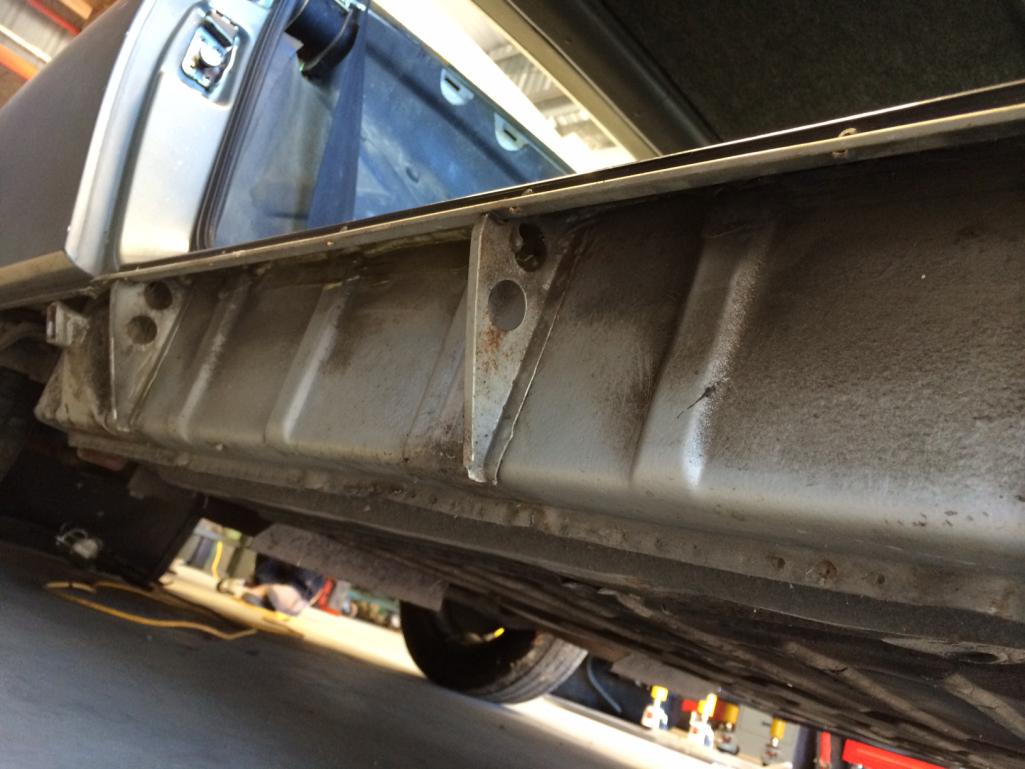 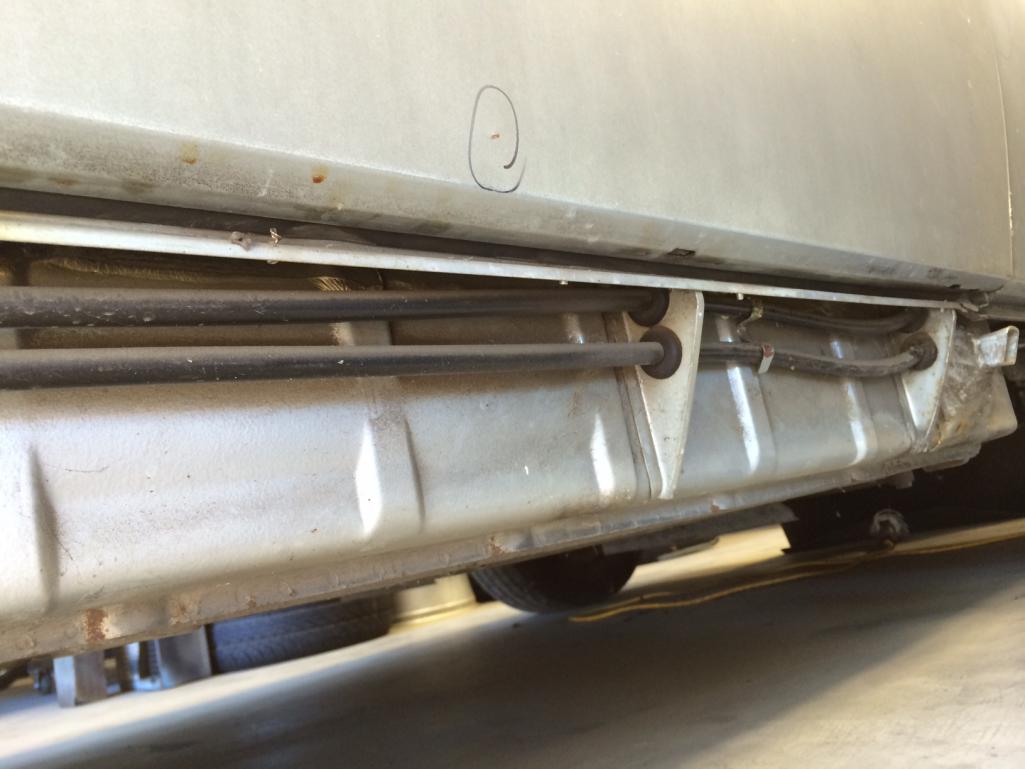
|
   |

 
|
Posts in this topic
 tygaboy My '74 Barn Find project Oct 26 2015, 06:12 PM
 914Sixer WOW that is a REALLY clean rocker panel area! ... Oct 26 2015, 06:24 PM
 jor I don't think my car's rust-free parts are... Oct 26 2015, 06:46 PM tygaboy Couple more pics. Dash has no cracks, all electric... Oct 26 2015, 06:43 PM altitude411 Wow, nice find! She's a sweet one. Not eve... Oct 26 2015, 06:48 PM Cairo94507 :wttc: Chris - She looks like a keeper. As clean ... Oct 26 2015, 07:00 PM tygaboy
:wttc: Chris - She looks like a keeper. As clean... Oct 26 2015, 07:08 PM iwanta914-6 wow, how did you find this gem? Oct 26 2015, 08:05 PM stevegm Nice. Oct 26 2015, 08:06 PM Mueller Dang...that is a nice chassis...great score, I... Oct 26 2015, 08:18 PM PlantMan :wttc:
Nice find for sure!
Is the FI still i... Oct 26 2015, 08:50 PM Larmo63 Your new baby looks great!!!
:wttc: Oct 26 2015, 09:03 PM Mueller I wonder if Randy W knew about this car...doesn... Oct 26 2015, 09:05 PM Montreal914 Very nice base for a project. :)
I would keep th... Oct 26 2015, 09:20 PM boxsterfan Build a 2270 4-cylinder and stay narrow body with ... Oct 26 2015, 09:42 PM Shadowfax :wttc:
Nice car! Looks like it's in good h... Oct 26 2015, 10:17 PM tygaboy To answer some of the questions:
It (I'm not y... Oct 27 2015, 07:53 AM porschetub
To answer some of the questions:
It (I'm not ... Oct 27 2015, 12:42 PM 74ravenna Great find. I'd love to see photos of the eng... Oct 27 2015, 08:27 AM Dave_Darling His user name on here is "RoadGlue".
ht... Oct 27 2015, 08:28 AM tygaboy OK, I've decided to go with a 6 conversion. Pu... Nov 3 2015, 02:56 PM tygaboy So maybe not as perfect as first assumed. Got the ... Nov 11 2015, 02:03 PM peteyd Just like the Germans, we get three beer brakes a ... Nov 11 2015, 03:36 PM napasteve I'm looking forward to watching your project t... Nov 11 2015, 03:58 PM tygaboy
I'm looking forward to watching your project ... Nov 11 2015, 06:18 PM Briby37 Awesome find! Looks great! Nov 11 2015, 06:45 PM Larmo63 A Porsche motor in a Porsche automobile seems righ... Nov 11 2015, 07:12 PM veekry9
Well,I can honestly say I'm thrilled you dis... Nov 11 2015, 07:31 PM RobW :wttc: :wttc: :wttc:
Let us know if you need a... Nov 11 2015, 08:51 PM PanelBilly What an excellent find. Take lots of pictures and ... Nov 11 2015, 09:04 PM Cairo94507 Post a WTB over on Pelican in the 911 section. Th... Nov 11 2015, 09:25 PM tygaboy Working on the 911 e-brake set up. Got so excited ... Nov 15 2015, 11:29 AM tygaboy And I have to get better at taking "before... Nov 15 2015, 11:37 AM zambezi The holes are probably from a relocated fuel pump.... Nov 15 2015, 10:10 PM tygaboy Not too exciting as everyone has seen any number o... Nov 29 2015, 08:16 AM tygaboy I sliced a relief cut at the corners and bonked do... Nov 29 2015, 08:19 AM Dave_Darling
I sliced a relief cut at the corners and bonked d... Nov 29 2015, 02:47 PM tygaboy
I sliced a relief cut at the corners and bonked ... Nov 29 2015, 04:28 PM tygaboy More goodies from Restoration Design! Mmmmm...... Nov 29 2015, 08:26 AM Cracker Impressive find...the kind folks dream of! Loo... Nov 29 2015, 07:00 PM tygaboy
Impressive find...the kind folks dream of! Lo... Nov 29 2015, 07:30 PM Cracker I have owned many quick cars - I gotta say this on... Nov 29 2015, 08:42 PM tygaboy More boring stuff for - Long stiffener kit is in... Dec 6 2015, 04:35 PM Cairo94507 Way to go! :trophy: Dec 6 2015, 06:49 PM Cracker Wow. Super clean install...keep the momentum going... Dec 6 2015, 07:46 PM tygaboy Well, Christmas is coming early! I'm worki... Dec 8 2015, 07:33 PM Cracker Good for you...contact me if interested. I had a l... Dec 8 2015, 07:40 PM tygaboy
Good for you...contact me if interested. I had a ... Dec 9 2015, 07:56 PM tygaboy Some more goodies arrived! Fachs. I decided to... Dec 18 2015, 05:49 PM tygaboy Got to working on fitting the front 1/2 floor pane... Dec 18 2015, 05:55 PM jmill Very nice! You'll need to let me know if ... Dec 18 2015, 08:03 PM tygaboy Gotta say, I'm really impressed with the Resto... Dec 27 2015, 04:50 PM SKL1 Nice find- I guess they're still out there if... Dec 27 2015, 07:53 PM Martin Baker Ready for pick up! Here are your signal housin... Dec 27 2015, 08:09 PM tygaboy It is FREEZING here in foggy Petaluma, CA so durin... Dec 30 2015, 03:25 PM Nemisus Welcome back Chris,
Your not too far from from me... Dec 30 2015, 04:14 PM tygaboy Floor fitted and ready for welding. :welder: Hop... Dec 31 2015, 06:00 PM tygaboy I applied weld through primer between all the pane... Dec 31 2015, 06:06 PM tygaboy Finished my buddy's 911 roll cage and finally ... Jan 10 2016, 08:01 PM peteyd Looks good!
Pete Jan 11 2016, 07:14 AM tygaboy
Looks good!
Pete
Well, after watching your... Jan 11 2016, 09:52 AM tygaboy Little bit of :welder: and the front floor half i... Jan 16 2016, 06:42 PM tygaboy Part of the floor repair includes a fix to the tun... Jan 17 2016, 06:17 PM tygaboy Next, I had to fab the patch. Different radius on ... Jan 17 2016, 06:19 PM tygaboy rough cut the patch, figure where the radius needs... Jan 17 2016, 06:20 PM tygaboy Ta da. Just like I'd hoped! Jan 17 2016, 06:21 PM tygaboy Trim, fit, trim, fit, trim, fit... then :welder: ... Jan 17 2016, 06:23 PM Cracker :trophy: Great job!
Bummer about the "C... Jan 17 2016, 06:26 PM tygaboy Then I decided to get fancy and I broke out the HF... Jan 17 2016, 06:26 PM mbseto Nice fab work. Jan 18 2016, 10:02 AM bigkensteele
Nice fab work.
:agree: Great job! Jan 18 2016, 07:19 PM tygaboy As mentioned, I'm working with Rich Johnson on... Feb 1 2016, 12:22 PM tygaboy On the drive train front, I'm getting to know ... Feb 1 2016, 12:48 PM tygaboy Struts are all done. Almost too pretty to hide und... Feb 5 2016, 04:13 PM tygaboy Fit the door sills. Learning that I get a better ... Feb 6 2016, 04:55 PM tygaboy Welded, ground and primer on! On to seam seali... Feb 6 2016, 04:56 PM tygaboy Did I say "on to seam sealer"? Maybe not... Feb 7 2016, 05:42 PM Larmo63 That is a pretty clean trunk you have there.
Nice... Feb 7 2016, 06:48 PM tygaboy Another repair of PO hole drilling. There were som... Feb 23 2016, 04:45 PM tygaboy So, it's time to fab up a patch. Here's a ... Feb 23 2016, 04:48 PM tygaboy Time to trim / fit the patch. Feb 23 2016, 04:51 PM tygaboy :sawzall: then :welder: then (insert grinder emo... Feb 23 2016, 04:55 PM tygaboy Oh, and I almost forgot: After 28 years, that... Feb 23 2016, 05:37 PM tygaboy Total Change of plan:
This car will be left stock ... Mar 3 2016, 12:10 PM iwanta914-6 I'm interested when it's all put back toge... Mar 3 2016, 12:25 PM tygaboy
I'm interested when it's all put back tog... Mar 3 2016, 12:44 PM iwanta914-6
I'm interested when it's all put back to... Mar 3 2016, 03:27 PM iwanta914-6 What was the original color anyway? Mar 3 2016, 03:28 PM tygaboy
What was the original color anyway?
L 99 A - De... Mar 3 2016, 07:10 PM iwanta914-6
What was the original color anyway?
L 99 A - D... Mar 3 2016, 07:50 PM tygaboy Wrapping up the front floor half install. Got to t... Mar 7 2016, 05:09 PM tygaboy Then I went after it on the car. I did my current ... Mar 7 2016, 05:12 PM Mikey914 You may be able to duplicate the look of the seam ... Mar 9 2016, 12:21 AM tygaboy
You may be able to duplicate the look of the seam... Mar 12 2016, 03:58 PM tygaboy Let's finish up the floor, shall we? Found tim... Mar 12 2016, 04:03 PM tygaboy :welder: :welder: and I have a repaired tunnel... Mar 12 2016, 04:05 PM iwanta914-6 I see she's up for sale at a very reasonable p... Aug 11 2016, 01:18 PM tygaboy And....... she's sold! Kind of a sad day b... Aug 15 2016, 06:41 PM Reverend Troublemaker and congrats to you Sir! Looking forward to se... Aug 15 2016, 07:15 PM
jor I don't think my car's rust-free parts are... Oct 26 2015, 06:46 PM tygaboy Couple more pics. Dash has no cracks, all electric... Oct 26 2015, 06:43 PM altitude411 Wow, nice find! She's a sweet one. Not eve... Oct 26 2015, 06:48 PM Cairo94507 :wttc: Chris - She looks like a keeper. As clean ... Oct 26 2015, 07:00 PM tygaboy
:wttc: Chris - She looks like a keeper. As clean... Oct 26 2015, 07:08 PM iwanta914-6 wow, how did you find this gem? Oct 26 2015, 08:05 PM stevegm Nice. Oct 26 2015, 08:06 PM Mueller Dang...that is a nice chassis...great score, I... Oct 26 2015, 08:18 PM PlantMan :wttc:
Nice find for sure!
Is the FI still i... Oct 26 2015, 08:50 PM Larmo63 Your new baby looks great!!!
:wttc: Oct 26 2015, 09:03 PM Mueller I wonder if Randy W knew about this car...doesn... Oct 26 2015, 09:05 PM Montreal914 Very nice base for a project. :)
I would keep th... Oct 26 2015, 09:20 PM boxsterfan Build a 2270 4-cylinder and stay narrow body with ... Oct 26 2015, 09:42 PM Shadowfax :wttc:
Nice car! Looks like it's in good h... Oct 26 2015, 10:17 PM tygaboy To answer some of the questions:
It (I'm not y... Oct 27 2015, 07:53 AM porschetub
To answer some of the questions:
It (I'm not ... Oct 27 2015, 12:42 PM 74ravenna Great find. I'd love to see photos of the eng... Oct 27 2015, 08:27 AM Dave_Darling His user name on here is "RoadGlue".
ht... Oct 27 2015, 08:28 AM tygaboy OK, I've decided to go with a 6 conversion. Pu... Nov 3 2015, 02:56 PM tygaboy So maybe not as perfect as first assumed. Got the ... Nov 11 2015, 02:03 PM peteyd Just like the Germans, we get three beer brakes a ... Nov 11 2015, 03:36 PM napasteve I'm looking forward to watching your project t... Nov 11 2015, 03:58 PM tygaboy
I'm looking forward to watching your project ... Nov 11 2015, 06:18 PM Briby37 Awesome find! Looks great! Nov 11 2015, 06:45 PM Larmo63 A Porsche motor in a Porsche automobile seems righ... Nov 11 2015, 07:12 PM veekry9
Well,I can honestly say I'm thrilled you dis... Nov 11 2015, 07:31 PM RobW :wttc: :wttc: :wttc:
Let us know if you need a... Nov 11 2015, 08:51 PM PanelBilly What an excellent find. Take lots of pictures and ... Nov 11 2015, 09:04 PM Cairo94507 Post a WTB over on Pelican in the 911 section. Th... Nov 11 2015, 09:25 PM tygaboy Working on the 911 e-brake set up. Got so excited ... Nov 15 2015, 11:29 AM tygaboy And I have to get better at taking "before... Nov 15 2015, 11:37 AM zambezi The holes are probably from a relocated fuel pump.... Nov 15 2015, 10:10 PM tygaboy Not too exciting as everyone has seen any number o... Nov 29 2015, 08:16 AM tygaboy I sliced a relief cut at the corners and bonked do... Nov 29 2015, 08:19 AM Dave_Darling
I sliced a relief cut at the corners and bonked d... Nov 29 2015, 02:47 PM tygaboy
I sliced a relief cut at the corners and bonked ... Nov 29 2015, 04:28 PM tygaboy More goodies from Restoration Design! Mmmmm...... Nov 29 2015, 08:26 AM Cracker Impressive find...the kind folks dream of! Loo... Nov 29 2015, 07:00 PM tygaboy
Impressive find...the kind folks dream of! Lo... Nov 29 2015, 07:30 PM Cracker I have owned many quick cars - I gotta say this on... Nov 29 2015, 08:42 PM tygaboy More boring stuff for - Long stiffener kit is in... Dec 6 2015, 04:35 PM Cairo94507 Way to go! :trophy: Dec 6 2015, 06:49 PM Cracker Wow. Super clean install...keep the momentum going... Dec 6 2015, 07:46 PM tygaboy Well, Christmas is coming early! I'm worki... Dec 8 2015, 07:33 PM Cracker Good for you...contact me if interested. I had a l... Dec 8 2015, 07:40 PM tygaboy
Good for you...contact me if interested. I had a ... Dec 9 2015, 07:56 PM tygaboy Some more goodies arrived! Fachs. I decided to... Dec 18 2015, 05:49 PM tygaboy Got to working on fitting the front 1/2 floor pane... Dec 18 2015, 05:55 PM jmill Very nice! You'll need to let me know if ... Dec 18 2015, 08:03 PM tygaboy Gotta say, I'm really impressed with the Resto... Dec 27 2015, 04:50 PM SKL1 Nice find- I guess they're still out there if... Dec 27 2015, 07:53 PM Martin Baker Ready for pick up! Here are your signal housin... Dec 27 2015, 08:09 PM tygaboy It is FREEZING here in foggy Petaluma, CA so durin... Dec 30 2015, 03:25 PM Nemisus Welcome back Chris,
Your not too far from from me... Dec 30 2015, 04:14 PM tygaboy Floor fitted and ready for welding. :welder: Hop... Dec 31 2015, 06:00 PM tygaboy I applied weld through primer between all the pane... Dec 31 2015, 06:06 PM tygaboy Finished my buddy's 911 roll cage and finally ... Jan 10 2016, 08:01 PM peteyd Looks good!
Pete Jan 11 2016, 07:14 AM tygaboy
Looks good!
Pete
Well, after watching your... Jan 11 2016, 09:52 AM tygaboy Little bit of :welder: and the front floor half i... Jan 16 2016, 06:42 PM tygaboy Part of the floor repair includes a fix to the tun... Jan 17 2016, 06:17 PM tygaboy Next, I had to fab the patch. Different radius on ... Jan 17 2016, 06:19 PM tygaboy rough cut the patch, figure where the radius needs... Jan 17 2016, 06:20 PM tygaboy Ta da. Just like I'd hoped! Jan 17 2016, 06:21 PM tygaboy Trim, fit, trim, fit, trim, fit... then :welder: ... Jan 17 2016, 06:23 PM Cracker :trophy: Great job!
Bummer about the "C... Jan 17 2016, 06:26 PM tygaboy Then I decided to get fancy and I broke out the HF... Jan 17 2016, 06:26 PM mbseto Nice fab work. Jan 18 2016, 10:02 AM bigkensteele
Nice fab work.
:agree: Great job! Jan 18 2016, 07:19 PM tygaboy As mentioned, I'm working with Rich Johnson on... Feb 1 2016, 12:22 PM tygaboy On the drive train front, I'm getting to know ... Feb 1 2016, 12:48 PM tygaboy Struts are all done. Almost too pretty to hide und... Feb 5 2016, 04:13 PM tygaboy Fit the door sills. Learning that I get a better ... Feb 6 2016, 04:55 PM tygaboy Welded, ground and primer on! On to seam seali... Feb 6 2016, 04:56 PM tygaboy Did I say "on to seam sealer"? Maybe not... Feb 7 2016, 05:42 PM Larmo63 That is a pretty clean trunk you have there.
Nice... Feb 7 2016, 06:48 PM tygaboy Another repair of PO hole drilling. There were som... Feb 23 2016, 04:45 PM tygaboy So, it's time to fab up a patch. Here's a ... Feb 23 2016, 04:48 PM tygaboy Time to trim / fit the patch. Feb 23 2016, 04:51 PM tygaboy :sawzall: then :welder: then (insert grinder emo... Feb 23 2016, 04:55 PM tygaboy Oh, and I almost forgot: After 28 years, that... Feb 23 2016, 05:37 PM tygaboy Total Change of plan:
This car will be left stock ... Mar 3 2016, 12:10 PM iwanta914-6 I'm interested when it's all put back toge... Mar 3 2016, 12:25 PM tygaboy
I'm interested when it's all put back tog... Mar 3 2016, 12:44 PM iwanta914-6
I'm interested when it's all put back to... Mar 3 2016, 03:27 PM iwanta914-6 What was the original color anyway? Mar 3 2016, 03:28 PM tygaboy
What was the original color anyway?
L 99 A - De... Mar 3 2016, 07:10 PM iwanta914-6
What was the original color anyway?
L 99 A - D... Mar 3 2016, 07:50 PM tygaboy Wrapping up the front floor half install. Got to t... Mar 7 2016, 05:09 PM tygaboy Then I went after it on the car. I did my current ... Mar 7 2016, 05:12 PM Mikey914 You may be able to duplicate the look of the seam ... Mar 9 2016, 12:21 AM tygaboy
You may be able to duplicate the look of the seam... Mar 12 2016, 03:58 PM tygaboy Let's finish up the floor, shall we? Found tim... Mar 12 2016, 04:03 PM tygaboy :welder: :welder: and I have a repaired tunnel... Mar 12 2016, 04:05 PM iwanta914-6 I see she's up for sale at a very reasonable p... Aug 11 2016, 01:18 PM tygaboy And....... she's sold! Kind of a sad day b... Aug 15 2016, 06:41 PM Reverend Troublemaker and congrats to you Sir! Looking forward to se... Aug 15 2016, 07:15 PM  |
1 User(s) are reading this topic (1 Guests and 0 Anonymous Users)
0 Members:

|
Lo-Fi Version | Time is now: 2nd April 2026 - 08:55 AM |
Invision Power Board
v9.1.4 © 2026 IPS, Inc.