|
|
|
Porsche, and the Porsche crest are registered trademarks of Dr. Ing. h.c. F. Porsche AG.
This site is not affiliated with Porsche in any way. Its only purpose is to provide an online forum for car enthusiasts. All other trademarks are property of their respective owners. |
|
|

  |

| 74ravenna |
 Nov 15 2015, 12:07 PM Nov 15 2015, 12:07 PM
Post
#1
|
|
Member  Group: Members Posts: 472 Joined: 19-October 14 From: nh Member No.: 18,032 Region Association: North East States |
I hate to ask because it should be pretty straight forward and I've searched the site for an explanation but couldn't find one.
So, what is the process for seat removal? The bolts at the rear of the track are easy enough to access but what about the forward bolts? Or does the seat slide out of the tracks somehow? I just need to access the wiring and do a little cleaning (surface rust removal) of the floor. Thanks in advance. |
   |

 
|
| mepstein |
Nov 15 2015, 12:16 PM
Post
#2
|
|
914-6 GT in waiting Group: Members Posts: 19,958 Joined: 19-September 09 From: Landenberg, PA/Wilmington, DE Member No.: 10,825 Region Association: MidAtlantic Region |
The seat slides off the track. I slide my finger under the track next to the sill. Press on the metal spring and slide the seat forward. Once you find the flat metal spring and push it flat to the rail, the seat will slide out of the track. Takes seconds. No tools.
|
 |
|
| Montreal914 |
Nov 15 2015, 12:21 PM
Post
#3
|
|
Senior Member Group: Members Posts: 1,856 Joined: 8-August 10 From: Claremont, CA Member No.: 12,023 Region Association: Southern California |
Two ways:
What you described; 2 screws on each side in the back. The front is simply engaged in the tilt mechanism. Once you remove the 4 rear screws, the seat is pretty much free (you will see). Or, slide the seat all the way forward until it its the stop, then back it off by 1/4-1/2". You then need to slide your finger in one of the two rails (I forget which one) from the front side and lift the metal tongue (stopping device) which will allow you to pull the seat forward, completely out of the rail. Worth removing with the screws the first time which will allow you to see the stopping mechanism with the seat out of the car. You can then slide out the rails, do even more cleaning. Next time you will be able to do just the slide out. Good luck. |
|
|
|
| 74ravenna |
Nov 15 2015, 01:31 PM
Post
#4
|
|
Member Group: Members Posts: 472 Joined: 19-October 14 From: nh Member No.: 18,032 Region Association: North East States |
Yup, came right out.
Now, there were/are disconnected wires that look like they are supposed to plug into the relays under the seat. Are all of these supposed to plug in, my guess is yes, then if so how do I figure out where the 3 leads plug in? Steve |
|
|
|
| Dave_Darling |
Nov 15 2015, 03:24 PM
Post
#5
|
|
914 Idiot Group: Members Posts: 15,196 Joined: 9-January 03 From: Silicon Valley / Kailua-Kona Member No.: 121 Region Association: Northern California |
Sounds like you have a 74? If so, those are for the "door ajar" buzzer, and for the Dreaded Seatbelt Interlock Relay. The relay can AND SHOULD be disarmed by splicing the two fat yellow wires that run to it together. The relay itself can be discarded or reinstalled, whatever floats your boat, at that point.
--DD |
|
|
|
| 74ravenna |
Nov 16 2015, 03:38 AM
Post
#6
|
|
Member Group: Members Posts: 472 Joined: 19-October 14 From: nh Member No.: 18,032 Region Association: North East States |
I do have a 74! I will take your advice and disarm it.
Thanks Steve |
|
|
|
| EdwardBlume |
Nov 16 2015, 06:40 AM
Post
#7
|
|
914 Wizard Group: Members Posts: 12,338 Joined: 2-January 03 From: SLO Member No.: 81 Region Association: Central California |
Not a bad idea to clean the rails and add some lubricant ie grease the rails upon reinstallation. 74s are the best BTW. (IMG:style_emoticons/default/shades.gif)
|
|
|
|
| 74ravenna |
Nov 16 2015, 08:29 AM
Post
#8
|
|
Member Group: Members Posts: 472 Joined: 19-October 14 From: nh Member No.: 18,032 Region Association: North East States |
I am definitely cleaning and lubing the rails. They operate very difficultly.
I first need to touch up some surface rust where the steel brackets that hold the relays and seat rails mount. Basically anything above where the coating was applied by the factory. As I chip off the coating around the seams I quickly get to shiny gray steel. Should I trust that there is no need to proceed and can leave the original coating on or is it more likely that there'll be hidden rust in some areas? Thanks Steve |
|
|
|
| orthobiz |
Nov 16 2015, 09:26 PM
Post
#9
|
|
Senior Member Group: Members Posts: 1,758 Joined: 8-January 07 From: Cadillac, Michigan Member No.: 7,438 Region Association: Upper MidWest |
My take on it in an old thread with lots of (excruciating) detail:
http://www.914world.com/bbs2/index.php?sho...=231430&hl= Paul |
|
|
|
| 74ravenna |
Dec 13 2015, 10:55 AM
Post
#10
|
|
Member Group: Members Posts: 472 Joined: 19-October 14 From: nh Member No.: 18,032 Region Association: North East States |
QUOTE(Dave_Darling @ Nov 15 2015, 04:24 PM)  Sounds like you have a 74? If so, those are for the "door ajar" buzzer, and for the Dreaded Seatbelt Interlock Relay. The relay can AND SHOULD be disarmed by splicing the two fat yellow wires that run to it together. The relay itself can be discarded or reinstalled, whatever floats your boat, at that point. --DD So do I understand this correctly? I splice the yellow/red stripe and yellow/white stripe together and tape off the rest of the wires? Thanks 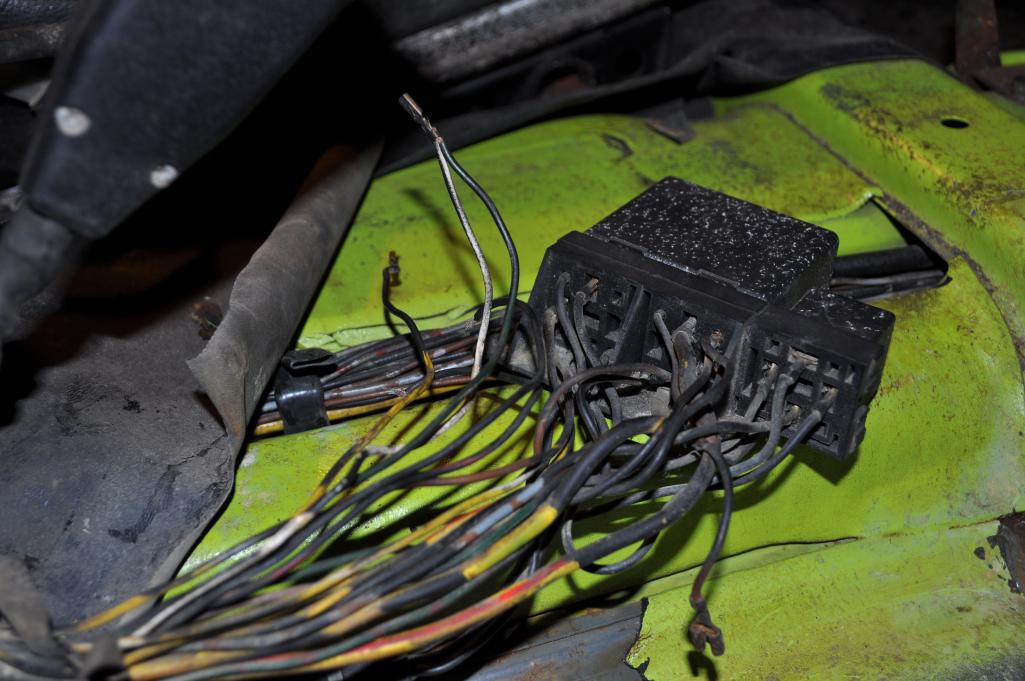 |
|
|
|
| 0396 |
Dec 13 2015, 11:01 AM
Post
#11
|
|
Advanced Member Group: Members Posts: 2,046 Joined: 13-October 03 From: L.A. Calif Member No.: 1,245 Region Association: Southern California |
QUOTE(74ravenna @ Dec 13 2015, 08:55 AM) QUOTE(Dave_Darling @ Nov 15 2015, 04:24 PM) Sounds like you have a 74? If so, those are for the "door ajar" buzzer, and for the Dreaded Seatbelt Interlock Relay. The relay can AND SHOULD be disarmed by splicing the two fat yellow wires that run to it together. The relay itself can be discarded or reinstalled, whatever floats your boat, at that point. --DD So do I understand this correctly? I splice the yellow/red stripe and yellow/white stripe together and tape off the rest of the wires? Thanks I have a 74, so (IMG:style_emoticons/default/popcorn[1].gif) |
|
|
|
| Dave_Darling |
Dec 13 2015, 01:54 PM
Post
#12
|
|
914 Idiot Group: Members Posts: 15,196 Joined: 9-January 03 From: Silicon Valley / Kailua-Kona Member No.: 121 Region Association: Northern California |
Yes. Splice the thick yellow/red wires together, and cover the splice with shrink tubing, to keep water and dirt out. Unless your 914 has no leaks. (IMG:style_emoticons/default/wink.gif)
--DD |
|
|
|
| 74ravenna |
Dec 13 2015, 02:06 PM
Post
#13
|
|
Member Group: Members Posts: 472 Joined: 19-October 14 From: nh Member No.: 18,032 Region Association: North East States |
QUOTE(Dave_Darling @ Dec 13 2015, 02:54 PM) Yes. Splice the thick yellow/red wires together, and cover the splice with shrink tubing, to keep water and dirt out. Unless your 914 has no leaks. (IMG:style_emoticons/default/wink.gif) --DD Ok, will do! Leaks? Its probably not "if" it leaks but how many leaks it'll have once its on the road. It hasn't been started in 32 years. It just sat it the POs cellar for that whole time so lots of dry rubber. Thanks once again for the help. Steve |
|
|
|
| jbyron |
Aug 10 2024, 11:42 AM
Post
#14
|
|
Jamie Group: Members Posts: 155 Joined: 17-July 07 From: Ballwin, MO Member No.: 7,916 Region Association: Upper MidWest |
Ok, zombie thread time. I just pulled my driver seat by removing the bolts because I couldn't find the spring release. Once removed, I found the spring on the TUNNEL side of the seat. Does that imply it's a passenger seat installed on the wrong side?
Oh, and the seat adjuster loop is on the left had for both seats. I think I have two passenger seats?? |
|
|
|
| Cairo94507 |
Aug 10 2024, 04:10 PM
Post
#15
|
|
Michael Group: Members Posts: 10,379 Joined: 1-November 08 From: Auburn, CA Member No.: 9,712 Region Association: Northern California |
The seat slider adjuster should be adjacent to the tunnel on both seats. Sound like you have 2 of the same seat brackets. (IMG:style_emoticons/default/beerchug.gif)
|
|
|
|
| jbyron |
Aug 10 2024, 08:11 PM
Post
#16
|
|
Jamie Group: Members Posts: 155 Joined: 17-July 07 From: Ballwin, MO Member No.: 7,916 Region Association: Upper MidWest |
QUOTE(Cairo94507 @ Aug 10 2024, 05:10 PM) The seat slider adjuster should be adjacent to the tunnel on both seats. Sound like you have 2 of the same seat brackets. (IMG:style_emoticons/default/beerchug.gif) Ok yeah, that makes sense. I don't actually need a different seat, I just need a driver side seat bracket. Thanks! |
|
|
|
| doug_b_928 |
Aug 10 2024, 08:28 PM
Post
#17
|
|
Senior Member Group: Members Posts: 714 Joined: 17-January 13 From: Winnipeg Member No.: 15,382 Region Association: Canada |
The silver brackets (one of which has the black handled seat adjuster) are independently bolted to the seat base so you should be able to just remove the seat and reverse the two silver brackets from that seat (i.e., switch them to opposite sides of the same seat). To check if you actually have two of the same side seats feel for the larger indentation on the driver’s seat which is a relief for the ebrake handle) and see if it’s just as big on the passenger seat (which would indicate that you have two driver’s seats). But I’m guessing a PO just put the silver tails on backwards on one of the seats.
|
|
|
|
| jbyron |
Aug 12 2024, 08:11 AM
Post
#18
|
|
Jamie Group: Members Posts: 155 Joined: 17-July 07 From: Ballwin, MO Member No.: 7,916 Region Association: Upper MidWest |
QUOTE(doug_b_928 @ Aug 10 2024, 09:28 PM) The silver brackets (one of which has the black handled seat adjuster) are independently bolted to the seat base so you should be able to just remove the seat and reverse the two silver brackets from that seat (i.e., switch them to opposite sides of the same seat). To check if you actually have two of the same side seats feel for the larger indentation on the driver’s seat which is a relief for the ebrake handle) and see if it’s just as big on the passenger seat (which would indicate that you have two driver’s seats). But I’m guessing a PO just put the silver tails on backwards on one of the seats. Tried swapping the silver brackets, but couldn't get the seat to go back on the rails. The metal prong that catches on the release spring interferes with the seat adjuster. Definitely have two passenger seats - no e-brake indentation. Ordering a replacement seat bracket for the driver's side. |
|
|
|
|
1 User(s) are reading this topic (1 Guests and 0 Anonymous Users)
0 Members:

|
Lo-Fi Version | Time is now: 8th July 2025 - 11:08 AM |
Invision Power Board
v9.1.4 © 2025 IPS, Inc.