|
|
|
Porsche, and the Porsche crest are registered trademarks of Dr. Ing. h.c. F. Porsche AG.
This site is not affiliated with Porsche in any way. Its only purpose is to provide an online forum for car enthusiasts. All other trademarks are property of their respective owners. |
|
|

  |

| sdoolin |
 Apr 11 2016, 05:43 PM Apr 11 2016, 05:43 PM
Post
#81
|
|
Member  Group: Members Posts: 423 Joined: 1-May 14 From: LouKY Member No.: 17,299 Region Association: None |
More fun finding TDC on #1. This fan from a bus (of course) so no marks on the fan itself, just a single mark on the pulley. That mark lines up at about 32 BTDC - which I think makes sense for a bus. You can barely see that mark (white dot) in the second image. Of course my pics will be rotated to appear as if I may have been standing on my head when I snapped them...
 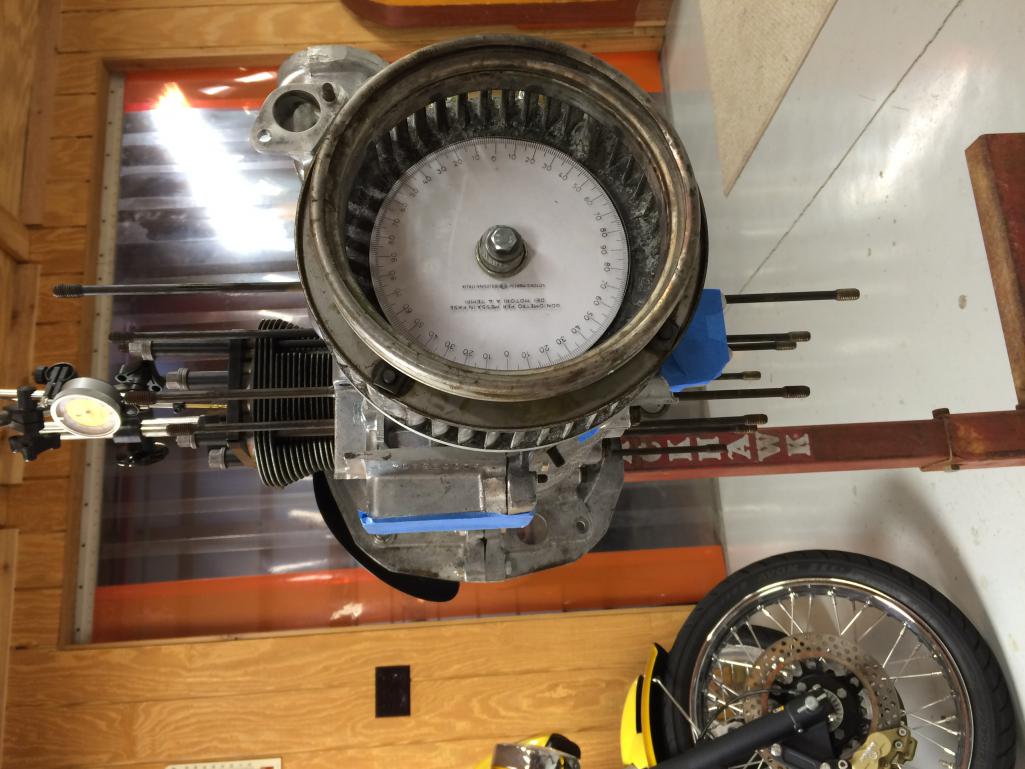 I suppose I need to make some marks so I can time this thing from the top through the timing sight in the fan shroud.... |
   |

 
|
| stugray |
Apr 11 2016, 07:43 PM
Post
#82
|
|
Advanced Member Group: Members Posts: 3,825 Joined: 17-September 09 From: Longmont, CO Member No.: 10,819 Region Association: None |
QUOTE(sdoolin @ Apr 11 2016, 05:43 PM)  I suppose I need to make some marks so I can time this thing from the top through the timing sight in the fan shroud.... I time my engine from the rear using the flywheel marks. There is (should be) a machined notch with white paint at TDC #1. I made a yellow mark 180 degrees from that. I can time my engine with the white mark thru the hole in the top front of the trans case, and I can set my valves from underneath using the white & yellow marks alternating as I rotate for each set of valves. You can see the white mark here: https://www.youtube.com/watch?v=QtPd5qzyTk8 I dont use the marks on the fan for anything anymore. |
|
|
|
| Dave_Darling |
Apr 11 2016, 08:49 PM
Post
#83
|
|
914 Idiot Group: Members Posts: 15,355 Joined: 9-January 03 From: Silicon Valley / Kailua-Kona Member No.: 121 Region Association: Northern California |
First: I would try to quantify the effect on deck height measurement of rocking the piston in the bore. You might find it is significant, or you might find it is not so.
Second: Removing material from one or both ends of the cylinder will raise the compression, not reduce it. Third: If Jake, who designed the cam profile and had input on the chamber shape and porting, says you should target 9:1, I would do what I can to get as close as possible to 9.000:1. --DD |
|
|
|
| sdoolin |
Apr 12 2016, 06:15 AM
Post
#84
|
|
Member Group: Members Posts: 423 Joined: 1-May 14 From: LouKY Member No.: 17,299 Region Association: None |
QUOTE(Dave_Darling @ Apr 11 2016, 10:49 PM) First: I would try to quantify the effect on deck height measurement of rocking the piston in the bore. You might find it is significant, or you might find it is not so. Second: Removing material from one or both ends of the cylinder will raise the compression, not reduce it. Third: If Jake, who designed the cam profile and had input on the chamber shape and porting, says you should target 9:1, I would do what I can to get as close as possible to 9.000:1. --DD First - I did attempt to quantify piston movement during deck height measurement. I would raise the piston in the bore until it just kissed my calibrated screw, not enough to move/rock the piston. Then lower piston, turn screw 1/4 turn (.25mm) then raise piston again. In all instances the 1/4 turn was too far, essentially using up all available piston "rock" and stopping the piston before it reached TDC (engine would not turn any farther). So - piston rock less than .25mm and my deck height (in the jug) of 1.0mm seems accurate. Second - agree, I am removing .72mm in an attempt to raise the compression ratio to 9.0:1. Third - COMPLETELY agree. Thanks for the input DD. |
|
|
|
| sdoolin |
Apr 28 2016, 06:42 AM
Post
#85
|
|
Member Group: Members Posts: 423 Joined: 1-May 14 From: LouKY Member No.: 17,299 Region Association: None |
More progress. Have spent the better part of a week fabricating a fixture to take material (.72mm) off the top of the jugs in order to get the CR desired.
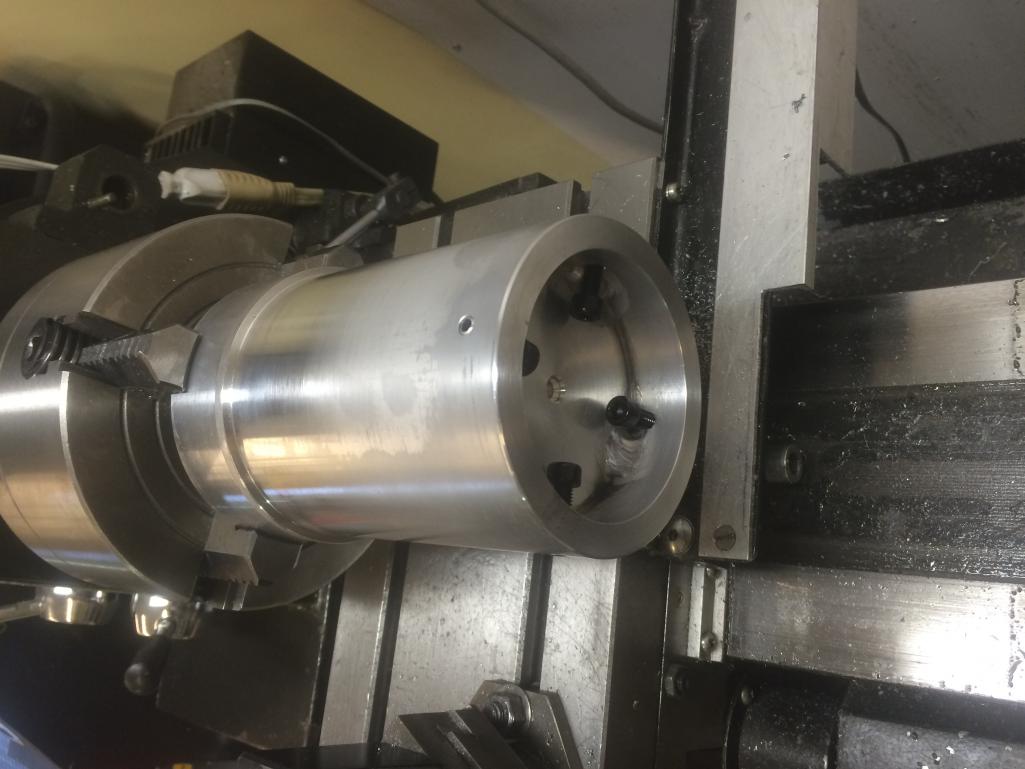  The jugs is very nearly an interference fit onto the fixture, and slides down to a shoulder to ensure all is true. Will use the tailstock on the lathe to make things even more secure/stabil when making the cut to the jugs. There are 4 aluminum set screws on the inside of the fixture to secure the jug. Is this overkill - YES. But all will be very true, and very much the same once completed. |
|
|
|
| sdoolin |
Apr 30 2016, 10:41 AM
Post
#86
|
|
Member Group: Members Posts: 423 Joined: 1-May 14 From: LouKY Member No.: 17,299 Region Association: None |
Never drop a brand new cylinder (or any other cylinder you might want to use). I turned down 3 of 4 cylinders using my wayoverthetop fixture, then tripped slightly on a dogs leash in my buddy's shop allowing the fourth cylinder to escape my grasp.
Damaged the skirt ever so slightly and it will not slip over my wayoverthetop fixture. Anyone have a single 96mm cylinder laying around that they feel the need to part with? |
|
|
|
| wndsrfr |
Apr 30 2016, 07:25 PM
Post
#87
|
|
Senior Member Group: Members Posts: 1,464 Joined: 30-April 09 From: Rescue, Virginia Member No.: 10,318 Region Association: MidAtlantic Region |
QUOTE(sdoolin @ Apr 30 2016, 08:41 AM) Never drop a brand new cylinder (or any other cylinder you might want to use). Anyone have a single 96mm cylinder laying around that they feel the need to part with? Yep, got a box with 4 of them that may work for you just gathering dust....I'll ship them to you & you can decide to pay whatever is fair IF you can use one & you hang on to the rest for the next unlucky dude. PM me your address-- |
|
|
|
| sdoolin |
May 1 2016, 07:38 AM
Post
#88
|
|
Member Group: Members Posts: 423 Joined: 1-May 14 From: LouKY Member No.: 17,299 Region Association: None |
QUOTE(wndsrfr @ Apr 30 2016, 09:25 PM) QUOTE(sdoolin @ Apr 30 2016, 08:41 AM) Never drop a brand new cylinder (or any other cylinder you might want to use). Anyone have a single 96mm cylinder laying around that they feel the need to part with? Yep, got a box with 4 of them that may work for you just gathering dust....I'll ship them to you & you can decide to pay whatever is fair IF you can use one & you hang on to the rest for the next unlucky dude. PM me your address-- I love this place. PM sent wndsrfr. |
|
|
|
| stugray |
May 1 2016, 10:43 AM
Post
#89
|
|
Advanced Member Group: Members Posts: 3,825 Joined: 17-September 09 From: Longmont, CO Member No.: 10,819 Region Association: None |
Nice setup for trimming. I wish I had a machine shop at my disposal.
One thing keeps nagging me. Why have I NEVER seen someone else ever trim the jugs like this? This is the first time I have ever heard mention of it. I have 9.5:1 and didn't have to trim my jugs. I think that lip on the heads is what killed you. |
|
|
|
| sdoolin |
May 2 2016, 06:27 AM
Post
#90
|
|
Member Group: Members Posts: 423 Joined: 1-May 14 From: LouKY Member No.: 17,299 Region Association: None |
Stugray - I agree about trimming the jugs. I asked quite a few times about it in this thread, got no real response. In all of my reading/research, material was removed from the heads to raise compression, never the jug(s) - which is why I asked so many times.
I bolted the heads up and measured clearance before deciding to go this route. Head - Jug clearance with everything torqued to spec was 1.25mm, so removing .72mm from the top of the jugs should not (I pray) create an issue there. Perhaps the 1mm step in the heads is the reason, not sure. All clearances will get very carefully measured as it goes together. I just gotta try not to drop anything else important... |
|
|
|
| wndsrfr |
May 2 2016, 06:56 PM
Post
#91
|
|
Senior Member Group: Members Posts: 1,464 Joined: 30-April 09 From: Rescue, Virginia Member No.: 10,318 Region Association: MidAtlantic Region |
QUOTE(sdoolin @ May 1 2016, 05:38 AM) QUOTE(wndsrfr @ Apr 30 2016, 09:25 PM) QUOTE(sdoolin @ Apr 30 2016, 08:41 AM) Never drop a brand new cylinder (or any other cylinder you might want to use). Anyone have a single 96mm cylinder laying around that they feel the need to part with? Yep, got a box with 4 of them that may work for you just gathering dust....I'll ship them to you & you can decide to pay whatever is fair IF you can use one & you hang on to the rest for the next unlucky dude. PM me your address-- I love this place. PM sent wndsrfr. OK....jugs went out via Priority Mail today, prolly be there Wed.... |
|
|
|
| sdoolin |
May 4 2016, 10:11 AM
Post
#92
|
|
Member Group: Members Posts: 423 Joined: 1-May 14 From: LouKY Member No.: 17,299 Region Association: None |
Thanks wndsrfr. Let me know what the shipping was.
Is there an official opinion on cylinder - piston clearance? I am measuring .002 and well, that seems very tight. I have already gapped my ringset (.020 top, .015 second), but if I need to hone the jugs for more clearance I will source another set (of rings). And I thought I'd have this thing built by now.... (IMG:style_emoticons/default/screwy.gif) |
|
|
|
| wndsrfr |
May 5 2016, 10:20 AM
Post
#93
|
|
Senior Member Group: Members Posts: 1,464 Joined: 30-April 09 From: Rescue, Virginia Member No.: 10,318 Region Association: MidAtlantic Region |
QUOTE(sdoolin @ May 4 2016, 08:11 AM) Thanks wndsrfr. Let me know what the shipping was. Is there an official opinion on cylinder - piston clearance? I am measuring .002 and well, that seems very tight. I have already gapped my ringset (.020 top, .015 second), but if I need to hone the jugs for more clearance I will source another set (of rings). And I thought I'd have this thing built by now.... (IMG:style_emoticons/default/screwy.gif) Was there a sheet that came with the pistons telling about p/c clearance? Are you using KB hypereutectic or J&B forged? Here's a link to clearances--I used the "Baja aircooled" recommendation on my build. http://www.hughesengines.com/TechArticles/...cticpistons.php Don't sweat shipping til you know if the jugs are useable... |
|
|
|
| sdoolin |
May 29 2016, 09:37 AM
Post
#94
|
|
Member Group: Members Posts: 423 Joined: 1-May 14 From: LouKY Member No.: 17,299 Region Association: None |
OK - so I had to take a break from this for a few weeks - other life priorities got in the way. I'm still not sure what I will do about the damaged jug - but should know this week. That means I will be able to finish the long block this week and then onto valve train geometry (yes, I said that back in February also).
Still no adjustable pushrod from Type IV Store, so I need to sort that out. Some questions... Can I set crank thrust (end play) with the long block all bolted up or do I need to do that before I get pistons, cylinders and heads installed? Crank moves very freely for/aft before everything bolted up. For ignition timing - I have been told by someone I trust to set initial advance at 14*, and full advance at 28*. But not sure if this is BTDC or ATDC. Does this mean I should make marks on my fan at those degrees of crank rotation (I have a degree wheel on the fan/crank) for use in timing later? I think yes, but would like other opinions. I need a distributor. Curious about opinions on what to use and where to get. |
|
|
|
| stugray |
May 29 2016, 10:32 AM
Post
#95
|
|
Advanced Member Group: Members Posts: 3,825 Joined: 17-September 09 From: Longmont, CO Member No.: 10,819 Region Association: None |
QUOTE(sdoolin @ May 29 2016, 09:37 AM) OK - so I had to take a break from this for a few weeks - other life priorities got in the way. I'm still not sure what I will do about the damaged jug - but should know this week. That means I will be able to finish the long block this week and then onto valve train geometry (yes, I said that back in February also). Still no adjustable pushrod from Type IV Store, so I need to sort that out. Some questions... Can I set crank thrust (end play) with the long block all bolted up or do I need to do that before I get pistons, cylinders and heads installed? Crank moves very freely for/aft before everything bolted up. For ignition timing - I have been told by someone I trust to set initial advance at 14*, and full advance at 28*. But not sure if this is BTDC or ATDC. Does this mean I should make marks on my fan at those degrees of crank rotation (I have a degree wheel on the fan/crank) for use in timing later? I think yes, but would like other opinions. I need a distributor. Curious about opinions on what to use and where to get. You can set the endplay with the engine finished and just before you bolt on the FW for the last time. Timing is usually set to 5deg BTDC 'static' before you fire up the engine for cam breakin. You wont be able to set it properly until after breakin. I use the mark on the FW through the access hole on the top of the tranny and a variable timing light. For me it is much easier to see than through the fan housing hole. https://www.youtube.com/watch?v=QtPd5qzyTk8 for dizzy, I use the mallory unilite, but they have been discontinued and are hard to find. |
|
|
|
| Bulldog9 |
May 29 2016, 11:53 AM
Post
#96
|
|
Senior Member Group: Members Posts: 706 Joined: 21-August 13 From: United States Member No.: 16,283 Region Association: MidAtlantic Region |
Not sure anyone else responded yet, but removing material or reducing deck height will increase your CR. If you are at 9.3 and want to go to 9.1 you need to increase deck height (meaning top of cyls). I added a .60 mm spacer under the jug to increase deck height and used NO cyl head gaskets or paper base, and with my Hoffman Rebuilt Heads am running about an 8.6:1 compression ratio. So a .55 or .50 should put you in the ballpark, but you can do the math if you want to be exact.
from Removing QUOTE(sdoolin @ Apr 9 2016, 12:26 PM) More deck height and compression ratio questions (really the same one but I never got a response(?)). I have measured and re-measured deck height on all 4 cylinders. All come up with 1mm deck height in the jug. I got sage advice from HAM that there is 1mm of step (deck height) in my cylinder heads. This gives me a total deck height of 2mm. I am targeting 9:1 Compression ratio. Plugging the numbers into CB's engine calculator and solving for deck height it yields 1.28mm for a CR of 9:1. So I need to remove 2.00mm - 1.28mm = 0.72mm. I'm pretty comfortable with my measurements and with this math. My question (finally) - can I remove 0.72mm from the jug, or do I need to remove it from the head?[i] It'd be much easier for me to remove it from the jug, so I'd prefer that, but if the conventional wisdom is against that, then I'll send the heads out. If it is OK to remove this material from the jugs I could get it done this weekend and complete the short block... As always - thanks in advance for all assistance. |
|
|
|
| sdoolin |
May 29 2016, 07:53 PM
Post
#97
|
|
Member Group: Members Posts: 423 Joined: 1-May 14 From: LouKY Member No.: 17,299 Region Association: None |
Having read a little more about timing today and given this a little more thought, the 14* initial and 28* full advance numbers I was asking about must be BTDC (hence why they are referred to as "advance"). So I plan to mark my fan at 0* (true TDC), at 5* BTDC (for break in), and then also at 14* and 28* BTDC for final tuning.
Stugray - thanks for the info on crank endplay - much appreciated. I really do need to find a dizzy. Steve Pratel - I have moved on from the CR thing, have removed .72mm from the tops of the jugs targeting a 9:1 CR. |
|
|
|
| sdoolin |
May 30 2016, 06:49 PM
Post
#98
|
|
Member Group: Members Posts: 423 Joined: 1-May 14 From: LouKY Member No.: 17,299 Region Association: None |
Finally made a little more progress. My dropped cylinder was able to be repaired (don't ask - but I am comfortable with what was done). So I was able to jig it up into the lathe and remove material from the top of it. Now that all 4 cylinders are the same height, I can move forward.
WNDSRFR - I did not use any of the jugs that you gifted me. I will PayPal you the $15 shipping this week, and will store those jugs in my barn either until the end of time, or until I can pay it forward for someone else to use. You are a scholar and a gentleman (I think). Checking ring end gap ...  I think I mentioned earlier I set top ring at .020, second ring at .015. Piston to cylinder clearance left at .002. Installing pistons into jugs... 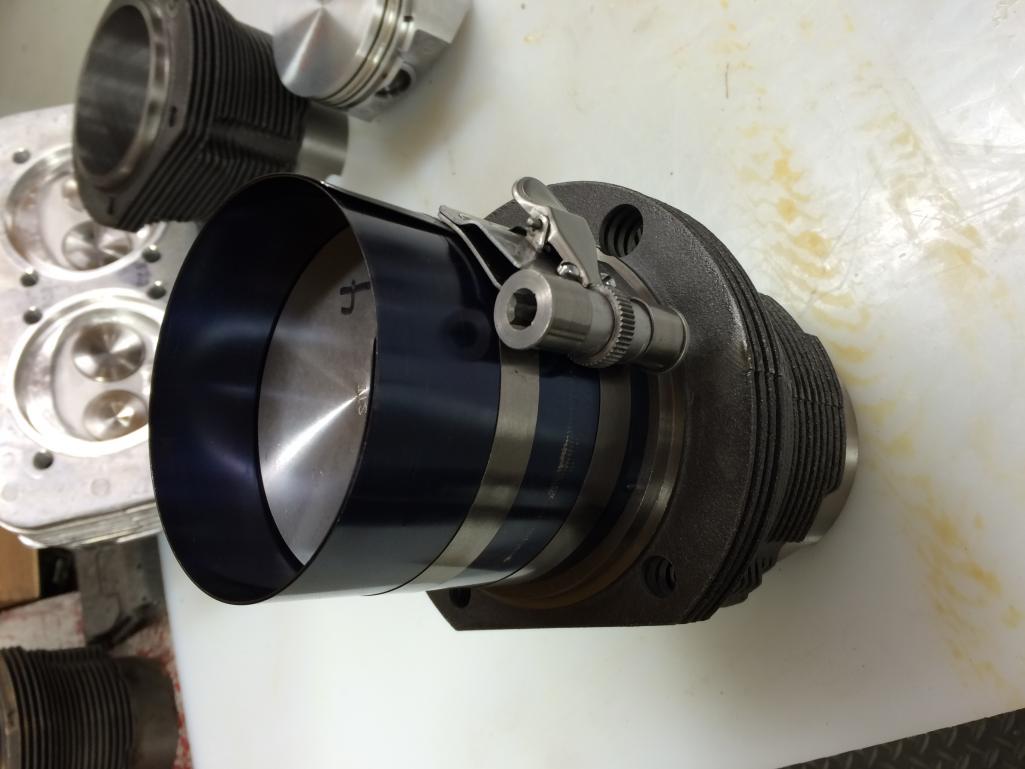 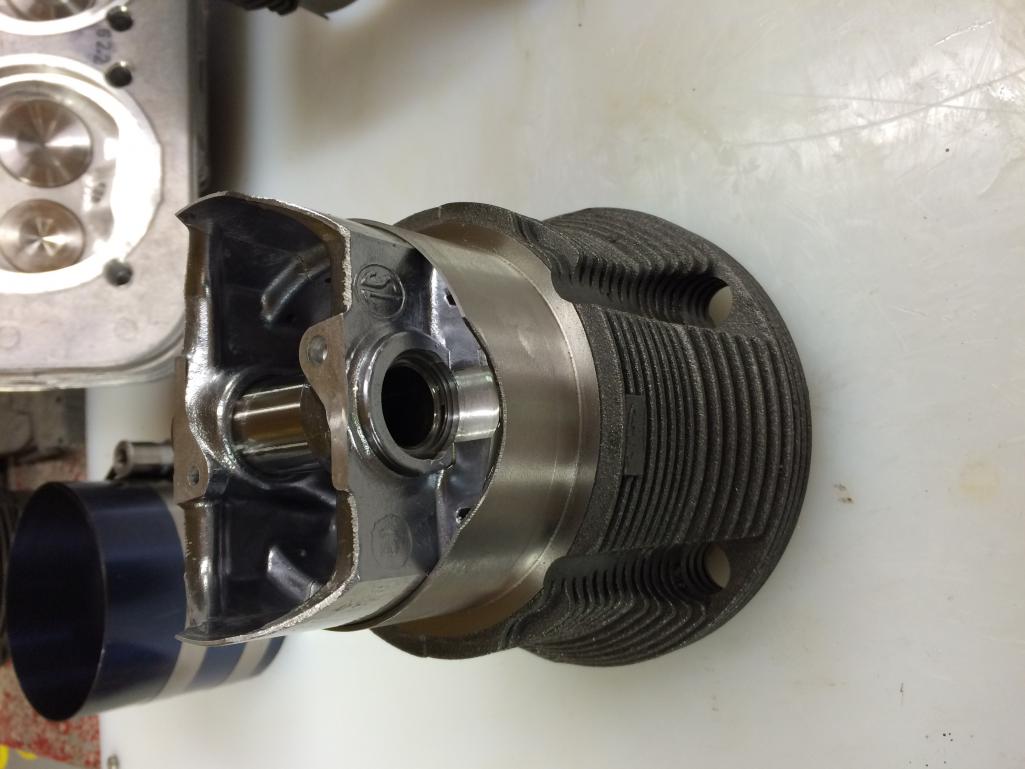 I hate (HATE) these new (to me) spiral-in wrist pin retainers. I hate them I say! |
|
|
|
| sdoolin |
May 30 2016, 06:58 PM
Post
#99
|
|
Member Group: Members Posts: 423 Joined: 1-May 14 From: LouKY Member No.: 17,299 Region Association: None |
And finally on side goes together (sort of still). I mangled one of the oil scraper rails so need to make an order before I do the other side. For now this is loosely bolted up with spacers and I will return to it when I get back from a week's worth of travel for work.
I still hate the spiral-in wrist pin retainers. No one can change my mind on that. 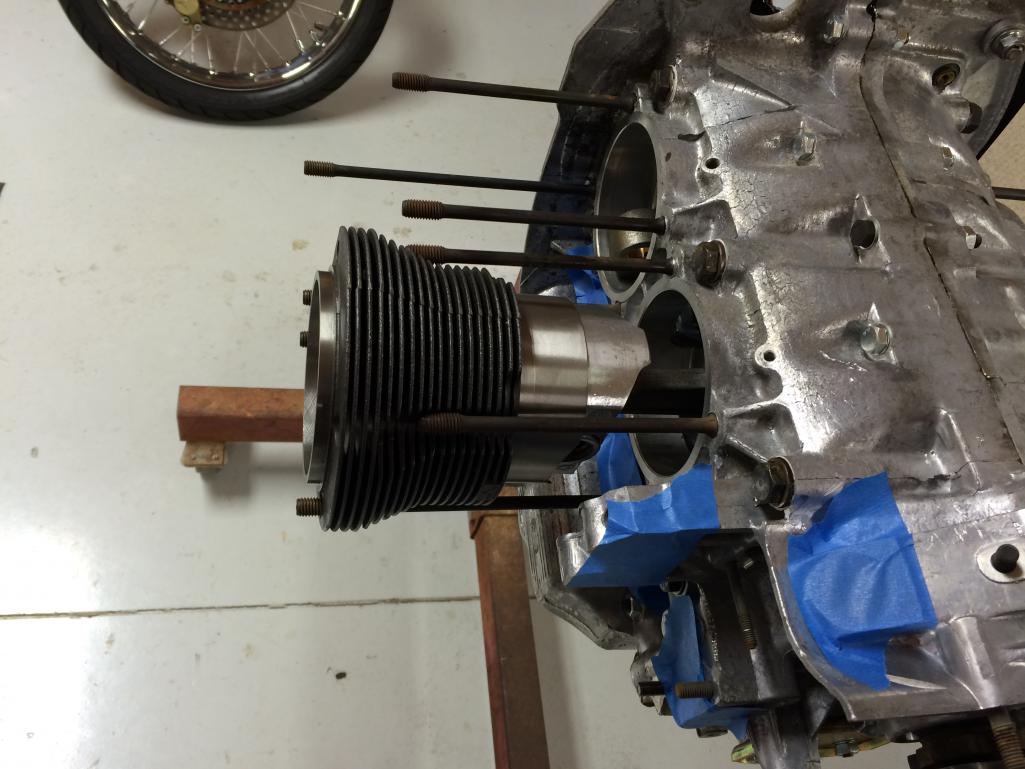 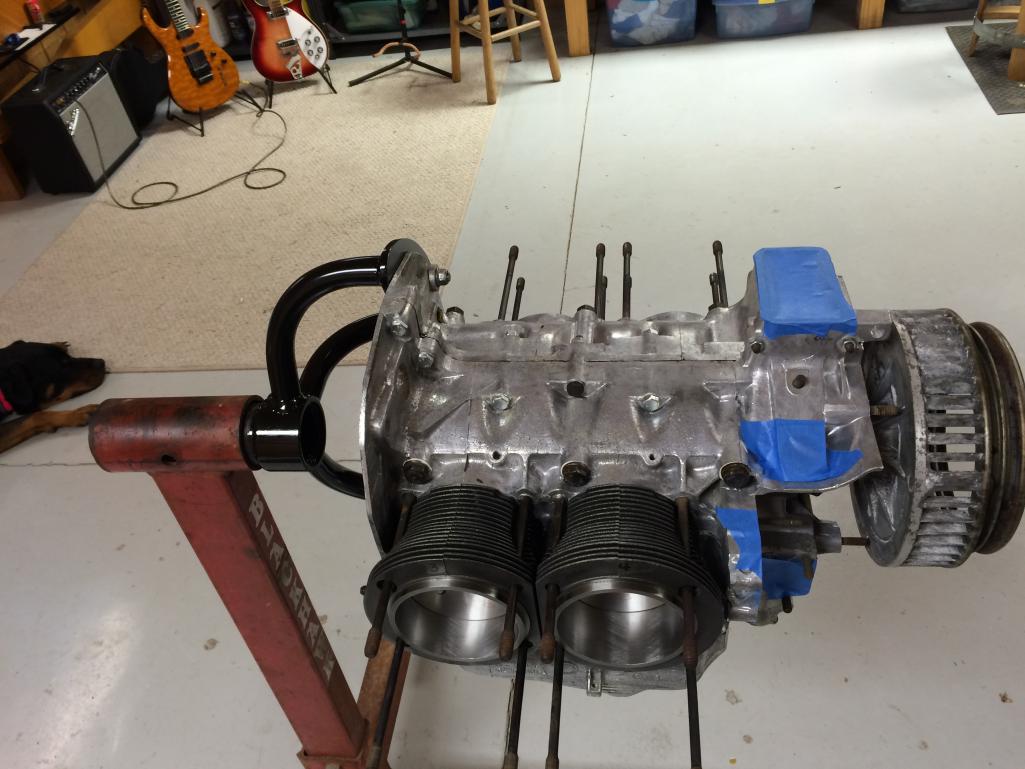 Have I mentioned that I hate the new spiral-in wrist pin retainers? |
|
|
|
| stugray |
May 31 2016, 06:31 AM
Post
#100
|
|
Advanced Member Group: Members Posts: 3,825 Joined: 17-September 09 From: Longmont, CO Member No.: 10,819 Region Association: None |
QUOTE(sdoolin @ May 30 2016, 06:58 PM) Have I mentioned that I hate the new spiral-in wrist pin retainers? I saw a youtube vid where the person stretched the springs out so they looked more like a spring than a washer when sitting on the table. Then they can go in with one finger. You just start one end then compress the spring and they snap right in. For getting them out, I took a tiny screwdriver and bent the tip to form a tiny hook to grab the end. Like this one: https://www.youtube.com/watch?v=vOYH_WICGYM |
|
|
|
|
1 User(s) are reading this topic (1 Guests and 0 Anonymous Users)
0 Members:

|
Lo-Fi Version | Time is now: 23rd July 2026 - 06:35 AM |
Invision Power Board
v9.1.4 © 2026 IPS, Inc.