|
|
|
Porsche, and the Porsche crest are registered trademarks of Dr. Ing. h.c. F. Porsche AG.
This site is not affiliated with Porsche in any way. Its only purpose is to provide an online forum for car enthusiasts. All other trademarks are property of their respective owners. |
|
|

  |

| Cairo94507 |
 Aug 22 2023, 01:58 PM Aug 22 2023, 01:58 PM
Post
#341
|
|
Michael  Group: Members Posts: 10,721 Joined: 1-November 08 From: Auburn, CA Member No.: 9,712 Region Association: Northern California |
I really like the inner-long stiffening kit. Just have to aware of all the mounting holes for everything and be sure the stiffening kit fits right against the factory sheetmetal. Of course, only weld a couple spots at a time and allow too cool. I would brace the chassis first just in case.
Looking forward to seeing the progress; love that you drive your car a lot. (IMG:style_emoticons/default/beerchug.gif) |
   |

 
|
| Optimusglen |
Oct 5 2023, 09:26 AM
Post
#342
|
|
Senior Member Group: Members Posts: 953 Joined: 26-February 16 From: Minneapolis Member No.: 19,709 Region Association: Upper MidWest |
Back from Rennsport Reunion 7, pretty amazing trip!
While out there I used Turo to rent a 2020 Audi TT. part of this was an ulterior motive... been kinda bummed about my 914 and dreading the downtime, not being able to drive the car (for a season at least, hopefully not more) And for a while at least I was considering exiting the game. So, part of the reason for the rental was to see if I would like to have a newer sporty-ish car instead. As soon as I got home I ordered the inner long stiffening pieces, so that should tell you what you need to know. You guys are stuck with me. I know I'll need to do part of the floor too, but I need to wait until I get into it to see the extent, or what other sections may need to be replaced. |
 |
|
| Gint |
Oct 5 2023, 01:13 PM
Post
#343
|
|
Mike Ginter Group: Admin Posts: 16,108 Joined: 26-December 02 From: Denver CO. Member No.: 20 Region Association: Rocky Mountains |
QUOTE(Optimusglen @ Oct 5 2023, 08:26 AM)  been kinda bummed about my 914 and dreading the downtime, not being able to drive the car (for a season at least, hopefully not more) That's why you need more than one! |
|
|
|
| Optimusglen |
May 23 2024, 08:58 AM
Post
#344
|
|
Senior Member Group: Members Posts: 953 Joined: 26-February 16 From: Minneapolis Member No.: 19,709 Region Association: Upper MidWest |
Well, I mentally explored the route of finding a different chassis instead of doing the bodywork on my own. After weighing the options and expenses, I ended up scrapping the idea. The devil you know...
So I started cutting into it yesterday. Rough cuts are done, but I'm picking up some smaller cutting discs and a band file to do the detailed trimming and fitting. (IMG:http://www.914world.com/bbs2/uploads_offsite/live.staticflickr.com-19709-1716476328.1.jpg) (IMG:http://www.914world.com/bbs2/uploads_offsite/live.staticflickr.com-19709-1716476328.2.jpg) I noticed that the forward pinch seam on the patch panel is too rusty, once the pain portion is in I will trim that away and weld a new flat patch in for that. |
|
|
|
| Cairo94507 |
May 23 2024, 09:52 AM
Post
#345
|
|
Michael Group: Members Posts: 10,721 Joined: 1-November 08 From: Auburn, CA Member No.: 9,712 Region Association: Northern California |
|
|
|
|
| rudedude |
May 23 2024, 10:53 AM
Post
#346
|
|
Senior Member Group: Members Posts: 568 Joined: 1-January 05 From: minneapolis, mn Member No.: 3,387 Region Association: Upper MidWest |
Glen,
Nice work, hard to make that first cut isn't it. Are you still looking for doors? Let me know. Jule |
|
|
|
| Optimusglen |
May 23 2024, 11:03 AM
Post
#347
|
|
Senior Member Group: Members Posts: 953 Joined: 26-February 16 From: Minneapolis Member No.: 19,709 Region Association: Upper MidWest |
QUOTE(rudedude @ May 23 2024, 11:53 AM) Glen, Nice work, hard to make that first cut isn't it. Are you still looking for doors? Let me know. Jule Hey Jule, yeah if you've got doors I'd buy them off you, if they're clean. Bonus points if they're late model with the scissor window mechanisms. |
|
|
|
| Optimusglen |
Aug 30 2024, 04:39 PM
Post
#348
|
|
Senior Member Group: Members Posts: 953 Joined: 26-February 16 From: Minneapolis Member No.: 19,709 Region Association: Upper MidWest |
I've been slowly preparing for the lift. The struts are at PMB so that they can work their magic and lower the spindles.
For the rear I have one piece of the puzzle done. I designed these collars to lift the rear while keeping the overall travel/droop the same. 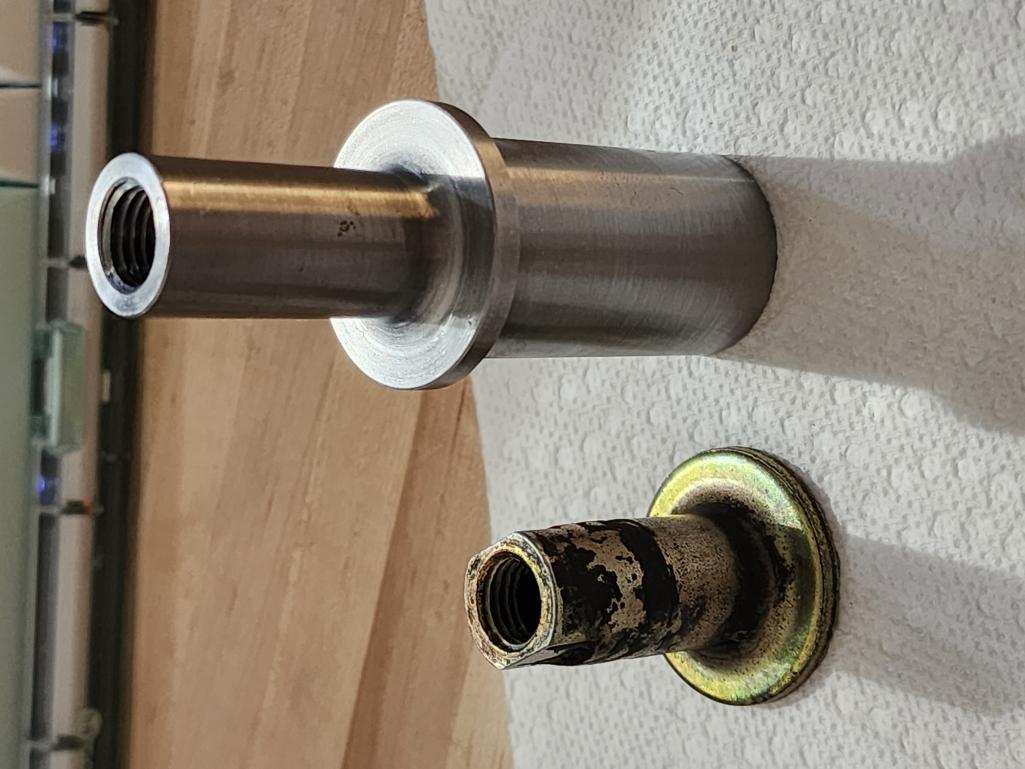 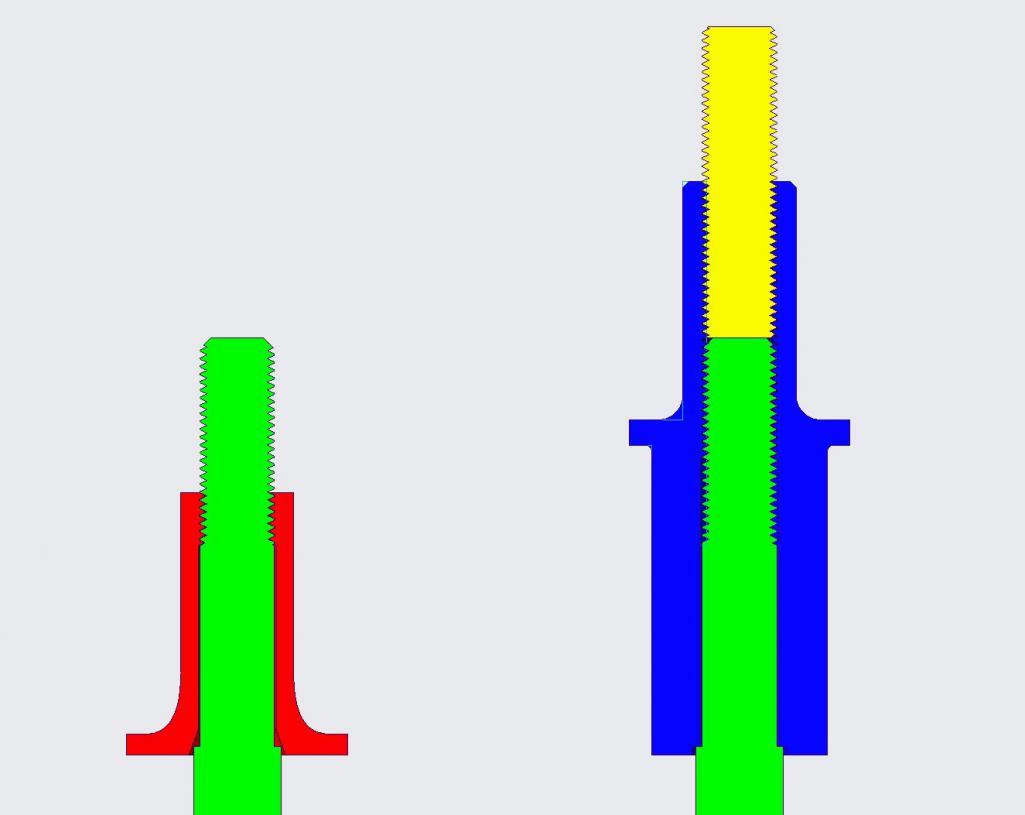 For the outer pivots I'll machine a spacer. And right now I'll likely need to do inner ear mods to create another mounting point lower down. I'm open to other solutions, but I think it's the only way. For now the car is still on the lift with the fender cut off. I need to get that welded on... |
|
|
|
| Optimusglen |
Sep 23 2024, 08:33 AM
Post
#349
|
|
Senior Member Group: Members Posts: 953 Joined: 26-February 16 From: Minneapolis Member No.: 19,709 Region Association: Upper MidWest |
Back with suspension!
I got the front struts back from PMB Performance. Dropped spindles with gussets added. Fresh paint too! Installed with new ball joints and tie rod ends, all the old stuff split boots when I was removing them. On the rear, I installed the collar that I designed and cranked the adjustable perches up a little just to get the height where I wanted it. I wanted to see just how much camber we're dealing with at ride height, without modifying the inner ears or spacing the outer pivots. On that front corner, I have a few tacks in place, but I think I need to do a bit more trimming. For both fenders, I needed to trim a little away from the front edge of the wheel well lip. To allow the wheels to turn left/right without hitting. I will need to make similar space with the front valence... if I mount one. I've been toying with the idea of leaving the front valence off and just running the front bumper. That may be a little too Mad Max though. Goal for the fall/winter is to get the fender welded up completely, the signal holes patched, a few small floorboard holes patched, and the inner long stiffening panels installed. Also, any inner rear suspension ear mods done. Paint will need to wait for next year, realistically. My garage is insulated, but not heated. Having set this to my desired ride height and tire size, I was not prepared to like it in the narrow as much as I do. That maaay delay the fender flare lay-up and install. (IMG:http://www.914world.com/bbs2/uploads_offsite/live.staticflickr.com-19709-1727102018.1.jpg) (IMG:http://www.914world.com/bbs2/uploads_offsite/live.staticflickr.com-19709-1727102020.2.jpg) (IMG:http://www.914world.com/bbs2/uploads_offsite/live.staticflickr.com-19709-1727102021.3.jpg) (IMG:http://www.914world.com/bbs2/uploads_offsite/live.staticflickr.com-19709-1727102021.4.jpg) |
|
|
|
| horizontally-opposed |
Sep 23 2024, 11:25 AM
Post
#350
|
|
Advanced Member Group: Members Posts: 3,456 Joined: 12-May 04 From: San Francisco Member No.: 2,058 Region Association: None |
|
|
|
|
| Bullethead |
Sep 23 2024, 01:05 PM
Post
#351
|
|
Oil Cooled heart Group: Members Posts: 969 Joined: 24-June 10 From: South Florida Member No.: 11,875 Region Association: South East States |
(IMG:style_emoticons/default/agree.gif) And those tires are perfect.
|
|
|
|
| DRPHIL914 |
Sep 23 2024, 03:13 PM
Post
#352
|
|
Dr. Phil Group: Members Posts: 5,955 Joined: 9-December 09 From: Kennesaw, GA Member No.: 11,106 Region Association: South East States |
QUOTE(horizontally-opposed @ Sep 23 2024, 01:25 PM) QUOTE(Bullethead @ Sep 23 2024, 03:05 PM) @Optimusglen (IMG:style_emoticons/default/agree.gif) Grabber A/T tires! so what will their purpose be, looks like you are heading int the off-road/rally direction? Phil |
|
|
|
| East coaster |
Sep 23 2024, 05:24 PM
Post
#353
|
|
Senior Member Group: Members Posts: 1,958 Joined: 28-March 03 From: Millville, NJ Member No.: 487 Region Association: None |
Welcome to the Safari club! I’m not sure how, but your rear camber looks ok to me. I had to add spacers (3/4”) on the outside of trailing arm mounts, and I lowered the inner mount point 1” to regain camber.
Lookin’ good! |
|
|
|
| Optimusglen |
Sep 23 2024, 09:56 PM
Post
#354
|
|
Senior Member Group: Members Posts: 953 Joined: 26-February 16 From: Minneapolis Member No.: 19,709 Region Association: Upper MidWest |
QUOTE(DRPHIL914 @ Sep 23 2024, 04:13 PM) QUOTE(horizontally-opposed @ Sep 23 2024, 01:25 PM) QUOTE(Bullethead @ Sep 23 2024, 03:05 PM) @Optimusglen (IMG:style_emoticons/default/agree.gif) Grabber A/T tires! so what will their purpose be, looks like you are heading int the off-road/rally direction? Phil I won't be hitting any jumps, but I wanted ground clearance and something that could handle a little bit of gravel. This is a driver, and the rallies I attend usually have gravel route options. Still tame enough for 90% road use though. The taller tires are going to give me some legs on the highway too. For my last x-country trip revs were a little high if I wanted to keep with traffic. For shorter drives it's fine but for 8 hours of highway it got old pretty quick. QUOTE(East coaster @ Sep 23 2024, 06:24 PM) Welcome to the Safari club! I’m not sure how, but your rear camber looks ok to me. I had to add spacers (3/4”) on the outside of trailing arm mounts, and I lowered the inner mount point 1” to regain camber. Lookin’ good! Yeah, I'm not sure exactly what the deal is here. I do know the rear passenger side had a lot of negative camber even in street guise. The metal all looks solid, so I had chalked it up to the factory not welding the panels in perfectly. For the lifted setup, the drivers side is borderline... I feel like in droop it might be heading into positive camber territory. I still want to measure where it's all at now, and maybe at full droop. If It's not too bad, I'm going to leave the inner ears as-is and chalk it up to dumb luck. BUT also... the tall tires account for a lot of the "lift" here. |
|
|
|
| Optimusglen |
May 12 2025, 08:52 AM
Post
#355
|
|
Senior Member Group: Members Posts: 953 Joined: 26-February 16 From: Minneapolis Member No.: 19,709 Region Association: Upper MidWest |
Some progress over the last week or so. I took some PTO at work to try and get some headway on the 914.
I got the new doors cleaned up and primed. The passenger door was excellent with only a couple of small areas where I needed to grind down surface rust and etch prime. The drivers door was a different story, with lots of removal of old primer hiding new traces of surface rust, grinding rough pitted metal, and in some cases missing sections altogether. For this car and this build, I felt it was acceptable to move forward. It's much better than my early door, and this is the only late style door I have. (IMG:http://www.914world.com/bbs2/uploads_offsite/live.staticflickr.com-19709-1747061522.1.jpg) I put the doors on the shelf and shifted my attention towards the car. I have the new front corner welded on mostly (there are a couple of spots I want to touch up) and the marker holes are all filled in. Then I stripped most of the interior, and the windshield came out, as well as the rear glass. I touched up a few light surface rust spots on the windshield frame and hit them with etching primer to protect them until it's time to do all the body primer/filler/surfacing etc. I have the inner long stiffening kit ready to go, that's probably my next step, as well as patching a few small perforations in the floorboards. I'm hoping to get the car painted and back together this summer at some point. #famouslastwords (IMG:http://www.914world.com/bbs2/uploads_offsite/live.staticflickr.com-19709-1747061522.2.jpg) |
|
|
|
| tygaboy |
May 12 2025, 08:59 AM
Post
#356
|
|
914 Guru Group: Members Posts: 5,845 Joined: 6-October 15 From: Petaluma, CA Member No.: 19,241 Region Association: Northern California |
I'll assume you're already planning for them but just in case: Ahead of chassis stiffening and the related welding, get a set of door braces. I can highly recommend Tangerine Racing's.
I checked the windshield-to-targa bar measurement so many times that 25.125 is seared into my memory forever. (IMG:style_emoticons/default/wacko.gif) Best of results on your upcoming work! (IMG:style_emoticons/default/welder.gif) |
|
|
|
| mb911 |
May 12 2025, 02:41 PM
Post
#357
|
|
914 Guru Group: Members Posts: 7,794 Joined: 2-January 09 From: Burlington wi Member No.: 9,892 Region Association: Upper MidWest |
QUOTE(tygaboy @ May 12 2025, 06:59 AM) I'll assume you're already planning for them but just in case: Ahead of chassis stiffening and the related welding, get a set of door braces. I can highly recommend Tangerine Racing's. I checked the windshield-to-targa bar measurement so many times that 25.125 is seared into my memory forever. (IMG:style_emoticons/default/wacko.gif) Best of results on your upcoming work! (IMG:style_emoticons/default/welder.gif) (IMG:style_emoticons/default/agree.gif) |
|
|
|
| Shivers |
May 12 2025, 05:11 PM
Post
#358
|
|
Senior Member Group: Members Posts: 3,493 Joined: 19-October 20 From: La Quinta, CA Member No.: 24,781 Region Association: Southern California |
(IMG:style_emoticons/default/welcome.png)
Congratulations. If you type into google 914world.com and then add what ever you are looking for, It works really well. I’ve never had much luck with the search here. If you can’t find it ask. There are some real guru’s here. Have fun Hahahaha, looks like I’m a little late to the party |
|
|
|
| Optimusglen |
Jul 28 2025, 11:26 PM
Post
#359
|
|
Senior Member Group: Members Posts: 953 Joined: 26-February 16 From: Minneapolis Member No.: 19,709 Region Association: Upper MidWest |
Things are moving along. The car is in epoxy now, and some filler has been done. Will be spraying 2k high build and start blocking towards the end of the week. Then hopefully epoxy sealer and then color next week. it's basically a scuff-n-spray, anything with starting rust I ground down to clean metal, but areas with clean paint I just sanded it down a bit to get a clean surface.
using SPI Epoxy primer and Turbo 2k, paint is single stage Omni (not great, I know, but I only found that out after I bought a gallon custom mixed) They couldn't find mix details for L21E Tangerine/Blood Orange so they scanned a section of my old door, turns out that GM Red Orange from 1980 was a 98% match. For this car, that's close enough, since it'll be an all-over paint job. (IMG:http://www.914world.com/bbs2/uploads_offsite/live.staticflickr.com-19709-1753767671.1.jpg) Here's the front fender where I made the splice. Can't really see much with just primer on. It's not perfect, but it also wont be sticking out like a sore thumb. (IMG:http://www.914world.com/bbs2/uploads_offsite/live.staticflickr.com-19709-1753767913.1.jpg) Making lemonade... While stripping the car down, I found more underbody damage, dents, and bends all over. Paired with the need for floors, I chose to band-aid it for now and start looking for a different shell next year. Maybe in the future I'll feel ambitious and want to tackle the metal work myself, if I can't find a straight shell to swap my parts onto. Until then, it'll be a fun driver and I'm not going to worry about it. |
|
|
|
| rudedude |
Jul 29 2025, 01:03 PM
Post
#360
|
|
Senior Member Group: Members Posts: 568 Joined: 1-January 05 From: minneapolis, mn Member No.: 3,387 Region Association: Upper MidWest |
Have you shot any of the omni color? I was just at local ppg paint shop looking for the same color in the old dcc line that is now discontinued and he was suggesting the omni. I wasnt impressed. He said the new essential? line is so hard that it needs to be sanded and buffed the next day or it is too hard correct defects. I'm really interested in your impression of the omni
Jule |
|
|
|
|
1 User(s) are reading this topic (1 Guests and 0 Anonymous Users)
0 Members:

|
Lo-Fi Version | Time is now: 27th July 2026 - 10:26 AM |
Invision Power Board
v9.1.4 © 2026 IPS, Inc.