|
|
|
Porsche, and the Porsche crest are registered trademarks of Dr. Ing. h.c. F. Porsche AG.
This site is not affiliated with Porsche in any way. Its only purpose is to provide an online forum for car enthusiasts. All other trademarks are property of their respective owners. |
|
|


| jack20 |
 Mar 28 2016, 11:52 PM Mar 28 2016, 11:52 PM
Post
#1
|
|
Member  Group: Members Posts: 406 Joined: 7-November 14 From: Granite Bay, CA Member No.: 18,099 Region Association: Northern California |
Today I removed the RH axle and hub on the way to a CV service, bearing replacement and hopefully rear bushings. Is it possible to remove the trailing arm without removing the 3 alignment bolts? I can't budge the 3 bolts.
Thanks in advance. Jack |
   |

 
|
  |
Replies(1 - 19)
| ndfrigi |
Mar 29 2016, 01:33 AM
Post
#2
|
|
Advanced Member Group: Members Posts: 2,928 Joined: 21-August 11 From: Orange County Member No.: 13,474 Region Association: Southern California |
try applying penetrating oil and use impact wrench or cross type tire wrench so you have balance when rotating it.
|
|
|
|
| Garland |
Mar 29 2016, 07:06 AM
Post
#3
|
|
Restoration Fanatic Group: Members Posts: 1,329 Joined: 8-January 04 From: ......Michigan...... Member No.: 1,535 Region Association: Upper MidWest |
There are plastic caps on the other side of the 3 bolts. Remove the caps and spray with penetrating oil.
|
|
|
|
| BeatNavy |
Mar 29 2016, 07:17 AM
Post
#4
|
|
Certified Professional Scapegoat Group: Members Posts: 2,924 Joined: 26-February 14 From: Easton, MD Member No.: 17,042 Region Association: MidAtlantic Region |
It is my understanding, although fortunately not my experience, that you really do NOT want to break or damage those bolts or threads. They can be repaired but it may not be easy (I believe there are one or two threads here on individuals' experiences). So I believe the lesson is be patient and use the normal "steps" as mentioned to help break them loose.
|
|
|
|
| ThePaintedMan |
Mar 29 2016, 07:38 AM
Post
#5
|
|
Advanced Member Group: Members Posts: 3,886 Joined: 6-September 11 From: St. Petersburg, FL Member No.: 13,527 Region Association: South East States |
(IMG:style_emoticons/default/agree.gif) Certainly not a fun job to replace. You might also consider heating them up with a MAPP torch to break loose the rust bond and/or punching the heads of the bolts with some well-placed hammer strikes. I have had success with both of those in the past to free up stuck fasteners.
|
|
|
|
| mepstein |
Mar 29 2016, 08:11 AM
Post
#6
|
|
914-6 GT in waiting Group: Members Posts: 19,276 Joined: 19-September 09 From: Landenberg, PA/Wilmington, DE Member No.: 10,825 Region Association: MidAtlantic Region |
God do we use a lot of mapp/acetalyne gas around the shop to unstick nuts and bolts.
|
 |
|
| r_towle |
Mar 29 2016, 08:25 AM
Post
#7
|
|
Custom Member Group: Members Posts: 24,574 Joined: 9-January 03 From: Taxachusetts Member No.: 124 Region Association: North East States |
Use an impact gun on those bolts, no a breaker bar...
|
|
|
|
| jack20 |
Mar 29 2016, 08:29 AM
Post
#8
|
|
Member Group: Members Posts: 406 Joined: 7-November 14 From: Granite Bay, CA Member No.: 18,099 Region Association: Northern California |
QUOTE(mepstein @ Mar 29 2016, 07:11 AM)  God do we use a lot of mapp/acetalyne gas around the shop to unstick nuts and bolts. Thanks guys. I tried an impact wrench yesterday but I didn't know about the plastic caps. I'll clean off the crud, remove them and shoot some PB blaster in there and some mapp gas heat on the heads. Should do it. Thanks for the help. Jack |
|
|
|
| jack20 |
Mar 29 2016, 08:34 AM
Post
#9
|
|
Member Group: Members Posts: 406 Joined: 7-November 14 From: Granite Bay, CA Member No.: 18,099 Region Association: Northern California |
QUOTE(r_towle @ Mar 29 2016, 07:25 AM) Use an impact gun on those bolts, no a breaker bar... Ok. I almost pulled out the breaker bar yesterday but I was very concerned about snapping off the heads... Thanks |
|
|
|
| madmax914 |
Mar 29 2016, 08:56 AM
Post
#10
|
|
Member Group: Members Posts: 204 Joined: 16-February 14 From: Salem, Oregon Member No.: 17,007 Region Association: Pacific Northwest |
I've been a fan of PB Blaster, it smells funny but I think it works better than some of the other penetrating oils. Drench the bolts and the between the bracket and mounting surface. Wait a day and drench it again, you can't use too much. I'm not a big fan of breaker bars because they do just that break bolts, but if you don't have access to an impact gun try using a shorter bar. After three days of soaking it should be ready to cooperate.
|
|
|
|
| malcolm2 |
Mar 29 2016, 09:44 AM
Post
#11
|
|
Advanced Member Group: Members Posts: 2,745 Joined: 31-May 11 From: Nashville Member No.: 13,139 Region Association: South East States |
QUOTE(madmax914 @ Mar 29 2016, 09:56 AM) I've been a fan of PB Blaster, it smells funny but I think it works better than some of the other penetrating oils. Drench the bolts and the between the bracket and mounting surface. Wait a day and drench it again, you can't use too much. I'm not a big fan of breaker bars because they do just that break bolts, but if you don't have access to an impact gun try using a shorter bar. After three days of soaking it should be ready to cooperate. I found this stuff. Made right here in Nashville, TN... I find that it is better than PB, which is good. SILI-KROIL link  |
|
|
|
| RoadGlue |
Mar 29 2016, 03:13 PM
Post
#12
|
|
Sonoma County Gear Head Group: Admin Posts: 2,033 Joined: 8-January 03 From: Santa Rosa, CA Member No.: 108 Region Association: Northern California |
Kano Kroil is the bomb. Thanks for the offer link too!
|
|
|
|
| barefoot |
Mar 29 2016, 03:59 PM
Post
#13
|
|
Senior Member Group: Members Posts: 1,275 Joined: 19-March 13 From: Charleston SC Member No.: 15,673 Region Association: South East States |
while i had no difficulty removing the bolts, i did not want to loose the alignment, so drilled a 1/4" hole up thru the trailing arm and into the chassis, so can pin it back to exact position upon re-assembly
|
|
|
|
| jcd914 |
Mar 29 2016, 04:59 PM
Post
#14
|
|
Advanced Member Group: Members Posts: 2,081 Joined: 7-February 08 From: Sacramento, CA Member No.: 8,684 Region Association: Northern California |
QUOTE(barefoot @ Mar 29 2016, 02:59 PM) while i had no difficulty removing the bolts, i did not want to loose the alignment, so drilled a 1/4" hole up thru the trailing arm and into the chassis, so can pin it back to exact position upon re-assembly Are you replacing the bushings? The alignment will change with new bushings even if you get the arm back in the same place. Jim |
|
|
|
| jack20 |
Mar 30 2016, 12:03 AM
Post
#15
|
|
Member Group: Members Posts: 406 Joined: 7-November 14 From: Granite Bay, CA Member No.: 18,099 Region Association: Northern California |
Thanks everybody. I was able to completely strip the rear end. Trailing arms, etc go to powder coating tomorrow.
I realize that re - alignment will be necessary. I did the entire front end last month and plan to take it in for a four wheel alignment once I put the rear back in. I'll be replacing the bushings with a new set from PMB who also did all my calipers. I need to add 2 zerk fittings to each trailing arm. If anyone has done this I'd like to know where you installed them in the arm. Jack |
|
|
|
| mepstein |
Mar 30 2016, 05:52 AM
Post
#16
|
|
914-6 GT in waiting Group: Members Posts: 19,276 Joined: 19-September 09 From: Landenberg, PA/Wilmington, DE Member No.: 10,825 Region Association: MidAtlantic Region |
Also talk with Eric about the powdercoat since some bushings will not slip over the powdercoat.
|
|
|
|
| jkb944t |
Mar 30 2016, 06:21 AM
Post
#17
|
|
Member Group: Members Posts: 464 Joined: 17-January 05 From: Canton, OH Member No.: 3,459 Region Association: None |
QUOTE(mepstein @ Mar 30 2016, 03:52 AM) Also talk with Eric about the powdercoat since some bushings will not slip over the powdercoat. I just had my front and rear control arms powder coated and there was no problem fitting the Elephant Racing poly-bronze bushings that I got from PMB. If there was going to be a problem it would most likely be with the front control arms and not the rear ones. Jeff B |
|
|
|
| jkb944t |
Mar 30 2016, 06:26 AM
Post
#18
|
|
Member Group: Members Posts: 464 Joined: 17-January 05 From: Canton, OH Member No.: 3,459 Region Association: None |
QUOTE(jack20 @ Mar 29 2016, 10:03 PM) Thanks everybody. I was able to completely strip the rear end. Trailing arms, etc go to powder coating tomorrow. I realize that re - alignment will be necessary. I did the entire front end last month and plan to take it in for a four wheel alignment once I put the rear back in. I'll be replacing the bushings with a new set from PMB who also did all my calipers. I need to add 2 zerk fittings to each trailing arm. If anyone has done this I'd like to know where you installed them in the arm. Jack The picture below shows the zerk fittings installed in my rear control arms. The instructions that come with the bushings will tell you how and where to install the fittings. (Edit) The one thing the directions do leave out is that you need to drill the holes with a 7/32 drill and then tap them to 1/4-28. 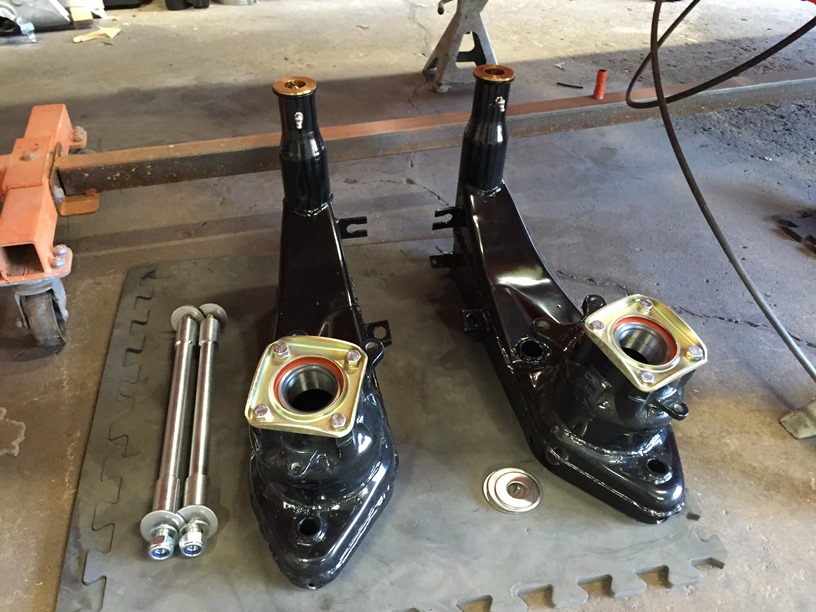 Jeff B |
|
|
|
| jack20 |
Mar 30 2016, 08:52 AM
Post
#19
|
|
Member Group: Members Posts: 406 Joined: 7-November 14 From: Granite Bay, CA Member No.: 18,099 Region Association: Northern California |
They look great! Did you re-plate the bearing caps? How did it go getting the old bushings out? The new bushings are still in the box so I haven't seen the instructions yet.
Thanks |
|
|
|
| jkb944t |
Mar 30 2016, 10:07 AM
Post
#20
|
|
Member Group: Members Posts: 464 Joined: 17-January 05 From: Canton, OH Member No.: 3,459 Region Association: None |
QUOTE(jack20 @ Mar 30 2016, 06:52 AM) They look great! Did you re-plate the bearing caps? How did it go getting the old bushings out? The new bushings are still in the box so I haven't seen the instructions yet. Thanks Thanks, yes I had the bearing caps yellow zinc plated. I took the old bushings out so long ago that I don't remember exactly how hard it was. I believe I used a small press to push the shaft out and then it wasn't too hard to remove the rubber bushings. Jeff B |
|
|
|
|
1 User(s) are reading this topic (1 Guests and 0 Anonymous Users)
0 Members:

|
Lo-Fi Version | Time is now: 19th May 2024 - 12:59 PM |
Invision Power Board
v9.1.4 © 2024 IPS, Inc.