|
|
|
Porsche, and the Porsche crest are registered trademarks of Dr. Ing. h.c. F. Porsche AG.
This site is not affiliated with Porsche in any way. Its only purpose is to provide an online forum for car enthusiasts. All other trademarks are property of their respective owners. |
|
|

  |

| catsltd |
 Jun 5 2016, 03:13 PM Jun 5 2016, 03:13 PM
Post
#1
|
|
Member  Group: Members Posts: 181 Joined: 7-June 15 From: Calgary Alberta Member No.: 18,814 Region Association: None |
Pulling tranny.decided to change out heat exchangers while at it.
Fou;ld lots of black soot,so leaking pretty bad. The problem is when I was pulling off the passenger side 3 of the studs came out. What should I do.??. 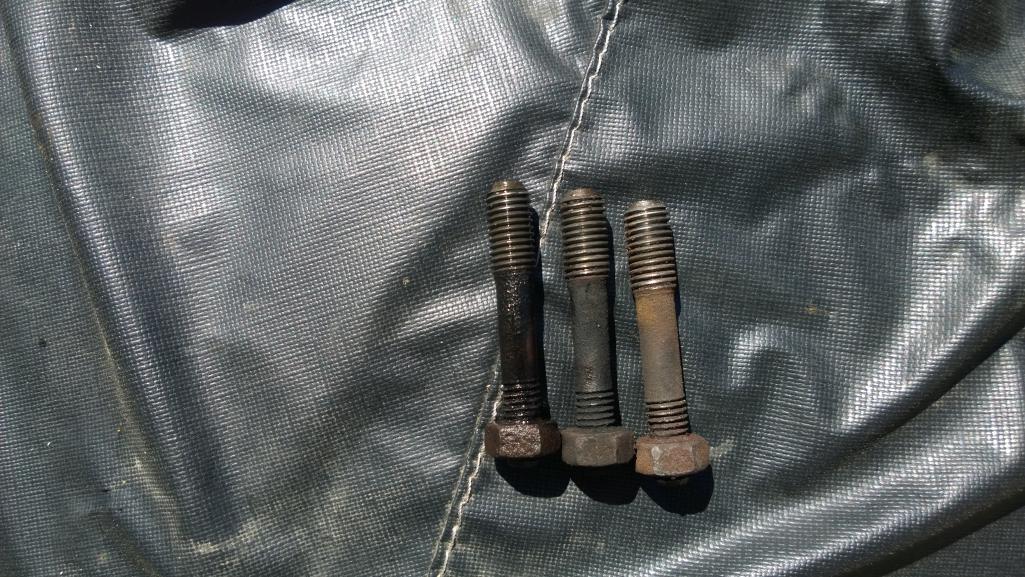 |
   |

 
|
| catsltd |
Jun 5 2016, 03:46 PM
Post
#2
|
|
Member Group: Members Posts: 181 Joined: 7-June 15 From: Calgary Alberta Member No.: 18,814 Region Association: None |
Should I order new Bolts.???
Old nuts are siezed solid. Thanks for any Help. |
|
|
|
| dlee6204 |
Jun 5 2016, 03:47 PM
Post
#3
|
|
Howdy Group: Members Posts: 2,162 Joined: 30-April 06 From: Burnsville, NC Member No.: 5,956 |
If the threads in the head are not damaged then simply replace the studs with new. If the threads have been stripped, then install a step stud (m10 on one end and m8 on the other) but it will require you to drill and tap the head to m10 which can be done without pulling the engine.
|
|
|
|
| injunmort |
Jun 5 2016, 05:16 PM
Post
#4
|
|
Senior Member Group: Members Posts: 1,024 Joined: 12-April 10 From: sugarloaf ny Member No.: 11,604 Region Association: North East States |
from the looks of things, your threads are fine. you can get new studs at flaps, dorfman for ford explorer 4.6l. 2mm longer but makes no difference. antisieze the hell out of them. replace. i like the dorfmans because they have a square end which makes it easy to thread back into head tightly and comes with shouldered nuts that are better than the original hardware.
|
|
|
|
| catsltd |
Jun 5 2016, 06:00 PM
Post
#5
|
|
Member Group: Members Posts: 181 Joined: 7-June 15 From: Calgary Alberta Member No.: 18,814 Region Association: None |
QUOTE(injunmort @ Jun 5 2016, 07:16 PM)  from the looks of things, your threads are fine. you can get new studs at flaps, dorfman for ford explorer 4.6l. 2mm longer but makes no difference. antisieze the hell out of them. replace. i like the dorfmans because they have a square end which makes it easy to thread back into head tightly and comes with shouldered nuts that are better than the original hardware. Thanks for your help.The threads in the head look new. I am wondering if I should locktight the end going into the head.???? Appreciate the help from everyone. Cheers. |
|
|
|
| rhodyguy |
Jun 5 2016, 06:58 PM
Post
#6
|
|
Chimp Sanctuary NW. Check it out. Group: Members Posts: 22,072 Joined: 2-March 03 From: Orion's Bell. The BELL! Member No.: 378 Region Association: Galt's Gulch |
You dodged 3 bullets. Congratulations.
|
|
|
|
| r_towle |
Jun 5 2016, 07:01 PM
Post
#7
|
|
Custom Member Group: Members Posts: 24,573 Joined: 9-January 03 From: Taxachusetts Member No.: 124 Region Association: North East States |
Lock tight won't hold up in the heads, and you don't want it to.
Either get the nuts off those and reuse them, or buy new ones |
|
|
|
| catsltd |
Jun 5 2016, 07:13 PM
Post
#8
|
|
Member Group: Members Posts: 181 Joined: 7-June 15 From: Calgary Alberta Member No.: 18,814 Region Association: None |
QUOTE(rhodyguy @ Jun 5 2016, 08:58 PM) You dodged 3 bullets. Congratulations. I kind of thought that also,they sure were tight. You can see the nuts on the stud were not very tight on the heat exchanger,so I had a massive exhaust leak,black carbon all over the heat exchanger,already fixed drivers side so I am glad I decided to check passenger side also. I was sure I was going to strip one.LOL. Im going to order new studs and hardware,seems like the smart thing to do,along with new copper exhaust gaskets. So far the clutch replacement is going pretty good,but Im sure that will change soon enuff. Cheers., |
|
|
|
| catsltd |
Jun 9 2016, 09:55 AM
Post
#9
|
|
Member Group: Members Posts: 181 Joined: 7-June 15 From: Calgary Alberta Member No.: 18,814 Region Association: None |
Help.
The exhaust leaks were massive,mainly because the nuts could not be tightened down. Anyway:questions. I ordered new copper nuts from Pelican along with new studs,but upon reading I keep hearing about the copper nuts stripping the studs. Should I use some other type of Nut????. The second question. How do I remove the old copper ring from the head,so far no luck,and when installing new copper o ring,do I attach it to the heat exchanger or head,and what can I use to hold it in place with. Really appreciate some help here,as potencial for breaking studs seems pretty dier. Thanks Grant. 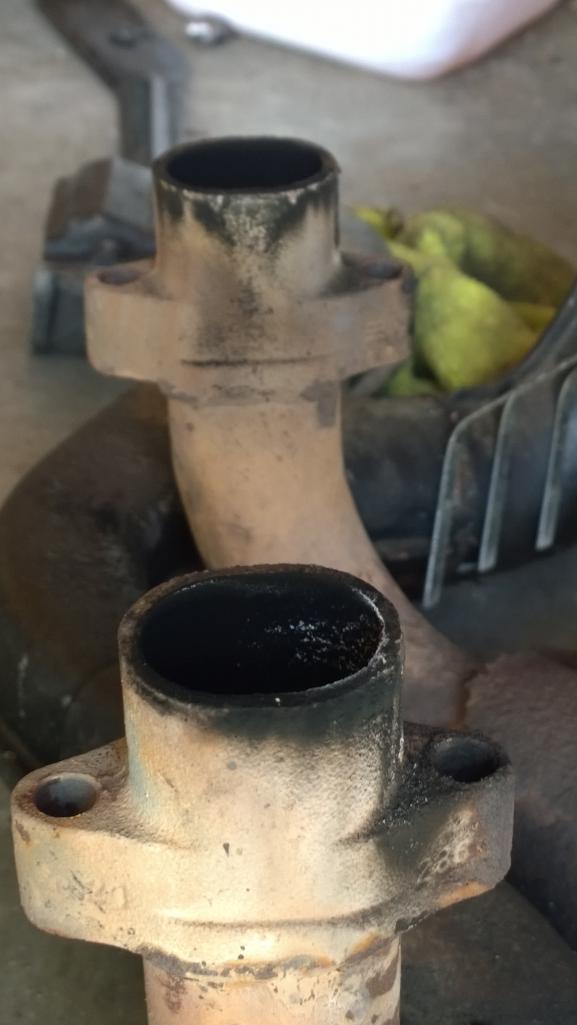 |
|
|
|
| BeatNavy |
Jun 9 2016, 10:22 AM
Post
#10
|
|
Certified Professional Scapegoat Group: Members Posts: 2,924 Joined: 26-February 14 From: Easton, MD Member No.: 17,042 Region Association: MidAtlantic Region |
I'm not aware of copper nut issues - I've always been told to use those. I would definitely consider using the copper anti-seize paste as well.
In terms of the copper gasket (ring as you call it): a small dental pick carefully applied should be able to get that out of there. The approach I had the best success with in terms of putting the gasket on was to use that copper spray gasket and use that almost as a glue -- it keeps the gasket in place on the head as you put the HE in position. I've heard others say using superglue is fine as well, as the heat from the engine will simply burn it off. Putting it on the HE while you lift it up into place is way too hit and miss for me. I tried that before and found I had one HE that sealed well and another that did not. Are you going to anneal the gasket? Have you considered filing down the HE's to make sure they're uniform? |
|
|
|
| TheCabinetmaker |
Jun 9 2016, 10:42 AM
Post
#11
|
|
I drive my car everyday Group: Members Posts: 8,300 Joined: 8-May 03 From: Tulsa, Ok. Member No.: 666 |
Large coarse file. 16" or better. File both tubes at once to keep them flat. File until clean metal shows completely. Remove the copper gaskets with a screwdriver. Gently hammer a flat screwdriver between the straight side of the gasket and the head. Then a good twist will deform the gasket enough to grab it with needle nose pliers.
(IMG:http://www.914world.com/bbs2/uploads_offsite/i290.photobucket.com-666-1465490577.1.jpg) (IMG:http://www.914world.com/bbs2/uploads_offsite/i290.photobucket.com-666-1465490577.2.jpg) |
|
|
|
| dlee6204 |
Jun 9 2016, 10:44 AM
Post
#12
|
|
Howdy Group: Members Posts: 2,162 Joined: 30-April 06 From: Burnsville, NC Member No.: 5,956 |
I use these...
http://vwparts.aircooled.net/ACN-Flanged-R...-p/acn-nuts.htm I use a dental prick and screwdrivers to remove the copper gaskets. Also make sure to anneal your new copper exhaust gaskets. It softens the copper and helps seals. I use a dab of super glue to hold them in the head. Here's some more good information. http://www.ratwell.com/technical/Exhaust.html |
|
|
|
| catsltd |
Jun 9 2016, 10:49 AM
Post
#13
|
|
Member Group: Members Posts: 181 Joined: 7-June 15 From: Calgary Alberta Member No.: 18,814 Region Association: None |
QUOTE(BeatNavy @ Jun 9 2016, 12:22 PM) I'm not aware of copper nut issues - I've always been told to use those. I would definitely consider using the copper anti-seize paste as well. In terms of the copper gasket (ring as you call it): a small dental pick carefully applied should be able to get that out of there. The approach I had the best success with in terms of putting the gasket on was to use that copper spray gasket and use that almost as a glue -- it keeps the gasket in place on the head as you put the HE in position. I've heard others say using superglue is fine as well, as the heat from the engine will simply burn it off. Putting it on the HE while you lift it up into place is way too hit and miss for me. I tried that before and found I had one HE that sealed well and another that did not. Are you going to anneal the gasket? Have you considered filing down the HE's to make sure they're uniform? I have a large file,and have already filed the heat exchanger( 1 of them) flat. I just read about heating the copper gaskets,so I will do that as well,but did not do it on the drivers side,and it leaks so not impressed. I am doing the clutch so I will pull both heat exchangers and replace copper o rings after I have anneal them.3 new studs,all new copper nuts(Thanks),and will file flat. Dont want to do this again,as I am sure Ill break a stud. Thanks for your help. Grant |
|
|
|
| McMark |
Jun 9 2016, 11:00 AM
Post
#14
|
|
914 Freak! Group: Retired Admin Posts: 20,179 Joined: 13-March 03 From: Grand Rapids, MI Member No.: 419 Region Association: None |
Some tips on exhaust.
* You don't need to file both pipes at once. They flex a lot. Just make sure each one is filed flat on its own. * Use a tiny amount of copper antisieze to stick the copper rings into the head during installation. Keeping those bugger in place is a pain sometimes. * When installing the pipes, it's not uncommon for the pipe edge to catch on the head slightly. Use a flashlight to spend a lot of time looking around the pipe. You should be able to see a small amount of copper around the pipe when it's installed. You can carefully pry the pipe into place with a screwdriver if it's stubborn. * Stainless steel headers are the most difficult to line up. * Don't tighten any of the nuts all the way first. You will get the pipe cocked a bit and it won't seal. Run all four nuts on part way, and then just go around and around tightening a little bit at a time. The best is to use a torque wrench set to a very low number. That way if one nut starts getting tight before the others you can skip it until the other nuts match torque. * Use a 1/4" drive ratchet. You don't need any more leverage than that and it makes it much harder to over tighten the nuts. You don't need to tighten these hard to make them seal. * You'll need to go back and retighten the nuts after a little run time. That's it off the top of my head. |
|
|
|
| rhodyguy |
Jun 9 2016, 11:05 AM
Post
#15
|
|
Chimp Sanctuary NW. Check it out. Group: Members Posts: 22,072 Joined: 2-March 03 From: Orion's Bell. The BELL! Member No.: 378 Region Association: Galt's Gulch |
Jake's method of painting the nut threads with milk of magnesia to prevent seizing works great.
|
|
|
|
| BeatNavy |
Jun 9 2016, 11:21 AM
Post
#16
|
|
Certified Professional Scapegoat Group: Members Posts: 2,924 Joined: 26-February 14 From: Easton, MD Member No.: 17,042 Region Association: MidAtlantic Region |
QUOTE(McMark @ Jun 9 2016, 01:00 PM) Some tips on exhaust. * You don't need to file both pipes at once. They flex a lot. Just make sure each one is filed flat on its own. * Use a tiny amount of copper antisieze to stick the copper rings into the head during installation. Keeping those bugger in place is a pain sometimes. * When installing the pipes, it's not uncommon for the pipe edge to catch on the head slightly. Use a flashlight to spend a lot of time looking around the pipe. You should be able to see a small amount of copper around the pipe when it's installed. You can carefully pry the pipe into place with a screwdriver if it's stubborn. * Stainless steel headers are the most difficult to line up. * Don't tighten any of the nuts all the way first. You will get the pipe cocked a bit and it won't seal. Run all four nuts on part way, and then just go around and around tightening a little bit at a time. The best is to use a torque wrench set to a very low number. That way if one nut starts getting tight before the others you can skip it until the other nuts match torque. * Use a 1/4" drive ratchet. You don't need any more leverage than that and it makes it much harder to over tighten the nuts. You don't need to tighten these hard to make them seal. * You'll need to go back and retighten the nuts after a little run time. That's it off the top of my head. Follow Mark's advice. That's what I did the first time, and it made an otherwise unpleasant (and somewhat risky) effort easier and more successful. One other tip that Mark or someone else suggested: yes, use the 1/4" ratchet and a flexible extension can be helpful too. |
|
|
|
| MarkV |
Jun 9 2016, 11:22 AM
Post
#17
|
|
Fear the Jack Stands Group: Members Posts: 1,493 Joined: 15-January 03 From: Sunny Tucson, AZ Member No.: 154 Region Association: None |
I had really bad luck with the copper nuts that are self locking. I think I bought them at Pelican. They seem to weld themselves in place and when you go to loosen them the stud comes out. I found some regular old flanged nuts somewhere and used milk of magnesia on the studs and the nuts. Use some grease to hold the seal to the head.
|
|
|
|
| worn |
Jun 9 2016, 11:23 AM
Post
#18
|
|
can't remember Group: Members Posts: 3,150 Joined: 3-June 11 From: Madison, WI Member No.: 13,152 Region Association: Upper MidWest |
QUOTE(catsltd @ Jun 9 2016, 08:49 AM) QUOTE(BeatNavy @ Jun 9 2016, 12:22 PM) I'm not aware of copper nut issues - I've always been told to use those. I would definitely consider using the copper anti-seize paste as well. In terms of the copper gasket (ring as you call it): a small dental pick carefully applied should be able to get that out of there. The approach I had the best success with in terms of putting the gasket on was to use that copper spray gasket and use that almost as a glue -- it keeps the gasket in place on the head as you put the HE in position. I've heard others say using superglue is fine as well, as the heat from the engine will simply burn it off. Putting it on the HE while you lift it up into place is way too hit and miss for me. I tried that before and found I had one HE that sealed well and another that did not. Are you going to anneal the gasket? Have you considered filing down the HE's to make sure they're uniform? I have a large file,and have already filed the heat exchanger( 1 of them) flat. I just read about heating the copper gaskets,so I will do that as well,but did not do it on the drivers side,and it leaks so not impressed. I am doing the clutch so I will pull both heat exchangers and replace copper o rings after I have anneal them.3 new studs,all new copper nuts(Thanks),and will file flat. Dont want to do this again,as I am sure Ill break a stud. Thanks for your help. Grant A lot of folks do not know that to soften copper or silver you heat to dull red and immediately quench in cool water. Opposite of steel. If you cool slowly you are following the process for hardening! |
|
|
|
| rhodyguy |
Jun 9 2016, 11:33 AM
Post
#19
|
|
Chimp Sanctuary NW. Check it out. Group: Members Posts: 22,072 Joined: 2-March 03 From: Orion's Bell. The BELL! Member No.: 378 Region Association: Galt's Gulch |
Marking the top of the pipes with a black sharpie makes filing easier. No need to remove anymore metal than Is required.
|
|
|
|
| Mark Henry |
Jun 9 2016, 11:35 AM
Post
#20
|
|
that's what I do! Group: Members Posts: 20,065 Joined: 27-December 02 From: Port Hope, Ontario Member No.: 26 Region Association: Canada |
If the studs are backing out the threads are stripped even though you think they are not.
I like using the 8mm/9mm step stud if you can find it, this gives you the option of the 8mm/10mm stud in the future. Below gives you the correct number, you might be able to get them from your local P-dealer. http://www.stoddard.com/n0146841.html I've also had luck with timeserts, but never use a helicoil on an exhaust stud. |
|
|
|
|
1 User(s) are reading this topic (1 Guests and 0 Anonymous Users)
0 Members:

|
Lo-Fi Version | Time is now: 5th May 2024 - 10:34 AM |
Invision Power Board
v9.1.4 © 2024 IPS, Inc.