|
|
|
Porsche, and the Porsche crest are registered trademarks of Dr. Ing. h.c. F. Porsche AG.
This site is not affiliated with Porsche in any way. Its only purpose is to provide an online forum for car enthusiasts. All other trademarks are property of their respective owners. |
|
|

  |

| aggiezig |
 Oct 3 2017, 11:57 AM Oct 3 2017, 11:57 AM
Post
#101
|
|
Porsche Wannabe  Group: Members Posts: 319 Joined: 13-January 16 From: Los Angeles, CA Member No.: 19,557 Region Association: Southern California |
QUOTE(porschetub @ Sep 11 2017, 01:28 AM)  Very impressed have been following progress....POS to really nice car is my thoughts,well done. Thanks for the kind words, they help to keep me motivated (IMG:style_emoticons/default/sawzall-smiley.gif) QUOTE(Tbrown4x4 @ Sep 11 2017, 04:09 AM) I didn't see if anybody answered your question about removing pushrods to build oil pressure. Never heard of such a thing. Adjust your valves. Remove your sparkplugs and disable the ignition. Crank until you get oil pressure, then install spark plugs, connect ignition, and fire it up. Maintain 2000 RPM for 20 minutes to beak in the cam. (Or whatever the cam MFG recommends.) That's exactly what I was planning to do. Good to hear some confirmation from someone else that my break-in plan was sufficient without pulling the pushrods. QUOTE(barefoot @ Sep 11 2017, 05:46 AM) The probable reason your tin was hacked up is that the coil mounted in that location often creates cracks due to heavy coil mounted on flimsy sheet metal. Mine was cracked badly in these locations as well. You should mount the coil on the fan housing where it's much stronger as sone years were done. Good catch & good advice. I will see if I can find a better place to mount the coil |
   |

 
|
| aggiezig |
Oct 3 2017, 12:16 PM
Post
#102
|
|
Porsche Wannabe Group: Members Posts: 319 Joined: 13-January 16 From: Los Angeles, CA Member No.: 19,557 Region Association: Southern California |
Well, I can finally say that the whole topside of the car is in epoxy primer. It took a lot longer to get here than I originally anticipated, but that's probably a true statement of most projects.
I noticed some black specs on my nice, new white epoxy primer in the front trunk. Turns out I'm an idiot and should have covered up the fresh paint before continuing with grinding, sanding, etc. So I forced myself to scuff down the entire front trunk and clean all of the mess off in order to re-spray another coat of epoxy on top. My fear is that those hot grinder sparks that melted through the original epoxy primer could have one day rusted through the top coat. Hopefully now I have abated that issue. It was also a good chance to spray the front fenders and front area under the bumper while I was at it. I decided to spray essentially the whole front clip in one go. I did a little bit of body work on my fenders prior to spraying the epoxy as the metal had warped where we filled in the wart holes. There is still some more filler work that will need to be finessed on top of the epoxy, but at least now I don't have to worry about the bare metal sitting out and rusting. I was using eastwood fast etch to help mitigate the flash rust, but I noticed that even after cleaning with PRE (as recommended prior to painting), I still had adhesion issues with any type of filler. So in my paranoia I decided to go ahead and put a light coat of master series over the bare metal and under the epoxy primer. This should prevent any rust from coming through. I know... probably overkill. Here are some pictures of cleaning / prepping and painting: (IMG:http://www.914world.com/bbs2/uploads_offsite/i.imgur.com-19557-1507054602.1.jpg) (IMG:http://www.914world.com/bbs2/uploads_offsite/i.imgur.com-19557-1507054603.2.jpg) (IMG:http://www.914world.com/bbs2/uploads_offsite/i.imgur.com-19557-1507054603.3.jpg) (IMG:http://www.914world.com/bbs2/uploads_offsite/i.imgur.com-19557-1507054603.4.jpg) (IMG:http://www.914world.com/bbs2/uploads_offsite/i.imgur.com-19557-1507054603.5.jpg) (IMG:http://www.914world.com/bbs2/uploads_offsite/i.imgur.com-19557-1507054603.6.jpg) (IMG:http://www.914world.com/bbs2/uploads_offsite/i.imgur.com-19557-1507054604.7.jpg) |
|
|
|
| bbrock |
Oct 3 2017, 01:30 PM
Post
#103
|
|
914 Guru Group: Members Posts: 5,269 Joined: 17-February 17 From: Montana Member No.: 20,845 Region Association: Rocky Mountains |
Thanks for the update. (IMG:style_emoticons/default/thumb3d.gif)
You have been one of my several mentors as a follow behind and do my best to mimic the quality. It is a high bar to leap! |
|
|
|
| aggiezig |
Oct 31 2017, 11:35 AM
Post
#104
|
|
Porsche Wannabe Group: Members Posts: 319 Joined: 13-January 16 From: Los Angeles, CA Member No.: 19,557 Region Association: Southern California |
QUOTE(bbrock @ Oct 3 2017, 02:30 PM) You have been one of my several mentors as a follow behind and do my best to mimic the quality. It is a high bar to leap! Wow, that's one heck of a compliment. Much appreciated! I decided it would probably a good idea to seam seal the car before blasting the bottom side so that I can try to keep too much sand from getting into the cabin / trunks. I'm using Eastwood brushable seam sealer in gray. It's not the easiest to work with and starts to get tacky really quickly. However, it can be molded / re-shaped if you spray some of their PRE paint prep on top of it before it fully cures. This makes it easier to smooth out hard tape lines after the fact. I went ahead and masked around all of the seams to try to create the cleanest looking result possible: (IMG:http://www.914world.com/bbs2/uploads_offsite/i.imgur.com-19557-1509471343.1.jpg) (IMG:http://www.914world.com/bbs2/uploads_offsite/i.imgur.com-19557-1509471344.2.jpg) It's not perfect, but looks great from 5 feet. I decided some of the pinholes from blasting the rust in the trunk aren't worth my time to cut out & replace. Especially when they are going to get covered up by bedliner / carpeting. This isn't "perfect" but I think it will do the job. The rust has already been neutralized with the blaster and fast-etch, so shouldn't be a recurring problem. (IMG:http://www.914world.com/bbs2/uploads_offsite/i.imgur.com-19557-1509471344.3.jpg) (IMG:http://www.914world.com/bbs2/uploads_offsite/i.imgur.com-19557-1509471345.4.jpg) I've also done the front trunk but forgot to take pics... will get those posted soon. While I was working, I went ahead and took a look at some of the surprise rust I found when blasting. (IMG:http://www.914world.com/bbs2/uploads_offsite/i.imgur.com-19557-1509471345.5.jpg) I tried to fill these holes with MIG weld, but there seems to be brazing and lead filler here as well... Not sure if from a previous repair or from the factory? At any rate, I will likely turn to aluminum filler once I know it's structurally sound. (IMG:http://www.914world.com/bbs2/uploads_offsite/i.imgur.com-19557-1509471346.6.jpg) I think I've decided to blast the underneath in two stages. First, I'll tackle the wheel wells and get them in epoxy primer or master series. Then, I'll do the rest under the floors. That way I can work in stages and bedline the underside all at once. |
|
|
|
| aggiezig |
Nov 6 2017, 08:50 PM
Post
#105
|
|
Porsche Wannabe Group: Members Posts: 319 Joined: 13-January 16 From: Los Angeles, CA Member No.: 19,557 Region Association: Southern California |
Making progress....
This weekend we tackled blasting the fender wells an outer rockers as a part of the effort to blast the underside of the car in two stages. There is just so much factory seam sealer on the bottom of the car that I decided it wasn't feasible to remove every last bit. Instead, we focused on removing seam sealer anywhere it appeared to be cracked or rusted through. This resulted in removing about 50% of the factory sealer. There are some nooks and crannies where it just wouldn't be feasible to take it all off unless you were cutting fenders off. After removing as much as we could, we masked up over the fresh epoxy paint to prevent sand from getting everywhere during blasting. (IMG:http://www.914world.com/bbs2/uploads_offsite/i.imgur.com-19557-1510023046.1.jpg) (IMG:http://www.914world.com/bbs2/uploads_offsite/i.imgur.com-19557-1510023046.2.jpg) Then, it was time to start blasting... (IMG:http://www.914world.com/bbs2/uploads_offsite/i.imgur.com-19557-1510023047.3.jpg) (enthusiasm quickly faded after this picture) (IMG:http://www.914world.com/bbs2/uploads_offsite/i.imgur.com-19557-1510023047.4.jpg) After a couple of hours of blasting and about 400lbs of abrasive, we knocked out the inner fenders. We even managed to blast the backsides of the fenders. I was on a mission to remove any remaining trace of red paint as the car will be a color change. Here is the end result: (IMG:http://www.914world.com/bbs2/uploads_offsite/i.imgur.com-19557-1510023047.5.jpg) (IMG:http://www.914world.com/bbs2/uploads_offsite/i.imgur.com-19557-1510023047.6.jpg) (IMG:http://www.914world.com/bbs2/uploads_offsite/i.imgur.com-19557-1510023047.7.jpg) (IMG:http://www.914world.com/bbs2/uploads_offsite/i.imgur.com-19557-1510023048.8.jpg) Now, what's left to blast is the "center" section or the flat bottom of the car (and the engine bay). Hopefully, what's left will go quicker as it's easy to access and the paint appears to not be as thick. I also found some nice swiss cheese rust holes under the headlight buckets. These were full of mice droppings when I got the car. The insides have already been cleaned and encapsulated, but now I have these to deal with: (IMG:http://www.914world.com/bbs2/uploads_offsite/i.imgur.com-19557-1510023048.9.jpg) (IMG:http://www.914world.com/bbs2/uploads_offsite/i.imgur.com-19557-1510023048.10.jpg) It amazes me to see what engineers at the time thought were good ideas for longevity. Up in the far corner in the rear of the vehicle, under the factory seam sealer appears to be open cell foam. This will have to come out... (IMG:http://www.914world.com/bbs2/uploads_offsite/i.imgur.com-19557-1510023048.11.jpg) With all of that said, I now have a big section of the underside clean and in Master Series rust encapsulating primer as a preventative measure (pics to come). My goal is to do the remaining portion in a couple of weekends and prime it as well. Once the whole bottom of the car is clean and primed, I will cover it in color-matched raptor liner bed liner. That means I have to actually pick which color blue I want to go with soon... More to come. |
|
|
|
| 76-914 |
Nov 7 2017, 02:16 PM
Post
#106
|
|
Repeat Offender & Resident Subaru Antagonist Group: Members Posts: 13,738 Joined: 23-January 09 From: Temecula, CA Member No.: 9,964 Region Association: Southern California |
Looking good. It's a great time of the year for working in TX. (IMG:style_emoticons/default/beerchug.gif)
|
 |
|
| barefoot |
Nov 7 2017, 05:17 PM
Post
#107
|
|
Senior Member Group: Members Posts: 1,411 Joined: 19-March 13 From: Charleston SC Member No.: 15,673 Region Association: South East States |
Also bought a 3-4 side passenger tin as the one I had was a 1.7/1.8 and the plug holes were in the wrong spot. It needed some repairs as a PO had hacked up the coil bracket mount. My repairs are rough, but good enough for engine tin:
(IMG:http://www.914world.com/bbs2/uploads_offsite/i120.photobucket.com-19557-1494909075.1.jpg) (IMG:http://www.914world.com/bbs2/uploads_offsite/i120.photobucket.com-19557-1494909225.1.jpg) [/quote] Put you coil where God intended on the fan housing, Mounted on the top tin will just result in future cracking in the same place (ask me how i know) (photo borrowed from someone else's engine) 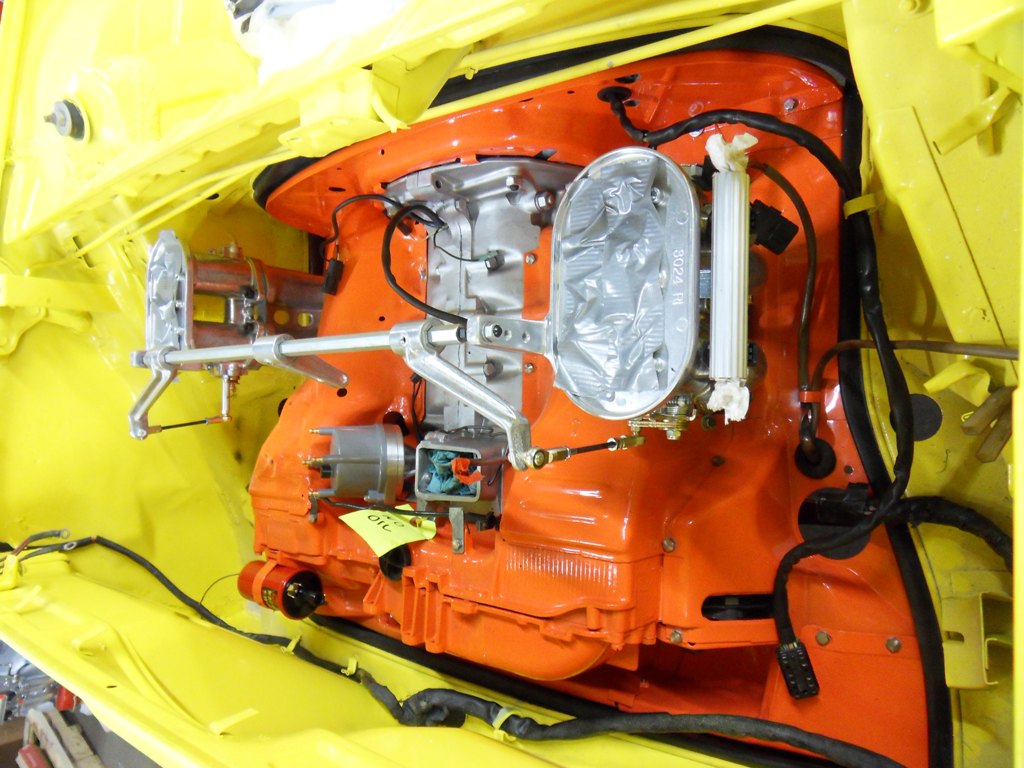 |
|
|
|
| aggiezig |
Jan 29 2018, 12:45 AM
Post
#108
|
|
Porsche Wannabe Group: Members Posts: 319 Joined: 13-January 16 From: Los Angeles, CA Member No.: 19,557 Region Association: Southern California |
It's time for a big and long overdue update. In the last couple of months I've been making steady progress trying to button up the bottom side of the car. I think half of this whole car restoration thing is a psychological game. So, I figured that if I can get at least half of the car in color, it'll mentally push me closer to the finish line. With that goal in mind, work started on prepping the bottom of the car for color matched raptorliner bedliner paint.
First up was picking away at the foam material that the factory hid up inside the rear fender-wells. I'm very thankful that Dad decided to take on this job, picking away at the nasty stuff with a variety of different tools. We didn't get all of it out, but as much as we possibly could. (IMG:http://www.914world.com/bbs2/uploads_offsite/i.imgur.com-19557-1517208299.1.jpg) (IMG:http://www.914world.com/bbs2/uploads_offsite/i.imgur.com-19557-1517208299.2.jpg) Next up was knocking out some of the remaining metal work. After blasting, we found some pinholes under the headlight buckets. I really wanted to avoid having to make and shape this piece, so I worked slowly trying to fill in the holes with mig weld. Almost all of it was fixed this way, just leaving a small area I cut out and patched later. (IMG:http://www.914world.com/bbs2/uploads_offsite/i.imgur.com-19557-1517208299.3.jpg) (IMG:http://www.914world.com/bbs2/uploads_offsite/i.imgur.com-19557-1517208300.4.jpg) I also fixed the gaping holes left by the dealership that installed the air conditioning in this car. From what I can tell, they butchered open this area to use as a pass through for lines. I just made a patch and plug welded it in place. (IMG:http://www.914world.com/bbs2/uploads_offsite/i.imgur.com-19557-1517208300.5.jpg) (IMG:http://www.914world.com/bbs2/uploads_offsite/i.imgur.com-19557-1517208300.6.jpg) In the process of running of hacking away original metal, they also removed a door sill support. I'm guessing so they'd have more room to run some sort of lines. I fabricated a piece to replace what was missing based on the original support on the other side of the car. I think it turned out pretty good. (IMG:http://www.914world.com/bbs2/uploads_offsite/i.imgur.com-19557-1517208300.7.jpg) (IMG:http://www.914world.com/bbs2/uploads_offsite/i.imgur.com-19557-1517208300.8.jpg) After the metal repairs were complete, the entire bottom side of the car and the engine bay were coated in master series rust encapsulator primer. Even though it was freshly blasted metal, this should keep anything from ever coming through the paint. It should also keep any rock chips from ever growing into a rust spot. (IMG:http://www.914world.com/bbs2/uploads_offsite/i.imgur.com-19557-1517208301.9.jpg) (IMG:http://www.914world.com/bbs2/uploads_offsite/i.imgur.com-19557-1517208301.10.jpg) (IMG:http://www.914world.com/bbs2/uploads_offsite/i.imgur.com-19557-1517208301.11.jpg) All original factory seam sealer was removed and will be replaced. I wanted to have a good primer underneath the seam sealer first. (IMG:http://www.914world.com/bbs2/uploads_offsite/i.imgur.com-19557-1517208301.12.jpg) (IMG:http://www.914world.com/bbs2/uploads_offsite/i.imgur.com-19557-1517208301.13.jpg) I'm going to break this update here before it gets too long. Keep reading below… |
|
|
|
| aggiezig |
Jan 29 2018, 12:46 AM
Post
#109
|
|
Porsche Wannabe Group: Members Posts: 319 Joined: 13-January 16 From: Los Angeles, CA Member No.: 19,557 Region Association: Southern California |
Now that the bottom side of the car was covered in primer, I started to plan out the remaining steps. First up was sealing all of the underside seams before spraying anything else on top. I used Eastwood seam sealer and to be honest, wasn't too satisfied with the results. Their brushable stuff is a lot easier to use that the kind you squeeze out with a caulk gun. It was hard to smooth and really didn't turn out too great in my eyes. At least it will all be covered up with bedliner.
(IMG:http://www.914world.com/bbs2/uploads_offsite/i.imgur.com-19557-1517208410.1.jpg) (IMG:http://www.914world.com/bbs2/uploads_offsite/i.imgur.com-19557-1517208411.2.jpg) (IMG:http://www.914world.com/bbs2/uploads_offsite/i.imgur.com-19557-1517208411.3.jpg) You won't be able to tell from reading this forum post, but it was at this stage that the car sat for several weeks while I waited on the weather to play nice so I could spray paint. It's been unusually cold and very rainy here in Houston. I spent the time prepping the silver primer and masking off the car. UPOL also recommends (and I did) spraying etch primer over any bare metal before spraying the raptor. Worth noting, I think this is the first time the car has been completely inverted while in my octagon rig. (IMG:http://www.914world.com/bbs2/uploads_offsite/i.imgur.com-19557-1517208411.4.jpg) I decided to first spray single stage color over the areas that I didn't want a high build of bedliner. This included anywhere that was a mount point for something. I also sprayed color around the "edges" where it will later blend with the color coat on the top of the car. This car actually has a lot of really great places to create break lines for paint. (IMG:http://www.914world.com/bbs2/uploads_offsite/i.imgur.com-19557-1517245872.1.jpg) (IMG:http://www.914world.com/bbs2/uploads_offsite/i.imgur.com-19557-1517245873.2.jpg) After the single stage color was down, I would follow up with the color matched raptor liner and overlap to blend where necessary. In practice, I made two mistakes. First, was not allowing enough flash time after the single stage paint. I think some of my raptor liner runs came from issues here. Second, was not paying attention when spraying raptor and I ended up getting it some places I was trying to avoid. The third mistake was not starting earlier in the day… (IMG:http://www.914world.com/bbs2/uploads_offsite/i.imgur.com-19557-1517208411.5.jpg) (IMG:http://www.914world.com/bbs2/uploads_offsite/i.imgur.com-19557-1517208412.6.jpg) (IMG:http://www.914world.com/bbs2/uploads_offsite/i.imgur.com-19557-1517208412.7.jpg) (IMG:http://www.914world.com/bbs2/uploads_offsite/i.imgur.com-19557-1517208412.8.jpg) (IMG:http://www.914world.com/bbs2/uploads_offsite/i.imgur.com-19557-1517208412.9.jpg) (IMG:http://www.914world.com/bbs2/uploads_offsite/i.imgur.com-19557-1517208412.10.jpg) In case you hadn't noticed, yes - the car will be Mexico Blue. And yes, it is that bright in person. A few thoughts for anyone considering going this route…
The plan now is to cover the fresh bedliner with plastic so it doesn't get trashed while I move on to bodywork. I'll get the car flipped back over later this week and start working on areas that need filler. Hope you all enjoyed the update, I'll be back with more soon. |
|
|
|
| jd74914 |
Jan 29 2018, 12:56 AM
Post
#110
|
|
Its alive Group: Members Posts: 4,852 Joined: 16-February 04 From: CT Member No.: 1,659 Region Association: North East States |
That looks great! Awesome color! (IMG:style_emoticons/default/piratenanner.gif)
Thanks for adding some tips. I'm planning on going the same way when mine finally gets to this point so its nice seeing what works for others. (IMG:style_emoticons/default/smile.gif) |
|
|
|
| djway |
Jan 29 2018, 01:48 AM
Post
#111
|
|
Senior Member Group: Members Posts: 787 Joined: 16-October 15 From: Riverside Member No.: 19,266 Region Association: Southern California |
Everyone has that problem with the color tint UPOL. You did the right thing. I will be going the same route on the 914 I am working on. I did this on the 59 Ghia and it is really quiet. Good to know how many bottles to get. Love the color, it is on my final 10 list. One thing I have noticed with the epoxy is that if you get a chip in the exterior color it tends separate at the epoxy. I actually used a rougher grit before I spayed primer over it the second time I used the epoxy and that is where it chips so we know one thing. The epoxy really sticks to the metal!
|
|
|
|
| Cairo94507 |
Jan 29 2018, 09:41 AM
Post
#112
|
|
Michael Group: Members Posts: 10,383 Joined: 1-November 08 From: Auburn, CA Member No.: 9,712 Region Association: Northern California |
Nice work and nicely detailed progress. Mexico Blue is a great color. Keep up the great work. (IMG:style_emoticons/default/smilie_pokal.gif)
|
|
|
|
| bbrock |
Jan 29 2018, 11:39 AM
Post
#113
|
|
914 Guru Group: Members Posts: 5,269 Joined: 17-February 17 From: Montana Member No.: 20,845 Region Association: Rocky Mountains |
Nice! I've been waffling between using 3M Body Schutz or Raptor on mine but have been leaning more and more toward Raptor. I'll be referencing this when the time comes. Thanks for posting details and tips! (IMG:style_emoticons/default/beerchug.gif)
|
|
|
|
| Shadowfax |
Jan 29 2018, 12:04 PM
Post
#114
|
|
Show us the meaning of haste Group: Members Posts: 509 Joined: 19-January 15 Member No.: 18,340 Region Association: South East States |
Thanks for the update. Car is looking really good. Love Mexico Blue!
|
|
|
|
| turk22 |
Jan 29 2018, 09:14 PM
Post
#115
|
|
Treetop Flyer Group: Members Posts: 735 Joined: 27-July 12 From: Cincinnati OH Member No.: 14,725 Region Association: Upper MidWest |
very enjoyable to watch your progress, thanks for all the detail, and keep on going!
(IMG:style_emoticons/default/beerchug.gif) |
|
|
|
| aggiezig |
Mar 5 2018, 06:14 PM
Post
#116
|
|
Porsche Wannabe Group: Members Posts: 319 Joined: 13-January 16 From: Los Angeles, CA Member No.: 19,557 Region Association: Southern California |
I really appreciate all of the kind words, it helps keep me motivated!
I picked up some PPG Concept DCC Single Stage paint last week. Man, that stuff is pricey but supposed to be miles ahead of Shopline. I guess we'll see! I'm working now on prepping my trunks, cabin and engine bay for two or three coats of color. I figure that will probably take me the rest of this month as each section has to be sanded, seam-sealed and then masked off before painting. I'm hoping that seeing the color inside of the car will really motivate me to knock out the remaining filler work on the outside so that I can get the whole thing in color. More pics to come soon, hopefully. |
|
|
|
| aggiezig |
Mar 23 2018, 10:09 AM
Post
#117
|
|
Porsche Wannabe Group: Members Posts: 319 Joined: 13-January 16 From: Los Angeles, CA Member No.: 19,557 Region Association: Southern California |
Lately I've been dreading the last two areas I have to seam seal (the cabin and the engine bay). I knew both were going to be a pain in the a$$ to mask off and when it comes to seam sealer I must have some sort of perfectionist complex. I decided to tackle the cabin this week, hoping that I could get enough done to consider spraying color inside the car.
I bought a new tube of SEM seam sealer and gave it a shot earlier this week. Long story short, I would not recommend this product. It dries (for my use) way too quick and gums / balls up very easily. By the time I went back to pull the tape off of a section, it had dried so much that I ended up pulling the whole seam off. After a frustrating few hours with this stuff, I decided to try another route. It was also at this point that I realized I was being a perfectionist about this area of seam sealer for no reason. The cabin is going to be covered in sound deadening and then carpet / trim. So, none of this will ever be seen... With that in mind, I decided to go back to brushable sealer. This time, I tried Evercoat's product. I think I found a winner. This product is a little bit thinner than the Eastwood stuff and easier to spray. It takes longer to tack up and skim so you have plenty of time to work with it. I will probably mask the seams in my engine compartment and use this stuff when the time comes. Here are some pics of the seam sealer inside the cabin: (IMG:http://www.914world.com/bbs2/uploads_offsite/i.imgur.com-19557-1521821358.1.jpg) (IMG:http://www.914world.com/bbs2/uploads_offsite/i.imgur.com-19557-1521821358.2.jpg) (IMG:http://www.914world.com/bbs2/uploads_offsite/i.imgur.com-19557-1521821359.3.jpg) (IMG:http://www.914world.com/bbs2/uploads_offsite/i.imgur.com-19557-1521821359.4.jpg) And some pics of the much cleaner seam sealer lines in the front trunk: (IMG:http://www.914world.com/bbs2/uploads_offsite/i.imgur.com-19557-1521821719.1.jpg) (IMG:http://www.914world.com/bbs2/uploads_offsite/i.imgur.com-19557-1521821720.2.jpg) I'm hoping to be able to spray color in the front trunk and also the cabin this weekend. Everything is scuffed so it just needs to be cleaned and masked for paint. I think I will have to set up my canopy in the driveway because the pollen is still really bad down here. Wish me luck! |
|
|
|
| bbrock |
Mar 23 2018, 10:50 AM
Post
#118
|
|
914 Guru Group: Members Posts: 5,269 Joined: 17-February 17 From: Montana Member No.: 20,845 Region Association: Rocky Mountains |
(IMG:style_emoticons/default/popcorn[1].gif) Can't wait to see your next update. Good luck! (IMG:style_emoticons/default/beer.gif)
|
|
|
|
| 914forme |
Mar 23 2018, 08:45 PM
Post
#119
|
|
Times a wastin', get wrenchin'! Group: Members Posts: 3,896 Joined: 24-July 04 From: Dayton, Ohio Member No.: 2,388 Region Association: None |
Great work with the Raptor I am liking this one (IMG:style_emoticons/default/aktion035.gif)
|
|
|
|
| Shadowfax |
Mar 25 2018, 11:27 AM
Post
#120
|
|
Show us the meaning of haste Group: Members Posts: 509 Joined: 19-January 15 Member No.: 18,340 Region Association: South East States |
Great progress! Pollen is bad here too sniff sniff (IMG:style_emoticons/default/biggrin.gif)
|
|
|
|
|
1 User(s) are reading this topic (1 Guests and 0 Anonymous Users)
0 Members:

|
Lo-Fi Version | Time is now: 12th July 2025 - 09:43 AM |
Invision Power Board
v9.1.4 © 2025 IPS, Inc.