|
|
|
Porsche, and the Porsche crest are registered trademarks of Dr. Ing. h.c. F. Porsche AG.
This site is not affiliated with Porsche in any way. Its only purpose is to provide an online forum for car enthusiasts. All other trademarks are property of their respective owners. |
|
|


| theleschyouknow |
 Aug 3 2016, 07:35 PM Aug 3 2016, 07:35 PM
Post
#1
|
|
Senior Member  Group: Members Posts: 524 Joined: 4-June 13 From: Texas Member No.: 15,967 Region Association: None |
I've had my car for about two years first year -what I call the year of living dangerously
I drove it whenever the weather allowed including a 914 weekend in the talimena hills after a brokenclutch cable clevis it's been wheels in the air for close to a year I've been cleaning the engine and trans and suspension arms and cv's/axles and shocks & springs and engine tin I can reach of 40+ years of grease and dirt -a bunch of it likely from the leaking cv's which I'm sure I'll ask about soon in another thread so here's my question for this thread: my rear valence has one 'big' dent in it and couple small wrinkles in the bottom 1/4" or so 'return' flange that defines the bottom edge pics following having never done any kind of body work before this seems fairly straight forward to repair what are the minimal tools required? what kind of results could reasonably be expected? could I (easily)screw it up beyond repair? thanks for any comments or suggestions 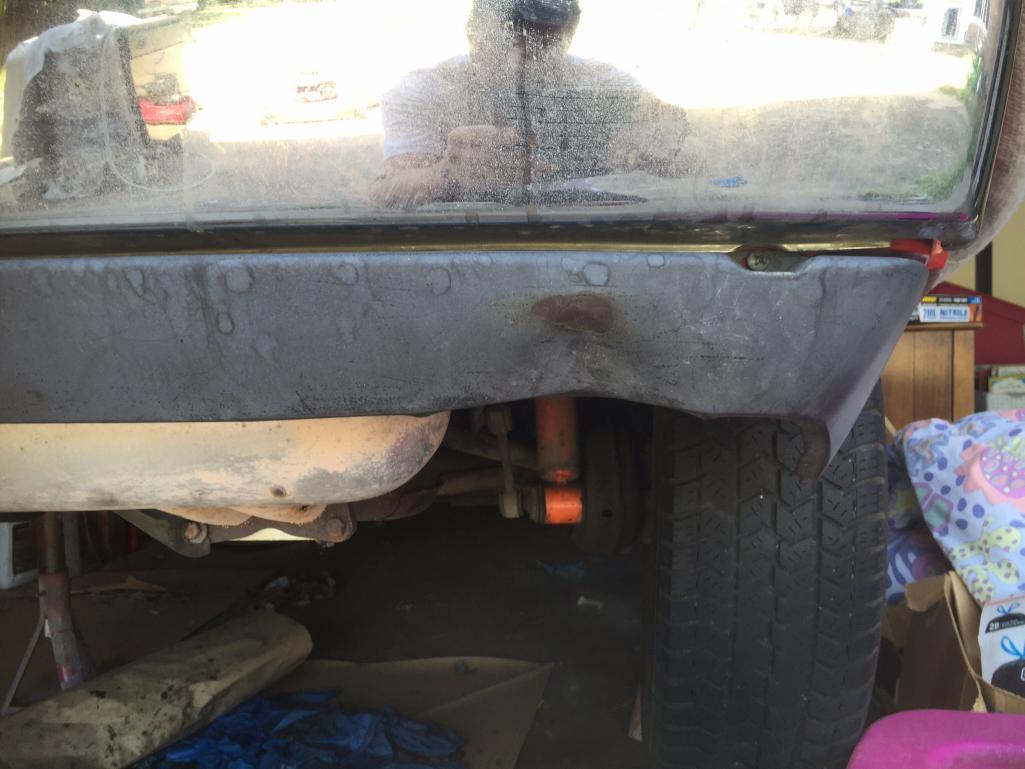 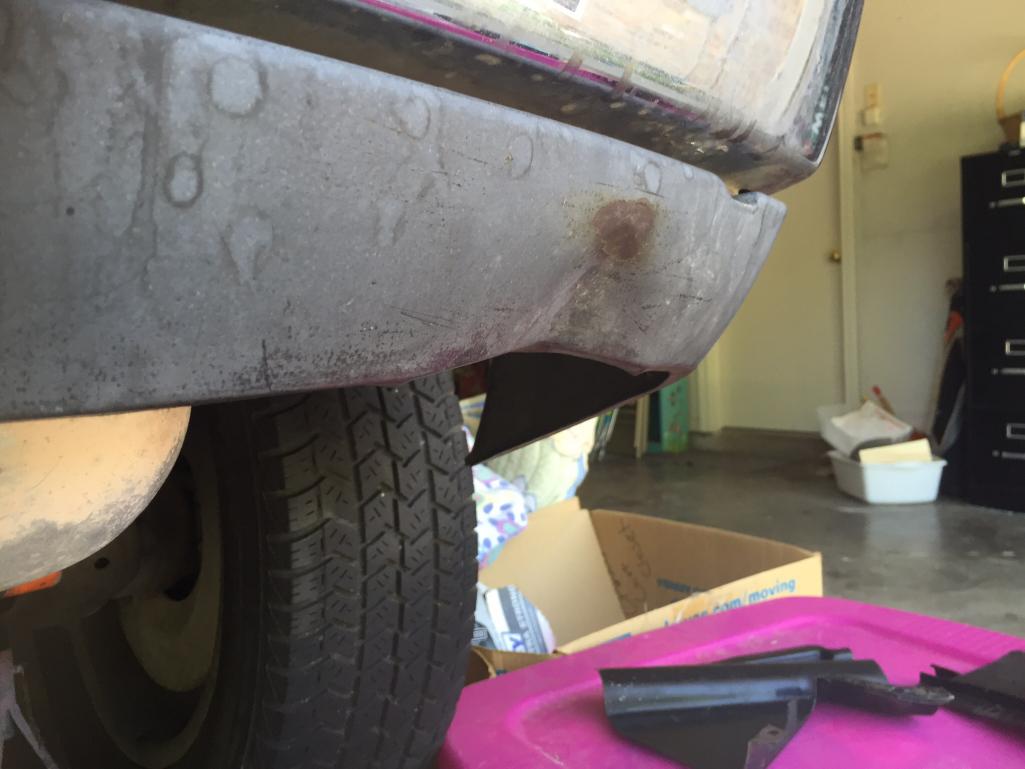  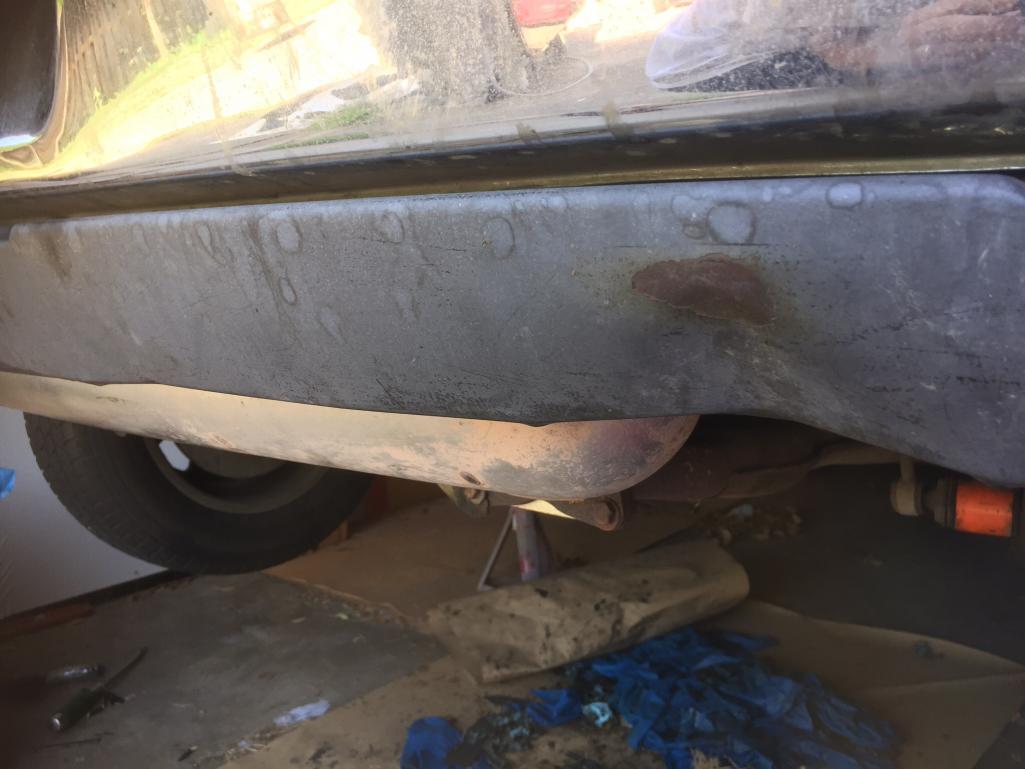 (IMG:style_emoticons/default/beerchug.gif) cjl |
   |

 
|
  |
Replies(20 - 27)
| theleschyouknow |
Aug 9 2016, 08:16 PM
Post
#21
|
|
Senior Member Group: Members Posts: 524 Joined: 4-June 13 From: Texas Member No.: 15,967 Region Association: None |
thanks for the support Darren I'll split the difference in weather temps with you anytime between mid-May and mid-September if we can work it out
I did get a chance to do a little more hammering tonight no pics as it got too dark but I feel like I have done quite a bit of good and some bad I've gotten the bottom much closer back to the original shape with a bit yet to go I have also put a few dings and high spots in it but I think I can work those down after I get the bottom shaped right I'll have some work to do on the return flange as Ive flattened it out a bit to make moving the metal in the ~90 plane on the wide side a bit easier one question regarding the bottom return flange: there are three support 'brackets' on the backside of the valance two 'vertical' ones about 3cm wide at equidistant midpoints and one about 20cm that mirrors the muffler cut out for backside support. At several spots where the flange meets these brackets to varying degrees it looks like the flange is either mis-shapened around those bracket connections or the brackets themselves are out of alignment. Anybody else notice this? I haven't had much luck moving both layers of metal but I haven't worked them much -still concentrating on the main problem area (IMG:style_emoticons/default/beerchug.gif) cjl |
|
|
|
| porschetub |
Aug 9 2016, 08:36 PM
Post
#22
|
|
Advanced Member Group: Members Posts: 4,869 Joined: 25-July 15 From: New Zealand Member No.: 18,995 Region Association: None |
QUOTE(Darren C @ Aug 9 2016, 06:50 PM)  I could use some of your weather. Don't play down your skills, you look like you have the abilities and aptitude to do great things, have confidence in them. (IMG:style_emoticons/default/agree.gif) ,looks good from what I can see. |
|
|
|
| theleschyouknow |
Aug 9 2016, 09:37 PM
Post
#23
|
|
Senior Member Group: Members Posts: 524 Joined: 4-June 13 From: Texas Member No.: 15,967 Region Association: None |
|
|
|
|
| Darren C |
Aug 10 2016, 12:45 AM
Post
#24
|
|
Member Group: Members Posts: 392 Joined: 26-December 14 From: Chichester UK Member No.: 18,255 Region Association: England |
"one question regarding the bottom return flange:
there are three support 'brackets' on the backside of the valance two 'vertical' ones about 3cm wide at equidistant midpoints and one about 20cm that mirrors the muffler cut out for backside support. At several spots where the flange meets these brackets to varying degrees it looks like the flange is either mis-shapened around those bracket connections or the brackets themselves are out of alignment. Anybody else notice this?" Can you post a couple of pictures so that we can compare yours with our brackets. Thanks |
|
|
|
| theleschyouknow |
Aug 10 2016, 07:41 PM
Post
#25
|
|
Senior Member Group: Members Posts: 524 Joined: 4-June 13 From: Texas Member No.: 15,967 Region Association: None |
here's a couple pics of what I'm talking about
below are the brackets I'm talking about 2 spaced midway and 1 around the muffler cut-out 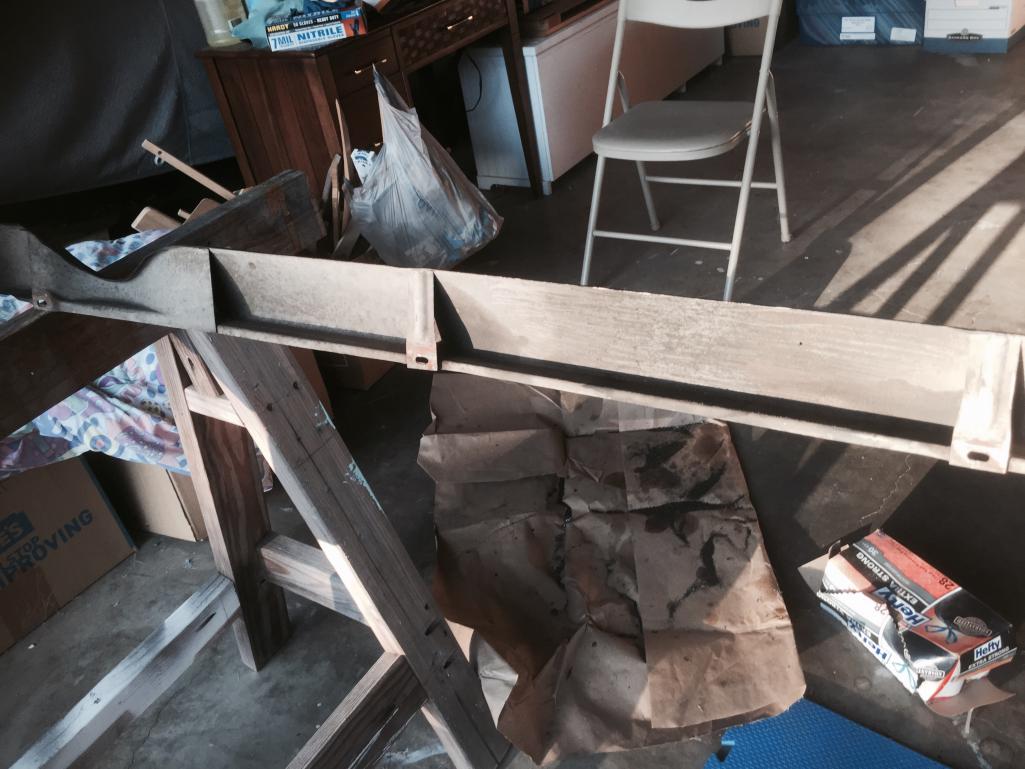 below you can see some of the issues I'm talking about around the support brackets I imagine I can help them out with some more patient smacking  |
|
|
|
| theleschyouknow |
Aug 10 2016, 07:49 PM
Post
#26
|
|
Senior Member Group: Members Posts: 524 Joined: 4-June 13 From: Texas Member No.: 15,967 Region Association: None |
and below is shot of one of the vertical brackets that I've already done some work on but you can still see the bracket doesn't appear to sit true to the line of the valance
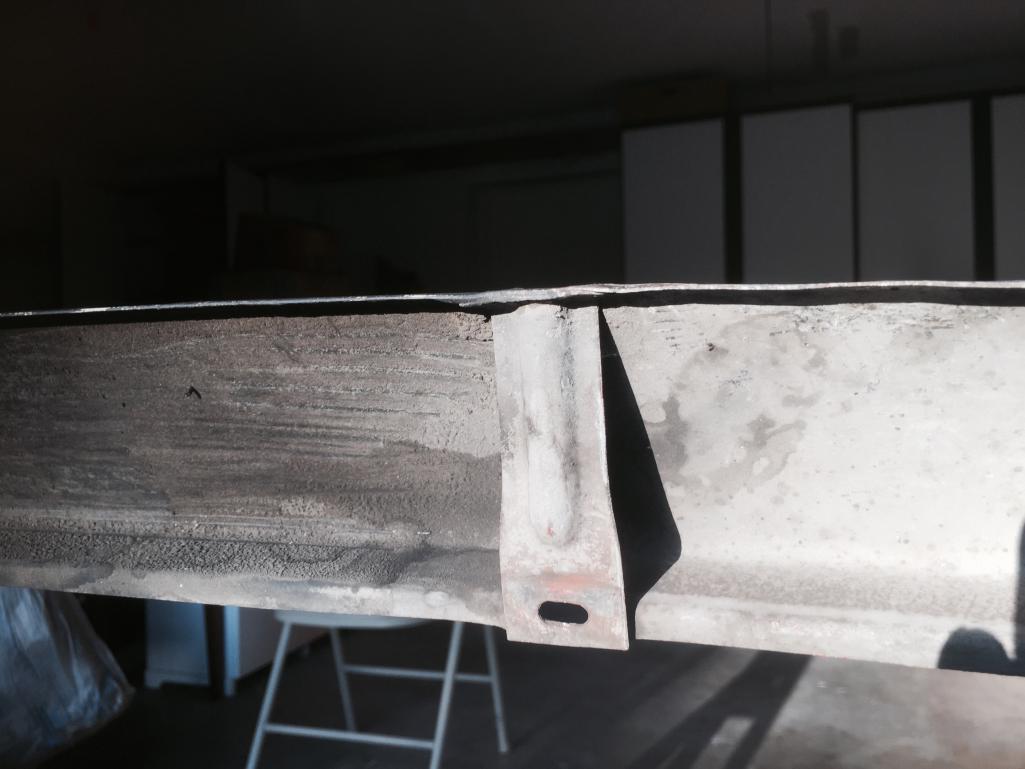 let me know what ya think I smacked on it a bit more tonight but just a half hour of work right after the sun went below the trees left me wringing wet -we're supposed to get some temperature relief on the weekend but supposed to be accompanied by rain as well I like seeing these pics myself, I can see some issues in the pics that are harder to notice staring right at the actual piece (IMG:style_emoticons/default/beerchug.gif) cj |
|
|
|
| Darren C |
Aug 11 2016, 01:36 AM
Post
#27
|
|
Member Group: Members Posts: 392 Joined: 26-December 14 From: Chichester UK Member No.: 18,255 Region Association: England |
Thanks, posting the pictures saves a 1000 words!
The two vertical brackets look as if they’ve been ever so slightly twisted from the original impact. The very first and last picture, to me, show the centre vertical bracket slightly twisted anti clockwise. You could initially try pressing the lower return lip where the bracket attaches in a metal vice (where the metal is 2 layers thick) and gently work the length of the “flat” section of this return lip from left to right. Place a couple of bolts through the slotted fixing hole, use a bolt shank if you can (free from thread) or two drill bit shanks that are a tight fit. This will keep the slots perfectly aligned while you crush press the return flange back in shape. If you have a couple of bits of similar gauge steel off-cuts, place them each side of the bracket on the return lip while pressing for a better result. The bracket over the muffler cut out is a little more complicated but a similar fix can be made. It looks again as if the two layers (valance & bracket) have slipped/moved upwards. Again you need to use two tight fitting bolts or drill bits in the slotted hole first to locate the two pieces before you begin to work the return lip. Once the fixing slot is aligned you can gently tap the return back to shape. You can do this with a “teardrop” dolly or over the end of any metal pipe or metal bar of similar diameter or anything solid with a close (but slightly smaller diameter than the job). Alternatively you can gently pinch the two return lips back close to shape with long nose molegrip pliers using some bits of aluminium scrap as jaw guards. This is a long winded way but possible with patience. Once the two return lip edges have been worked back into shape you can take the two bolts or drill bits out the slotted holes and they should be aligned. Again you could put a small tack or spot weld at the slotted hole (when the bolts/drill bits are in) to positively secure bracket to valance if you so wished. Good luck |
|
|
|
| theleschyouknow |
Aug 11 2016, 06:03 PM
Post
#28
|
|
Senior Member Group: Members Posts: 524 Joined: 4-June 13 From: Texas Member No.: 15,967 Region Association: None |
thanks Darren, good advice & good explanation
I will work those into the repair/reshaping I can't promise as much daily progress as you on your build but I will keep hammering away (IMG:style_emoticons/default/smash.gif) -always wanted to use that one (IMG:style_emoticons/default/beerchug.gif) cjl |
|
|
|
|
1 User(s) are reading this topic (1 Guests and 0 Anonymous Users)
0 Members:

|
Lo-Fi Version | Time is now: 1st July 2025 - 08:00 AM |
Invision Power Board
v9.1.4 © 2025 IPS, Inc.