|
|
|
Porsche, and the Porsche crest are registered trademarks of Dr. Ing. h.c. F. Porsche AG.
This site is not affiliated with Porsche in any way. Its only purpose is to provide an online forum for car enthusiasts. All other trademarks are property of their respective owners. |
|
|

  |

| pneuhyde |
 Oct 7 2016, 11:51 AM Oct 7 2016, 11:51 AM
Post
#1
|
|
Member  Group: Members Posts: 105 Joined: 24-February 05 From: San Leandro, Ca. Member No.: 3,654 Region Association: Pacific Northwest |
I hope to install my back window this weekend and am looking for any tips.
I have Mikey's Butyl cord package and the 2 rubber spacer blocks that I believe get placed on the lower sill? area for the window to rest on. And, I read something somewhere about hooking up 2 batteries in parallel to run current thru the Butyl cord to warm it up? Is that a preferred method? Your help is appreciated, Steve |
   |

 
|
| Kansas 914 |
Oct 7 2016, 11:57 AM
Post
#2
|
|
Advanced Member Group: Members Posts: 3,008 Joined: 1-March 03 From: Durango, Colorado Member No.: 373 Region Association: Rocky Mountains |
QUOTE(pneuhyde @ Oct 7 2016, 11:51 AM)  I hope to install my back window this weekend and am looking for any tips. I have Mikey's Butyl cord package and the 2 rubber spacer blocks that I believe get placed on the lower sill? area for the window to rest on. And, I read something somewhere about hooking up 2 batteries in parallel to run current thru the Butyl cord to warm it up? Is that a preferred method? Your help is appreciated, Steve The battery method was only to be used with the proper butyl - 914Rubber butyl is not that type. It really isn't necessary. Here is a good write up: http://www.914world.com/bbs2/index.php?showtopic=15821 |
|
|
|
| BeatNavy |
Oct 7 2016, 12:00 PM
Post
#3
|
|
Certified Professional Scapegoat Group: Members Posts: 2,965 Joined: 26-February 14 From: Easton, MD Member No.: 17,042 Region Association: MidAtlantic Region |
QUOTE(pneuhyde @ Oct 7 2016, 01:51 PM) the 2 rubber spacer blocks that I believe get placed on the lower sill? area for the window to rest on. Correct. I've not heard about the battery trick, but that's interesting. Other thoughts: Very thoroughly clean the surfaces, both the metal and the glass surfaces. It is good to have a second pair of hands to help. Take a couple of rolled up towels and wedge them between the seat headrest and the window to put pressure on the window and seal, say, overnight. Did you get a new rear window seal? Now's a good time to replace that. I didn't think this was that hard. Just take your time. |
|
|
|
| blackmoon |
Oct 7 2016, 12:20 PM
Post
#4
|
|
Member Group: Members Posts: 153 Joined: 27-May 08 From: Cal Bay Area Member No.: 9,106 Region Association: None |
be careful when removing the glass, it can be a little awkward and removing the old hardened sealant is a pain.
|
|
|
|
| pneuhyde |
Oct 8 2016, 08:52 AM
Post
#5
|
|
Member Group: Members Posts: 105 Joined: 24-February 05 From: San Leandro, Ca. Member No.: 3,654 Region Association: Pacific Northwest |
QUOTE(Kansas 914 @ Oct 7 2016, 10:57 AM) QUOTE(pneuhyde @ Oct 7 2016, 11:51 AM) I hope to install my back window this weekend and am looking for any tips. I have Mikey's Butyl cord package and the 2 rubber spacer blocks that I believe get placed on the lower sill? area for the window to rest on. And, I read something somewhere about hooking up 2 batteries in parallel to run current thru the Butyl cord to warm it up? Is that a preferred method? Your help is appreciated, Steve The battery method was only to be used with the proper butyl - 914Rubber butyl is not that type. It really isn't necessary. Thank you, that's a relief. Here is a good write up: http://www.914world.com/bbs2/index.php?showtopic=15821 Good info |
|
|
|
| pneuhyde |
Oct 8 2016, 08:53 AM
Post
#6
|
|
Member Group: Members Posts: 105 Joined: 24-February 05 From: San Leandro, Ca. Member No.: 3,654 Region Association: Pacific Northwest |
QUOTE(BeatNavy @ Oct 7 2016, 11:00 AM) QUOTE(pneuhyde @ Oct 7 2016, 01:51 PM) the 2 rubber spacer blocks that I believe get placed on the lower sill? area for the window to rest on. Correct. I've not heard about the battery trick, but that's interesting. Other thoughts: Very thoroughly clean the surfaces, both the metal and the glass surfaces. It is good to have a second pair of hands to help. Take a couple of rolled up towels and wedge them between the seat headrest and the window to put pressure on the window and seal, say, overnight. Did you get a new rear window seal? Now's a good time to replace that. I didn't think this was that hard. Just take your time. Thanks, |
|
|
|
| pneuhyde |
Oct 8 2016, 08:54 AM
Post
#7
|
|
Member Group: Members Posts: 105 Joined: 24-February 05 From: San Leandro, Ca. Member No.: 3,654 Region Association: Pacific Northwest |
QUOTE(blackmoon @ Oct 7 2016, 11:20 AM) be careful when removing the glass, it can be a little awkward and removing the old hardened sealant is a pain. Already done, by p.o. |
|
|
|
| Kansas 914 |
Oct 8 2016, 09:03 AM
Post
#8
|
|
Advanced Member Group: Members Posts: 3,008 Joined: 1-March 03 From: Durango, Colorado Member No.: 373 Region Association: Rocky Mountains |
QUOTE(BeatNavy @ Oct 7 2016, 12:00 PM) I've not heard about the battery trick, but that's interesting. The factory butyl had a wire in it. It was Solbit 8mm and made by Bostik - not sure if it is available anywhere anymore. This is from the Workshop Manual: 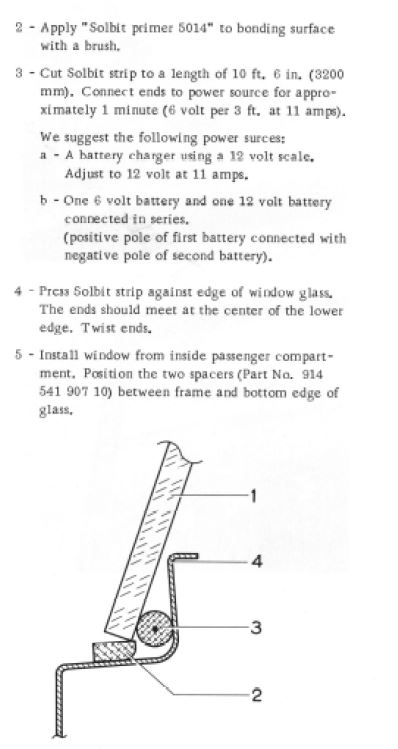 |
|
|
|
| PanelBilly |
Oct 8 2016, 09:28 AM
Post
#9
|
|
914 Guru Group: Members Posts: 5,990 Joined: 23-July 06 From: Kent, Wa Member No.: 6,488 Region Association: Pacific Northwest |
Barbour freight has glass suction cups that you can use to hold the windsheild
|
|
|
|
| mlindner |
Oct 8 2016, 09:33 AM
Post
#10
|
|
Senior Member Group: Members Posts: 1,790 Joined: 11-November 11 From: Merrimac, WI Member No.: 13,770 Region Association: Upper MidWest |
I did mine a week ago, very easy.....that said, the butyle is really sticky...soo, do a dry fit with spacers in place, place glass bottom on spacers and rock back to fit. Then do the same move with butyl in place. Have fun. Best, Mark
|
 |
|
| Cairo94507 |
Oct 8 2016, 09:58 AM
Post
#11
|
|
Michael Group: Members Posts: 10,685 Joined: 1-November 08 From: Auburn, CA Member No.: 9,712 Region Association: Northern California |
I did this on my last Six. Definitely do the "dry run" first to make sure you have the whole "rock the window in place" down. Make sure everything is super clean with no dust left on anything. Plenty of light and room to work. The towels behind the headrest is a good tip too. Good luck.
|
|
|
|
| 87m491 |
Oct 8 2016, 12:24 PM
Post
#12
|
|
Member Group: Members Posts: 331 Joined: 29-July 12 From: Portland, the original! Member No.: 14,731 Region Association: North East States |
Just did this last week. I found that factory drawing to be off a bit. I used 3/8s (9.5mm) from NAPA and wished I used the 5/16s (8mm) my factory blocks were still in place and with the 3/8s butyl, I could barely get my glass to sit over/on them as the butyl was so thick. I'd guess at ambient of 90 or so there is more give. It was 70 maybe, and even with a heat gun to warm the glass and butyl the glass sat further out than I was happy with.
The original tape I removed was compressed to between 2 and 3mm. No way for me to get that thin with 3/8s (IMG:http://www.914world.com/bbs2/uploads_offsite/i723.photobucket.com-14731-1475951700.1.jpg) QUOTE(Kansas 914 @ Oct 8 2016, 07:03 AM) QUOTE(BeatNavy @ Oct 7 2016, 12:00 PM) I've not heard about the battery trick, but that's interesting. The factory butyl had a wire in it. It was Solbit 8mm and made by Bostik - not sure if it is available anywhere anymore. This is from the Workshop Manual: |
|
|
|
| EdwardBlume |
Oct 8 2016, 12:42 PM
Post
#13
|
|
914 Wizard Group: Members Posts: 12,340 Joined: 2-January 03 From: SLO Member No.: 81 Region Association: Central California |
i did one with a weld in roll bar. Once it's in, it's in. Get it right the first time. Oh, and have fun!
|
|
|
|
|
1 User(s) are reading this topic (1 Guests and 0 Anonymous Users)
0 Members:

|
Lo-Fi Version | Time is now: 29th June 2026 - 09:20 AM |
Invision Power Board
v9.1.4 © 2026 IPS, Inc.