|
|
|
Porsche, and the Porsche crest are registered trademarks of Dr. Ing. h.c. F. Porsche AG.
This site is not affiliated with Porsche in any way. Its only purpose is to provide an online forum for car enthusiasts. All other trademarks are property of their respective owners. |
|
|

  |

| Mowog4 |
 Oct 25 2016, 07:14 PM Oct 25 2016, 07:14 PM
Post
#1
|
|
Member  Group: Members Posts: 290 Joined: 2-November 15 From: Mesa AZ Member No.: 19,325 Region Association: None |
I am putting the dash into my car this weekend, would like to know how you installed the dash pad. Does anyone have a picture of how the defroster vents fit? I didn't take the car apart, so it is like a puzzle piece. Once the PAD is in I will install my 914 Rubber dash. Thanks for pointing me in the right direction.
Ed |
   |

 
|
| tygaboy |
Oct 25 2016, 07:51 PM
Post
#2
|
|
914 Guru Group: Members Posts: 5,292 Joined: 6-October 15 From: Petaluma, CA Member No.: 19,241 Region Association: Northern California |
QUOTE(Mowog4 @ Oct 25 2016, 06:14 PM)  I am putting the dash into my car this weekend, would like to know how you installed the dash pad. Does anyone have a picture of how the defroster vents fit? I didn't take the car apart, so it is like a puzzle piece. Once the PAD is in I will install my 914 Rubber dash. Thanks for pointing me in the right direction. Ed Maybe this will help w/part of it? Not sure how far apart your car may be... http://www.914world.com/bbs2/index.php?showtopic=86942 |
|
|
|
| Coondog |
Oct 25 2016, 08:06 PM
Post
#3
|
|
Advanced Member Group: Members Posts: 2,089 Joined: 24-September 15 From: Apple Valley Calif Member No.: 19,195 Region Association: Southern California |
Search you tube. Good 15min. video on this subject.
|
|
|
|
| iankarr |
Oct 25 2016, 08:24 PM
Post
#4
|
|
The wrencher formerly known as Cuddy_K Group: Members Posts: 2,473 Joined: 22-May 15 From: Heber City, UT Member No.: 18,749 Region Association: Intermountain Region |
Is the metal dash frame out of the car? If so, you'll find it a lot easier to work on it. Also easier if the glass is out. The order that worked best for me was 1) refurbish the face material, 2) install new upper dash foam and vinyl, tucking the excess around the curved cutout for the vents, 3) Install the new dash top (protecting the upper dash from scuffing by the dash top studs). 4) Install the entire dash as one unit into the car. If you have a helper, it'll be easier to place the wiring harness in the right spot when the dash goes in.
When I did mine, the windshield was out. I took the defroster vents off by removing the spring clamps that hold the two halves together in the front trunk (they're very fragile, be careful). Once the pad was in place, i gently worked the vents back up into the slots. Then finished it off with a new rubber dash-to-windshield seal from 914rubber. Here's a pic. Enjoy! 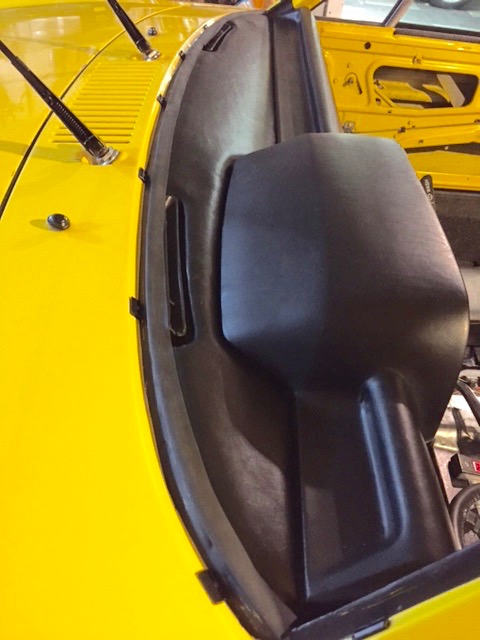 |
|
|
|
| Blue6 |
Oct 25 2016, 10:08 PM
Post
#5
|
|
Senior Member Group: Members Posts: 1,035 Joined: 3-October 13 From: SoCal Member No.: 16,470 Region Association: Southern California |
I have a metal dash frame with the dash pad still attached taken out of an early car. Let me know if any pics of the underside would help you with your project... dave
|
 |
|
| Mowog4 |
Oct 26 2016, 01:07 AM
Post
#6
|
|
Member Group: Members Posts: 290 Joined: 2-November 15 From: Mesa AZ Member No.: 19,325 Region Association: None |
QUOTE(cuddyk @ Oct 25 2016, 07:24 PM) Is the metal dash frame out of the car? If so, you'll find it a lot easier to work on it. Also easier if the glass is out. The order that worked best for me was 1) refurbish the face material, 2) install new upper dash foam and vinyl, tucking the excess around the curved cutout for the vents, 3) Install the new dash top (protecting the upper dash from scuffing by the dash top studs). 4) Install the entire dash as one unit into the car. If you have a helper, it'll be easier to place the wiring harness in the right spot when the dash goes in. When I did mine, the windshield was out. I took the defroster vents off by removing the spring clamps that hold the two halves together in the front trunk (they're very fragile, be careful). Once the pad was in place, i gently worked the vents back up into the slots. Then finished it off with a new rubber dash-to-windshield seal from 914rubber. Here's a pic. Enjoy! This should work perfectly, this picture is great. I will assemble it this weekend. |
|
|
|
|
1 User(s) are reading this topic (1 Guests and 0 Anonymous Users)
0 Members:

|
Lo-Fi Version | Time is now: 17th May 2024 - 02:17 PM |
Invision Power Board
v9.1.4 © 2024 IPS, Inc.