|
|
|
Porsche, and the Porsche crest are registered trademarks of Dr. Ing. h.c. F. Porsche AG.
This site is not affiliated with Porsche in any way. Its only purpose is to provide an online forum for car enthusiasts. All other trademarks are property of their respective owners. |
|
|


| Mikey914 |
 Nov 14 2016, 01:53 AM Nov 14 2016, 01:53 AM
Post
#61
|
|
The rubber man  Group: Members Posts: 12,782 Joined: 27-December 04 From: Hillsboro, OR Member No.: 3,348 Region Association: None |
Wes was nice enough to hook Taylor up with a roller project. He drove down to Mendocino to get it about 3 weeks ago. We finally have it in a place we can work on it and started the clean up.
The backstory is that Wes got it in Oakland where it had sat behind a rib joint for some time. Apparently, some rodents made a home in the air box. They also acquired a taste for ribs. It appears the brought a few back with them. They were there for some time, and urinated eating the bulkhead out. The hell hole and floorboards look good. The pan is intact and looks good. He has a bunch of work ahead of him, but it will get restored back to stock ivory white. Attached thumbnail(s) 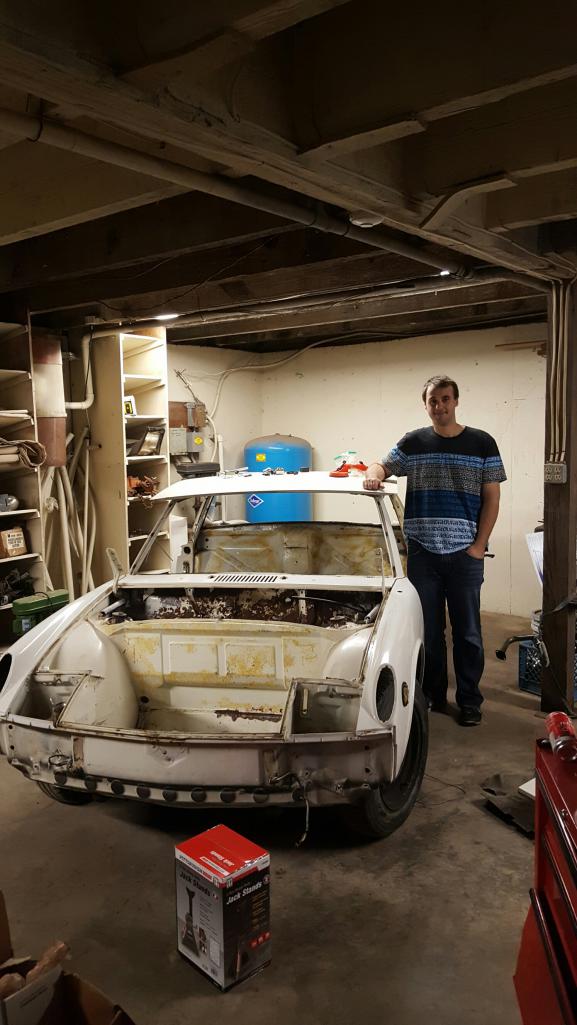 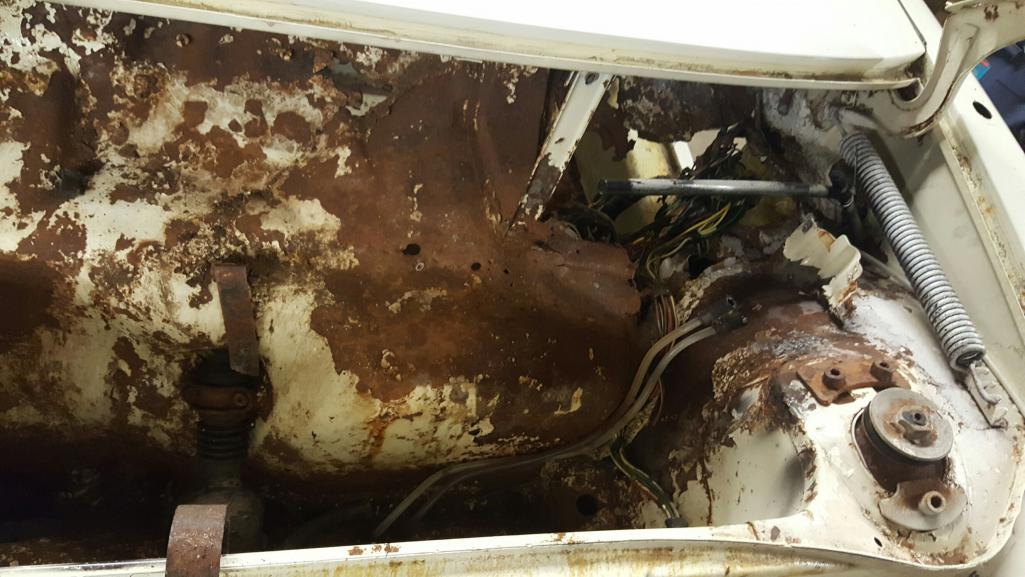 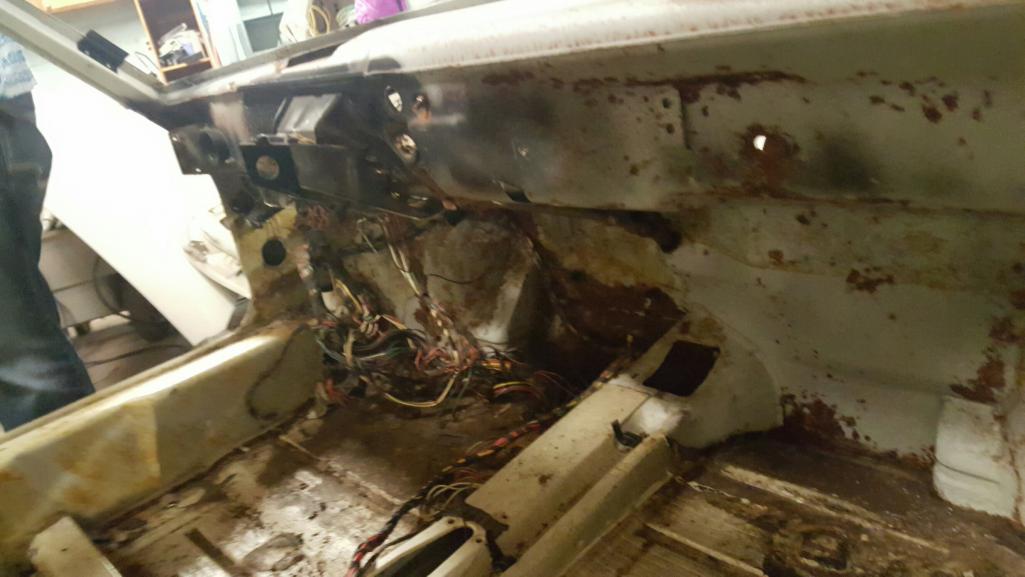
|
   |

 
|
Posts in this topic
 Mikey914 Taylors new project thanks to Wes Nov 14 2016, 01:53 AM
 wes I'm very :Qarl: happy to see she's in goo... Nov 14 2016, 05:00 PM cary Looks like the heater hose hole and the trunk pull... Nov 15 2016, 01:02 AM Mikey914 Yes pretty much gone. Need to buy / build a rotiss... Nov 15 2016, 09:31 AM sixnotfour mouse/rat nest area...,,, hope fully they didn... Nov 16 2016, 12:18 AM Mikey914 Looks like we didn't get any other than the bu... Nov 16 2016, 12:01 PM rhodyguy Does he know about that ratchet jackstand in the b... Nov 16 2016, 08:14 PM Mikey914 Yes, He bought ceremonial jack stands. Trying to s... Nov 17 2016, 12:49 AM Taylor.914 Since the pictures were taken i have gotten a litt... Jan 18 2017, 11:55 PM Krieger Congratulations! That looks like a decent car... Jan 19 2017, 12:01 AM wes This was a fairly nice car that someone let set fo... Jan 19 2017, 02:05 PM ConeDodger That's a great color. I know a guy, who knows ... Jan 19 2017, 08:50 PM Mikey914 Yes Rob. I know him well too.
I'm actually ex... Jan 19 2017, 10:45 PM cary Super In Law should get them finished up tomorrow.... Jan 26 2017, 10:34 PM Mikey914 Thanks Cary,
Not too concerned about the 75+ ones ... Jan 27 2017, 02:39 AM Taylor.914 Just got back from california to pick up the motor... Feb 11 2017, 06:05 PM
wes I'm very :Qarl: happy to see she's in goo... Nov 14 2016, 05:00 PM cary Looks like the heater hose hole and the trunk pull... Nov 15 2016, 01:02 AM Mikey914 Yes pretty much gone. Need to buy / build a rotiss... Nov 15 2016, 09:31 AM sixnotfour mouse/rat nest area...,,, hope fully they didn... Nov 16 2016, 12:18 AM Mikey914 Looks like we didn't get any other than the bu... Nov 16 2016, 12:01 PM rhodyguy Does he know about that ratchet jackstand in the b... Nov 16 2016, 08:14 PM Mikey914 Yes, He bought ceremonial jack stands. Trying to s... Nov 17 2016, 12:49 AM Taylor.914 Since the pictures were taken i have gotten a litt... Jan 18 2017, 11:55 PM Krieger Congratulations! That looks like a decent car... Jan 19 2017, 12:01 AM wes This was a fairly nice car that someone let set fo... Jan 19 2017, 02:05 PM ConeDodger That's a great color. I know a guy, who knows ... Jan 19 2017, 08:50 PM Mikey914 Yes Rob. I know him well too.
I'm actually ex... Jan 19 2017, 10:45 PM cary Super In Law should get them finished up tomorrow.... Jan 26 2017, 10:34 PM Mikey914 Thanks Cary,
Not too concerned about the 75+ ones ... Jan 27 2017, 02:39 AM Taylor.914 Just got back from california to pick up the motor... Feb 11 2017, 06:05 PM
 wes
Just got back from california to pick up the moto... Feb 11 2017, 06:55 PM Larmo63 Yes, that is a factory stamped control number. Feb 11 2017, 06:11 PM Mikey914 There is also an I.O. stamped in the front of the ... Feb 12 2017, 10:07 AM Taylor.914 Just a taste more pic later. finished the blasting... Feb 27 2017, 07:44 PM cary Lookn good ..........................
Hope to cut ... Feb 27 2017, 08:24 PM Mikey914 A few more Mar 1 2017, 12:48 AM Mikey914 more Mar 1 2017, 12:50 AM cary :sawzall: :sawzall: :sawzall:
Still need... Mar 4 2017, 10:28 PM Taylor.914 Here is the up date. Had a bit of a sawzall party... Apr 29 2017, 09:31 PM Taylor.914 RE: Taylors new project thanks to Wes Apr 29 2017, 09:32 PM porschetub Wow clean looking tub,dam those rats that's a ... Apr 30 2017, 04:09 PM wes Looking good really glad to see her coming back to... Apr 30 2017, 10:08 PM cary Taylor's project arrived at MiddleMotors this ... Jun 16 2017, 10:16 PM Larmo63 Keep at it, that looks like a good body/chassis fr... Jun 16 2017, 10:25 PM Taylor.914 Back at it cutting out the rust and drilling spot ... Jun 17 2017, 07:22 PM Taylor.914 RE: Taylors new project thanks to Wes Jun 17 2017, 07:25 PM cary A couple more shots from yesterday. Taylor had a g... Jun 18 2017, 06:34 AM Garland Taylor,
Welcome to the path that leads to the ro... Jun 18 2017, 06:57 AM cary Back to work on Taylor's project.
1st. Cut of... Jun 30 2017, 10:27 PM 914Sixer I have never seen rust in half those places. Jul 1 2017, 06:51 AM Mikey914
I have never seen rust in half those places.
Rat... Jul 1 2017, 11:12 AM cary Today I'll get Taylor set up removing the trim... Jul 1 2017, 07:58 AM cary Taylor had a very productive day. He got most of t... Jul 1 2017, 08:52 PM Taylor.914 Weekend update. Finished drilling the welds and re... Jul 8 2017, 07:55 PM Taylor.914 RE: Taylors new project thanks to Wes Jul 8 2017, 07:59 PM Taylor.914 RE: Taylors new project thanks to Wes Jul 8 2017, 08:00 PM Taylor.914 RE: Taylors new project thanks to Wes Jul 8 2017, 08:01 PM Taylor.914 Making some more progress. Got the front end of th... Aug 7 2017, 11:18 AM Taylor.914 RE: Taylors new project thanks to Wes Aug 7 2017, 11:19 AM tygaboy Taylor - Those of us who have dissected these cars... Aug 7 2017, 11:53 AM mb911
Taylor - Those of us who have dissected these car... Aug 7 2017, 12:17 PM Matty900 He's got some skills. Great work Taylor :first... Aug 7 2017, 10:09 PM cary Today's the day Taylor's harvested parts s... Sep 2 2017, 09:12 AM cary Time to switch from coach to hired gun.
Cut out t... Sep 3 2017, 10:09 AM cary Monday the right fender will get a close inspectio... Sep 3 2017, 10:11 AM cary Labor Day 2017
Taylor will be laboring to remove ... Sep 4 2017, 06:36 AM cary Started Labor Day doing my least favorite task, ou... Sep 5 2017, 08:38 AM cary Here's a shot of where we're at on Taylor... Oct 4 2017, 08:13 AM Andyrew
Here's a shot of where we're at on Taylor... Oct 4 2017, 08:40 AM Mikey914 Yes this was a almost rust free car. Otherwise thi... Oct 4 2017, 10:04 AM wes
Yes this was a almost rust free car. Otherwise th... Oct 4 2017, 02:34 PM bbrock Man, this is not your ordinary restoration. Keep ... Oct 4 2017, 10:11 AM cary With Super In Law awaiting his release, its time t... Dec 26 2017, 10:05 AM cary Getting off to a chilly start ..................br... Dec 26 2017, 11:35 PM cary After a little more inspecting ..................
... Dec 26 2017, 11:43 PM cary Next it was time to cut out the right fender pee p... Dec 26 2017, 11:48 PM Mikey914 Thanks Cary,
Looks like it was a little worse ther... Dec 27 2017, 01:56 AM cary Got all bundled up and got back to work. Still 40 ... Dec 27 2017, 11:26 PM Mikey914 Good news is it's supposed to be warmer tomorr... Dec 28 2017, 12:37 AM cary Started with tidying up the thin spots created by ... Dec 29 2017, 10:55 AM Mueller ^wow, great sheet metal work there! Dec 29 2017, 10:56 AM jimkelly man, i love to see a car being blasted right down ... Dec 29 2017, 12:17 PM cary It costs. But it's the only way you find every... Dec 29 2017, 12:27 PM Mikey914 This is my gift to my son. He puts in the time, I ... Dec 29 2017, 02:02 PM cary Next was the tune up of the hinge support and dash... Dec 29 2017, 09:42 PM cary Forgot to post Sunday's work.
Started the day... Jan 1 2018, 10:42 PM cary Next onto the seriously dented cross-member mount.... Jan 1 2018, 10:55 PM cary Then it was time to start fitting and trimming ...... Jan 1 2018, 11:02 PM cary Let the fun begin. Tuning and tacking ............... Jan 1 2018, 11:05 PM Mikey914 Thanks Cary,
See you Wed with some cash. Jan 2 2018, 02:14 AM cary Friday didn't quite go as planned so I went ba... Jan 6 2018, 09:15 AM cary Got the tip welded back on ...........
After t... Jan 7 2018, 11:34 AM cary
Well I went to the geometry expert for some inp... Jan 10 2018, 11:10 PM rick 918-S Nice work Cary. It's always interesting and ch... Jan 11 2018, 03:06 AM tygaboy
Nice work Cary. It's always interesting and c... Jan 11 2018, 09:03 AM cary Well after all the measurements, pictures and emai... Jan 11 2018, 11:01 PM rick 918-S Always enjoy a challenge. :smash: :sawzall: :wel... Jan 12 2018, 07:06 AM cary Here's all the geometry ..............
... Jan 13 2018, 08:44 AM cary Spent the morning weldng on the right rear cross m... Jan 13 2018, 09:11 AM cary Finished up the left side arch yesterday.
Next... Jan 19 2018, 09:36 AM cary Catch up on Taylor's car.
1st. Treated the bot... Jan 21 2018, 08:48 PM cary Took a little tuning to get it ready to weld in. I... Jan 21 2018, 08:55 PM Taylor.914 Have not been very active on the forum but still m... May 6 2018, 12:33 PM Taylor.914 koo May 6 2018, 12:39 PM Taylor.914 RE: Taylors new project thanks to Wes May 6 2018, 12:40 PM cary I feel bad. I've been so busy in the other roo... May 6 2018, 01:20 PM Taylor.914 Some good progress was made this weekend on firewa... Aug 6 2018, 09:25 PM Taylor.914 RE: Taylors new project thanks to Wes Aug 6 2018, 09:26 PM Taylor.914 RE: Taylors new project thanks to Wes Aug 6 2018, 09:27 PM Taylor.914 RE: Taylors new project thanks to Wes Aug 6 2018, 09:27 PM Taylor.914 Prepping the donor. Aug 6 2018, 09:29 PM Taylor.914 RE: Taylors new project thanks to Wes Aug 6 2018, 09:29 PM Mikey914 just ordered up the passenger side engine tray sec... Aug 8 2018, 04:52 PM wes Amazing work, turned out the car had more rust tha... Aug 8 2018, 05:07 PM
wes
Just got back from california to pick up the moto... Feb 11 2017, 06:55 PM Larmo63 Yes, that is a factory stamped control number. Feb 11 2017, 06:11 PM Mikey914 There is also an I.O. stamped in the front of the ... Feb 12 2017, 10:07 AM Taylor.914 Just a taste more pic later. finished the blasting... Feb 27 2017, 07:44 PM cary Lookn good ..........................
Hope to cut ... Feb 27 2017, 08:24 PM Mikey914 A few more Mar 1 2017, 12:48 AM Mikey914 more Mar 1 2017, 12:50 AM cary :sawzall: :sawzall: :sawzall:
Still need... Mar 4 2017, 10:28 PM Taylor.914 Here is the up date. Had a bit of a sawzall party... Apr 29 2017, 09:31 PM Taylor.914 RE: Taylors new project thanks to Wes Apr 29 2017, 09:32 PM porschetub Wow clean looking tub,dam those rats that's a ... Apr 30 2017, 04:09 PM wes Looking good really glad to see her coming back to... Apr 30 2017, 10:08 PM cary Taylor's project arrived at MiddleMotors this ... Jun 16 2017, 10:16 PM Larmo63 Keep at it, that looks like a good body/chassis fr... Jun 16 2017, 10:25 PM Taylor.914 Back at it cutting out the rust and drilling spot ... Jun 17 2017, 07:22 PM Taylor.914 RE: Taylors new project thanks to Wes Jun 17 2017, 07:25 PM cary A couple more shots from yesterday. Taylor had a g... Jun 18 2017, 06:34 AM Garland Taylor,
Welcome to the path that leads to the ro... Jun 18 2017, 06:57 AM cary Back to work on Taylor's project.
1st. Cut of... Jun 30 2017, 10:27 PM 914Sixer I have never seen rust in half those places. Jul 1 2017, 06:51 AM Mikey914
I have never seen rust in half those places.
Rat... Jul 1 2017, 11:12 AM cary Today I'll get Taylor set up removing the trim... Jul 1 2017, 07:58 AM cary Taylor had a very productive day. He got most of t... Jul 1 2017, 08:52 PM Taylor.914 Weekend update. Finished drilling the welds and re... Jul 8 2017, 07:55 PM Taylor.914 RE: Taylors new project thanks to Wes Jul 8 2017, 07:59 PM Taylor.914 RE: Taylors new project thanks to Wes Jul 8 2017, 08:00 PM Taylor.914 RE: Taylors new project thanks to Wes Jul 8 2017, 08:01 PM Taylor.914 Making some more progress. Got the front end of th... Aug 7 2017, 11:18 AM Taylor.914 RE: Taylors new project thanks to Wes Aug 7 2017, 11:19 AM tygaboy Taylor - Those of us who have dissected these cars... Aug 7 2017, 11:53 AM mb911
Taylor - Those of us who have dissected these car... Aug 7 2017, 12:17 PM Matty900 He's got some skills. Great work Taylor :first... Aug 7 2017, 10:09 PM cary Today's the day Taylor's harvested parts s... Sep 2 2017, 09:12 AM cary Time to switch from coach to hired gun.
Cut out t... Sep 3 2017, 10:09 AM cary Monday the right fender will get a close inspectio... Sep 3 2017, 10:11 AM cary Labor Day 2017
Taylor will be laboring to remove ... Sep 4 2017, 06:36 AM cary Started Labor Day doing my least favorite task, ou... Sep 5 2017, 08:38 AM cary Here's a shot of where we're at on Taylor... Oct 4 2017, 08:13 AM Andyrew
Here's a shot of where we're at on Taylor... Oct 4 2017, 08:40 AM Mikey914 Yes this was a almost rust free car. Otherwise thi... Oct 4 2017, 10:04 AM wes
Yes this was a almost rust free car. Otherwise th... Oct 4 2017, 02:34 PM bbrock Man, this is not your ordinary restoration. Keep ... Oct 4 2017, 10:11 AM cary With Super In Law awaiting his release, its time t... Dec 26 2017, 10:05 AM cary Getting off to a chilly start ..................br... Dec 26 2017, 11:35 PM cary After a little more inspecting ..................
... Dec 26 2017, 11:43 PM cary Next it was time to cut out the right fender pee p... Dec 26 2017, 11:48 PM Mikey914 Thanks Cary,
Looks like it was a little worse ther... Dec 27 2017, 01:56 AM cary Got all bundled up and got back to work. Still 40 ... Dec 27 2017, 11:26 PM Mikey914 Good news is it's supposed to be warmer tomorr... Dec 28 2017, 12:37 AM cary Started with tidying up the thin spots created by ... Dec 29 2017, 10:55 AM Mueller ^wow, great sheet metal work there! Dec 29 2017, 10:56 AM jimkelly man, i love to see a car being blasted right down ... Dec 29 2017, 12:17 PM cary It costs. But it's the only way you find every... Dec 29 2017, 12:27 PM Mikey914 This is my gift to my son. He puts in the time, I ... Dec 29 2017, 02:02 PM cary Next was the tune up of the hinge support and dash... Dec 29 2017, 09:42 PM cary Forgot to post Sunday's work.
Started the day... Jan 1 2018, 10:42 PM cary Next onto the seriously dented cross-member mount.... Jan 1 2018, 10:55 PM cary Then it was time to start fitting and trimming ...... Jan 1 2018, 11:02 PM cary Let the fun begin. Tuning and tacking ............... Jan 1 2018, 11:05 PM Mikey914 Thanks Cary,
See you Wed with some cash. Jan 2 2018, 02:14 AM cary Friday didn't quite go as planned so I went ba... Jan 6 2018, 09:15 AM cary Got the tip welded back on ...........
After t... Jan 7 2018, 11:34 AM cary
Well I went to the geometry expert for some inp... Jan 10 2018, 11:10 PM rick 918-S Nice work Cary. It's always interesting and ch... Jan 11 2018, 03:06 AM tygaboy
Nice work Cary. It's always interesting and c... Jan 11 2018, 09:03 AM cary Well after all the measurements, pictures and emai... Jan 11 2018, 11:01 PM rick 918-S Always enjoy a challenge. :smash: :sawzall: :wel... Jan 12 2018, 07:06 AM cary Here's all the geometry ..............
... Jan 13 2018, 08:44 AM cary Spent the morning weldng on the right rear cross m... Jan 13 2018, 09:11 AM cary Finished up the left side arch yesterday.
Next... Jan 19 2018, 09:36 AM cary Catch up on Taylor's car.
1st. Treated the bot... Jan 21 2018, 08:48 PM cary Took a little tuning to get it ready to weld in. I... Jan 21 2018, 08:55 PM Taylor.914 Have not been very active on the forum but still m... May 6 2018, 12:33 PM Taylor.914 koo May 6 2018, 12:39 PM Taylor.914 RE: Taylors new project thanks to Wes May 6 2018, 12:40 PM cary I feel bad. I've been so busy in the other roo... May 6 2018, 01:20 PM Taylor.914 Some good progress was made this weekend on firewa... Aug 6 2018, 09:25 PM Taylor.914 RE: Taylors new project thanks to Wes Aug 6 2018, 09:26 PM Taylor.914 RE: Taylors new project thanks to Wes Aug 6 2018, 09:27 PM Taylor.914 RE: Taylors new project thanks to Wes Aug 6 2018, 09:27 PM Taylor.914 Prepping the donor. Aug 6 2018, 09:29 PM Taylor.914 RE: Taylors new project thanks to Wes Aug 6 2018, 09:29 PM Mikey914 just ordered up the passenger side engine tray sec... Aug 8 2018, 04:52 PM wes Amazing work, turned out the car had more rust tha... Aug 8 2018, 05:07 PM  |
1 User(s) are reading this topic (1 Guests and 0 Anonymous Users)
0 Members:

|
Lo-Fi Version | Time is now: 23rd June 2026 - 07:05 PM |
Invision Power Board
v9.1.4 © 2026 IPS, Inc.