|
|
|
Porsche, and the Porsche crest are registered trademarks of Dr. Ing. h.c. F. Porsche AG.
This site is not affiliated with Porsche in any way. Its only purpose is to provide an online forum for car enthusiasts. All other trademarks are property of their respective owners. |
|
|

  |

| Speedmster |
 Nov 19 2016, 08:12 AM Nov 19 2016, 08:12 AM
Post
#1
|
|
Member  Group: Members Posts: 62 Joined: 19-September 07 From: Louisville, Ky Member No.: 8,132 Region Association: MidAtlantic Region |
We have been freshing up dads 914-6 (#1006). Had some paint work done and several other touch ups here and there.
We have the windshield out because the seal was dried up and only sealing 2/3rds the way around. With the windshield out we decided to replace the cracked dash pad and to replace the upper dash face (I think that is what it is called). My question is can the upper dash face be replaced with the windshield out without dropping the dash itself? If so, how do you recommend getting the forward edge of the material around and under the lip? Clint (IMG:http://www.914world.com/bbs2/uploads_offsite/i9.photobucket.com-8132-1479564773.1.jpg) (IMG:http://www.914world.com/bbs2/uploads_offsite/i9.photobucket.com-8132-1479564773.2.jpg) (IMG:http://www.914world.com/bbs2/uploads_offsite/i9.photobucket.com-8132-1479564774.3.jpg) (IMG:http://www.914world.com/bbs2/uploads_offsite/i9.photobucket.com-8132-1479564774.4.jpg) |
   |

 
|
| tygaboy |
Nov 19 2016, 08:25 AM
Post
#2
|
|
914 Guru Group: Members Posts: 5,844 Joined: 6-October 15 From: Petaluma, CA Member No.: 19,241 Region Association: Northern California |
Sorry, I'm no help on the dash pad but I have to compliment you and your Pops on a very cool car. Love those wheels! (IMG:style_emoticons/default/smilie_pokal.gif)
|
|
|
|
| iankarr |
Nov 19 2016, 08:48 AM
Post
#3
|
|
The wrencher formerly known as Cuddy_K Group: Members Posts: 2,603 Joined: 22-May 15 From: Heber City, UT Member No.: 18,749 Region Association: Intermountain Region |
Very cool that you're doing that for your dad. Yes, you can install the top pad with the dash in the car, but the job is so much easier and will turn out better if you remove the dash frame. You'll also be glad you did when it comes time to install the new main dash pad and you don't break your knuckles trying to get at the two studs behind the instrument cluster. IMHO the time you spend struggling to get everything smooth and stick properly (so that the edges don't start peeling up in the summer) will be equal to or greater than what it will take to remove the dash frame and do the job right. Totally worth it while the glass is out! Especially on a -6.
I just did this project. Pm me if you have any questions! |
|
|
|
| stevegm |
Nov 19 2016, 08:56 AM
Post
#4
|
|
Advanced Member Group: Members Posts: 2,111 Joined: 14-July 14 From: North Carolina Member No.: 17,633 Region Association: South East States |
(IMG:style_emoticons/default/popcorn[1].gif)
I am getting ready to do the exact same project on our car. |
|
|
|
| toolguy |
Nov 19 2016, 09:13 AM
Post
#5
|
|
Senior Member Group: Members Posts: 1,277 Joined: 2-April 11 From: San Diego / El Cajon Member No.: 12,889 Region Association: Southern California |
Keep life simple, leave the glass out until you have the dash installed. . so much easier.
|
|
|
|
| Speedmster |
Nov 19 2016, 09:17 AM
Post
#6
|
|
Member Group: Members Posts: 62 Joined: 19-September 07 From: Louisville, Ky Member No.: 8,132 Region Association: MidAtlantic Region |
QUOTE(toolguy @ Nov 19 2016, 10:13 AM)  Keep life simple, leave the glass out until you have the dash installed. . so much easier. That is our plan. |
|
|
|
| Speedmster |
Nov 19 2016, 09:32 AM
Post
#7
|
|
Member Group: Members Posts: 62 Joined: 19-September 07 From: Louisville, Ky Member No.: 8,132 Region Association: MidAtlantic Region |
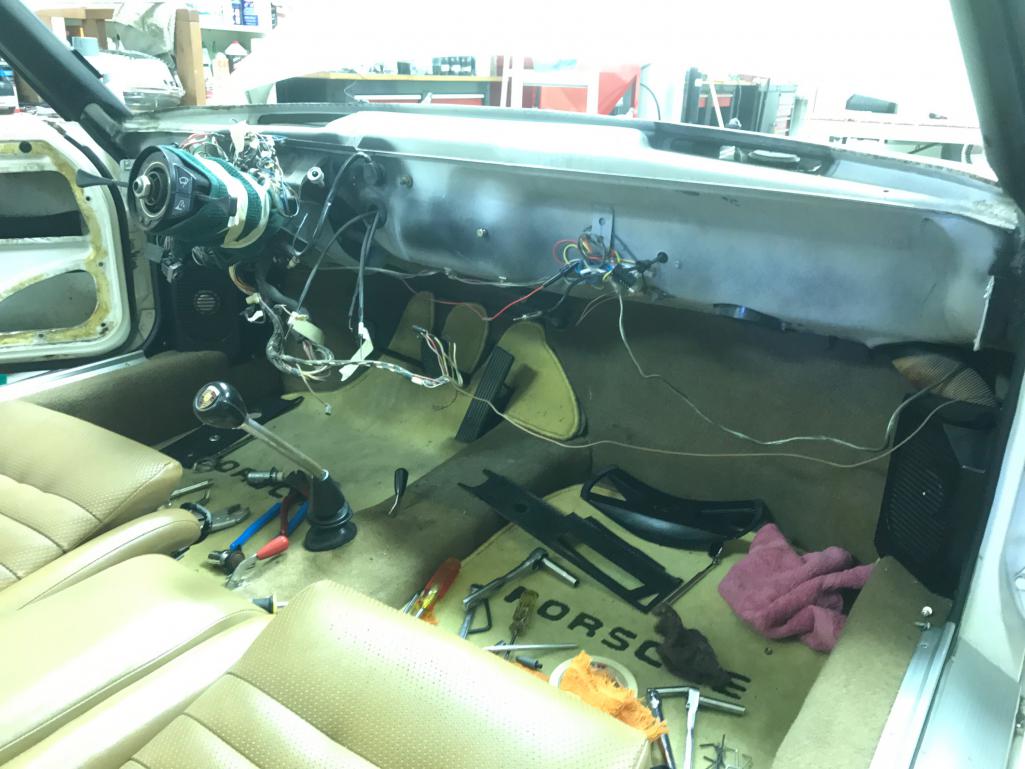
QUOTE(cuddyk @ Nov 19 2016, 09:48 AM) Very cool that you're doing that for your dad. Yes, you can install the top pad with the dash in the car, but the job is so much easier and will turn out better if you remove the dash frame. You'll also be glad you did when it comes time to install the new main dash pad and you don't break your knuckles trying to get at the two studs behind the instrument cluster. IMHO the time you spend struggling to get everything smooth and stick properly (so that the edges don't start peeling up in the summer) will be equal to or greater than what it will take to remove the dash frame and do the job right. Totally worth it while the glass is out! Especially on a -6. I just did this project. Pm me if you have any questions! Most of the dash is apart thanks to getting to the dash pad nuts (IMG:style_emoticons/default/chair.gif) . So if my thought process is right, the blower switch, instrument panel, and steering column will need to be removed or least disconnected correct? Is there anything different for a -6 with the steering column that will need to be done? I've been referencing a thread from the Lapuwali Classic Thread Forum, but it is from a -4 http://www.914world.com/bbs2/index.php?showtopic=42757 Clint |
|
|
|
| iankarr |
Nov 19 2016, 09:34 AM
Post
#8
|
|
The wrencher formerly known as Cuddy_K Group: Members Posts: 2,603 Joined: 22-May 15 From: Heber City, UT Member No.: 18,749 Region Association: Intermountain Region |
Go for it! Here's a summary of how to remove the dash frame.
– Remove the lower dash "knee" pad (fasteners on bottom and sides) and the air vents (they pop out). – Remove the turn signal and windshield wiper switches and steering column "collar". – Remove bolt underneath the climate control, pull the unit forward, use a sharpie to mark the position of the cables with respect to the fasteners and release them. (some people prefer to release on the other end, but I had no trouble releasing from the control side. Just need to gently bend things a bit. don't forget to pull out the lights. – Pull the wiring harness out of the channel at the base of the dash frame and let it dangle. – There are four bolts under the windshield holding the dash frame to the car. They're accessed from under the cowl in the front trunk. To get at them, you'll need to remove the defroster hoses and vents by releasing the spring clip. Be very careful pulling the vents out...they're fragile and prone to cracking. Just wiggle them until they release. – Once the cowl bolts are out, remove the side bolts holding the dash frame to the car. Make sure you have a helper so the frame doesn't just drop and pull on the wiring harness. Carefully pull the dash frame out, making sure you don't pull on the harness. There are several threads on how to replace the upper dash pad, so I won't repeat those here. When it comes time to install the new dash top (I assume you got one from 914rubber), make sure you put a towel or other protection on the upper dash pad so that the studs from the top don't scratch it while you're trying to guide them into their holes. Once the whole thing is assembled and you're ready to re-install, you'll need a helper to keep the dash in position while you guide the wiring harness back into the channel. Don't forget the windshield-to-dash rubber when finished. Good luck! Ian 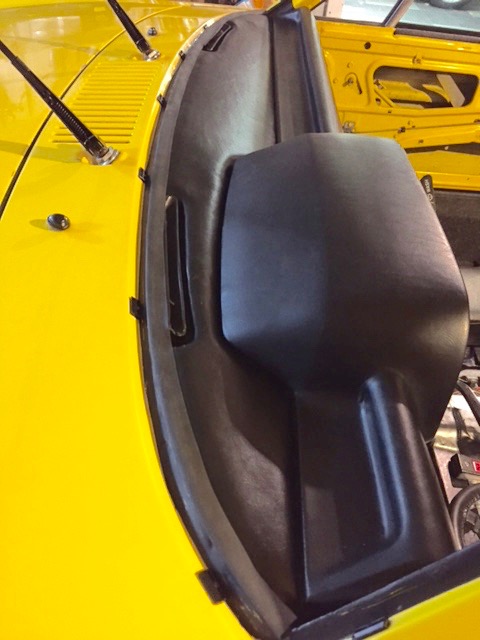 |
|
|
|
| iankarr |
Nov 19 2016, 09:43 AM
Post
#9
|
|
The wrencher formerly known as Cuddy_K Group: Members Posts: 2,603 Joined: 22-May 15 From: Heber City, UT Member No.: 18,749 Region Association: Intermountain Region |
QUOTE(Speedmster @ Nov 19 2016, 10:32 AM) QUOTE(cuddyk @ Nov 19 2016, 09:48 AM) Very cool that you're doing that for your dad. Yes, you can install the top pad with the dash in the car, but the job is so much easier and will turn out better if you remove the dash frame. You'll also be glad you did when it comes time to install the new main dash pad and you don't break your knuckles trying to get at the two studs behind the instrument cluster. IMHO the time you spend struggling to get everything smooth and stick properly (so that the edges don't start peeling up in the summer) will be equal to or greater than what it will take to remove the dash frame and do the job right. Totally worth it while the glass is out! Especially on a -6. I just did this project. Pm me if you have any questions! Most of the dash is apart thanks to getting to the dash pad nuts (IMG:style_emoticons/default/chair.gif) . So if my thought process is right, the blower switch, instrument panel, and steering column will need to be removed or least disconnected correct? Is there anything different for a -6 with the steering column that will need to be done? I've been referencing a thread from the Lapuwali Classic Thread Forum, but it is from a -4 http://www.914world.com/bbs2/index.php?showtopic=42757 Clint Hey Clint... That classic thread is great. Pictures help a lot. And I'm sure I forgot something that's covered there (IMG:style_emoticons/default/wink.gif). I only have a -4, so I'm not sure if there are other quirks which make removal different, but there shouldn't be. Yes, you'll need to remove the instrument cluster and steering "collar". This is a great time to have Tim refresh your gauges and update to LED. Or you can follow his thread to do it yourself... http://www.914world.com/bbs2/index.php?showtopic=217100 |
|
|
|
| boxstr |
Nov 19 2016, 01:29 PM
Post
#10
|
|
MEMBER:PACIFIC NORTHWEST REGION Group: Members Posts: 7,522 Joined: 25-December 02 From: OREGON Member No.: 12 Region Association: Pacific Northwest |
The one thing I found that I used a foam under the vinyl that is the same thickness as original or use the original.
What I found was anything thicker than original really sticks out and looks puffed up and odd looking. Craig at CAMP |
|
|
|
| rgalla9146 |
Nov 19 2016, 04:45 PM
Post
#11
|
|
Advanced Member Group: Members Posts: 4,983 Joined: 23-November 05 From: Paramus NJ Member No.: 5,176 Region Association: None |
QUOTE(boxstr @ Nov 19 2016, 02:29 PM) The one thing I found that I used a foam under the vinyl that is the same thickness as original or use the original. What I found was anything thicker than original really sticks out and looks puffed up and odd looking. Craig at CAMP (IMG:style_emoticons/default/agree.gif) Absolutely. |
|
|
|
| Speedmster |
Nov 19 2016, 06:15 PM
Post
#12
|
|
Member Group: Members Posts: 62 Joined: 19-September 07 From: Louisville, Ky Member No.: 8,132 Region Association: MidAtlantic Region |
QUOTE(boxstr @ Nov 19 2016, 02:29 PM) The one thing I found that I used a foam under the vinyl that is the same thickness as original or use the original. What I found was anything thicker than original really sticks out and looks puffed up and odd looking. Craig at CAMP That is interesting. The padding I have is thicker. The original has already been removed and can't be reused. I do have a few pieces around and will find a suitable replacement. Thanks of the heads up. |
|
|
|
| Speedmster |
Nov 19 2016, 06:16 PM
Post
#13
|
|
Member Group: Members Posts: 62 Joined: 19-September 07 From: Louisville, Ky Member No.: 8,132 Region Association: MidAtlantic Region |
Double Post
|
|
|
|
| Mikey914 |
Nov 20 2016, 03:12 AM
Post
#14
|
|
The rubber man Group: Members Posts: 12,782 Joined: 27-December 04 From: Hillsboro, OR Member No.: 3,348 Region Association: None |
You can use 1/8" headliner material.
|
|
|
|
| Speedmster |
Mar 12 2017, 06:06 PM
Post
#15
|
|
Member Group: Members Posts: 62 Joined: 19-September 07 From: Louisville, Ky Member No.: 8,132 Region Association: MidAtlantic Region |
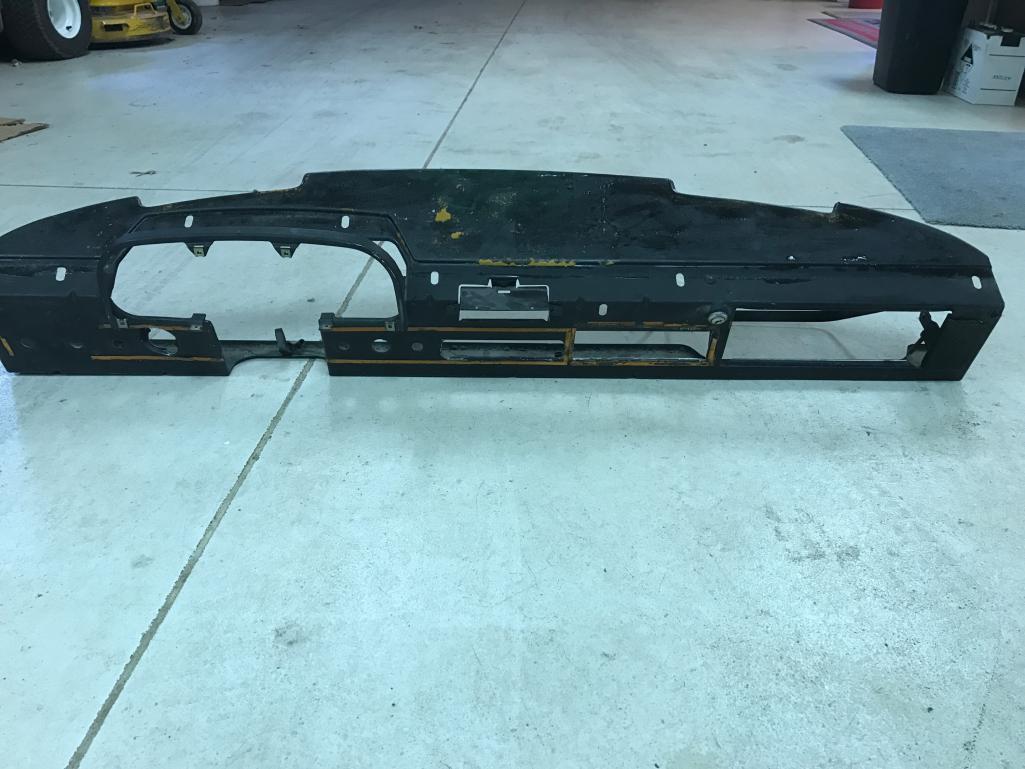
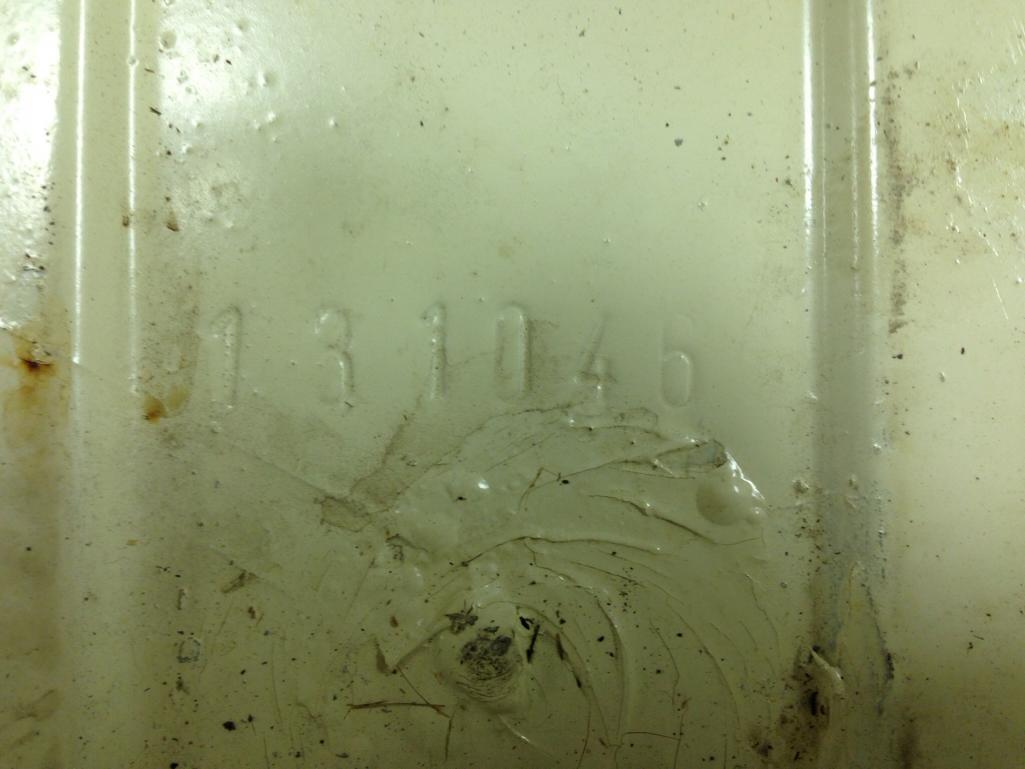
We got the dash out and much to our surprise the chassis number for the Karmann body in he truck didn't match up to the what was written on th back the dash. Any thought?
Attached thumbnail(s) 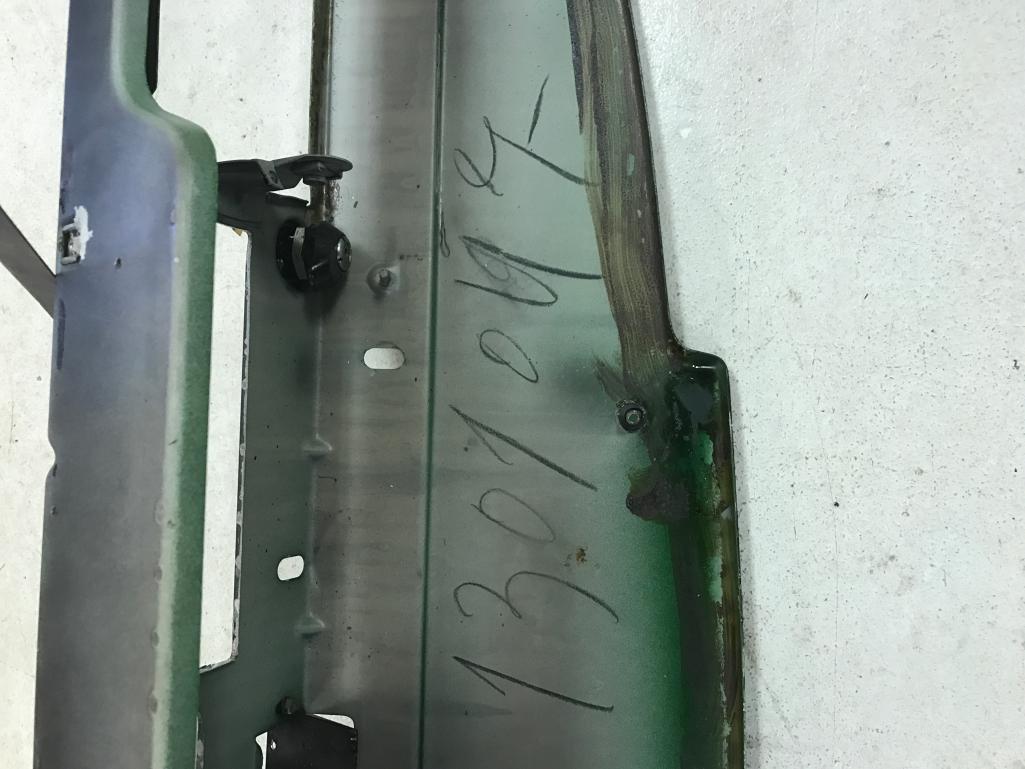
|
|
|
|
| Speedmster |
Mar 12 2017, 06:08 PM
Post
#16
|
|
Member Group: Members Posts: 62 Joined: 19-September 07 From: Louisville, Ky Member No.: 8,132 Region Association: MidAtlantic Region |
repop
|
|
|
|
| Speedmster |
Mar 12 2017, 06:09 PM
Post
#17
|
|
Member Group: Members Posts: 62 Joined: 19-September 07 From: Louisville, Ky Member No.: 8,132 Region Association: MidAtlantic Region |
mor follow on
 |
|
|
|
| Speedmster |
Mar 12 2017, 06:10 PM
Post
#18
|
|
Member Group: Members Posts: 62 Joined: 19-September 07 From: Louisville, Ky Member No.: 8,132 Region Association: MidAtlantic Region |
 |
|
|
|
| Speedmster |
Mar 12 2017, 06:12 PM
Post
#19
|
|
Member Group: Members Posts: 62 Joined: 19-September 07 From: Louisville, Ky Member No.: 8,132 Region Association: MidAtlantic Region |
repop
|
|
|
|
| Speedmster |
Mar 12 2017, 06:15 PM
Post
#20
|
|
Member Group: Members Posts: 62 Joined: 19-September 07 From: Louisville, Ky Member No.: 8,132 Region Association: MidAtlantic Region |
Any ideas why the numbers hand written below dash would be different from stamped Karmann number in trunk?
 |
|
|
|
|
1 User(s) are reading this topic (1 Guests and 0 Anonymous Users)
0 Members:

|
Lo-Fi Version | Time is now: 20th July 2026 - 09:55 AM |
Invision Power Board
v9.1.4 © 2026 IPS, Inc.