|
|
|
Porsche, and the Porsche crest are registered trademarks of Dr. Ing. h.c. F. Porsche AG.
This site is not affiliated with Porsche in any way. Its only purpose is to provide an online forum for car enthusiasts. All other trademarks are property of their respective owners. |
|
|


| ConeDodger |
 Dec 6 2016, 06:09 PM Dec 6 2016, 06:09 PM
Post
#181
|
|
Apex killer!  Group: Members Posts: 24,480 Joined: 31-December 04 From: Tahoe Area Member No.: 3,380 Region Association: Northern California |
Ok, some of you showed interest in getting the two parts on the left on top of the Hella box.
Who's in? Ordering information is now here Orders Received: Dion raynekat Niklas 914Sixer jkb944t simonjb maf914 treemn Jett Attached thumbnail(s) 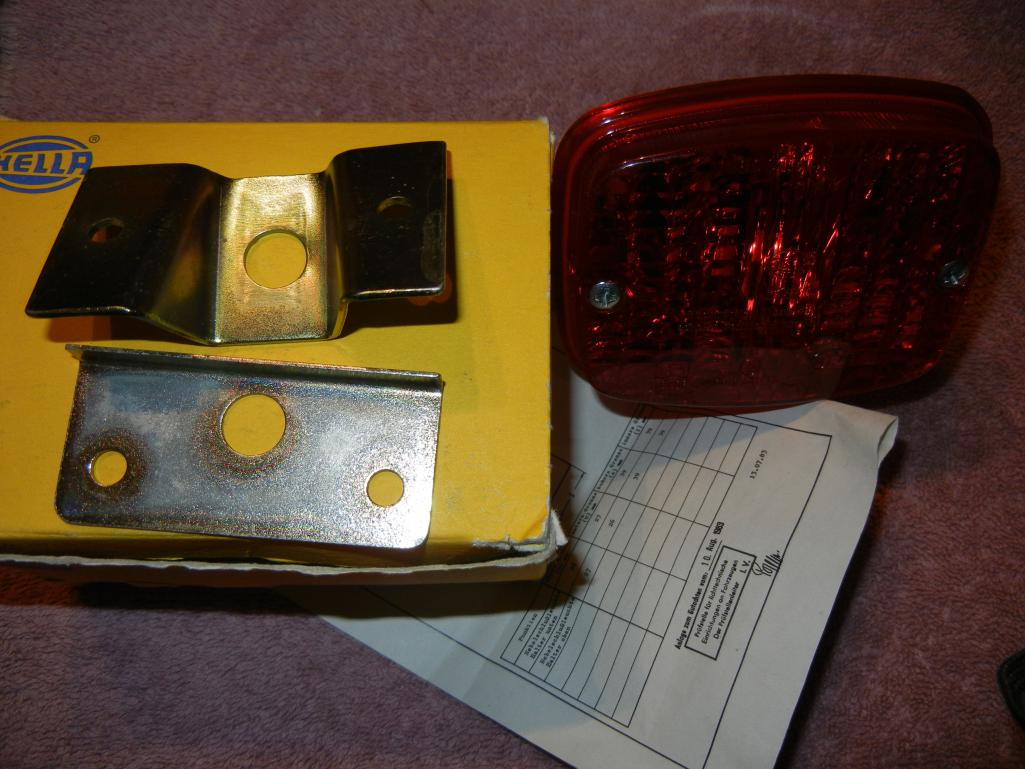
|
   |

 
|
Posts in this topic
 ConeDodger Reproducing the elusive rear fog light bracket. Dec 6 2016, 06:09 PM
 Dion What the hell. Why not. Either all in or...
I ru... Dec 6 2016, 06:49 PM raynekat Sign me up....I'm in for one. Dec 6 2016, 07:06 PM
Dion What the hell. Why not. Either all in or...
I ru... Dec 6 2016, 06:49 PM raynekat Sign me up....I'm in for one. Dec 6 2016, 07:06 PM
 raynekat
Sign me up....I'm in for one.
If it helps, ... Dec 11 2016, 06:08 PM ConeDodger
Sign me up....I'm in for one.
If it helps,... Dec 11 2016, 08:28 PM ConeDodger Two down, eight to go!
The other two parts re... Dec 6 2016, 08:27 PM porbmw I actually bought the brackets from a member, a wh... Dec 6 2016, 11:40 PM ConeDodger
I actually bought the brackets from a member, a w... Dec 6 2016, 11:59 PM edrotol
I actually bought the brackets from a member, a ... Dec 7 2016, 07:06 PM jim_hoyland Thanks for going through with the process.
***Upd... Dec 7 2016, 07:54 AM ConeDodger 3/10! :cheer: Dec 7 2016, 10:27 AM ConeDodger I need 5 of these to be spoken for before I can g... Dec 8 2016, 04:19 PM Jeff Bowlsby Rob this sounds like a perfect offering for 914rub... Dec 8 2016, 04:37 PM ConeDodger
Rob this sounds like a perfect offering for 914ru... Dec 8 2016, 06:28 PM wes I'll take one,thanks! Dec 8 2016, 06:00 PM ConeDodger
I'll take one,thanks!
Thanks Wes! 3... Dec 8 2016, 06:31 PM whitetwinturbo :popcorn: Dec 8 2016, 11:34 PM ConeDodger :bump:
Just two more to go. If I get 5/10, I... Dec 10 2016, 10:47 AM Dion I know it holiday time. $ is tight.
Is there... Dec 11 2016, 08:56 AM Cal Looks great.....I'll take one. Send me a PM w... Dec 12 2016, 06:26 AM ConeDodger
Looks great.....I'll take one. Send me a PM ... Dec 12 2016, 08:04 AM Dion :first: Thanks for making this happen. Please le... Dec 12 2016, 08:06 AM Mike Fitton I have never seen one of these mounted on a 914, a... Dec 12 2016, 08:27 AM Cal
I have never seen one of these mounted on a 914, ... Dec 12 2016, 09:45 AM Dion Nice car. Not mine. Dec 12 2016, 08:36 AM ConeDodger A new wrinkle. McMark has a source he uses who can... Dec 12 2016, 03:26 PM raynekat
A new wrinkle. McMark has a source he uses who ca... Dec 13 2016, 06:21 PM ConeDodger
A new wrinkle. McMark has a source he uses who c... Dec 13 2016, 07:22 PM eric914 put me down for one:) let me know final $. Dec 12 2016, 03:55 PM Cal Couple more photos.... Dec 13 2016, 06:39 AM rgalla9146 The 'cup' of these lamps is chrome ? is it... Dec 14 2016, 10:37 AM ConeDodger
The 'cup' of these lamps is chrome ? is i... Dec 14 2016, 11:20 AM db9146 I might be interested if the price comes down a li... Dec 14 2016, 11:36 AM Niklas I want a set.
Sent to Sweden.
Is it 125 USD with... Dec 14 2016, 11:48 AM ConeDodger
I want a set.
Sent to Sweden.
Is it 125 USD wit... Dec 14 2016, 01:20 PM TJB/914
I want a set.
Sent to Sweden.
Is it 125 USD wi... Dec 17 2016, 02:21 PM Niklas http://www.ebay.de/itm/HELLA-Nebelschlussl...soAAO... Dec 14 2016, 12:17 PM Larmo63 I will be in for a set too, Rob.
Thank you. Dec 14 2016, 01:35 PM rgalla9146 Eureka !
All visitors here please go to the n... Dec 15 2016, 07:57 PM Dion HAHAHAH Rory that is too funny. Good eye! Dec 15 2016, 08:47 PM db9146
Eureka !
All visitors here please got to the... Dec 16 2016, 08:18 AM Blue6 Rob, please add me to the list. After seeing this... Dec 17 2016, 08:16 PM ConeDodger
Rob, please add me to the list. After seeing thi... Dec 18 2016, 08:38 AM TJB/914 Blue6
Yes, that mounting bracket is for a 911. I ... Dec 17 2016, 09:02 PM rgalla9146
Blue6
Yes, that mounting bracket is for a 911. I... Dec 18 2016, 08:21 AM Blue6 Thank you for the confirmation. I'll put it on... Dec 18 2016, 12:25 AM Blue6 Thank you Rob and Rgalla9146. I'll bring it to... Dec 19 2016, 05:55 PM Larmo63 Isn't the 914 rear fog light itself supposed t... Dec 20 2016, 12:15 AM raynekat
Isn't the 914 rear fog light itself supposed ... Dec 20 2016, 12:47 AM ConeDodger Well, we have news. I really appreciate you guys w... Mar 4 2017, 09:42 PM eric914 Sweet!
I'm still in :D Mar 4 2017, 09:46 PM Dion Thanks Rob, standing by..... Mar 4 2017, 11:22 PM 914Sixer Put me down for one set Mar 5 2017, 07:59 AM wes :popcorn: Mar 5 2017, 11:49 AM jkb944t I would be interested in this so keep us updated.
... Mar 6 2017, 11:35 AM ConeDodger Will do Jeff. I will need to plate them once we ha... Mar 6 2017, 11:42 AM simonjb Count me in
Thanks Mar 6 2017, 12:35 PM db9146
I want a set.
Sent to Sweden.
Is it 125 USD wi... Mar 6 2017, 12:57 PM ConeDodger
[quote name='ConeDodger' post='2433843' date='Dec... Mar 6 2017, 03:33 PM db9146 Great, count me in for one set, please. Mar 6 2017, 03:38 PM Niklas I am the swedish guy.
Yes i want two sets. Mar 6 2017, 04:23 PM simonjb Just received my Fog light from Kamper. Good price... Mar 10 2017, 08:24 AM maf914
Just received my Fog light from Kamper. Good pric... Mar 11 2017, 07:34 AM ConeDodger
Just received my Fog light from Kamper. Good pri... Mar 11 2017, 08:12 AM ConeDodger They've been ordered. Then we'll plate the... Mar 10 2017, 08:47 AM Dion That's awesome Rob. Thanks for your and McMark... Mar 10 2017, 10:30 PM ConeDodger
That's awesome Rob. Thanks for your and McMar... Mar 10 2017, 11:04 PM maf914 Rob, I would like a set if still available. Thank... Mar 11 2017, 07:23 AM sixnotfour FYI ..I sent Bowlsby a factory Harness... Mar 11 2017, 08:43 AM simonjb JustKampers.com. Fast and a fairly good price.
R... Mar 11 2017, 08:48 AM simonjb RE: Reproducing the elusive rear fog light bracket. Mar 11 2017, 09:55 AM ConeDodger A little teaser. McMark picked these up today. The... Mar 28 2017, 04:56 PM wes
A little teaser. McMark picked these up today. Th... Mar 28 2017, 10:19 PM simonjb Hi,
Any update on making the brackets? May 3 2017, 09:43 AM Larmo63 Those look great, Rob. McMark strikes again!... Mar 28 2017, 05:58 PM simonjb
Those look great, Rob. McMark strikes again!... Mar 28 2017, 08:13 PM Nie Zu Alt If it's not too late, put me down for a set.
... Mar 28 2017, 09:15 PM Dion Those are sweet. Thanks Rob & McMark. Mar 28 2017, 09:55 PM McMark I have them, but was going to get the zinc plated.... May 3 2017, 11:23 AM ConeDodger I do, but you can have mine plated when you have t... May 3 2017, 11:32 AM TJB/914
I do, but you can have mine plated when you had t... May 3 2017, 04:20 PM ConeDodger
I do, but you can have mine plated when you had ... May 3 2017, 04:33 PM TJB/914
[quote name='TJB/914' post='2482311' date='May 3 ... May 3 2017, 07:03 PM simonjb Will they rust if they are not plated ? May 3 2017, 07:07 PM raynekat
Will they rust if they are not plated ?
I would... May 4 2017, 05:20 PM ConeDodger
[quote name='TJB/914' post='2482311' date='May 3... May 3 2017, 10:30 PM TJB/914
[quote name='TJB/914' post='2482311' date='May 3 ... May 6 2017, 08:56 PM Larmo63 Are they shipping soon? May 3 2017, 04:54 PM ConeDodger That depends.
As McMark asked, do you mind if yo... May 3 2017, 05:29 PM Dion McMark,
I'm fine with receiving the non plat... May 4 2017, 08:51 AM db9146 Gosh, I sure wish they were smooth and plated like... May 4 2017, 02:13 PM McMark Okay, this shoulda been obvious. :rolleyes:
I... May 4 2017, 06:19 PM Louiscurtis These are great. I would like to buy a set. Thanks... May 5 2017, 03:14 PM raynekat Definitely want to buy a set. Sent McMark PM alrea... May 5 2017, 05:02 PM ConeDodger Sunday! Sunday! Sunday! :Qarl:
Mark... May 6 2017, 09:11 AM McMark I played around with these a little more today and... May 7 2017, 07:23 AM Dion McMark, ordered. Thanks all.
I'm not concou... May 7 2017, 08:17 AM 914Sixer Paid for 2 sets of the raw. May 7 2017, 09:14 AM ConeDodger Well there you go. Now available!
I have cont... May 7 2017, 09:38 AM Louiscurtis Thanks for doing these! Order placed. May 7 2017, 09:42 AM
raynekat
Sign me up....I'm in for one.
If it helps, ... Dec 11 2016, 06:08 PM ConeDodger
Sign me up....I'm in for one.
If it helps,... Dec 11 2016, 08:28 PM ConeDodger Two down, eight to go!
The other two parts re... Dec 6 2016, 08:27 PM porbmw I actually bought the brackets from a member, a wh... Dec 6 2016, 11:40 PM ConeDodger
I actually bought the brackets from a member, a w... Dec 6 2016, 11:59 PM edrotol
I actually bought the brackets from a member, a ... Dec 7 2016, 07:06 PM jim_hoyland Thanks for going through with the process.
***Upd... Dec 7 2016, 07:54 AM ConeDodger 3/10! :cheer: Dec 7 2016, 10:27 AM ConeDodger I need 5 of these to be spoken for before I can g... Dec 8 2016, 04:19 PM Jeff Bowlsby Rob this sounds like a perfect offering for 914rub... Dec 8 2016, 04:37 PM ConeDodger
Rob this sounds like a perfect offering for 914ru... Dec 8 2016, 06:28 PM wes I'll take one,thanks! Dec 8 2016, 06:00 PM ConeDodger
I'll take one,thanks!
Thanks Wes! 3... Dec 8 2016, 06:31 PM whitetwinturbo :popcorn: Dec 8 2016, 11:34 PM ConeDodger :bump:
Just two more to go. If I get 5/10, I... Dec 10 2016, 10:47 AM Dion I know it holiday time. $ is tight.
Is there... Dec 11 2016, 08:56 AM Cal Looks great.....I'll take one. Send me a PM w... Dec 12 2016, 06:26 AM ConeDodger
Looks great.....I'll take one. Send me a PM ... Dec 12 2016, 08:04 AM Dion :first: Thanks for making this happen. Please le... Dec 12 2016, 08:06 AM Mike Fitton I have never seen one of these mounted on a 914, a... Dec 12 2016, 08:27 AM Cal
I have never seen one of these mounted on a 914, ... Dec 12 2016, 09:45 AM Dion Nice car. Not mine. Dec 12 2016, 08:36 AM ConeDodger A new wrinkle. McMark has a source he uses who can... Dec 12 2016, 03:26 PM raynekat
A new wrinkle. McMark has a source he uses who ca... Dec 13 2016, 06:21 PM ConeDodger
A new wrinkle. McMark has a source he uses who c... Dec 13 2016, 07:22 PM eric914 put me down for one:) let me know final $. Dec 12 2016, 03:55 PM Cal Couple more photos.... Dec 13 2016, 06:39 AM rgalla9146 The 'cup' of these lamps is chrome ? is it... Dec 14 2016, 10:37 AM ConeDodger
The 'cup' of these lamps is chrome ? is i... Dec 14 2016, 11:20 AM db9146 I might be interested if the price comes down a li... Dec 14 2016, 11:36 AM Niklas I want a set.
Sent to Sweden.
Is it 125 USD with... Dec 14 2016, 11:48 AM ConeDodger
I want a set.
Sent to Sweden.
Is it 125 USD wit... Dec 14 2016, 01:20 PM TJB/914
I want a set.
Sent to Sweden.
Is it 125 USD wi... Dec 17 2016, 02:21 PM Niklas http://www.ebay.de/itm/HELLA-Nebelschlussl...soAAO... Dec 14 2016, 12:17 PM Larmo63 I will be in for a set too, Rob.
Thank you. Dec 14 2016, 01:35 PM rgalla9146 Eureka !
All visitors here please go to the n... Dec 15 2016, 07:57 PM Dion HAHAHAH Rory that is too funny. Good eye! Dec 15 2016, 08:47 PM db9146
Eureka !
All visitors here please got to the... Dec 16 2016, 08:18 AM Blue6 Rob, please add me to the list. After seeing this... Dec 17 2016, 08:16 PM ConeDodger
Rob, please add me to the list. After seeing thi... Dec 18 2016, 08:38 AM TJB/914 Blue6
Yes, that mounting bracket is for a 911. I ... Dec 17 2016, 09:02 PM rgalla9146
Blue6
Yes, that mounting bracket is for a 911. I... Dec 18 2016, 08:21 AM Blue6 Thank you for the confirmation. I'll put it on... Dec 18 2016, 12:25 AM Blue6 Thank you Rob and Rgalla9146. I'll bring it to... Dec 19 2016, 05:55 PM Larmo63 Isn't the 914 rear fog light itself supposed t... Dec 20 2016, 12:15 AM raynekat
Isn't the 914 rear fog light itself supposed ... Dec 20 2016, 12:47 AM ConeDodger Well, we have news. I really appreciate you guys w... Mar 4 2017, 09:42 PM eric914 Sweet!
I'm still in :D Mar 4 2017, 09:46 PM Dion Thanks Rob, standing by..... Mar 4 2017, 11:22 PM 914Sixer Put me down for one set Mar 5 2017, 07:59 AM wes :popcorn: Mar 5 2017, 11:49 AM jkb944t I would be interested in this so keep us updated.
... Mar 6 2017, 11:35 AM ConeDodger Will do Jeff. I will need to plate them once we ha... Mar 6 2017, 11:42 AM simonjb Count me in
Thanks Mar 6 2017, 12:35 PM db9146
I want a set.
Sent to Sweden.
Is it 125 USD wi... Mar 6 2017, 12:57 PM ConeDodger
[quote name='ConeDodger' post='2433843' date='Dec... Mar 6 2017, 03:33 PM db9146 Great, count me in for one set, please. Mar 6 2017, 03:38 PM Niklas I am the swedish guy.
Yes i want two sets. Mar 6 2017, 04:23 PM simonjb Just received my Fog light from Kamper. Good price... Mar 10 2017, 08:24 AM maf914
Just received my Fog light from Kamper. Good pric... Mar 11 2017, 07:34 AM ConeDodger
Just received my Fog light from Kamper. Good pri... Mar 11 2017, 08:12 AM ConeDodger They've been ordered. Then we'll plate the... Mar 10 2017, 08:47 AM Dion That's awesome Rob. Thanks for your and McMark... Mar 10 2017, 10:30 PM ConeDodger
That's awesome Rob. Thanks for your and McMar... Mar 10 2017, 11:04 PM maf914 Rob, I would like a set if still available. Thank... Mar 11 2017, 07:23 AM sixnotfour FYI ..I sent Bowlsby a factory Harness... Mar 11 2017, 08:43 AM simonjb JustKampers.com. Fast and a fairly good price.
R... Mar 11 2017, 08:48 AM simonjb RE: Reproducing the elusive rear fog light bracket. Mar 11 2017, 09:55 AM ConeDodger A little teaser. McMark picked these up today. The... Mar 28 2017, 04:56 PM wes
A little teaser. McMark picked these up today. Th... Mar 28 2017, 10:19 PM simonjb Hi,
Any update on making the brackets? May 3 2017, 09:43 AM Larmo63 Those look great, Rob. McMark strikes again!... Mar 28 2017, 05:58 PM simonjb
Those look great, Rob. McMark strikes again!... Mar 28 2017, 08:13 PM Nie Zu Alt If it's not too late, put me down for a set.
... Mar 28 2017, 09:15 PM Dion Those are sweet. Thanks Rob & McMark. Mar 28 2017, 09:55 PM McMark I have them, but was going to get the zinc plated.... May 3 2017, 11:23 AM ConeDodger I do, but you can have mine plated when you have t... May 3 2017, 11:32 AM TJB/914
I do, but you can have mine plated when you had t... May 3 2017, 04:20 PM ConeDodger
I do, but you can have mine plated when you had ... May 3 2017, 04:33 PM TJB/914
[quote name='TJB/914' post='2482311' date='May 3 ... May 3 2017, 07:03 PM simonjb Will they rust if they are not plated ? May 3 2017, 07:07 PM raynekat
Will they rust if they are not plated ?
I would... May 4 2017, 05:20 PM ConeDodger
[quote name='TJB/914' post='2482311' date='May 3... May 3 2017, 10:30 PM TJB/914
[quote name='TJB/914' post='2482311' date='May 3 ... May 6 2017, 08:56 PM Larmo63 Are they shipping soon? May 3 2017, 04:54 PM ConeDodger That depends.
As McMark asked, do you mind if yo... May 3 2017, 05:29 PM Dion McMark,
I'm fine with receiving the non plat... May 4 2017, 08:51 AM db9146 Gosh, I sure wish they were smooth and plated like... May 4 2017, 02:13 PM McMark Okay, this shoulda been obvious. :rolleyes:
I... May 4 2017, 06:19 PM Louiscurtis These are great. I would like to buy a set. Thanks... May 5 2017, 03:14 PM raynekat Definitely want to buy a set. Sent McMark PM alrea... May 5 2017, 05:02 PM ConeDodger Sunday! Sunday! Sunday! :Qarl:
Mark... May 6 2017, 09:11 AM McMark I played around with these a little more today and... May 7 2017, 07:23 AM Dion McMark, ordered. Thanks all.
I'm not concou... May 7 2017, 08:17 AM 914Sixer Paid for 2 sets of the raw. May 7 2017, 09:14 AM ConeDodger Well there you go. Now available!
I have cont... May 7 2017, 09:38 AM Louiscurtis Thanks for doing these! Order placed. May 7 2017, 09:42 AM  |
1 User(s) are reading this topic (1 Guests and 0 Anonymous Users)
0 Members:

|
Lo-Fi Version | Time is now: 21st June 2026 - 01:29 PM |
Invision Power Board
v9.1.4 © 2026 IPS, Inc.