|
|
|
Porsche, and the Porsche crest are registered trademarks of Dr. Ing. h.c. F. Porsche AG.
This site is not affiliated with Porsche in any way. Its only purpose is to provide an online forum for car enthusiasts. All other trademarks are property of their respective owners. |
|
|

  |

| mb911 |
 Aug 6 2017, 07:07 AM Aug 6 2017, 07:07 AM
Post
#41
|
|
914 Guru  Group: Members Posts: 7,794 Joined: 2-January 09 From: Burlington wi Member No.: 9,892 Region Association: Upper MidWest |
QUOTE(914forme @ Aug 6 2017, 04:23 AM)  Ben, My stock Air filter as the I got a bit of fuel spray and got a bit to hot syndrome. So I picked up a metal housing off a 911, will have to do a bit of work on it to clean it up, I would love to use it thou, as it keeps a nice sleeper look. If not I will go with filters and run 906ish Rain Shields , with a bit of a twist, I would like to have cones on the bottom side over the velocity stacks to divert the air pulses instead of blasting it back down the intake. I would have to have a huge runner to make intake pulse running work at the desired RPM. As this will be mainly a street car, I will say the RPMs will be limited except when I need to hear the Revs. Most likely every time I leave in 1st. Im getting older and lets face it, reaction times slow down. Jim, As far as fuel injection controller, it will be SDS, as I have one here sitting in the bin ready to go onto something. It might as well be this six. Which means the EG33 swap car will go with MS3 Pro. I will be able to rev it up on the start line, engine pumping and thumping in time. And use that launch control like the EVO and WRX guys do. Oh and any time I can work part of a Cake lyric into a post (IMG:style_emoticons/default/aktion035.gif) 1.5 inch heat exchangers would be perfect for you .. |
   |

 
|
| 914forme |
Aug 25 2017, 06:24 PM
Post
#42
|
|
Times a wastin', get wrenchin'! Group: Members Posts: 3,899 Joined: 24-July 04 From: Dayton, Ohio Member No.: 2,388 Region Association: None |
Well after a very frustrating day at work, I got back to wrenching, always clears your mind. Some people like to golf, some ride motorcycles ( I would kill myself on a bike) and well I wrench.
So I fired up the lathe and cut down some metal inserts for a set of Minilites I have. Got thant done, need to toss them in to the freezer and they should drop in, and expand out to fully seat. Other wise you would have to press them into the mag hub. (IMG:style_emoticons/default/wacko.gif) Next up I decided to remove the shifter lock in the trans I purchased, The lock was to keep it out of first gear. Just a simple piece of EMT slid of the shifter rod. Okay easy enough to fix. 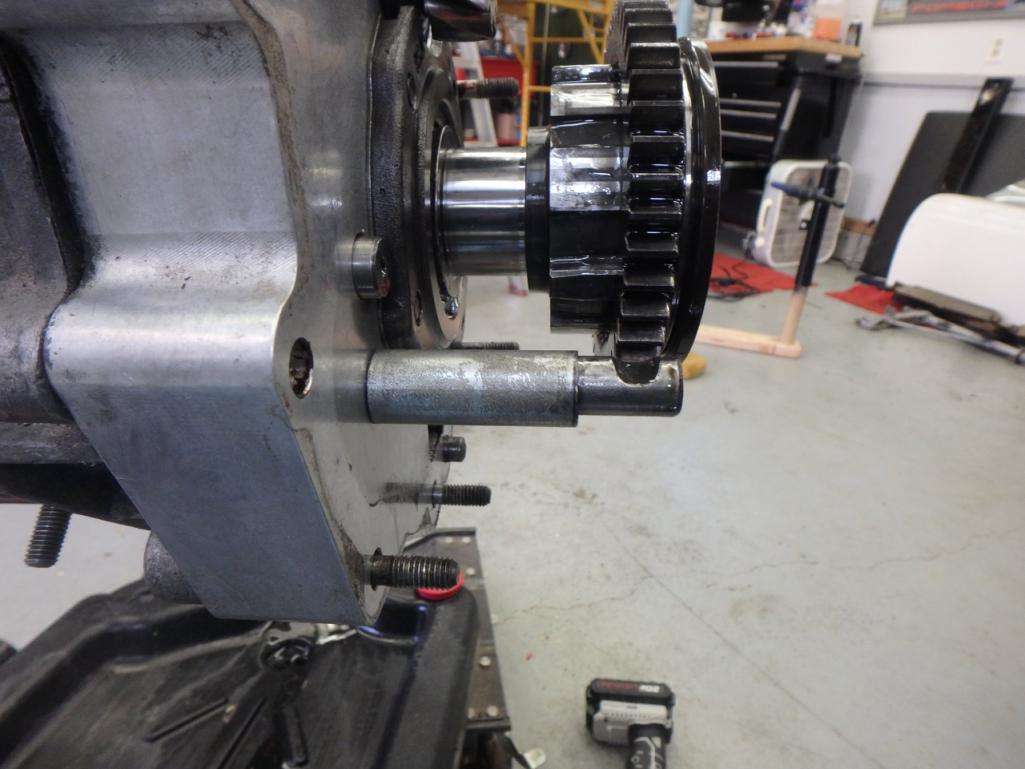 Okay something is missing here (IMG:style_emoticons/default/headbang.gif) Luckily we have parts This is what it should look like. 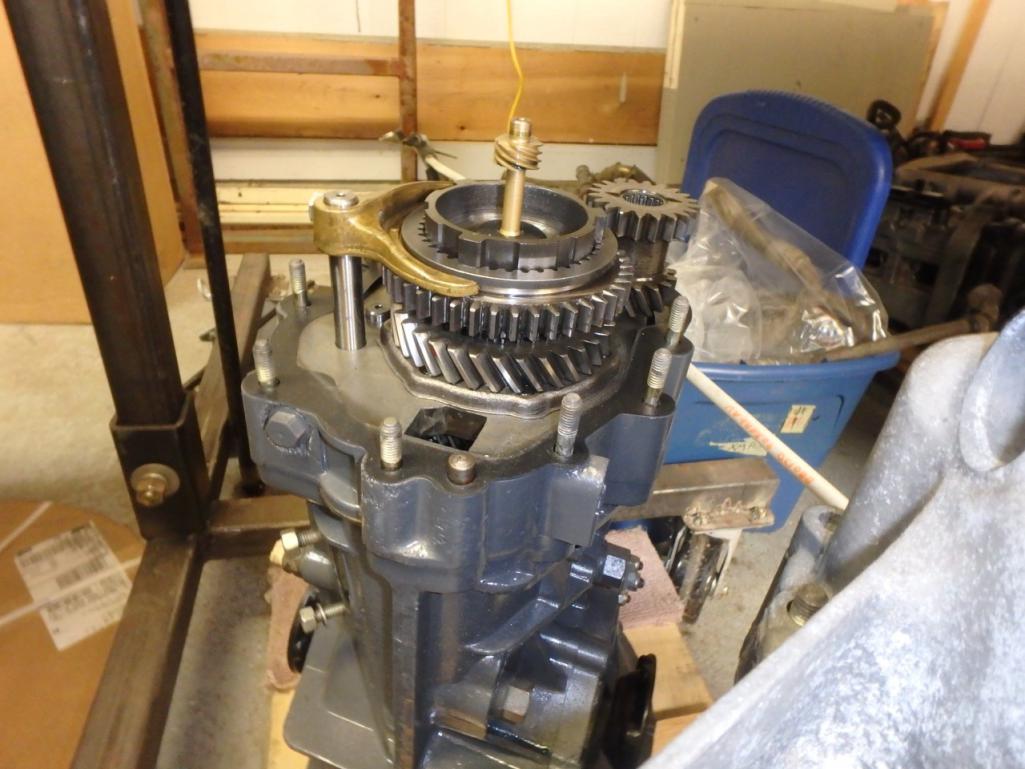 One step forward 2 steps back. (IMG:style_emoticons/default/headbang.gif) |
|
|
|
| mb911 |
Aug 25 2017, 07:13 PM
Post
#43
|
|
914 Guru Group: Members Posts: 7,794 Joined: 2-January 09 From: Burlington wi Member No.: 9,892 Region Association: Upper MidWest |
Keep up the good work.. I actually made a little progress today myself. Floor pan, firewall , longs almost done.
|
|
|
|
| 914forme |
Aug 26 2017, 06:28 PM
Post
#44
|
|
Times a wastin', get wrenchin'! Group: Members Posts: 3,899 Joined: 24-July 04 From: Dayton, Ohio Member No.: 2,388 Region Association: None |
Ben that is great.
So I spent lots of time today with paint stripper on a different project but while I wait for paint to bubble I started looking through all my transmission parts seeing what I have and if I need anything or not. So counting gear teeth (IMG:style_emoticons/default/blink.gif) Eyes are all crossed, and the beagle keep barking which would distract me and make me lose count. But I got it done (IMG:style_emoticons/default/cheer.gif) No real first gear, the spare I have is a 11/32 or A needs synchro teeth looks like someone liked to grind 1st (IMG:style_emoticons/default/headbang.gif) poor first gear set. Stuff out of this trans is beautiful, so I need to find as nice of stuff to drop in for first gear. On that quest I have added this post. Now back to the build Tore the trans down just to make sure I knew what gears where in it. 1st gear - is missing 2nd gear - is a 15:36 C 2.4 3rd gear - is a 23:29 N 1.261 4th gear - is a 29:23 Z 0.7931 5th gear - is a 32:19 or a Flipped H at 0.5950 Wow that is a called geared trans My plan is to put an A in for 1st gear 11:34 A 3.091 Only use it to get going like on a hill if need be. With the C gear in 2nd place your going 12.9MPH at 2000 RPM running 23" tires. That is a 205/50-15 on a 6.5" rim. The H gear will be used only on the freeway and above 70 MPH. So lets see what this tranny looks like (IMG:style_emoticons/default/aktion035.gif) You can see a Quaffe TBD in there such a nice sight to see  Gear Stacks look good 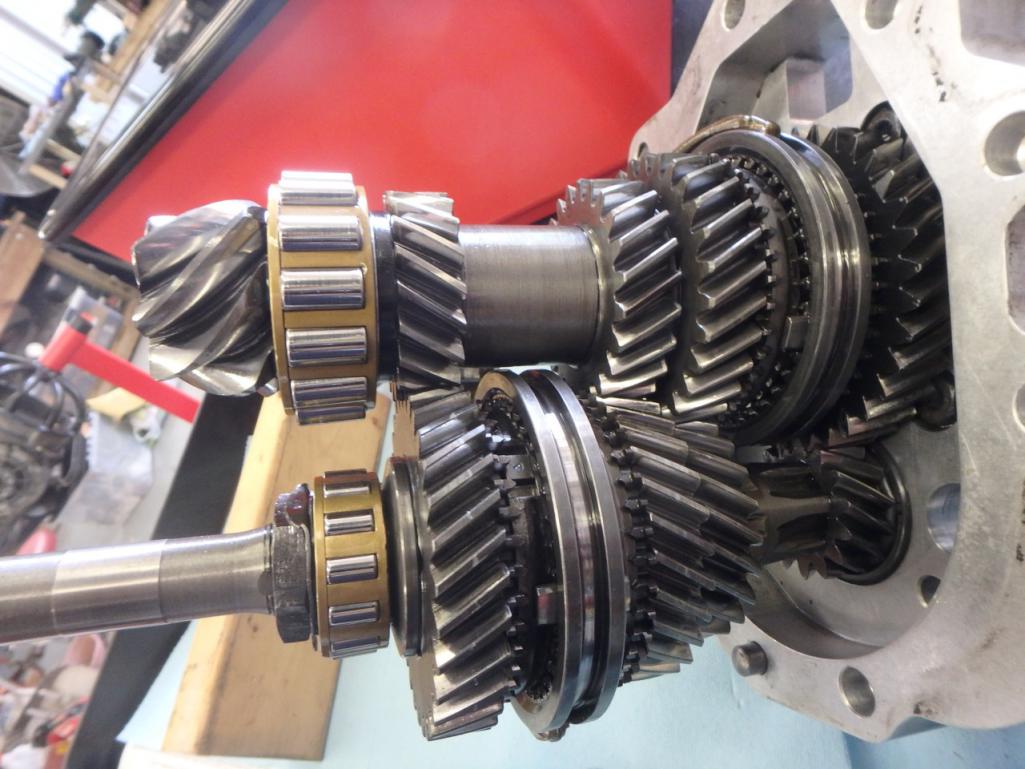 904 Main Shaft (IMG:style_emoticons/default/aktion035.gif) 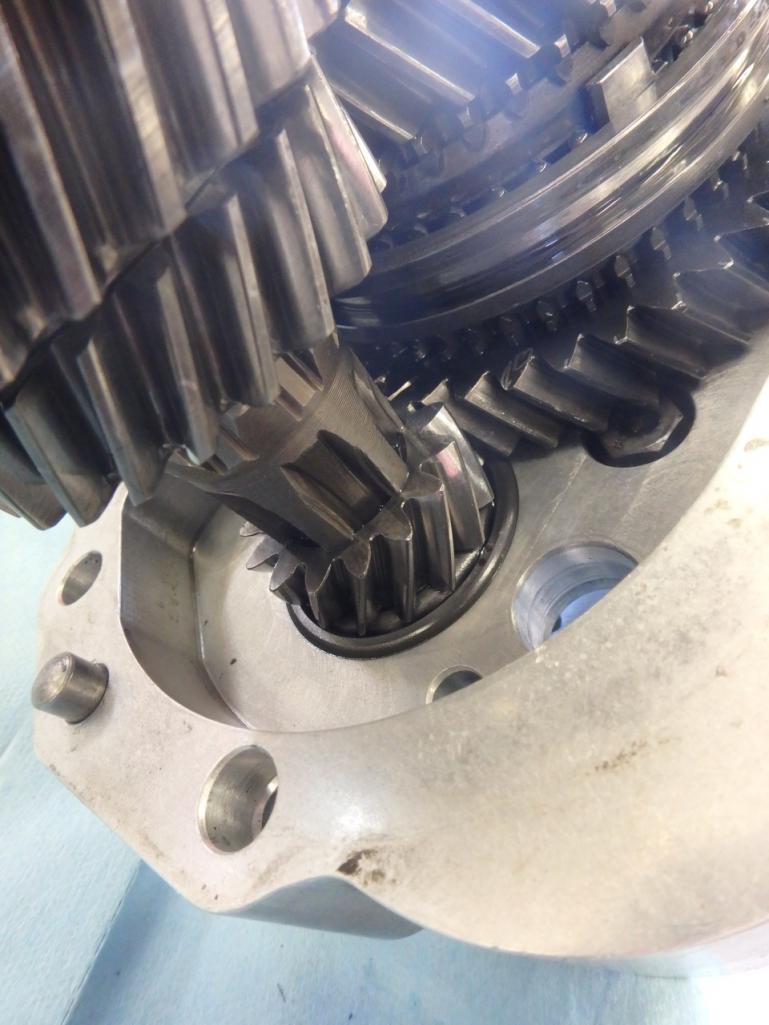 Stock Main shaft just for reference if you never seen one, 2nd gear is a fixed gear on the stock units. 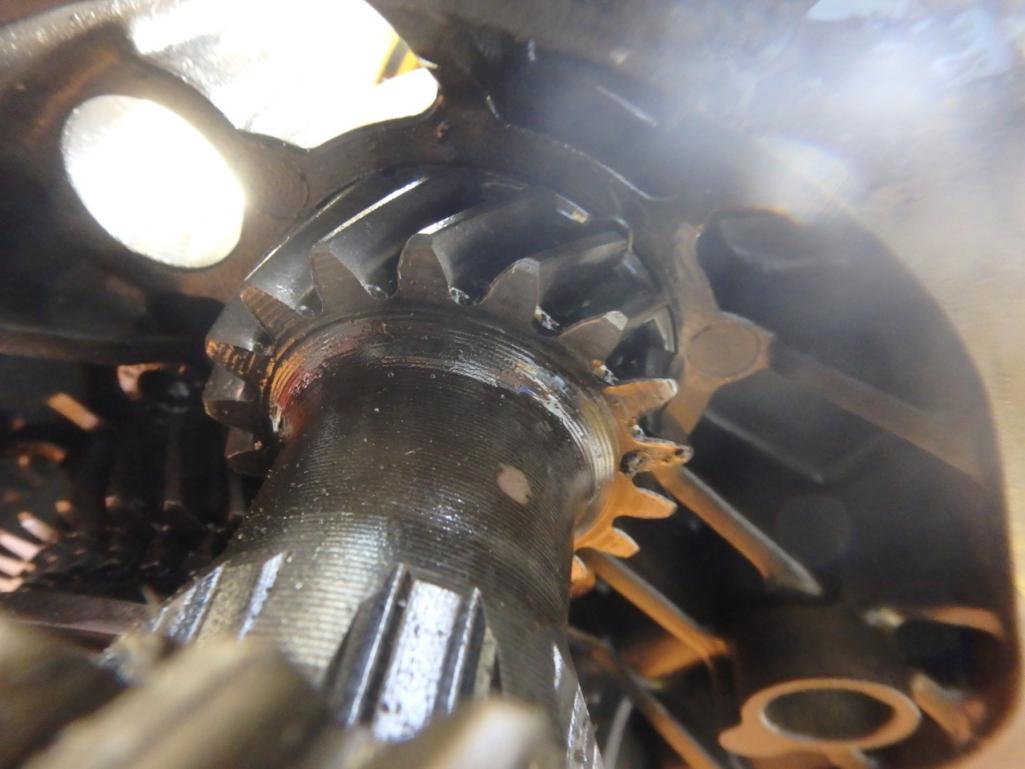 Starting to put it back together and hunting for a good 1st gear assembly. 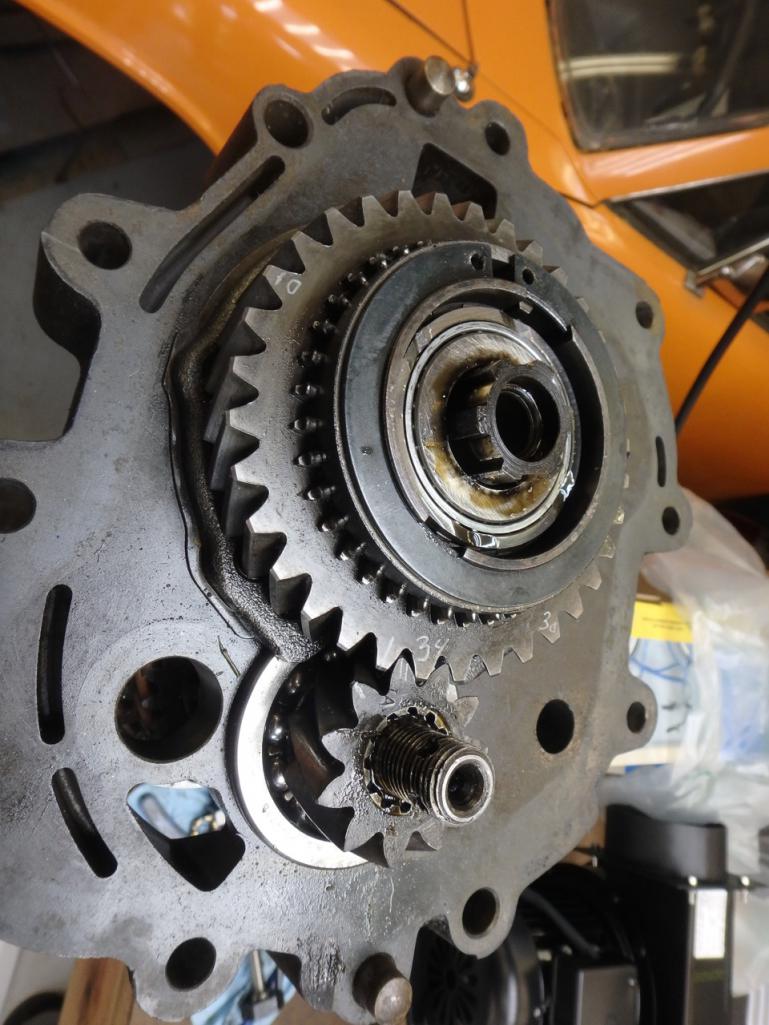 Thats not it, engagement teeth are all ground down. Next 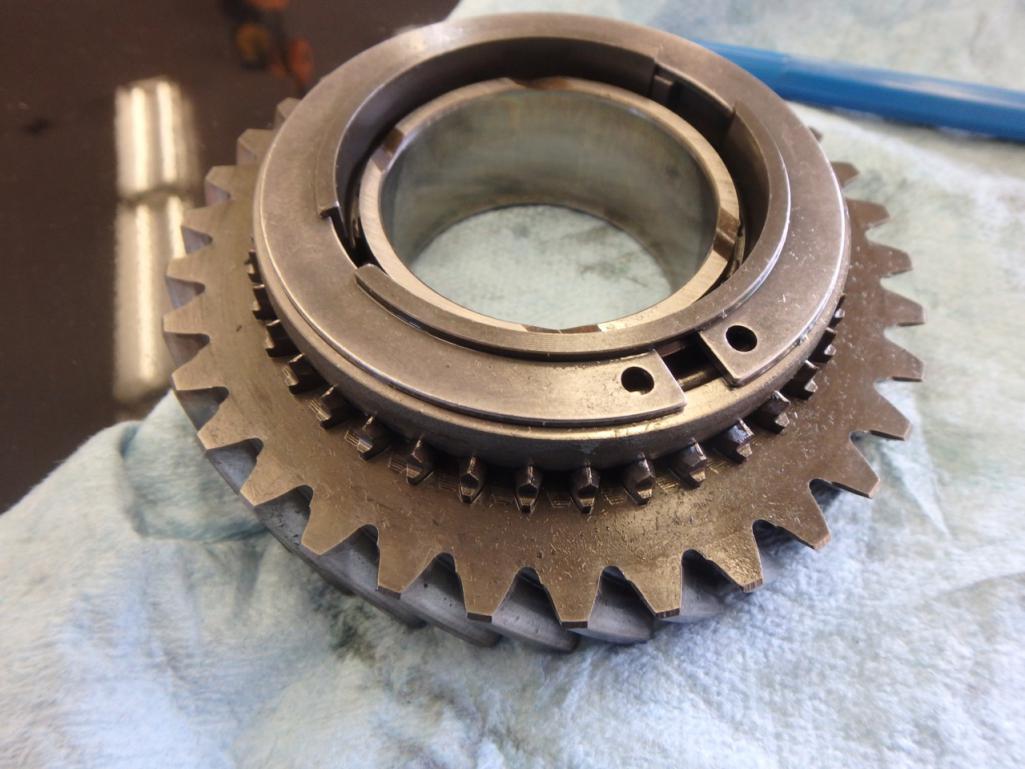 Inplace 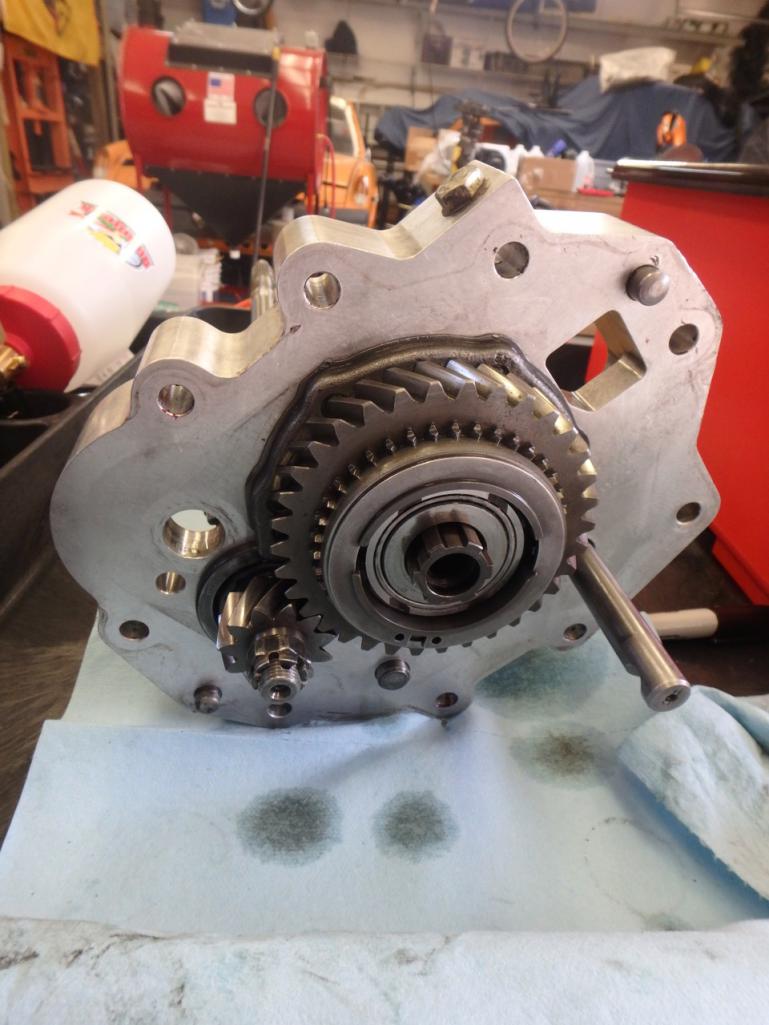 And now the slider and bolt 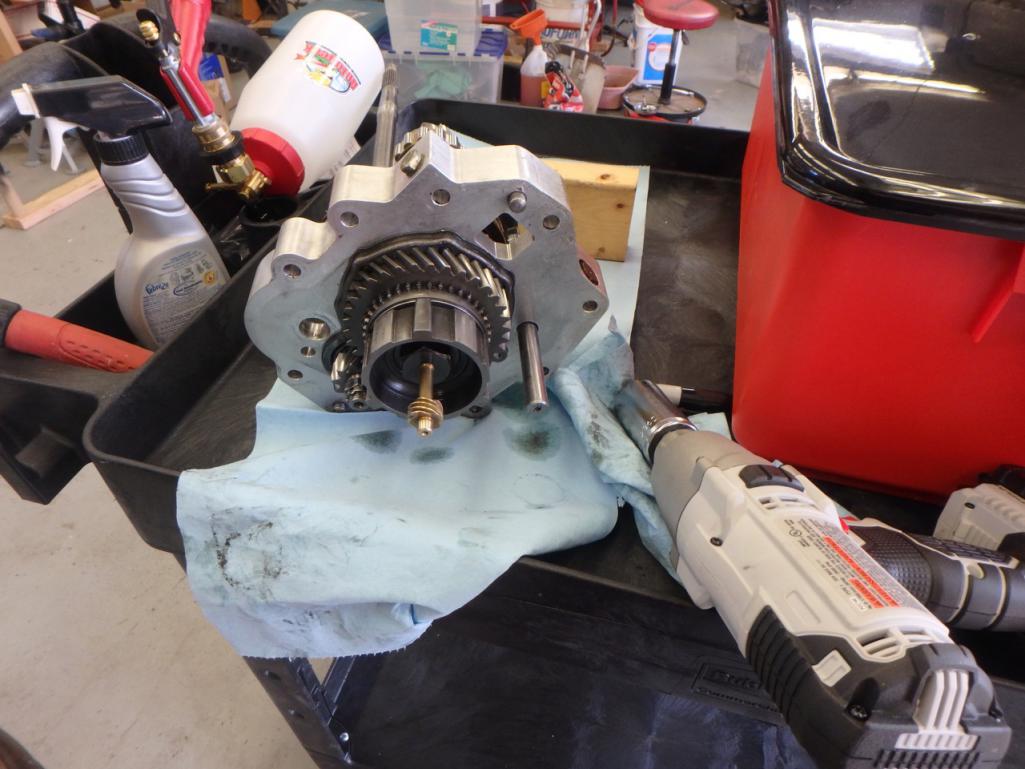 A, B, or C 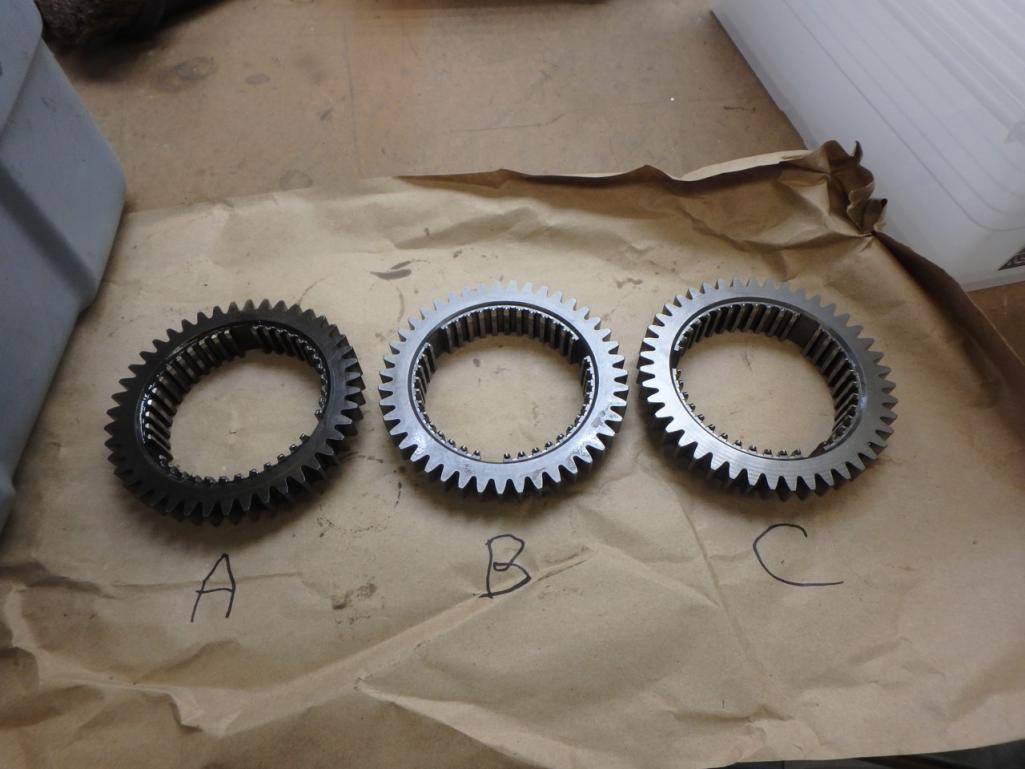 And last but not least I got these adapters knocked off the CV trans flanges 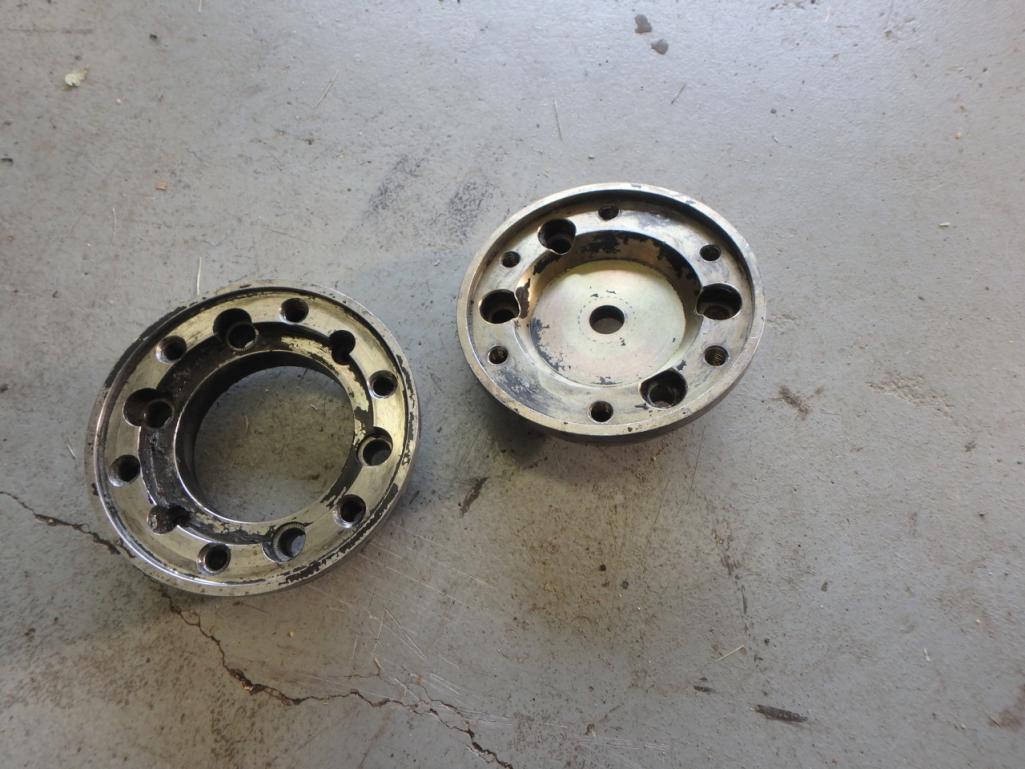 More than likely sell them, don't think I'll be making enough HP to be popping CVs all day long. (IMG:style_emoticons/default/idea.gif) Maybe I should keep them just incase I need a set of 930 CVs (IMG:style_emoticons/default/happy11.gif) |
|
|
|
| white1975 |
Aug 26 2017, 09:07 PM
Post
#45
|
|
Member Group: Members Posts: 94 Joined: 28-December 10 From: Milford ohio Member No.: 12,529 Region Association: None |
I have tranny tools if you need to borrow them to set it up Kerry
I have a couple of spare trannys 3 I think 1 tale and 2 side |
|
|
|
| 914forme |
Aug 27 2017, 05:59 AM
Post
#46
|
|
Times a wastin', get wrenchin'! Group: Members Posts: 3,899 Joined: 24-July 04 From: Dayton, Ohio Member No.: 2,388 Region Association: None |
Thank you for the offer, I'll let you know if I need anything.
|
|
|
|
| 914forme |
Oct 18 2017, 06:40 AM
Post
#47
|
|
Times a wastin', get wrenchin'! Group: Members Posts: 3,899 Joined: 24-July 04 From: Dayton, Ohio Member No.: 2,388 Region Association: None |
So for an update.
I am officially stalled. Not do to not working on things, just do to not having time due to other priorities taking precedence. What has been done since the last post. I got first gear assembled and tranny back together (IMG:style_emoticons/default/piratenanner.gif) I got the passenger side front break line off (IMG:style_emoticons/default/dry.gif) Yes I it is the brake line, but I had to break them to get them out. Rusty as hell, I hope that is not a sign of more rust. Sorry no pictures, I had couple of minutes, get it done, instead of wasting time on pictures. The life items: Buried a co-worker who was 21 years old, great kid, was great to see him becoming a man. (IMG:style_emoticons/default/sad.gif) Motorcycle, he was rear ended, waiting to make the left turn, some one did not see him stoped and hit him at 55 MPH. Not only is the lose of life bad, the other kid who hit him is now dealing with that pain also. Southwest Ohio farming community, actually near Dr. Evil's place. This was one of the hardest things I have done as a leader, lot easier when us old dogs die. (IMG:style_emoticons/default/sad.gif) Traveling for work Heck I have the engine for this car sitting in a warehouse right now, have not even had time to go over there and look at it. (IMG:style_emoticons/default/confused24.gif) You would have thought that would have been a priority. (IMG:style_emoticons/default/dry.gif) Farm work, and rental property work. Wife is redoing a house with my father, I am now helping get electrical work done. This will be my last weekend for that stuff (IMG:style_emoticons/default/lol-2.gif) (IMG:style_emoticons/default/av-943.gif) (IMG:style_emoticons/default/screwy.gif) Been telling myself that for the last 3 weekends. See the light at the end of the tunnel, thinking I can get there, have a feeling something will pull me back in. (IMG:style_emoticons/default/sad.gif) My guess will it be plumbing. Though I would prefer it to be setting the final grade around the house. I could use a bit of dozer and excavation time, to get some of the stress off. I have no problem digging holes and filling them back in if I get to use large pieces of equipment that have names like Cat, Deere, of Bob in their names.... (IMG:style_emoticons/default/shades.gif) |
|
|
|
| 76-914 |
Oct 18 2017, 07:06 PM
Post
#48
|
|
Repeat Offender & Resident Subaru Antagonist Group: Members Posts: 13,912 Joined: 23-January 09 From: Temecula, CA Member No.: 9,964 Region Association: Southern California |
QUOTE(914forme @ Oct 18 2017, 05:40 AM) So for an update. I am officially stalled. Not do to not working on things, just do to not having time due to other priorities taking precedence. What has been done since the last post. I got first gear assembled and tranny back together (IMG:style_emoticons/default/piratenanner.gif) I got the passenger side front break line off (IMG:style_emoticons/default/dry.gif) Yes I it is the brake line, but I had to break them to get them out. Rusty as hell, I hope that is not a sign of more rust. Sorry no pictures, I had couple of minutes, get it done, instead of wasting time on pictures. The life items: Buried a co-worker who was 21 years old, great kid, was great to see him becoming a man. (IMG:style_emoticons/default/sad.gif) Motorcycle, he was rear ended, waiting to make the left turn, some one did not see him stoped and hit him at 55 MPH. Not only is the lose of life bad, the other kid who hit him is now dealing with that pain also. Southwest Ohio farming community, actually near Dr. Evil's place. This was one of the hardest things I have done as a leader, lot easier when us old dogs die. (IMG:style_emoticons/default/sad.gif) Traveling for work Heck I have the engine for this car sitting in a warehouse right now, have not even had time to go over there and look at it. (IMG:style_emoticons/default/confused24.gif) You would have thought that would have been a priority. (IMG:style_emoticons/default/dry.gif) Farm work, and rental property work. Wife is redoing a house with my father, I am now helping get electrical work done. This will be my last weekend for that stuff (IMG:style_emoticons/default/lol-2.gif) (IMG:style_emoticons/default/av-943.gif) (IMG:style_emoticons/default/screwy.gif) Been telling myself that for the last 3 weekends. See the light at the end of the tunnel, thinking I can get there, have a feeling something will pull me back in. (IMG:style_emoticons/default/sad.gif) My guess will it be plumbing. Though I would prefer it to be setting the final grade around the house. I could use a bit of dozer and excavation time, to get some of the stress off. I have no problem digging holes and filling them back in if I get to use large pieces of equipment that have names like Cat, Deere, of Bob in their names.... (IMG:style_emoticons/default/shades.gif) You know who you can call if you have a plumbing question, Stephen. (IMG:style_emoticons/default/rolleyes.gif) |
|
|
|
| 914forme |
Oct 22 2017, 05:04 PM
Post
#49
|
|
Times a wastin', get wrenchin'! Group: Members Posts: 3,899 Joined: 24-July 04 From: Dayton, Ohio Member No.: 2,388 Region Association: None |
Thank you Kent, still messing with electrical (IMG:style_emoticons/default/screwy.gif)
|
|
|
|
| 914forme |
Oct 22 2017, 05:39 PM
Post
#50
|
|
Times a wastin', get wrenchin'! Group: Members Posts: 3,899 Joined: 24-July 04 From: Dayton, Ohio Member No.: 2,388 Region Association: None |
Now to keep me off the slacker list (IMG:style_emoticons/default/poke.gif)
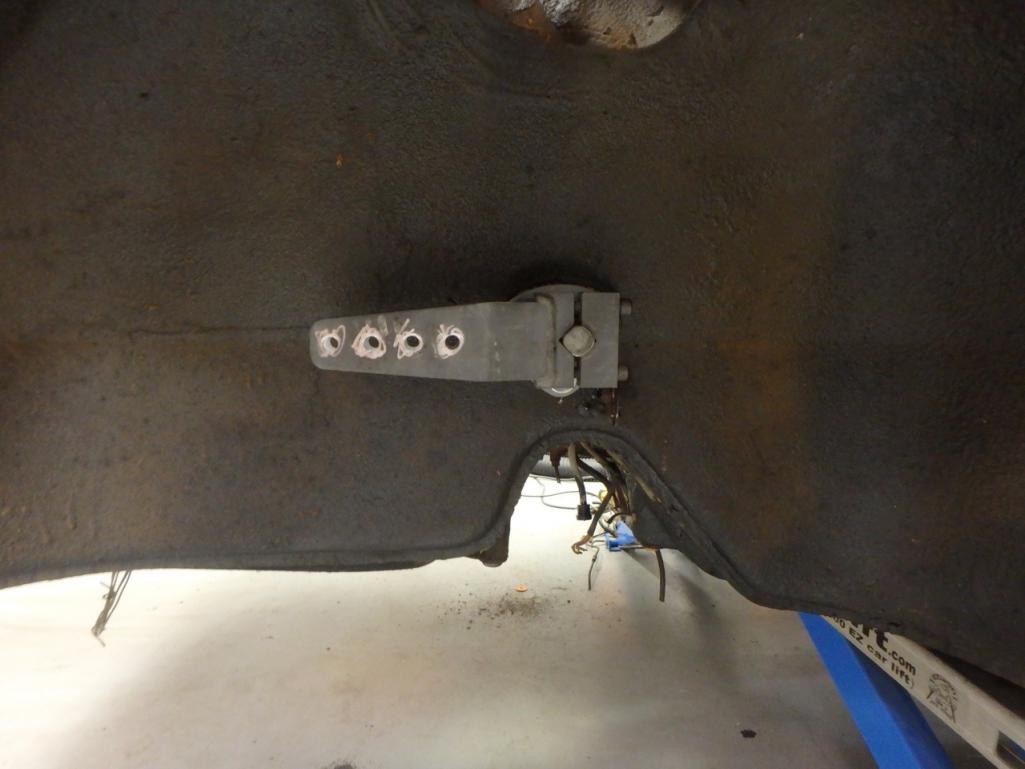
Did a few things 914-6 related (IMG:style_emoticons/default/piratenanner.gif) First up Passenger side sway bar mount. At least Prep. For refresher I am using Brad's mount on the 914-6 (IMG:style_emoticons/default/aktion035.gif) 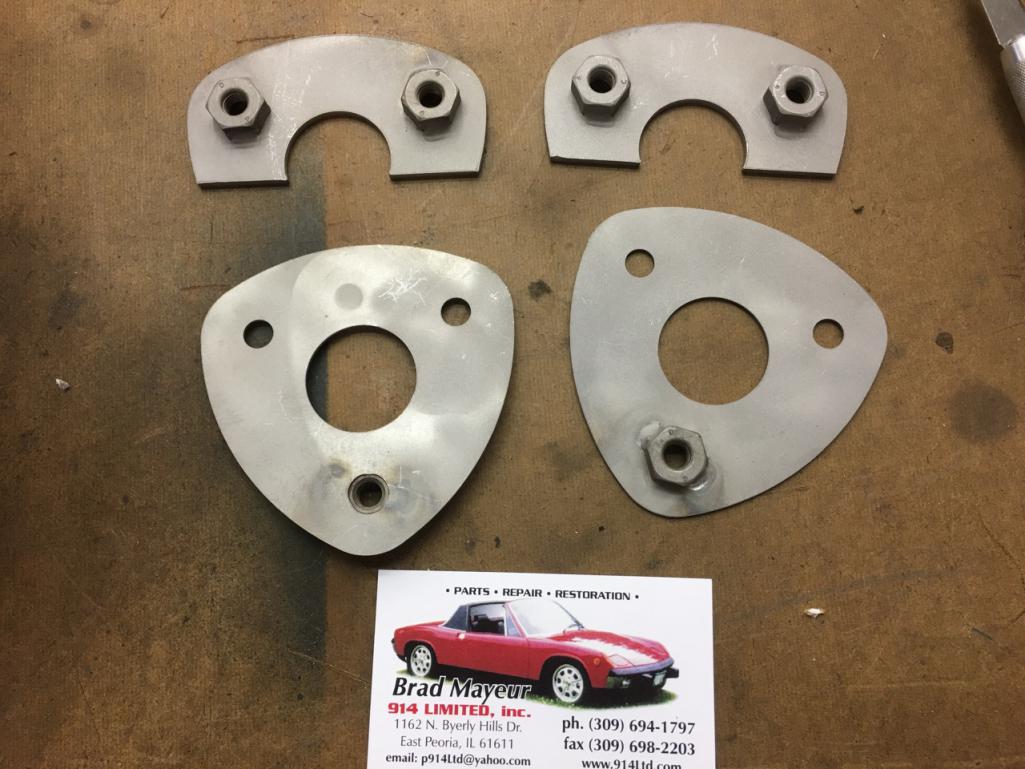 So I signed up the backside with the notch in the wheel well and used a transfer punch to set my first screw location. Drilled it, opened it ou for the bolt, and bolted it together. Moved the transfer punch to the next hole, and got a center mark, and drilled it out. I then bolted the sway bar mount in place to give me the location of the lower hole. I marked the center, and then drilled a pilot and then used a step drill to punch it out to clear the not on he back side of the Brad's outer plate. That all done it looks like this. 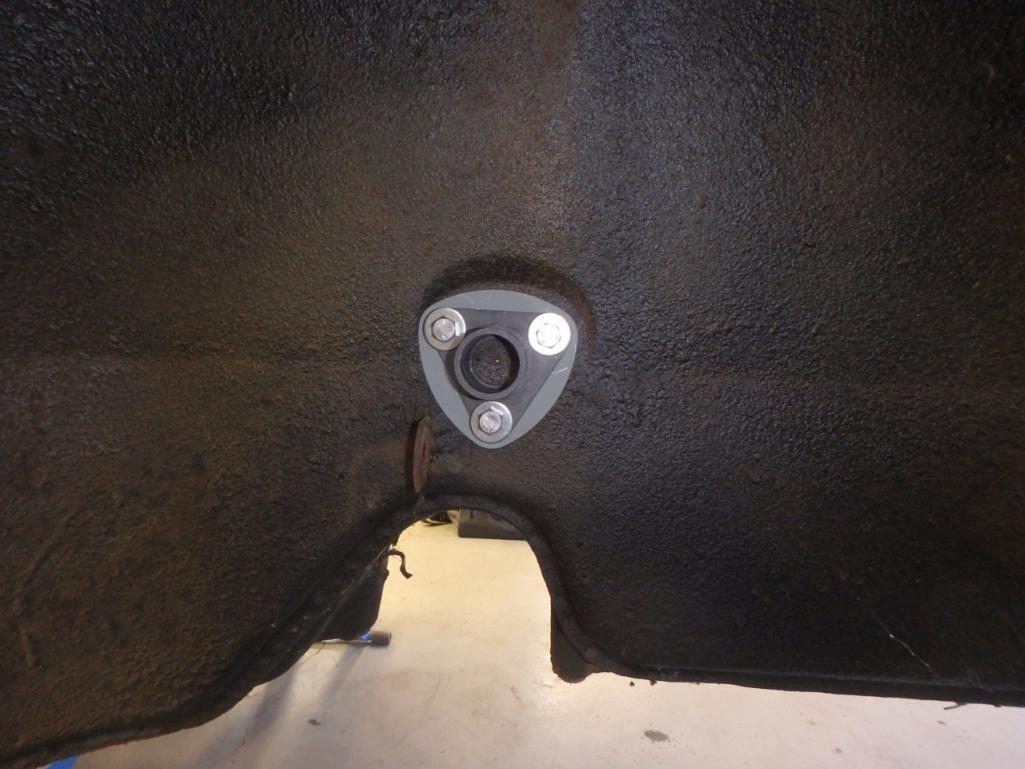 ' 'So then I need to mark the center one the swatbar location. Since I was missing time on my metal lathe, I turned a spacer down.  Fits like a precision glove, well because it is a precision fit. 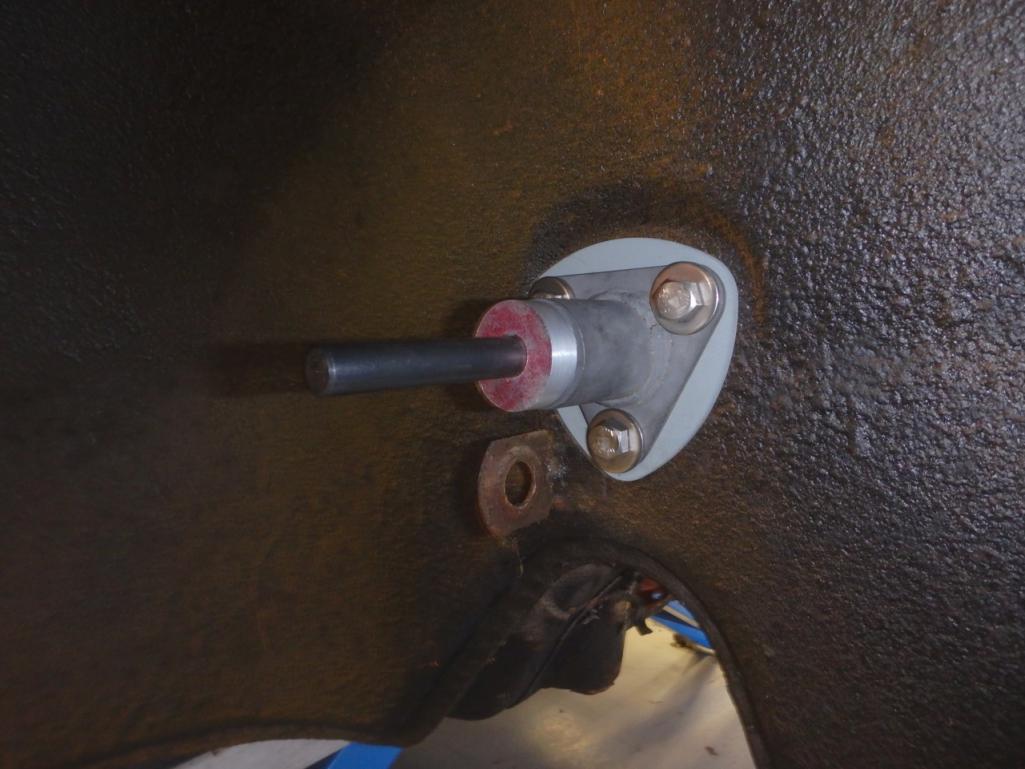 Transfer punch inserted in the last picture , give it a few hits with the hammer, and disassemble the pieces one last time. Probably not (IMG:style_emoticons/default/dry.gif) Drill a pilot hole and then drill the hole. 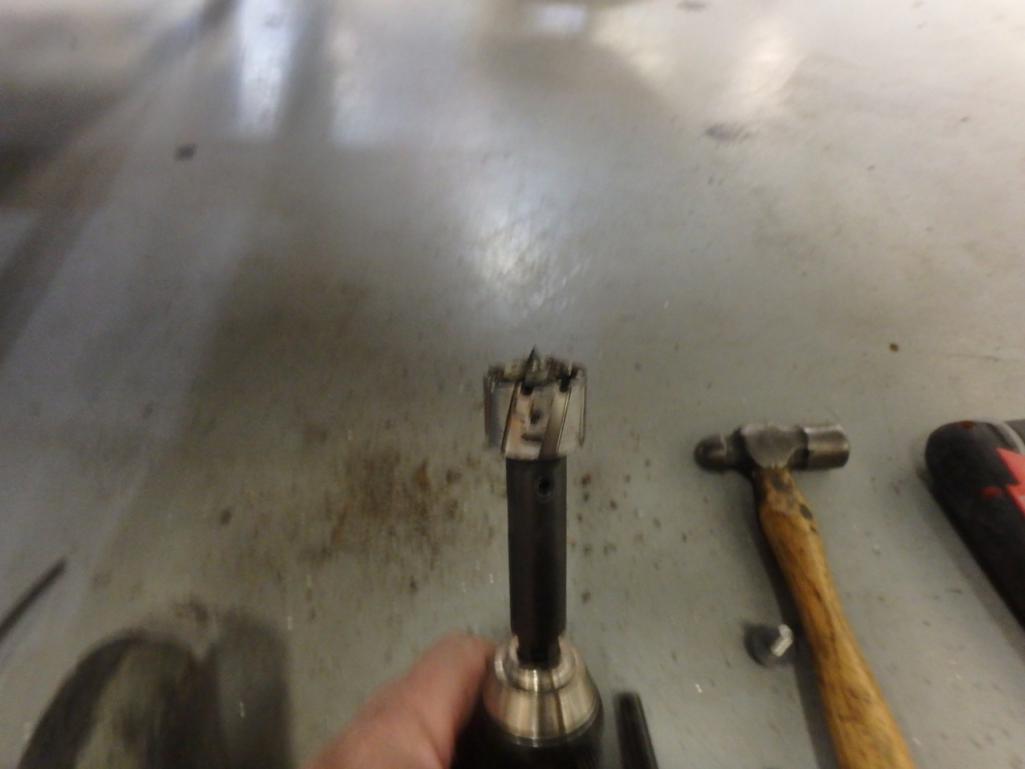 Tools of the trade to fit these, in a pile on the floor. 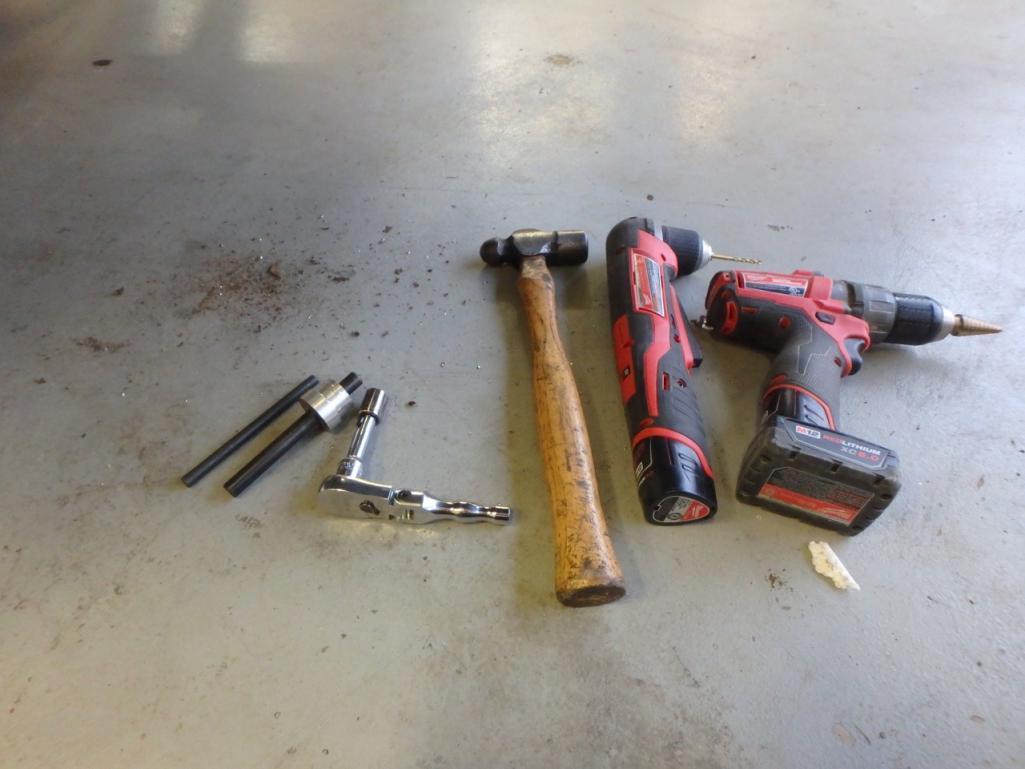 Small Ball Peen hammer Socke wrench, extension and socket Transfer Punches Close Quarters drill - pilot holes 1/2 inch drill - step drill Rotabroach to drill the big hole Final Big hole drilled 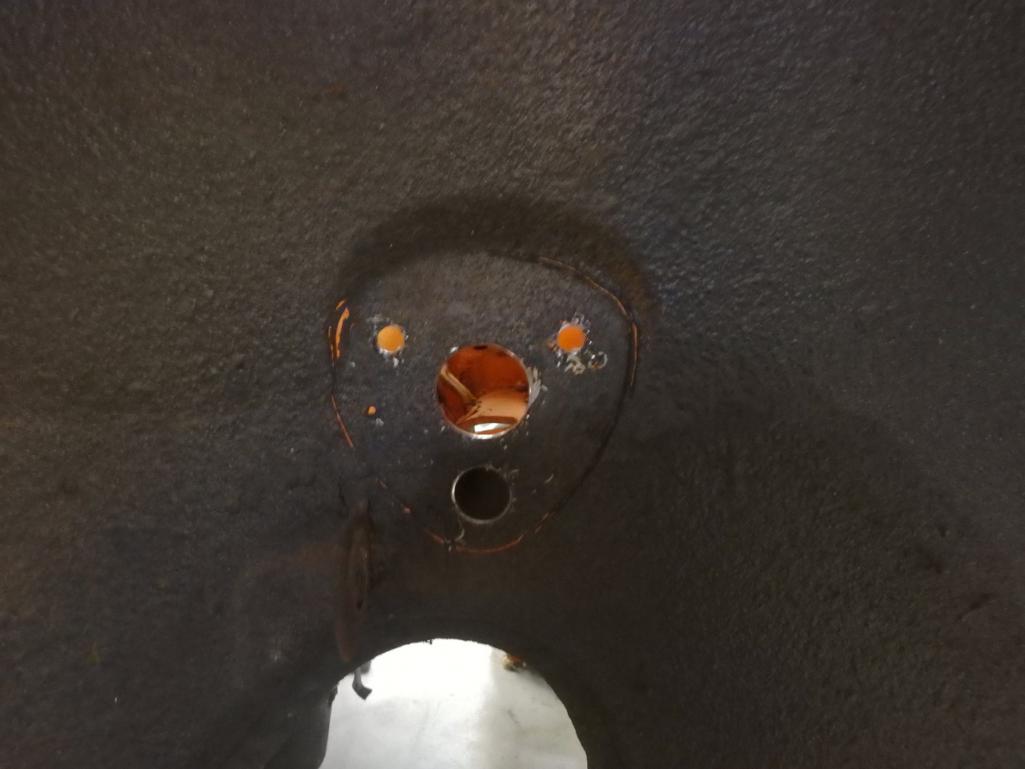 And in place, well I', holding it in place, did not feel like bolting it all together to take it apart again. 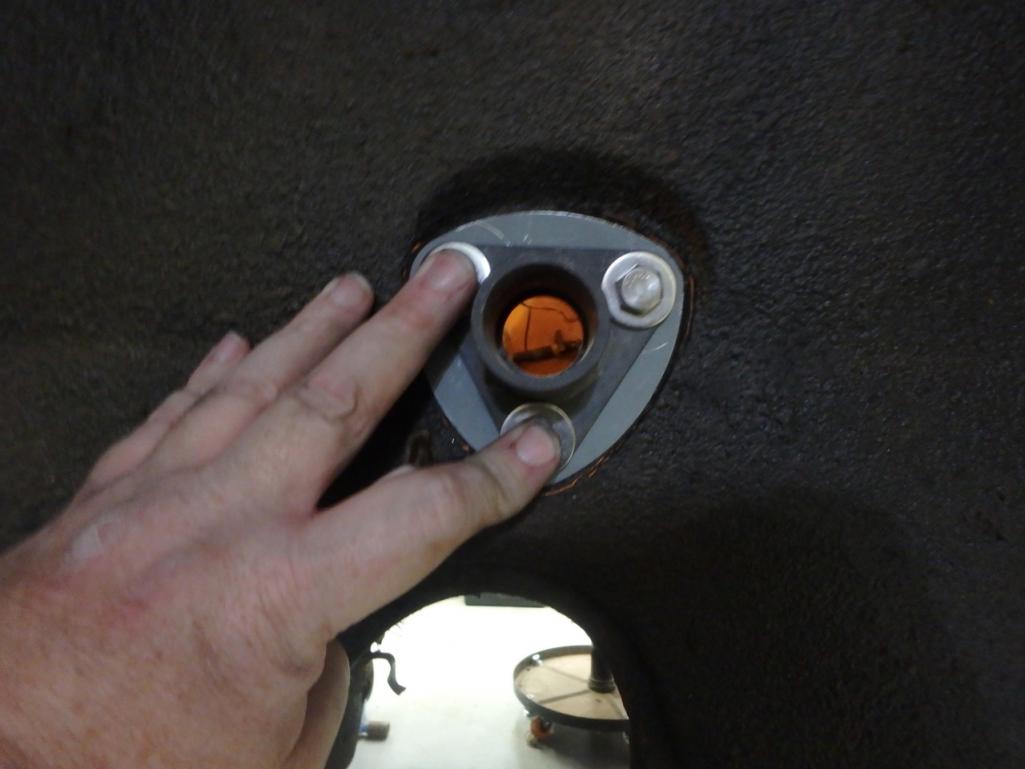 Next up for this side is clean the undercoating. Scuff up the paint, and JB weld it to the car. Yes normally I would weld, but since I don't want to repaint, where the weld would burn off paint, it will be JB Weld. Brad says it will work, and I see no reason it would not work. I tend to measure project success and the amount of fun I have had by the number of chips, pile of metal shavings, and metal abound. 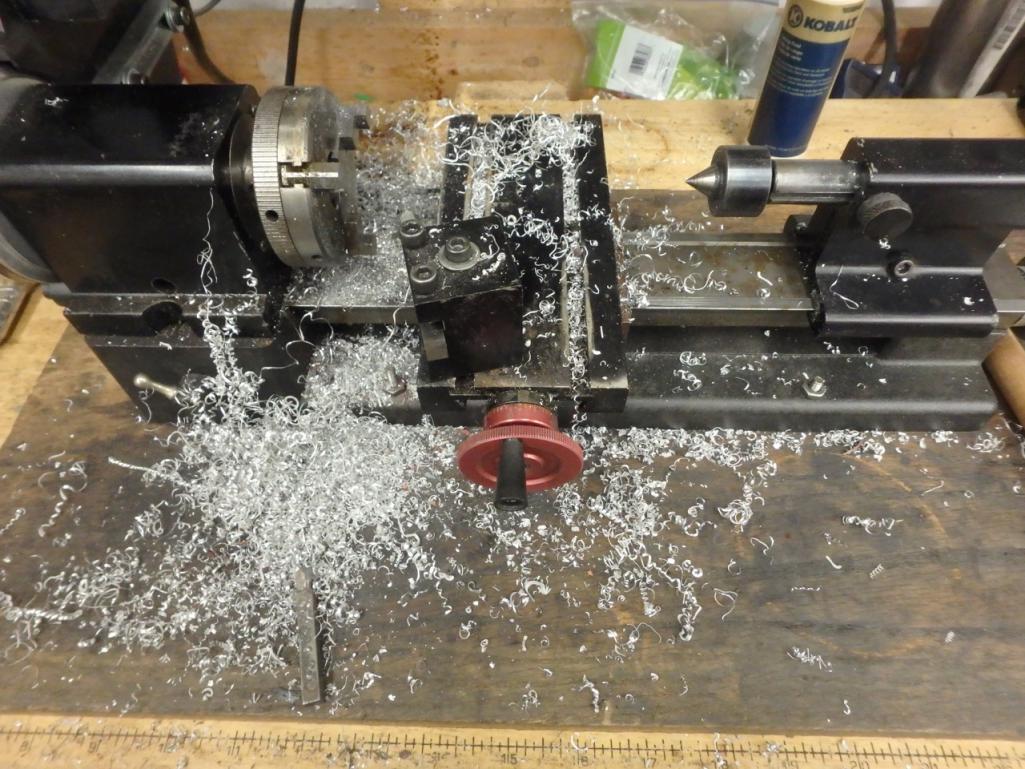 Successful and fun day (IMG:style_emoticons/default/piratenanner.gif) Oh the not fun part of my day, I have been working on one of the sets of MiniLites I have. Prepping for paint, as they where in good condition. But lots of small paint chips, and different colors. So following the instructions off a wheel restore that works on Ferrari Mag wheels I got to this point. 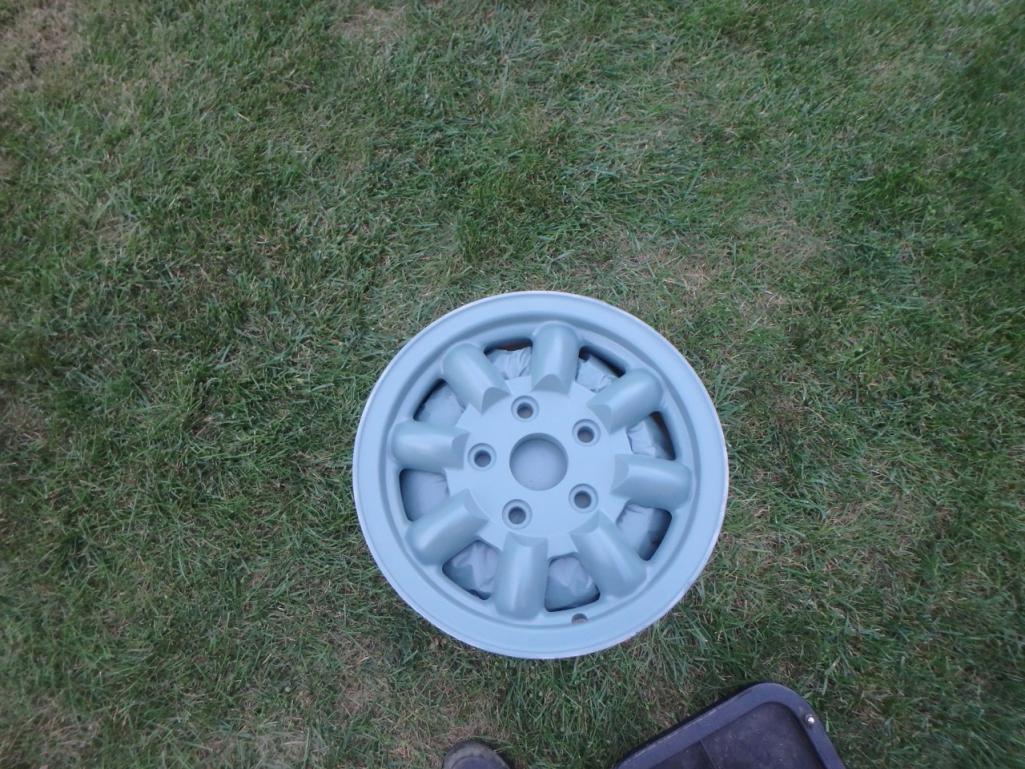 That one was sitting on my stool that turns, hate the stool, but it does a great job for painting wheels 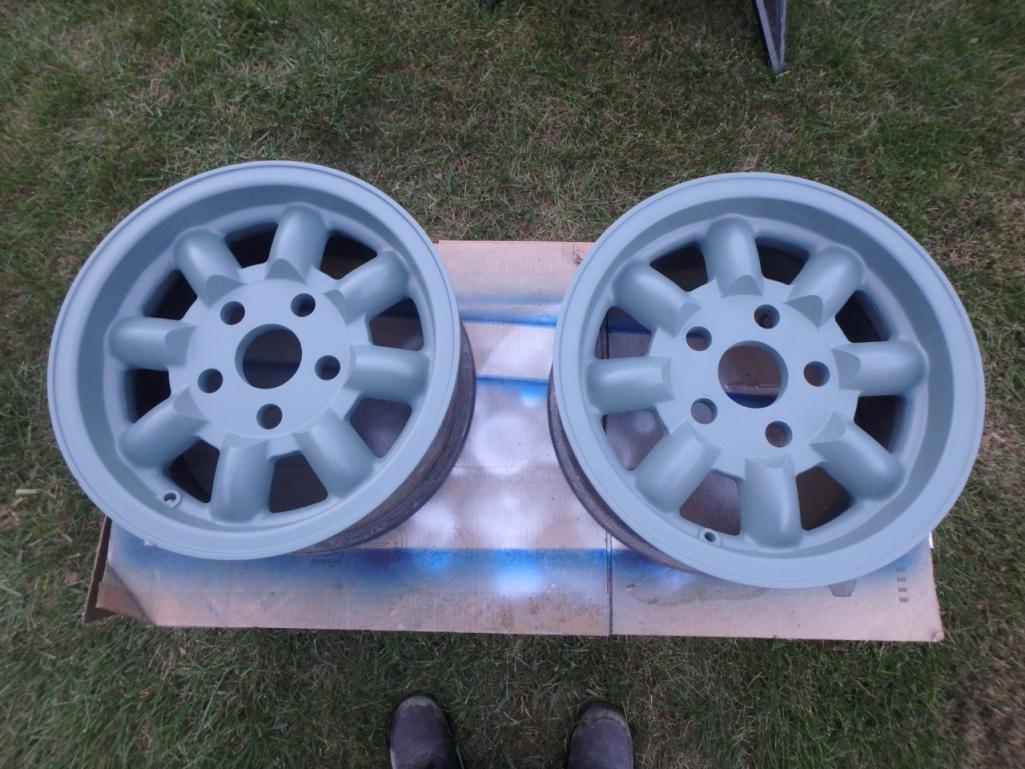 And the last one, all where baking in the afternoon sun 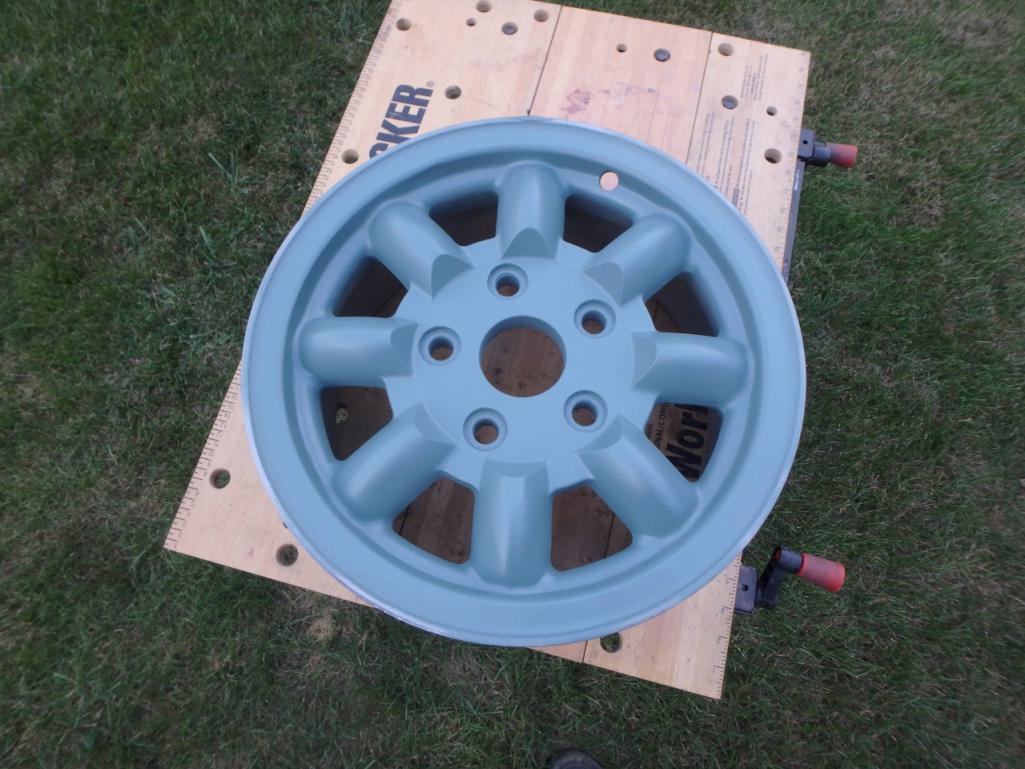 Hope to get a bit more done on the wheels over the week, but maybe I will focus on the sway bar mounts and install. Would like to start having the car go back together. And well my plan is to put it together, as McMark says a running driving 914 beats any of them that are on jack stands any day. |
|
|
|
| mepstein |
Oct 22 2017, 06:01 PM
Post
#51
|
|
914-6 GT in waiting Group: Members Posts: 20,816 Joined: 19-September 09 From: Landenberg, PA/Wilmington, DE Member No.: 10,825 Region Association: MidAtlantic Region |
Thanks for the “how to” on the sway bar. I need one on my conversion car. I will order a set of Brad’s mounts this week.
|
|
|
|
| 914forme |
Oct 23 2017, 05:29 AM
Post
#52
|
|
Times a wastin', get wrenchin'! Group: Members Posts: 3,899 Joined: 24-July 04 From: Dayton, Ohio Member No.: 2,388 Region Association: None |
Your welcome, thank you for letting me know it was useful (IMG:style_emoticons/default/beer.gif)
I will finish it out with the JB weld and final fitting. The other side is just a rinse and repeat process. Though I have thought about building another adapter and using laser bore sight to mark the center on the other side. The might be taking this to an extreme. (IMG:style_emoticons/default/rolleyes.gif) |
|
|
|
| McMark |
Oct 23 2017, 06:08 AM
Post
#53
|
|
914 Freak! Group: Retired Admin Posts: 20,180 Joined: 13-March 03 From: Grand Rapids, MI Member No.: 419 Region Association: None |
QUOTE(914forme @ Oct 23 2017, 07:29 AM) Your welcome, thank you for letting me know it was useful (IMG:style_emoticons/default/beer.gif) I will finish it out with the JB weld and final fitting. The other side is just a rinse and repeat process. Though I have thought about building another adapter and using laser bore sight to mark the center on the other side. The might be taking this to an extreme. (IMG:style_emoticons/default/rolleyes.gif) Once you get both holes, slide the sway bar into place and make sure things line up nicely. You can pull the bar most of the way out one side, and then use it as a level to realign the metal. I'd add the JBWeld once everything's aligned and let the JBWeld cure with the bar in place. Little steps will add up to the whole. Keep on those and you'll progress nicely. Looking good! (IMG:style_emoticons/default/drunk.gif) |
|
|
|
| 914forme |
Oct 23 2017, 06:14 AM
Post
#54
|
|
Times a wastin', get wrenchin'! Group: Members Posts: 3,899 Joined: 24-July 04 From: Dayton, Ohio Member No.: 2,388 Region Association: None |
Thanks for the tip Mark (IMG:style_emoticons/default/beer3.gif)
|
|
|
|
| 914forme |
Oct 27 2017, 07:10 PM
Post
#55
|
|
Times a wastin', get wrenchin'! Group: Members Posts: 3,899 Joined: 24-July 04 From: Dayton, Ohio Member No.: 2,388 Region Association: None |
got in the shop tonight, and finished up the swaybar installation.
 Not as smooth as my roller bearing mounted swaybar on the EG conversion, so I need to add a bit of machining and a grease fitting, to give them a little less friction. That equals more lathe and mill time. (IMG:style_emoticons/default/piratenanner.gif) |
|
|
|
| 914forme |
Nov 22 2017, 08:29 PM
Post
#56
|
|
Times a wastin', get wrenchin'! Group: Members Posts: 3,899 Joined: 24-July 04 From: Dayton, Ohio Member No.: 2,388 Region Association: None |
Got a bit more done today, might keep me out of the slackers thread.
First up horns, each bracket needed to be clocked correctly. And the electrical posts needed to be bent from 90 degrees to 0 degrees or maybe 1-2 degrees if your wanting to be picky. The Horns are Hella SuperTones, 130dB Might keep somebody from running over the top of the 914. (IMG:style_emoticons/default/dry.gif) 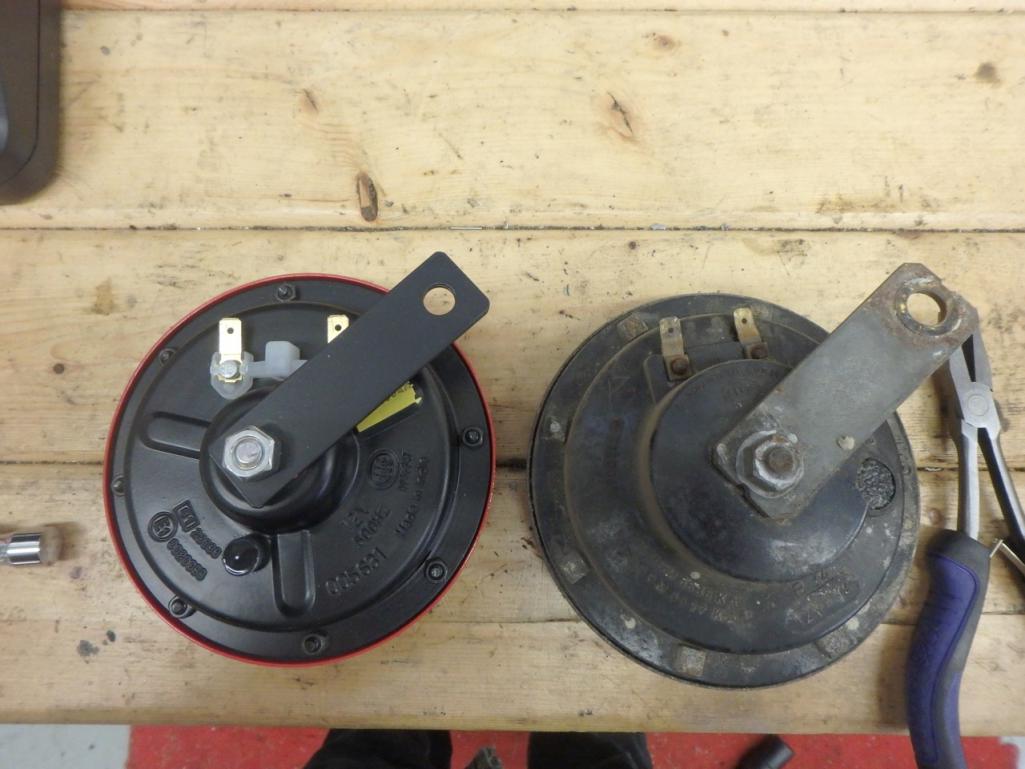 Next up cleaned up the Cibie Friving lights. 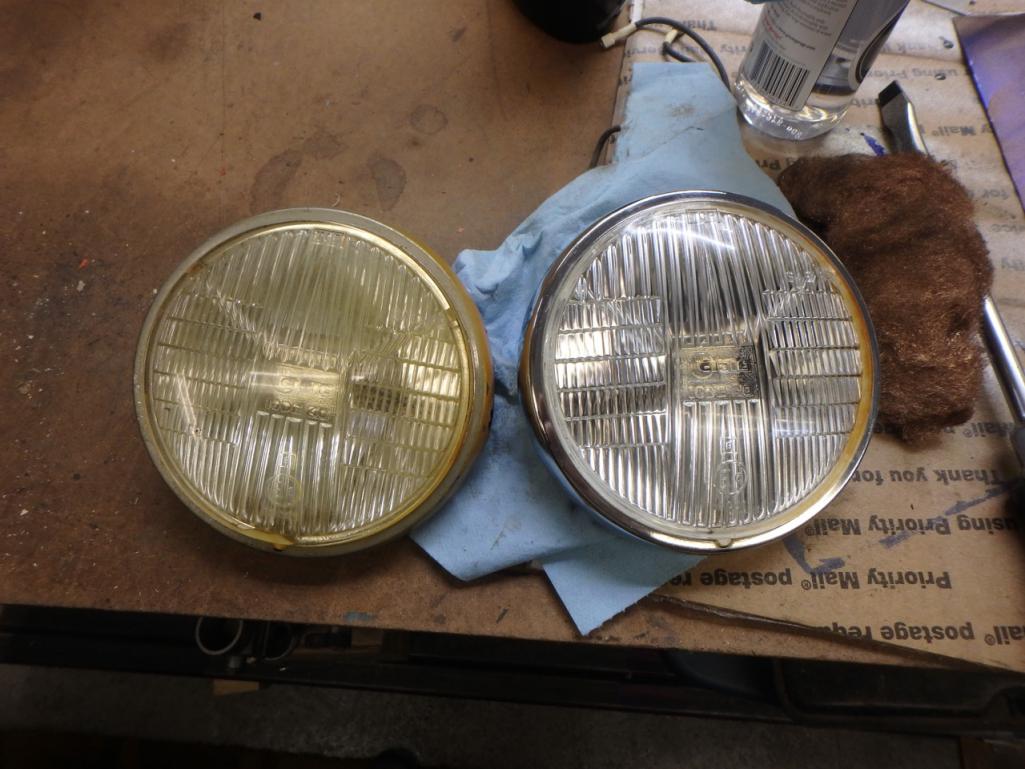 Wow they where dirty (IMG:style_emoticons/default/confused24.gif) 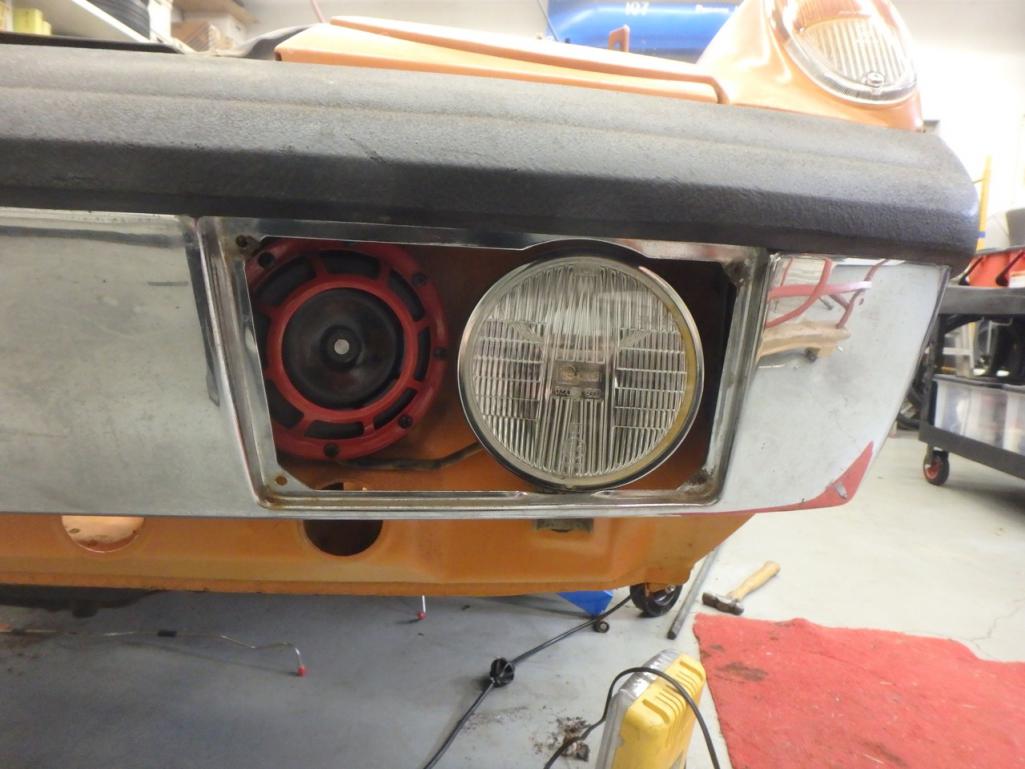 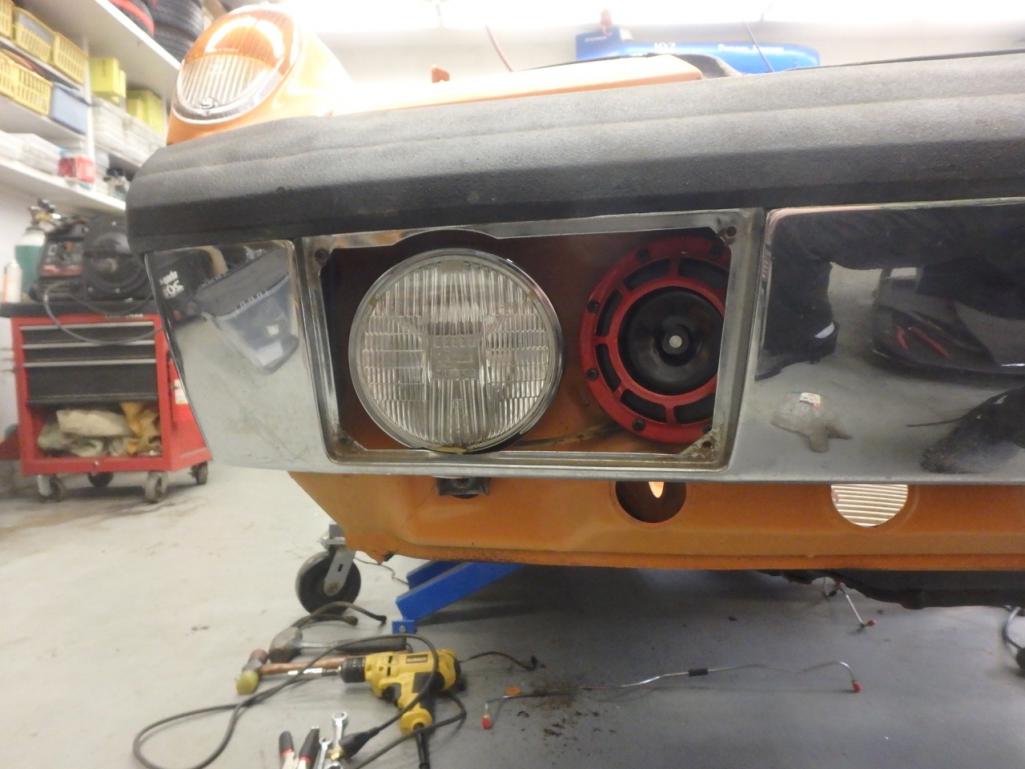 Both sides mounted up 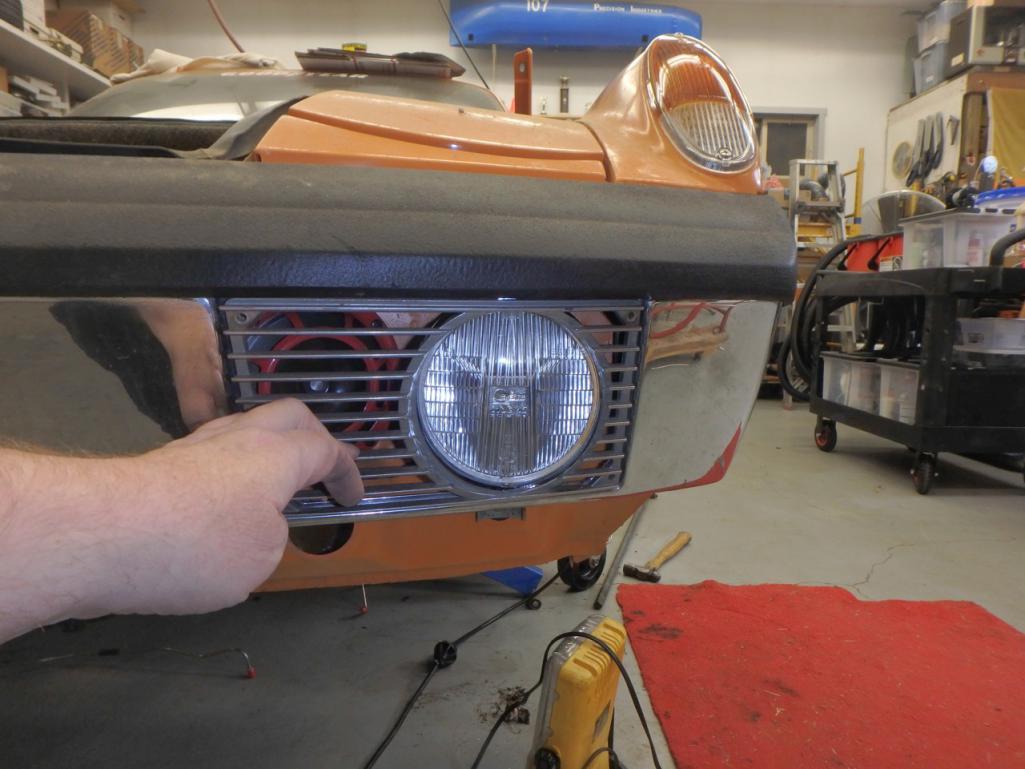 Need to find some SS screws to mount the grill covers with, anyone know the screw size off hand? Back to the sway bar installation JB Welded them in. Brad says that will work, and in reality your clamping these, and just keeping them from falling down behind the gas tank. That would suck. 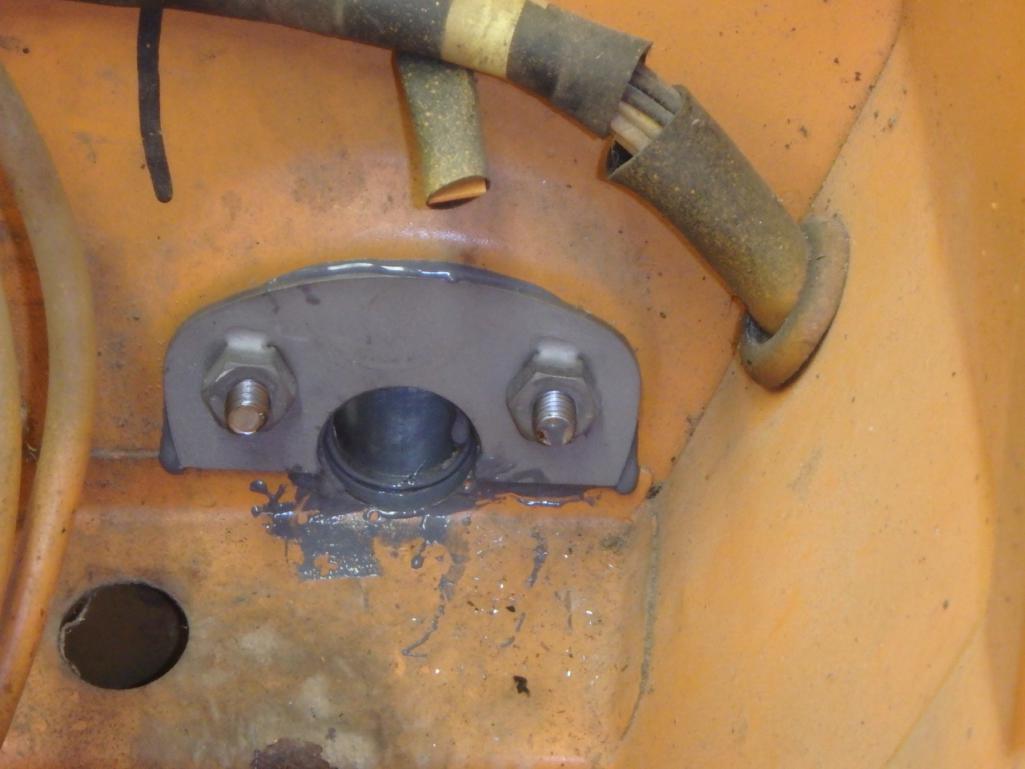 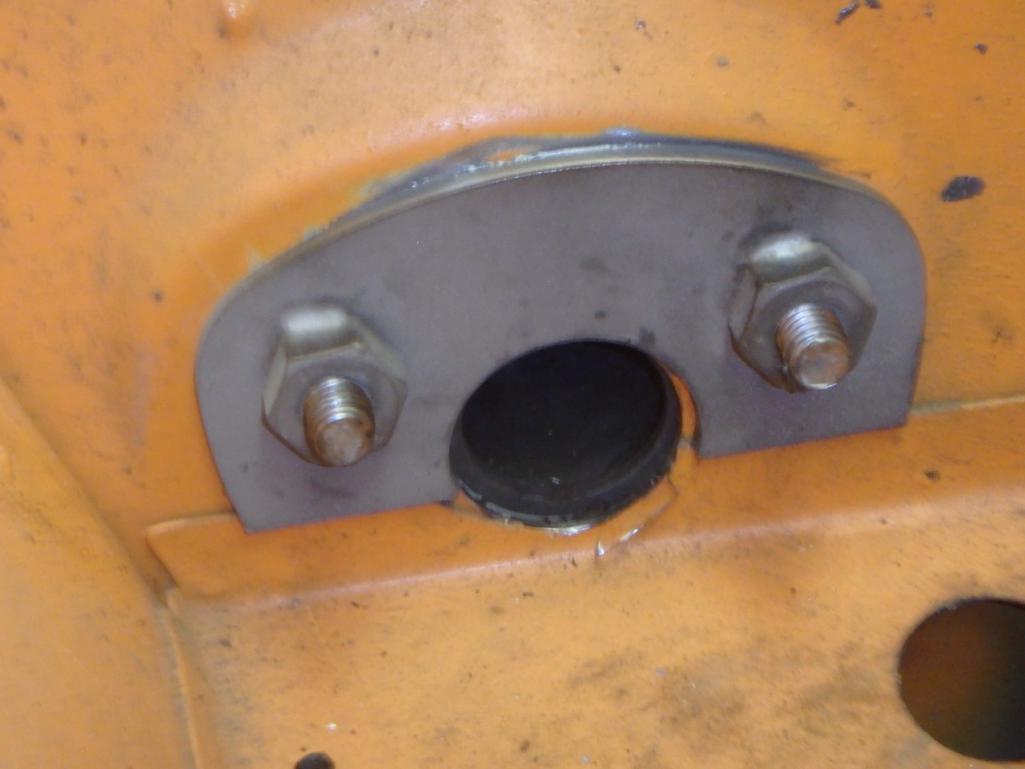 If it becomes an issue, it is not like I don't know my way around welders (IMG:style_emoticons/default/av-943.gif) In the wheel wells, once set I will hit them with a top coat and then undercoat them. Just to make it match what Dad had done. 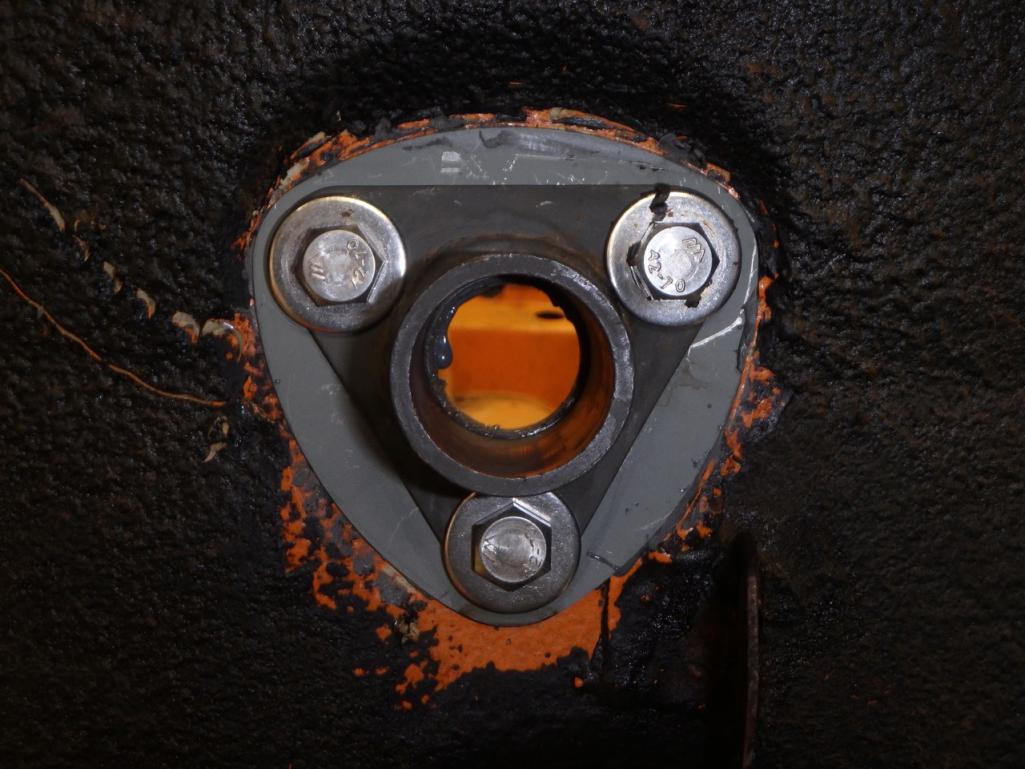 Been working on my second set of Mini-Lites the first set is going up for sale. 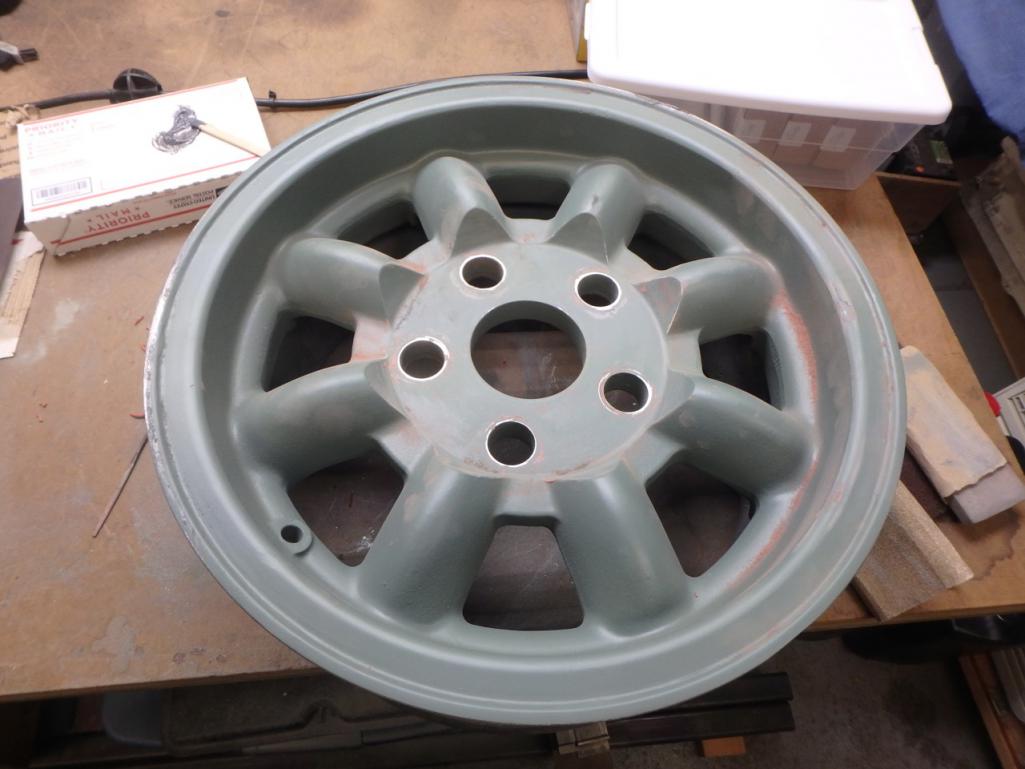 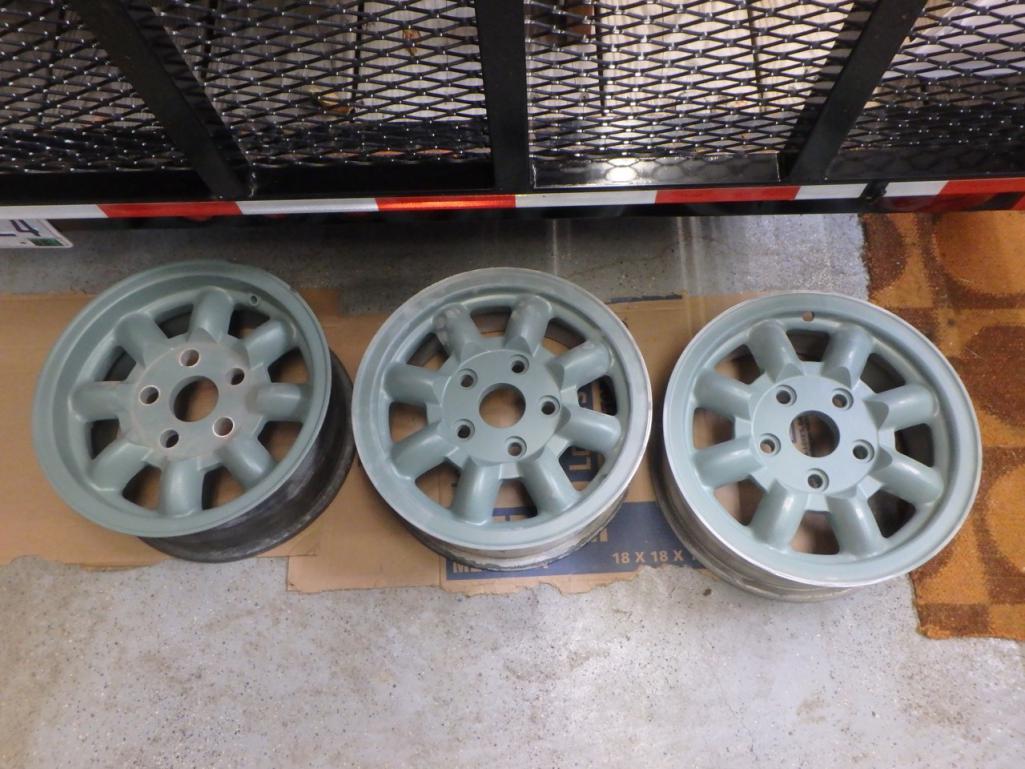 Last but not least some brake Porn (IMG:style_emoticons/default/drooley.gif) PMB, a sourced set of Brembo Alpha calipers, and speed bleeders (IMG:style_emoticons/default/drooley.gif) 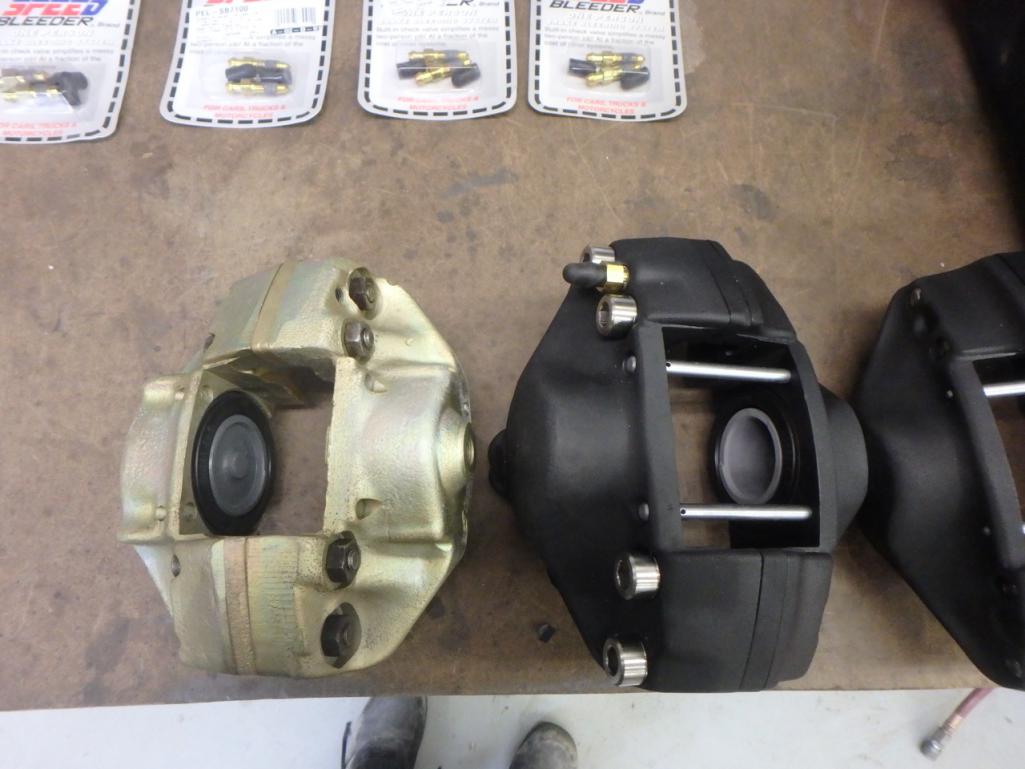 Alphas Much bigger than the 914-6 fronts (IMG:style_emoticons/default/aktion035.gif) And they are Aluminum (IMG:style_emoticons/default/aktion035.gif) Much lighter to boot (IMG:style_emoticons/default/aktion035.gif) And I ordered to many speed leaders, did not realize they come in pairs. (IMG:style_emoticons/default/headbang.gif) Yet it worked out because the Alpha Calipers required a M10 bleeder and I just so happened to have 4 sets for my EG build, that is using Boxster Calipers which are also M10. (IMG:style_emoticons/default/piratenanner.gif) For once a mis-order worked for me. Speed bleeders going into the classifieds also. At a fraction of the orginal cost (IMG:style_emoticons/default/shades.gif) Attached thumbnail(s) 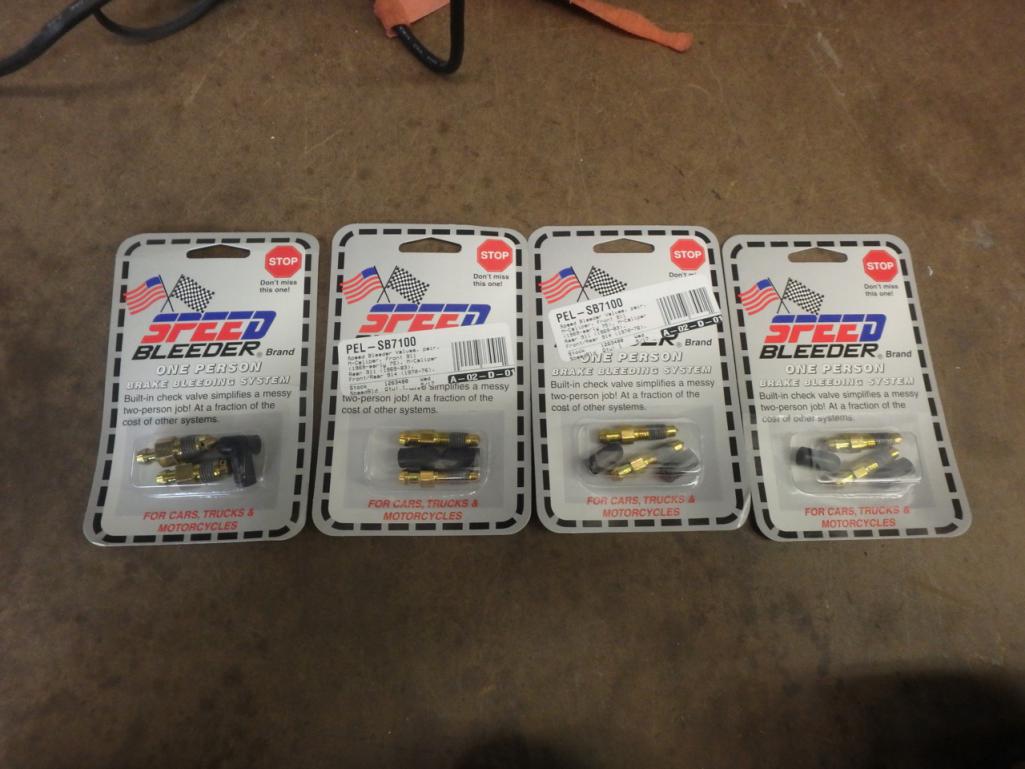
|
|
|
|
| 914forme |
Dec 1 2017, 08:05 PM
Post
#57
|
|
Times a wastin', get wrenchin'! Group: Members Posts: 3,899 Joined: 24-July 04 From: Dayton, Ohio Member No.: 2,388 Region Association: None |
Been traveling for work. here is the update of what I got done while I was in town.
First up got my welding area kinda of setup. I am still looking for some steel to build a good bench, or a used one I like. 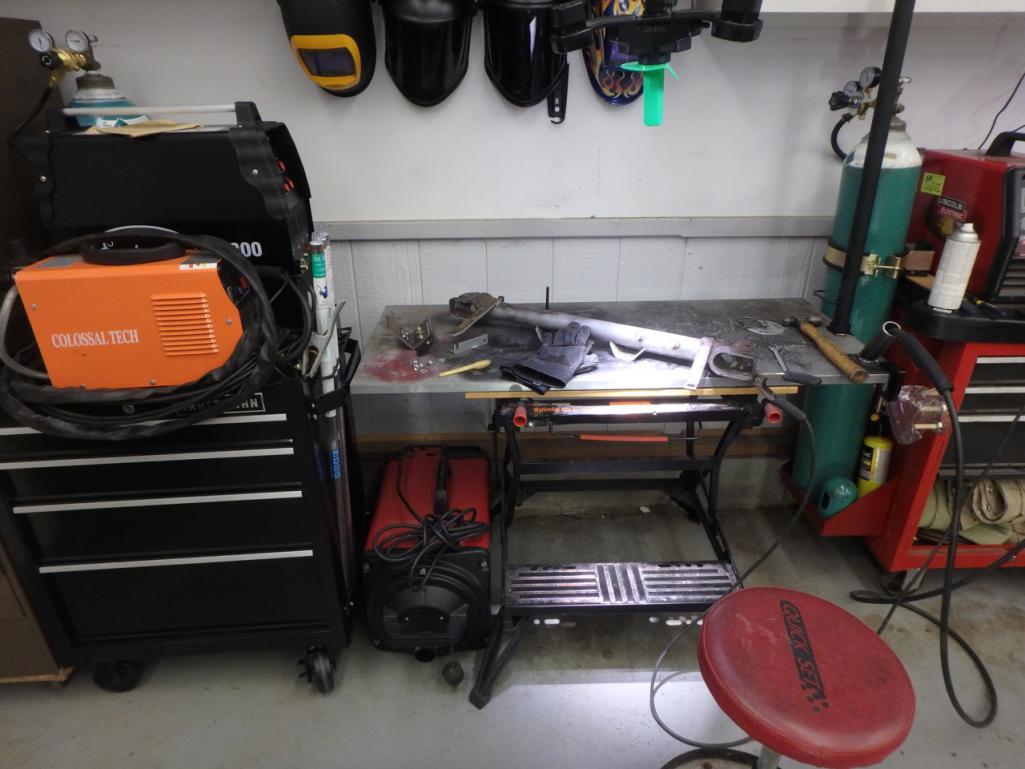 Nice to have dedicated welding space, now to get to welding. I have not been welding for about 6 months, man I am rusty, but I got back in the grove pretty quickly. I worked on some welding tank mounts, and other things to get the muscle memory back. Then I started this. 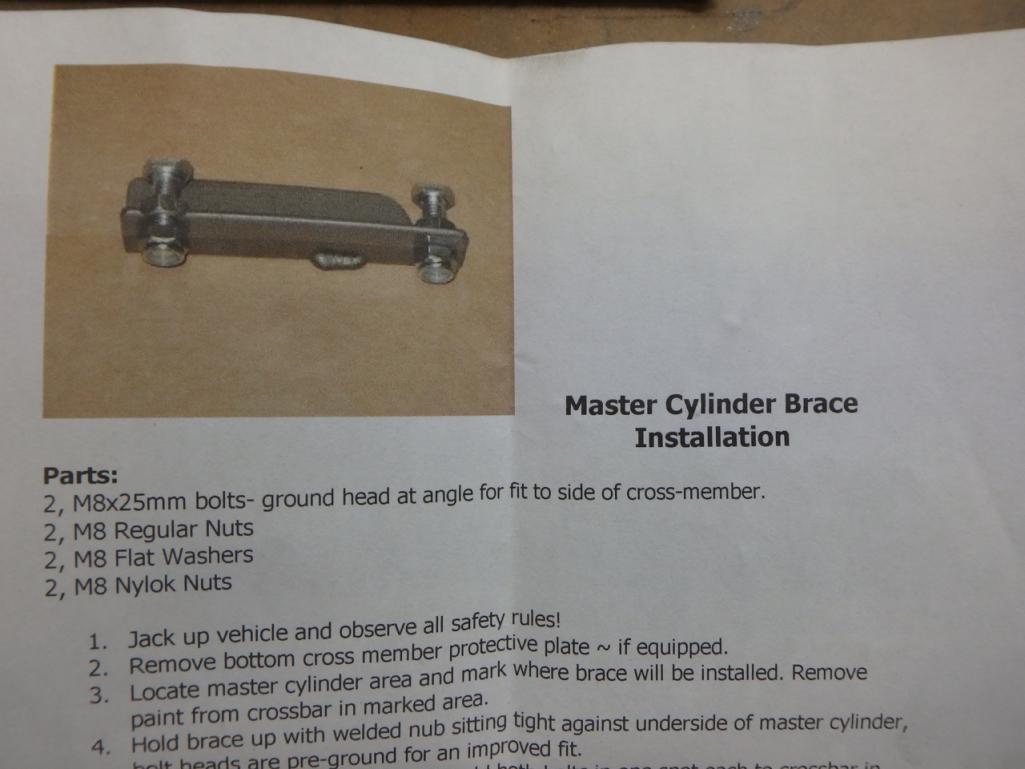 Welded up 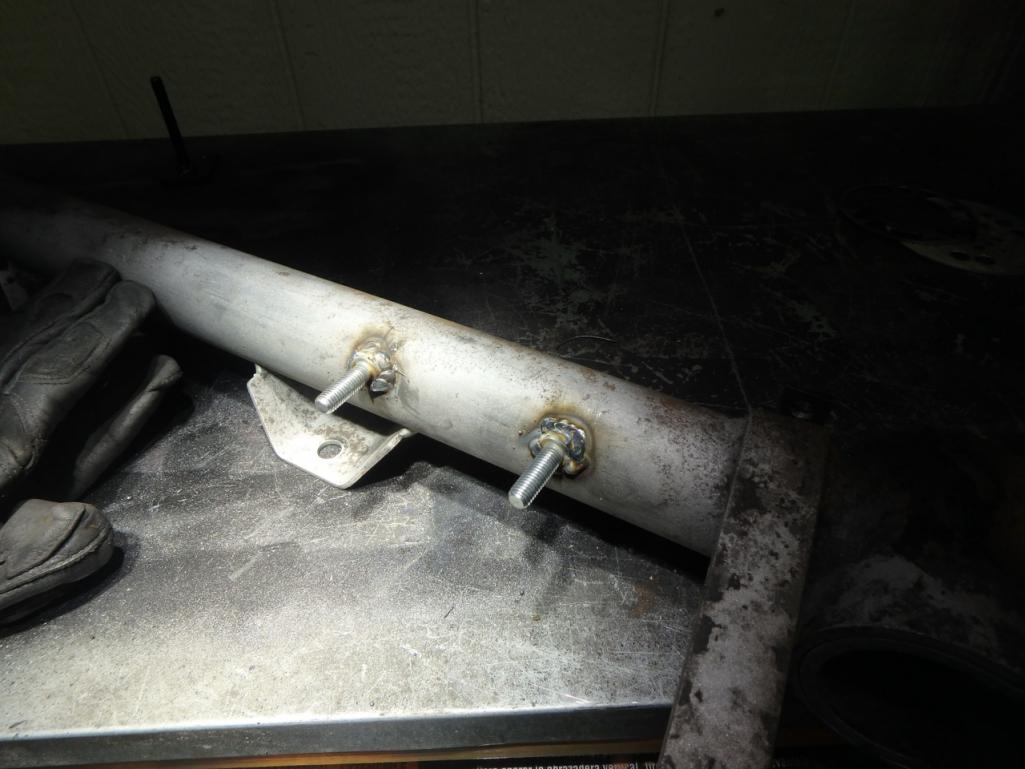 Spot on, like all of Chris' stuff, it (IMG:style_emoticons/default/aktion035.gif) 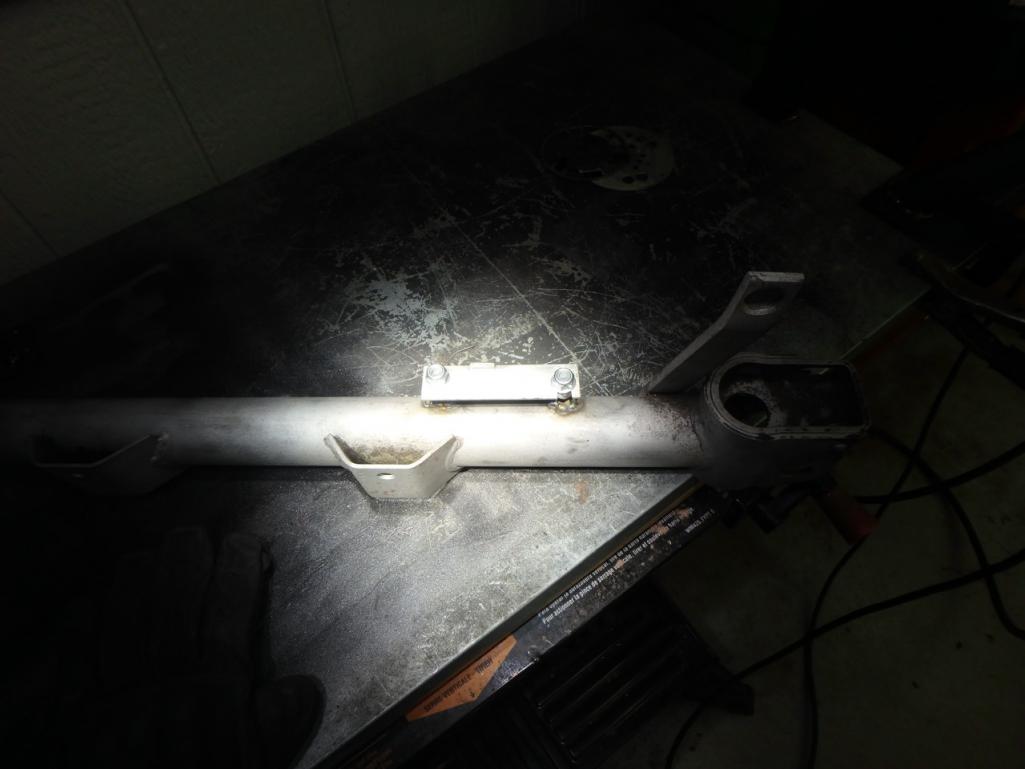 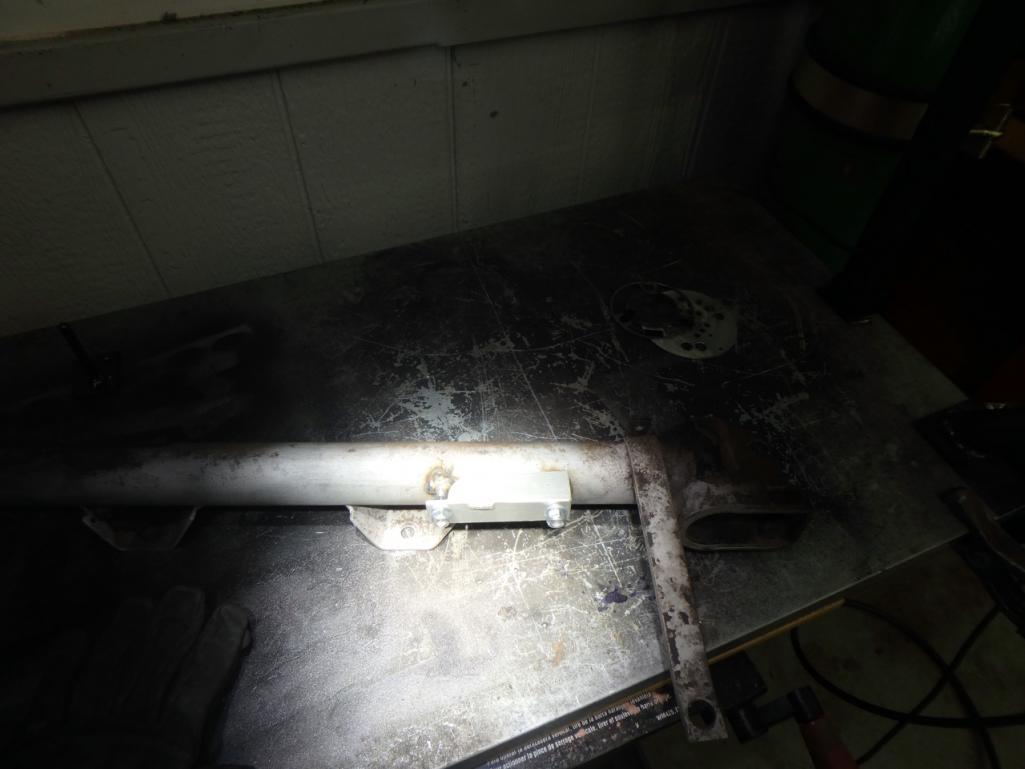 Okay no I am not welding in a dark shop, I have some strong lights, but this welding table light really screws with the digital camera. This is just turning off the light. 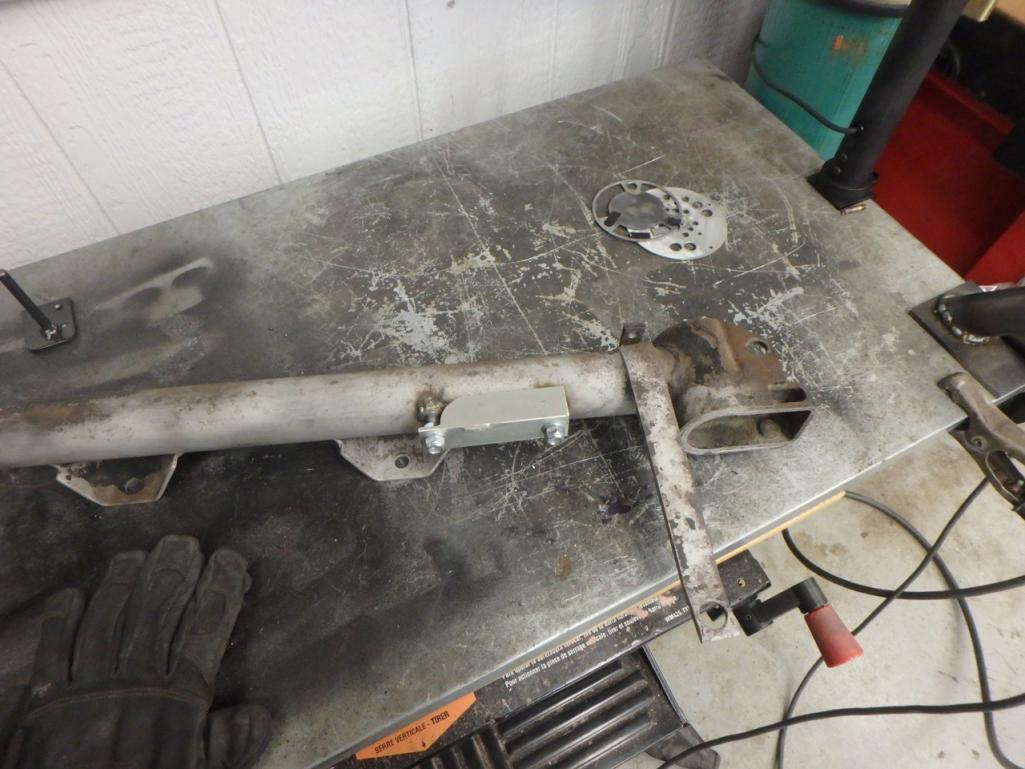 Thanks Scott (IMG:style_emoticons/default/beer.gif) |
|
|
|
| NoEcm |
Dec 1 2017, 08:24 PM
Post
#58
|
|
Member Group: Members Posts: 95 Joined: 20-June 05 From: Seattle, WA Member No.: 4,309 |
QUOTE(914forme @ Oct 22 2017, 03:39 PM) I tend to measure project success and the amount of fun I have had by the number of chips, pile of metal shavings, and metal abound. Successful and fun day (IMG:style_emoticons/default/piratenanner.gif) Great little 3" lathe. I have the same one myself. |
|
|
|
| Amenson |
Dec 1 2017, 10:04 PM
Post
#59
|
|
That's opposite lock!! Group: Members Posts: 645 Joined: 27-May 05 From: Dublin, OH Member No.: 4,154 Region Association: None |
QUOTE(914forme @ Dec 1 2017, 09:05 PM) Welded up Did you actually use your Tig welder for part of the right bolt or is it just a really clean MIG weld? |
|
|
|
| mb911 |
Dec 2 2017, 08:14 AM
Post
#60
|
|
914 Guru Group: Members Posts: 7,794 Joined: 2-January 09 From: Burlington wi Member No.: 9,892 Region Association: Upper MidWest |
Its mig.
|
|
|
|
|
2 User(s) are reading this topic (2 Guests and 0 Anonymous Users)
0 Members:

|
Lo-Fi Version | Time is now: 16th July 2026 - 03:18 AM |
Invision Power Board
v9.1.4 © 2026 IPS, Inc.