|
|
|
Porsche, and the Porsche crest are registered trademarks of Dr. Ing. h.c. F. Porsche AG.
This site is not affiliated with Porsche in any way. Its only purpose is to provide an online forum for car enthusiasts. All other trademarks are property of their respective owners. |
|
|

  |

| tygaboy |
 Feb 8 2018, 04:35 PM Feb 8 2018, 04:35 PM
Post
#261
|
|
914 Guru  Group: Members Posts: 5,810 Joined: 6-October 15 From: Petaluma, CA Member No.: 19,241 Region Association: Northern California |
|
   |

 
|
| bbrock |
Feb 9 2018, 10:39 AM
Post
#262
|
|
914 Guru Group: Members Posts: 5,269 Joined: 17-February 17 From: Montana Member No.: 20,845 Region Association: Rocky Mountains |
One Small Step, One Giant Leap
Got a little work done last night with a surprisingly big impact. I liberated the old door jambs from the quarter panels. First up was cleaning out the seam sealer. A heat gun and putty knife, followed by a stiff plastic wheel on the drill did the trick. 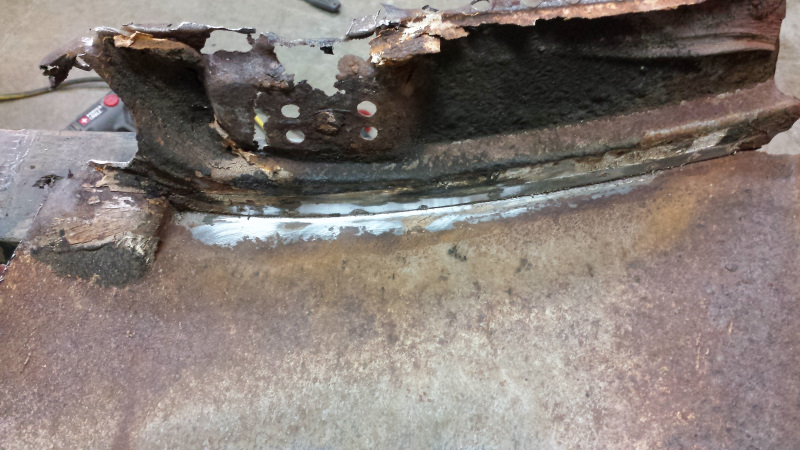 Spot welds are too close to the corner to get the Rotabroach in there, so I had to use a cutoff wheel on the die grinder. Didn't take too long to get them off. I think I need to do something artsy with the one with the compliance sticker.  The insides of the quarters are both crusty, but should clean up. Both need a little patchwork done at the bottom corners under the jambs, but I'm a bit worried what I'm going to find under this passenger side quarter. 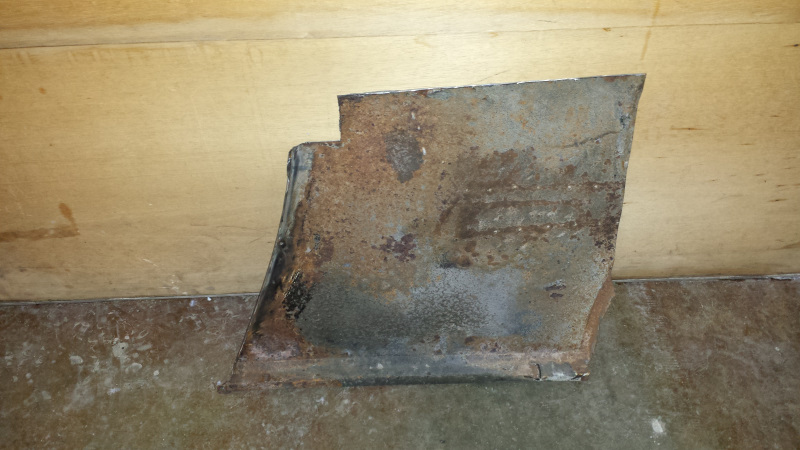 That panel is noticeably heavier so there is definitely a lot of filler in it. You can see it oozing through the holes drilled for keys. More ominous are the lines in the rust pattern between those holes. I'm afraid I'm going to find a brazed patch in there. I'll know when I strip them down. Here's a close-up of that worry spot.  I did a quick and very rough dry fit to see how the pieces were going to fit together. Suddenlty, things got real. This IS going to look like a car again!  I'll need to tune up the corner under the door handle on the RD panel to make it more crisp to blend with the factory quarters. Any tips from those of you who've done this before? Advice on the dolly to use maybe?  |
|
|
|
| bbrock |
Feb 11 2018, 12:12 AM
Post
#263
|
|
914 Guru Group: Members Posts: 5,269 Joined: 17-February 17 From: Montana Member No.: 20,845 Region Association: Rocky Mountains |
Secrets Reveal - Could Use Some Advice Here
Spent most of the day cleaning up the quarter panel sections that will go back on the car. There are different issues to be address on each side and I'd love to hear opinions. First, the driver's side. The issue on this one is rust. I stripped off the paint on both sides, then took it to the blasting cabinet to blast the rust to see what I was dealing with. After a thorough inspaction, I treated it with Ospho. I already knew the front corner was rusted away along with some holes in the bottom edge that require patching. No new surprises there and I can deal with those. The undercoat was applied thin inside those quarters and there are scattered little pits of rust where grit and gravel broke through to the metal. This car saw a lot of gravel road miles when I was driving it. Those are nothing to worry about though.  More disturbing is the amount of pitting along the bottom on the inside of the panel. It isn't horrible, the metal is still mostly good and solid with the exception of 3 deep pits that have cratered through and the outer skin looks great other than those pinholes. It is just a little rougher on the inside than I'd like to see, and not something that can be sanded out without thinning the metal too much. If I had a nice bending brake with box fingers, I'd probably make a patch that replicated the bottom edge channel and extended up the side enough to replace all the pitted stuff. But I don't, so I think I'm going to live with it other than zapping those three deep pits closed. I'm wondering if I should smooth it with some body solder or kevlar reinforced filler before primer. Once it is primered and undercoated, you'll neve know the difference regardless of what I do. Opinions welcome here. I've drawn a line around the pitted area. This was before Ospho so it stands out better.  Now on to the passenger side. This was the side that was heavy with filler, and it was thick. I torched and scraped it all off, then went over it with a stripping disc, but still need to put it in the blasting cabinet to clean up the areas the disc couldn't reach. This side fared better with rust for a change. Just a tiny hole at the very tip of the lower corner and the scattered road rash on the inside like the driver's side.  Also, my fears of a brazed patch didn't come true, but the secrets were revealed. It appears this car was in a minor fender bender where the quarter panel was creased. The rows of holes look like they were for pulling the creases out with a slide hammer.  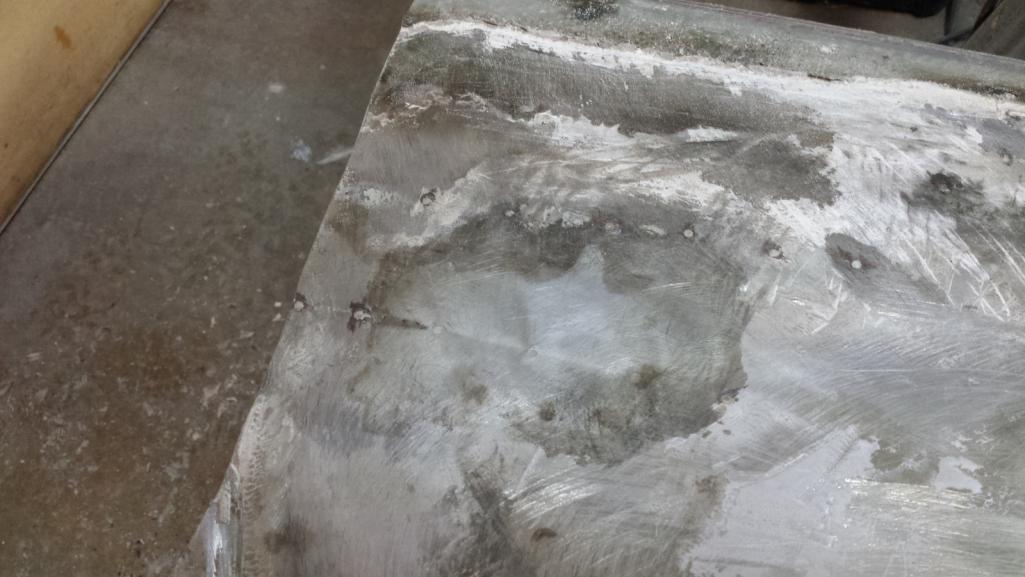 The crease runs off the edge to the section that is still on the car, so I'll need to strip that off to see how far back it goes. It also looks like there are a number of door dings near the jamb edge. Rather than bump anything out, they slathered the entire section (and who knows how far back) with a layer of Bondo. It was a minimum of 1/8" thick, and almost 14" in some spots. The weight that came off alone is probably worth a couple horsepower. This would have been done in the 70s and I know that's how too many shops did it back then, but it's puzzling why they laid it on so thick. There is no place on that panel where the filler had been sanded back to the metal surface. They could have accomplished the same quicky repair with a lot less Bondo. The worst part of that repair is that it looks like they went over the hole panel with a 36 grit disc, no doubt to get an aggressive tooth for the Bondo to key into. So there's that to deal with. The big question I have is, what's the correct squence for repair here? Should I hammer and dolly the creases and dings before putting the panel back on the car, or would it be better to do it after it is welded on? My instinct is that because the damage extends to the other piece, it would be best to weld the piece back on, being careful to keep the edges flush, then break out the hammer and dolly. I can also tell the panel is stretched, so I'll need to run the magic shrinking disc over it as well. Any advice here? I did complete one last task for the day. I removed the trunk hinge pivot from the driver's side, ground the area flat, and marked out approximate the area to cut out for a patch. 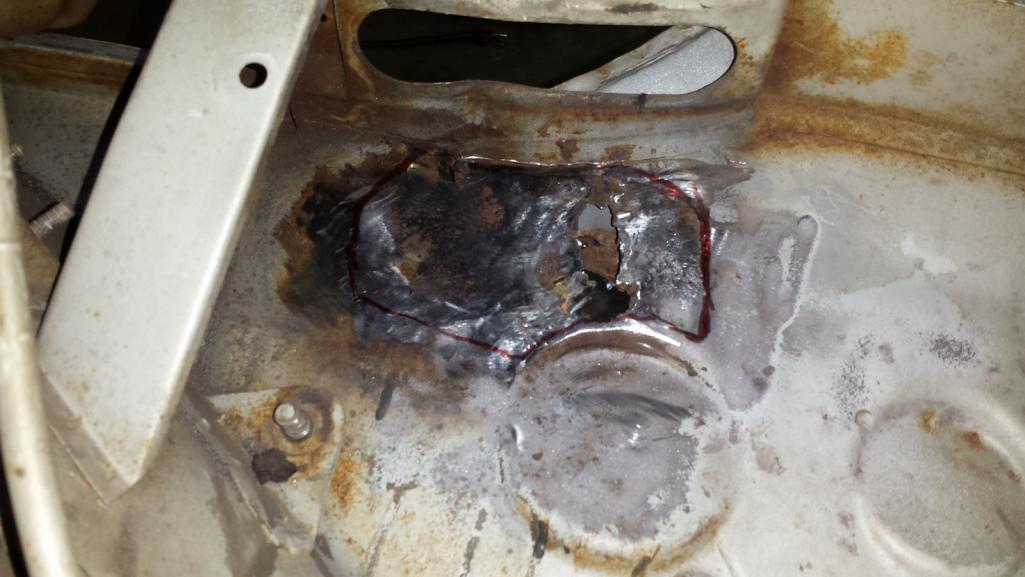 |
|
|
|
| burton73 |
Feb 11 2018, 12:49 AM
Post
#264
|
|
Senior member, and old dude Group: Members Posts: 3,994 Joined: 2-January 07 From: Los Angeles Member No.: 7,414 Region Association: Southern California |
Have you looked online at Tube or Eastwood Deluxe Body Solder Kit
For doing lead filler. It does not seen that bad. You can do it with out buying all of the Eastwood stuff. See some UTube. I think you can do it for a lot less and what I have seen from you I know you can do it. Best regards, Bob B |
|
|
|
| bbrock |
Feb 11 2018, 11:00 PM
Post
#265
|
|
914 Guru Group: Members Posts: 5,269 Joined: 17-February 17 From: Montana Member No.: 20,845 Region Association: Rocky Mountains |
QUOTE(burton73 @ Feb 10 2018, 11:49 PM)  Have you looked online at Tube or Eastwood Deluxe Body Solder Kit For doing lead filler. It does not seen that bad. You can do it with out buying all of the Eastwood stuff. See some UTube. I think you can do it for a lot less and what I have seen from you I know you can do it. Best regards, Bob B Well Bob, you might as well have made this a "Double Dog Dare." I actually have a minimalist soldering kit I bought from J.C. Whitney decades ago when I painted my wife's 914. I even used a little somewhere earlier in this thread. I think on the firewall. Your suggestion was all the arm twisting I needed to break out the lead again. With that goal in mind, I started the morning patching up the rusted bottom of that driver's quarter. 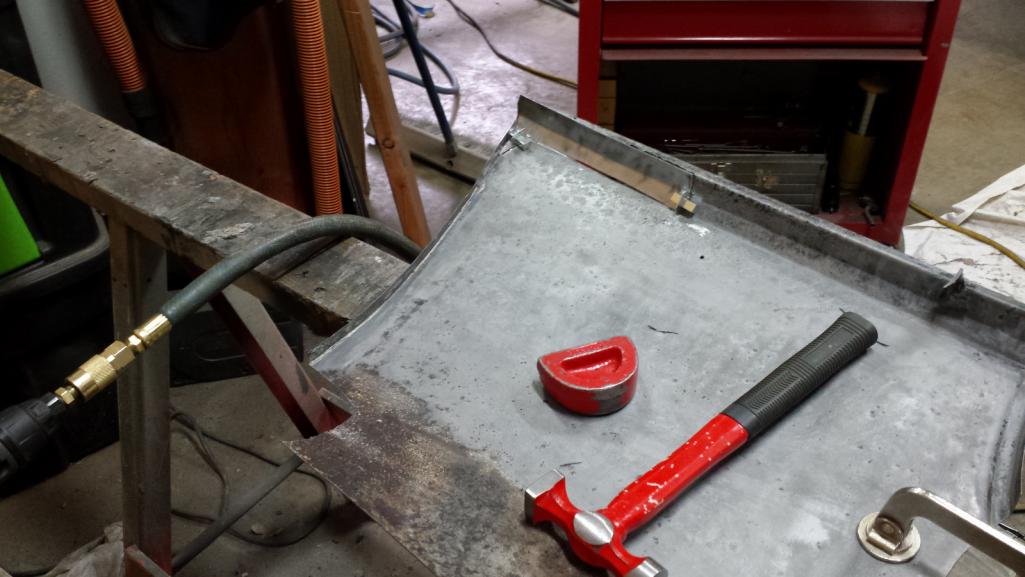 The patch was welded up and ground down. Then it was time to play with some lead. As with my other forays into body solder, it was a bit of a mixed bag. There's a reason this is a "lost art." It's harder than it looks. First, I think the tub of tinning paste I have is pretty low quality. The tin content seems pretty low, and no matter how clean I get the metal surface, a bunch of black crap starts floating around as soon as I heat the flux. But the lead seems to stick okay and the crap doesn't seem to affect the final result. It just makes it hard to tell whether you are doing a good job. Despite my inexperience, I did get a nice layer down over the pitted area of the back side. Then I did what I seem to always do with this stuff, not understand its limits. The back went well enough that I thought it would be nice to touch up some spots on the front with solder. That went pretty well, but when I flipped the piece back over to look at the back, I realized my mistake. I don't know why I didn't think about the fact that heating the front would melt the lead off the back. It didn't melt all the way off, it just sort of ran and pooled so the lead was thin in some spots and puddled up in others. Of course, reheating the back would ruin the front, and only one side needs to look pretty. I was happy with the front. 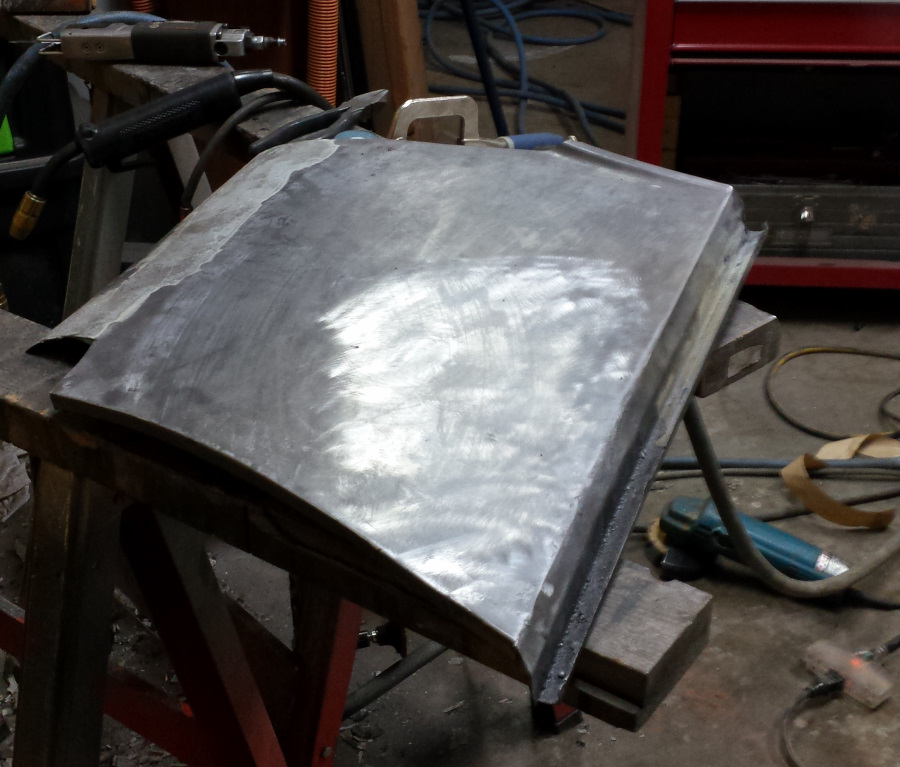 So I just filed and ground the back as it was. Anyway, it isn't bad, but it isn't baby butt smooth. The black edges in the next pic are from the lead pooling and ruining the feathered edges rather than pits in the metal. It did accomplish the purpose of reinforcing that pitted section at least and the metal there feels as solid as the rest of the panel. I could probably get it smoother, but how much time should one spend making a perfect surface that will be buried under undercoat? 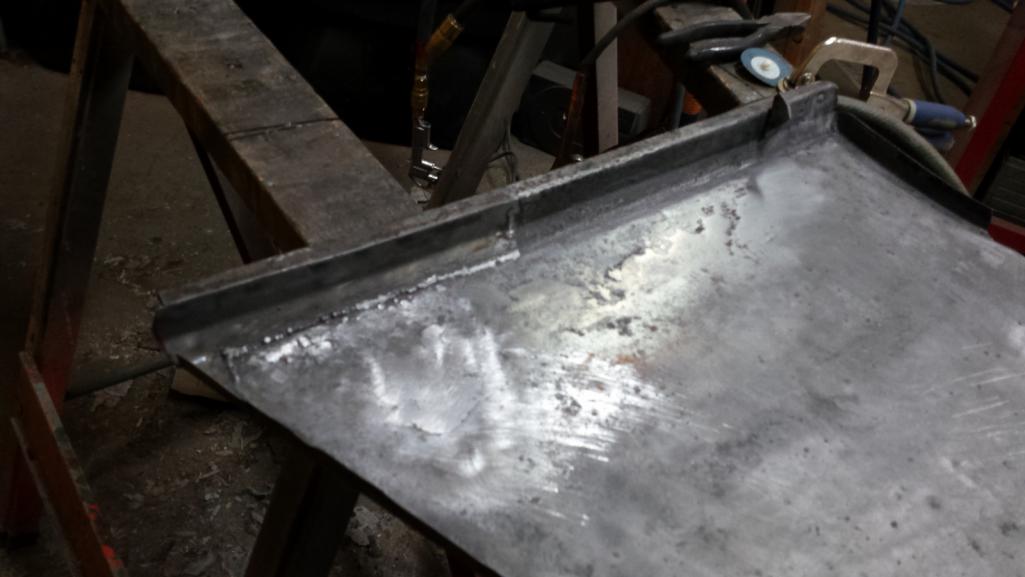 Here's the before pic again for comparison. (IMG:http://www.914world.com/bbs2/uploads/post-20845-1518327654_thumb.jpg) With the panel clamped back on the car, there was one little issue that wasn't going to fly. I don't know if you can see it, but door gap at the very bottom ended up flared a little.  The fix was to cut a thin slit using my Dremel with thin cutoff wheel behind the flange. 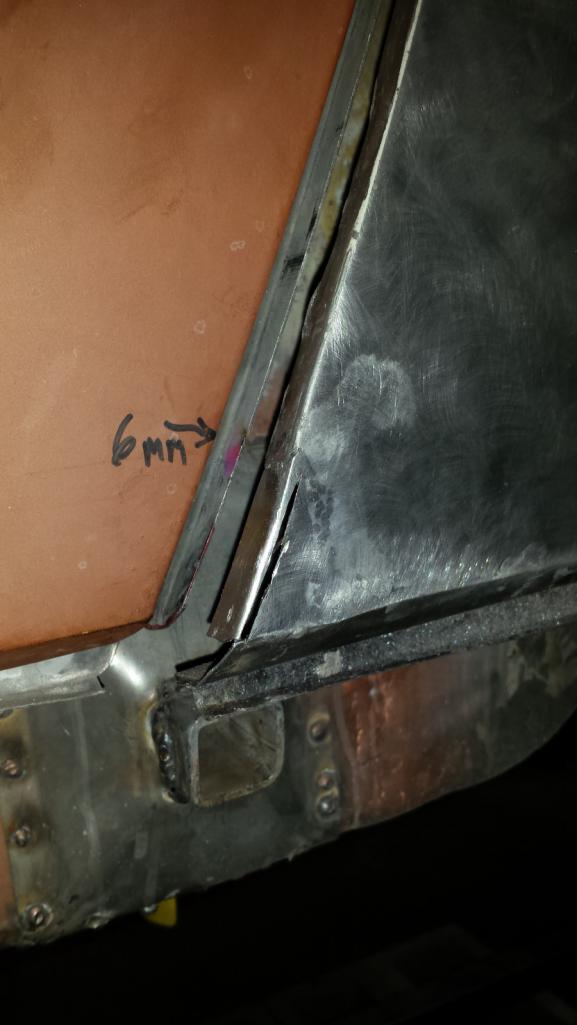 Then adjust the gap before welding the slit shut. It will need a little fine tuning, but this is much better. 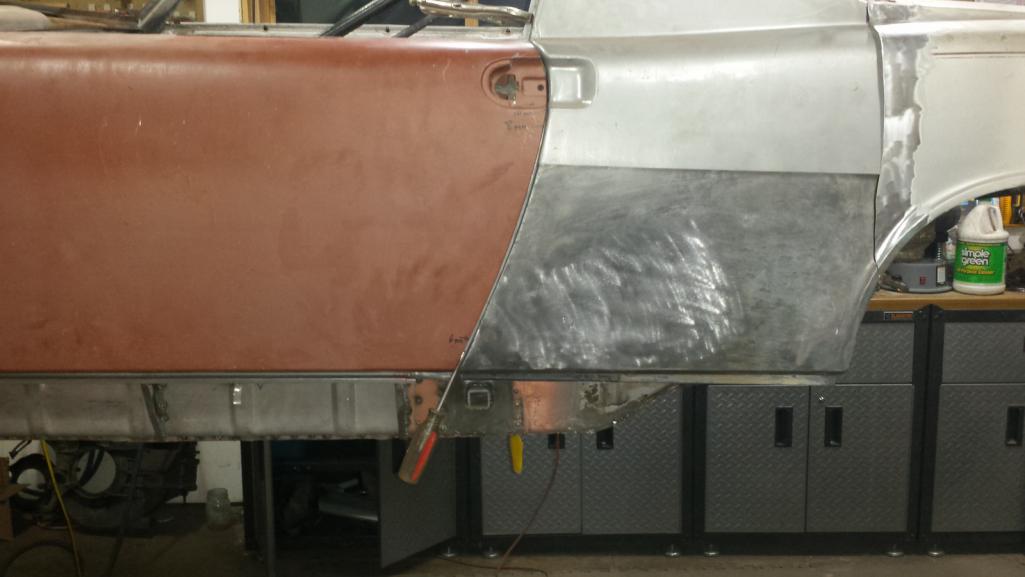 |
|
|
|
| bbrock |
Feb 18 2018, 01:21 PM
Post
#266
|
|
914 Guru Group: Members Posts: 5,269 Joined: 17-February 17 From: Montana Member No.: 20,845 Region Association: Rocky Mountains |
And Now for Something Completely Different
My evening side project for the week. Backpad was looking a little grungy.  Amazing what a scrubbing and wipe with 303 protectant can do.  |
|
|
|
| burton73 |
Feb 18 2018, 01:43 PM
Post
#267
|
|
Senior member, and old dude Group: Members Posts: 3,994 Joined: 2-January 07 From: Los Angeles Member No.: 7,414 Region Association: Southern California |
QUOTE(bbrock @ Feb 11 2018, 09:00 PM) QUOTE(burton73 @ Feb 10 2018, 11:49 PM) Have you looked online at Tube or Eastwood Deluxe Body Solder Kit For doing lead filler. It does not seen that bad. You can do it with out buying all of the Eastwood stuff. See some UTube. I think you can do it for a lot less and what I have seen from you I know you can do it. Best regards, Bob B Well Bob, you might as well have made this a "Double Dog Dare." I actually have a minimalist soldering kit I bought from J.C. Whitney decades ago when I painted my wife's 914. I even used a little somewhere earlier in this thread. I think on the firewall. Your suggestion was all the arm twisting I needed to break out the lead again. With that goal in mind, I started the morning patching up the rusted bottom of that driver's quarter. The patch was welded up and ground down. Then it was time to play with some lead. As with my other forays into body solder, it was a bit of a mixed bag. There's a reason this is a "lost art." It's harder than it looks. First, I think the tub of tinning paste I have is pretty low quality. The tin content seems pretty low, and no matter how clean I get the metal surface, a bunch of black crap starts floating around as soon as I heat the flux. But the lead seems to stick okay and the crap doesn't seem to affect the final result. It just makes it hard to tell whether you are doing a good job. Despite my inexperience, I did get a nice layer down over the pitted area of the back side. Then I did what I seem to always do with this stuff, not understand its limits. The back went well enough that I thought it would be nice to touch up some spots on the front with solder. That went pretty well, but when I flipped the piece back over to look at the back, I realized my mistake. I don't know why I didn't think about the fact that heating the front would melt the lead off the back. It didn't melt all the way off, it just sort of ran and pooled so the lead was thin in some spots and puddled up in others. Of course, reheating the back would ruin the front, and only one side needs to look pretty. I was happy with the front. So I just filed and ground the back as it was. Anyway, it isn't bad, but it isn't baby butt smooth. The black edges in the next pic are from the lead pooling and ruining the feathered edges rather than pits in the metal. It did accomplish the purpose of reinforcing that pitted section at least and the metal there feels as solid as the rest of the panel. I could probably get it smoother, but how much time should one spend making a perfect surface that will be buried under undercoat? Here's the before pic again for comparison. (IMG:http://www.914world.com/bbs2/uploads/post-20845-1518327654_thumb.jpg) With the panel clamped back on the car, there was one little issue that wasn't going to fly. I don't know if you can see it, but door gap at the very bottom ended up flared a little. The fix was to cut a thin slit using my Dremel with thin cutoff wheel behind the flange. Then adjust the gap before welding the slit shut. It will need a little fine tuning, but this is much better. Brent, Massaging the metal. Right on. This is what is done. Waite till you get into the paint. Lots of tricks on body prep but you can end up with a car with super straight lines that will look new. Like a custom fit suit from a tailor. Keep fitting it till it is just right. It is funny that some people think that what we may do as magic while some of what they do in different areas is magic to us. Yes you have a great skillset. Regards, Bob B |
|
|
|
| Dion |
Feb 18 2018, 02:29 PM
Post
#268
|
|
RN Group: Members Posts: 2,926 Joined: 16-September 04 From: Audubon,PA Member No.: 2,766 Region Association: MidAtlantic Region |
Nice work Brent, when did ya say your coming to Pennsylvania? Hehehe
Your work, Tygaboy, Defiantly, & Bens build. I’ll tell ya wealth of knowledge. Always learning from you guys. Top notch. |
|
|
|
| mb911 |
Feb 18 2018, 02:49 PM
Post
#269
|
|
914 Guru Group: Members Posts: 7,742 Joined: 2-January 09 From: Burlington wi Member No.: 9,892 Region Association: Upper MidWest |
QUOTE(burton73 @ Feb 18 2018, 11:43 AM) QUOTE(bbrock @ Feb 11 2018, 09:00 PM) QUOTE(burton73 @ Feb 10 2018, 11:49 PM) Have you looked online at Tube or Eastwood Deluxe Body Solder Kit For doing lead filler. It does not seen that bad. You can do it with out buying all of the Eastwood stuff. See some UTube. I think you can do it for a lot less and what I have seen from you I know you can do it. Best regards, Bob B Well Bob, you might as well have made this a "Double Dog Dare." I actually have a minimalist soldering kit I bought from J.C. Whitney decades ago when I painted my wife's 914. I even used a little somewhere earlier in this thread. I think on the firewall. Your suggestion was all the arm twisting I needed to break out the lead again. With that goal in mind, I started the morning patching up the rusted bottom of that driver's quarter. The patch was welded up and ground down. Then it was time to play with some lead. As with my other forays into body solder, it was a bit of a mixed bag. There's a reason this is a "lost art." It's harder than it looks. First, I think the tub of tinning paste I have is pretty low quality. The tin content seems pretty low, and no matter how clean I get the metal surface, a bunch of black crap starts floating around as soon as I heat the flux. But the lead seems to stick okay and the crap doesn't seem to affect the final result. It just makes it hard to tell whether you are doing a good job. Despite my inexperience, I did get a nice layer down over the pitted area of the back side. Then I did what I seem to always do with this stuff, not understand its limits. The back went well enough that I thought it would be nice to touch up some spots on the front with solder. That went pretty well, but when I flipped the piece back over to look at the back, I realized my mistake. I don't know why I didn't think about the fact that heating the front would melt the lead off the back. It didn't melt all the way off, it just sort of ran and pooled so the lead was thin in some spots and puddled up in others. Of course, reheating the back would ruin the front, and only one side needs to look pretty. I was happy with the front. So I just filed and ground the back as it was. Anyway, it isn't bad, but it isn't baby butt smooth. The black edges in the next pic are from the lead pooling and ruining the feathered edges rather than pits in the metal. It did accomplish the purpose of reinforcing that pitted section at least and the metal there feels as solid as the rest of the panel. I could probably get it smoother, but how much time should one spend making a perfect surface that will be buried under undercoat? Here's the before pic again for comparison. (IMG:http://www.914world.com/bbs2/uploads/post-20845-1518327654_thumb.jpg) With the panel clamped back on the car, there was one little issue that wasn't going to fly. I don't know if you can see it, but door gap at the very bottom ended up flared a little. The fix was to cut a thin slit using my Dremel with thin cutoff wheel behind the flange. Then adjust the gap before welding the slit shut. It will need a little fine tuning, but this is much better. Brent, Massaging the metal. Right on. This is what is done. Waite till you get into the paint. Lots of tricks on body prep but you can end up with a car with super straight lines that will look new. Like a custom fit suit from a tailor. Keep fitting it till it is just right. It is funny that some people think that what we may do as magic while some of what they do in different areas is magic to us. Yes you have a great skillset. Regards, Bob B (IMG:style_emoticons/default/agree.gif) Looks great.. As always I would be happy to talk you through some of the little things but you pretty much have a handle on it.. I will be onto those things soon enough as well. I was gone all week for work so this weekend was off limits for garage work.. Keep up the good work.. |
|
|
|
| doug_b_928 |
Feb 18 2018, 05:14 PM
Post
#270
|
|
Senior Member Group: Members Posts: 730 Joined: 17-January 13 From: Winnipeg Member No.: 15,382 Region Association: Canada |
Great work Brent! I think we are living largely parallel 914 lives! Right down to working on our harness right now and my multiple trips to emergency last summer (twice to have impaled metal removed from my eyeballs, once to have crushed glass medial removed from my eye, once once for 3 stitches due to getting my angle grinder too close to my knuckle). One difference is I put my car away for the winter and frankly needed the break! Just the deja vu from reading through your thread has me feeling exhausted again! But after reading through your thread, I don't feel so anal anymore (IMG:style_emoticons/default/biggrin.gif)
|
|
|
|
| Dave_Darling |
Feb 18 2018, 05:34 PM
Post
#271
|
|
914 Idiot Group: Members Posts: 15,338 Joined: 9-January 03 From: Silicon Valley / Kailua-Kona Member No.: 121 Region Association: Northern California |
QUOTE(bbrock @ Feb 18 2018, 11:21 AM) Amazing what a scrubbing and wipe with 303 protectant can do. That's not going to replace the missing material!! Did you repair the cardboard backing and the vinyl, or did you just replace the whole thing? --DD |
|
|
|
| bbrock |
Feb 18 2018, 06:28 PM
Post
#272
|
|
914 Guru Group: Members Posts: 5,269 Joined: 17-February 17 From: Montana Member No.: 20,845 Region Association: Rocky Mountains |
QUOTE(Dave_Darling @ Feb 18 2018, 04:34 PM) QUOTE(bbrock @ Feb 18 2018, 11:21 AM) Amazing what a scrubbing and wipe with 303 protectant can do. That's not going to replace the missing material!! Did you repair the cardboard backing and the vinyl, or did you just replace the whole thing? --DD (IMG:style_emoticons/default/smilie_pokal.gif) (IMG:style_emoticons/default/lol-2.gif) I was wondering who would be the one to call bull (IMG:style_emoticons/default/stromberg.gif) on that. I picked up one of 914rubbers new plastic backpad cards and their vinyl kit on their Black Friday sale and finally got around to the project. I ran into a detail that isn't covered in Nick Mironov's excellent upholstery tutorial and a couple others that are peculiar to the plastic backpad card. I'll post a few details this evening. I just wanted to see who was paying attention. (IMG:style_emoticons/default/biggrin.gif) |
|
|
|
| bbrock |
Feb 18 2018, 11:06 PM
Post
#273
|
|
914 Guru Group: Members Posts: 5,269 Joined: 17-February 17 From: Montana Member No.: 20,845 Region Association: Rocky Mountains |
QUOTE(doug_b_928 @ Feb 18 2018, 04:14 PM) Great work Brent! I think we are living largely parallel 914 lives! Right down to working on our harness right now and my multiple trips to emergency last summer (twice to have impaled metal removed from my eyeballs, once to have crushed glass medial removed from my eye, once once for 3 stitches due to getting my angle grinder too close to my knuckle). One difference is I put my car away for the winter and frankly needed the break! Just the deja vu from reading through your thread has me feeling exhausted again! But after reading through your thread, I don't feel so anal anymore (IMG:style_emoticons/default/biggrin.gif) Goodness! Did they give you one of those punch cards so your 10th visit is free? As always, thank everyone for the encouragement but I have to confess that any skills I have managed to acquire are just from copying what I read on these forums and obsessively watching youtube videos. As a lifelong woodworker, this has been an interesting journey. With wood, it is all about the precision of the cuts. If you mess up, the joint is ruined and you throw away the piece and start again. Metal is an interesting media in that it is more like clay and can be pushed and reworked to a degree. Pretty fun stuff! |
|
|
|
| bbrock |
Feb 18 2018, 11:46 PM
Post
#274
|
|
914 Guru Group: Members Posts: 5,269 Joined: 17-February 17 From: Montana Member No.: 20,845 Region Association: Rocky Mountains |
The Real Story
Dave caught my BS and as promised, here's the real story. My backpad was trashed beyond hope. It was already in serious trouble when I got the car back when the 924 turbo was the hot new Porsche on the magazine covers. By the time I revived this project, they were only half there.  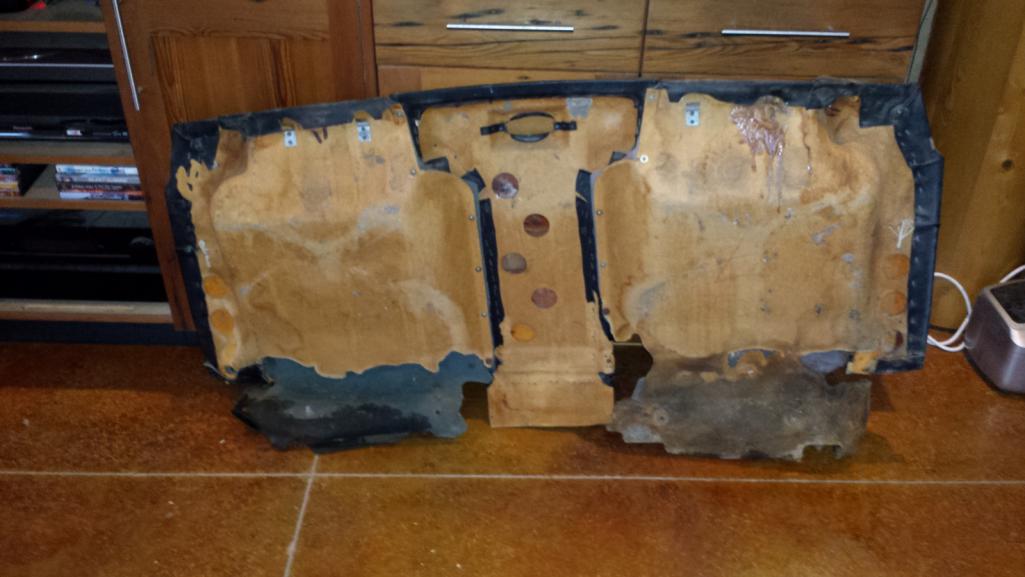 Mark offered some pretty smokin' hot deals on the new 914rubber plastic backpad cards and vinyl kits in the big Black Friday sale, so I snatched them up. I mostly followed Nick Mironov's tutorial on recovering backpads in the classic threads. But I discovered a detail not covered in his tutorial and plastic cards required a few other steps. I won't repeat anything covered in the tutorial, so just reference it if anything seems confusing here. First was stripping down the old pieces and prepping the new cards. I only stripped one side at a time to leave the other intact for reference. Once a card was stripped, I used what was left of the old card as a template for drilling the new one. The originals have a series of 2-inch holes cut under the foam. My first inclination was to ignore those, but then I realized those might have been added to allow air to move out and in when the foam is compressed and relaxed. You can imagine that if the foam bolsters were compressed rapidly without those holes, they would act like a balloon and could blow out staples or stitching. So I replicated them in the new cards. 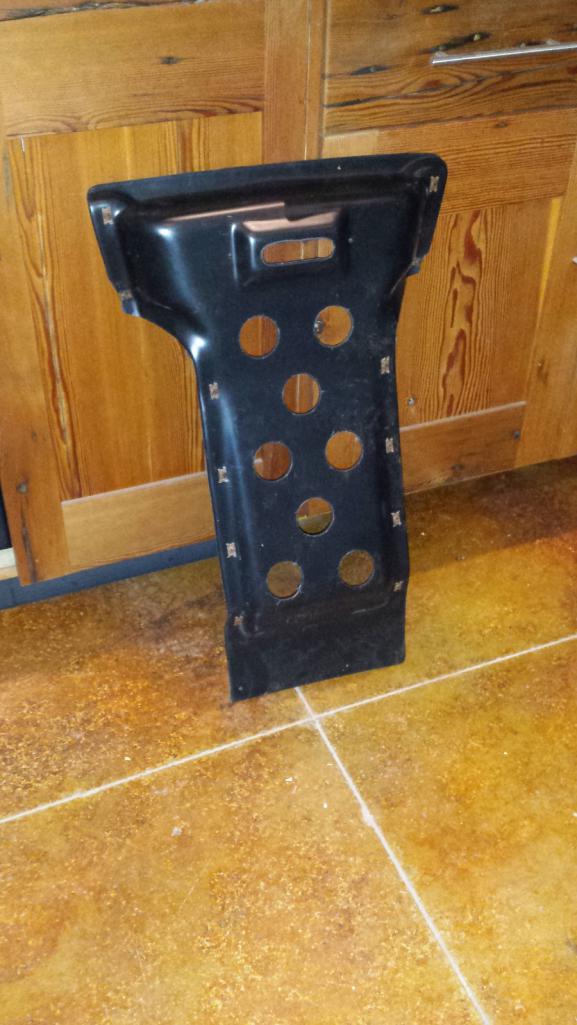 I also chose to transfer the metal speed nuts over to the new center piece. I don't think this is necessary because the plastic has plenty of bite to hold the screws, but I wasn't sure how that would hold over time, so decided to transfer. The speed nuts just press into the plastic with little spikes. I used vice grips to press them in. But they are easy to pop out of the plastic, so I glued the in with some E600 adhesive to convince them to stay put. One tip I learned through trial and error is to drill the holes where the side pieces screw to the center oversized so the screws can spin. If you use the speed nuts, do this for both sides and center pieces. Otherwise, the screws will bite into the plastic and it will be a bitch to get them to pull tight. If you don't use the speed nuts, only drill the side pieces oversize. 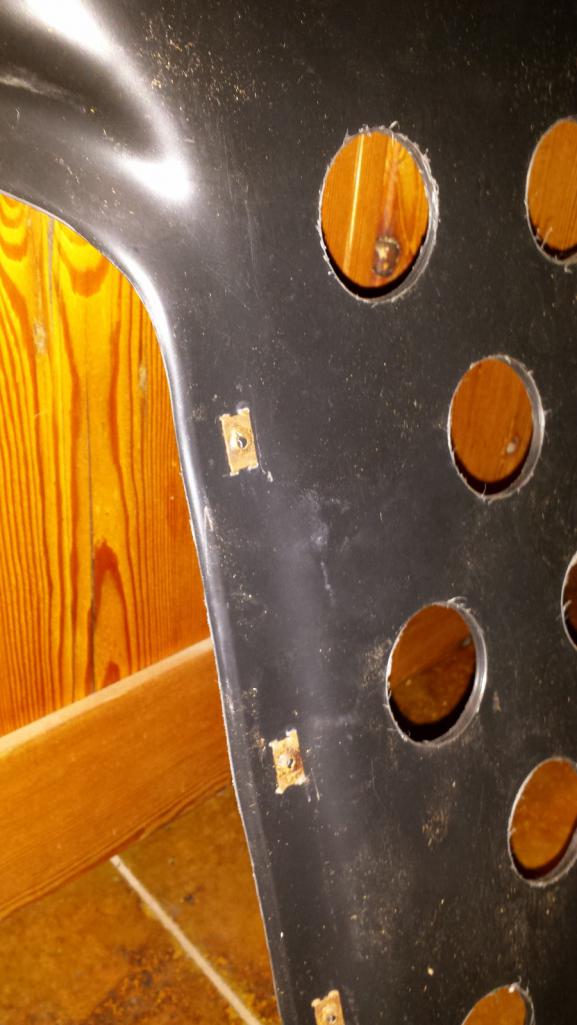 Next I followed the tutorial on upholstering the first side. But there is a little metal wire piece sewn into the side bolsters where the seam crosses them, that are pulled tight with a cord truss sort of affair. I don't know if it is necessary to do this, but I think we have established that I'm a wee bit on the anal side, and I do think it improved the final result. The pocket that holds the wire was rotted on one side of mine, but here's what it should look like. 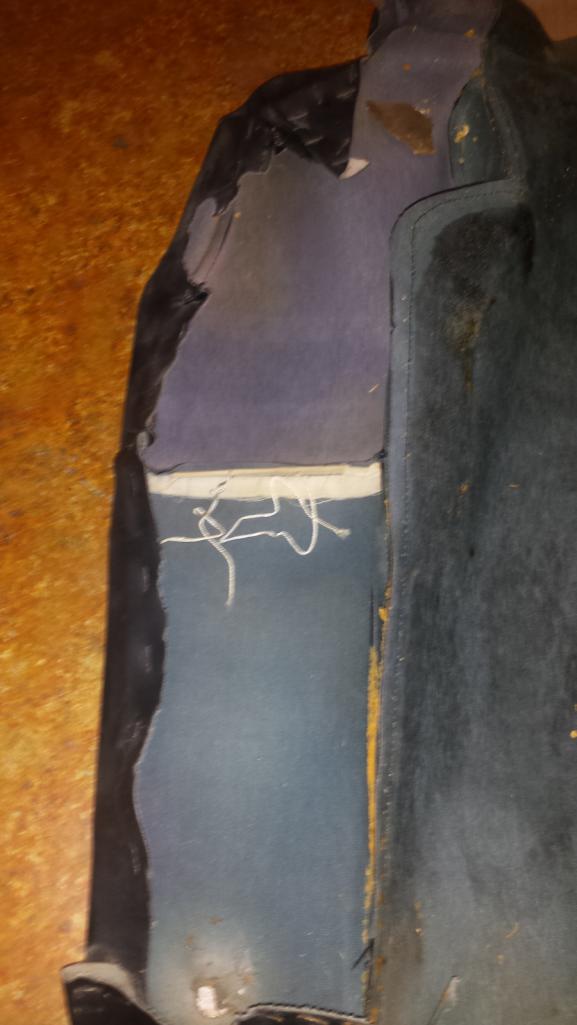 And here is the cord system. 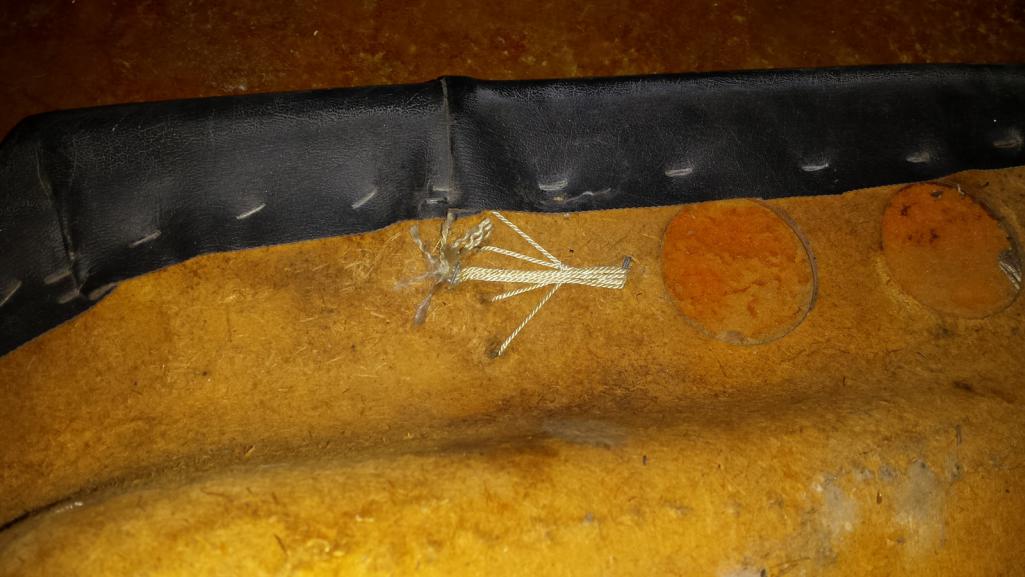 It looks complicated at first, but it isn't. There are four holes drilled into the card along where the seam will lie and two cords feed up through pairs of holes to form two loops around the wire hold down like this. 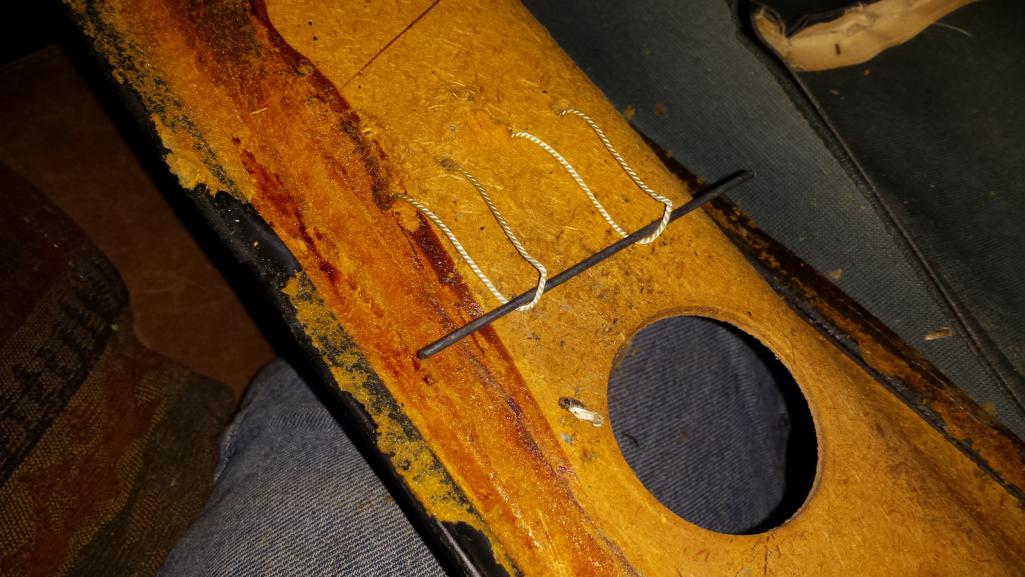 When installed, those cords feed up through a slit in the foam before catching the wire. 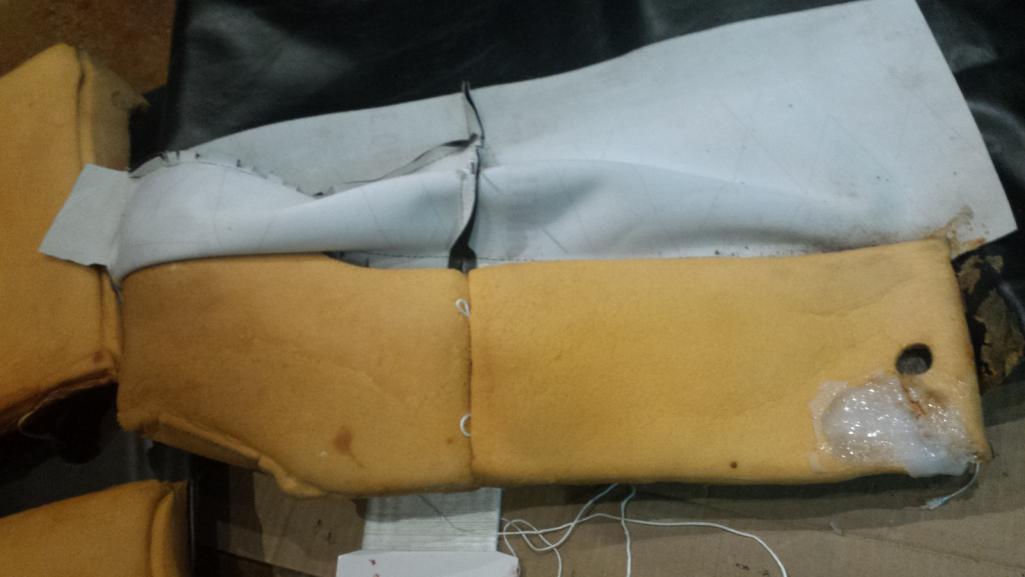 |
|
|
|
| bbrock |
Feb 19 2018, 12:26 AM
Post
#275
|
|
914 Guru Group: Members Posts: 5,269 Joined: 17-February 17 From: Montana Member No.: 20,845 Region Association: Rocky Mountains |
Backpad continued...
As a side note, note the big glob of silicone to fill a gouge in the foam. This didn't work very well and was a noticeably different texture when the vinyl was stretched over. So I pulled out the silicone and replaced it with a foam patch. The reapire is undetectable in the finished pad. 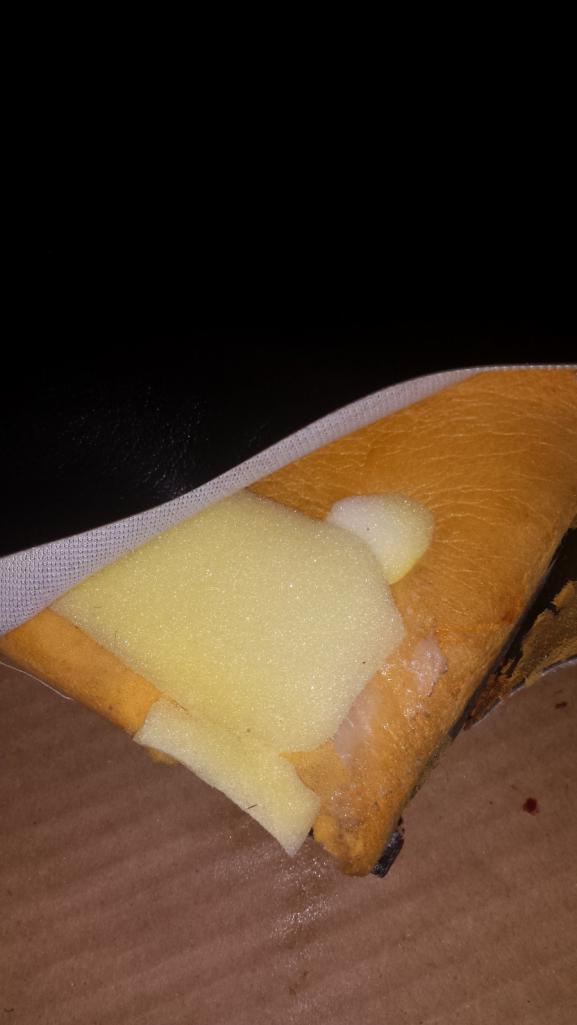 The vinyl kit doesn't come with a pocket for the wire hold down, so I just sewed it to the seam flap with 3/16" upholstery cord. 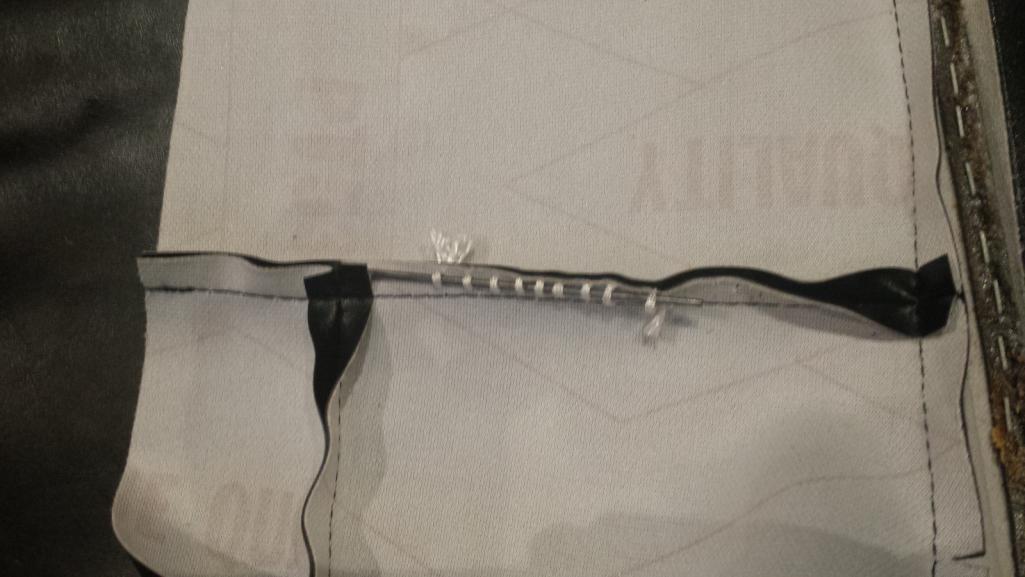 I learned the hard way that when stapling the beading strip to the vinyl and card, it is important to line up the bolster seam with the holes for the cording on the card first, then stretch the vinyl up and down from that point as you staple the rest of the beading. Then when you glue the foam to the card, line up the slit in the foam with the holes and seam, and make sure you scrunch the foam together tight over that slit. Otherwise, you'll wind up with a gap in the foam that will leave a dead air space. The pull the vinyl over the seam and hook the two loops of cord coming up through the card and foam over each end of the wire hold down. Stretch the vinyl over the seam to the other side and pull at the seam over the back of the card and staple it in place with several staples. Use your still assembled side as a gude for how much to stretch. Next, pull the cords on the back side of the card to bull the wire hold down evenly down to the card. While keeping tension on the cords, tie an overhand knot as close to the holes as you can to tie the cords together. Then pull the cords down on the card and put several staples in place. Then pull the remaining ends of the cords up to the other side of the holes in the card, and staple again. Trim off the access cord. That replicates the factory tie down. 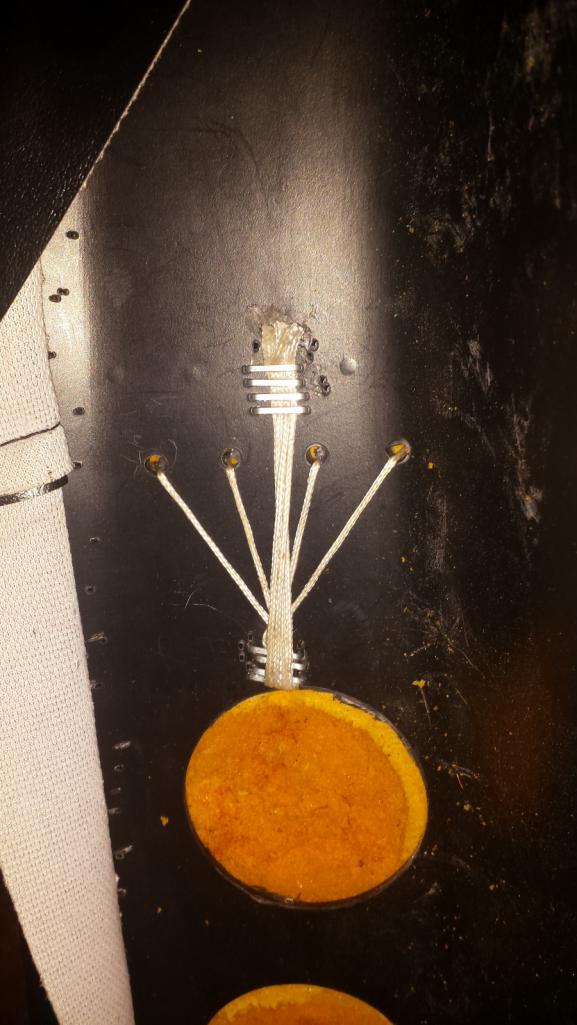 There are a few other things needed to use the plastic cards. First, you need to transfer the upper clips to attach the backpad tot he firewall, and the clips for the light to the new cards. The holes in the clips are just a smidge smaller than 3/16" so I had to drill them out to accept 3/16" pop rivets. The original rivets were countersunk into the card flush. On the first card I did, the pop rivets were proud to the card surface and show as small bumps after the vinyl was on. It doesn't look bad and will be hidden behind the seat, but on the second card, I heated a rivet with a propane torch and pressed it down into the plastic to countersink. I didn't get it all the way as I didn't want to get the plastic too thin, but the rivets are a little less noticeable on that side. I'm trying to resist the urge to rip open the first side and redo that part. A big issue I had on the first one was that I learned the card needs to have a slot cut to allow the bottom of the side bolster to pull straight through and up like the factory did. That portion had rotted away on my originals, so I didn't discover this until I already had the vinyl mostly install and it was a challenge to hack a slot in without screwing up my work. The second one was easy to do with a sabre saw. 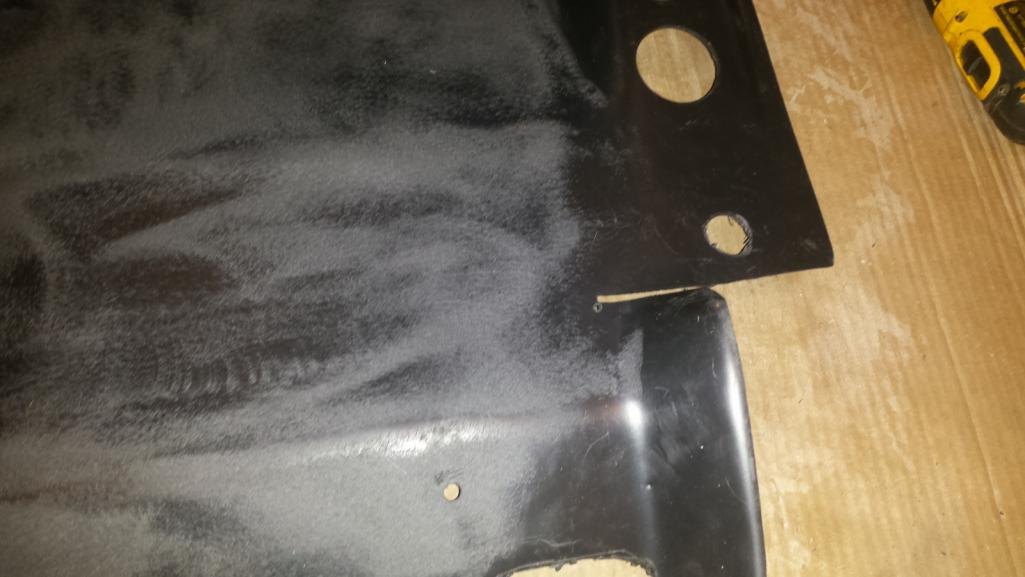 Also, the recess on the lower left of the driver's side panel wasn't deep enough to clear the metal tab that the e-brake cable cover plate attaches to. Again, sabre saw made short work of that. And finally, after gluing down the vinyl across the back of the first side I did, the final kept trying to pop up where it bends up to meet the center panel. I kept pressing it back down every couple hours and eventually it stayed in place. But for the second panel, I ran a random orbit sander over the plastic with a 60 grit disc to give the plastic a little more bite. I still had a little lifting, but I only had to press it back down a couple times before it stuck for good. 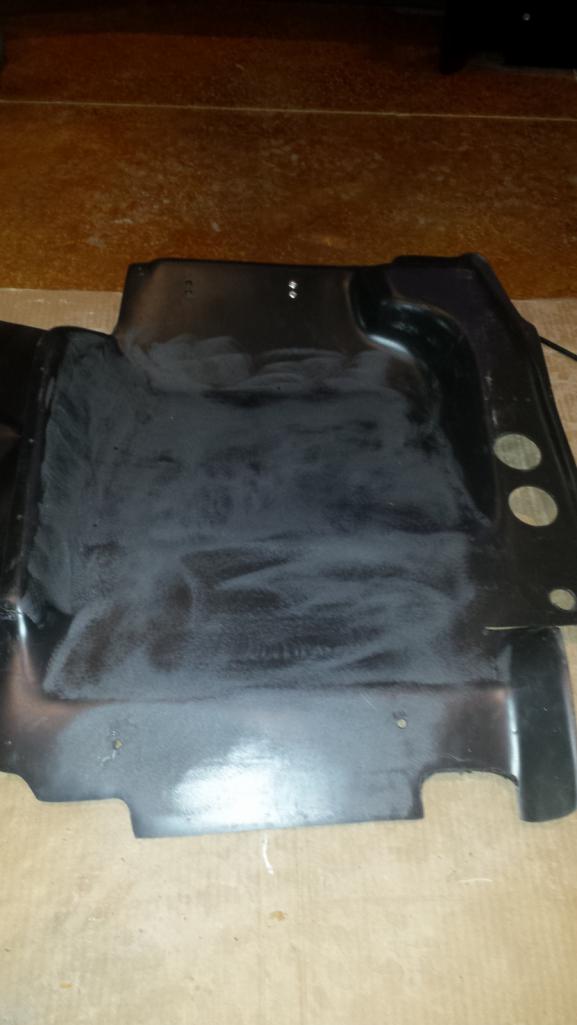 The last thing to do is screw the panels together. My only advice here is to lay every curse word you know out on the table before you start, because you will need every single one of them, and in as many combinations as you can muster. One of the hardest f'ing things I've done on this car. It's a bitch to find those holes through the vinyl you just stretch on, and a bitch to get the holes lined up even if you do. I wound up removing staples to pull vinyl back to expose holes, then poke holes in the vinyl over the holes and re-stapling. Then cursing my way into hell when none of that worked. I'm getting pissed off again just thinking about it, so good luck. But eventually, I prevailed. 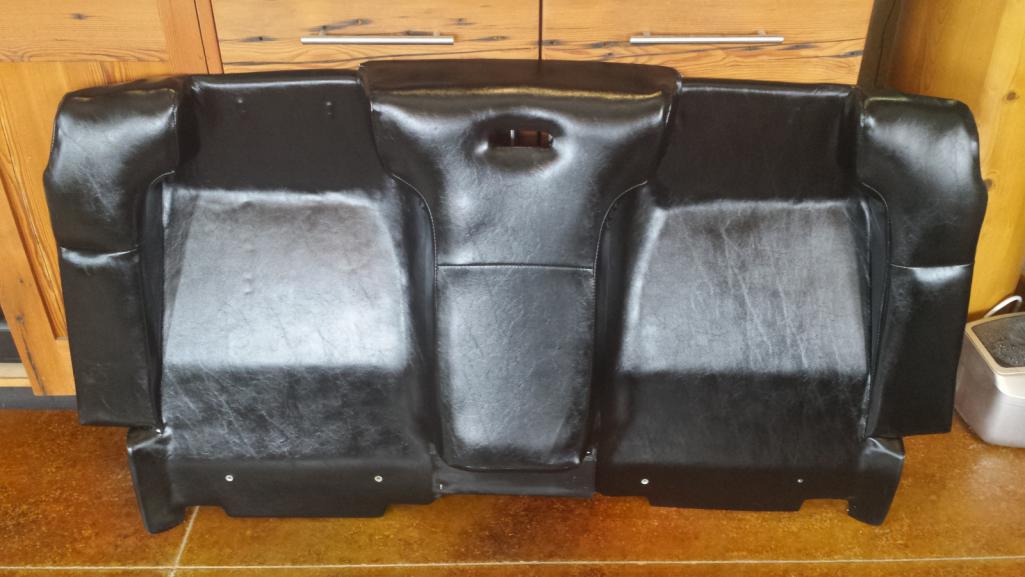 |
|
|
|
| mbseto |
Feb 19 2018, 01:23 PM
Post
#276
|
|
Senior Member Group: Members Posts: 1,257 Joined: 6-August 14 From: Cincy Member No.: 17,743 Region Association: North East States |
This is inspiring work. Keep it up!
|
|
|
|
| bbrock |
Feb 22 2018, 05:51 PM
Post
#277
|
|
914 Guru Group: Members Posts: 5,269 Joined: 17-February 17 From: Montana Member No.: 20,845 Region Association: Rocky Mountains |
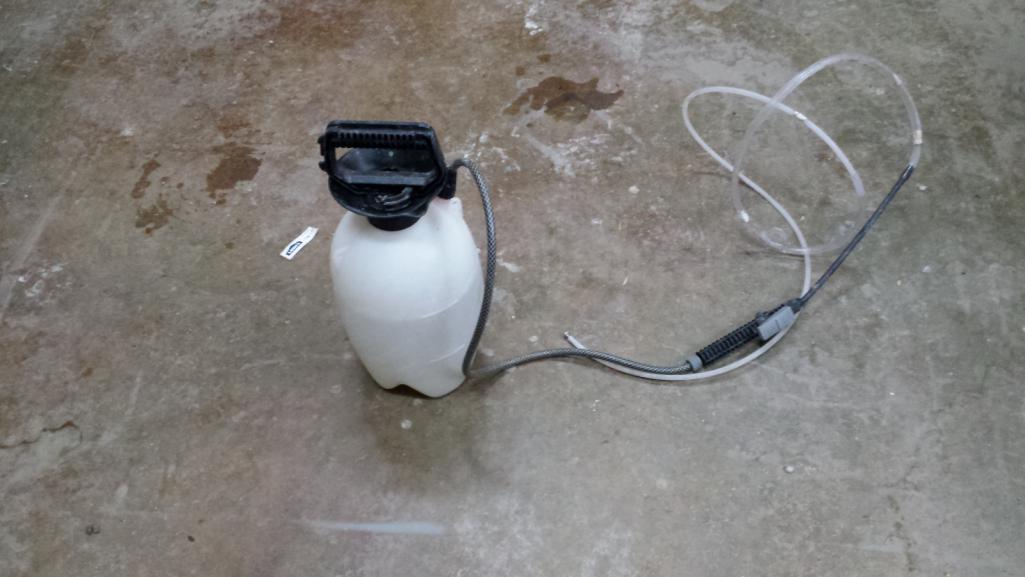
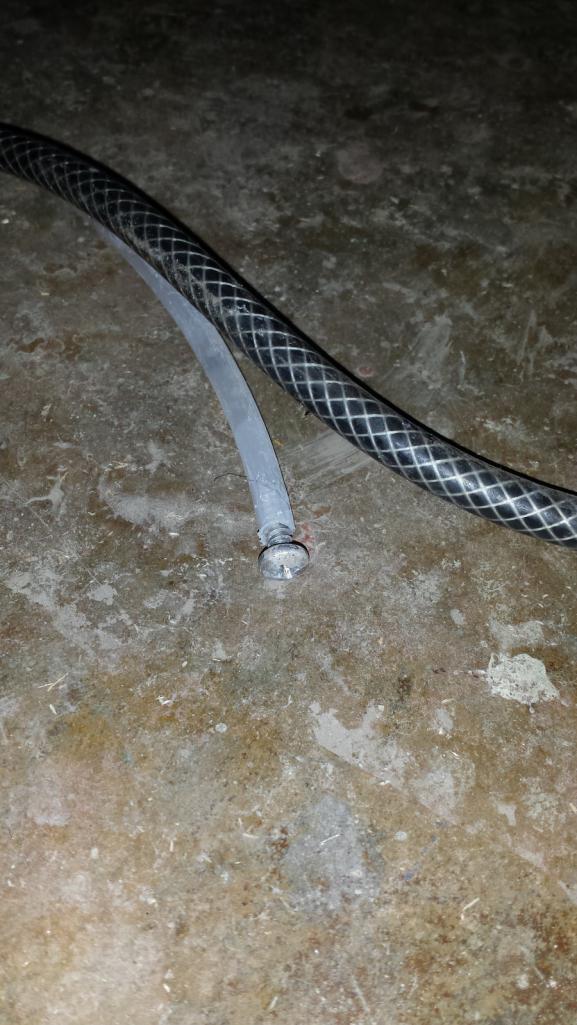
A couple items here to catch up. Over the weekend I worked on prepping the roll bar and sail panels for the big event. I wound up following Perry's method for treating cavities from this thread. I modified a cheap pump sprayer as a cavity sprayer. Just a matter of attaching the wand to the smallest tubing I could find at the local hardware, putting a few pinholes around the end, and plugging the end with an SS screw. It's not the greatest spray pattern, but good enough for wetting everything down.
  First was the Ospho (actually Klean-Strip brand which is the same stuff for $5 less per gallon at the local HD). I ran several passes through the roll bar and up into the inner cavity of the sail panels, rocking the car to distribute well. I let that soak for most of a day and then repeated the process 3X with water to make sure all of the acid was neutralized. Then I went around all of the seams and surfaces with a heat gun set on high. I made sure every surface got too hot to touch, and kept it hot until no hint of steam was coming out of anywhere. When I was finished, I went over everything again. I left the car overnight to make absolutely sure everything was dry. The next day, I sprayed two coats of the green Eastwood Internal Frame Cavity treatment in all of the cavities. I had forgotten how potent the solvent in this stuff is. After it dried about an hour, I ran compressed air through all of the cavities to flush out any flammable gases. Then I left it alone for another day. I tried to get pics with an endoscope, but they didn't come out well. Here they are anyway. One of the roll bar, and two of a sail panel. 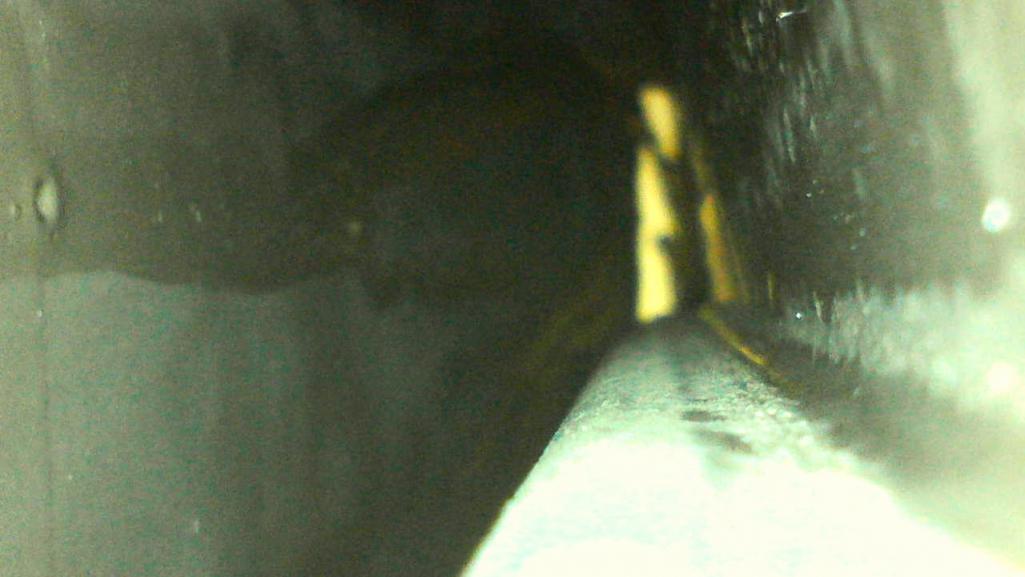 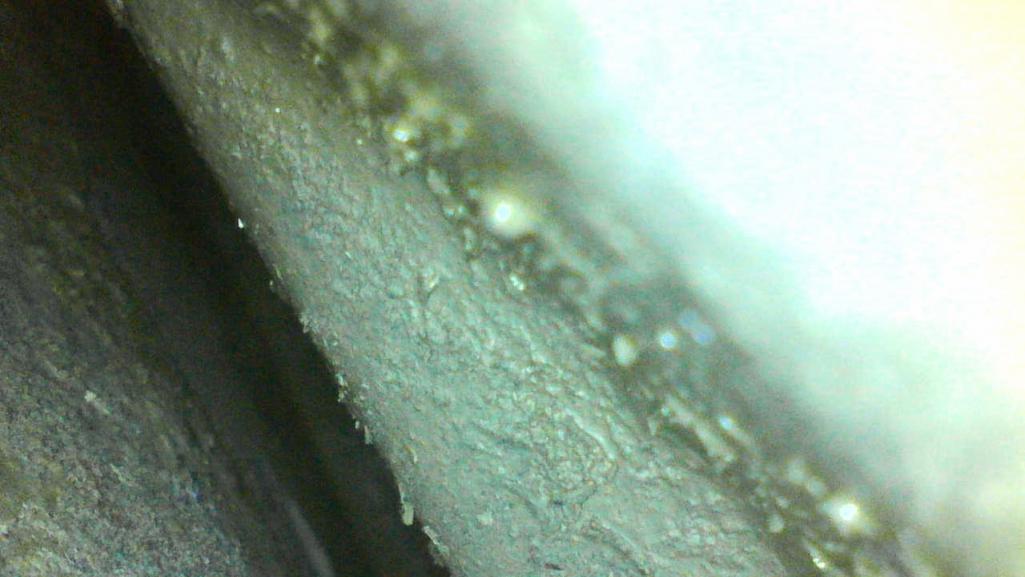 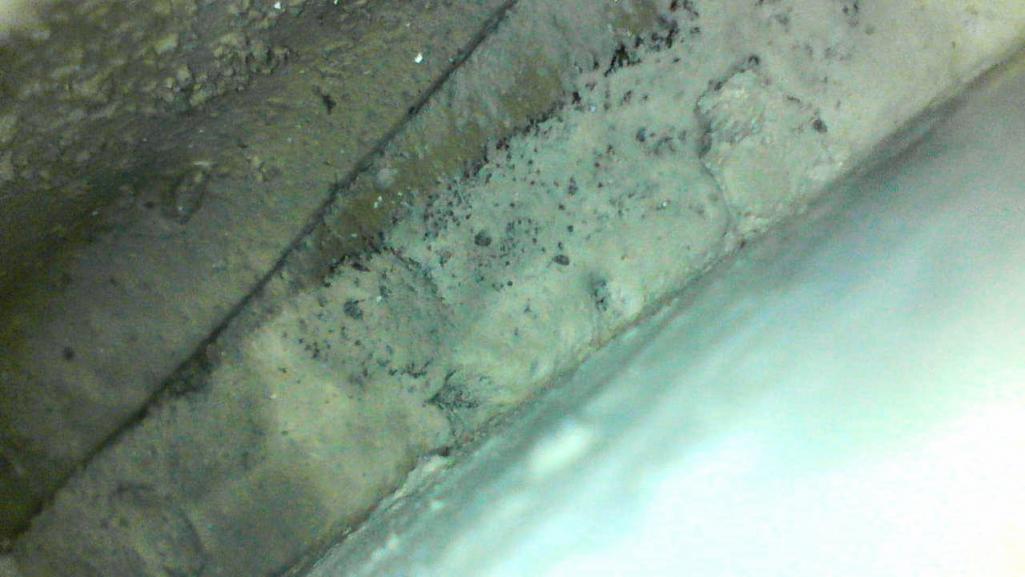 Then I welded in the patch under the trunk pivot on the driver's side but only got a little way through the grinding. 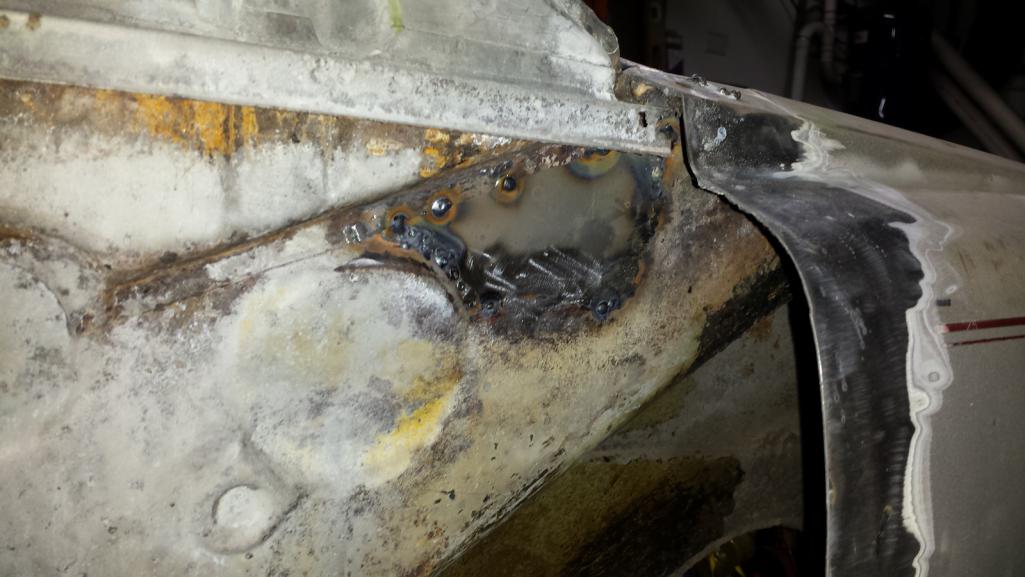 I need to finish a fair amount of grinding, strip some more of the inner fender to bare metal, and then I'll be ready to primer before welding on the sails and quarters. |
|
|
|
| bbrock |
Feb 22 2018, 06:11 PM
Post
#278
|
|
914 Guru Group: Members Posts: 5,269 Joined: 17-February 17 From: Montana Member No.: 20,845 Region Association: Rocky Mountains |
Sidetracked
Didn't get much done the last couple days. On Monday, we burned our last stick of firewood. So, of course, Tuesday night, the ignitor on our boiler crapped out. Temps were -7F outside which was a lot better than the -22F we registered the night before. Luckily, our house is very well insulated so by morning, we had only dropped 6 degrees and were still at an acceptable 60F. But our boiler also makes our hot water, so that sucked. The ignitor is a simple part to replace, but not available locally thanks to the worthless contractor who stopped supporting all the boilers they put in around here. I got on the phone to an online store I've used for parts before, and learned that he literally was selling the last of that part while I was leaving my voicemail message. He was nice and asked where I was. When he said he knew about Bozeman, MT because of its importance in Star Trek, I knew I was one namedrop away from getting the VIP treatment. Zefram Cochrane. If you are a Trekkie, you get it. This guy was a huge Trekkie and that did it. The gears of the machine started turning. He started making calls and within a half hour, had located what I needed in Milwaukie and had it drop shipped overnight to me. In the mean time, I had to keep the house warm which meant dropping everything yesterday to quickly cut some firewood. Done and done. I got home with the part a couple hours ago and just took my first hot shower in two days. Whew that feels good! (IMG:style_emoticons/default/dance.gif) Yes, this is a meander from the project, but it's life, and the two are interwoven. I did manage to get one thing done though. A few weeks ago while rummaging through parts, I discovered that the rear signal lens I thought had escaped damage from the great shelf collapse, had not. In fact, it was way worse than the other. I didn't take a pic before starting repairs, but one of the mounting studs had been knocked sideways and created a series of cracks. I needed some of the watery Weld-on 4 solvent to repair it. That's the stuff that is thin so it flows by capillary action into the cracks and forms the bond. I learned from a local glass shop that the reason you can't find that stuff readily is because of post 9/11 shipping rules. It's too expensive to ship. But the guy gave me a slightly used tube of Weld-On 16 at no charge. This stuff is the consistency of syrup. The label shows acetone and MEK as the thinning solvents, so I thinned the syrup down with acetone to the right viscosity and tested it on an old, badly damaged, lens. It worked. I taped the lens I wanted to repair to hold the cracks tightly together, and flowed the solvent adhesive into all the cracks. It isn't ideal and you can see the cracks if you look for them, but you do have to look for them. In fact, I had to hold the lens at several angles against the light before I could get them to show in a picture. That will have to do. 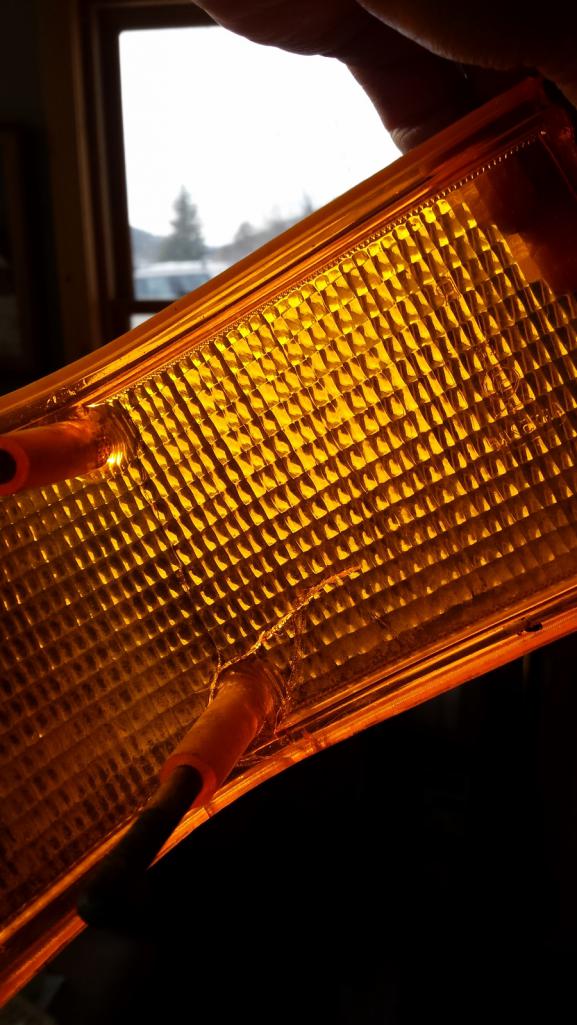 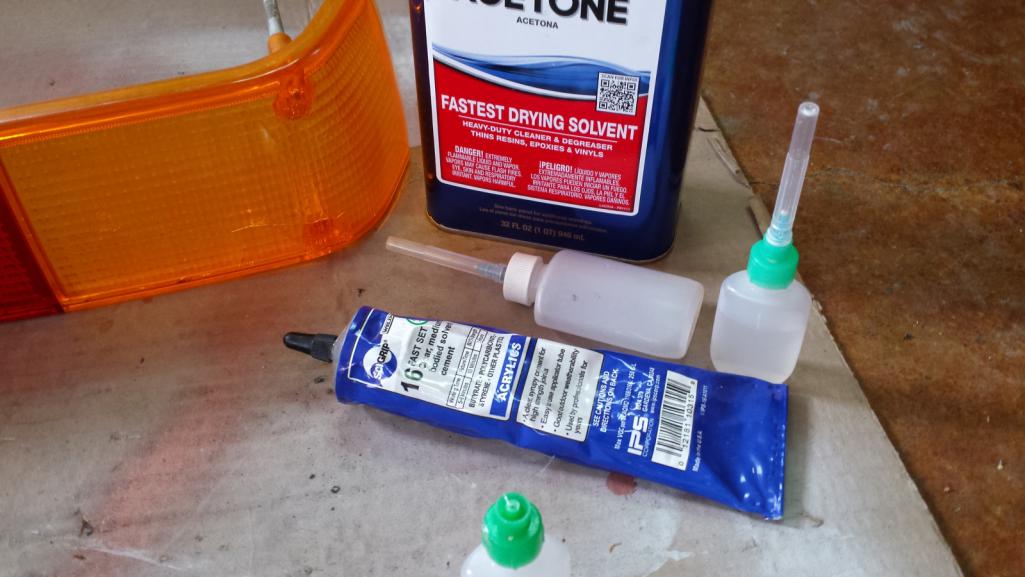 |
|
|
|
| bbrock |
Feb 23 2018, 11:56 PM
Post
#279
|
|
914 Guru Group: Members Posts: 5,269 Joined: 17-February 17 From: Montana Member No.: 20,845 Region Association: Rocky Mountains |
No Pretty Colors
Well, I just had to do it. My left eye has been feeling just slightly irritated at the end of the day this week. Last night I looked hard in the mirror since it wasn't improving. Sure enough, another fleck of crap embedded in the cornea. (IMG:style_emoticons/default/WTF.gif) This time, they had to break out the drill to get it out but I felt robbed because there were no psychedelic colors. Doctor said it had started to rust in there. I even took my fairly new, and very expensive prescription safety glasses in to get an opinion. The doctor said they looked like good glasses. Just bad luck I guess. I might need a frequent purchaser punch card myself. Not sure how much work I'll be able to accomplish this weekend. (IMG:style_emoticons/default/sad.gif) |
|
|
|
| doug_b_928 |
Feb 24 2018, 06:09 AM
Post
#280
|
|
Senior Member Group: Members Posts: 730 Joined: 17-January 13 From: Winnipeg Member No.: 15,382 Region Association: Canada |
Sorry to hear that Brent. It’s disconcerting when the physician comes at your eye with a needle. I also took appropriate precautions each time. With so much metal flying and bouncing off of everything somehow it seems one little spec will defy the laws of physics and find its way in there (IMG:style_emoticons/default/sad.gif). Last time I had it done they said they see one person per week for it due to grinding.
|
|
|
|
|
1 User(s) are reading this topic (1 Guests and 0 Anonymous Users)
0 Members:

|
Lo-Fi Version | Time is now: 18th April 2026 - 06:36 PM |
Invision Power Board
v9.1.4 © 2026 IPS, Inc.