|
|
|
Porsche, and the Porsche crest are registered trademarks of Dr. Ing. h.c. F. Porsche AG.
This site is not affiliated with Porsche in any way. Its only purpose is to provide an online forum for car enthusiasts. All other trademarks are property of their respective owners. |
|
|

  |

| nick mironov |
 May 14 2007, 10:07 PM May 14 2007, 10:07 PM
Post
#1
|
|
nickm  Group: Members Posts: 204 Joined: 12-June 05 From: San Francisco, CA Member No.: 4,264 |
This shows how to re-upholster late model backpad and seats using pre-made kits.
This thread should nicely complement the excellent How to Restore Headrest, Tutorial with Pictures thread in the classics forum. My kits came from Autos International - ask for Auggie. Nice guy, very helpful, did extra research for me, sent samples, and used custom fabric and perforation. I also found kits at World Upholstry, but they did not want to deal with other than vinyl or leather fabric, and I wanterd the perforated suede. I think that there are other upholstery kits available as well. Basic costs are about $200 a seat and $200 for the backpad. Mine were a little more because of the perforated "suede" material from Miami Corp that I elected to use. At first I thought that I would try to sew the upholstery myself, using the existing pieces as templates. I finally decided against it and I am very glad that I did not attempt to sew. The only problem that I had was that the seat headrest fabric fit too loosely. Autos International would have fixed it, but I took care of it myself by re-stitching some of the seams. I am sure that they would have done it better than I did, but I did not want to send them the headrests and wait to get them back. If you choose Autos International, I recommend that you send them your headrests for proper fitting. After shooting a number of pictures, I found that my camera was starting to act up and finally failed. Many of the pictures were unfortunately not salvageable, so I only chose the best ones, and the presentation is not as detailed as I had hoped it would be. Mt 914 is a V8 conversion with 16" 4-lug Superlight wheels. Carpet kits are by Morph. Make sure that you have a good staple gun and get 2 large cans of spray-on adhesive (I used 3M Super 77) and two tubes of rubber cement (I used Barge Cement) Very important: Remove the fabric from only one piece or seat at a time, leaving the other intact for you to reference the details during the re-assembly process. Finished Interior: Attached image(s) 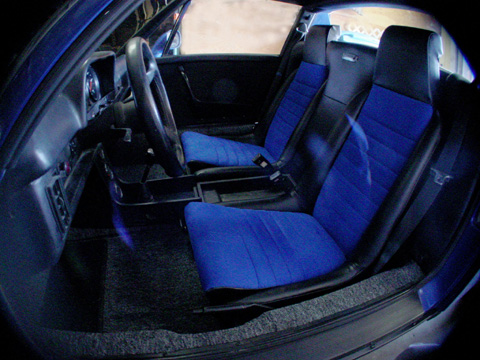 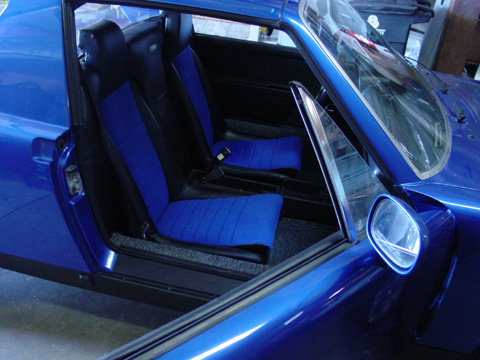
|
   |

 
|
| nick mironov |
May 14 2007, 10:16 PM
Post
#2
|
|
nickm Group: Members Posts: 204 Joined: 12-June 05 From: San Francisco, CA Member No.: 4,264 |
Backpad re-upholstering:
First remove the seats. Remove the backpad by removing the four screws at the bottom. Slide the bottom of the packpad down and toward the front of the car. Disassemble the backpad into three pieces by unscrewing the screws at the joints. The first picture shows the backpad removed and disassembled - backside view. The second picture shows the brackets at the tops of a side-piece of the backpad that hold the backpad in place against the rear firewall. Note that the hooks face up, so that is why it gets removed by pulling it down. Attached image(s) 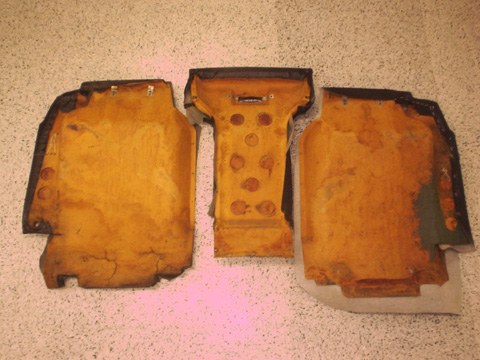 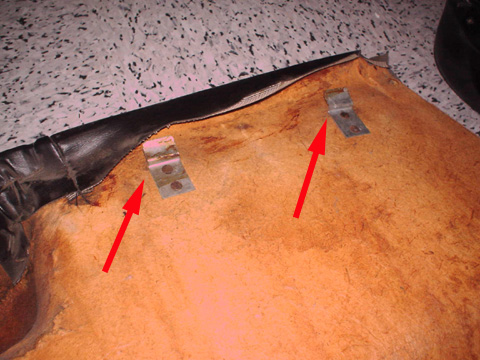
|
|
|
|
| nick mironov |
May 14 2007, 10:22 PM
Post
#3
|
|
nickm Group: Members Posts: 204 Joined: 12-June 05 From: San Francisco, CA Member No.: 4,264 |
Remove all of the staples form the back and then peel off the old vinyl upholstery until you expose the foam padding. Carefully peel the foam off the backing board to expose the stapled bead. Remove the staples (prying with a small screwdriver) from the bead that holds the upholstery in place along the edge of the foam, attempting to save the bead. If you damage it, you will need to come up with a replacement. It is likely fragile and will break. Even so, you can still re-use it as long as it is not completely trashed.
Attached image(s) 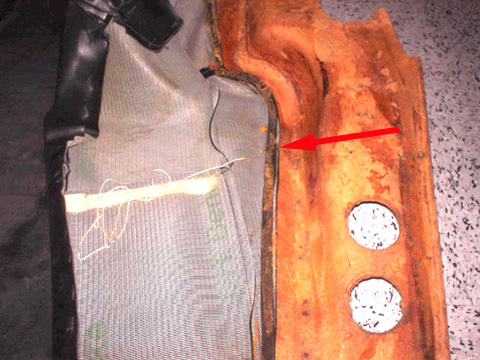
|
|
|
|
| nick mironov |
May 14 2007, 10:25 PM
Post
#4
|
|
nickm Group: Members Posts: 204 Joined: 12-June 05 From: San Francisco, CA Member No.: 4,264 |
Repair any damage to the backing board. I used fiberglass resin and mesh. Any repairs on the front need to be made smooth because any imperfection will telegraph through the new vinyl upholstery covering you will be gluing down later. Repairs on the back can be rough - up to you.
Attached image(s) 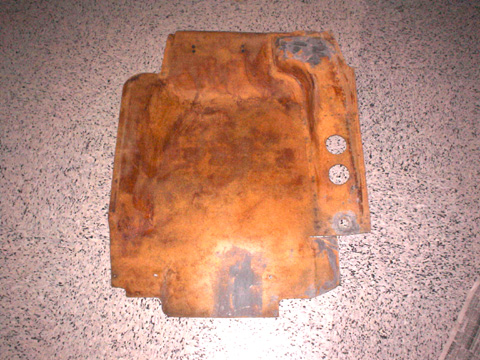 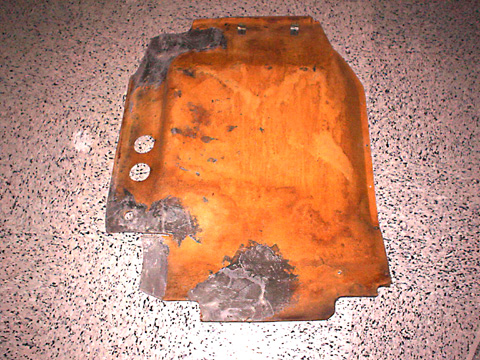
|
|
|
|
| nick mironov |
May 14 2007, 10:32 PM
Post
#5
|
|
nickm Group: Members Posts: 204 Joined: 12-June 05 From: San Francisco, CA Member No.: 4,264 |
Now you are ready to install the new upholstery.
Start by laying the seam into the heel of the contour and then overlay the bead you salvaged over the seam. Start stapling form the top and stretch the seam away from the top as you staple from top to bottom - very important. The first picture shows the foam pad just laying there on the left. Its final position is to the right of the bead. The second picture shows the foam pad glued in place. The installed foam pad must cover the bead, otherwise the fabric will not be in contact with the foam and will have air pockets. Attached image(s) 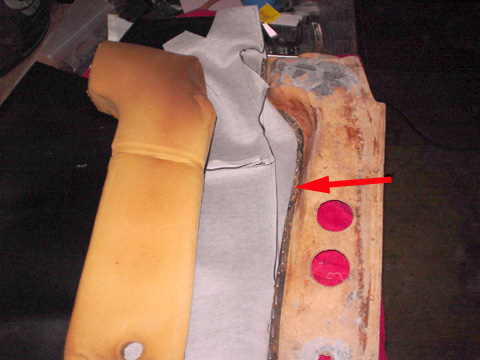 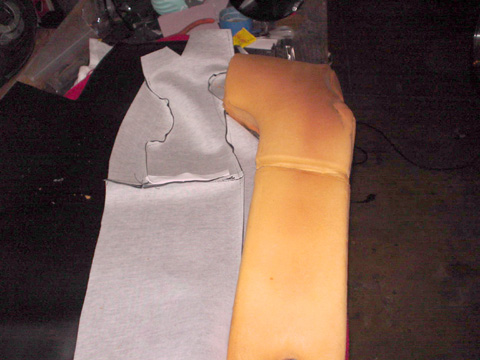
|
|
|
|
| nick mironov |
May 14 2007, 10:37 PM
Post
#6
|
|
nickm Group: Members Posts: 204 Joined: 12-June 05 From: San Francisco, CA Member No.: 4,264 |
Fill any tears and gouges in the padding with clear silicone seal and let it set. I found that silicone seal had a similar density to the foam after it dried and later, after the upholstery was finished, I could not tell where it was applied.
Attached image(s) 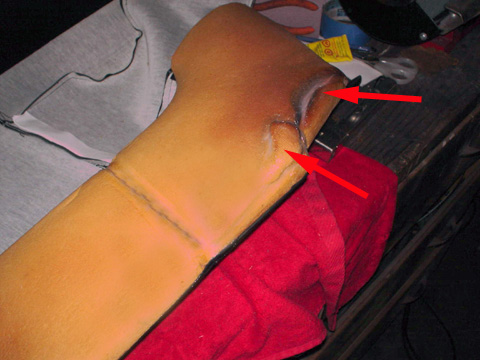
|
|
|
|
| nick mironov |
May 14 2007, 10:45 PM
Post
#7
|
|
nickm Group: Members Posts: 204 Joined: 12-June 05 From: San Francisco, CA Member No.: 4,264 |
This is where the camera failed, so I did not get useful pictures of the process of stretching the fabric over the backboard.
Start by stretching the fabric over the foam padding and stapling the back. This can be hard work on your fingers - really pull on the material. Then spray the entire backboard and back of the fabric with the spray-on contact adhesive. Let it dry - very important. Go do something else while it dries. If you do not let it dry, the two parts will not stick to each other and you will have serious problems. Don't rush the drying process - very, very important. When the spray-on adhesive is dry, stretch the fabric over the front of the backboard, careully filling in the nooks and crannys with fabric using your fingers to push it in place - it will stick. The adhesive is fairly forgiving, so you can still pull it up and redo somthing if you make a mistake. After you are done with the front, turn the backboard over and trim the ends (look at the original installation to see the techniques used for both inside and outside corners. Apply spray adhesive to both the backboard and the material, let dry, and then stretch around. Attached image(s) 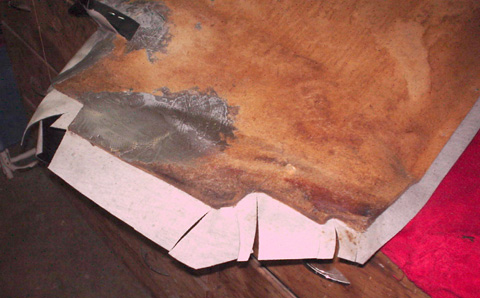 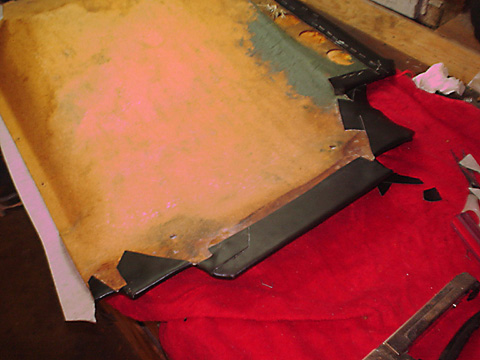
|
|
|
|
| nick mironov |
May 14 2007, 10:49 PM
Post
#8
|
|
nickm Group: Members Posts: 204 Joined: 12-June 05 From: San Francisco, CA Member No.: 4,264 |
This is one finished side. Repeat the process on the other side.
Attached image(s) 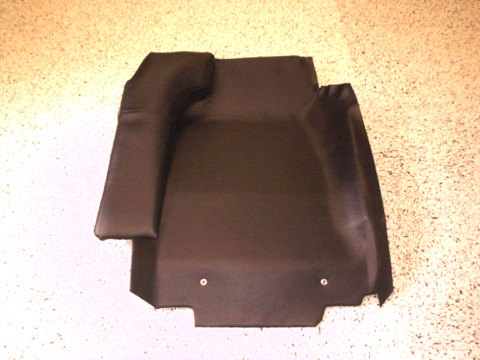
|
|
|
|
| nick mironov |
May 14 2007, 10:54 PM
Post
#9
|
|
nickm Group: Members Posts: 204 Joined: 12-June 05 From: San Francisco, CA Member No.: 4,264 |
Next work on the center pad. This is very easy compared to the side pieces.
Remove the staples from the back and peel off the fabric. You will not need to remove the foam padding. Fill tears and gouges with clear silicone seal. Check the condition of the interior light mounting brackets. I don't know what they are suposed to look like, but mine were obviously screwed up, so I had to make some new ones. Stretch the fabric over the foam pad and staple the rear. Cut the hole for the light and either glue or staple the flaps. Examine how the flaps were cut on the removed original piece. Attached image(s) 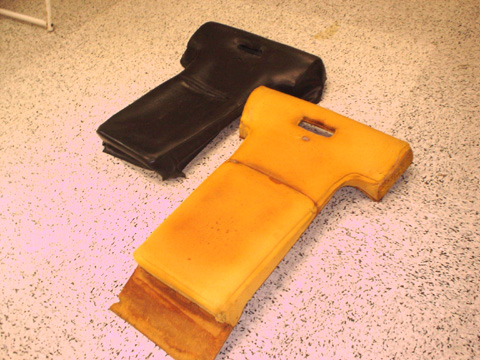 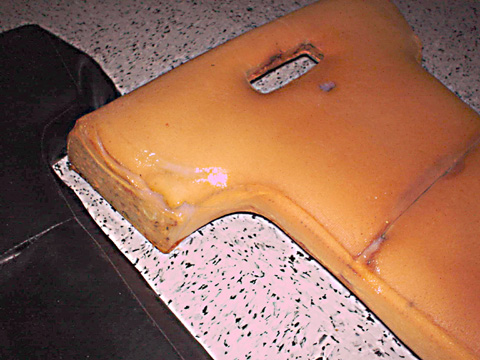 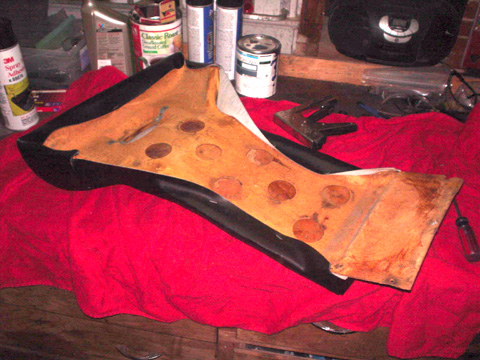
|
|
|
|
| nick mironov |
May 14 2007, 10:57 PM
Post
#10
|
|
nickm Group: Members Posts: 204 Joined: 12-June 05 From: San Francisco, CA Member No.: 4,264 |
Reassemble the three pieces - two side pieces and one center piece. Reinstall using the reverse of the removal process, and you are done with the packpad.
This might be a good time to fix you rear glass if it is loose in its frame - before you re-install the backpad. Attached image(s) 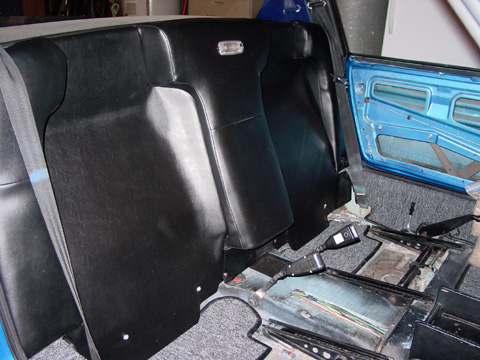 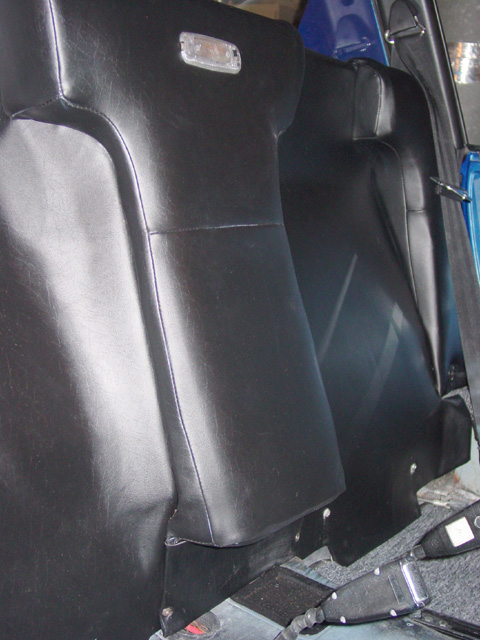
|
|
|
|
| nick mironov |
May 14 2007, 11:01 PM
Post
#11
|
|
nickm Group: Members Posts: 204 Joined: 12-June 05 From: San Francisco, CA Member No.: 4,264 |
The seats are next.
Disassemble only one at a time - you will need the un-touched seat to remember the various details. Take pictures as well. Start by removing the bottom seat cushion. Pull up on the back of it, and then pull it out. Note the small hook/bracket on the front that holds it to the seat frame. Attached image(s) 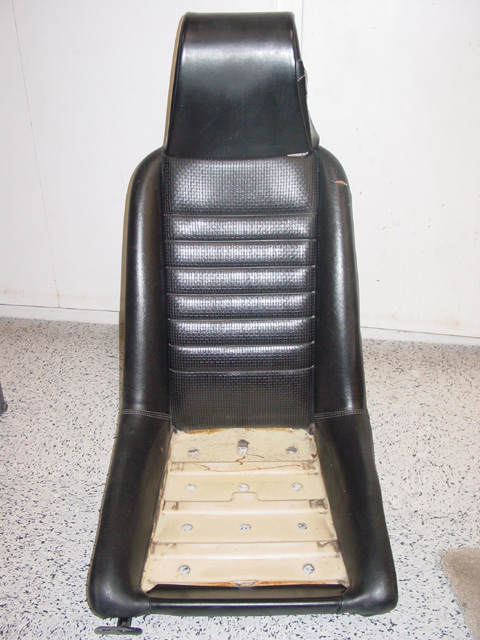
|
|
|
|
| nick mironov |
May 14 2007, 11:04 PM
Post
#12
|
|
nickm Group: Members Posts: 204 Joined: 12-June 05 From: San Francisco, CA Member No.: 4,264 |
Remove two screws on the back of the headrest that hold the cover flap in place. Then remove the two srews behind the flap. The inner screws hold the headrest to the seat.
Attached image(s) 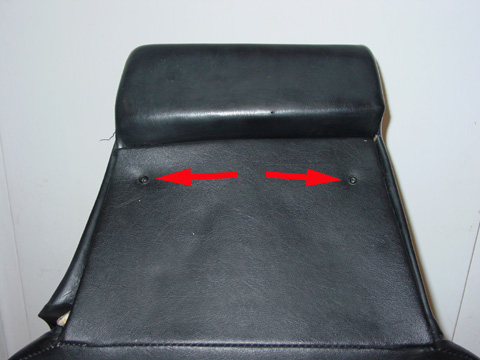 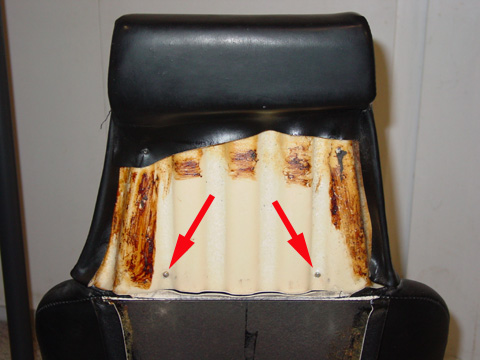
|
|
|
|
| nick mironov |
May 14 2007, 11:09 PM
Post
#13
|
|
nickm Group: Members Posts: 204 Joined: 12-June 05 From: San Francisco, CA Member No.: 4,264 |
Remove the backpad. Note the three hooks at the base of the backpad at the back of the seat. Starighten them out with needlenose pliers and unhook the bottom of the backpad - see second picture. Swing the bottom of the backpad up and the top will come right off. It comes off very easy - if you need to force something, you have not completely freed the backpad from the seat.
Attached image(s) 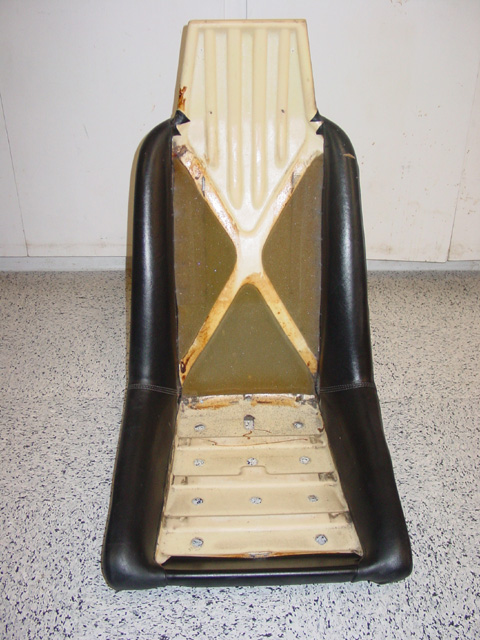 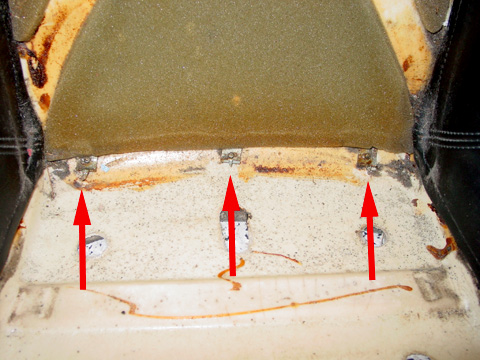
|
|
|
|
| nick mironov |
May 14 2007, 11:09 PM
Post
#14
|
|
nickm Group: Members Posts: 204 Joined: 12-June 05 From: San Francisco, CA Member No.: 4,264 |
This picture shows the backside of the backpad. Note the locations and arrangment of the pieces.
Attached image(s) 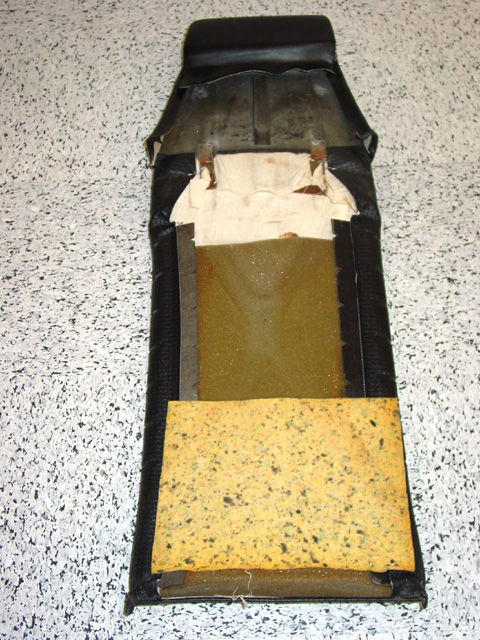
|
|
|
|
| nick mironov |
May 14 2007, 11:13 PM
Post
#15
|
|
nickm Group: Members Posts: 204 Joined: 12-June 05 From: San Francisco, CA Member No.: 4,264 |
Now remove the seat rails using a hex key on the attachment bolts.
For eveyone who ever wanted to know how to remove the seats from the car, note the bracket that you need to push in addition to operating the regular slider bracket. You need to release both brackets on both tracks at the same time to release the seat. It then simply slides forward and off the tracks. Attached image(s) 
|
|
|
|
| nick mironov |
May 14 2007, 11:16 PM
Post
#16
|
|
nickm Group: Members Posts: 204 Joined: 12-June 05 From: San Francisco, CA Member No.: 4,264 |
Remove the seat cover fabric. Note that it is held in place along the inside of the seat using bent hooks - same as the bottom of the backpad. Straighten them out with needlenose pliers. Then pull the bead off the hooks.
Attached image(s) 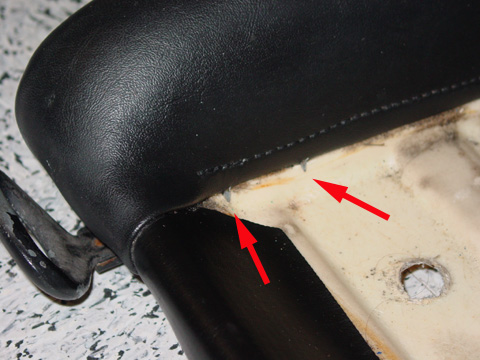 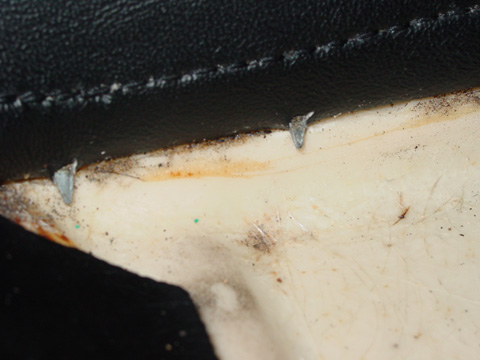 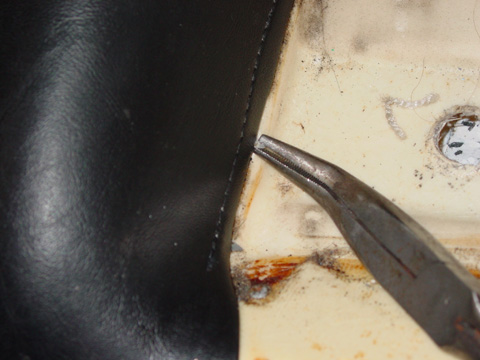 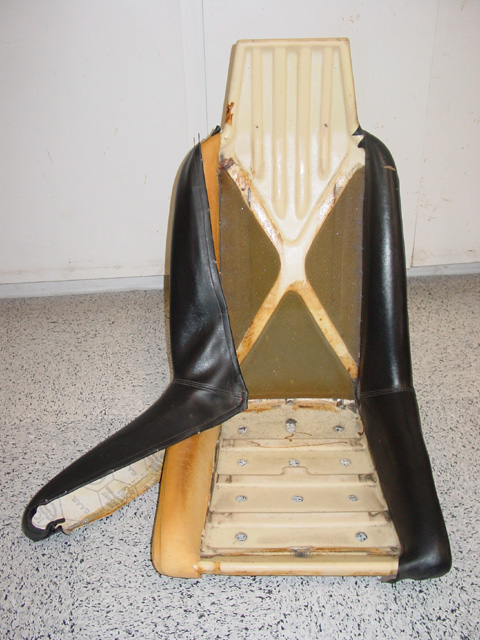
|
|
|
|
| nick mironov |
May 14 2007, 11:18 PM
Post
#17
|
|
nickm Group: Members Posts: 204 Joined: 12-June 05 From: San Francisco, CA Member No.: 4,264 |
Pull the wire beads out from the side pockets. I put one end in the vise to hold it and then pulled the fabric off of it.
Attached image(s) 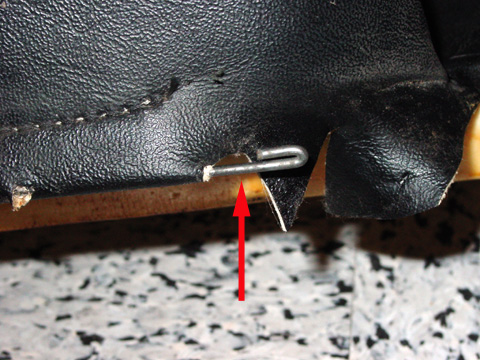 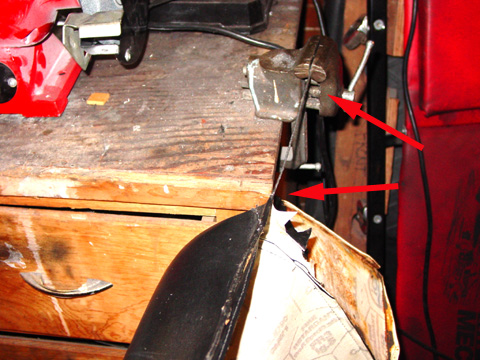
|
|
|
|
| nick mironov |
May 14 2007, 11:22 PM
Post
#18
|
|
nickm Group: Members Posts: 204 Joined: 12-June 05 From: San Francisco, CA Member No.: 4,264 |
Disassemble the backpad. Very carefully, using your fingers, separate the padding from the backing. Mine was all glued, but came apart reasonably well. I used a razor knife as a scalpel tslice the foam where the glue was too firm to simply peeloff the foam. Pull out the wire bead from the bottom pocket.
Attached image(s) 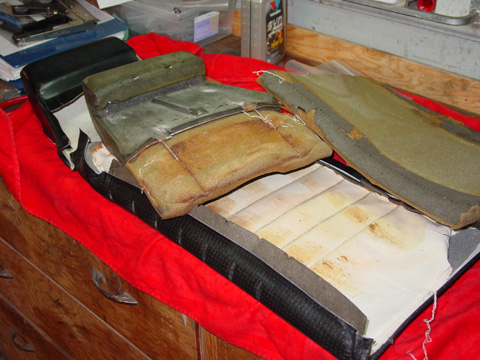 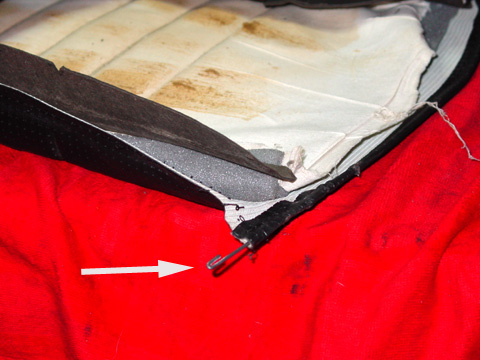
|
|
|
|
| nick mironov |
May 14 2007, 11:29 PM
Post
#19
|
|
nickm Group: Members Posts: 204 Joined: 12-June 05 From: San Francisco, CA Member No.: 4,264 |
You are now ready to start re-upholstering the seat.
Glue on the front piece using spray adhesive. Make sure that each of the hooks has a sharp point and is pointing outward. Insert the wire beads into the pockets on both sides. Wrap the new kit fabric around the back of the seat - like putting a coat on it. Start in the heel of the seat - by piercing the pointed hooks through the fabric above the wire bead. Stretch the fabric and work you way toward the front and up. Bend the hooks over as you go to secure the bead down. Attached image(s)  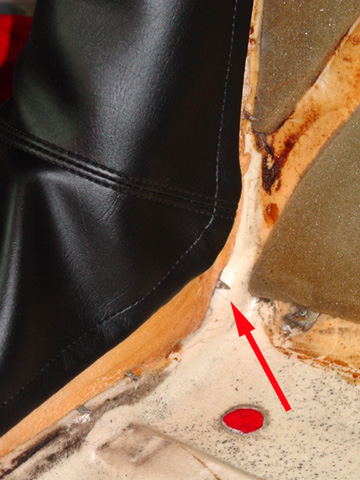
|
|
|
|
| nick mironov |
May 14 2007, 11:30 PM
Post
#20
|
|
nickm Group: Members Posts: 204 Joined: 12-June 05 From: San Francisco, CA Member No.: 4,264 |
Work the fabric by stretching the wrinkles out.
Attached image(s) 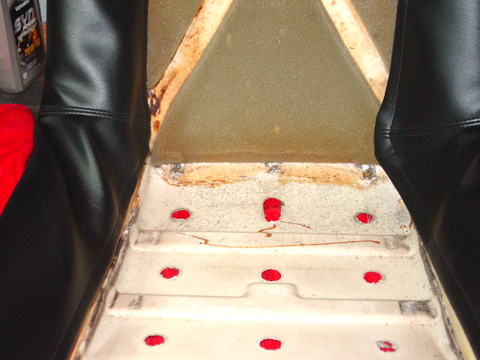 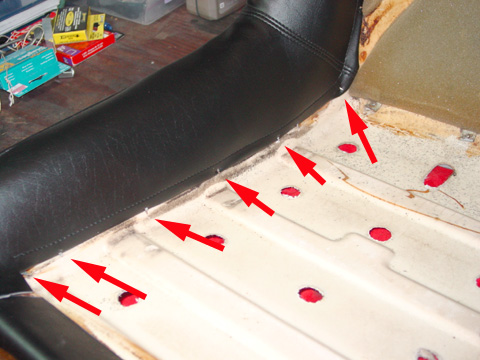
|
|
|
|
|
1 User(s) are reading this topic (1 Guests and 0 Anonymous Users)
0 Members:

|
Lo-Fi Version | Time is now: 28th June 2026 - 06:14 PM |
Invision Power Board
v9.1.4 © 2026 IPS, Inc.