|
|
|
Porsche, and the Porsche crest are registered trademarks of Dr. Ing. h.c. F. Porsche AG.
This site is not affiliated with Porsche in any way. Its only purpose is to provide an online forum for car enthusiasts. All other trademarks are property of their respective owners. |
|
|

  |

| mb911 |
 Jan 11 2018, 06:13 PM Jan 11 2018, 06:13 PM
Post
#161
|
|
914 Guru  Group: Members Posts: 7,791 Joined: 2-January 09 From: Burlington wi Member No.: 9,892 Region Association: Upper MidWest |
Looks good.. Nice progress.. I did my hell hole the same way.. The shrinker/stretcher was the key for mine..
|
   |

 
|
| BENBRO02 |
Jan 11 2018, 10:26 PM
Post
#162
|
|
Member Group: Members Posts: 485 Joined: 6-March 15 From: Nokesville, Virginia Member No.: 18,493 Region Association: MidAtlantic Region |
QUOTE(raynekat @ Oct 1 2017, 04:43 PM)  Car Bone is great but a lot of people here in the States either don't know about them...or are scared because they are located in Poland. I've had nothing but good experiences with them. Plus they can custom reproduce anything if you furnish an example. I got a door jamb vin sticker from them and they did a great job. |
|
|
|
| defianty |
Jan 14 2018, 09:11 AM
Post
#163
|
|
Senior Member Group: Members Posts: 659 Joined: 9-August 06 From: Essex, UK Member No.: 6,621 Region Association: None |
I came across the photo whilst putting together the next instalment below and I thought I'd post it as a reminder of what the hell hole really looked like on first inspection. It truly looks awful but all those layers of paint had at least given the area some extra protection from the elements and acid. You can also see the reason I replaced the engine shelf - the huge hole is quite visible here.
(IMG:http://www.914world.com/bbs2/uploads_offsite/s6.postimg.org-6621-1515942701.1.jpg) |
|
|
|
| defianty |
Jan 14 2018, 09:11 AM
Post
#164
|
|
Senior Member Group: Members Posts: 659 Joined: 9-August 06 From: Essex, UK Member No.: 6,621 Region Association: None |
Finishing the hell hole meant I could then weld in a new trunk hinge support as I removed mine due to an exceptionally poor repair years ago. With that complete I could then refit the trunk lid I needed this on to enable me to line up the accident damaged rear quarter.
Most of this work I'd done months previous so it was great to finally see the end of this part of the project. So here's the story... Here's what I started with after chipping and sanding away at the bondo. As I mentioned before I knew there was damage there but it had been sculpted so well I didn't envisage it being as bad. It didn't take long to realise nothing in that area was going to be salvagable so I set about finding replacement panels. NOS and reproduction rear quarters aren't available so an offcut from another car was going to be my only option. (IMG:http://www.914world.com/bbs2/uploads_offsite/s6.postimg.org-6621-1515942714.1.jpg) (IMG:http://www.914world.com/bbs2/uploads_offsite/s6.postimg.org-6621-1515942714.2.jpg) I always had a small rust bubble in this area so this was no surprise. (IMG:http://www.914world.com/bbs2/uploads_offsite/s6.postimg.org-6621-1515942715.3.jpg) Investigating (IMG:http://www.914world.com/bbs2/uploads_offsite/s6.postimg.org-6621-1515942715.4.jpg) Absorbant foam, what a great idea! (IMG:http://www.914world.com/bbs2/uploads_offsite/s6.postimg.org-6621-1515942716.5.jpg) Over the years the seam sealer holding this in had split - no doubt encouraged by the accident. This had then let the water in. As a precation I'll be cutting out the other side and removing the foam. You can see in the background of this shot the replacement rear wing I found. (IMG:http://www.914world.com/bbs2/uploads_offsite/s6.postimg.org-6621-1515942716.6.jpg) After removing all the foam this part of the inner wing would need to be repaired. (IMG:http://www.914world.com/bbs2/uploads_offsite/s6.postimg.org-6621-1515942717.7.jpg) Repair underway. (IMG:http://www.914world.com/bbs2/uploads_offsite/s6.postimg.org-6621-1515942717.8.jpg) |
|
|
|
| defianty |
Jan 14 2018, 09:12 AM
Post
#165
|
|
Senior Member Group: Members Posts: 659 Joined: 9-August 06 From: Essex, UK Member No.: 6,621 Region Association: None |
Here's the replacement rear wing being cleaned up before installation. As is always the case with replacement panels, you never know if the replacement is actually any good. I actually wanted to use more of the wing but sadly the rest wasn't usable. I'll cover that at a later date when I get on to the B post repair.
(IMG:http://www.914world.com/bbs2/uploads_offsite/s6.postimg.org-6621-1515942729.1.jpg) Fingers crossed there's no rot in this one. (IMG:http://www.914world.com/bbs2/uploads_offsite/s6.postimg.org-6621-1515942731.2.jpg) Completely rust free, almost ready to use. (IMG:http://www.914world.com/bbs2/uploads_offsite/s6.postimg.org-6621-1515942731.3.jpg) |
|
|
|
| defianty |
Jan 14 2018, 09:12 AM
Post
#166
|
|
Senior Member Group: Members Posts: 659 Joined: 9-August 06 From: Essex, UK Member No.: 6,621 Region Association: None |
The damage wasn't just on the corner but also along the rear panel, again cleverly disguised with filler. This would need to be replaced too. Sourcing a rear panel took quite some time, when I first looked original panels were still available but priced at around £1K and I didn't fancy paying out that much. As my search continued the last NOS one I knew about was sold. Since this Restoration Design now reproduce this rear panel.
I'd need to replace everything marked here. (IMG:http://www.914world.com/bbs2/uploads_offsite/s6.postimg.org-6621-1515942744.1.jpg) So I cut it out! (IMG:http://www.914world.com/bbs2/uploads_offsite/s6.postimg.org-6621-1515942745.2.jpg) (IMG:http://www.914world.com/bbs2/uploads_offsite/s6.postimg.org-6621-1515942745.3.jpg) I found a couple of used rear panels in Germany but they were asking too much for my liking. Eventually Garold Shaffer helped me out and shipped this to me from the US for a decent price. (IMG:http://www.914world.com/bbs2/uploads_offsite/s6.postimg.org-6621-1515942745.4.jpg) It was going to need a fair bit of work but it was a good solid start. My mistake here, I think, was not using the entire panel and cutting it in half. Lining everything up was extremely difficult when I came to fit it and maybe it would have been easier if I'd left the panel in one piece. Another learning expreience. Cleaning up the rear panel. (IMG:http://www.914world.com/bbs2/uploads_offsite/s6.postimg.org-6621-1515942746.5.jpg) (IMG:http://www.914world.com/bbs2/uploads_offsite/s6.postimg.org-6621-1515942746.6.jpg) I'd need to weld up the badge hole as I've something different to go there I've been working on. (IMG:http://www.914world.com/bbs2/uploads_offsite/s6.postimg.org-6621-1515942747.7.jpg) Holes welded up. (IMG:http://www.914world.com/bbs2/uploads_offsite/s6.postimg.org-6621-1515942747.8.jpg) Lots to more to do but at this stage I realised it would be best to get the panel blasted. (IMG:http://www.914world.com/bbs2/uploads_offsite/s6.postimg.org-6621-1515942747.9.jpg) |
|
|
|
| defianty |
Jan 14 2018, 09:12 AM
Post
#167
|
|
Senior Member Group: Members Posts: 659 Joined: 9-August 06 From: Essex, UK Member No.: 6,621 Region Association: None |
After having the panel blasted I offered it up for its first fit along with the replacent corner panel. Lots of measuring ahead before it would finally be welded in.
(IMG:http://www.914world.com/bbs2/uploads_offsite/s6.postimg.org-6621-1515942766.1.jpg) Talking of measuring this is a prime example of what happens when you only measure one! This is me welding on an extra piece as I'd cut it 4mm too short. You can just about see the gap in the picture above. (IMG:http://www.914world.com/bbs2/uploads_offsite/s6.postimg.org-6621-1515942766.2.jpg) (IMG:http://www.914world.com/bbs2/uploads_offsite/s6.postimg.org-6621-1515942767.3.jpg) So it was at that stage I knew I'd need the trunk lid fitted to continue so I set about finishing the trunk floor and got to work on the hell hole. |
|
|
|
| defianty |
Jan 14 2018, 09:12 AM
Post
#168
|
|
Senior Member Group: Members Posts: 659 Joined: 9-August 06 From: Essex, UK Member No.: 6,621 Region Association: None |
With everything now in place I could continue.
Rear panel being tacked and screwed into place. (IMG:http://www.914world.com/bbs2/uploads_offsite/s6.postimg.org-6621-1515942776.1.jpg) Corner gusset fitted and corner section Rear wing fitted. (IMG:http://www.914world.com/bbs2/uploads_offsite/s6.postimg.org-6621-1515942777.2.jpg) Nice and straight finally. (IMG:http://www.914world.com/bbs2/uploads_offsite/s6.postimg.org-6621-1515942777.3.jpg) Getting the above straight and the corner section to line up took an incredible amount of time, measuring, measuring, measuring and head scratching over several days. The problem all stemmed from the replacement rear wing being a slightly different shape from the other side. It was only a few millimetres different but more than enough to throw everything out of line. Originally when I had everything in, what I thought was, the correct place - the corner light cluster fitted poorly and wouldn't make a seal. I even wondered if my cluster was bent and sourced a replacement to try. When that didn't fit I really was lost for a while. Anyway, with that and other issues beaten I was on to the finishing stretch. Bonnet on, panel gaps perfect, lights in and bumper on. One straight rear end with no bondo! (IMG:http://www.914world.com/bbs2/uploads_offsite/s6.postimg.org-6621-1515942777.4.jpg) That brings me all up to date again. There's a few welds to clean up on the rear end so that's the next small task. After that I'll be venturing under the sail panels to see what rusty delights are awaiting me. |
|
|
|
| ndfrigi |
Jan 14 2018, 09:42 AM
Post
#169
|
|
Advanced Member Group: Members Posts: 2,983 Joined: 21-August 11 From: Orange County Member No.: 13,474 Region Association: Southern California |
Wow Stephen! that is a very fast restoration and a beautiful build!
|
|
|
|
| Lucky9146 |
Jan 14 2018, 10:23 AM
Post
#170
|
|
Always Wanted A Bigger Go Cart Group: Members Posts: 1,711 Joined: 22-September 14 From: Poway California Member No.: 17,942 Region Association: Southern California |
QUOTE(defianty @ Jan 14 2018, 07:12 AM) Nice and straight finally. Getting the above straight and the corner section to line up took an incredible amount of time, measuring, measuring, measuring and head scratching over several days. The problem all stemmed from the replacement rear wing being a slightly different shape from the other side. It was only a few millimetres different but more than enough to throw everything out of line. Originally when I had everything in, what I thought was, the correct place - the corner light cluster fitted poorly and wouldn't make a seal. I even wondered if my cluster was bent and sourced a replacement to try. When that didn't fit I really was lost for a while. Anyway, with that and other issues beaten I was on to the finishing stretch. Bonnet on, panel gaps perfect, lights in and bumper on. One straight rear end with no bondo! (IMG:http://www.914world.com/bbs2/uploads_offsite/s6.postimg.org-6621-1515942777.4.jpg) That brings me all up to date again. There's a few welds to clean up on the rear end so that's the next small task. After that I'll be venturing under the sail panels to see what rusty delights are awaiting me. Impressive! Dang! Seeing this level of work and result I had to go back to see if I had actually read something correctly earlier in your thread and I found it from your June 16th 2017 post where someone had said: Nice fab work! From the looks of your skills, that body work will be no problem to sort out. Your response was: Thanks very much. However before starting this project I'd never done anything like this and I've only been welding a few months. I love a challenge. Have to say that I have done a bit of welding in my day but never to this level. Great work Stephen (IMG:style_emoticons/default/smilie_pokal.gif) Thanks for the great documentation and your experience. Oh and I used to work with a guy who used the word bonnet and I hadn't heard it many years so thanks for that too! (IMG:style_emoticons/default/white914.jpg) |
|
|
|
| defianty |
Jan 15 2018, 01:43 AM
Post
#171
|
|
Senior Member Group: Members Posts: 659 Joined: 9-August 06 From: Essex, UK Member No.: 6,621 Region Association: None |
Thanks again Jim. I'm getting excited, it's really progressing now and getting closer to being painted.
|
|
|
|
| Cairo94507 |
Jan 15 2018, 09:39 AM
Post
#172
|
|
Michael Group: Members Posts: 10,686 Joined: 1-November 08 From: Auburn, CA Member No.: 9,712 Region Association: Northern California |
Stephen - That rear end looks really nice (IMG:style_emoticons/default/smilie_pokal.gif) That is the way to correct a damaged rear for sure. (IMG:style_emoticons/default/beerchug.gif)
|
 |
|
| defianty |
Feb 3 2018, 04:24 AM
Post
#173
|
|
Senior Member Group: Members Posts: 659 Joined: 9-August 06 From: Essex, UK Member No.: 6,621 Region Association: None |
In this weeks episode of the Rust Explorer we take a look at the sail panels. (IMG:style_emoticons/default/laugh.gif)
There's no easy way of doing this without removing a lot of metal. This part of the rear quarter had been beaten to hell in a previous life and was covered in filler. It didn't take long to decide to cut that off and bin it. (IMG:http://www.914world.com/bbs2/uploads_offsite/s6.postimg.org-6621-1517653476.1.jpg) Originally I'd hoped I'd be able to repair the rust that was bubbling through above the door handle but on closer inspection the copious amount seam sealer that was stuffed there had failed. This resulted in a fair bit of corrosion and metal thinned beyond repair. This is where I had a couple of bubbles peeping through. (IMG:http://www.914world.com/bbs2/uploads_offsite/s6.postimg.org-6621-1517653477.2.jpg) It didn't get any better. (IMG:http://www.914world.com/bbs2/uploads_offsite/s6.postimg.org-6621-1517653478.3.jpg) So... off with the sail panel. I've not mentioned my hatred for drilling spot welds have I. I've tried multiple tools and have just decided it's a bugger of a job. Every tool seems to blunt so quickly. (IMG:http://www.914world.com/bbs2/uploads_offsite/s6.postimg.org-6621-1517653478.4.jpg) I've discovered opening up panels on a 914 is not like opening up presents on Christmas morning. Much too much disappointment in my opinion. Unless it was a present from an elderly distant great Aunt (IMG:style_emoticons/default/laugh.gif) (IMG:http://www.914world.com/bbs2/uploads_offsite/s6.postimg.org-6621-1517653479.5.jpg) (IMG:http://www.914world.com/bbs2/uploads_offsite/s6.postimg.org-6621-1517653479.6.jpg) That stuff hanging down is sponge - the water absorbing, rust inducing kind (IMG:style_emoticons/default/laugh.gif) Here's the underside of the removed sail panel, I think you can see just how thin the metal is here. Not savable. (IMG:http://www.914world.com/bbs2/uploads_offsite/s6.postimg.org-6621-1517653481.7.jpg) Fortunately after removing all the seam sealer and underseal the damage was only on the surface, again I got there in the knick of time. (IMG:http://www.914world.com/bbs2/uploads_offsite/s6.postimg.org-6621-1517653482.8.jpg) |
|
|
|
| defianty |
Feb 3 2018, 04:25 AM
Post
#174
|
|
Senior Member Group: Members Posts: 659 Joined: 9-August 06 From: Essex, UK Member No.: 6,621 Region Association: None |
Before the car gets painted the remaining painted areas are going to be media blasted. This area under the sail panel will be almost inaccessible so I'll be treating it now before putting it all back together.
A good coating if epoxy primer later and things are starting to look a lot tidier. The areas where the seams will be welded are coated in weld thru primer. (IMG:http://www.914world.com/bbs2/uploads_offsite/s6.postimg.org-6621-1517653499.1.jpg) Roger Bray did me a good deal on a pair of sail panels, now was the time to try them out. Getting everything lined up wasn't easy, well for me it wasn't. (IMG:style_emoticons/default/laugh.gif) (IMG:http://www.914world.com/bbs2/uploads_offsite/s6.postimg.org-6621-1517653500.2.jpg) I refitting the door latch mechanism so I could get everything lined up, at this stage I wanted to make sure I was heading in the right direction so the door gaps were perfect. Looking good, and measuring within 0.5mm all down the door. (IMG:http://www.914world.com/bbs2/uploads_offsite/s6.postimg.org-6621-1517653500.3.jpg) |
|
|
|
| defianty |
Feb 3 2018, 04:25 AM
Post
#175
|
|
Senior Member Group: Members Posts: 659 Joined: 9-August 06 From: Essex, UK Member No.: 6,621 Region Association: None |
You can't just do one side can you...
So the otherside received the same treatment. Tougher this side though as I need to replace the door jam too as that suffered in the accident. (IMG:http://www.914world.com/bbs2/uploads_offsite/s6.postimg.org-6621-1517653512.1.jpg) (IMG:http://www.914world.com/bbs2/uploads_offsite/s6.postimg.org-6621-1517653512.2.jpg) (IMG:http://www.914world.com/bbs2/uploads_offsite/s6.postimg.org-6621-1517653513.3.jpg) (IMG:http://www.914world.com/bbs2/uploads_offsite/s6.postimg.org-6621-1517653513.4.jpg) The sail panel obviously came from a different supplier originally and abielt a slightly thinner gauge steel it did fit slightly better. |
|
|
|
| defianty |
Feb 3 2018, 04:25 AM
Post
#176
|
|
Senior Member Group: Members Posts: 659 Joined: 9-August 06 From: Essex, UK Member No.: 6,621 Region Association: None |
Whilst I was in the area I need to attend to this jacking point too. Luckily the inner skin was unaffected so it was a simple case of cutting off and replacing. Nice simple job.
(IMG:http://www.914world.com/bbs2/uploads_offsite/s6.postimg.org-6621-1517653524.1.jpg) Ready to weld. (IMG:http://www.914world.com/bbs2/uploads_offsite/s6.postimg.org-6621-1517653525.2.jpg) Done. (IMG:http://www.914world.com/bbs2/uploads_offsite/s6.postimg.org-6621-1517653525.3.jpg) |
|
|
|
| defianty |
Feb 3 2018, 04:25 AM
Post
#177
|
|
Senior Member Group: Members Posts: 659 Joined: 9-August 06 From: Essex, UK Member No.: 6,621 Region Association: None |
I finally found a decent early passenger door. These are starting to get rare now in good condition and not easy to find in the UK. I was very close to buying one and shipping it from the US. Thanks to Retro Restorer in Oxfordshire for this.
(IMG:http://www.914world.com/bbs2/uploads_offsite/s6.postimg.org-6621-1517653537.1.jpg) And this is where we are now, all ready for lots of welding but close to finishing the body. (IMG:http://www.914world.com/bbs2/uploads_offsite/s6.postimg.org-6621-1517653538.2.jpg) Hopefully the next installment will see the body back in one piece (IMG:style_emoticons/default/laugh.gif) Well almost. And if I ever decide what colour to paint the thing it'll go off to paint. |
|
|
|
| maf914 |
Feb 3 2018, 07:16 AM
Post
#178
|
|
Not a Guru! Group: Members Posts: 3,049 Joined: 30-April 03 From: Central Florida Member No.: 632 Region Association: None |
Good photos and nice work.
Where does the vent tube from the door jam vent terminate? Does it actually move air? I have always wondered what the purpose was of the black plastic vent in the door jam. (IMG:style_emoticons/default/idea.gif) Attached image(s) 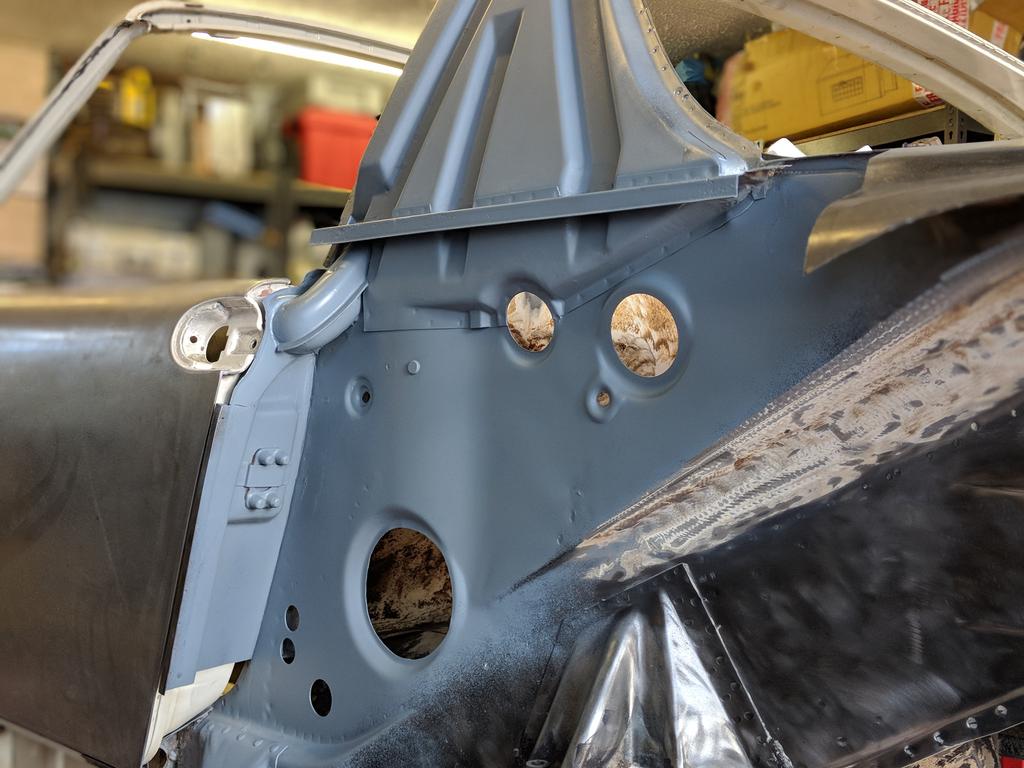
|
|
|
|
| defianty |
Feb 3 2018, 07:18 AM
Post
#179
|
|
Senior Member Group: Members Posts: 659 Joined: 9-August 06 From: Essex, UK Member No.: 6,621 Region Association: None |
QUOTE(maf914 @ Feb 3 2018, 01:16 PM) Good photos and nice work. Where does the vent tube from the door jam vent terminate? Does it actually move air? I have always wondered what the purpose was of the black plastic vent in the door jam. (IMG:style_emoticons/default/idea.gif) I don't have a photo but I it goes behind the back pad. I guess it's just to equalise cabin pressure but could be wrong. Interestingly European 914's didn't have the black plastic grill. |
|
|
|
| mepstein |
Feb 3 2018, 08:44 AM
Post
#180
|
|
914-6 GT in waiting Group: Members Posts: 20,790 Joined: 19-September 09 From: Landenberg, PA/Wilmington, DE Member No.: 10,825 Region Association: MidAtlantic Region |
QUOTE(defianty @ Feb 3 2018, 08:18 AM) QUOTE(maf914 @ Feb 3 2018, 01:16 PM) Good photos and nice work. Where does the vent tube from the door jam vent terminate? Does it actually move air? I have always wondered what the purpose was of the black plastic vent in the door jam. (IMG:style_emoticons/default/idea.gif) I don't have a photo but I it goes behind the back pad. I guess it's just to equalise cabin pressure but could be wrong. Interestingly European 914's didn't have the black plastic grill. You are right. Let’s some air out of the cabin. Helps the heat system as well. I don’t know about the euro cars but early didn’t have the round plastic vent grill. Mid and late cars do. |
|
|
|
|
1 User(s) are reading this topic (1 Guests and 0 Anonymous Users)
0 Members:

|
Lo-Fi Version | Time is now: 3rd July 2026 - 04:33 PM |
Invision Power Board
v9.1.4 © 2026 IPS, Inc.