|
|
|
Porsche, and the Porsche crest are registered trademarks of Dr. Ing. h.c. F. Porsche AG.
This site is not affiliated with Porsche in any way. Its only purpose is to provide an online forum for car enthusiasts. All other trademarks are property of their respective owners. |
|
|

  |

| scallyk9 |
 Jul 26 2017, 09:24 PM Jul 26 2017, 09:24 PM
Post
#21
|
|
Member  Group: Members Posts: 378 Joined: 16-October 16 From: Port Orchard, WA, USA Member No.: 20,499 Region Association: Pacific Northwest |
3. Finally, anyone know where to find a replacement for the hinge pin that is peened on both ends? Seems like it should be a common hardware part but I'm not even sure what it would be called. Closest I've found is a "headless rivet" and those don't seem easy to source. Alternatively, I'm guessing a rivet with low profile head would do. What have other people used?
Thanks in advance for any tips and advice. [/quote] I sourced that part from, dare I say it, AA about a year ago and it's in their catalog. Basically an allen bolt with a smooth shank through the assembly and only threaded at the end for a locknut which was supplied. Works great and just as smoothly as the original pin. |
   |

 
|
| URY914 |
Jul 27 2017, 04:35 AM
Post
#22
|
|
I built the lightest 914 in the history of mankind. Group: Members Posts: 133,219 Joined: 3-February 03 From: Jacksonville, FL Member No.: 222 Region Association: None |
[quote name='scallyk9' date='Jul 26 2017, 08:24 PM' post='2510532']
3. Finally, anyone know where to find a replacement for the hinge pin that is peened on both ends? Seems like it should be a common hardware part but I'm not even sure what it would be called. Closest I've found is a "headless rivet" and those don't seem easy to source. Alternatively, I'm guessing a rivet with low profile head would do. What have other people used? Thanks in advance for any tips and advice. [/quote] I sourced that part from, dare I say it, AA about a year ago and it's in their catalog. Basically an allen bolt with a smooth shank through the assembly and only threaded at the end for a locknut which was supplied. Works great and just as smoothly as the original pin. [/quote] You can reuse the original pin. With the amount of tension on it from the spring it will not back out. Install the pin in the handle so the end that is still "large" is at the top side of the handle. |
|
|
|
| bbrock |
Jul 27 2017, 08:25 PM
Post
#23
|
|
914 Guru Group: Members Posts: 5,269 Joined: 17-February 17 From: Montana Member No.: 20,845 Region Association: Rocky Mountains |
Well... if this was a part buried deep in the car and a PIA to replace, I wouldn't have even asked the question about repairing. But it's an easy 20 minute remove and replace job and I'm cheap, stubborn, and curious. A bad combination. (IMG:style_emoticons/default/screwy.gif)
So I did some googling on pot metal repair and discovered it CAN be repaired..... maybe. Here are the methods I found: 1. welding. Turns out SOME pot metals can be welded by a really skilled and experienced welder. That ain't me so moving on... 2. A product called Muggy Weld. This is a low melting temperature alloy used to solder pot metal and other white metals together. This looked like the best bet but it's $60 to get a small pack of sticks and flux so didn't pencil out for this little experiment. 3. Brazing. Like welding, it depends on the composition of the pot metal and the skill of the brazer. I thought about taking it somewhere to have a pro give it a try, but sounds rather risky. 4. Soldering. I'm pretty good at it and can do it myself. The part was headed to the scrap pile anyway, so I decided to give it a whirl. I decided to use silver solder because I thought it might be a bit stronger than lead. For heat, I used a propane torch. It actually went quite well. I had a nice, clean repair with solder that flowed out flat and down into the crack. Then I decided I would just touch it up a bit. (IMG:style_emoticons/default/051103-stupid4.gif) I got a little too high on the hole for the pin where the metal gets thin and partially blew out a bit of pot metal. The melting point of the pot metal is only a few degrees hotter than the solder, so it is tricky business. But I was already in at at this stage so I switched over to my 100w soldering iron used for seaming gutters and tried my hand at filling that blowout. It took some finesse, but I wound up with a pretty clean looking patch. Only time will tell how well it holds up. It might bust off on the first cold day. Or maybe it will last for years. It seems pretty strong though. 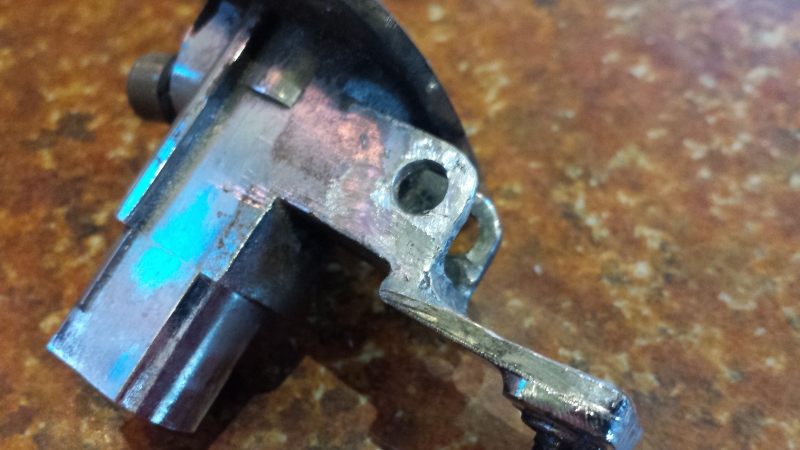 I think after it is rechromed, you won't be able to tell I was there. For the stud, I'm going to drill it out, countersink the outside of the hole, and solder in an M6 countersunk bolt that again, should disapear with chrome plating. scallyK9 and URY914, thanks for the tips on hinge pins. (IMG:style_emoticons/default/beerchug.gif) I managed to squish one of the heads down on this one to get it out in a reusable state, but I think that was just freakish luck. I'll be taking apart the other one for plating and it's good to know the pin can be reused. I might just JB Weld a little cap onto the cut end for extra measure. |
|
|
|
|
1 User(s) are reading this topic (1 Guests and 0 Anonymous Users)
0 Members:

|
Lo-Fi Version | Time is now: 29th May 2026 - 05:37 PM |
Invision Power Board
v9.1.4 © 2026 IPS, Inc.