|
|
|
Porsche, and the Porsche crest are registered trademarks of Dr. Ing. h.c. F. Porsche AG.
This site is not affiliated with Porsche in any way. Its only purpose is to provide an online forum for car enthusiasts. All other trademarks are property of their respective owners. |
|
|

  |

| Gatornapper |
 Aug 5 2019, 04:03 PM Aug 5 2019, 04:03 PM
Post
#121
|
|
Senior Member  Group: Members Posts: 1,290 Joined: 22-September 17 From: Woods west of Richmond, VA Member No.: 21,449 Region Association: South East States |
Well, well, well. No wonder!
HOW did this linkage shift at all?!?!? Put the 914 on the lift, pulled the front boot at the firewall, and.......THERE ARE NO BUSHINGS AT ALL IN THE COUPLER!!!! Not only that, the firewall bushing is not in the firewall, but loose on the shift rod behind the firewall! So apparently the bushings in the coupler were worn out, destroyed - and who knows what happened to them - no, no pieces laying in the boot. Maybe some bacteria ate them while in my friend's barn over the 12 years it was there....... And apparently the firewall bushing was pushed out after being installed - as it cannot move once the rod is inside it - and how did any mechanic miss that when re-connecting the coupler??????? Well, the good news is this: the new bushings (on the way) should have this tranny shifting like new! I can't wait! GN |
   |

 
|
| Gatornapper |
Aug 5 2019, 07:10 PM
Post
#122
|
|
Senior Member Group: Members Posts: 1,290 Joined: 22-September 17 From: Woods west of Richmond, VA Member No.: 21,449 Region Association: South East States |
QUOTE(euro911 @ Aug 3 2019, 11:36 AM)  There's 4 shift rod bushing locations in a late car. 1. The firewall bushing (figure 2). 2. The coupler bushing (pair) just aft of the firewall (also shown in figure 2). 3. The rear shift console housing (on the transaxle) where the rod enters it (not shown, but easy to find). 4. The ball cup bushing where the rear rod 'socket' contacts the lever in shift console (figure 1). The most difficult part of the job is while you're replacing the coupler bushings. The center 'pin' needs to be pressed out to remove the old bushings (or the remnants), and pressed back in after the new bushings are installed. The outer housing (fork) is structurally weak so one needs to be real careful not to bend or break it while pressing the pin out, or back in. Mark - All is apart and ready for new bushings. Please advise me on pressing out center pin of the coupler: I'm planning on using a 1/2" rigid conduit threaded coupling or even small piece of rigid conduit to place under the center pin, just longer than the pin itself. Then to use the press to push the pin out. A piece of 1/2" roll stock to push pin out once pressed end is flush with coupler shaft. No pressure at all hits alloy U-joint piece. And reverse the process to press the pin back in. Sound good to you? TIA, GN |
|
|
|
| Gatornapper |
Aug 8 2019, 08:19 PM
Post
#123
|
|
Senior Member Group: Members Posts: 1,290 Joined: 22-September 17 From: Woods west of Richmond, VA Member No.: 21,449 Region Association: South East States |
Mark -
All back together, all tight, went very well, thanks to your pre-counsel. VERY disappointed that the rear shaft bushing (#3 on your list) is not tight in the shaft port on the shift box, but has over 1/16" slop in it. Thought about removing it and wrapping it with enough electrical tape just to make it tight, but already had everything greased up and removing the good bushing risked damaging it, so I let it go. The bushing was tight around the shaft, but not in the hole. Seems this particular bushing also might be one of the most critical ones for precise shifting. May go back to it someday in the future. Any idea on why this bushing is so loose in its mounting hole? As I noted on another thread, disappointed as well that I could not take the car out for a test drive tonight. (IMG:style_emoticons/default/driving.gif) Had soft brakes and was bleeding all calipers and discover a major leak in the front right outer caliper piston. Problem is the PO put in brake calipers from a BMW 320i - but I have no idea what year. GN QUOTE(euro911 @ Aug 3 2019, 11:36 AM) There's 4 shift rod bushing locations in a late car. 1. The firewall bushing (figure 2). 2. The coupler bushing (pair) just aft of the firewall (also shown in figure 2). 3. The rear shift console housing (on the transaxle) where the rod enters it (not shown, but easy to find). 4. The ball cup bushing where the rear rod 'socket' contacts the lever in shift console (figure 1). The most difficult part of the job is while you're replacing the coupler bushings. The center 'pin' needs to be pressed out to remove the old bushings (or the remnants), and pressed back in after the new bushings are installed. The outer housing (fork) is structurally weak so one needs to be real careful not to bend or break it while pressing the pin out, or back in. |
|
|
|
| euro911 |
Aug 9 2019, 12:56 AM
Post
#124
|
|
Retired & living the dream. God help me if I wake up! Group: Members Posts: 8,937 Joined: 2-December 06 From: So.Cal. & No.AZ (USA) Member No.: 7,300 Region Association: Southern California |
Glad to hear you were able to correct most of your shifting issues. I went with a CFR/Tangerine spherical firewall bushing, and bronze coupler and console bushings so I wouldn't ever need to replace them again ... but alas, I sold that car last year. I will be installing bronze bushings on my '71 when I get to that part of the build.
It's hard to say why your console bushing is sloppy without looking at it. It's possible that the bushing wore out and the hole was enlarged by the rod rubbing on it over time (IMG:style_emoticons/default/confused24.gif) You'll need to remove the rear ball-cup housing and the rod again, remove the console bushing and measure the diameter of the hole. Then someone with a known good console handy can also measure the diameter to determine if yours is out of spec and needs replacement. I'd be happy to do it, but my side-shift transaxles are 500 miles away at the moment. If the enlarged hole is still perfectly round, you might be able to get away with machining a sleeve to take up the difference. |
|
|
|
| stinkindiesel |
Aug 9 2019, 11:50 AM
Post
#125
|
|
Member Group: Members Posts: 184 Joined: 14-June 13 From: Georgetown, TX Member No.: 16,012 Region Association: Southwest Region |
I ordered rear bushings from several different sources, and they were all loose in the hole. My temporary fix was to massage JB Weld into the gaps and around the bushing.
The hole in the bracket looked clean and circular, so I have trouble seeing it getting bashed by the shift shaft, but it was clearly too large for the bushings. Gary |
|
|
|
| Gatornapper |
Aug 9 2019, 05:22 PM
Post
#126
|
|
Senior Member Group: Members Posts: 1,290 Joined: 22-September 17 From: Woods west of Richmond, VA Member No.: 21,449 Region Association: South East States |
QUOTE(euro911 @ Aug 9 2019, 12:56 AM) Glad to hear you were able to correct most of your shifting issues. I went with a CFR/Tangerine spherical firewall bushing (Mark - think that's what I got from AA), and bronze coupler (next if I keep the car - and know how easy it is to replace the bushings and console bushings so I wouldn't ever need to replace them again ... but alas, I sold that car last year. I will be installing bronze bushings on my '71 when I get to that part of the build. It's hard to say why your console bushing is sloppy without looking at it. It's possible that the bushing wore out and the hole was enlarged by the rod rubbing on it over time (IMG:style_emoticons/default/confused24.gif) [/color]No - console bushing was not in bad shape, never any metal-to-metal contact. Problem is in the new bushing. I may shim it in future. You'll need to remove the rear ball-cup housing and the rod again, remove the console bushing and measure the diameter of the hole. Then someone with a known good console handy can also measure the diameter to determine if yours is out of spec and needs replacement. I'd be happy to do it, but my side-shift transaxles are 500 miles away at the moment. Again, console hole is as original - perfect un-marred condition. If the enlarged hole is still perfectly round, you might be able to get away with machining a sleeve to take up the difference. Thanks Mark! |
|
|
|
| Gatornapper |
Aug 9 2019, 05:27 PM
Post
#127
|
|
Senior Member Group: Members Posts: 1,290 Joined: 22-September 17 From: Woods west of Richmond, VA Member No.: 21,449 Region Association: South East States |
Gary - very interesting. Have an idea for shimming it in the future - can do it while all parts are in place. Could only improve the tightness of the shifting, even if only to a minor degree.
Didn't mention it before, but also noticed the front rod was pretty loose in the new firewall bushing - guess that's normal too. It was a different material than all the other bushings, not white, but an orange and much softer material. Seems to me the material was too soft for the location and too loose as well....but what do I know? I'm an electrical engineer.....who should have been a mechanical engineer! GN QUOTE(stinkindiesel @ Aug 9 2019, 11:50 AM) I ordered rear bushings from several different sources, and they were all loose in the hole. My temporary fix was to massage JB Weld into the gaps and around the bushing. The hole in the bracket looked clean and circular, so I have trouble seeing it getting bashed by the shift shaft, but it was clearly too large for the bushings. Gary |
|
|
|
| Gatornapper |
Aug 9 2019, 05:33 PM
Post
#128
|
|
Senior Member Group: Members Posts: 1,290 Joined: 22-September 17 From: Woods west of Richmond, VA Member No.: 21,449 Region Association: South East States |
Ok, discovered leaking piston O ring on front right caliper - which is from a BMW 320i (assuming PO would not lie to me about this).
Delighted to find out from Pelican that there are only 2 - 320i calipers - 2 piston ('79 - '83) & 4 piston (later) - mine are 2-piston, so I ordered a rebuild kit for both calipers. Too bad PMB doesn't rebuild them - asked Eric but never heard back from him...... Anyone know if the original front 914 calipers were noted for being a weak design? GN |
|
|
|
| euro911 |
Aug 9 2019, 06:40 PM
Post
#129
|
|
Retired & living the dream. God help me if I wake up! Group: Members Posts: 8,937 Joined: 2-December 06 From: So.Cal. & No.AZ (USA) Member No.: 7,300 Region Association: Southern California |
As far as I know, Eric still 'restores' BMW calipers.
|
|
|
|
| Gatornapper |
Aug 9 2019, 07:58 PM
Post
#130
|
|
Senior Member Group: Members Posts: 1,290 Joined: 22-September 17 From: Woods west of Richmond, VA Member No.: 21,449 Region Association: South East States |
QUOTE(euro911 @ Aug 9 2019, 06:40 PM) As far as I know, Eric still 'restores' BMW calipers. I thought so - emailed him and asked - guess he's just too busy to reply.....know they are swamped..... GN |
|
|
|
| Gatornapper |
Aug 10 2019, 09:02 PM
Post
#131
|
|
Senior Member Group: Members Posts: 1,290 Joined: 22-September 17 From: Woods west of Richmond, VA Member No.: 21,449 Region Association: South East States |
Ok, was able to take the 914 out for a good test of the shift linkage........wow! Not worried about the tiny slop in the rear console bushing. If anything, the linkage is TOO TIGHT.
All gear changes work great - except for one: the shift from 1st to 2nd, half the time, jumps from 1st to 4th. This never never never happened before the new bushings. 1st to 2nd was always quite certain and sure....it was 3rd to 4th that was the problem. Well the 3rd to 4th is no longer a problem. But half the time, 1st to 2nd jumps to 4th. I have to be very careful and deliberate to hit the 2nd gate. Apparently because of the new bushings, the spring (requiring forced R and 1st) now is 4x as strong - and in the shift from 1st forces the shifter to go over to the gate for 4th. I cannot let the spring "do its thing" because it seems to force the linkage too far. Looking for input from those here who know this linkage and tranny better than I do - as it's all new to me. I know this car's linkage and tranny are not known for their positive attributes. But I don't see any adjustments that I can make to change this problem...... TIA, GN |
|
|
|
| Gatornapper |
Aug 10 2019, 09:04 PM
Post
#132
|
|
Senior Member Group: Members Posts: 1,290 Joined: 22-September 17 From: Woods west of Richmond, VA Member No.: 21,449 Region Association: South East States |
Hmmm.....rebuilt calipers for 1980 BMW 320i at Summitt Racing for $41.......
https://www.summitracing.com/parts/ado-18fr.../bmw/model/320i Can't pass that up - looks like the ones on my 914.... GN |
|
|
|
| euro911 |
Aug 11 2019, 02:31 AM
Post
#133
|
|
Retired & living the dream. God help me if I wake up! Group: Members Posts: 8,937 Joined: 2-December 06 From: So.Cal. & No.AZ (USA) Member No.: 7,300 Region Association: Southern California |
Dialing in the shift rod is sometimes a time-consuming process. It's even worse on a tail-shifter arrangement.
The point of adjustment for a side-shifter is located under the shift lever in the cockpit. If you have a center console, you may want to to remove it, or at least the horizontal cover panel and any carpet covering the shift lever's base. When you look at the rear of the lever assembly, you'll see a open slot, and below that, you'll see a clevis (19) at the very bottom of the lever where the front shift rod (30) inserts into it. It is a split clevis with a bolt (1) that cinches around the rod. Place the shift lever into the neutral position. Take a silver Sharpie and mark both the linear and lateral positions on the clevis and the rod where it sits in the clevis. Next, reach down into the slot with the appropriate size socket (IIRC, a 13mm) and loosening the cinch bolt (1). 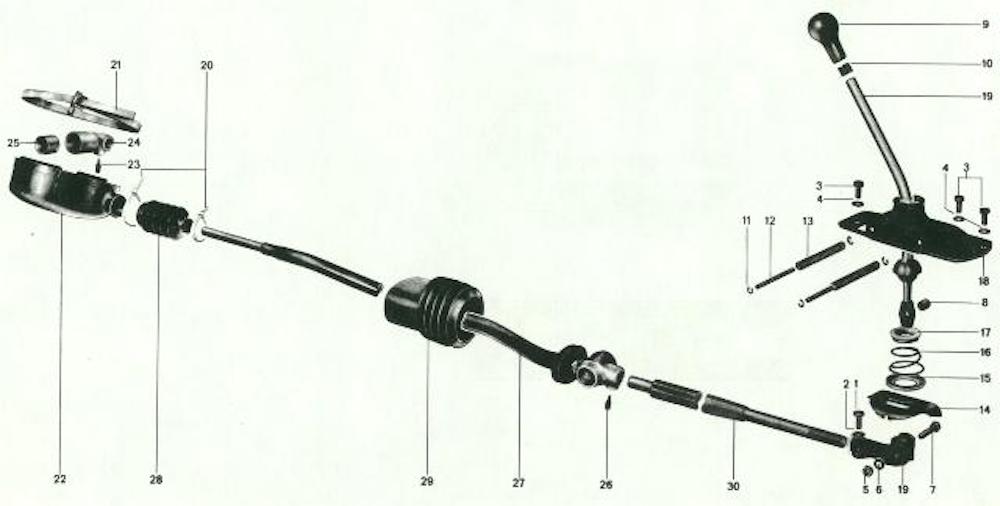 Now you'll be able to adjust the forward/rearward motion and the rotational movement of the clevis as needed. You'll need to keep the shift rod from rotating while moving the shift lever around, especially if the clevis is still holding the rod tight. A suggestion is to have a friend under the car to make sure the rod doesn't rotate (or move forward or rearward) while you're adjusting the shift lever's position. If that's not an option, you can secure the rear of the rod with a pair of Vice Grips inside the rear access plate (located between the seats near the firewall). You will need to remove the center armrest box if so equipped) to find the plate. Do not adjust the linear movement if you're not having difficulty going forward and rearward into the gears. Make slight rotational adjustments either to the left or right and tighten the cinch bolt on the clevis, taking note of the alignment marks mentioned above. Test it out and see if it's now shifting better (or worse). If worse, loosen the cinch bolt again and readjust the shift lever in the other rotational direction and test again. You'll probably have to play around with the adjustments for a while until you get it spot-on ... it's sort of a right of passage ... |
|
|
|
| Gatornapper |
Aug 11 2019, 08:07 PM
Post
#134
|
|
Senior Member Group: Members Posts: 1,290 Joined: 22-September 17 From: Woods west of Richmond, VA Member No.: 21,449 Region Association: South East States |
Mark -
Cannot thank you enough for the detailed description of how to "tune" the linkage. Understand most of it, but not all. Looks like one of those "you have to do it to understand it" things. Some responses in blue: QUOTE(euro911 @ Aug 11 2019, 02:31 AM) Dialing in the shift rod is sometimes a time-consuming process. It's even worse on a tail-shifter arrangement. The point of adjustment for a side-shifter is located under the shift lever in the cockpit. If you have a center console, you may want to to remove it, or at least the horizontal cover panel and any carpet covering the shift lever's base. All is wide open now - time to do the job. When you look at the rear of the lever assembly, you'll see a open slot, and below that, you'll see a clevis (19) at the very bottom of the lever where the front shift rod (30) inserts into it. It is a split clevis with a bolt (1) that cinches around the rod. Place the shift lever into the neutral position. Gotcha, loud & clear. Take a silver Sharpie and mark both the linear and lateral positions on the clevis and the rod where it sits in the clevis. Next, reach down into the slot with the appropriate size socket (IIRC, a 13mm) and loosening the cinch bolt (1). Pretty sure I get it - i.e., mark the existing linear and lateral positions on the clevis. I assume I'll use those as reference points for adjustments...... Now you'll be able to adjust the forward/rearward motion and the rotational movement of the clevis as needed. You'll need to keep the shift rod from rotating while moving the shift lever around, especially if the clevis is still holding the rod tight. A suggestion is to have a friend under the car to make sure the rod doesn't rotate (or move forward or rearward) while you're adjusting the shift lever's position. If that's not an option, you can secure the rear of the rod with a pair of Vice Grips inside the rear access plate (located between the seats near the firewall). You will need to remove the center armrest box if so equipped) to find the plate.Think I'll go with this option - rear access plate is still off, rod open for Vice Grips. Do not adjust the linear movement if you're not having difficulty going forward and rearward into the gears.Gotcha. Having NO problem with forward and rearward movement at all. Very precise presently. Make slight rotational adjustments either to the left or right and tighten the cinch bolt on the clevis, taking note of the alignment marks mentioned above. Test it out and see if it's now shifting better (or worse). If worse, loosen the cinch bolt again and readjust the shift lever in the other rotational direction and test again.Sounds like simple trial & error. You'll probably have to play around with the adjustments for a while until you get it spot-on ... it's sort of a right of passage ...Understand. But seems to me all this may not be needed for this reason (check me on this): Having no problems at all on precise hitting of far left gears (R & 1st), and far right gears (4th & 5th) from any of the other gear positions. This would seem to indicate to me that the rod is properly aligned in the clevis. The ONLY problem I'm having is in the center gates, and ONLY shifting from 1st to 2nd. All other shifts, up or down, or even skipping a gear (e.g., 4th to 2nd) are no problem. It SEEMS to me that unless I override the spring that throws the shift rod from left to right going from 1st to 2nd, the spring throws the shift rod too far to the right, sending it into 4th gear instead of 2nd. What further puzzles me is that while the bushings were bad or non-existent, the shift from 1st to 2nd was not a problem. Doesn't this seem to indicate the clevis and rod are properly aligned? PBPWM......(please be patient with me....) I'm 74 and have been driving hot cars with all kinds of manual trannies since I was 15, as well as working on them. But I've never run into this particular issue. GN |
|
|
|
| anderssj |
Aug 12 2019, 10:41 AM
Post
#135
|
|
Dog is my copilot... Group: Members Posts: 1,792 Joined: 28-January 03 From: VA Member No.: 207 Region Association: MidAtlantic Region |
Richard,
My apologies--I thought I emailed a couple of links to 2 different sets of instructions on how adjust the shift linkage (one from Dr Evil and one from Chris up at Tangerine). I'm apparently having some email issues again.... Here are the links: http://www.914world.com/bbs2/index.php?showtopic=188120 and http://www.914world.com/bbs2/index.php?sho...shifter++bungee The second was posted by Clay Perrine--I couldn't find my link to Chris' procedure, but think it's similar. Hope these help! Steve A- |
|
|
|
| Gatornapper |
Aug 12 2019, 11:45 AM
Post
#136
|
|
Senior Member Group: Members Posts: 1,290 Joined: 22-September 17 From: Woods west of Richmond, VA Member No.: 21,449 Region Association: South East States |
Steve -
Thank you so much! Will read ASAP. I've been wondering if there is a way to adjust the tension on the spring - don't see one presently, but have not looked closely. Looking forward to these articles! Richard QUOTE(anderssj @ Aug 12 2019, 10:41 AM) Richard, My apologies--I thought I emailed a couple of links to 2 different sets of instructions on how adjust the shift linkage (one from Dr Evil and one from Chris up at Tangerine). I'm apparently having some email issues again.... Here are the links: http://www.914world.com/bbs2/index.php?showtopic=188120 and http://www.914world.com/bbs2/index.php?sho...shifter++bungee The second was posted by Clay Perrine--I couldn't find my link to Chris' procedure, but think it's similar. Hope these help! Steve A- |
|
|
|
| euro911 |
Aug 12 2019, 02:14 PM
Post
#137
|
|
Retired & living the dream. God help me if I wake up! Group: Members Posts: 8,937 Joined: 2-December 06 From: So.Cal. & No.AZ (USA) Member No.: 7,300 Region Association: Southern California |
Both Mike's and Clay's threads spell out good methods. I hadn't seen either one, nor Chris' method before. I know Chris sells a nice 'precise adjustment component/ on his site.
Looks like you have some other good options to try out. I've heard of some folks finding worn out springs in the shift lever assembly's base, but I haven't experienced that fault myself. I'm not even sure how to tell if they're worn (IMG:style_emoticons/default/confused24.gif) We're installing a THOMAS side-shift trans in our '71 and will be installing a Rennshift shift lever assembly that I got from Steve ( @Steve ) a couple of years ago. Adjusting with the new shift lever will be new territory for me. |
|
|
|
| Gatornapper |
Aug 12 2019, 06:37 PM
Post
#138
|
|
Senior Member Group: Members Posts: 1,290 Joined: 22-September 17 From: Woods west of Richmond, VA Member No.: 21,449 Region Association: South East States |
Thanks Steve -
More driving makes me think the problem has been with the ShiftER, not the shift linkage. Getting the feel so I'm hitting 2nd now 90% of the time....this helped from another shift linkage thread - a post by Dave Darling, "But there are many reasons that we tell people to momentarily pause in between gears when shifting a 914; allowing the lever to fall into the correct plane is only one of them." The shift linkage is all VERY tight...like in a new vehicle....... GN QUOTE(Gatornapper @ Aug 12 2019, 11:45 AM) Steve - Thank you so much! Will read ASAP. I've been wondering if there is a way to adjust the tension on the spring - don't see one presently, but have not looked closely. Looking forward to these articles! Richard QUOTE(anderssj @ Aug 12 2019, 10:41 AM) Richard, My apologies--I thought I emailed a couple of links to 2 different sets of instructions on how adjust the shift linkage (one from Dr Evil and one from Chris up at Tangerine). I'm apparently having some email issues again.... Here are the links: http://www.914world.com/bbs2/index.php?showtopic=188120 and http://www.914world.com/bbs2/index.php?sho...shifter++bungee The second was posted by Clay Perrine--I couldn't find my link to Chris' procedure, but think it's similar. Hope these help! Steve A- |
|
|
|
| Gatornapper |
Aug 12 2019, 06:41 PM
Post
#139
|
|
Senior Member Group: Members Posts: 1,290 Joined: 22-September 17 From: Woods west of Richmond, VA Member No.: 21,449 Region Association: South East States |
Next 914 challenge: alternator not charging.....should not be a problem diagnosing as I'm an electrical guy, and have some good threads on diagnosing whether it's the alternator, regulator, chassis ground, whatever.
My main question is: How do I access the alternator and check the belt tension? Seems pretty inaccessible to me...... GN |
|
|
|
| euro911 |
Aug 12 2019, 07:31 PM
Post
#140
|
|
Retired & living the dream. God help me if I wake up! Group: Members Posts: 8,937 Joined: 2-December 06 From: So.Cal. & No.AZ (USA) Member No.: 7,300 Region Association: Southern California |
Diagnose the trouble: https://www.pelicanparts.com/914/914qa/914Q..._alternator.htm
Don't forget to check the fuses on the engine compartment's relay board. I had an intermittent power outage that was caused by the 25A fuse that had two broken strips of the fuse near one end. The fuse looked good until I attempted to pull it out and the fusible material fell into two pieces. Apparently the two pieces were touching and intermittently, vibrating apart every now & then (IMG:style_emoticons/default/blink.gif)  This thread discusses replacing the belt, so it works for checking the belt's tension too. http://www.914world.com/bbs2/index.php?showtopic=38596 Hopefully you find the problem lies with an external component, so you won't have to perform this major surgical procedure: http://www.914world.com/specs/alternator_replacement.php |
|
|
|
|
1 User(s) are reading this topic (1 Guests and 0 Anonymous Users)
0 Members:

|
Lo-Fi Version | Time is now: 12th June 2026 - 12:22 AM |
Invision Power Board
v9.1.4 © 2026 IPS, Inc.