|
|
|
Porsche, and the Porsche crest are registered trademarks of Dr. Ing. h.c. F. Porsche AG.
This site is not affiliated with Porsche in any way. Its only purpose is to provide an online forum for car enthusiasts. All other trademarks are property of their respective owners. |
|
|

  |

| 914bub |
 Sep 15 2018, 10:06 AM Sep 15 2018, 10:06 AM
Post
#21
|
|
Member  Group: Members Posts: 433 Joined: 16-August 13 From: Modesto CA. Member No.: 16,260 Region Association: None |
QUOTE(dr914@autoatlanta.com @ Sep 15 2018, 07:43 AM)  right now we are in the process of making a reproduction 914 clock identical in every way to the original but just not with the VDO on the face. We will be selling it along with the installation gasket for no more than 95.00 an hopefully cheaper George Hopefully, they'll be more impressive than your oil temp gauges. Your oil temp gauge looks nothing like the 914 Gauge. For $38.00 and free shipping a person could get this: https://www.ebay.com/p/Aftermarket-Porsche-...8991&chn=ps I'm tempted since my car isn't original anyway. I think if you can have an original clock restored for $110 that would be the route most would go. I'm almost done installing another VDO movement into my 914 clock and it's coming out well so I probably won't have one restored or buy aftermarket. Good luck with the clocks. I'll probably start a thread about how I'm doing mine. EDIT I just looked at your site and saw you offer the same gauge. I saw a different gauge you posted a picture of in the last couple of days. |
   |

 
|
| dr914@autoatlanta.com |
Sep 15 2018, 10:29 AM
Post
#22
|
|
914 Guru Group: Members Posts: 8,232 Joined: 3-January 07 From: atlanta georgia Member No.: 7,418 Region Association: None |
you have not seen a pic of our oil temp gauge yet as I have not posted it, only posted the oil PRESSURE gauge!!!!!!!
Ours looks exactly like the Indian one you provided the link for. Why waste time making a non matching gauge? Would be silly. QUOTE(914bub @ Sep 15 2018, 09:06 AM) QUOTE(dr914@autoatlanta.com @ Sep 15 2018, 07:43 AM) right now we are in the process of making a reproduction 914 clock identical in every way to the original but just not with the VDO on the face. We will be selling it along with the installation gasket for no more than 95.00 an hopefully cheaper George Hopefully, they'll be more impressive than your oil temp gauges. Your oil temp gauge looks nothing like the 914 Gauge. For $38.00 and free shipping a person could get this: https://www.ebay.com/p/Aftermarket-Porsche-...8991&chn=ps I'm tempted since my car isn't original anyway. I think if you can have an original clock restored for $110 that would be the route most would go. I'm almost done installing another VDO movement into my 914 clock and it's coming out well so I probably won't have one restored or buy aftermarket. Good luck with the clocks. I'll probably start a thread about how I'm doing mine. EDIT I just looked at your site and saw you offer the same gauge. I saw a different gauge you posted a picture of in the last couple of days. |
|
|
|
| Coondog |
Sep 15 2018, 10:43 AM
Post
#23
|
|
Advanced Member Group: Members Posts: 2,089 Joined: 24-September 15 From: Apple Valley Calif Member No.: 19,195 Region Association: Southern California |
QUOTE(dr914@autoatlanta.com @ Sep 15 2018, 07:43 AM) right now we are in the process of making a reproduction 914 clock identical in every way to the original but just not with the VDO on the face. We will be selling it along with the installation gasket for no more than 95.00 an hopefully cheaper AA told me this a year ago, still waiting !! |
|
|
|
| 914bub |
Sep 15 2018, 10:51 AM
Post
#24
|
|
Member Group: Members Posts: 433 Joined: 16-August 13 From: Modesto CA. Member No.: 16,260 Region Association: None |
QUOTE(dr914@autoatlanta.com @ Sep 15 2018, 09:29 AM) you have not seen a pic of our oil temp gauge yet as I have not posted it, only posted the oil PRESSURE gauge!!!!!!! Ours looks exactly like the Indian one you provided the link for. Why waste time making a non matching gauge? Would be silly. QUOTE(914bub @ Sep 15 2018, 09:06 AM) QUOTE(dr914@autoatlanta.com @ Sep 15 2018, 07:43 AM) right now we are in the process of making a reproduction 914 clock identical in every way to the original but just not with the VDO on the face. We will be selling it along with the installation gasket for no more than 95.00 an hopefully cheaper George Hopefully, they'll be more impressive than your oil temp gauges. Your oil temp gauge looks nothing like the 914 Gauge. For $38.00 and free shipping a person could get this: https://www.ebay.com/p/Aftermarket-Porsche-...8991&chn=ps I'm tempted since my car isn't original anyway. I think if you can have an original clock restored for $110 that would be the route most would go. I'm almost done installing another VDO movement into my 914 clock and it's coming out well so I probably won't have one restored or buy aftermarket. Good luck with the clocks. I'll probably start a thread about how I'm doing mine. EDIT I just looked at your site and saw you offer the same gauge. I saw a different gauge you posted a picture of in the last couple of days. Mine is an exact match as it uses a 914 housing, face etc. It uses a VDO mechanism out of a 52mm gauge. I only attempted it because I had 10-15 working 52mm clocks lying around. I guess mine will match better since it is VDO! In the picture, I have 52mm hands installed. The finished product will have proper 60mm hands.  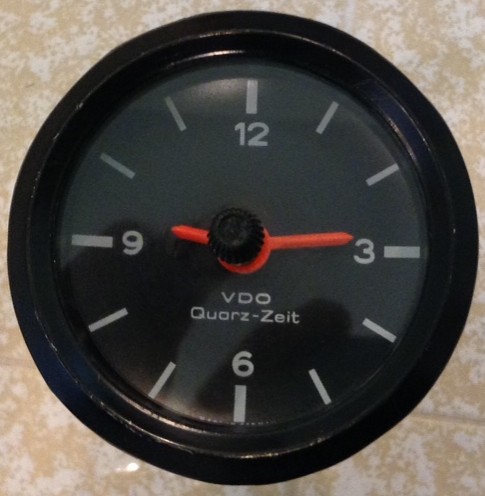 I have seen a picture of your gauge. It is posted on your site. |
|
|
|
| dr914@autoatlanta.com |
Sep 15 2018, 11:44 AM
Post
#25
|
|
914 Guru Group: Members Posts: 8,232 Joined: 3-January 07 From: atlanta georgia Member No.: 7,418 Region Association: None |
Yup, Coon, that guy in India (he is a good guy) was very very slow on this one. He makes the equalizer cables, the speedo angle drives, the Horn an driving light grilles, the thermostat cables, and the volt meters, pressure gauges, temp gauges, and soon clocks. Took WAY too long on the horn and driving light grilles, we had had them planned back in 2011!!!!!!!!!
QUOTE(Coondog @ Sep 15 2018, 09:43 AM) QUOTE(dr914@autoatlanta.com @ Sep 15 2018, 07:43 AM) right now we are in the process of making a reproduction 914 clock identical in every way to the original but just not with the VDO on the face. We will be selling it along with the installation gasket for no more than 95.00 an hopefully cheaper AA told me this a year ago, still waiting !! |
|
|
|
| 914werke |
Oct 23 2018, 04:38 PM
Post
#26
|
|
"I got blisters on me fingers" Group: Members Posts: 11,576 Joined: 22-March 03 From: USofA Member No.: 453 Region Association: Pacific Northwest |
any update?
|
|
|
|
| 914werke |
Dec 11 2018, 11:59 AM
Post
#27
|
|
"I got blisters on me fingers" Group: Members Posts: 11,576 Joined: 22-March 03 From: USofA Member No.: 453 Region Association: Pacific Northwest |
|
|
|
|
| Porschef |
Dec 11 2018, 12:10 PM
Post
#28
|
|
How you doin' Group: Members Posts: 2,180 Joined: 7-September 10 From: LawnGuyland Member No.: 12,152 Region Association: North East States |
(IMG:style_emoticons/default/locust.gif) (IMG:style_emoticons/default/locust.gif)
I looked into finding a small 12v quartz movement that can fit inside the can. Wasn’t very successful (IMG:style_emoticons/default/dry.gif) |
|
|
|
| dr914@autoatlanta.com |
Dec 11 2018, 12:20 PM
Post
#29
|
|
914 Guru Group: Members Posts: 8,232 Joined: 3-January 07 From: atlanta georgia Member No.: 7,418 Region Association: None |
we had an in person meeting with our manufacturer just before Thanksgiving and they have dissected the original and the smaller vdo replacement as well as the 944 /924 clocks, and accordingly the early ones have movements the later ones electronic. They will be making the clocks fully electronic but looking identical to the original console clocks. He has not given us an update since, we have the identical volt meters, the oil temp gauges as well as the new factory console sized oil pressure gauges, we are also thinking of having him make
right pass side door panel boxes switch bezels for driving fog emergency and hazard lights headlight motor knobs "taco" plates 200 degree factory look sending units 74.5-76 fuel filler neck gaskets any interest, any one already doing these? (do not want to make something someone is already making in this small market |
|
|
|
| drem914 |
Dec 11 2018, 12:54 PM
Post
#30
|
|
Senior Member Group: Members Posts: 1,067 Joined: 16-May 08 From: Trabuco Canyon, CA Member No.: 9,062 Region Association: Southern California |
Just saw this pop back up. I didn't realize I had started the questions. Still have not taken apart the clock yet to give it a shot at a repair. Last time I took a clock apart I was a kid. (IMG:style_emoticons/default/smash.gif) My parents weren't too happy about it....
|
|
|
|
| Lmaze |
May 3 2020, 12:33 PM
Post
#31
|
|
Newbie Group: Members Posts: 8 Joined: 3-May 20 From: Edmonton Alberta Member No.: 24,218 Region Association: Canada |
1974 914 2.0 Clock Repair - I removed my clock face with a "terminating screw driver", these are fine and sharp and make easy work of removing the face by turning up the lip around the edge. I then removed the three screws off the back of the housing and lastly heated up the ground solder to release the clock body from the housing.
I immediately noticed one of the blue capaciotors was fried and one solder leg melted off. These are easy to replace. You can either take it into an electronics shop and have them do it or just take in the old capacitor and have them match it and solder it back on yourself. I will be replacing both of them just to be safe. All the other components were just fine, gears, shafts, etc. I will recommend lubricating them since you already have the clock open at this point. You can buy a "terminating screw driver" at Home Depot. Update to follow on the success of the capacitor change out... Attached thumbnail(s)  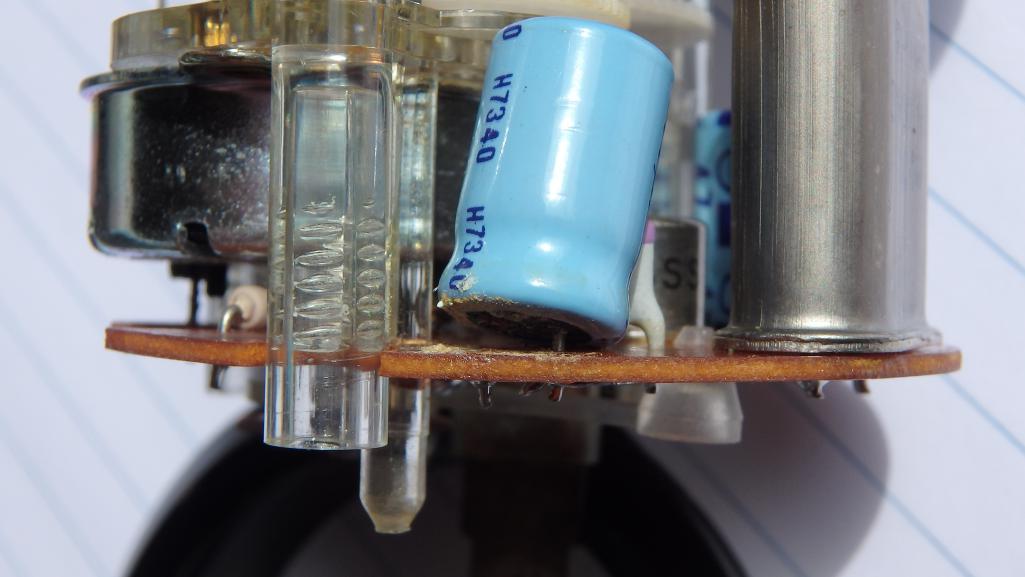 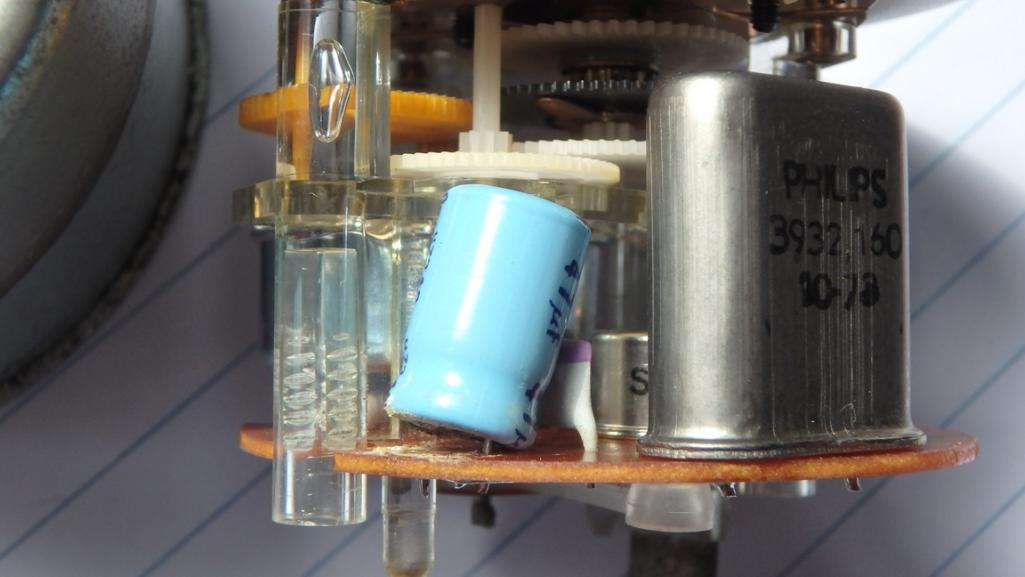
|
|
|
|
| Lmaze |
May 3 2020, 12:40 PM
Post
#32
|
|
Newbie Group: Members Posts: 8 Joined: 3-May 20 From: Edmonton Alberta Member No.: 24,218 Region Association: Canada |
I forgot to mention you do not need to take any other part this clock apart to replace the capacitors, the hands, clock face and PC board can all remain in place and the less invasive the better with these things. Here are pics the terminating screw driver, it will save a whole bunch of frustration and possibly damage by using the wrong tool.
Attached thumbnail(s) 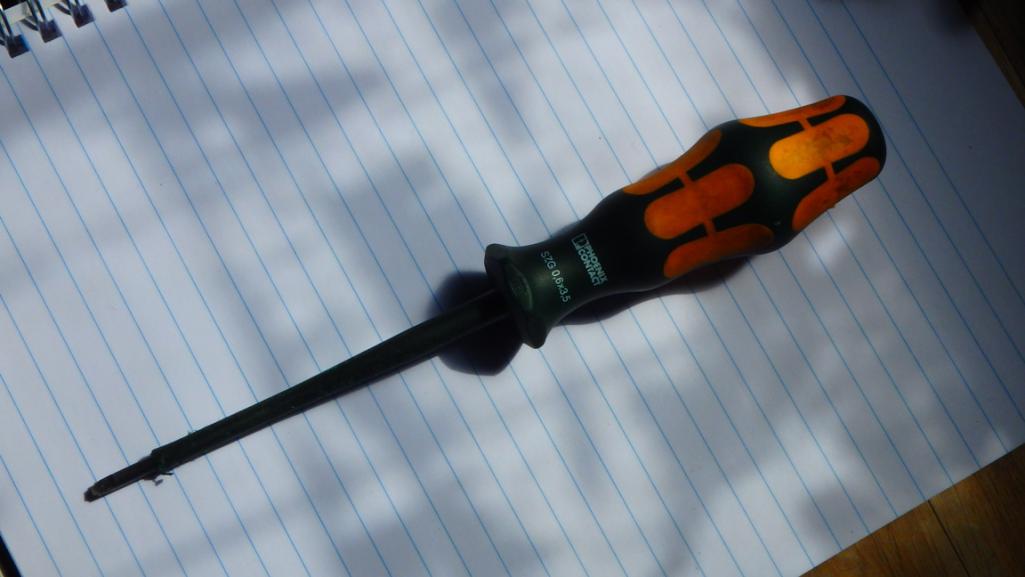 
|
|
|
|
| StarBear |
May 3 2020, 01:04 PM
Post
#33
|
|
Advanced Member Group: Members Posts: 2,241 Joined: 2-September 09 From: NJ Member No.: 10,753 Region Association: North East States |
QUOTE(Mikey914 @ Oct 8 2017, 04:47 PM) My thoughts exactly. You started with a broken clock, you may be able to fix. If you do a thread may be in order. I have a feeling it could be a simple process. I keep telling my wife, "What am I going to do - break it more?" Usually successful, but also know when to call/send to the professionals. Fixed our hand mixer yesterday - just some dirty switch contacts. Whrrrr.... |
|
|
|
| Lmaze |
May 3 2020, 01:13 PM
Post
#34
|
|
Newbie Group: Members Posts: 8 Joined: 3-May 20 From: Edmonton Alberta Member No.: 24,218 Region Association: Canada |
I keep telling my wife, "What am I going to do - break it more?" Usually successful, but also know when to call/send to the professionals. Fixed our hand mixer yesterday - just some dirty switch contacts. Whrrrr.... [/quote] We used to fix things all the time but most of it is throw-away these days. What drove me to try and fix this was the replacement cost. Hopefully it's just the capacitor and it's so true... I had a non-working clock to begin with so only up from here I guess. |
|
|
|
| bbrock |
May 3 2020, 04:28 PM
Post
#35
|
|
914 Guru Group: Members Posts: 5,269 Joined: 17-February 17 From: Montana Member No.: 20,845 Region Association: Rocky Mountains |
Deleted. Comment doesn't apply to this clock.
|
|
|
|
| Superhawk996 |
May 3 2020, 04:59 PM
Post
#36
|
|
914 Guru Group: Members Posts: 7,735 Joined: 25-August 18 From: Woods of N. Idaho Member No.: 22,428 Region Association: Galt's Gulch |
QUOTE(bbrock @ May 3 2020, 06:28 PM) Be aware the solder on the two legs that pop apart is low temperature and acts as a fuse to safeguard the clock when the mechanics gum up enough to increase resistance. There is a sticker on the back of the clock indicating solder temp. If you use regular solder, the clock may eventually fry if it gums up again. I fixed mine simply by remelting the low temp solder that was originally there and soldered the legs back together. It cost me only the electricity for the soldering station. @bbrock That one is a later model quartz unit. I'm not sure if they have the same solder "fuse" that we have on our earlier mechanical VDO Kienzle units. @Lmaze I've never worked on a quart unit so advice is worth what you paid. Electrolytic capacitors (the can type) go bad over time as you've already discovered. The electrolyte in them dries out and the no longer act as a capacitor. Alternatively, they swell and explode / leak as looks like is the case with yours. The electrolyte is corrosive so the lead that looks fried might just corroded away and not "fried" without any other damage. The capacitors are the prime suspects for sure. The other thing to look at if you're not alreay aware, is the copper board trace that might be below or near the capacitor. Not uncommon for the electrolyte to corrode that trace away too, but, that can usually be fixed with a jumper wire if necessary. Please post with followup on how this works out. |
|
|
|
| bbrock |
May 3 2020, 05:15 PM
Post
#37
|
|
914 Guru Group: Members Posts: 5,269 Joined: 17-February 17 From: Montana Member No.: 20,845 Region Association: Rocky Mountains |
QUOTE(Superhawk996 @ May 3 2020, 04:59 PM) QUOTE(bbrock @ May 3 2020, 06:28 PM) Be aware the solder on the two legs that pop apart is low temperature and acts as a fuse to safeguard the clock when the mechanics gum up enough to increase resistance. There is a sticker on the back of the clock indicating solder temp. If you use regular solder, the clock may eventually fry if it gums up again. I fixed mine simply by remelting the low temp solder that was originally there and soldered the legs back together. It cost me only the electricity for the soldering station. @bbrock That one is a later model quartz unit. I'm not sure if they have the same solder "fuse" that we have on our earlier mechanical VDO Kienzle units. My bad. I didn't catch that. Thanks for pointing it out. (IMG:style_emoticons/default/beer.gif) |
|
|
|
| Superhawk996 |
May 3 2020, 05:37 PM
Post
#38
|
|
914 Guru Group: Members Posts: 7,735 Joined: 25-August 18 From: Woods of N. Idaho Member No.: 22,428 Region Association: Galt's Gulch |
QUOTE(bbrock @ May 3 2020, 07:15 PM) What do I know . . . . I'm only guessing too since I've never actually worked on the quartz version (IMG:style_emoticons/default/confused24.gif) It's the internet though . . . advice is always worth what was paid! (IMG:style_emoticons/default/av-943.gif) |
|
|
|
| Lmaze |
May 3 2020, 06:35 PM
Post
#39
|
|
Newbie Group: Members Posts: 8 Joined: 3-May 20 From: Edmonton Alberta Member No.: 24,218 Region Association: Canada |
Capacitors commonly deteriorate over time. I'm not an electronic tech, but I am an electrician and have seen many capacitors fail. I have removed the capacitor, the board will be cleaned with contact cleaner prior to soldering the new legs in place. My assumption is that these two capacitors provide the regulated burst of voltage the motors requires to turn the gears. Technically they store and release a charge voltage as needed. I can't see them being used as a fuse connection. You could attribute the fine solder lines as a fuse point. I don't see any other issue other than a failed capacitor that feeds gated voltage to the motor. My solder iron is a small hobby unit, which for the most part takes forever to heat up and holds a solder melt for about a second when directly applied. I'm not concerned at this point about and heat related issued that would extend to the motor.
That being said we will soon find out when I install the new capacitor and fire up the clock. Hopefully this fix is viable. |
|
|
|
| bbrock |
May 3 2020, 07:36 PM
Post
#40
|
|
914 Guru Group: Members Posts: 5,269 Joined: 17-February 17 From: Montana Member No.: 20,845 Region Association: Rocky Mountains |
QUOTE(Lmaze @ May 3 2020, 06:35 PM) Capacitors commonly deteriorate over time. I'm not an electronic tech, but I am an electrician and have seen many capacitors fail. I have removed the capacitor, the board will be cleaned with contact cleaner prior to soldering the new legs in place. My assumption is that these two capacitors provide the regulated burst of voltage the motors requires to turn the gears. Technically they store and release a charge voltage as needed. I can't see them being used as a fuse connection. You could attribute the fine solder lines as a fuse point. I don't see any other issue other than a failed capacitor that feeds gated voltage to the motor. My solder iron is a small hobby unit, which for the most part takes forever to heat up and holds a solder melt for about a second when directly applied. I'm not concerned at this point about and heat related issued that would extend to the motor. That being said we will soon find out when I install the new capacitor and fire up the clock. Hopefully this fix is viable. You're good. As @Superhawk996 pointed out, I was referencing the earlier self-winding clock style. It has a spring loaded solder connection that is clearly labeled as a fuse. I just checked my clock and it is 120 C solder. Very low melting point. Doesn't apply to your clock though. Interested to see how it turns out. I love it when people take the time to fix these things. (IMG:style_emoticons/default/beerchug.gif) |
|
|
|
|
1 User(s) are reading this topic (1 Guests and 0 Anonymous Users)
0 Members:

|
Lo-Fi Version | Time is now: 14th March 2026 - 03:27 AM |
Invision Power Board
v9.1.4 © 2026 IPS, Inc.