|
|
|
Porsche, and the Porsche crest are registered trademarks of Dr. Ing. h.c. F. Porsche AG.
This site is not affiliated with Porsche in any way. Its only purpose is to provide an online forum for car enthusiasts. All other trademarks are property of their respective owners. |
|
|


| 76-914 |
 Oct 14 2017, 02:44 PM Oct 14 2017, 02:44 PM
Post
#21
|
|
Repeat Offender & Resident Subaru Antagonist  Group: Members Posts: 13,794 Joined: 23-January 09 From: Temecula, CA Member No.: 9,964 Region Association: Southern California |
If you didn't see elsewhere this is a 1970 914 w/ a 327 and 901 transmission. I purchased the car from "Bullit" and here is some info I gotten thus far. The wiring harness is out of a '73; the front end is off a 911 but I forget which year w/ "M" calipers; Trailing arms have some of Foley's reinforcement kit; Engman inner stiffener kit was installed; Griffen radiator;window regulators from a '73; stock 914 1/2 shafts and a lot more which I'll note later.
I'm presently working on the rear brakes and trailing arms and have 2 questions. What is the torque valve for the nut that my torque wrench is attached to; 108 ft lb or 50 ft lb? The manual says 50 for "Control arm bearing/body" and 108 ft lbs for the "Control arm bearing/control arm". Not sure which is which! (IMG:style_emoticons/default/confused24.gif) 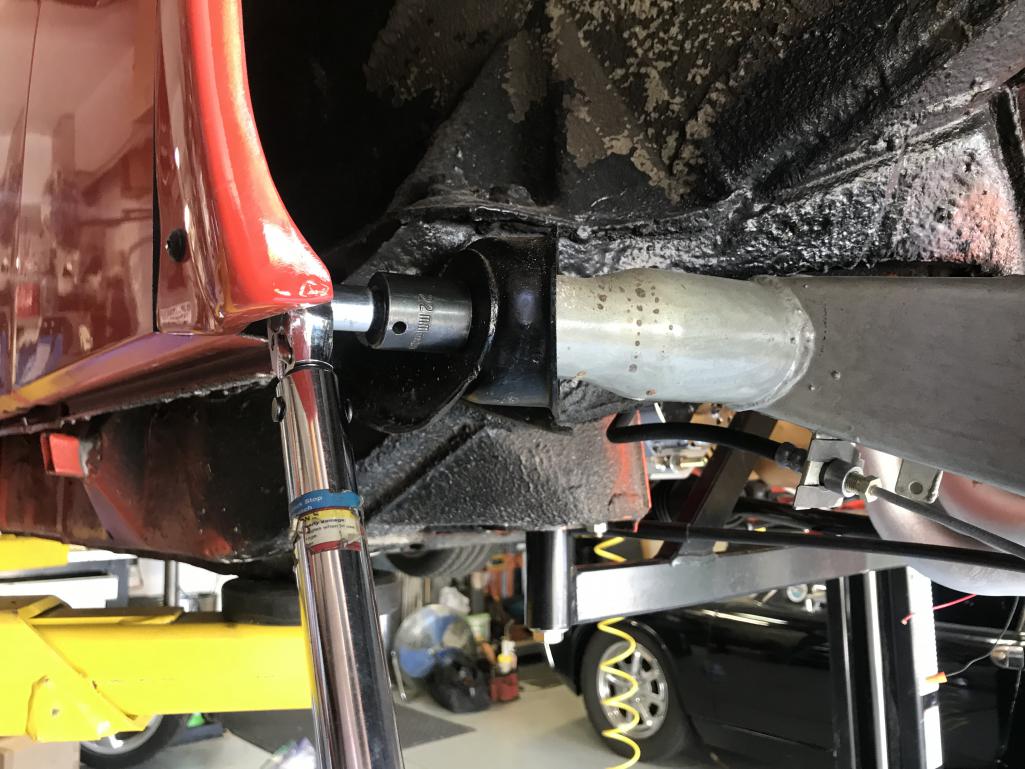 |
   |

 
|
Posts in this topic
 76-914 My '70 V-8 Assembly Thread Oct 14 2017, 02:44 PM
 Chris914n6 108. 50 is for the 3 bolts on the "adjustment... Oct 14 2017, 02:53 PM
 76-914
108. 50 is for the 3 bolts on the "adjustmen... Oct 14 2017, 03:15 PM 76-914 2nd question. The new E brake cable head came with... Oct 14 2017, 03:13 PM zig-n-zag I say 108 ftlbs for the nut, and the three bolts w... Oct 14 2017, 04:10 PM 76-914 Must be 108 if both you guys agree. I couldn't... Oct 14 2017, 05:30 PM burton73 That spot will be covered by a Ducktail spoiler so... Oct 14 2017, 09:03 PM 76-914
That spot will be covered by a Ducktail spoiler s... Oct 15 2017, 09:42 AM barefoot . While I was at it I did the same on the left sid... Oct 19 2017, 05:43 AM 76-914 I spent this morning doing a little house cleaning... Oct 15 2017, 02:40 PM KELTY360
Also took a good pic of the block casting #
... Nov 3 2017, 07:48 PM Andyrew I found this on the head casting, looks like maybe... Oct 15 2017, 06:52 PM bulitt Andrew thats the info I have
Heads- 3998993 rebuil... Oct 15 2017, 07:46 PM rhodyguy Be pointed forward when you go for the first big t... Oct 16 2017, 07:14 AM 76-914
Be pointed forward when you go for the first big ... Oct 16 2017, 06:47 PM ValcoOscar
[quote name='rhodyguy' post='2538119' date='Oct 1... Oct 16 2017, 07:53 PM Larmo63 "Mr. Ugly" was staring back at you?
... Oct 16 2017, 08:02 PM 76-914 I tried to install these today but their appx 1... Oct 18 2017, 08:17 PM Chris914n6
I tried to install these today but their appx 1... Oct 18 2017, 11:29 PM Mike Bellis 327 is a great SBC choice in a 914. Good power, no... Oct 18 2017, 08:58 PM Cracker Welcome to the World of fun 914's Kent...nothi... Oct 19 2017, 04:26 AM 76-914
327 is a great SBC choice in a 914. Good power, n... Oct 19 2017, 07:53 AM Andyrew I had 225's on mine as well, even had 275... Oct 19 2017, 09:23 AM whitetwinturbo :popcorn: ..and who makes that "better" ... Oct 21 2017, 08:22 AM 76-914
:popcorn: ..and who makes that "better... Oct 21 2017, 09:02 AM 76-914 I'm working on "how to" use the exis... Oct 22 2017, 05:15 PM 76-914 Finally got a chance to work on Red today. Finishe... Oct 28 2017, 09:40 PM 76-914 Made the rough cut templates out of cardboard. The... Nov 2 2017, 08:23 PM 76-914 The side will get a trim flange to fill the void o... Nov 2 2017, 08:27 PM Andyrew Looks good!!! Nov 2 2017, 08:40 PM bulitt :trophy: Nov 3 2017, 05:15 AM rhodyguy Kent, contact TC914-8 (tony) about the carb linkag... Nov 3 2017, 09:11 AM 76-914 Thx Andrew and Bob. When I peel back that protecti... Nov 3 2017, 05:33 PM 76-914 Good eye Mark. I totally missed that. Now where wa... Nov 8 2017, 10:10 PM Blue6 :cheer: Nov 8 2017, 10:43 PM Larmo63 Damn, Kent. That looks pretty good. I have to get ... Nov 8 2017, 11:19 PM rhodyguy Fast work Kent! Carry on. Nov 9 2017, 07:51 AM 76-914 Got'a keep moving if I want to sell this thing... Nov 9 2017, 08:50 AM Andyrew A chemical might help remove it. There might be so... Nov 9 2017, 09:33 AM bulitt It was a temp install to transport the car 2500 mi... Nov 9 2017, 03:59 PM Chris914n6 I usually just use a wire brush by hand and my thu... Nov 9 2017, 03:59 PM 76-914 Yeah Chris, When I get after it I will remove that... Nov 9 2017, 08:09 PM 914forme 3M adhesive earser wheel Nov 9 2017, 08:39 PM 76-914 That's it Stephan. But it's about 3/16... Nov 9 2017, 10:16 PM bulitt Wire wheel for a dremel? Nov 10 2017, 06:10 AM 76-914
Wire wheel for a dremel?
Yea Bob, I'm thinki... Nov 10 2017, 08:41 AM 914_teener
Wire wheel for a dremel?
Yea Bob, I'm think... Nov 10 2017, 08:45 AM 76-914 Delete that Rob. I don't want her to see that.... Nov 25 2017, 06:05 PM 76-914 Since I have this huge mass of cast iron I added a... Nov 25 2017, 06:41 PM bulitt Isn't this car running yet? :D
Great Job Ke... Nov 26 2017, 09:18 AM 76-914 It is now but there is still a lot to do. :beer2:... Dec 11 2017, 06:27 PM ValcoOscar
It is now but there is still a lot to do. :beer2... Dec 11 2017, 08:08 PM bulitt Woo Hoo! Can't tell if you hooked up the ... Dec 11 2017, 08:42 PM Cracker Way to go Kent!!! :beer2: :trophy:... Dec 11 2017, 08:50 PM bulitt
Way to go Kent!!! :beer2: :trophy... Dec 11 2017, 08:53 PM Cracker I remember that now...long time ago! Cool.
To... Dec 11 2017, 08:59 PM Andyrew Mmmm Torque, glorious torque!!! Congra... Dec 12 2017, 07:08 AM sb914 Nice job ! :Qarl: Dec 12 2017, 07:17 AM bulitt 7hCf3HRTc84 Dec 12 2017, 07:43 AM rhodyguy Do you need another horn pad? Dec 12 2017, 08:15 AM Larmo63 Sounds great so far....!!!!!... Dec 12 2017, 07:36 PM 76-914 Thanks guys. The growl raised my testosterone leve... Dec 12 2017, 09:19 PM burton73
Thanks guys. The growl raised my testosterone lev... Dec 13 2017, 12:44 PM 76-914
Thanks guys. The growl raised my testosterone le... Dec 13 2017, 06:34 PM 914350 I love the way you mounted the radiator. The shrou... Dec 13 2017, 11:18 AM 76-914
I love the way you mounted the radiator. The shro... Dec 13 2017, 06:31 PM Cracker I believe it is way too early to determine value..... Dec 13 2017, 07:13 PM burton73
I believe it is way too early to determine value.... Dec 13 2017, 07:58 PM Cracker Ok. With that logic...why stop at 4x? Kent - go fo... Dec 13 2017, 08:03 PM 76-914 Who knows? I certainly don't. The interior sho... Dec 14 2017, 09:13 AM Andyrew A sorted v8 car in good condition is between 10-15... Dec 14 2017, 09:27 AM Cracker Anyone wanting a radio in that car should not be a... Dec 14 2017, 09:41 AM burton73
Anyone wanting a radio in that car should not be ... Dec 14 2017, 10:32 PM Chris914n6
Anyone wanting a radio in that car should not be ... Dec 16 2017, 03:35 PM Mueller
Anyone wanting a radio in that car should not be ... Jan 4 2018, 11:51 AM rhodyguy :agree: don't fret about a radio. Dec 14 2017, 10:07 AM 76-914 So I'm killing time waiting on the mufflers to... Dec 14 2017, 07:16 PM 76-914 I've decided to complete this 914 w/o a radio.... Dec 16 2017, 07:40 PM Chris914n6
I've decided to complete this 914 w/o a radio... Dec 16 2017, 08:57 PM 76-914 Thx Chris. I've since discovered that 914rubbe... Dec 19 2017, 09:22 PM 76-914 I don't know how people get anything done on t... Jan 4 2018, 11:32 AM Cracker Great idea Kent - great Dad!!! I hope ... Jan 4 2018, 11:54 AM 76-914
Great idea Kent - great Dad!!! I hope... Jan 4 2018, 09:00 PM bulitt
I don't know how people get anything done on ... Jan 4 2018, 07:34 PM Chris914n6
I don't know how people get anything done on ... Jan 4 2018, 09:36 PM rhodyguy Nice.
Don't forget to add transport to the p... Jan 4 2018, 12:16 PM 914forme :headbanger: Jan 4 2018, 09:34 PM 76-914
:headbanger:
Oh yea, I forgot your in that tribe... Jan 5 2018, 11:34 PM get off my lawn About a million years ago I was at Irwindale racew... Jan 8 2018, 06:29 PM 76-914
About a million years ago I was at Irwindale race... Jan 13 2018, 10:20 PM bulitt Wow! Great job! Jan 14 2018, 06:09 AM 76-914 Thx Bob.Wow, I just realized I forgot to mention t... Jan 14 2018, 10:44 AM Cracker Good for you Kent...
When the "hand-off... Jan 14 2018, 11:01 AM 76-914
Good for you Kent...
When the "hand-off... Jan 14 2018, 11:19 AM 76-914 I forgot to add these pic's once I closed up t... Jan 14 2018, 01:39 PM mepstein Very clean looking. Is that an RH setup? Jan 14 2018, 01:49 PM Mueller Nice radiator setup...might want to add a bead or ... Jan 14 2018, 02:31 PM dakotaewing Try some Denatured alcohol to the cover to remove ... Jan 14 2018, 05:42 PM rhodyguy Nice work Kent. Jan 14 2018, 06:00 PM 76-914
Very clean looking. Is that an RH setup?
Don... Jan 15 2018, 09:19 AM
76-914
108. 50 is for the 3 bolts on the "adjustmen... Oct 14 2017, 03:15 PM 76-914 2nd question. The new E brake cable head came with... Oct 14 2017, 03:13 PM zig-n-zag I say 108 ftlbs for the nut, and the three bolts w... Oct 14 2017, 04:10 PM 76-914 Must be 108 if both you guys agree. I couldn't... Oct 14 2017, 05:30 PM burton73 That spot will be covered by a Ducktail spoiler so... Oct 14 2017, 09:03 PM 76-914
That spot will be covered by a Ducktail spoiler s... Oct 15 2017, 09:42 AM barefoot . While I was at it I did the same on the left sid... Oct 19 2017, 05:43 AM 76-914 I spent this morning doing a little house cleaning... Oct 15 2017, 02:40 PM KELTY360
Also took a good pic of the block casting #
... Nov 3 2017, 07:48 PM Andyrew I found this on the head casting, looks like maybe... Oct 15 2017, 06:52 PM bulitt Andrew thats the info I have
Heads- 3998993 rebuil... Oct 15 2017, 07:46 PM rhodyguy Be pointed forward when you go for the first big t... Oct 16 2017, 07:14 AM 76-914
Be pointed forward when you go for the first big ... Oct 16 2017, 06:47 PM ValcoOscar
[quote name='rhodyguy' post='2538119' date='Oct 1... Oct 16 2017, 07:53 PM Larmo63 "Mr. Ugly" was staring back at you?
... Oct 16 2017, 08:02 PM 76-914 I tried to install these today but their appx 1... Oct 18 2017, 08:17 PM Chris914n6
I tried to install these today but their appx 1... Oct 18 2017, 11:29 PM Mike Bellis 327 is a great SBC choice in a 914. Good power, no... Oct 18 2017, 08:58 PM Cracker Welcome to the World of fun 914's Kent...nothi... Oct 19 2017, 04:26 AM 76-914
327 is a great SBC choice in a 914. Good power, n... Oct 19 2017, 07:53 AM Andyrew I had 225's on mine as well, even had 275... Oct 19 2017, 09:23 AM whitetwinturbo :popcorn: ..and who makes that "better" ... Oct 21 2017, 08:22 AM 76-914
:popcorn: ..and who makes that "better... Oct 21 2017, 09:02 AM 76-914 I'm working on "how to" use the exis... Oct 22 2017, 05:15 PM 76-914 Finally got a chance to work on Red today. Finishe... Oct 28 2017, 09:40 PM 76-914 Made the rough cut templates out of cardboard. The... Nov 2 2017, 08:23 PM 76-914 The side will get a trim flange to fill the void o... Nov 2 2017, 08:27 PM Andyrew Looks good!!! Nov 2 2017, 08:40 PM bulitt :trophy: Nov 3 2017, 05:15 AM rhodyguy Kent, contact TC914-8 (tony) about the carb linkag... Nov 3 2017, 09:11 AM 76-914 Thx Andrew and Bob. When I peel back that protecti... Nov 3 2017, 05:33 PM 76-914 Good eye Mark. I totally missed that. Now where wa... Nov 8 2017, 10:10 PM Blue6 :cheer: Nov 8 2017, 10:43 PM Larmo63 Damn, Kent. That looks pretty good. I have to get ... Nov 8 2017, 11:19 PM rhodyguy Fast work Kent! Carry on. Nov 9 2017, 07:51 AM 76-914 Got'a keep moving if I want to sell this thing... Nov 9 2017, 08:50 AM Andyrew A chemical might help remove it. There might be so... Nov 9 2017, 09:33 AM bulitt It was a temp install to transport the car 2500 mi... Nov 9 2017, 03:59 PM Chris914n6 I usually just use a wire brush by hand and my thu... Nov 9 2017, 03:59 PM 76-914 Yeah Chris, When I get after it I will remove that... Nov 9 2017, 08:09 PM 914forme 3M adhesive earser wheel Nov 9 2017, 08:39 PM 76-914 That's it Stephan. But it's about 3/16... Nov 9 2017, 10:16 PM bulitt Wire wheel for a dremel? Nov 10 2017, 06:10 AM 76-914
Wire wheel for a dremel?
Yea Bob, I'm thinki... Nov 10 2017, 08:41 AM 914_teener
Wire wheel for a dremel?
Yea Bob, I'm think... Nov 10 2017, 08:45 AM 76-914 Delete that Rob. I don't want her to see that.... Nov 25 2017, 06:05 PM 76-914 Since I have this huge mass of cast iron I added a... Nov 25 2017, 06:41 PM bulitt Isn't this car running yet? :D
Great Job Ke... Nov 26 2017, 09:18 AM 76-914 It is now but there is still a lot to do. :beer2:... Dec 11 2017, 06:27 PM ValcoOscar
It is now but there is still a lot to do. :beer2... Dec 11 2017, 08:08 PM bulitt Woo Hoo! Can't tell if you hooked up the ... Dec 11 2017, 08:42 PM Cracker Way to go Kent!!! :beer2: :trophy:... Dec 11 2017, 08:50 PM bulitt
Way to go Kent!!! :beer2: :trophy... Dec 11 2017, 08:53 PM Cracker I remember that now...long time ago! Cool.
To... Dec 11 2017, 08:59 PM Andyrew Mmmm Torque, glorious torque!!! Congra... Dec 12 2017, 07:08 AM sb914 Nice job ! :Qarl: Dec 12 2017, 07:17 AM bulitt 7hCf3HRTc84 Dec 12 2017, 07:43 AM rhodyguy Do you need another horn pad? Dec 12 2017, 08:15 AM Larmo63 Sounds great so far....!!!!!... Dec 12 2017, 07:36 PM 76-914 Thanks guys. The growl raised my testosterone leve... Dec 12 2017, 09:19 PM burton73
Thanks guys. The growl raised my testosterone lev... Dec 13 2017, 12:44 PM 76-914
Thanks guys. The growl raised my testosterone le... Dec 13 2017, 06:34 PM 914350 I love the way you mounted the radiator. The shrou... Dec 13 2017, 11:18 AM 76-914
I love the way you mounted the radiator. The shro... Dec 13 2017, 06:31 PM Cracker I believe it is way too early to determine value..... Dec 13 2017, 07:13 PM burton73
I believe it is way too early to determine value.... Dec 13 2017, 07:58 PM Cracker Ok. With that logic...why stop at 4x? Kent - go fo... Dec 13 2017, 08:03 PM 76-914 Who knows? I certainly don't. The interior sho... Dec 14 2017, 09:13 AM Andyrew A sorted v8 car in good condition is between 10-15... Dec 14 2017, 09:27 AM Cracker Anyone wanting a radio in that car should not be a... Dec 14 2017, 09:41 AM burton73
Anyone wanting a radio in that car should not be ... Dec 14 2017, 10:32 PM Chris914n6
Anyone wanting a radio in that car should not be ... Dec 16 2017, 03:35 PM Mueller
Anyone wanting a radio in that car should not be ... Jan 4 2018, 11:51 AM rhodyguy :agree: don't fret about a radio. Dec 14 2017, 10:07 AM 76-914 So I'm killing time waiting on the mufflers to... Dec 14 2017, 07:16 PM 76-914 I've decided to complete this 914 w/o a radio.... Dec 16 2017, 07:40 PM Chris914n6
I've decided to complete this 914 w/o a radio... Dec 16 2017, 08:57 PM 76-914 Thx Chris. I've since discovered that 914rubbe... Dec 19 2017, 09:22 PM 76-914 I don't know how people get anything done on t... Jan 4 2018, 11:32 AM Cracker Great idea Kent - great Dad!!! I hope ... Jan 4 2018, 11:54 AM 76-914
Great idea Kent - great Dad!!! I hope... Jan 4 2018, 09:00 PM bulitt
I don't know how people get anything done on ... Jan 4 2018, 07:34 PM Chris914n6
I don't know how people get anything done on ... Jan 4 2018, 09:36 PM rhodyguy Nice.
Don't forget to add transport to the p... Jan 4 2018, 12:16 PM 914forme :headbanger: Jan 4 2018, 09:34 PM 76-914
:headbanger:
Oh yea, I forgot your in that tribe... Jan 5 2018, 11:34 PM get off my lawn About a million years ago I was at Irwindale racew... Jan 8 2018, 06:29 PM 76-914
About a million years ago I was at Irwindale race... Jan 13 2018, 10:20 PM bulitt Wow! Great job! Jan 14 2018, 06:09 AM 76-914 Thx Bob.Wow, I just realized I forgot to mention t... Jan 14 2018, 10:44 AM Cracker Good for you Kent...
When the "hand-off... Jan 14 2018, 11:01 AM 76-914
Good for you Kent...
When the "hand-off... Jan 14 2018, 11:19 AM 76-914 I forgot to add these pic's once I closed up t... Jan 14 2018, 01:39 PM mepstein Very clean looking. Is that an RH setup? Jan 14 2018, 01:49 PM Mueller Nice radiator setup...might want to add a bead or ... Jan 14 2018, 02:31 PM dakotaewing Try some Denatured alcohol to the cover to remove ... Jan 14 2018, 05:42 PM rhodyguy Nice work Kent. Jan 14 2018, 06:00 PM 76-914
Very clean looking. Is that an RH setup?
Don... Jan 15 2018, 09:19 AM  |
1 User(s) are reading this topic (1 Guests and 0 Anonymous Users)
0 Members:

|
Lo-Fi Version | Time is now: 7th September 2025 - 10:06 AM |
Invision Power Board
v9.1.4 © 2025 IPS, Inc.