|
|
|
Porsche, and the Porsche crest are registered trademarks of Dr. Ing. h.c. F. Porsche AG.
This site is not affiliated with Porsche in any way. Its only purpose is to provide an online forum for car enthusiasts. All other trademarks are property of their respective owners. |
|
|

  |

| simonjb |
 Nov 27 2017, 11:38 AM Nov 27 2017, 11:38 AM
Post
#1
|
|
KiwiMan  Group: Members Posts: 563 Joined: 18-October 16 From: Stamford, Connecticut Member No.: 20,505 Region Association: North East States |
I've read a bunch of posts on this but I am still not getting how to remove and replace the roller for the trunk. I have made a notch in an adjustable spanner/wrench.
What I don't understand is what do I lever the wrench off/on to so that the spring bar will lift off the roller so that I can remove and put the new one on? 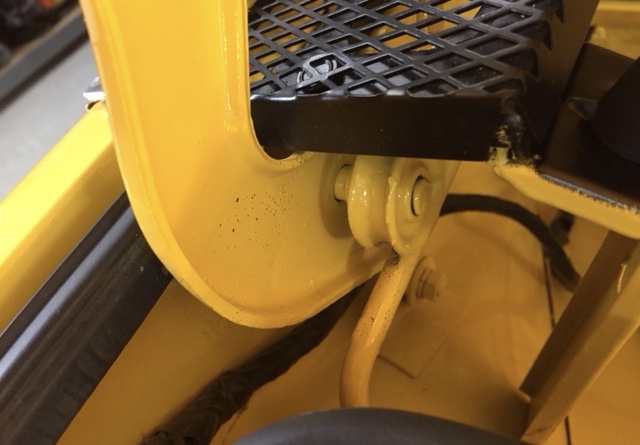 Thanks! |
   |

 
|
| clapeza |
Nov 27 2017, 11:48 AM
Post
#2
|
|
Member Group: Members Posts: 229 Joined: 7-February 11 From: South GA Member No.: 12,677 Region Association: South East States |
I ended up sliding a 10mm deep socket over the end of the metal bar (spring) that is under the roller. With it pushed down, it frees up the roller. Use a nice long extension to get as much leverage as you can. You'll need it! While it's compressed, have someone grab the old roller off with pliers or similar - you don't want anyone's fingers in the way - and slide on the new one.
There are several methods to do this. As long as you're careful and safe, they all work, and it only take a few seconds. |
|
|
|
| BeatNavy |
Nov 27 2017, 01:06 PM
Post
#3
|
|
Certified Professional Scapegoat Group: Members Posts: 2,924 Joined: 26-February 14 From: Easton, MD Member No.: 17,042 Region Association: MidAtlantic Region |
QUOTE(simonjb @ Nov 27 2017, 12:38 PM)  I've read a bunch of posts on this but I am still not getting how to remove and replace the roller for the trunk. This is something I need to do, and I've been in the same boat - I read the posts but my little brain still can't quite visualize how someone uses that notched tool...thing. I think I'll try the 10 mm deepwell socket thing. That I can understand. Do you need to remove the engine lid to do this, or does it help significantly? |
|
|
|
| clapeza |
Nov 27 2017, 02:06 PM
Post
#4
|
|
Member Group: Members Posts: 229 Joined: 7-February 11 From: South GA Member No.: 12,677 Region Association: South East States |
QUOTE(BeatNavy @ Nov 27 2017, 02:06 PM) I think I'll try the 10 mm deepwell socket thing. That I can understand. Do you need to remove the engine lid to do this, or does it help significantly? Leave it attached. The car will help hold the torsion bar in place for you. (IMG:style_emoticons/default/biggrin.gif) |
|
|
|
| North Coast Jim |
Nov 27 2017, 02:54 PM
Post
#5
|
|
Member Group: Members Posts: 323 Joined: 11-December 15 From: Northern Ohio Member No.: 19,450 Region Association: MidAtlantic Region |
QUOTE(simonjb @ Nov 27 2017, 12:38 PM) I've read a bunch of posts on this but I am still not getting how to remove and replace the roller for the trunk. I have made a notch in an adjustable spanner/wrench. What I don't understand is what do I lever the wrench off/on to so that the spring bar will lift off the roller so that I can remove and put the new one on? Thanks! Just did this job last week to both sides and the torsion bars were unloaded to boot. It is a job and one that should be done with safety in mind. I tried the socket on the end of the torsion bar routine and almost took off my ear. I replicated a tool that was shown to me and I call it the "enabler" It hooks around the torsion bar in the area of the bends of the bar. If your torsion bars are unloaded then follow below procedure. Assemble "Enabler" onto the torsion bar by way of the 3/8 slot with the slot facing toward the outside of the car. Pressure then toward the front of the car will bend or load the torsion bar. The tool can't go flying off into space as it's hooked on the torsion bar. The procedure is actually a three step process. First load the torsion bar moving it about half way to its final position. Have a helper ready to slip a solid piece of metal or hardwood under the first large bend keeping their hands clear. Remember safety. This holds the bar in a partially loaded position. Relax the pressure on the tool and move it further DOWN the torsion bar toward that first big bend. Getting it past there is even better. Now comes the hard part. Put the biggest guy on this - push the tool toward the front of the car thereby loading the torsion bar once again from this new position. Once past the axle of the roller have your helper coax the torsion bar around on to the other side. Relieve the pressure on the torsion bar slowly ensuring the torsion bar stays where it's needed. Rest a minute or two or three. Your almost there. The hard part is done. Lastly ensure the "enabler" is at the bottom most point it can be and load the torsion one more time moving the tool toward the front of the car enough to where your helper can slip the roller onto the axle shaft. Use a pair of pliers or other such tool for this DON"T use your hands. Slowly relieve the pressure ensuring the torsion bar is caught in the groove of the roller. Side one done. Move to other side and repeat. if your just replacing the rollers the job is much easier. Just move the bar as described above in the last step to enable the removal and replacement of the roller. I used the aluminum rollers rather that the plastic ones. Found them on ebay. When done go drink a beer - that's the fourth step in the process. By the way the angle of 30 degrees at the handle end is to make room for your hand up against the bottom side of the trunk lid. Bend it the other way for the opposite side of the car. Use a BIG vise and BIG bar to bend the handle in the opposite direction. Material of the tool needs to be hard enough to withstand the forces required w/o bending (too) much. I used SS. It does get beat up doing this job, I still have it in a usable condition and if you want to borrow it PM me. Lastly there is the possibility of removing paint in this area. I readied a number of 1/8" thick pieces of wood and used them as protectors for my paint job. Hope this help. 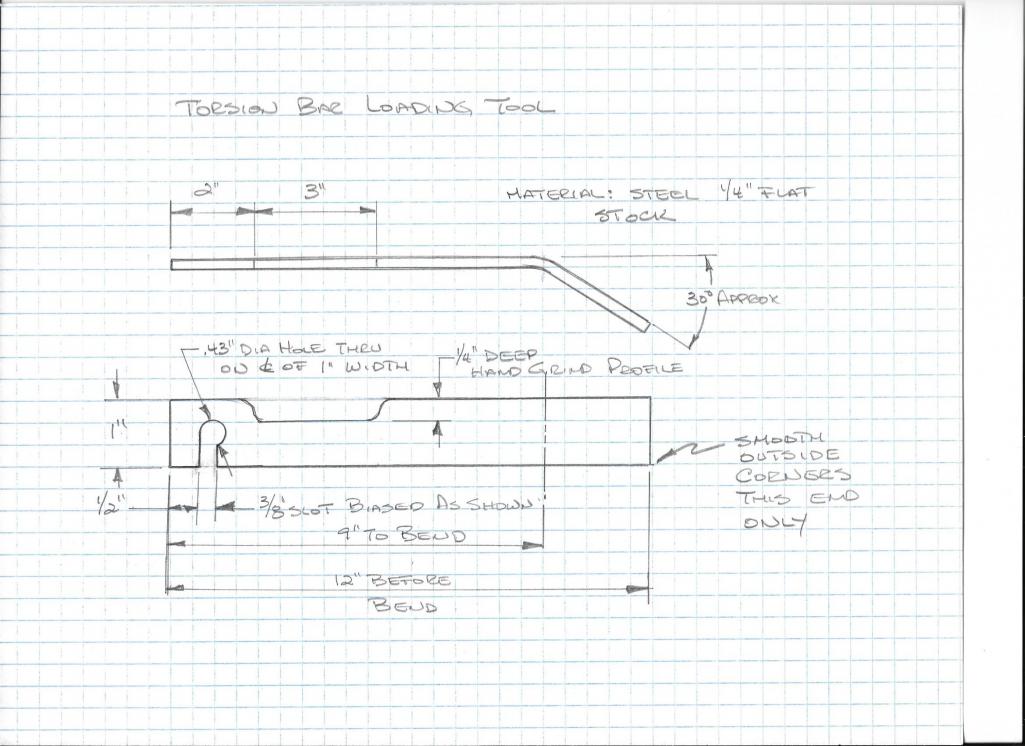 |
|
|
|
| theer |
Nov 27 2017, 03:01 PM
Post
#6
|
|
Senior Member Group: Members Posts: 676 Joined: 31-July 15 From: Dover, MA Member No.: 19,014 Region Association: North East States |
I made a much uglier version of the above with stuff I had in hand.
Pictures in the thread here: http://ww.w.914world.com/bbs2/index.php?showtopic=309069 |
|
|
|
| rhodyguy |
Nov 27 2017, 03:08 PM
Post
#7
|
|
Chimp Sanctuary NW. Check it out. Group: Members Posts: 22,076 Joined: 2-March 03 From: Orion's Bell. The BELL! Member No.: 378 Region Association: Galt's Gulch |
A 1/4" drive socket and a long extension. Prop the lid up to take as much weight/pressure off the rods as you can. You'll prob have to persuade the socket on with a hammer. Just ease the torsion rod off to one side. You only have to move it down enough to clear the roller. Leave the socket and extension on for now, put the new roller on and swing the rod back over. Repeat. No extra set of hands required. Your fingers are never in the danger zone. 1/2 hour or less. Lube the posts for the rollers.
|
|
|
|
| BeatNavy |
Nov 27 2017, 04:20 PM
Post
#8
|
|
Certified Professional Scapegoat Group: Members Posts: 2,924 Joined: 26-February 14 From: Easton, MD Member No.: 17,042 Region Association: MidAtlantic Region |
Thanks, fellas. Jim, thanks for the detailed instructions. All of this helps me. Hopefully this helps the OP, too.
|
|
|
|
| simonjb |
Nov 27 2017, 07:04 PM
Post
#9
|
|
KiwiMan Group: Members Posts: 563 Joined: 18-October 16 From: Stamford, Connecticut Member No.: 20,505 Region Association: North East States |
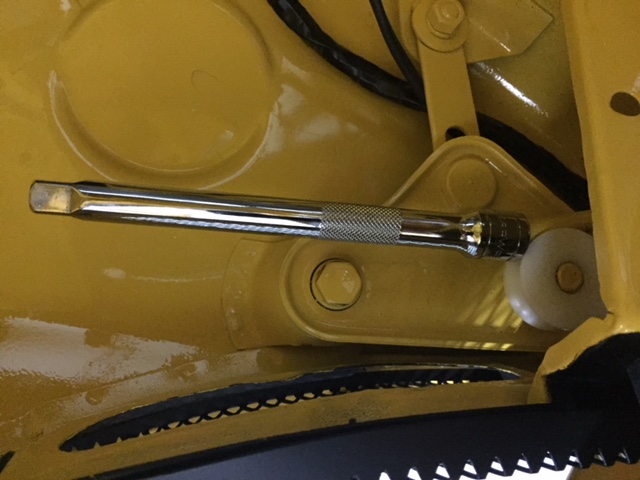
Thanks guys. I ended up just using a 3/8th socket extension - just by placing the end of it over the end of the spring rod after it passes under the roller. Then I pushed down on the extension bar (towards the front of the car) carefully and SLOWLY and at the same time used a big flat screwdriver to move the old roller off the bar. I rested and then slowlypushed the extension bar down again and very carefully placed the new roller on. Went very easy. I did tape the end of the spring rod with painters tape so that the extension bar did not slide off easily. I also taped the screwdriver so that it didn’t scratch the paint. I left trunk open.
|
|
|
|
| rhodyguy |
Nov 27 2017, 07:14 PM
Post
#10
|
|
Chimp Sanctuary NW. Check it out. Group: Members Posts: 22,076 Joined: 2-March 03 From: Orion's Bell. The BELL! Member No.: 378 Region Association: Galt's Gulch |
No socket? Just the extension?
|
|
|
|
| Mikey914 |
Nov 27 2017, 07:36 PM
Post
#11
|
|
The rubber man Group: Members Posts: 12,659 Joined: 27-December 04 From: Hillsboro, OR Member No.: 3,348 Region Association: None |
Ive done the socket method. The drawing looks like the factory tool.
Ill do a bunch of these up should be cheap. Mark |
|
|
|
| bbrock |
Nov 27 2017, 09:56 PM
Post
#12
|
|
914 Guru Group: Members Posts: 5,269 Joined: 17-February 17 From: Montana Member No.: 20,845 Region Association: Rocky Mountains |
QUOTE(North Coast Jim @ Nov 27 2017, 01:54 PM) Material of the tool needs to be hard enough to withstand the forces required w/o bending (too) much. I used SS. It does get beat up doing this job, I still have it in a usable condition and if you want to borrow it PM me. Emphasis on the "hard enough to withstand forces" I made one out of some bar stock from the local Home Despot I had on hand it is was NOT hard enough. It managed to get the job done after reinforcing with a little welding but is really too wimpy for the task. |
|
|
|
| Garland |
Nov 27 2017, 10:51 PM
Post
#13
|
|
Restoration Fanatic Group: Members Posts: 1,328 Joined: 8-January 04 From: ......Michigan...... Member No.: 1,535 Region Association: Upper MidWest |
Try this
R&R Trunk Bar |
|
|
|
| simonjb |
Nov 28 2017, 09:19 AM
Post
#14
|
|
KiwiMan Group: Members Posts: 563 Joined: 18-October 16 From: Stamford, Connecticut Member No.: 20,505 Region Association: North East States |
Right - just the extension. It worked perfectly.
|
|
|
|
| North Coast Jim |
Nov 28 2017, 06:36 PM
Post
#15
|
|
Member Group: Members Posts: 323 Joined: 11-December 15 From: Northern Ohio Member No.: 19,450 Region Association: MidAtlantic Region |
QUOTE(Mikey914 @ Nov 27 2017, 08:36 PM) Ive done the socket method. The drawing looks like the factory tool. Ill do a bunch of these up should be cheap. Mark Mikey forgot to tell you the design is patented - Ha Ha. Have at it On the second "early" car we did we had to modify the slot opening. Is there a difference in dia of torsion bars over the years ?? I think the tool that was made for me had a small slot opening maybe slightly under the 3/8" on the drawing. Be advised. |
|
|
|
| simonjb |
Nov 28 2017, 07:11 PM
Post
#16
|
|
KiwiMan Group: Members Posts: 563 Joined: 18-October 16 From: Stamford, Connecticut Member No.: 20,505 Region Association: North East States |
Here is how I replaced the roller - with some painters tape on the spring as well
 |
|
|
|
| Mikey914 |
Nov 29 2017, 11:29 AM
Post
#17
|
|
The rubber man Group: Members Posts: 12,659 Joined: 27-December 04 From: Hillsboro, OR Member No.: 3,348 Region Association: None |
Thanks,
There was some discussion awhile ago about these, can't remember why I didn't make it until you re-posted. Mark |
|
|
|
|
1 User(s) are reading this topic (1 Guests and 0 Anonymous Users)
0 Members:

|
Lo-Fi Version | Time is now: 11th May 2024 - 02:02 AM |
Invision Power Board
v9.1.4 © 2024 IPS, Inc.