|
|
|
Porsche, and the Porsche crest are registered trademarks of Dr. Ing. h.c. F. Porsche AG.
This site is not affiliated with Porsche in any way. Its only purpose is to provide an online forum for car enthusiasts. All other trademarks are property of their respective owners. |
|
|

  |

| simonjb |
 Jan 29 2018, 07:53 PM Jan 29 2018, 07:53 PM
Post
#21
|
|
KiwiMan  Group: Members Posts: 563 Joined: 18-October 16 From: Stamford, Connecticut Member No.: 20,505 Region Association: North East States |
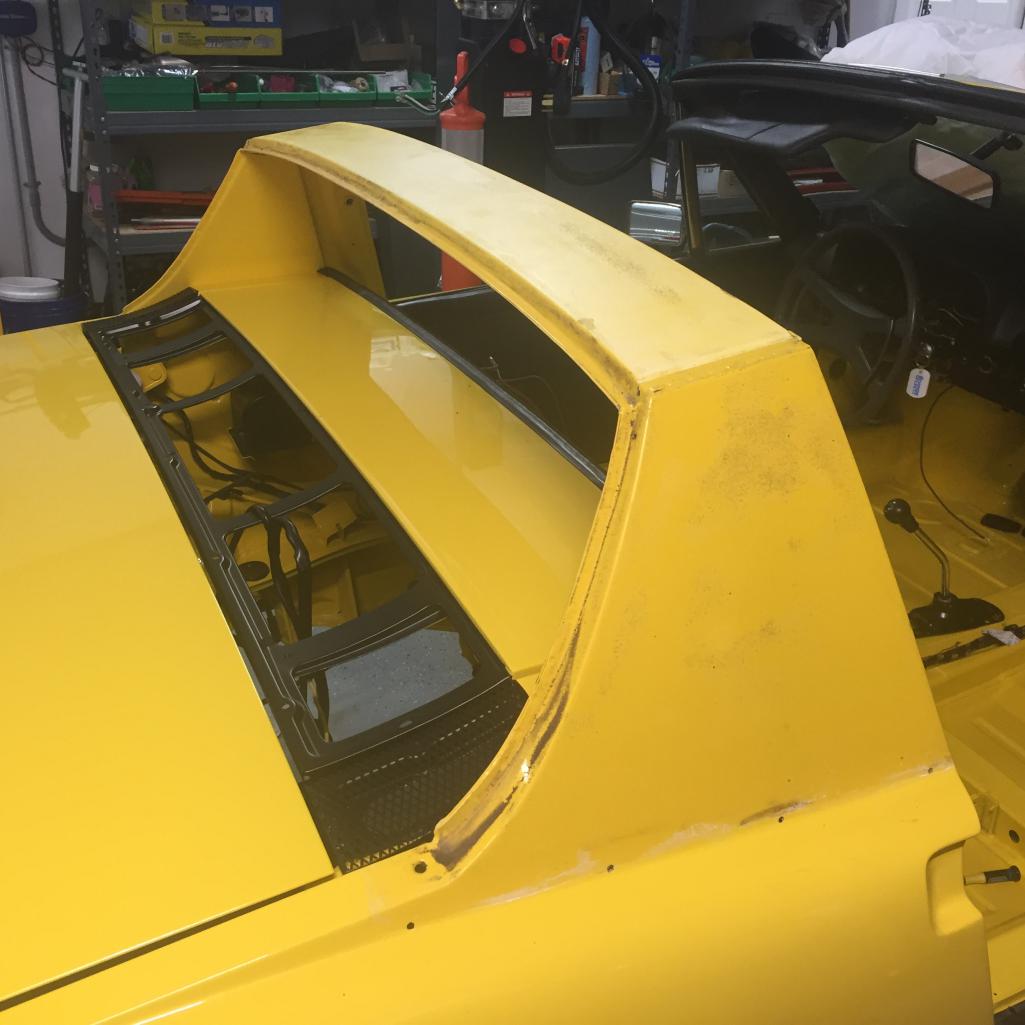
I finally decided that I should replace the vinyl on the sail and roll bar. I debated leaving it - but given I’ve refreshed everything else, I decided to go ahead. Stage one was removal of the old vinyl...not bad underneath after 40 plus years!
 |
   |

 
|
| simonjb |
Feb 3 2018, 03:33 PM
Post
#22
|
|
KiwiMan Group: Members Posts: 563 Joined: 18-October 16 From: Stamford, Connecticut Member No.: 20,505 Region Association: North East States |
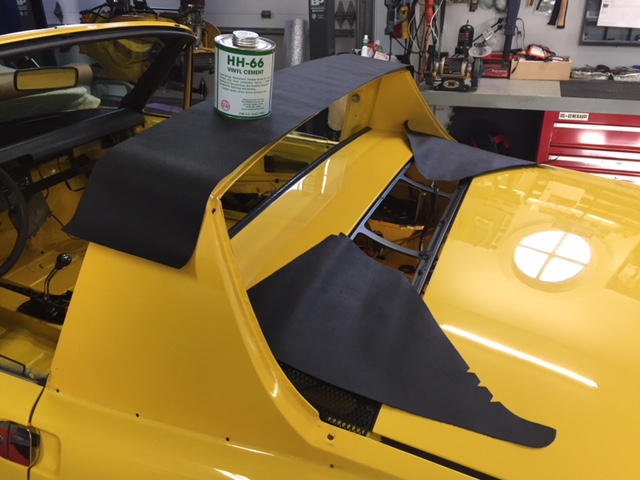
Ready to cement the new Sail and cross-beam from 914Rubber
 |
|
|
|
| aggiezig |
Feb 4 2018, 12:25 AM
Post
#23
|
|
Porsche Wannabe Group: Members Posts: 319 Joined: 13-January 16 From: Los Angeles, CA Member No.: 19,557 Region Association: Southern California |
Your progress is inspiring me to push forward. It must be so nice to work in a shiny, new, clean engine bay. I'm jealous!
Keep up the good work (IMG:style_emoticons/default/aktion035.gif) |
|
|
|
| defianty |
Feb 4 2018, 03:15 AM
Post
#24
|
|
Senior Member Group: Members Posts: 659 Joined: 9-August 06 From: Essex, UK Member No.: 6,621 Region Association: None |
Car is looking fantastic. I can't wait until this part in my build, I've got boxes stashed of new parts ready to install and a big order on its way from 914rubber right now.
Keep up the good work and looking forward to more updates. |
|
|
|
| simonjb |
Feb 4 2018, 02:52 PM
Post
#25
|
|
KiwiMan Group: Members Posts: 563 Joined: 18-October 16 From: Stamford, Connecticut Member No.: 20,505 Region Association: North East States |
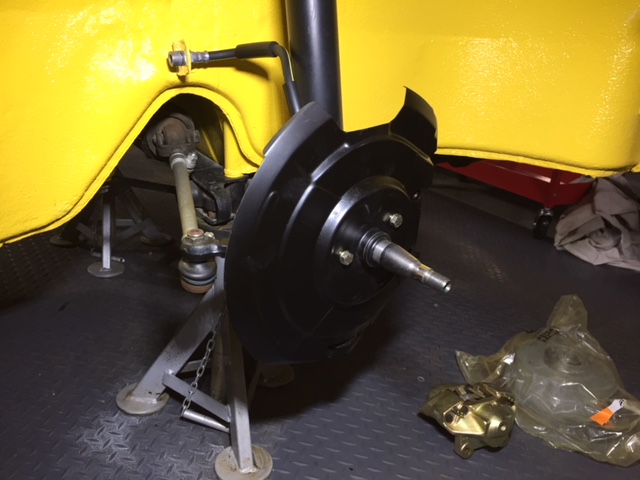
Commenced work on the front bearings and brakes today...
 |
|
|
|
| gothspeed |
Feb 5 2018, 09:43 AM
Post
#26
|
|
Senior Member Group: Members Posts: 1,539 Joined: 3-February 09 From: SoCal Member No.: 10,019 Region Association: None |
QUOTE(simonjb @ Dec 23 2017, 05:31 PM)  Had the car repainted and am now in the process of reassembling. I am surprised by the amount of time it takes to put everything back together...put new SS line and fuel pump for the 2.3. Nice fuel pump install! I was thinking to mount it in that general area. What did you use to mount the fuel pump? Threaded insert into panel? Does the filter have a 'mount' to firewall? |
|
|
|
| simonjb |
Feb 5 2018, 11:42 AM
Post
#27
|
|
KiwiMan Group: Members Posts: 563 Joined: 18-October 16 From: Stamford, Connecticut Member No.: 20,505 Region Association: North East States |
QUOTE(gothspeed @ Feb 5 2018, 10:43 AM) QUOTE(simonjb @ Dec 23 2017, 05:31 PM) Had the car repainted and am now in the process of reassembling. I am surprised by the amount of time it takes to put everything back together...put new SS line and fuel pump for the 2.3. Nice fuel pump install! I was thinking to mount it in that general area. What did you use to mount the fuel pump? Threaded insert into panel? Does the filter have a 'mount' to firewall? I must send out kudos to Chris at Tangerine[u]. He came up with the mounting and has the parts to make it all come together. I mounted the pump with a bolt and nut all the way through the firewall. The filter "hangs" , but its not going anywhere. |
|
|
|
| simonjb |
Feb 5 2018, 11:49 AM
Post
#28
|
|
KiwiMan Group: Members Posts: 563 Joined: 18-October 16 From: Stamford, Connecticut Member No.: 20,505 Region Association: North East States |
So, after fretting about how hard it could be to mount the front hubs, I managed to do both within an hour.
I removed old bearings and ground down the outer edges to use as a punch. Froze the races overnight and got all 4 of them seated nicely with some gentle guidance - made sure they all set perfectly. Placed the new well greased up bearings in and she went right on to the spindle! I was worried because the old ones were stuck on very tightly. Tightened the nut up and then slack off a 1/4 turn, then hand tight while rotating the wheel. Then new caps. 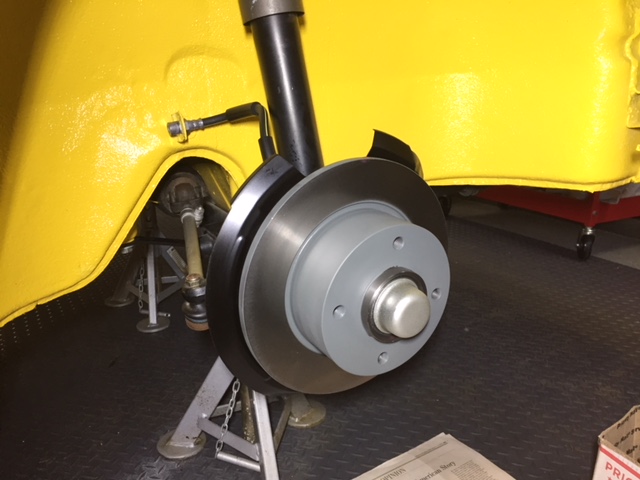 |
|
|
|
| simonjb |
Feb 5 2018, 04:29 PM
Post
#29
|
|
KiwiMan Group: Members Posts: 563 Joined: 18-October 16 From: Stamford, Connecticut Member No.: 20,505 Region Association: North East States |
Started on re-doing the vinyl. It really takes some time to make sure you don't mess it up! Cutting the bottom of the sail was scary
Old vs New and partial install.. 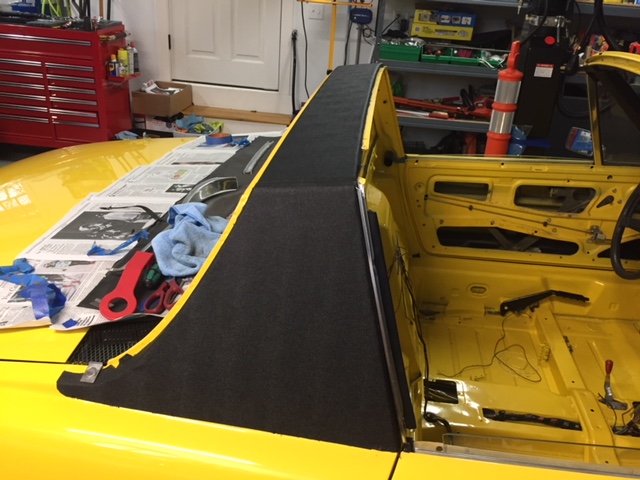 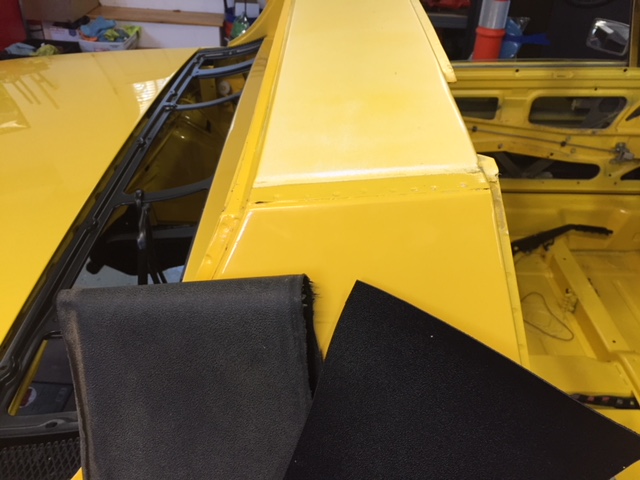 |
|
|
|
| gothspeed |
Feb 5 2018, 04:59 PM
Post
#30
|
|
Senior Member Group: Members Posts: 1,539 Joined: 3-February 09 From: SoCal Member No.: 10,019 Region Association: None |
QUOTE(simonjb @ Feb 5 2018, 09:42 AM) QUOTE(gothspeed @ Feb 5 2018, 10:43 AM) QUOTE(simonjb @ Dec 23 2017, 05:31 PM) Had the car repainted and am now in the process of reassembling. I am surprised by the amount of time it takes to put everything back together...put new SS line and fuel pump for the 2.3. Nice fuel pump install! I was thinking to mount it in that general area. What did you use to mount the fuel pump? Threaded insert into panel? Does the filter have a 'mount' to firewall? I must send out kudos to Chris at Tangerine[u]. He came up with the mounting and has the parts to make it all come together. I mounted the pump with a bolt and nut all the way through the firewall. The filter "hangs" , but its not going anywhere. car looks great! thanks for the info on the fuel pump install (IMG:style_emoticons/default/smile.gif) |
|
|
|
| simonjb |
Feb 10 2018, 12:59 PM
Post
#31
|
|
KiwiMan Group: Members Posts: 563 Joined: 18-October 16 From: Stamford, Connecticut Member No.: 20,505 Region Association: North East States |
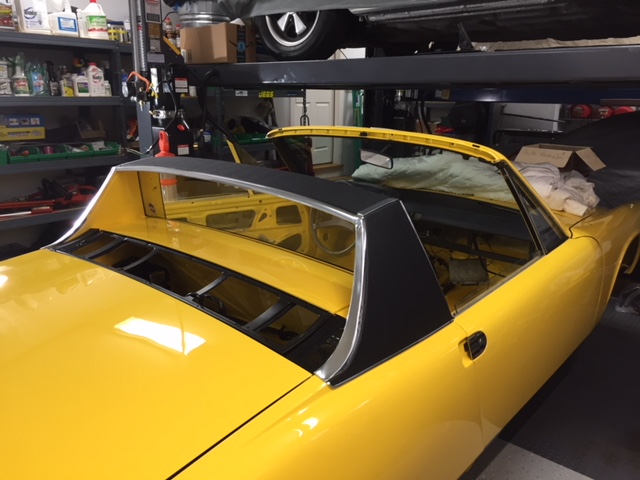
Finally managed to finish the new vinyl. Not a hard job, but finicky and time consuming.
 |
|
|
|
| simonjb |
Feb 19 2018, 10:23 AM
Post
#32
|
|
KiwiMan Group: Members Posts: 563 Joined: 18-October 16 From: Stamford, Connecticut Member No.: 20,505 Region Association: North East States |
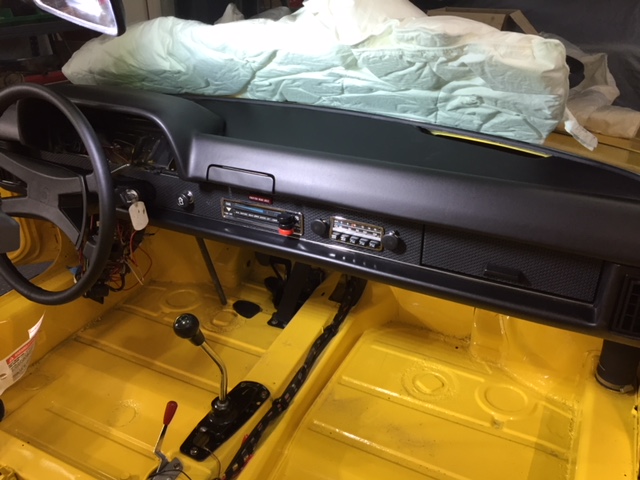
The dash is finally coming together. Gauges are at NH speedometer getting a renovation and should be back soon. I'll finish the wiring when I install the battery and make sure that all is ok.
 |
|
|
|
| defianty |
Feb 19 2018, 10:41 AM
Post
#33
|
|
Senior Member Group: Members Posts: 659 Joined: 9-August 06 From: Essex, UK Member No.: 6,621 Region Association: None |
Beautiful clean and top class work.
|
|
|
|
| Mikey914 |
Feb 19 2018, 10:46 AM
Post
#34
|
|
The rubber man Group: Members Posts: 12,638 Joined: 27-December 04 From: Hillsboro, OR Member No.: 3,348 Region Association: None |
First class work.
That little rubber bushing is probably the e brake sleeve. |
|
|
|
| simonjb |
Feb 19 2018, 11:42 AM
Post
#35
|
|
KiwiMan Group: Members Posts: 563 Joined: 18-October 16 From: Stamford, Connecticut Member No.: 20,505 Region Association: North East States |
Thanks guys. Its time consuming, but very rewarding. Now I know why it costs so much to have it professionally done.
|
|
|
|
| mepstein |
Feb 19 2018, 12:34 PM
Post
#36
|
|
914-6 GT in waiting Group: Members Posts: 19,239 Joined: 19-September 09 From: Landenberg, PA/Wilmington, DE Member No.: 10,825 Region Association: MidAtlantic Region |
QUOTE(simonjb @ Feb 19 2018, 12:42 PM) Thanks guys. Its time consuming, but very rewarding. Now I know why it costs so much to have it professionally done. Looks great! When we build from the ground up at the shop, it always seems like it should go together much faster but it doesn't. |
|
|
|
| effutuo101 |
Feb 19 2018, 10:45 PM
Post
#37
|
|
Advanced Member Group: Members Posts: 2,734 Joined: 10-April 05 From: Lemon Grove Member No.: 3,914 Region Association: Southern California |
There should be! (IMG:style_emoticons/default/driving.gif)
|
|
|
|
| simonjb |
Feb 22 2018, 11:35 AM
Post
#38
|
|
KiwiMan Group: Members Posts: 563 Joined: 18-October 16 From: Stamford, Connecticut Member No.: 20,505 Region Association: North East States |
I have been slowly restoring my 1974 with about 38,000 miles on the clock. As you can see below, I've stripped it all the way down. I am also re-thinking if I should also replace the front and rear shocks? The rear ones are BOGE and look original. The car only has 38,000 miles, but it is over 40 years old...plus would it be easier now than latter? Comments? |
|
|
|
| barefoot |
Feb 22 2018, 12:39 PM
Post
#39
|
|
Senior Member Group: Members Posts: 1,269 Joined: 19-March 13 From: Charleston SC Member No.: 15,673 Region Association: South East States |
QUOTE(simonjb @ Feb 22 2018, 12:35 PM) I have been slowly restoring my 1974 with about 38,000 miles on the clock. As you can see below, I've stripped it all the way down. I am also re-thinking if I should also replace the front and rear shocks? The rear ones are BOGE and look original. The car only has 38,000 miles, but it is over 40 years old...plus would it be easier now than latter? Comments? Easy enough to strip them down (borrow a spring compressor from your local FLAPS) then clean & repaint you can test the shocks to see if still good then. |
 |
|
| n2j2ryan |
Feb 22 2018, 01:45 PM
Post
#40
|
|
Member Group: Members Posts: 85 Joined: 9-January 17 From: Victoria BC Member No.: 20,740 Region Association: Canada |
Thanks for the Pics. I am a couple of months behind you so am storing some of your photos!!!
Is that a Tangerine Fuel kit? Thanks Neil |
|
|
|
|
2 User(s) are reading this topic (2 Guests and 0 Anonymous Users)
0 Members:

|
Lo-Fi Version | Time is now: 26th April 2024 - 06:24 AM |
Invision Power Board
v9.1.4 © 2024 IPS, Inc.