|
|
|
Porsche, and the Porsche crest are registered trademarks of Dr. Ing. h.c. F. Porsche AG.
This site is not affiliated with Porsche in any way. Its only purpose is to provide an online forum for car enthusiasts. All other trademarks are property of their respective owners. |
|
|

  |

| 914Sixer |
 Feb 11 2018, 03:59 PM Feb 11 2018, 03:59 PM
Post
#1
|
|
914 Guru  Group: Members Posts: 8,872 Joined: 17-January 05 From: San Angelo Texas Member No.: 3,457 Region Association: Southwest Region |
I had a bunch of 52mm VDO old style gauges so I thought I would see how they would fit inside the stock 60mm gauge. Turns out they are drop in. You simply use the spacer rings from the two gauges and you have plug and play(new plastic ones won't work).. Sent them to North Hollywood for rings ($135). Used the later Volt so all the gauge faces are the same size, plus I liked the bright markings.
Attached image(s) 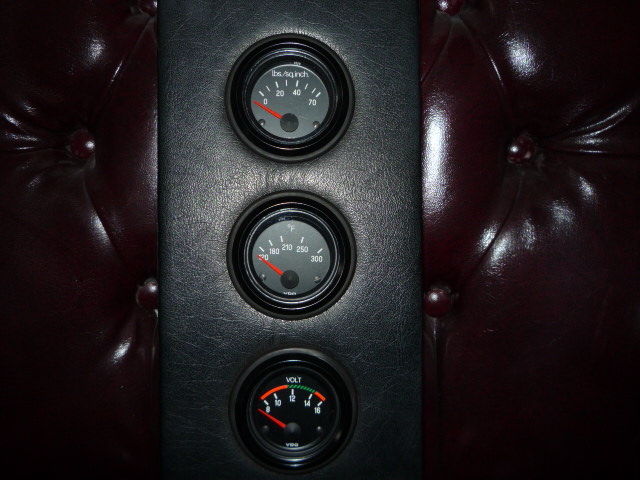
|
   |

 
|
| sithot |
Feb 11 2018, 04:02 PM
Post
#2
|
|
Member Group: Members Posts: 446 Joined: 25-October 06 From: Virginia Member No.: 7,090 Region Association: None |
Slick.
|
|
|
|
| EdwardBlume |
Feb 11 2018, 05:35 PM
Post
#3
|
|
914 Wizard Group: Members Posts: 12,338 Joined: 2-January 03 From: SLO Member No.: 81 Region Association: Central California |
QUOTE(sithot @ Feb 11 2018, 02:02 PM)  Slick. (IMG:style_emoticons/default/agree.gif) (IMG:style_emoticons/default/agree.gif) Looking good! |
|
|
|
| Dave_Darling |
Feb 11 2018, 10:40 PM
Post
#4
|
|
914 Idiot Group: Members Posts: 14,981 Joined: 9-January 03 From: Silicon Valley / Kailua-Kona Member No.: 121 Region Association: Northern California |
You may notice that the later voltage gauge is pretty heavily filtered, so it does not react nearly as strongly to things light the turn signal or brake lights...
--DD |
|
|
|
| gothspeed |
Feb 12 2018, 10:07 AM
Post
#5
|
|
Senior Member Group: Members Posts: 1,539 Joined: 3-February 09 From: SoCal Member No.: 10,019 Region Association: None |
Awesome! (IMG:style_emoticons/default/popcorn[1].gif)
Does 914Sixer do this type of gauge/kit? With silver dot too? Attached image(s) 
|
|
|
|
| 914Sixer |
Feb 12 2018, 01:57 PM
Post
#6
|
|
914 Guru Group: Members Posts: 8,872 Joined: 17-January 05 From: San Angelo Texas Member No.: 3,457 Region Association: Southwest Region |
Sorry, I have never tackled one of those. Installing silver center is easy though. Destroy a combo fuel gauge and drill out the center post rivet. Pop base off and transfer hole location to three way gauge center. Rivet on post and glue cap.
|
|
|
|
| Mikey914 |
Feb 12 2018, 02:00 PM
Post
#7
|
|
The rubber man Group: Members Posts: 12,649 Joined: 27-December 04 From: Hillsboro, OR Member No.: 3,348 Region Association: None |
Actually easier to just cut a new piece of 1/4" plywood to the new gauge sizes and recover. No extra rings required.
|
|
|
|
| gothspeed |
Feb 12 2018, 02:05 PM
Post
#8
|
|
Senior Member Group: Members Posts: 1,539 Joined: 3-February 09 From: SoCal Member No.: 10,019 Region Association: None |
QUOTE(914Sixer @ Feb 12 2018, 11:57 AM) Sorry, I have never tackled one of those. Installing silver center is easy though. Destroy a combo fuel gauge and drill out the center post rivet. Pop base off and transfer hole location to three way gauge center. Rivet on post and glue cap. How about one like the one you sold except with oil pressure instead of temp? Attached image(s) 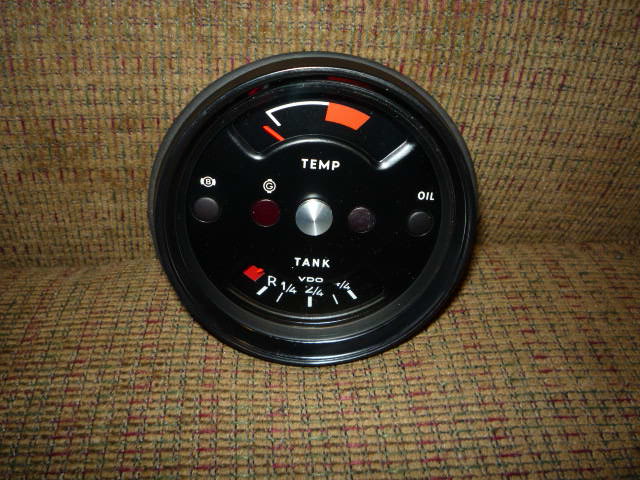
|
|
|
|
| 914Sixer |
Feb 12 2018, 02:08 PM
Post
#9
|
|
914 Guru Group: Members Posts: 8,872 Joined: 17-January 05 From: San Angelo Texas Member No.: 3,457 Region Association: Southwest Region |
Three way requires lots of cutting on the back and redrilling holes.
|
|
|
|
| gothspeed |
Feb 12 2018, 02:17 PM
Post
#10
|
|
Senior Member Group: Members Posts: 1,539 Joined: 3-February 09 From: SoCal Member No.: 10,019 Region Association: None |
QUOTE(914Sixer @ Feb 12 2018, 12:08 PM) Three way requires lots of cutting on the back and redrilling holes. What about two way with Pressure instead of temp? like the one pictured above (IMG:style_emoticons/default/smile.gif) |
|
|
|
| 914Sixer |
Feb 12 2018, 02:31 PM
Post
#11
|
|
914 Guru Group: Members Posts: 8,872 Joined: 17-January 05 From: San Angelo Texas Member No.: 3,457 Region Association: Southwest Region |
I pulled the trim rings because the needles were faded and the glass was clouded.
Three way conversion works best with later 75-76 that only has one hole cut in the bottom. |
|
|
|
| aturboman |
Feb 12 2018, 03:17 PM
Post
#12
|
|
Member Group: Members Posts: 135 Joined: 18-October 11 From: CA Member No.: 13,687 Region Association: None |
Great idea and results...
I did something similar for a special build I'm working on. Different requirements from your gauges but a common theme here, custom shrunken gauges (IMG:style_emoticons/default/biggrin.gif) 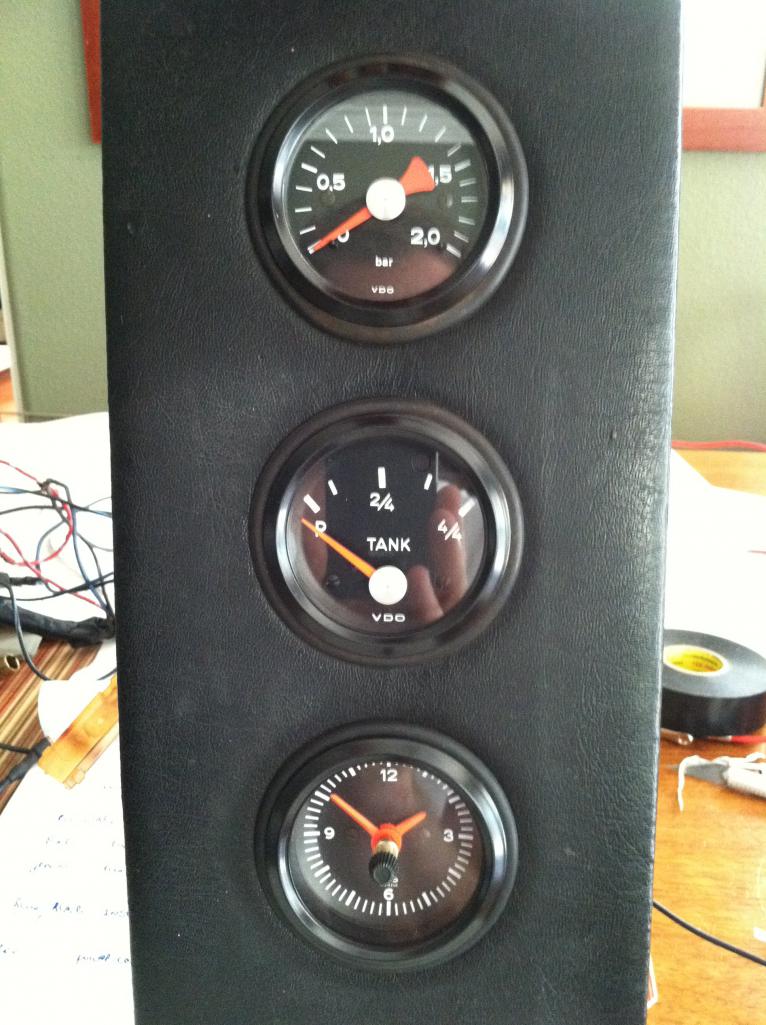 |
|
|
|
|
1 User(s) are reading this topic (1 Guests and 0 Anonymous Users)
0 Members:

|
Lo-Fi Version | Time is now: 2nd May 2024 - 12:31 PM |
Invision Power Board
v9.1.4 © 2024 IPS, Inc.