|
|
|
Porsche, and the Porsche crest are registered trademarks of Dr. Ing. h.c. F. Porsche AG.
This site is not affiliated with Porsche in any way. Its only purpose is to provide an online forum for car enthusiasts. All other trademarks are property of their respective owners. |
|
|

  |

| Greenguy |
 Feb 26 2018, 05:32 PM Feb 26 2018, 05:32 PM
Post
#1
|
|
Member  Group: Members Posts: 51 Joined: 29-December 06 From: Clovis, CA Member No.: 7,402 |
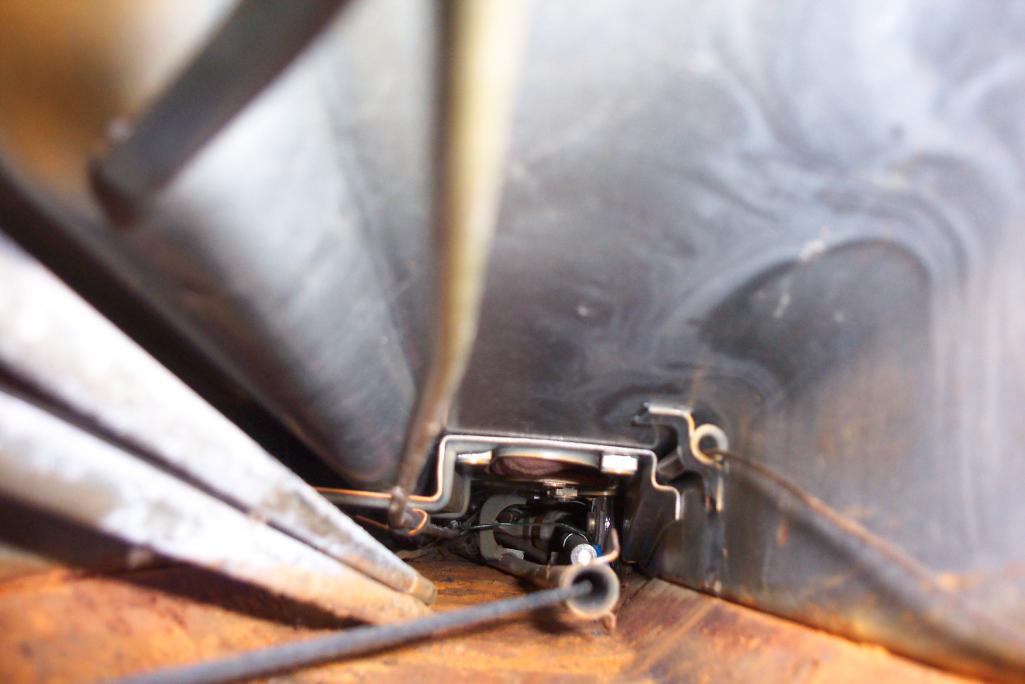
It’s good to see the board alive and well, I've keep track but haven’t posted in a long time. The reason that I’m back is that a reoccurring pain in the neck problem came back and the 914 has been parked since (6 months). The problem is a broken clutch tube. Attached is a picture of the problem when it first occurred……….which I thought was permanently fixed with a plug weld, but I guess I thought wrong because it’s broken again. The plug weld lasted 4 years, has anyone got any ideas on a permanent fix for this problem
 |
   |

 
|
| gothspeed |
Feb 26 2018, 05:46 PM
Post
#2
|
|
Senior Member Group: Members Posts: 1,539 Joined: 3-February 09 From: SoCal Member No.: 10,019 Region Association: None |
Mine was not detached like yours but as a preventative, I welded a .0625" thick x 1"x1"x1.5" long piece of angle iron over the clutch tube. As far forward as my MIG weld tip would allow through shifter opening. I then stitch welded the angle to the tunnel floor and tunnel wall. Then some spot welds from the angle to the tube. (IMG:style_emoticons/default/smile.gif)
|
|
|
|
| ndfrigi |
Feb 26 2018, 05:48 PM
Post
#3
|
|
Advanced Member Group: Members Posts: 2,928 Joined: 21-August 11 From: Orange County Member No.: 13,474 Region Association: Southern California |
sir, did u just weld the forward front and not the one in the middle part?
Looks like you still have the original tunnel fuel lines. Maybe it’s time to replace them with SS fue tunnel lines. Not that expensive and not so difficult to replace. |
|
|
|
| burton73 |
Feb 26 2018, 06:02 PM
Post
#4
|
|
burton73 Group: Members Posts: 3,524 Joined: 2-January 07 From: Los Angeles Member No.: 7,414 Region Association: Southern California |
http://www.914world.com/bbs2/index.php?showtopic=274079
Look at this posting. There are a few ways to fix this. Bob B |
|
|
|
| burton73 |
Feb 26 2018, 06:08 PM
Post
#5
|
|
burton73 Group: Members Posts: 3,524 Joined: 2-January 07 From: Los Angeles Member No.: 7,414 Region Association: Southern California |
My 6 when I got it had a u clamp over the tube and 2 thin nuts squeezing the tube to the left side of the tunnel. I guess it worked but I fixed it by welding a bracket over it when I had it apart.
Question is how far do you want to go in? Bob B |
|
|
|
| malcolm2 |
Feb 26 2018, 06:34 PM
Post
#6
|
|
Advanced Member Group: Members Posts: 2,745 Joined: 31-May 11 From: Nashville Member No.: 13,139 Region Association: South East States |
QUOTE(burton73 @ Feb 26 2018, 06:08 PM)  My 6 when I got it had a u clamp over the tube and 2 thin nuts squeezing the tube to the left side of the tunnel. I guess it worked but I fixed it by welding a bracket over it when I had it apart. Question is how far do you want to go in? Bob B YEP.... that is what a PO did with mine. U-Bolt thru the floor pan holding the tube at just about the place that the bracket was. along with several door knob holes in the top of the tunnel. Guess he was hunting where the problem was. Along with welding a 1/4" thick 2" x 2" piece of steel on the outside firewall. They cut a notch in the plate so the tube would sit in it. I have been 40K miles of daily driving with this shade tree fix. Pretty difficult to fix "right". |
|
|
|
| rgalla9146 |
Feb 26 2018, 07:55 PM
Post
#7
|
|
Advanced Member Group: Members Posts: 4,554 Joined: 23-November 05 From: Paramus NJ Member No.: 5,176 Region Association: None |
It can be done with a wide heater hose clamp.
Use a cut-off wheel to make two parallel slots about 3/4" apart one above the other on the side of the tunnel. Dress the ends or the slots with a small round file. Feed the end of the clamp into the lower slot then around the tube and out the upper slot. Feed the plain end of the clamp into the tightening slot and tighten away. It's tough on the fingers but it works.....with less fear than welding. Use a hole saw to make a 2" access hole in the top of the tunnel to allow access to install the clamp. |
|
|
|
| JeffBowlsby |
Feb 26 2018, 08:04 PM
Post
#8
|
|
914 Wiring Harnesses Group: Members Posts: 8,509 Joined: 7-January 03 From: San Ramon CA Member No.: 104 Region Association: None |
A correct plug weld...or two ...or three is a permanent fix. See photo in the linked thread.
|
 |
|
| malcolm2 |
Feb 26 2018, 08:09 PM
Post
#9
|
|
Advanced Member Group: Members Posts: 2,745 Joined: 31-May 11 From: Nashville Member No.: 13,139 Region Association: South East States |
QUOTE(Jeff Bowlsby @ Feb 26 2018, 08:04 PM) A correct plug weld...or two ...or three is a permanent fix. See photo in the linked thread. I like Dr Evil and Barefoot's fix. (IMG:style_emoticons/default/piratenanner.gif) (IMG:style_emoticons/default/piratenanner.gif) (IMG:style_emoticons/default/piratenanner.gif) |
|
|
|
| burton73 |
Feb 26 2018, 08:44 PM
Post
#10
|
|
burton73 Group: Members Posts: 3,524 Joined: 2-January 07 From: Los Angeles Member No.: 7,414 Region Association: Southern California |
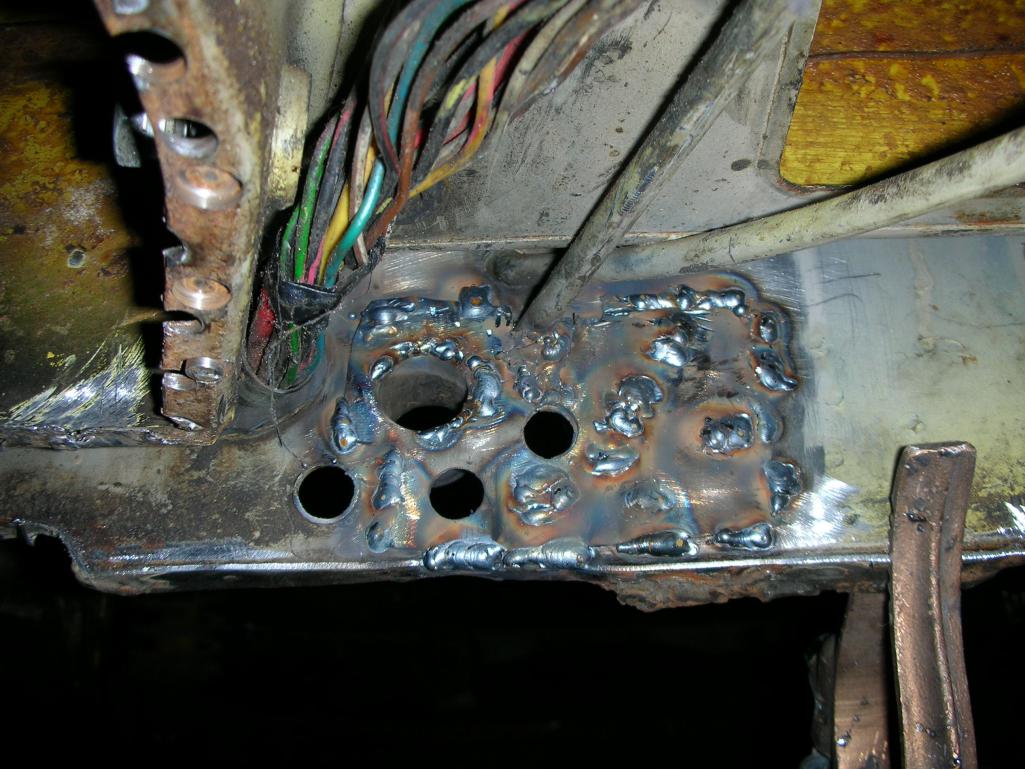
This was my 6 when I fixed the lose tube. The drill is a heat sink so it does not burn through.
Bob B (IMG:style_emoticons/default/welder.gif)  |
|
|
|
| dr914@autoatlanta.com |
Feb 27 2018, 09:05 AM
Post
#11
|
|
914 Guru Group: Members Posts: 7,864 Joined: 3-January 07 From: atlanta georgia Member No.: 7,418 Region Association: None |
wow excellent picture, we reinstall the original bracket, weld the tube to the bracket and the bracket to the side of the tunnel, then go into the middle and weld the tube there and finally in the back burning out the factory braise and welding the tube to the firewall and have never had an additional problem (of course keep the cable well lubricated, the clevis and bushing in good condition, and the rear roller assembly clean and lubricated
QUOTE(Greenguy @ Feb 26 2018, 04:32 PM) It’s good to see the board alive and well, I've keep track but haven’t posted in a long time. The reason that I’m back is that a reoccurring pain in the neck problem came back and the 914 has been parked since (6 months). The problem is a broken clutch tube. Attached is a picture of the problem when it first occurred……….which I thought was permanently fixed with a plug weld, but I guess I thought wrong because it’s broken again. The plug weld lasted 4 years, has anyone got any ideas on a permanent fix for this problem |
|
|
|
| bbrock |
Feb 27 2018, 10:24 AM
Post
#12
|
|
914 Guru Group: Members Posts: 5,269 Joined: 17-February 17 From: Montana Member No.: 20,845 Region Association: Rocky Mountains |
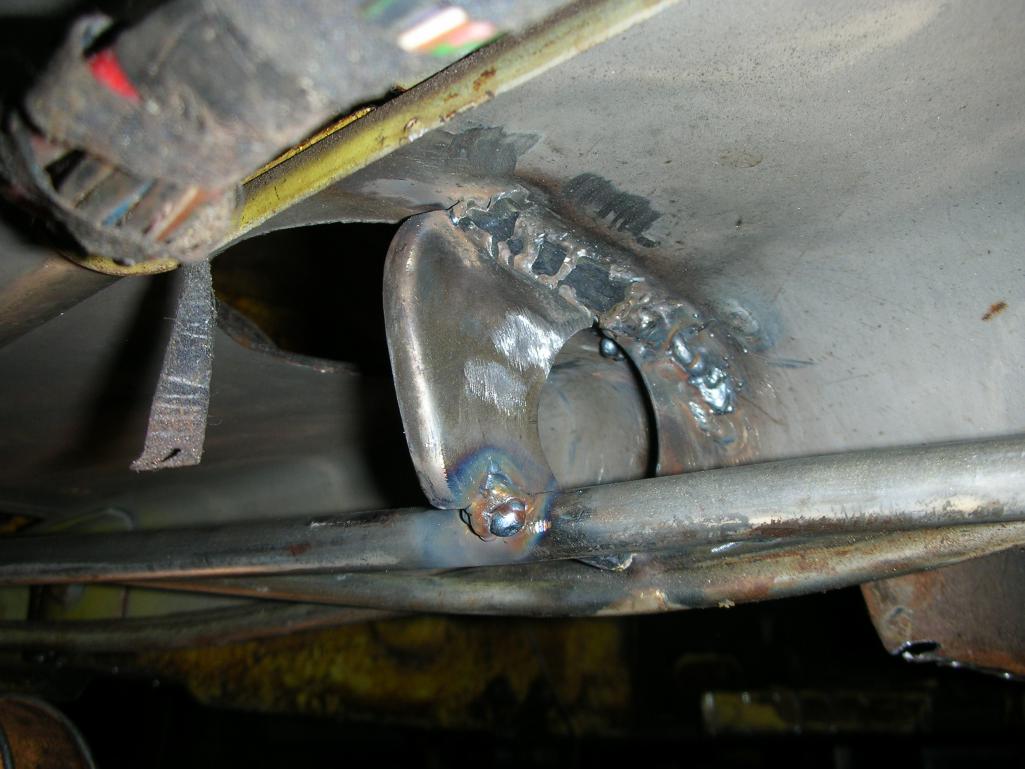
QUOTE(burton73 @ Feb 26 2018, 07:44 PM) This was my 6 when I fixed the lose tube. The drill is a heat sink so it does not burn through. Bob B (IMG:style_emoticons/default/welder.gif) That's what I did to mine just as a preventative measure while I had the tunnel open for floor replacement. Tube was still in place, but the brazing was starting to crack. It was only a matter of time. At the firewall end, I fashioned a bracket that wrapped around, and was welded to the tube and then plug welded to the floor, in addition to welding the tube to the firewall. |
|
|
|
| burton73 |
Feb 27 2018, 11:01 AM
Post
#13
|
|
burton73 Group: Members Posts: 3,524 Joined: 2-January 07 From: Los Angeles Member No.: 7,414 Region Association: Southern California |
|
|
|
|

| dwillouby |
Feb 27 2018, 06:51 PM
Post
#14
|
|
Member Group: Members Posts: 392 Joined: 27-December 02 From: Mt Washington, KY Member No.: 29 Region Association: None |
|
|
|
|
| Greenguy |
Feb 28 2018, 12:02 PM
Post
#15
|
|
Member Group: Members Posts: 51 Joined: 29-December 06 From: Clovis, CA Member No.: 7,402 |
Thanks for all of the great replies.....I've got a reasonably good idea of how to attack this problem, again
Greg |
|
|
|
|
1 User(s) are reading this topic (1 Guests and 0 Anonymous Users)
0 Members:

|
Lo-Fi Version | Time is now: 17th May 2024 - 02:43 PM |
Invision Power Board
v9.1.4 © 2024 IPS, Inc.