|
|
|
Porsche, and the Porsche crest are registered trademarks of Dr. Ing. h.c. F. Porsche AG.
This site is not affiliated with Porsche in any way. Its only purpose is to provide an online forum for car enthusiasts. All other trademarks are property of their respective owners. |
|
|

  |

| mgphoto |
 Feb 28 2018, 02:21 PM Feb 28 2018, 02:21 PM
Post
#21
|
|
"If there is a mistake it will find me"  Group: Members Posts: 1,339 Joined: 1-April 09 From: Los Angeles, CA Member No.: 10,225 Region Association: Southern California |
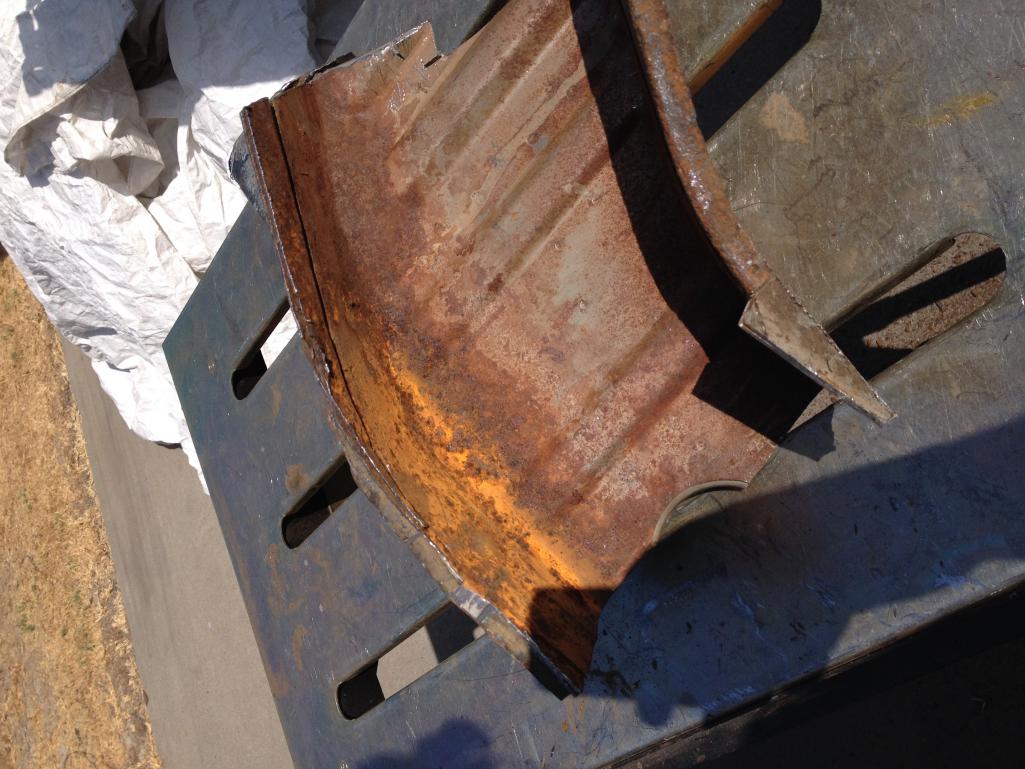
Cut down to these sizes.
 |
   |

 
|
| mgphoto |
Feb 28 2018, 02:37 PM
Post
#22
|
|
"If there is a mistake it will find me" Group: Members Posts: 1,339 Joined: 1-April 09 From: Los Angeles, CA Member No.: 10,225 Region Association: Southern California |
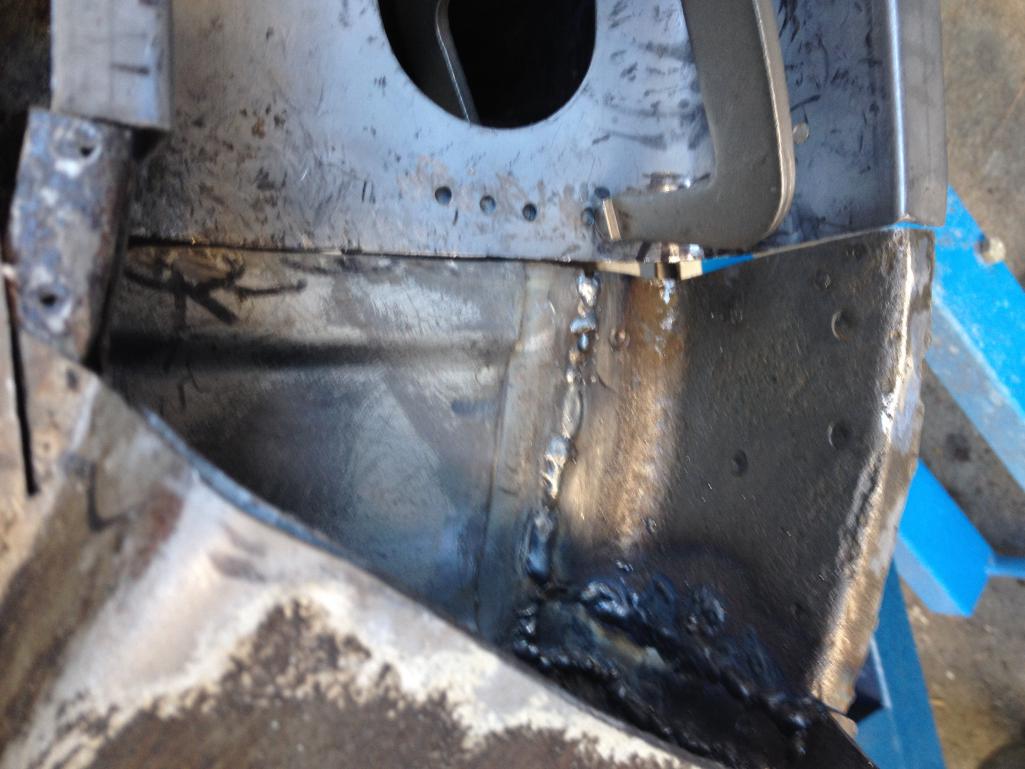
This is the section I welded in for the outer, a previous image has the inside piece welded in to span over the repair.
 |
|
|
|
| mgphoto |
Feb 28 2018, 02:44 PM
Post
#23
|
|
"If there is a mistake it will find me" Group: Members Posts: 1,339 Joined: 1-April 09 From: Los Angeles, CA Member No.: 10,225 Region Association: Southern California |
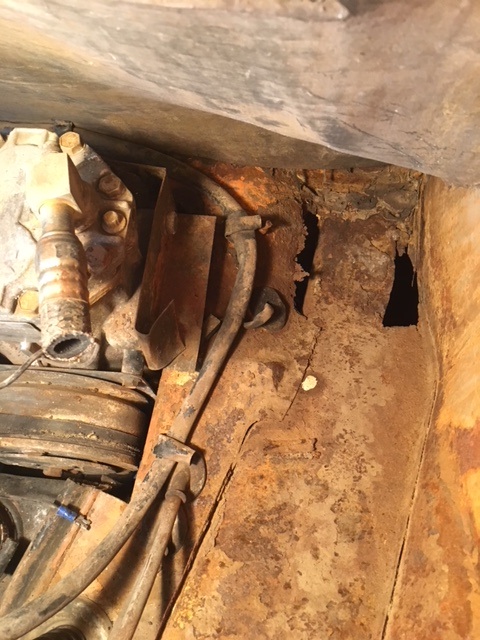
I cut sections from the front and rear fenders to gain access to the rusted areas.
 |
|
|
|
| Mueller |
Feb 28 2018, 02:57 PM
Post
#24
|
|
914 Freak! Group: Members Posts: 17,146 Joined: 4-January 03 From: Antioch, CA Member No.: 87 Region Association: None |
QUOTE(mgphoto @ Feb 28 2018, 12:44 PM)  I cut sections from the front and rear fenders to gain access to the rusted areas. More info on that lift? I replaced the drivers side long on father-in-laws '70 911 targa, I had to cut the rear qtr panel, luckily my car needs a complete repaint. |
|
|
|
| mgphoto |
Feb 28 2018, 03:07 PM
Post
#25
|
|
"If there is a mistake it will find me" Group: Members Posts: 1,339 Joined: 1-April 09 From: Los Angeles, CA Member No.: 10,225 Region Association: Southern California |
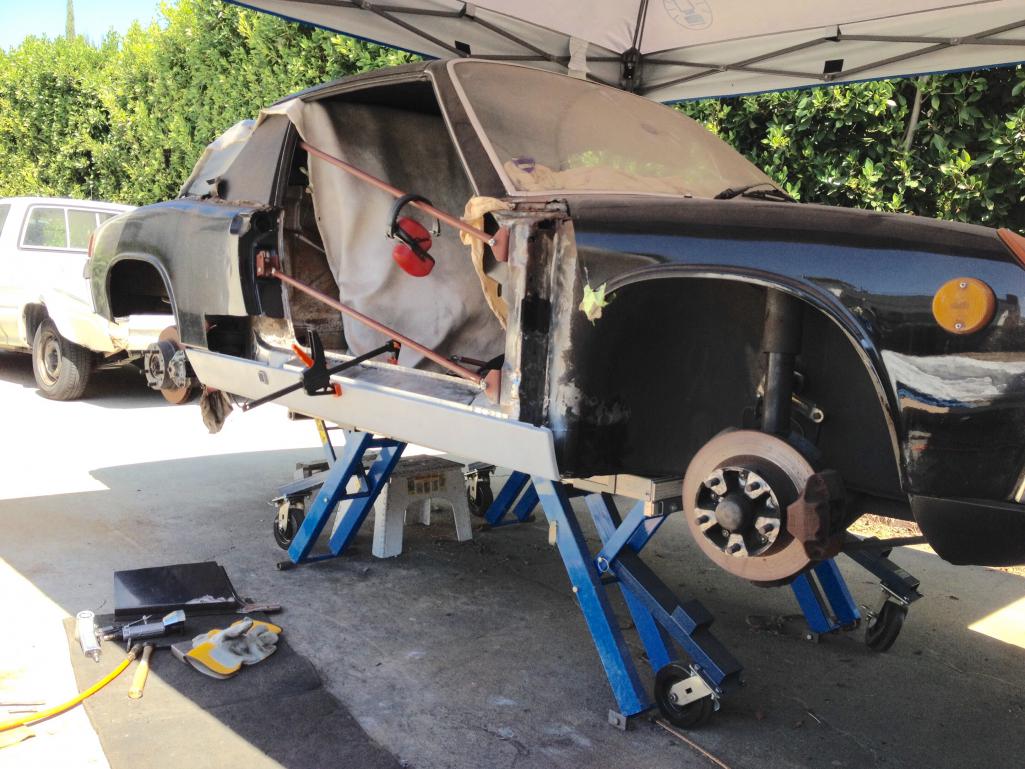
QUOTE(Mueller @ Feb 28 2018, 12:57 PM) QUOTE(mgphoto @ Feb 28 2018, 12:44 PM) I cut sections from the front and rear fenders to gain access to the rusted areas. More info on that lift? I replaced the drivers side long on father-in-laws '70 911 targa, I had to cut the rear qtr panel, luckily my car needs a complete repaint. EZ Car Lift, I bought the caster set so I could spin the car around to work on both sides. 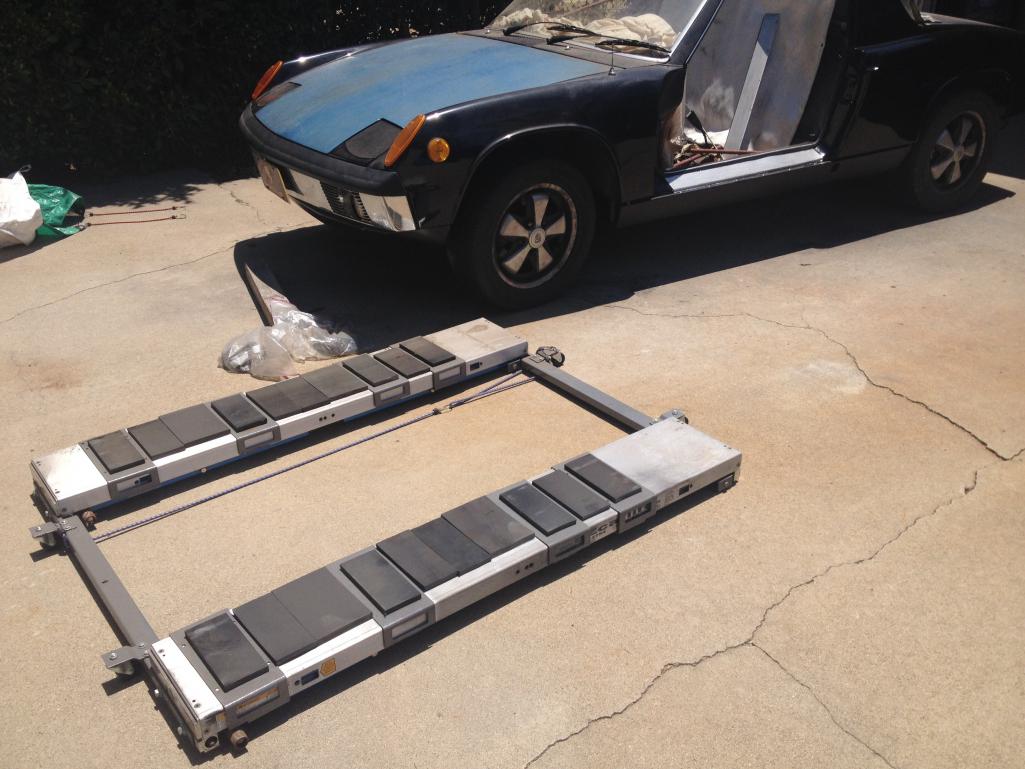 I added rubber pads to support the pan. Great tool, 150 lbs. uses an electric drill for up and down movement. ezcarlift.com |
|
|
|
| Mueller |
Feb 28 2018, 04:46 PM
Post
#26
|
|
914 Freak! Group: Members Posts: 17,146 Joined: 4-January 03 From: Antioch, CA Member No.: 87 Region Association: None |
QUOTE(mgphoto @ Feb 28 2018, 01:07 PM) QUOTE(Mueller @ Feb 28 2018, 12:57 PM) QUOTE(mgphoto @ Feb 28 2018, 12:44 PM) I cut sections from the front and rear fenders to gain access to the rusted areas. More info on that lift? I replaced the drivers side long on father-in-laws '70 911 targa, I had to cut the rear qtr panel, luckily my car needs a complete repaint. EZ Car Lift, I bought the caster set so I could spin the car around to work on both sides. I added rubber pads to support the pan. Great tool, 150 lbs. uses an electric drill for up and down movement. ezcarlift.com Thanks, I just sent the wife a text asking for one.....she told me to back to work (IMG:style_emoticons/default/smile.gif) (IMG:style_emoticons/default/smash.gif) |
|
|
|
| David Billo |
Feb 28 2018, 06:13 PM
Post
#27
|
|
Member Group: Members Posts: 64 Joined: 23-November 17 From: Plainfield, Ontario Member No.: 21,625 Region Association: Canada |
QUOTE(bbrock @ Feb 28 2018, 09:55 AM) ...I had to replace the inner wheelhouse on mine using the Restoration Design part: http://www.restoration-design.com/store/SRCH?Search=PP331 Brent, does that part consist of two pieces welded together, as implied by the RD description? QUOTE Inner wheelhouse spot weldedd to the outer wheelhouse panel. |
|
|
|
| mgphoto |
Feb 28 2018, 07:17 PM
Post
#28
|
|
"If there is a mistake it will find me" Group: Members Posts: 1,339 Joined: 1-April 09 From: Los Angeles, CA Member No.: 10,225 Region Association: Southern California |
QUOTE(David Billo @ Feb 28 2018, 04:13 PM) QUOTE(bbrock @ Feb 28 2018, 09:55 AM) ...I had to replace the inner wheelhouse on mine using the Restoration Design part: http://www.restoration-design.com/store/SRCH?Search=PP331 Brent, does that part consist of two pieces welded together, as implied by the RD description? QUOTE Inner wheelhouse spot weldedd to the outer wheelhouse panel. R&D their outside panel is 2 piece inner and outer panels spot welded together, while the inside long section is single wall but corrugated. |
|
|
|
| David Billo |
Feb 28 2018, 08:20 PM
Post
#29
|
|
Member Group: Members Posts: 64 Joined: 23-November 17 From: Plainfield, Ontario Member No.: 21,625 Region Association: Canada |
QUOTE(mgphoto @ Feb 28 2018, 08:17 PM) R&D their outside panel is 2 piece inner and outer panels spot welded together, while the inside long section is single wall but corrugated. Thanks! But isn't that inside long section supposed to be double wall also? I.e., the corrugated piece is hidden inside the long, but the exposed skin, where the engine mount and suspension console are attached, is smooth. At least, that's the way it is on the car originally, AFAIK. |
|
|
|
| bbrock |
Feb 28 2018, 08:32 PM
Post
#30
|
|
914 Guru Group: Members Posts: 5,269 Joined: 17-February 17 From: Montana Member No.: 20,845 Region Association: Rocky Mountains |
QUOTE(David Billo @ Feb 28 2018, 05:13 PM) QUOTE(bbrock @ Feb 28 2018, 09:55 AM) ...I had to replace the inner wheelhouse on mine using the Restoration Design part: http://www.restoration-design.com/store/SRCH?Search=PP331 Brent, does that part consist of two pieces welded together, as implied by the RD description? QUOTE Inner wheelhouse spot weldedd to the outer wheelhouse panel. Yes, you get the whole double wall treatment. It is an intimidating piece, but actually not too hard to put in. |
|
|
|
| bbrock |
Feb 28 2018, 08:39 PM
Post
#31
|
|
914 Guru Group: Members Posts: 5,269 Joined: 17-February 17 From: Montana Member No.: 20,845 Region Association: Rocky Mountains |
QUOTE(David Billo @ Feb 28 2018, 07:20 PM) QUOTE(mgphoto @ Feb 28 2018, 08:17 PM) R&D their outside panel is 2 piece inner and outer panels spot welded together, while the inside long section is single wall but corrugated. Thanks! But isn't that inside long section supposed to be double wall also? I.e., the corrugated piece is hidden inside the long, but the exposed skin, where the engine mount and suspension console are attached, is smooth. At least, that's the way it is on the car originally, AFAIK. Yep, the factory inner long is double wall from in front of the seat belt mount all the way back (or close to it). I spent several weeks fabricating patches for inner and outer walls on both sides of the car as others have shown on this thread. |
|
|
|
| Chip |
Mar 5 2018, 10:38 PM
Post
#32
|
|
Member Group: Members Posts: 125 Joined: 1-April 17 From: Brigham City, UT Member No.: 20,986 Region Association: Intermountain Region |
I think that the "Right passenger inner wheel house firewall" is the proper sheet metal to repair the rust/holes beneath the battery hell hole. Correct?
 |
|
|
|
| Chip |
Mar 5 2018, 10:59 PM
Post
#33
|
|
Member Group: Members Posts: 125 Joined: 1-April 17 From: Brigham City, UT Member No.: 20,986 Region Association: Intermountain Region |
QUOTE(bbrock @ Feb 28 2018, 12:16 PM) QUOTE(Chip @ Feb 28 2018, 11:56 AM) QUOTE(bbrock @ Feb 28 2018, 07:55 AM) Pics of the damage and a link to the part you are referencing would help. I had to replace the inner wheelhouse on mine using the Restoration Design part: http://www.restoration-design.com/store/SRCH?Search=PP331, but it isn't always needed and depends on how deep the corrosion went. Outer and inner longitudinals seem to be more common and the inners can often be patched depending on severity of damage and your skill. RD calls the outer longitudinal an "Inner Rocker." Post pics and you'll get lots of help! (IMG:style_emoticons/default/smile.gif) Thanks, Brent. Not sure if the pics went through. May have gotten mixed up with another same situation of the hell hole. That hole is part of the inner long and can often be patched. You'll need to pull off your rocker cover and poke around at least from the jack point rearward with a screwdriver to figure out what else is rotted because it rarely stops there. Here is a pic of what the inner wheelhouse area of mine looked like before repair to give you an example of one that needed to be replaced. (IMG:http://www.914world.com/bbs2/uploads/post-20845-1502386440.jpg) There are a number of build threads both past and present that have great information on tackling these repairs. Jeff Hail's "Bring out your dead" is one of the best. Here is a link to about where my hell hole repair starts and includes patching that spot in your pics. http://www.914world.com/bbs2/index.php?s=&...t&p=2515579 Mine wasn't the worst one that has been rescued, but it was getting up there. (IMG:style_emoticons/default/beerchug.gif) Thanks, Brent. The jack hole is pretty bad but difficult to see any more damage rearward due to the fender, which seems solid, (from the outside.) Lots of rust debris inside the holes, however. |
|
|
|
| brettrarnold |
Mar 6 2018, 12:26 AM
Post
#34
|
|
New 914 owner in Lakewood CO Group: Members Posts: 89 Joined: 11-September 15 From: Lakewood, Colorado Member No.: 19,149 Region Association: Rocky Mountains |
yo i cut out all of the rust and rewelded it with a 99$ harbor freight welder as a beginner.. Not sure of your level or experience but if i can do it, literally anyone can. check out my signature for the blog info on my welding.
If you can post some other photos from farther back that would be helpful. When i was welding or asking for welding advice i would provide as much detail as possible. I would always use a piece of steel that i got from ace to try to match the thickness of what i cut out. Give me a call if you have any questions and i can walk you through from a beginners perspective. PM me for number. -Brett [quote name='Chip' post='2586115' date='Mar 5 2018, 09:38 PM'] I think that the "Right passenger inner wheel house firewall" is the proper sheet metal to repair the rust/holes beneath the battery hell hole. Correct? |
|
|
|
| mgphoto |
Mar 6 2018, 09:36 AM
Post
#35
|
|
"If there is a mistake it will find me" Group: Members Posts: 1,339 Joined: 1-April 09 From: Los Angeles, CA Member No.: 10,225 Region Association: Southern California |
Do not use a flux core welder for body work. The chances of leaving flux material in the weld is very high. Down the road that will cause adherence problems. Buy a better welder and sell it off when your done.
|
|
|
|
| mgphoto |
Mar 6 2018, 09:40 AM
Post
#36
|
|
"If there is a mistake it will find me" Group: Members Posts: 1,339 Joined: 1-April 09 From: Los Angeles, CA Member No.: 10,225 Region Association: Southern California |
QUOTE(Chip @ Mar 5 2018, 08:38 PM) I think that the "Right passenger inner wheel house firewall" is the proper sheet metal to repair the rust/holes beneath the battery hell hole. Correct? You will need to open the outside section to see how much damage. The hellhole there is the top of the inner long. |
|
|
|
| Chip |
Mar 20 2018, 05:02 PM
Post
#37
|
|
Member Group: Members Posts: 125 Joined: 1-April 17 From: Brigham City, UT Member No.: 20,986 Region Association: Intermountain Region |
QUOTE(dr914@autoatlanta.com @ Feb 28 2018, 12:49 PM) right inner firewall yes along with the engine shelf and maybe the upper longitudinal part The very first parts we made ever were to repair this area, Hopefully you do not need much. Also in this area are right rear floor pan inner right firewall outer right firewall right inner rocker panel jack post and support floor pan triangle battery tray battery tray support engine bay c channel trunk hinge cup control unit bracket inner suspension console right outer rocker panel the only two pieces that we do not make are the outer three bolt suspension console and the right engine mounting pod, but have found in very few cases that these parts cannot be reused QUOTE(Chip @ Feb 27 2018, 10:36 PM) Is the "Right passenger inner wheel house firewall" the proper part to repair the rust holes deep in the bowels of the hell hole? Beneath the battery? Thanks to you all. |
|
|
|
|
1 User(s) are reading this topic (1 Guests and 0 Anonymous Users)
0 Members:

|
Lo-Fi Version | Time is now: 7th June 2024 - 07:37 PM |
Invision Power Board
v9.1.4 © 2024 IPS, Inc.